Geyser P7 - Effect machine Chauvet - Free user manual and instructions
Find the device manual for free Geyser P7 Chauvet in PDF.

User questions about Geyser P7 Chauvet
0 question about this device. Answer the ones you know or ask your own.
Ask a new question about this device
Download the instructions for your Effect machine in PDF format for free! Find your manual Geyser P7 - Chauvet and take your electronic device back in hand. On this page are published all the documents necessary for the use of your device. Geyser P7 by Chauvet.
USER MANUAL Geyser P7 Chauvet
natural_image
Technical line drawing of a mechanical device with internal components and control panel (no text or symbols)CHAUVET 3
About This Guide
The Geyser P7 Quick Reference Guide (QRG) has basic product information such as menu options. Download the User Manual from www.chauvetdj.com for more details.
Disclaimer
The information and specifications contained in this QRG are subject to change without notice.
Safety Notes
These Safety Notes include important information about installation, use, and maintenance.
- This product is not intended for permanent installation.
- ONLY connect this product to a grounded and protected circuit.
- Always disconnect from power before cleaning or replacing the fuse.
- Make sure the power cord is not crimped or damaged.
- Never disconnect this product from power by pulling on the cord.
- When mounting this product overhead, ALWAYS use a safety cable.
- DO NOT touch this product when it is operating because it may be hot.
- Do not set this product on a flammable surface (linoleum, carpet, wood, paper, carton, plastic, etc.).
-
Do not touch the output nozzle on this product. It is very hot during operation and it may remain hot for several hours after turning the unit off.
-
Depending on the amount of fog generated, all fog machines may set off smoke detectors.
- The voltage of the outlet to which you are connecting this product must be within the range stated on the decal or rear panel of the product.
- This product is for indoor use only! (IP20) To prevent risk of fire or shock, do not expose this product to rain or moisture.
- Always mount this product in a location with adequate ventilation, at least 20 in (50 cm) from adjacent surfaces.
- Be sure that no ventilation slots on the unit's housing are blocked.
- Never connect this product to a dimmer or rheostat.
- Replace the fuse with one of the same type and rating.
- ONLY use the carry handle to carry this product.
- The maximum ambient temperature is 104 °F (40 °C). Do not operate this product at higher temperatures.
- In the event of a serious operating problem, stop using immediately.
- DO NOT open this product. It contains no user-serviceable parts.
- Do not use for space heating purposes.
- Use only CHAUVET water-based fog fluid.
- Drain the tank before transporting or storing the product.
- To eliminate unnecessary wear and improve its lifespan, during periods of non-use completely disconnect the product from power via the breaker or by unplugging it.
Contact
Outside the U.S., United Kingdom, Ireland, Mexico, or Benelux, contact your distributor to request support or return a product. Visit www.chauvetdj.com for contact information.
What is Included
• G e y s e r P 7
- Power Cord
- Warranty Card
- Quick Reference Guide
• Geyser Wireless Remote Control and Receiver
To Begin
Unpack your Geyser P7 and make sure you have received all parts in good condition. If the box or contents appear damaged, notify the carrier immediately, not Chauvet.
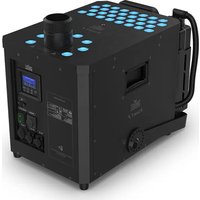
Product Overview
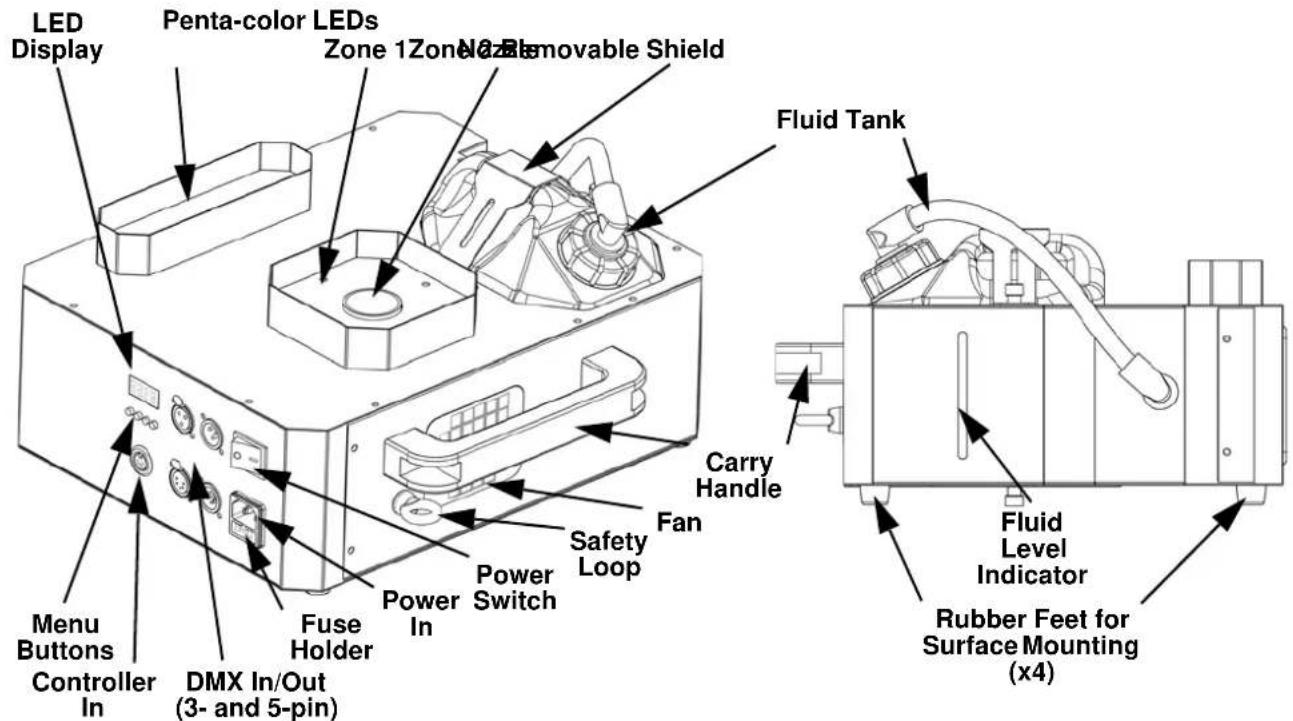
text_image
LED Display Penta-color LEDs Zone 1 Zone No.2 Removable Shield Fluid Tank Menu Buttons Controller In DMX In/Out (3- and 5-pin) Fuse Holder Power In Power Switch Safety Loop Fan Carry Handle Fluid Level Indicator Rubber Feet for Surface Mounting (x4)
FCQ (Fog Cleaner Quart) was specifically developed by Chauvet to clean your Geyser P7. Make sure you use FCQ regularly, no longer than 90 days between cleanings, to increase the life of your product.

While operating the Geyser P7, make sure there is adequate fog fluid in the machine to prevent pump and heater damage. When the fog fluid level becomes low, simply add more fog fluid to continue using the Geyser P7.
AC Power
This product has a fixed voltage power supply and it can work with an input voltage of either 120 VAC, 60 Hz or 230 VAC, 50 Hz, depending on the specific model.

To eliminate wear and improve its lifespan, during periods of non-use completely disconnect the product from power via breaker or by unplugging it.
Fuse Replacement
- Disconnect the product from power.
- Wedge the tip of a flat-head screwdriver into the slot of the fuse holder.
- Pry the safety cap out of the housing.
- Remove the blown fuse from the clip on the front of the safety cap and replace with a fuse of the exact same type and rating.
- Re-insert the fuse holder and reconnect power.
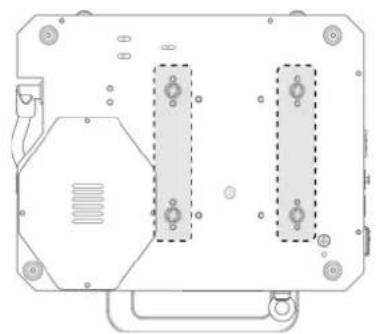
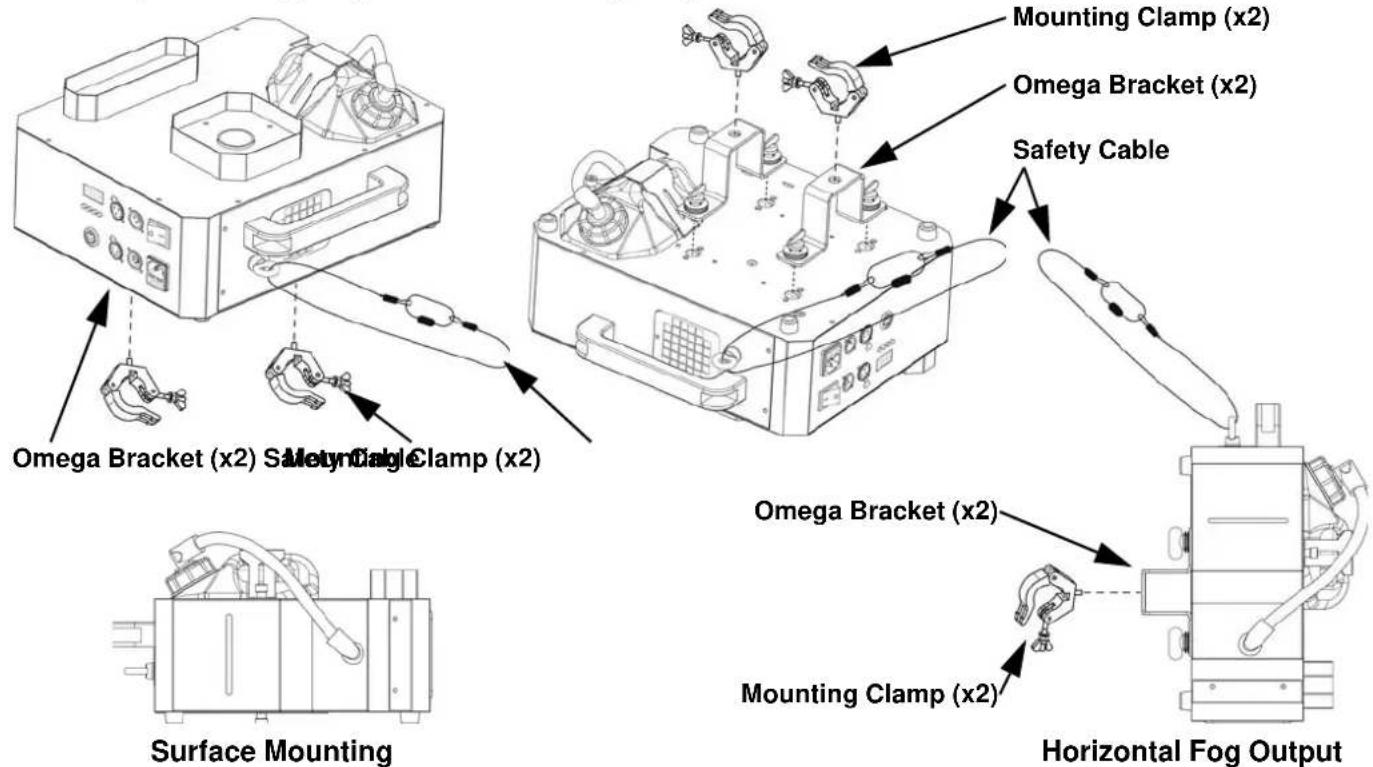
Mounting
Before mounting this product, read the Safety Notes. Use at least 2 mounting points per product.
Inverting the Tank
To prevent leaking or spilling, always position the fluid tank with its cap in the uppermost position, above the fog fluid line. When mounting the Geyser P7 overhead, invert the fluid tank by doing the following:
- Detach the removable shield by removing the thumb-screw.
- Pull the fluid tank out and set it on a flat surface.
- Detach the fluid tank plate by removing 4 screws.
- Secure the fluid tank plate to the opposite side with the 4 screws.
-
Insert the fluid tank.
-
Secure the removable shield by inserting the end without the thumbscrew into the slot, and screwing in the thumbscrew.
Mounting Diagram
natural_image
Technical diagram of a mechanical component with mounting holes and arrows indicating features (no text or symbols)Fluid Tank Plate Screws (x4)
natural_image
Technical line drawing of a mechanical or electronic component with no visible text, numbers, or symbols.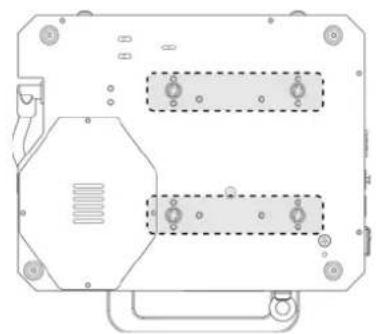
natural_image
Technical line drawing of a mechanical or electronic component with no visible text, numbers, or symbols.Omega Bracket Placement Options
Upwards Fog Output Downwards Fog Output
text_image
Mounting Clamp (x2) Omega Bracket (x2) Safety Cable Omega Bracket (x2) Mounting Clamp (x2) Horizontal Fog Output Surface Mounting Molecular Cable Clamp (x2)
- To prevent leaking or spilling, always position the fluid tank with its cap in the uppermost position, above the fog fluid line.
- Do not fill the fluid tank to the cap when mounted horizontally.
Control Panel Description
| BUTTON FUNCTION | |
| Exits from the current menu or function | |
| Navigates upwards through the menu list and increases the numeric value when in a function | |
| Navigates downwards through the menu list and decreases the numeric value when in a function | |
| Enables the currently displayed menu or sets the currently selected value into the selected function | |
Menu Map
| MAIN LEVEL PROGRAMMING LEVELS DESCRIPTION | ||
| Addr 1-512 Sets the DMX starting address | ||
| CH-1-4 | oFF No color output | |
| Co 1 Red | ||
| Co 2 Green | ||
| Co 3 Blue | ||
| Co 4 Amber | ||
| Co 5 Ultraviolet | ||
| Co 6 Hot pink | ||
| Co 7 Magenta | ||
| Co 8 Yellow | ||
| Co 9 Cyan | ||
| Co10 White | ||
| Co11 | Zone 1 green, zone 2 red | |
| Co12 Zone 1 blue, zone 2 red | ||
| Co13 Zone 1 red, zone 2 green | ||
| Co14 Zone 1 blue, zone 2 green | ||
| Co15 Zone 1 red, zone 2 blue | ||
| Co16 Zone 1 green, zone 2 blue | ||
| Co17 Zone 1 amber, zone 2 magenta | ||
| Co18 Zone 1 blue, zone 2 magenta | ||
| Co19 Zone 1 magenta, zone 2 amber | ||
| Co20 Zone 1 hot pink, zone 2 blue | ||
| rand Random color output | ||
Wireless Remote Control
To trigger fog output and activate the color program using the wireless remote control, do the following:
- Plug the wireless receiver into the Controller In port on the side of the Geyser P7.
- Program the color choice for each button on the remote (<1>-<4>), using the CH-1-4 menu options on the Geyser P7.
- On the wireless transmitter, press the button assigned to the desired color program (<1>-<4>). The Geyser P7 emits fog and outputs color for as long as the button is held down.
DMX Linking
The Geyser P7 can work with a DMX controller. Instructions for connecting and configuring this product for DMX operation are in the User Manual. If you are not familiar with DMX, download the DMX Primer from www.chauvetdj.com.
Starting Address
To ensure full access to all channels available in each DMX mode, the highest recommended DMX address is 498.
DMX Values
15Ch
| CHANNEL FUNCTION VALUE PERCENT/SETTING | ||
| 1 Fog | 000 ⇔ 009 No function | |
| 010 ⇔ 255 Output fog | ||
| 2 Zone | 1 Red | 000 ⇔ 014 No function |
| 015 ⇔ 255 0-100% | ||
| 3 Zone | 1 Green | 000 ⇔ 014 No function |
| 015 ⇔ 255 0-100% | ||
| 4 Zone | 1 Blue | 000 ⇔ 014 No function |
| 015 ⇔ 255 0-100% | ||
| 5 Zone | 1 Amber | 000 ⇔ 014 No function |
| 015 ⇔ 255 0-100% | ||
| 6 Zone | 1 Ultraviolet | 000 ⇔ 014 No function |
| 015 ⇔ 255 0-100% | ||
| 7 Zone | 2 Red | 000 ⇔ 014 No function |
| 015 ⇔ 255 0-100% | ||
| 8 Zone | 2 Green | 000 ⇔ 014 No function |
| 015 ⇔ 255 0-100% | ||
| 9 Zone | 2 Blue | 000 ⇔ 014 No function |
| 015 ⇔ 255 0-100% | ||
| 10 Zone | 2 Amber | 000 ⇔ 014 No function |
| 015 ⇔ 255 0-100% | ||
| 11 Zone | 2 Ultraviolet | 000 ⇔ 014 No function |
| 015 ⇔ 255 0-100% | ||
| 12 Color Macro | 000 ⇔ 009 No function | |
| 010 ⇔ 255 Color macros | ||
| 13 Color Macro Speed | 000 ⇔ 009 No function | |
| 010 ⇔ 255 Color macro speed, slow to fast | ||
| 14 Strobe | 000 ⇔ 009 No function | |
| 010 ⇔ 255 Strobe, slow to fast | ||
| 15 Dimmer | 000 ⇔ 014 No function | |
| 015 ⇔ 255 0-100% | ||

The LEDs will automatically shut off after 60 seconds of sustained output. Reset the dimmer to re-enable LED output.
Acerca de esta guía
natural_image
Technical line drawing of a mechanical or electronic component with no visible text, numbers, or symbols.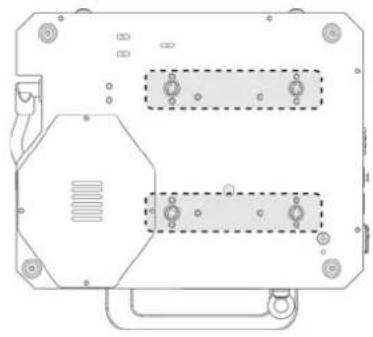
natural_image
Technical line drawing of a mechanical component with mounting holes and internal features (no text or symbols)natural_image
Technical line drawing of a mechanical or electronic component with no visible text, numbers, or symbols.natural_image
Technical line drawing of a mechanical component with mounting holes and internal features (no text or symbols)natural_image
Diagram of a device rear panel with mounting holes and directional arrows indicating movement (no text or symbols)natural_image
Technical line drawing of a mechanical housing or enclosure with mounting holes and internal compartments (no text or symbols)natural_image
Technical line drawing of a mechanical component with mounting holes and internal features (no text or symbols)natural_image
Technical line drawing of a mechanical or electronic component with no visible text, numbers, or symbols.
natural_image
Technical line drawing of a mechanical component with mounting holes and internal structure (no text or symbols)natural_image
Technical diagram of a device casing with mounting holes and internal components (no text or symbols)natural_image
Technical line drawing of a mechanical housing or enclosure with internal components and mounting holes (no text or symbols)natural_image
Technical line drawing of a mechanical component with mounting holes and internal features (no text or symbols)General Information Technical Support
Address: 5200 NW 108th Ave. Voice: (844) 393-7575
Sunrise, FL 33351 Fax: (954) 756-8015
Voice: (954) 577-4455 Email: chauvetcs@chauvetlighting.com
Fax: (954) 929-5560
Website
Toll Free: (800) 762-1084 www.chauvetlighting.com
EUROPE
General Information Technical Support
Address: Stokstraat 18 Email: eutech@chauvetlighting.eu
9770 Kruishoutem
Website
Belgium www.chauvetlighting.eu
Voice: +32 9 388 93 97
General Information Technical Support
Address: Unit 1C Email: uktech@chauvetlighting.com
Brookhill Road Industrial Estate
Pinxton, Nottingham, UK
Website
NG16 6NT www.chauvetlighting.co.uk
Voice: +44 (0) 1773 511115
Fax: +44 (0) 1773 511110
MEXICO
General Information Technical Support
(Entrance by Calle 2)
Zona Industrial Lerma
Email: servicio@chauvet.com.mx
Website
Outside the U.S., United Kingdom, Ireland, Mexico or Benelux, contact the dealer of record. Follow the instructions to request support or to return a product. Visit our website for contact details.
Geyser P7 QRG Rev. 2 ML6
© Copyright 2017 Chauvet
All rights reserved
Printed in the P.R.C.

RoHS