IAN 399960 - Fitness Equipment CRIVIT - Free user manual and instructions
Find the device manual for free IAN 399960 CRIVIT in PDF.
| Brand | CRIVIT |
| Model | IAN 399960 |
| Product type | Foldable rowing machine |
| Use | Home, indoor |
| Dimensions (unfolded) | 223 x 58 x 106 cm (L x W x H) |
| Dimensions (folded) | 118 x 58 x 146 cm (L x W x H) |
| Weight | 35 kg |
| Power supply | 4 AA 1.5 V batteries (LR6) |
| Maximum load capacity | 110 kg |
| Resistance system | Speed-independent braking, 10 levels |
| Display | Computer with time, distance, calories, heart rate, 10 preset programs + custom |
| Standards | EMC 2014/30/EU, RoHS 2011/65/EU, ISO 20957 Class H |
| Warranty | 3 years on material and manufacturing defects |
| After-sales service France | 0800 919270 / deltasport@lidl.fr |
| Wear parts | Batteries |
| Maintenance | Cleaning with water, lubrication of the chain every 50 hours with mineral oil |
| Safety | Use from age 14, max weight 110 kg, non-slip flat surface, free space of 0.6 m around |
| Delivery contents | Rowing machine, seat, footrests, tools, batteries, manual |
| Number of programs | 10 preset (P01-P10) + 1 custom |
| Seat | Sliding on rail, adjustable |
Frequently Asked Questions - IAN 399960 CRIVIT
User questions about IAN 399960 CRIVIT
0 question about this device. Answer the ones you know or ask your own.
Ask a new question about this device
Download the instructions for your Fitness Equipment in PDF format for free! Find your manual IAN 399960 - CRIVIT and take your electronic device back in hand. On this page are published all the documents necessary for the use of your device. IAN 399960 by CRIVIT.
USER MANUAL IAN 399960 CRIVIT
natural_image
Rear machine with mounted equipment and a small inset QR code (no text or symbols on the machine itself)
RUDERGERÄT ROWING MACHINE RAMEUR
| (1) (2) | (3) (4) |
| RUDERGERÄT | EDWINO MACHINE |
| Geschränkserwährung | Indikator for use |
| (5) (6) | (6) (7) |
| RAMEUR | ROELAPPARAAT |
| Nettoer bilirubion | Gebelbemannfang |
| (8) | |
| WIOSLARZ | VISLAŃSKY TRENÁZÉR |
| Intralco zyśrzejunk | Nasok i poziń |
| (9) | (9) |
| VESLOVACI STROJ | MÁQUINA DE REMO |
| Nevedno poziJEVO | Indikator de Use |
| (10) | |
| ROMASKINE | |
| Bruganofloting |
CE
CABLOPECHEN, JONATHKOWA (Canada A. 087257 Hamburg)
40786
。
m 10/201
[Unreadable]
8
IAN 399960_2104IAN 399960_2104

(b) (b) Before reading, hold out the illustration on page and put to know all of the functions at your unit.
where between and independent are given that the independent
⑤
in the case
- 2017年
For example, the following
(30) Other not active varied after, a no active was taken to obtain a observation as its critical
(8)
Chronic and biotrophic neural activity of the dendritic cell, which is a receptor-like factor.
07/21/CH Inductional Solventilator
| 2017: Comparison of malaria in January 2017 | |||
| Mildness of malaria in the whole state Figure 22 | |||
| Mildness | Differences in non-poor plants | Pigments | 28 |
| 4 | Widowed and unclassified malaria (non-poor plants) | Others | 15 |
| 5.7 | Hodgaly and human species | Others | 36 |
| 5.6 | Polyglycans positive in a protected world | Others | 49 |
| 5.7 | Hodgaly and human species, especially in other countries | Pigments | 49 |
| 5.6 | Hodgaly and human species, especially in other countries | Others | 50 |
text_image
Technical diagram showing exploded view and assembly of a mechanical component with labeled parts and numbered parts.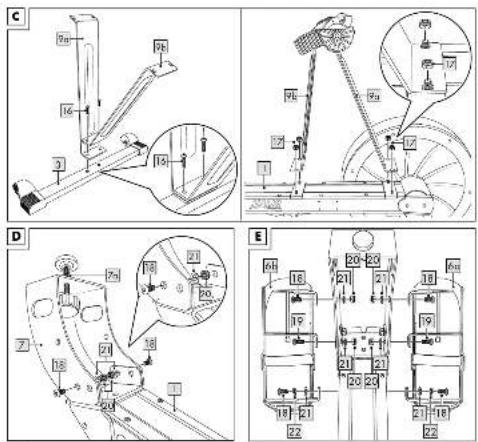
text_image
Technical diagram showing mechanical assembly and component layout with labeled parts and annotations
text_image
Technical diagram of a stationary exercise machine with labeled components and motion arrows indicating movement direction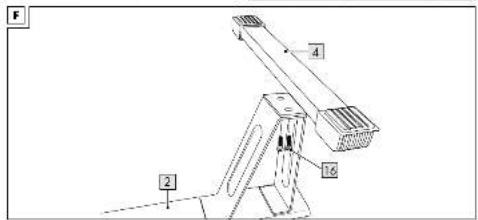
text_image
F 4 2 16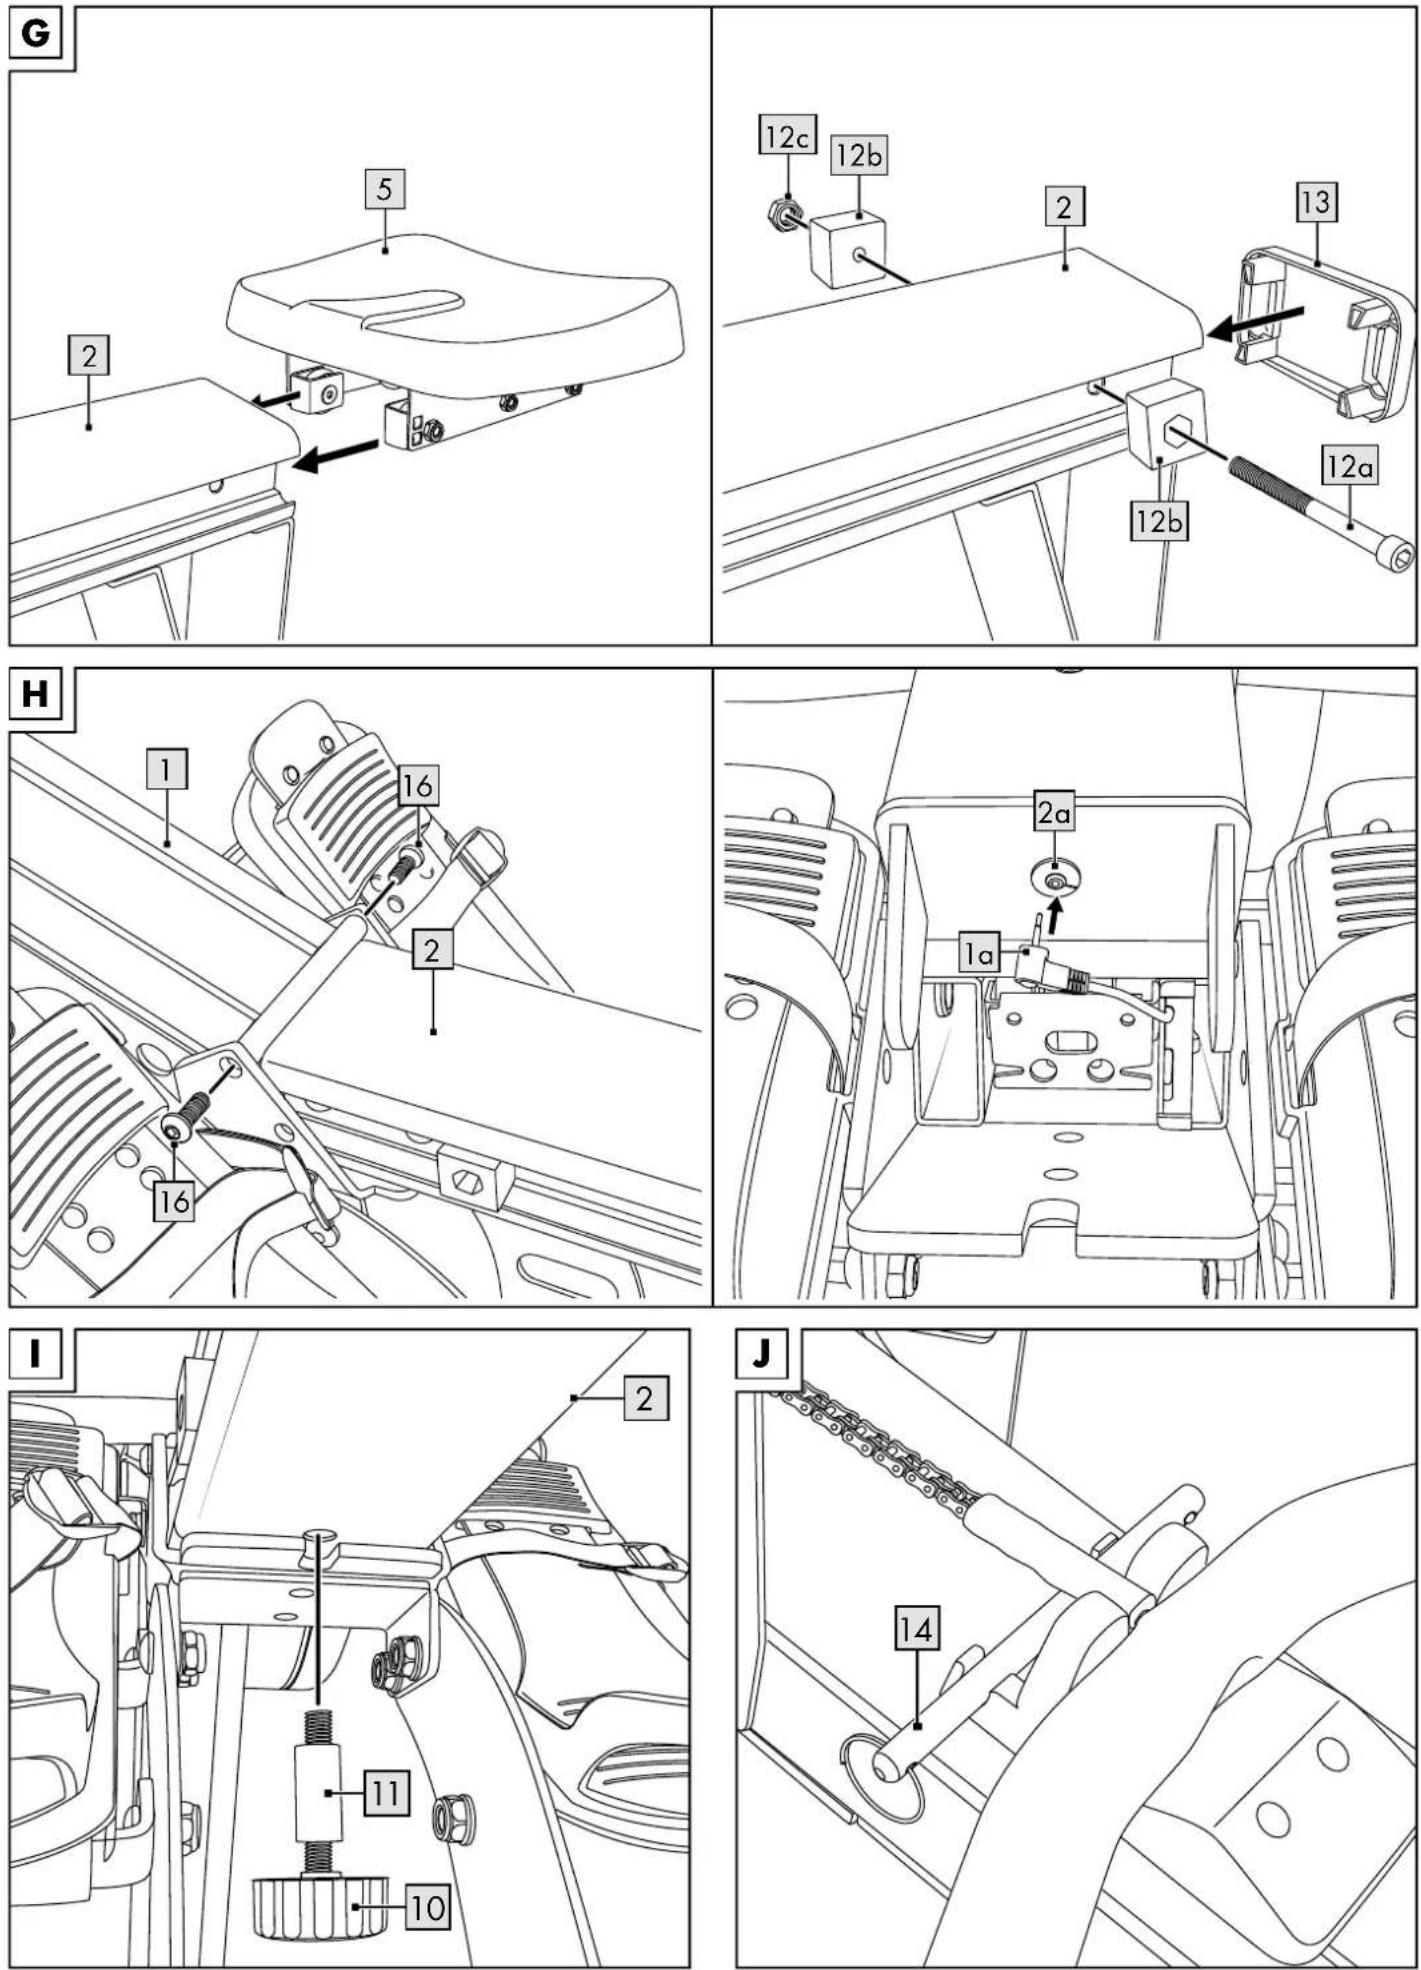
text_image
K 8a 1b 8 15 8b 15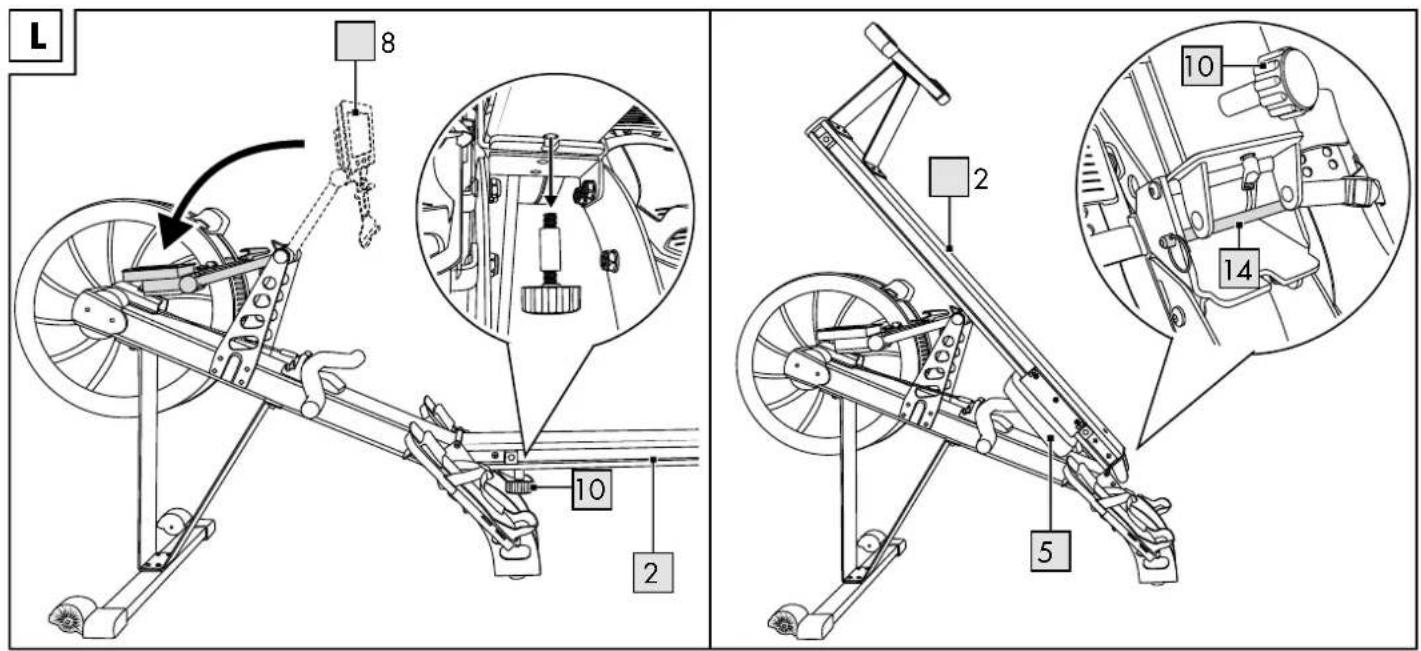
text_image
L 8 10 2 2 10 14 5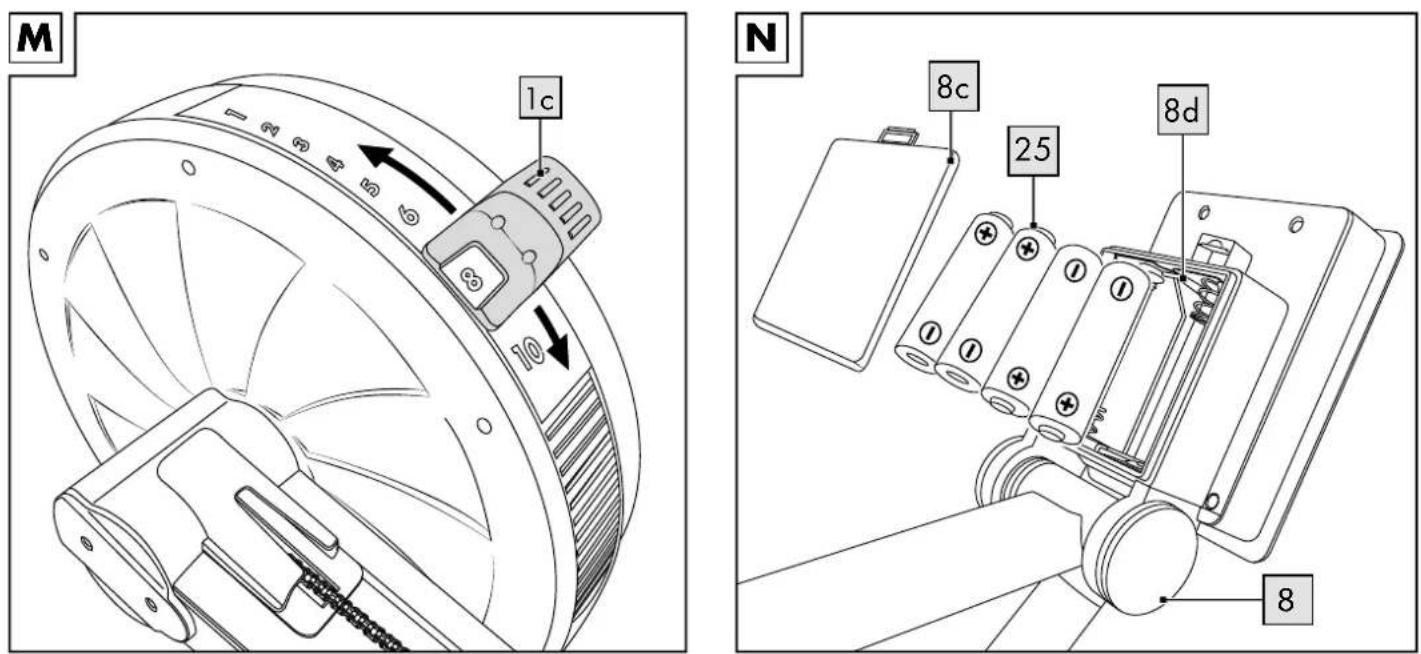
text_image
M 1c N 8c 25 8d 8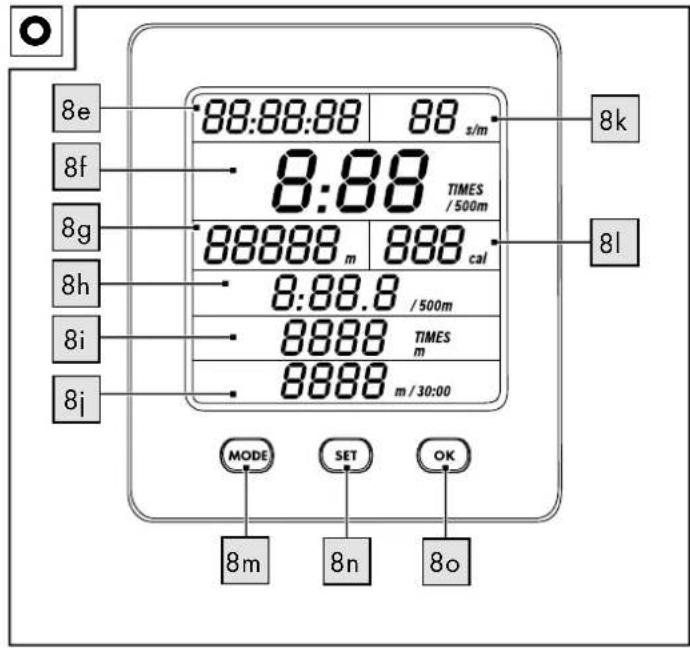
text_image
8e 8f 8g 8h 8i 8j 88:88:88 88 s/m 8:88 TIMES / 500m 88888 m 888 cal 8:88.8 / 500m 8888 TIMES m 8888 m / 30:00 MODE SET OK 8m 8n 8o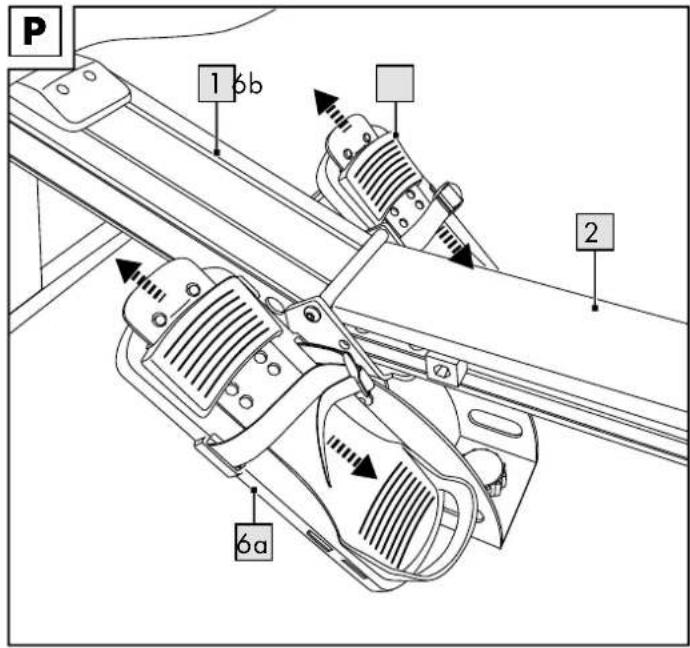
text_image
P 1 6b 2 6a
natural_image
Line drawing of a person using a rowing machine on a bench (no text or symbols)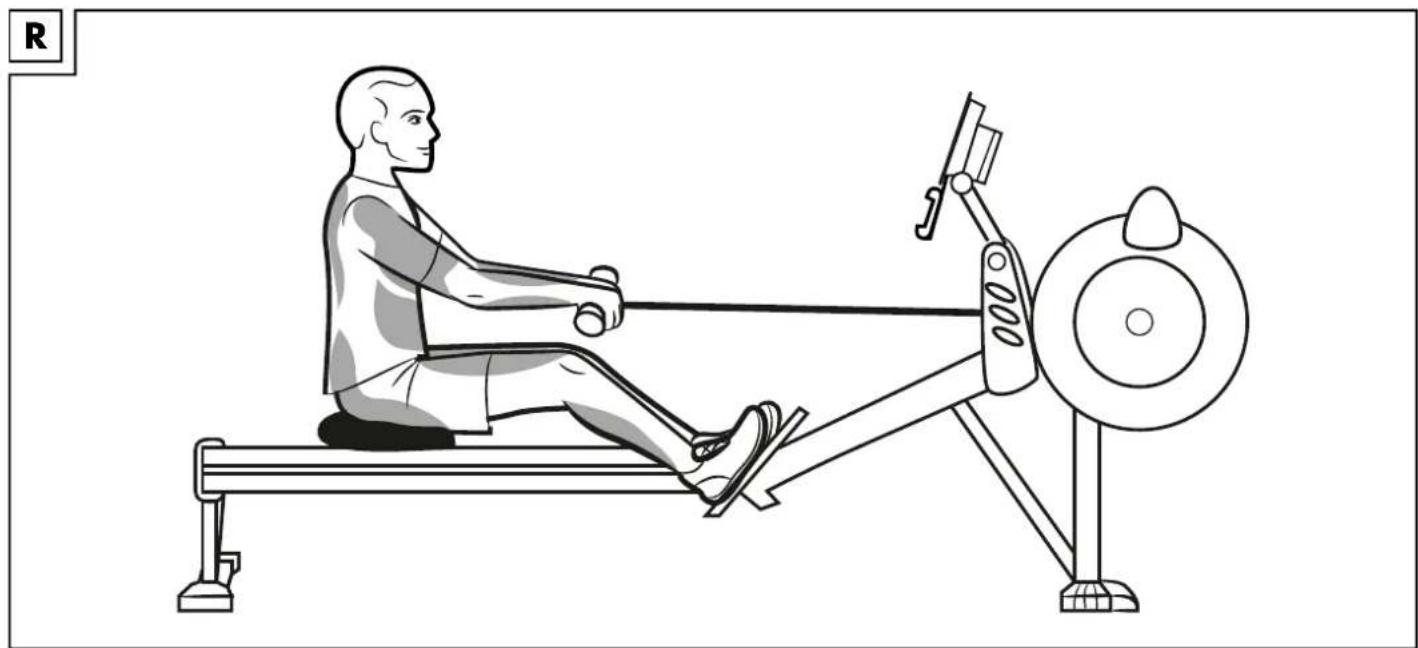
natural_image
Line drawing of a person using a rowing machine on a bench (no text or symbols)
natural_image
Line drawing of a person using a rowing machine on a bench (no text or symbols)
natural_image
Line drawing of a person using a rowing machine on a bench (no text or symbols)
text_image
U 0,6m 0,6m 0,6m 0,6mDE AT CH
Danger of crushed fingers! 18
Extra caution - risk of injury to children! ... 18
Dangers due to wear and tear 18
Warnings on batteries! 18
Danger! 18
Inserting the batteries into the product ..... 18
Inserting the batteries 18
Replacing the batteries 18
Notes on setting up 18
Assembly 18-19
Folding up the product 19
Using the product 19 - 20
Setting the resistance 19
Adjusting the footrests 19
Operating the computer 19
Turning the product on and off 19
Display 19
Selecting the mode 19
Setting pre-programmed workouts ..... 19
Workouts 19-20
Setting individual standard training 20
General training instructions 20
Warming up 20
Training procedure 20
Stretching 20
Storage, cleaning 20
Disposal 21
Notes on the guarantee
and service handling 21
FR BE
1 x Schraubenschlüssel
SW 13 mm/SW 17 mm (23)
You have chosen to purchase a high-quality product. Familiarise yourself with the product before using it for the first time.

Read the following instructions for use carefully.
Use the product only as described and only for the given areas of application. Store these instructions for use carefully. When passing the product on to third parties, please also hand over all accompanying documents.
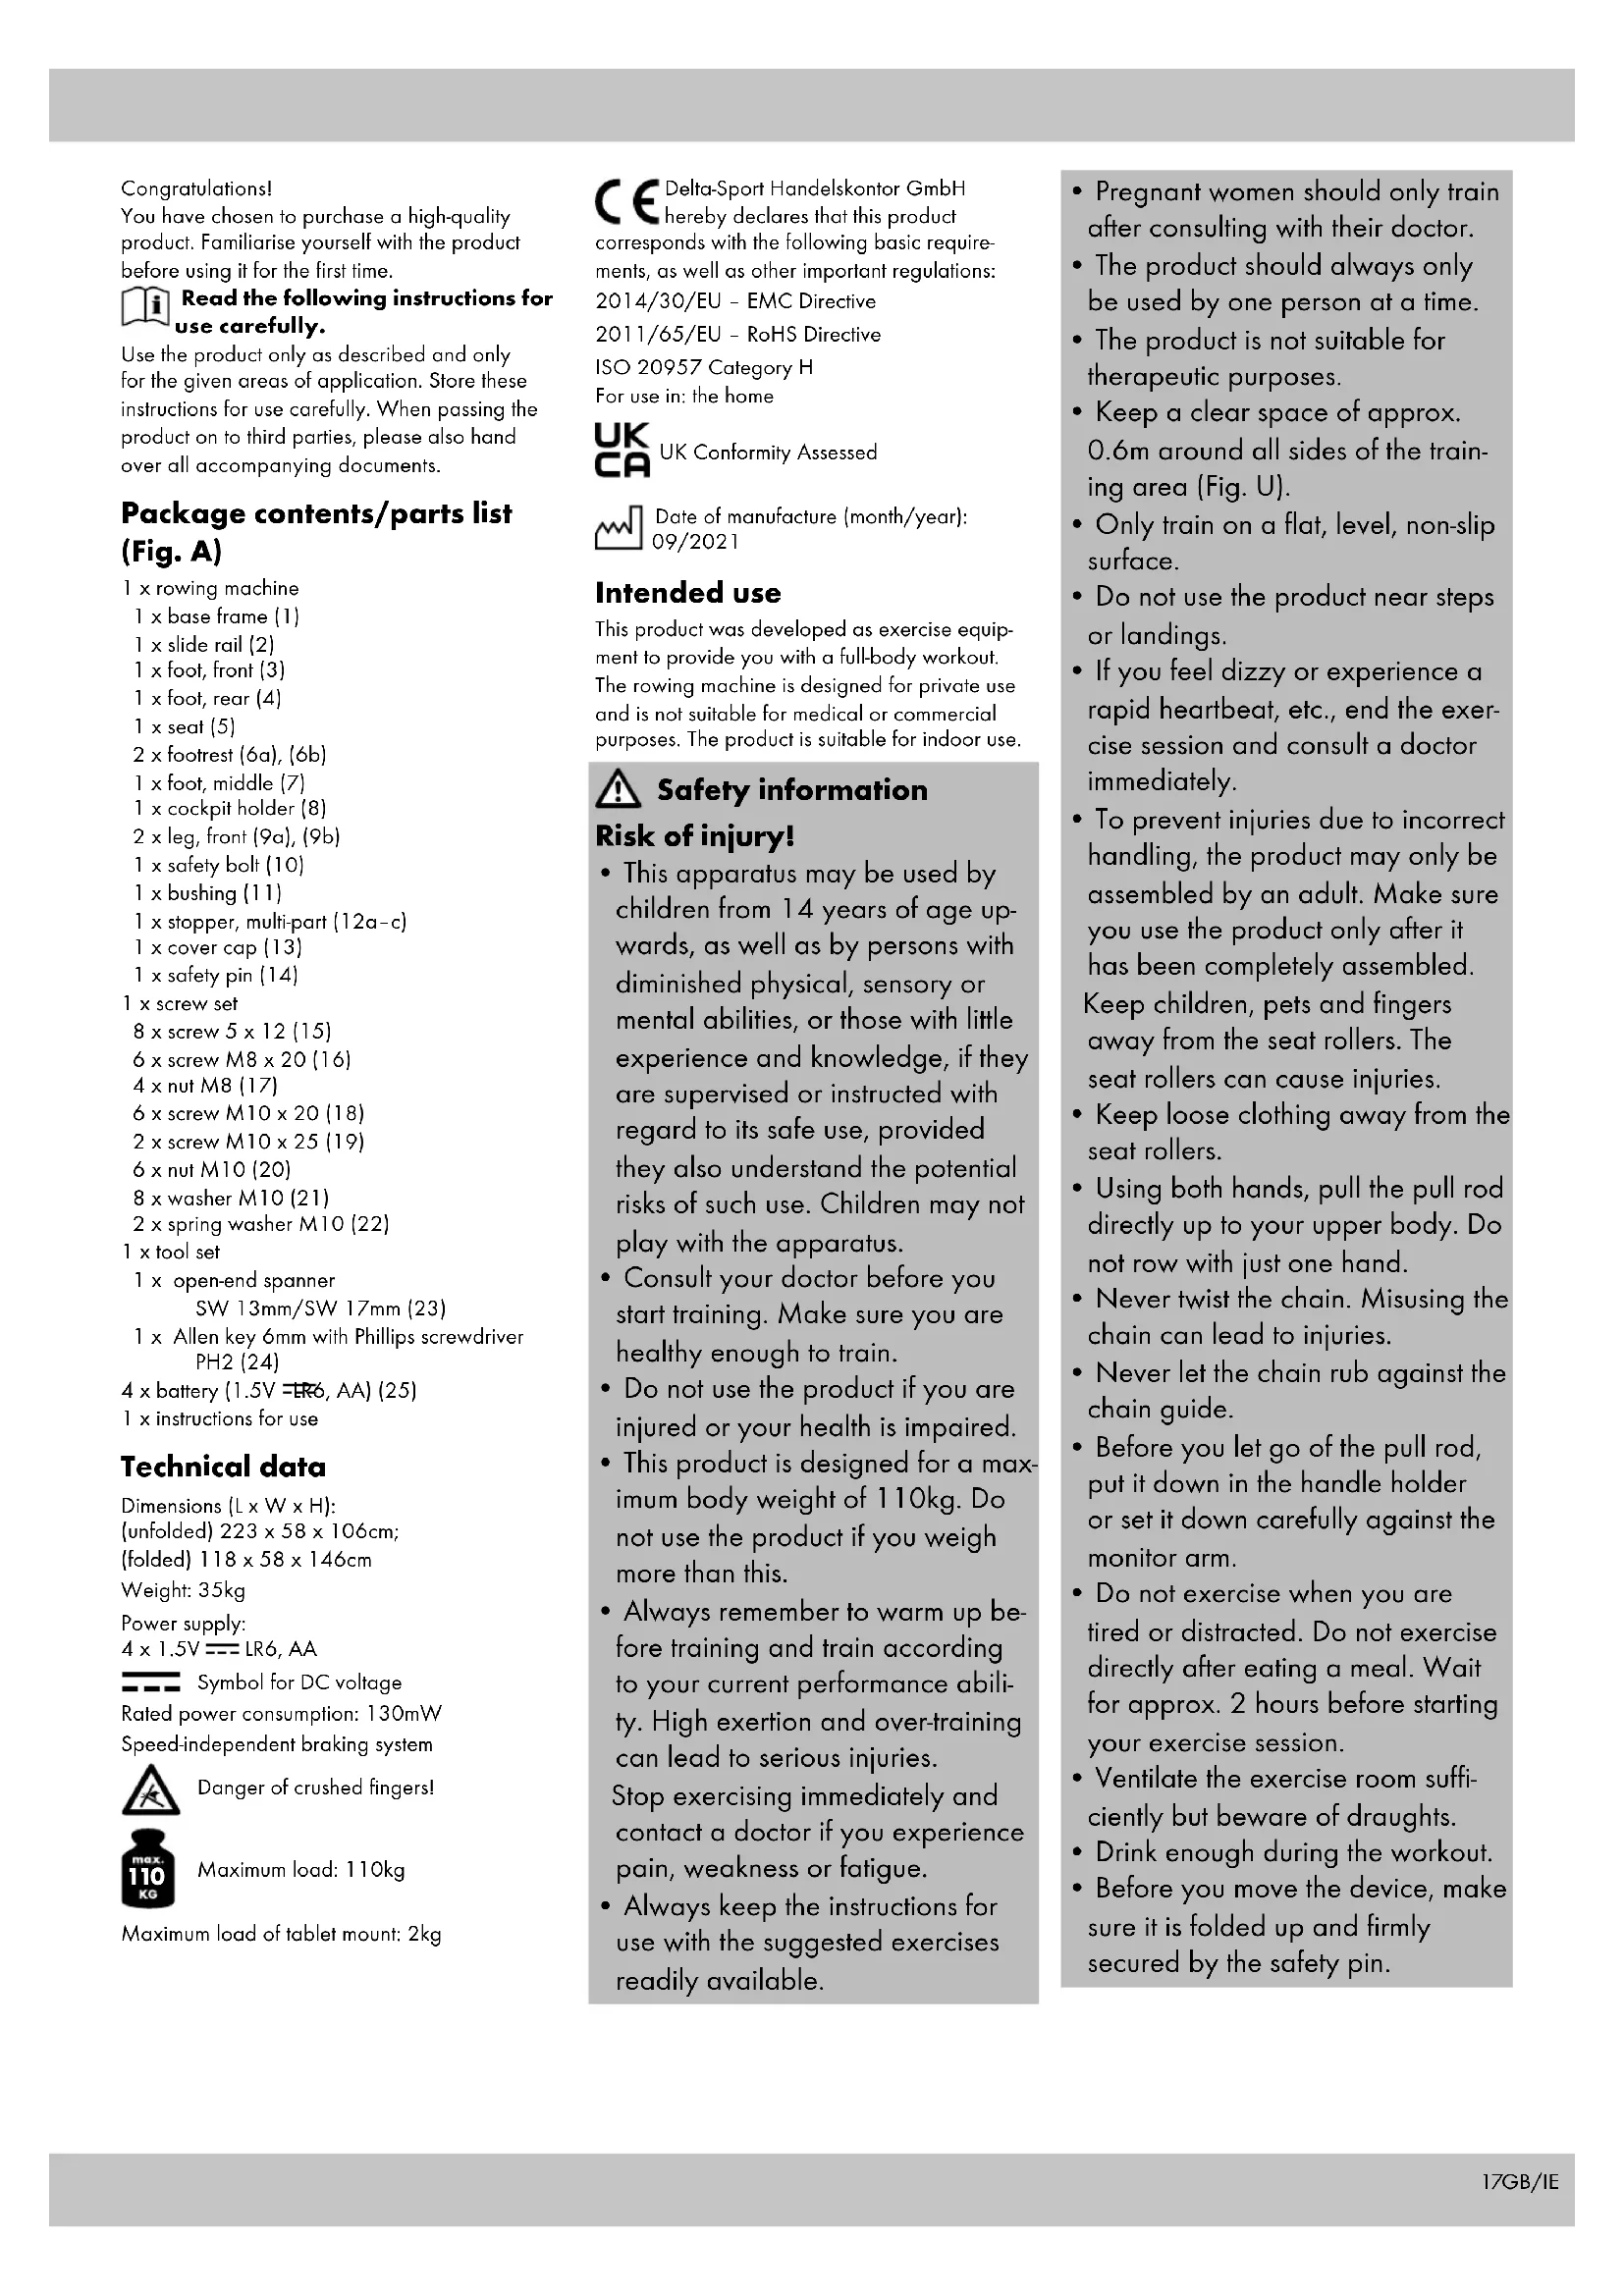
Package contents/parts list (Fig. A)
1 x rowing machine
1 x base frame (1)
1 x slide rail (2)
1 x foot, front (3)
1 x foot, rear (4)
1 x seat (5)
2 x footrest (6a), (6b)
1 x foot, middle (7)
1 x cockpit holder (8)
2 x leg, front (9a), (9b)
1 x safety bolt (10)
1 x bushing (11)
1 x stopper, multi-part (12a-c)
1 x cover cap (13)
1 x safety pin (14)
1 x screw set
8 x screw 5 x 12 (15)
6 x screw M8 x 20 (16)
4 x nut M8 (17)
6 x screw M10 x 20 (18)
2 x screw M10 x 25 (19)
6 x nut M10 (20)
8 x washer M10 (21)
2 x spring washer M10 (22)
1 x tool set
1 x open-end spanner
SW 13mm/SW 17mm (23)
1 x Allen key 6mm with Phillips screwdriver PH2 (24)
4 x battery (1.5V = 6, AA) (25)
1 x instructions for use
Technical data
Dimensions (L x W x H):
(unfolded) 223 x 58 x 106cm;
(folded) 118 × 58 × 146cm
Weight: 35kg
Power supply:
4 × 1.5V === LR6, AA

Symbol for DC voltage
Rated power consumption: 130mW
Speed-independent braking system

Danger of crushed fingers!

Maximum load: 110kg
Maximum load of tablet mount: 2kg
CE Delta-Sport Handelskontor GmbH hereby declares that this product corresponds with the following basic requirements, as well as other important regulations: 2014/30/EU - EMC Directive 2011/65/EU - RoHS Directive ISO 20957 Category H For use in: the home

UK Conformity Assessed

Date of manufacture (month/year): 09/2021
Intended use
This product was developed as exercise equipment to provide you with a full-body workout. The rowing machine is designed for private use and is not suitable for medical or commercial purposes. The product is suitable for indoor use.

Safety information
Risk of injury!
- This apparatus may be used by children from 14 years of age upwards, as well as by persons with diminished physical, sensory or mental abilities, or those with little experience and knowledge, if they are supervised or instructed with regard to its safe use, provided they also understand the potential risks of such use. Children may not play with the apparatus.
- Consult your doctor before you start training. Make sure you are healthy enough to train.
- Do not use the product if you are injured or your health is impaired.
- This product is designed for a maximum body weight of 110kg. Do not use the product if you weigh more than this.
• Always remember to warm up before training and train according to your current performance ability. High exertion and over-training can lead to serious injuries.
Stop exercising immediately and contact a doctor if you experience pain, weakness or fatigue.
• Always keep the instructions for use with the suggested exercises readily available.
- Pregnant women should only train after consulting with their doctor.
- The product should always only be used by one person at a time.
- The product is not suitable for therapeutic purposes.
- Keep a clear space of approx. 0.6m around all sides of the training area (Fig. U).
- Only train on a flat, level, non-slip surface.
- Do not use the product near steps or landings.
- If you feel dizzy or experience a rapid heartbeat, etc., end the exercise session and consult a doctor immediately.
- To prevent injuries due to incorrect handling, the product may only be assembled by an adult. Make sure you use the product only after it has been completely assembled. Keep children, pets and fingers away from the seat rollers. The seat rollers can cause injuries.
- Keep loose clothing away from the seat rollers.
- Using both hands, pull the pull rod directly up to your upper body. Do not row with just one hand.
- Never twist the chain. Misusing the chain can lead to injuries.
- Never let the chain rub against the chain guide.
- Before you let go of the pull rod, put it down in the handle holder or set it down carefully against the monitor arm.
- Do not exercise when you are tired or distracted. Do not exercise directly after eating a meal. Wait for approx. 2 hours before starting your exercise session.
- Ventilate the exercise room sufficiently but beware of draughts.
- Drink enough during the workout.
- Before you move the device, make sure it is folded up and firmly secured by the safety pin.

Danger of crushed fingers!
- Watch out for pinch points when folding up and unfolding the rowing machine.

Extra caution – risk of injury to children!
- Keep children away from the packaging materials. There is a risk of suffocation!
- The product is not suitable play equipment and must be stored somewhere that is inaccessible to children when not in use. To eliminate the risk of injury, the product must not be within reach of children during the workout.
- Point out to children specifically that the product is not a toy.
• Children should not be allowed play with the product.

Dangers due to wear and tear
- The product may only be used if it is in perfect condition. Check the product for damage or wear before each use.
The safety of the rowing machine can only be guaranteed if it is regularly inspected for damage and wear and tear. If, for example, the chain or the handles of the pull rod show signs of damage, do not use the product any more. - Use only original replacement parts.
- Protect the product from extreme temperatures, sun and dampness. Improper storage and use of the product could lead to premature wear and tear, and possible breakages in the structure, which could result in injuries.
- Check the product regularly for damage or deterioration. If the product is damaged, you must not use it any longer.
- Do NOT secure or screw the device permanently to the floor. Non-compliance can cause considerable damage to the device.

Warnings on batteries!
- Remove the batteries if they are empty or if the product is not going to be used for an extended period.
- Do not use different battery types or brands, new and used batteries in combination, or batteries with different capacities, as they leak and can thus cause damage.
- Observe the polarity (+/-) when inserting batteries.
- Change all batteries at the same time and dispose of the old batteries properly.
- Warning! Batteries may not be charged or reactivated in any way. They may not be dismantled, thrown into fire, or short-circuited.
• Always keep batteries out of the reach of children.
- Do not use rechargeable batteries!
- The cleaning and user-maintenance may not be carried out by children without supervision.
- Clean the batteries and the device contacts as necessary and before inserting the batteries.
- Do not expose the batteries to extreme conditions (e.g. radiators or direct sunlight). Otherwise there is an increased risk of leaks.
- Batteries can endanger life if swallowed. Keep batteries out of the reach of small children for this reason. Seek medical help immediately if a battery is swallowed.

Danger!
- Handle a damaged or leaking battery with extreme care and dispose of it properly and immediately. Wear gloves to handle the battery.
- If you come into contact with battery acid then wash the affected area with soap and water. If battery acid gets in your eye rinse it out with water and seek medical help immediately!
- Do not short-circuit the terminals.
Inserting the batteries into the product (Fig. N)

CAUTION: observe the following instructions to avoid mechanical
and electrical damage.
Insert the enclosed batteries (25) into the battery compartment (8d) of the cockpit (8).
Inserting the batteries
- Open the battery compartment lid (8c) on the back of the cockpit display (8) and remove.
- Carefully insert the four 1.5V LR6, AA batteries (25) into the battery compartment (8d). The batteries must fit snugly in the battery compartment (8d).

CAUTION: check the positive/negative poles of the batteries (25) and
ensure that they are inserted correctly, as marked on the bottom of the battery compartment (8d).
- Close the battery compartment lid (8c).
Replacing the batteries

CAUTION: observe the following instructions to avoid mechanical
and electrical damage.
When the batteries (25) are flat, replace them as described in the insertion instructions above. Remove the batteries from the product before inserting new ones.
Notes on setting up
- Choose an exercise area of approx. 3 × 1.8m (L x W).
- Train on a flat, non-slip surface only.
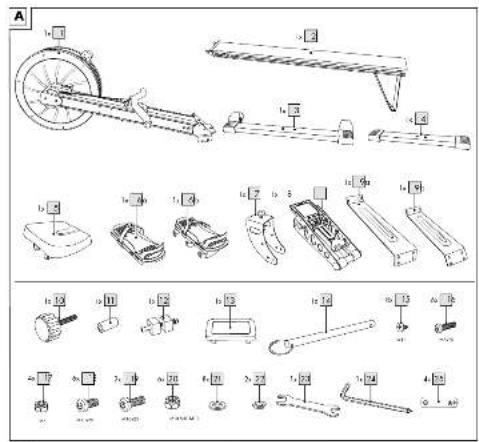
Assembly
The product should be assembled by two people.
Step 1 (Fig. C):
- Attach the two front legs (9a), (9b) to the front foot (3).
Note: make sure that the curved parts on the two legs (9a), (9b) are each facing outwards.
- Then attach the two long legs (9a), (9b) to the base frame (1).
Note: to make it easier to assemble the legs, turn the base frame so that the screw holes are facing upwards.
Step 2 (Fig. D):
- Leave the base frame (1) inverted and mount the middle foot (7).
Note: after completing the assembly of the rowing machine, the floor height level can be adjusted with the thumbscrew.
- Adjust the floor height level with the thumb-screw and then tighten the lock nut (7a).
Step 3 (Fig. E):
Leave the base frame (1) inverted and mount the two footrests (6a), (6b).
Note: make sure they are correctly oriented (left (6a)/right (6b)).
Step 4 (Fig. F):
Attach the rear foot (4) to the slide rail (2).
Step 5 (Fig. G):
- Slide the seat (5) from behind onto the slide rail (2). To do this, direct the gliding carriage under the seat into the guide on the slide rail.
Note: make sure the seat is correctly oriented.
-
Attach the stoppers (12) to the right and left on the front and back end of the slide rail (2).
-
Place the cover cap (13) onto the back end of the slide rail (2).
Step 6 (Fig. H):
- Place the base frame (1) and the slide rail (2) on the respective feet.
- Insert the slide rail (2) into the base frame (1) and screw it tight. Make sure the sensor cable is not crushed or damaged when inserting the slide rail (2).
- Fold the slide rail up (2) and insert the connector of the sensor cable (1a) into the corresponding bushing (2a) of the slide rail.
Step 7 (Fig. I):
When unfolded, the slide rail (2) must be stabilised with the safety bolt (10).
- Put the bushing (11) on the safety bolt (10).
- Screw the safety bolt (10) from below into the threaded hole provided on the slide rail (2).
Note: tighten the safety bolt (10) so that the rowing machine remains stable during training.
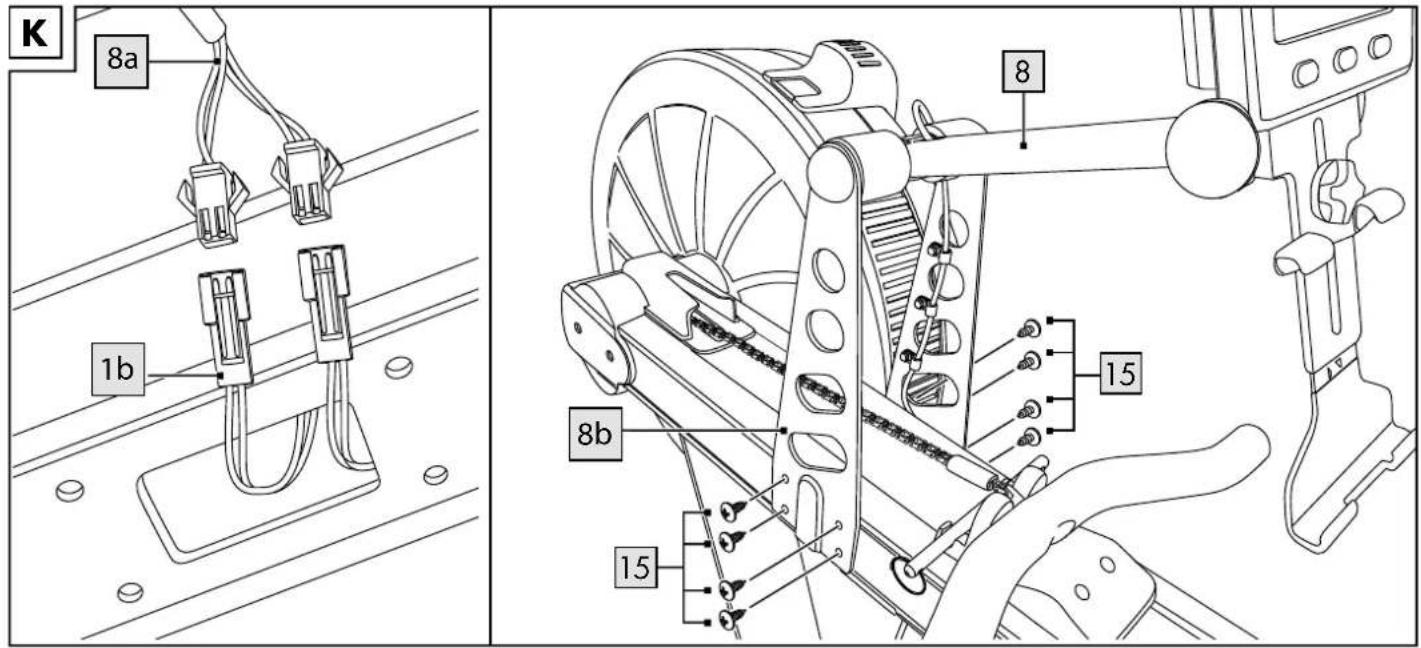
Step 8 (Fig. K):
- Connect the two sensor cables of the cockpit (8a) with the sensor cables of the base frame (1b).
- Screw the cockpit holder (8b) firmly to the base frame (1).
Folding up the product (Fig. L)
You can fold up the device when you are not using it.
- Fold the cockpit (8) backwards.
- Slide the seat (5) forwards.
Note: make sure that the seat (5) is completely pushed forwards and cannot slip out of position again when the rowing machine is being folded up.
- Loosen the safety bolt (10) and fold the slide rail (2) upwards.
- Secure the slide rail (2) with the locking pin (14) which is under the pull rod chain (Fig. J) when unfolded.
Note: screw the safety bolt (10) back into the threaded hole provided on the slide rail, so as not to lose it.
- Perform this procedure in reverse to unfold the device again.
Note: hold the slide rail (2) firmly when you fasten or pull out the locking pin (14).
Using the product
Setting the resistance (Fig. M)
Before you start exercising, the resistance on the wind wheel (1c) of the rowing machine must be set. The resistance can be adjusted to 10 different levels.
Note: the higher the resistance, the more strenuous the exercise will be. Be aware that setting the resistance too high can lead to adverse effects on your health.
Adjusting the footrests (Fig. P)
Adjust the footrests (6a), (6b) to the appropriate size for your feet before you start exercising.
- Pull the movable part of the footrest upwards to reduce the foot surface area. Pull the movable part of the footrest downwards to extend the foot surface area.
- Tighten the strap tightly enough so that your foot cannot slip.
Note: the strap must be above the ball of your foot to guarantee a secure footing.
Operating the computer
The rowing machine meets accuracy grade C, i.e., there is no claim to the accuracy of the computer displays.
Turning the product on and off
When you start exercising, or pull strongly on the pull rod, the computer switches on automatically. The default display is displayed (all parameters are at 0).
Note: the computer switches on when you press one of the 3 buttons.
The computer switches off automatically if the rowing machine is not operated for approx. 100 seconds.
Display (Fig. O)
The display shows:
• Exercise duration from :00 to 59:59:59 (8e)
- Predicted time needed to travel 500m from 0 to 9:59/500m at current speed (8f)
• Total distance from 0 to 99999m (8g)
• Average time it took to travel 500m from :00 to 9:59.9/500m (8h)
- Distance covered at the current speed within 5 minutes from 0 to 1999 TIMES/m (8i)
- Predicted distance covered in 30 minutes from 0 to 9999m/30:00 (8j)
• Strokes per minute from 0 to 99s/m (8k)
- Calorie consumption* from 0 to 999cal (8l)
*The calculation is based on pre-programmed standard values that can only serve as a guideline.
Selecting the mode
You can either complete a standard training session or choose from 10 pre-programmed workouts.
Setting pre-programmed workouts
- Press the 'MODE' button (8m) once to enter the training session mode.
- Press the 'SET' button (8n) to select one of the 10 pre-programmed workouts (P01-P10).
- Press the 'OK' button (80) to confirm your selection.
Workouts
P01
- Choose the workout P01, as described in the section 'Selecting the mode' and start the training session.
- The total distance is 2,000m.
- You may now start your training. The computer counts down the pre-programmed values to '0 m'.
- As soon as the pre-programmed target is reached, the computer stops counting.
P02
- Choose the workout P02, as described in the section 'Selecting the mode' and start the training session.
- The total distance is 5,000m.
- You may now start your training. The computer counts down the pre-programmed values to '0 m'.
- As soon as the pre-programmed target is reached, the computer stops counting.
P03
- Choose the workout P03, as described in the section 'Selecting the mode' and start the training session.
- The total distance is 10,000m.
- You may now start your training. The computer counts down the pre-programmed values to '0 m'.
- As soon as the pre-programmed target is reached, the computer stops counting.
P04
- Choose the workout P04, as described in the section 'Selecting the mode' and start the training session.
- The training session lasts for 30 minutes.
- You may now start your training. The computer counts down the pre-programmed values to '0:00'.
- As soon as the pre-programmed target is reached, the computer stops counting.
P05
- Choose the workout P05, as described in the section 'Selecting the mode' and start the training session.
- Row 500m.
- Take a 1 minute break.
- Repeat 5 times.
- The computer stops counting as soon as you have completed all of the rounds.
P06
- Choose the workout P06, as described in the section 'Selecting the mode' and start the training session.
- Row for 30 seconds.
- Take a 30 second break.
- Repeat 10 times.
- The computer stops counting as soon as you have completed all of the rounds.
P07
- Choose the workout P07, as described in the section 'Selecting the mode' and start the training session.
- Row for 1 minute and then take a 1 minute break.
- Row for 2 minutes and then take a 2 minute break.
- Row for 3 minutes and then take a 3 minute break.
- Row for 4 minutes and then take a 4 minute break.
- Row for 3 minutes and then take a 3 minute break.
- Row for 2 minutes and then take a 2 minute break.
- Row for 1 minute and then take a 1 minute break.
- The computer stops counting as soon as you have completed all of the rounds.
P08
- Choose the workout P08, as described in the section 'Selecting the mode' and start the training session.
- Row 2,000m, 1,500, 1,000 and 500m.
- Take a 3 minute break after each set.
- The computer stops counting as soon as you have completed all of the rounds.
P09
- Choose the workout P09, as described in the section 'Selecting the mode' and start the training session.
- Row for 100 seconds and take a 20 second break.
- Repeat 5 times.
- Take a 140 second break after the 5th repetition.
- Row for 100 seconds and take a 20 second break.
- Repeat 4 times.
- The computer stops counting as soon as you have completed all of the rounds.
P10
- Choose the workout P10, as described in the section 'Selecting the mode' and start the training session.
- You may now start your training.
- The computer counts down the pre-programmed values from '42195m' to '0m'.
- As soon as the pre-programmed target is reached, the computer stops counting.
Setting individual standard training S01
- Press the 'MODE' button (8m) twice to enter the standard training mode.
- Press the 'OK' button (80) to confirm your selection.
- Press the 'SET' button (8n) to select the training duration (8e) display.
- Press the 'OK' button (80) until you reach the desired training duration.
Note: press the 'SET' button (8n) to toggle between the numbers in each field.
-
Press the 'SET' button (8n) to select the total distance (8g) display.
-
Press the 'OK' button (80) until you have set the desired total distance.
Note: press the 'SET' button (8n) to toggle between the numbers in each field.
Note: the training program is ended when the display stops counting and the set training duration or distance has expired.
Note: if you want to change the settings entered, proceed as described in steps 1-6.
Resetting the display
The display is at 0 when used for the first time. You can begin with the training or select a pre-programmed workout.
- Press the 'SET' button (8n) for 2 seconds to reset the display.
- To end a workout ahead of time, press the 'MODE' button (8m).
Note: the 'END' readout is displayed for 3 seconds. Afterwards, the display is at 0.
- To select a different workout during the training, press the 'SET' button (8n).
General training instructions
- Wear comfortable sportswear.
- Warm up before each training session and end the training session gradually.
• Take breaks between the exercise routines and drink enough. - If you are a beginner, never train with too much intensity. Increase the intensity of the training sessions slowly.
- Perform all exercises smoothly, not jerkily or fast.
- Be sure to breathe steadily. Exhale during exertion and inhale upon release.
- Maintain correct body posture while exercising.
- Make sure that your feet are optimally placed on the tread.
Warming up
Take sufficient time before each training session to warm up. Some simple exercises to do this are shown below.
You should repeat each exercise two to three times.
Neck muscles
- Turn your head slowly to the left and to the right. Repeat this movement four to five times.
- Rotate your head slowly, first in one direction, then in the other.
Arms and shoulders
- Clasp your hands behind your back and pull them carefully upwards.
If you bend your upper body forwards at the same time, all your muscles will be maximally warmed up. - Rotate both your shoulders forwards at the same time and then change direction after one minute.
- Pull your shoulders up to your ears and let your shoulders fall again.
- Rotate your right and left arms alternately forwards and then, after one minute, backwards.
Important: don't forget to keep breathing steadily!
Leg muscles
- Stand on one leg and lift the other leg with your knee bent approx. 20cm off the floor.
- First rotate your raised foot in one direction, and then change direction after a few seconds.
- Then switch to your other leg and repeat this exercise.
- Lift your legs one at a time and take a few steps in place. Make sure you only lift your legs to a height where you are still able to maintain your balance well.
Training procedure
- Bend your knees and lean your upper body forwards until you can grasp the pull rod (Fig. Q).
Note: keep your shoulders relaxed and your head upright. - Push back with your feet and stretch your legs. Lean your upper body backwards slightly (Fig. R).
Note: never extend your legs out completely, keep your knees slightly bent.
- Only pull the pull rod towards your upper body when your legs are stretched out (Fig. S).
Note: make sure the handle is below your ribs. Keep your shoulders and hands relaxed.
-
First stretch your arms out again and then bend slightly forwards from the hips.
-
When your hands reach your knees, bend your knees and roll forwards with the seat (Fig. T).
-
Begin again with step 1.
Note: make sure that the individual steps flow into each other and form a smooth movement sequence.
Stretching
Take sufficient time to stretch after each training session. Some simple exercises to do this are shown below.
You should perform each exercise 3 times per side for 30-40 seconds.
Neck muscles
- Position yourself in a relaxed posture. Pull your head gently to one side with one hand, first to the left and then to the right. This exercise stretches the sides of your neck.
Arms and shoulders
- Stand up straight with your knees slightly bent.
- Bend your right arm behind your head until your right hand is between your shoulder blades.
- Grab your right elbow with your left hand and pull it backwards.
- Change sides and repeat the exercise.
Leg muscles
- Stand upright and lift one foot off the floor.
- Rotate it slowly, first in one direction, then in the other.
- Switch feet after a while.
Important: make sure your thighs remain parallel to each other. Push your pelvis forwards, keeping your upper body upright.
Storage, cleaning
When not in use, always store the product dry, clean, without batteries and at room temperature.
After each use
Clean the roll protector and the slide rail with water only and wipe dry afterwards with a cleaning cloth.
IMPORTANT! Never clean the product with harsh cleaning agents.
Every 50 operating hours
Lubricate the chain with a paper towel and about 1 teaspoon of mineral oil (3-in-1 oil or 20W motor oil). Remove the excess oil from the chain.
IMPORTANT! Never clean the product with harsh cleaning agents.
Disposal

In the interest of protecting the environment, do not throw your product into the household waste once you are finished with it, but rather take it to a specialty disposal facility. Find out about collection sites and their hours of operation from your local authority. Defective or used batteries must be recycled pursuant to Directive 2006/66/EC and changes to it. Return batteries and/or the product via the collecting sites provided. Packaging materials, such as plastic bags, must be kept away from children. Keep the packaging materials out of reach of children.

Environmental damage caused by improper disposal of batteries! Batteries may not be disposed of with household waste. They may contain toxic heavy metals and are subject to hazardous waste treatment. The chemical symbols of the heavy metals are as follows: Cd = cadmium, Hg = mercury, Pb = lead. Dispose of used batteries at a municipal collection site.

Dispose of the product and packaging in an environmentally friendly manner.

Note the label on the packaging materials when separating waste, as these are labelled with abbreviations (a) and numbers (b) with the following meaning: 1-7: plastics/20-22: paper and cardboard/80-98: composite materials. The product and the packaging materials can be recycled, dispose of them separately for better treatment of waste. The Triman logo only applies to France. Find out how to dispose of the used product from your municipal or city administration.
Notes on the guarantee and service handling
he product was produced with great care and under continuous quality control. DELTA-SPORT HANDELSKONTOR GmbH gives private end customers a three-year guarantee on this product from the date of purchase (guarantee period) in accordance with the following provisions. The guarantee is only valid for material and manufacturing defects. The guarantee does not cover parts subject to normal wear and tear that are thus considered wear parts (e.g. batteries) or fragile parts such as switches, rechargeable batteries, or parts made of glass.
Claims under this guarantee are excluded if the product has been used incorrectly, improperly, or contrary to the intended purpose, or if the provisions in the instructions for use were not observed, unless the end customer proves that a material or manufacturing defect exists that was not caused by one of the aforementioned circumstances.
Claims under the guarantee can only be made within the guarantee period by presenting the original sales receipt. Please therefore keep the original sales receipt. The guarantee period is not extended by any repairs carried out under the guarantee, under statutory guarantees, or as a gesture of goodwill. This also applies to replaced and repaired parts.
If you wish to make a claim please first contact the service hotline mentioned below or contact us by e-mail. If there is a guarantee case, then the product will be repaired or replaced free of charge to you or the purchase price will be refunded, depending on our choice.
Your legal rights, in particular guarantee claims against the respective seller, are not limited by this guarantee.
IAN: 399960_2104
GB Service Great Britain Tel.: 0800 404 7657 E-Mail: deltasport@lidl.co.uk
IE Service Ireland
Tel.: 1890 930 034 (0,08 EUR/Min., (peak)) (0,06 EUR/Min., (off peak))
E-Mail: deltasport@lidl.ie
Félicitations !
1 x cockpitholder (8)
2 x ben, for (9a), (9b)
1 x läseskrue (10)
1 x muffe (11)
1 x stopper, flerdelt (12a-c)
1 x afdækning (13)
1 x läsepal (14)
1 x skruesæt
8 x skrue 5 x 12 (15)
6 x skrue M8 x 20 (16)
4 x møtrik M8 (17)
6 x skrue M10 x 20 (18)
2 x skrue M10 x 25 (19)
6 x møtrik M10 (20)