FlareCON Air 2 - Controller Chauvet - Free user manual and instructions
Find the device manual for free FlareCON Air 2 Chauvet in PDF.
| Product Type | Controller / Wireless Transceiver |
| Brand | Chauvet |
| Model | FlareCON Air 2 |
| Dimensions (approx.) | 120 x 80 x 30 mm |
| Weight (approx.) | 200 g |
| Power Supply | 5 V DC (via USB) |
| Wireless Connectivity | Wi-Fi 2.4 GHz, range up to 30 m |
| Protocol | DMX512 (via wireless antenna), D-Fi compatible |
| Number of Controllable Devices | Up to 32 compatible devices |
| Main Functions | Wireless DMX control, scene programming, effects, groups, synchronization |
| App Compatibility | FlareCON (iOS and Android) |
| Maintenance and Cleaning | Clean with a soft, dry cloth; avoid liquids |
| Safety | Do not expose to water or moisture; indoor use only |
| Spare Parts and Repairability | Repair by a qualified technician; spare parts available from Chauvet |
| General Information | Make sure to use the latest firmware and app version |
Frequently Asked Questions - FlareCON Air 2 Chauvet
User questions about FlareCON Air 2 Chauvet
0 question about this device. Answer the ones you know or ask your own.
Ask a new question about this device
Download the instructions for your Controller in PDF format for free! Find your manual FlareCON Air 2 - Chauvet and take your electronic device back in hand. On this page are published all the documents necessary for the use of your device. FlareCON Air 2 by Chauvet.
USER MANUAL FlareCON Air 2 Chauvet
natural_image
Abstract graphic with red and dark blue curved shapes (no text or symbols)
natural_image
Abstract black logo design with stylized flame-like shapes and a partial letter 'P' (no text or symbols present)FlareCON
User Manual

natural_image
Abstract flame-like logo design with red, yellow, and orange colors on a gray background (no text or symbols)Table of Contents
1. Setup 1
Downloading the App.... 1
Connecting to the FlareCON Wi-Fi Network 1
FIXTURES 2
Fixtures 2
Groups 5
2. Operation 8
PROGRAM.... 8
Static Color 10
Color Picker.... 11
Color Fader 11
Color Preset 13
Add to Show 16
Choose an Effect.... 18
Paparazzi 18
Strobe.... 18
Fade 18
Flicker.... 18
Pulse 18
Pairs 18
Rainbow 18
Advanced 19
PLAYBACK 21
Blackout 21
Master Dimmer....21
Playback Shows.... 21
Playback Speed 22
Sync to Box 22
View/ Edit Show 23
Edit Show 23
Rename show 23
Adjust scene/step timing 24
Customize show 24
Add a new scene.... 25
Delete a show 25
Action Widget 26
SETTINGS 27
Device 28
Input Mode 28
Address Chart 28
Data Import / Export 29
Effects Presets 30
Wipe All Data 31
DMX Output Chart.... 32
Wifi 33
Índice
1. Configuración 35
The FlareCON User Manual includes a description and instructions for programming and using the FlareCON as of the release date of this edition.
Trademarks
Chauvet, Chauvet DJ, the Chauvet logo, and FlareCON are registered trademarks or trademarks of Chauvet & Sons, LLC (d/b/a Chauvet and Chauvet Lighting) in the United States and other countries. Other company and product names and logos referred to herein may be trademarks of their respective companies.
Copyright Notice
The works of authorship contained in this manual, including, but not limited to, all designs, texts, and images are owned by Chauvet.
© Copyright 2023 Chauvet & Sons, LLC. All rights reserved.
Electronically published by Chauvet in the United States of America.
Manual Use
Chauvet authorizes its customers to download and print this manual for professional information purposes only. Chauvet expressly prohibits the usage, copy, storage, distribution, modification, or printing of this manual or its content for any other purpose without written consent from Chauvet.
Document Printing
For best results, print this document in color, on letter size paper (8.5 x 11 in), double-sided. If using A4 paper (210 x 297 mm), configure the printer to scale the content accordingly.
Intended Audience
Any person operating this product should completely read through this manual before operating this product.
Disclaimer
Chauvet believes that the information contained in this manual is accurate in all respects. However, Chauvet assumes no responsibility and specifically disclaims any and all liability to any party for any loss, damage, or disruption caused by any errors or omissions in this document, whether such errors or omissions result from negligence, accident, or any other cause. Chauvet reserves the right to revise the content of this document without any obligation to notify any person or company of such revision; however, Chauvet has no obligation to make, and does not commit to make, any such revisions. Download the latest version from www.chauvetdj.com.
Document Revision
This FlareCON User Manual is the 3^rd edition of this document. Go to www.chauvetdj.com for the latest version.
1. Setup
Downloading the App
The FlareCON app is available from the Google Play Store or the Apple App Store. The FlareCON Air 2 wireless transceiver is not required at the time of downloading or installing the app, but it is required to control lights. For more information about downloading and installing apps onto your mobile device, see the documentation that came with your mobile device.

Before connecting to the FlareCON Wi-Fi network, ensure that the FlareCON Air 2 is in Wi-Fi mode. For further instructions on setting the FlareCON Air 2 to Wi-Fi mode, see the FlareCON Air 2 User Manual at www.chauvetdj.com
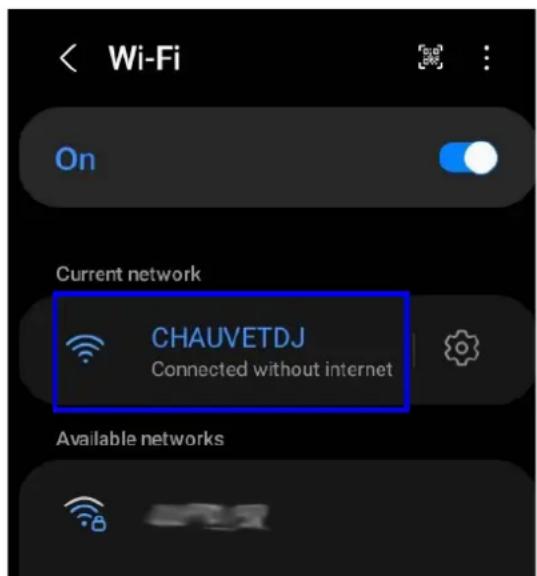
Connecting to the FlareCON Wi-Fi Network
The FlareCON Air 2 generates a Wi-Fi signal, which a mobile device running the app must connect to in order to control any lights.
- Hold
- Turn on Wi-Fi on your mobile device.
- Go to the Wi-Fi settings on your mobile device and connect to the FlareCON Air 2 default Wi-Fi (SSID).
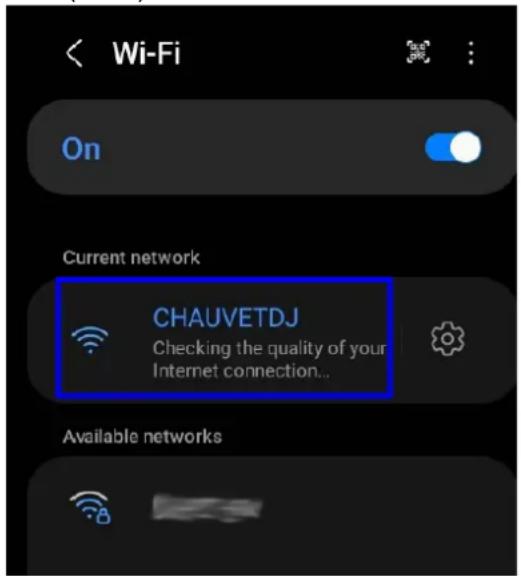
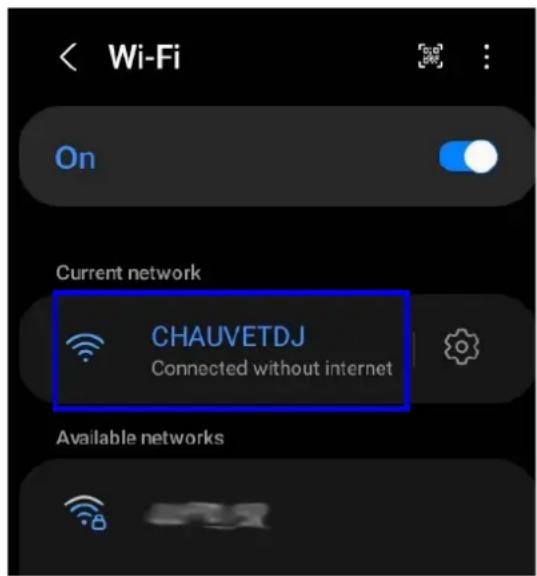
While connecting to the Internet, it will display “Checking the quality of your Internet connection...”. Once connected to the FlareCON Wi-Fi, it will display “Connected without Internet”.
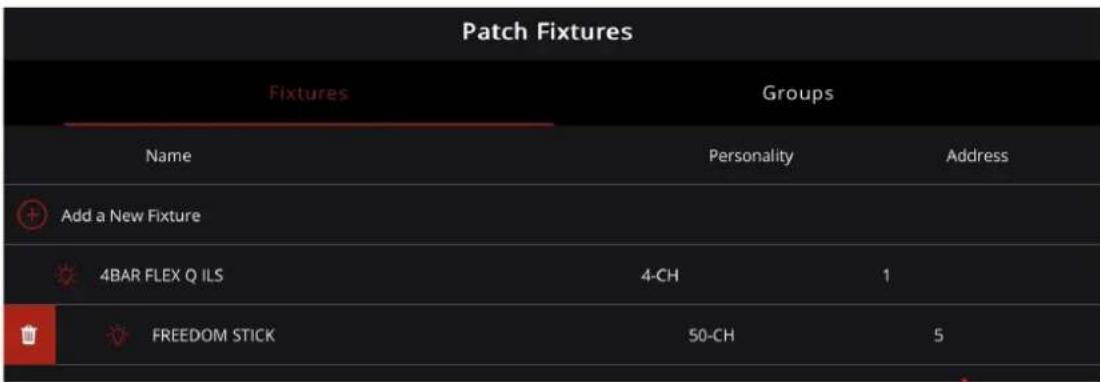
FIXTURES
The FlareCON app allows users to patch single fixtures or to add fixtures to groups.
Fixtures
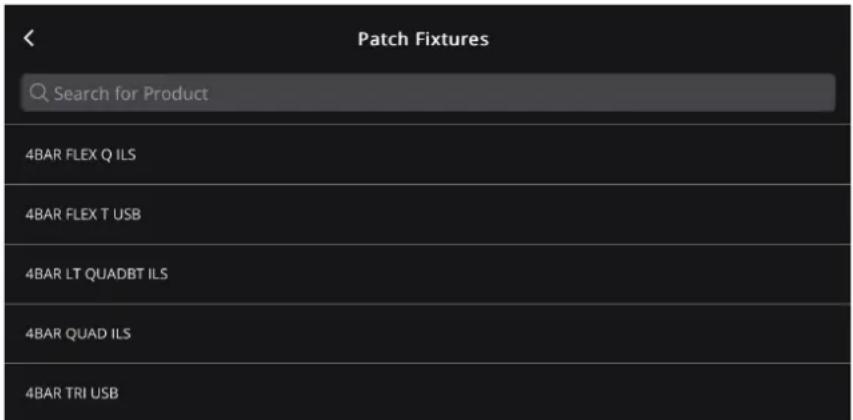
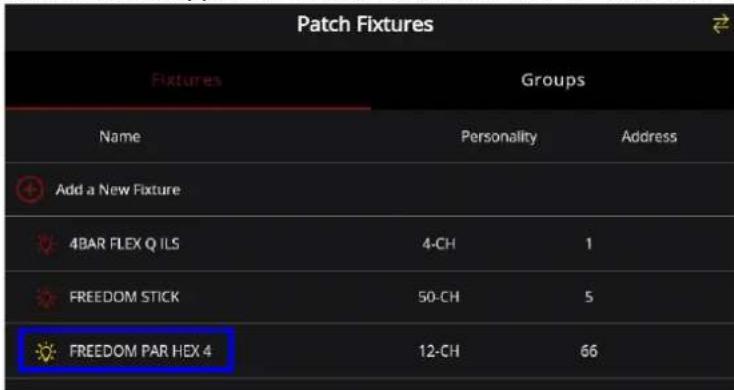
To patch a single fixture:
- Locate and tap the FIXTURES icon at the bottom of the page.
- Select the Fixtures tab at the top of the page. This will display the previously patched fixtures.
- If there are no existing fixtures saved, "No Fixture to show" will be displayed. Tap Add Fixtures to view the available fixtures that can be patched.

- If there are existing fixtures saved, tap Add a New Fixture to view the available fixtures.
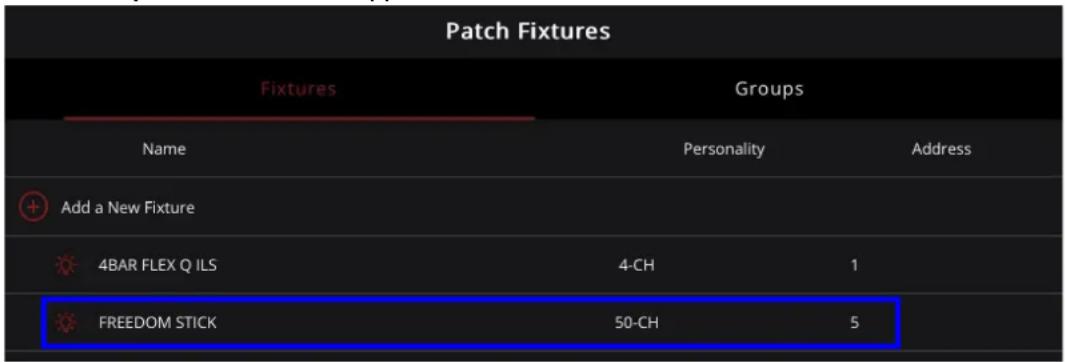
| Patch Fixtures | ||
| Fixtures | Groups | |
| Name | Personality | Address |
| Add a New Fixture | ||
| 4BAR FLEX Q ILS | 4-CH | 1 |
- Select from the list of fixtures or search for fixtures by typing the name in the search bar.
- After selecting the fixture, the Fixture Details to Add box will appear. Set the Fixture Name, Personality, Address, and Quantity before tapping Add To Fixtures. Note that the available personalities for each fixture will be automatically displayed in a drop-down box once the Personality option is chosen.

- The newly added fixture will appear on the Fixtures section.
To highlight a fixture from the list:
- Select the light bulb icon to the left of the fixture name.
- To stop highlighting the fixture, select the light bulb icon again.
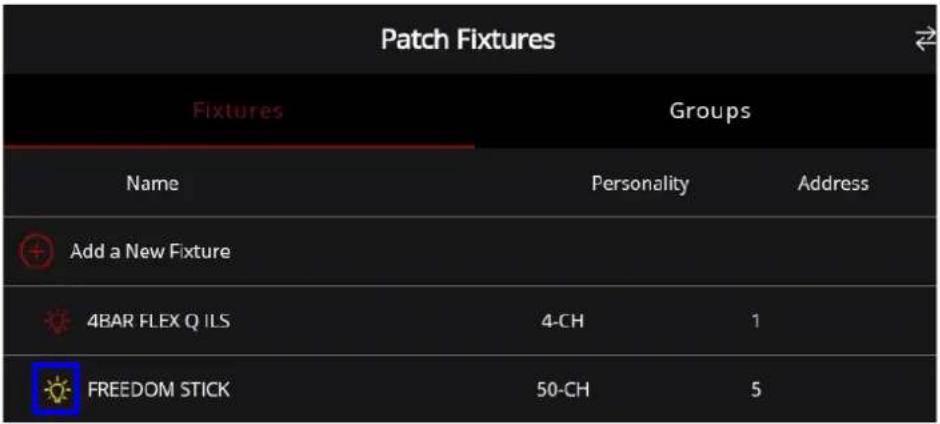

The light bulb icon functions as a locate button. Selecting the light bulb icon will illuminate the icon and the corresponding fixture simultaneously.
To delete a fixture from the list:
- Go to the Fixtures section.
- Tap and hold the name of the fixture and swipe left or right for the trash icon to appear.
- Tap the trash icon to delete the fixture from the list.
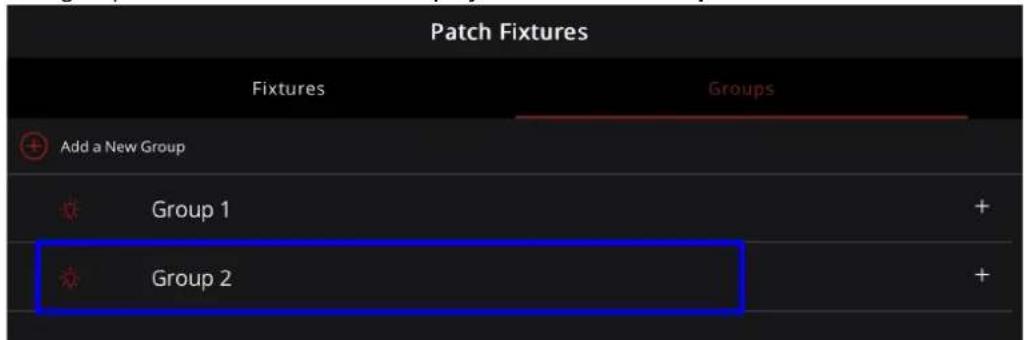
Groups
The Groups tab lists all groups and allows users to add new groups, highlight an entire group, view fixtures listed in a group, or delete a group from the list.
To add a new group:
- Locate and tap the FIXTURES icon at the bottom of the page.
- Tap the Groups tab at the top of the page. This will display the groups that have been previously created and saved.
- If there are no existing groups listed, tap Add Groups.
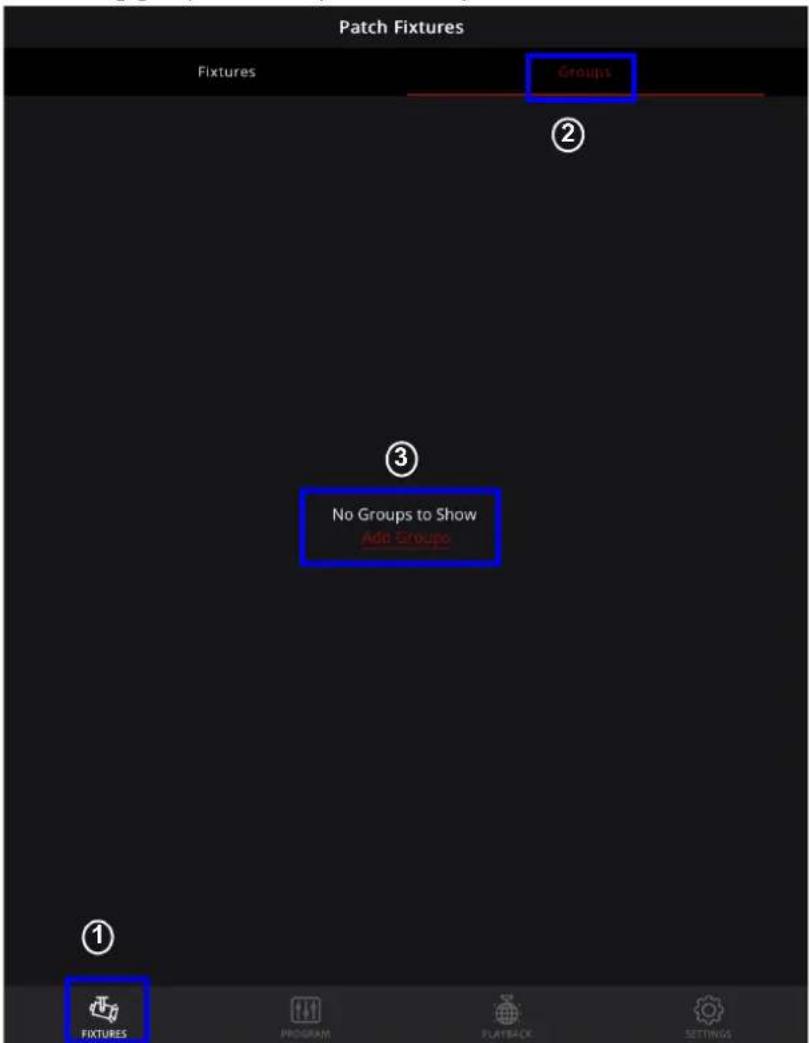
- If there are existing groups listed, tap Add a New Group, and follow instructions 5–7 below on how to create a new group.
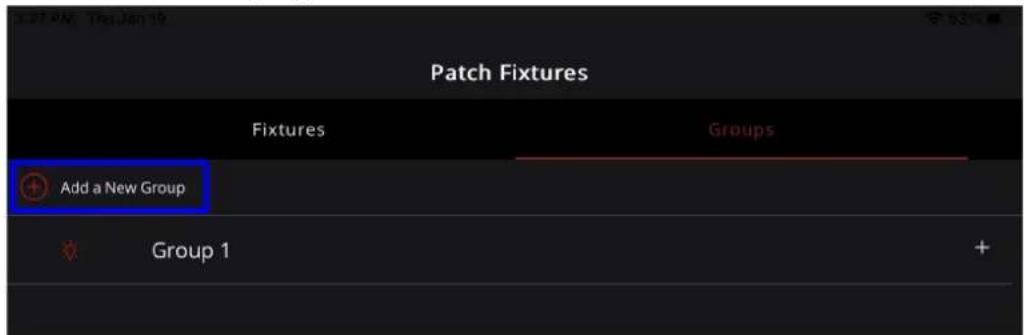
- Enter a group name in the Group Name bar.
- Select the desired fixtures from the Select Fixtures list.
- When more than one fixture have been selected, tap Save Group.
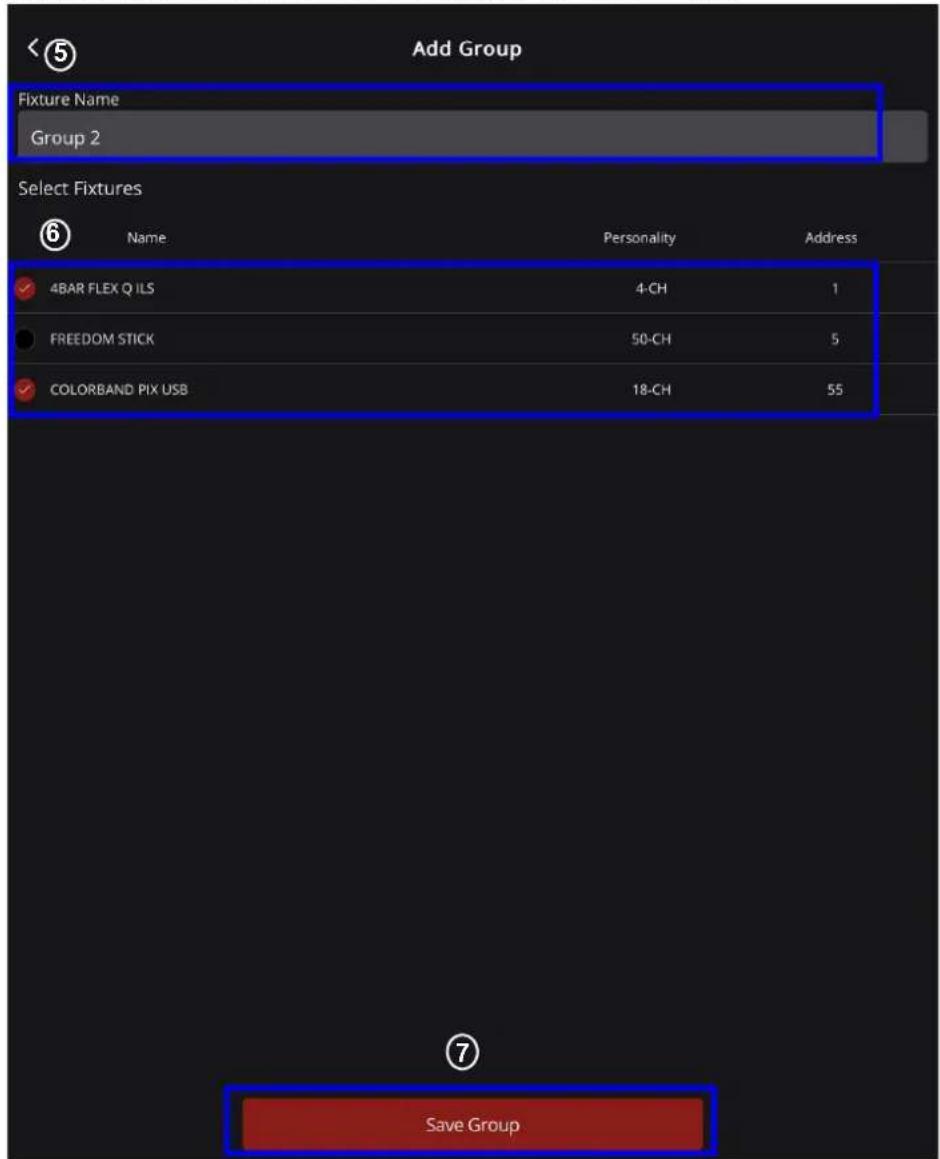
- The group will now be added and displayed under the Groups tab.
To view the fixtures saved to a group:
- Identify the desired group in the Groups section.
- Tap the <+> sign to enable the drop down list of fixtures.
- Tap the <-> sign to disable the drop down list of fixtures.
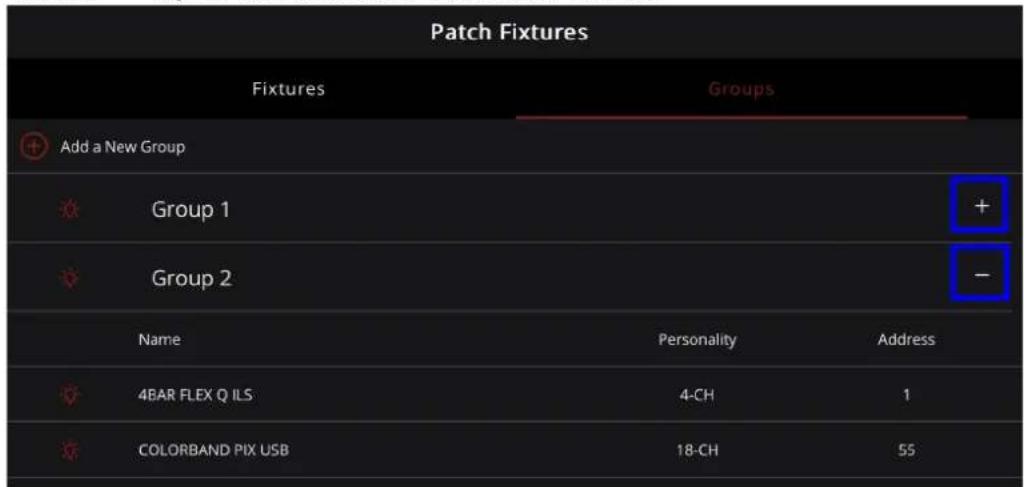
To rename a group and edit the fixtures added to it:
- Tap the group name and swipe left or right for the note icon to appear.
- Follow instructions 5–7 on how to add a group.

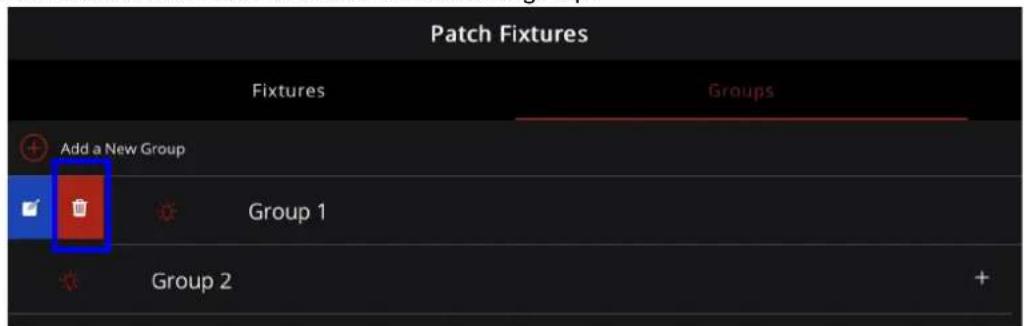
To delete a group from the list:
- Select the group name and swipe left or right for the trash bin icon to appear.
- Select the trash bin icon to delete the selected group.
2. Operation
The FlareCON app runs on Android or Apple iOS to control any CHAUVET DJ Freedom or D-Fi receiver as well as any other LED static wash light from your smartphone or tablet (additional hardware required). The Wi-Fi signal is generated from the FlareCON Air 2 hardware interface, and no other Wi-Fi signals are needed.
The FlareCON app has built-in profiles for all 4BAR, COLORband, COREpar, EVE, EZPar, Freedom, SlimBANK, and SlimPAR products. The app can create and store up to 18 scenes with 20 steps each. Each scene can be assigned a Fade Time and Hold Time, with customizable effects, and can be exported to other users across both iOS and Android platforms.
PROGRAM
To program the light output on an intended fixture:
- Tap the PROGRAM icon at the bottom of the screen.
- On the Program page, choose the fixture(s) or group(s) to be programmed by checking the black pop-up circle next to the fixture name(s). If choosing all the fixtures available, select All.
- Tap Start Programming.
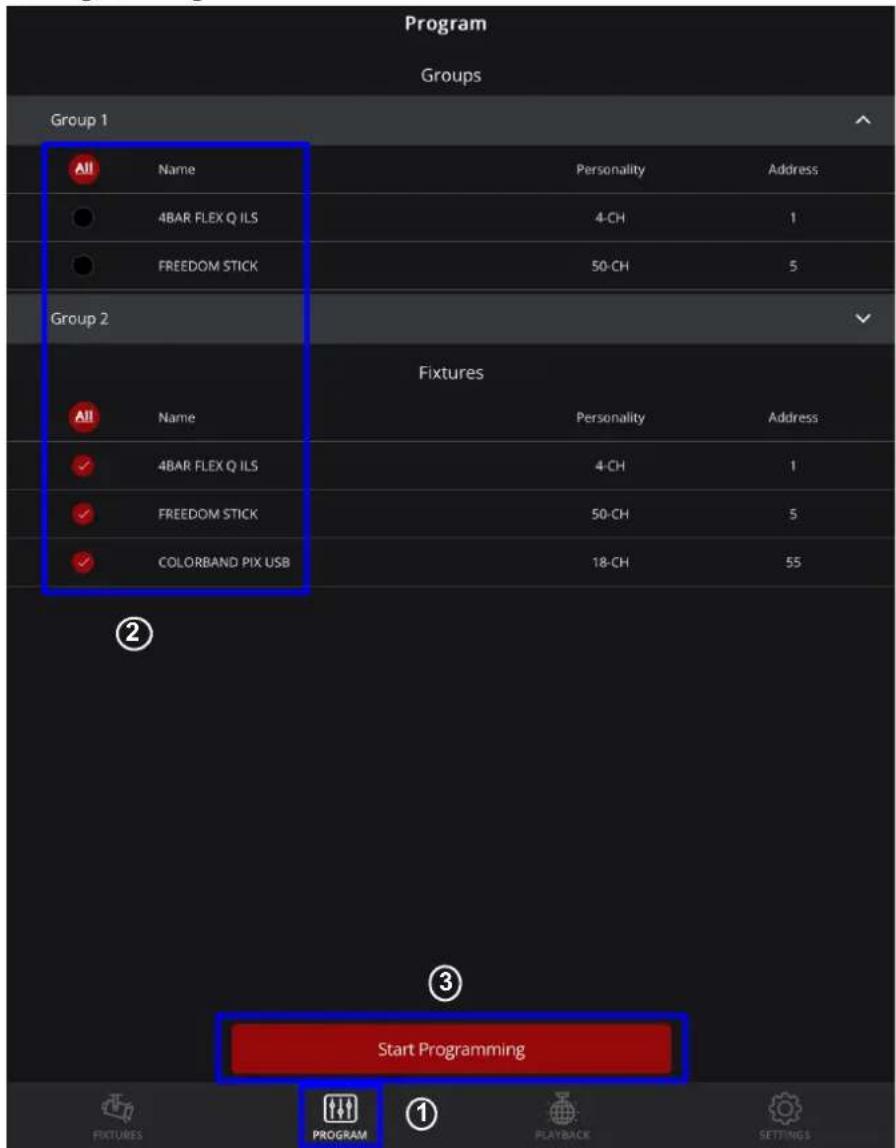

Only patched fixtures can be programmed (see FIXTURES for instructions on how to patch fixtures to the FlareCON App).
- After tapping the Start Programming button, the Multiple Fixtures page will appear. From here, it is possible to add static colors or choose an effect.
- When choosing a single fixture or multiples of the same fixture type, the product name will be displayed on the fixture page, and the advanced programming option will be enabled (see Advanced).


The fixtures have to be of the same type to enable the option for advanced programming.
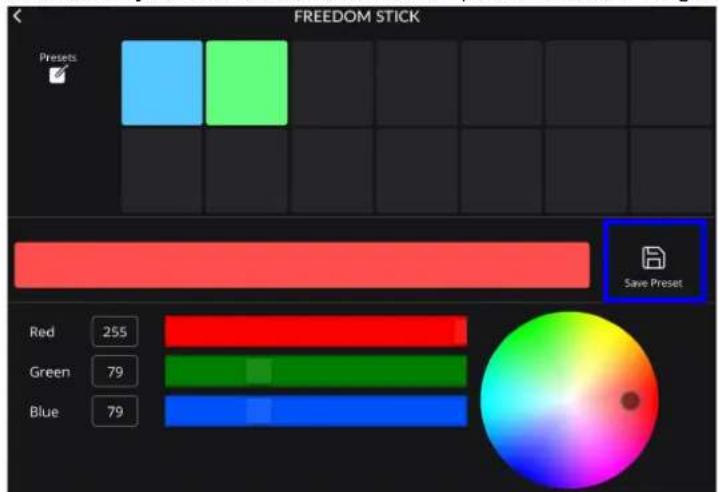
Static Color
To design static colors for a scene:
- Tap the Static Color box at the top of the page.

- A pop-up box will appear with color presets, a color fader, and a color picker. These are 3 methods of designing the color output.
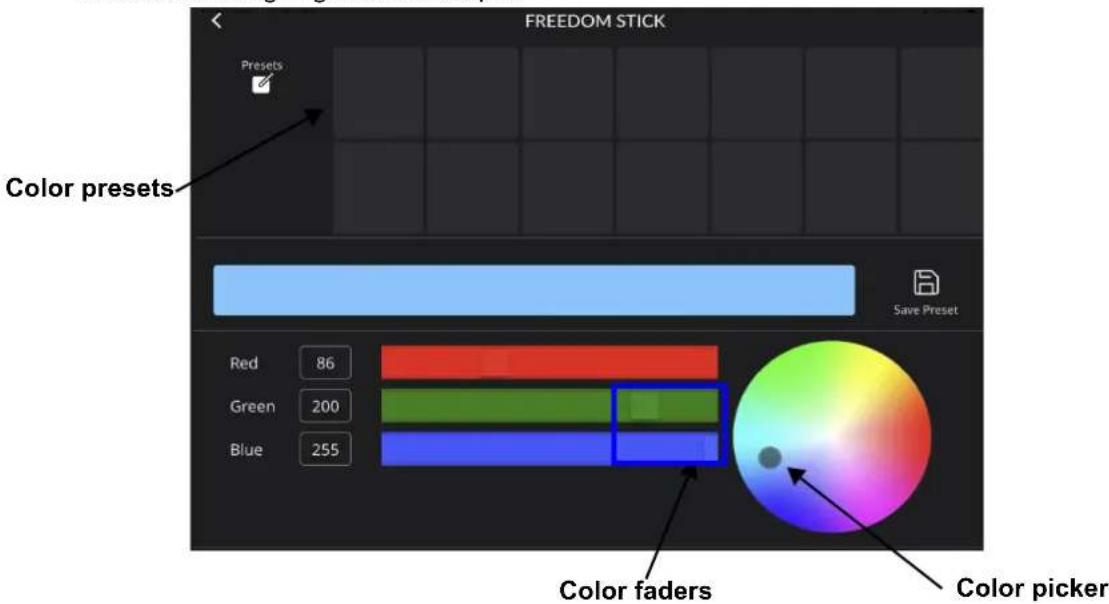
- When using the color presets, color fader, or color picker to design a color, a preview of the design will display in a color box in the middle of the screen.

Color Picker
The color picker provides a 360^ color spectrum for selecting and refining the color output.

natural_image
Circular gradient color wheel with a central dot, set against a black background (no text or symbols)To use the color picker:
- Tap and hold any area of the color picker.
- Swipe in any direction to adjust the colors on the color picker.
- Save to color preset if desired (see Color Preset).
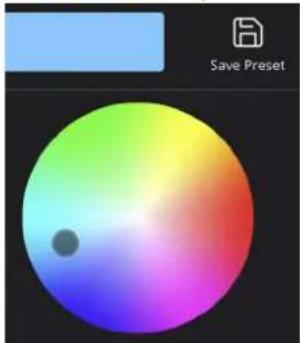
natural_image
Color gradient circle with a small dot, labeled 'Save Preset' in the corner (no other text or symbols)Color Fader
The color fader provides faders for each available color and a fader value box for displaying specific color values.
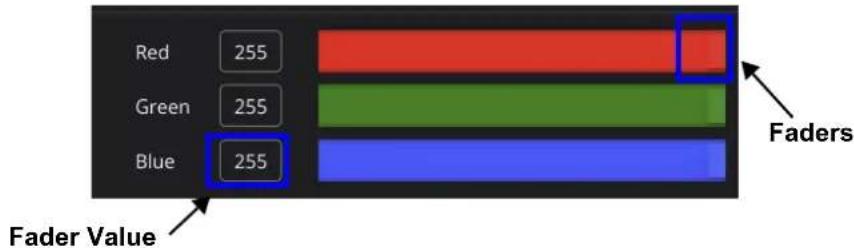
bar
| Color | Value | |---|---| | Red | 255 | | Green | 255 | | Blue | 255 | Faders label indicates 'Faders Value' at the bottom left of the bar.To customize colors using the color faders:
- Tap and hold one of the faders in a color bar. The available colors will depend on the fixture in use.
- Drag the fader to the left or right to increase or decrease the value of the chosen color.
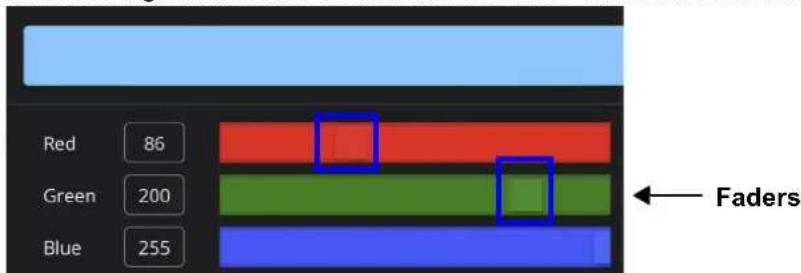
- The value of the color will appear in the fader value box.

- When the faders are moved, the numbers in the fader value box will change, and the color picker will move to correspond to the newly selected value.
- The available colors next to the fader value boxes will vary depending on the patched fixture or the fixture being programmed.
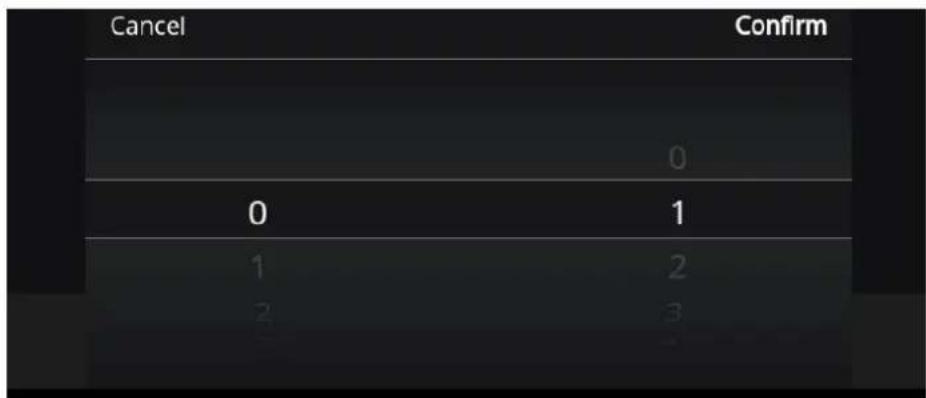
To customize colors using the fader value boxes:
- Tap any of the fader value boxes. The numerical wheel will appear at the bottom of the screen.
- Choose the desired value using the numerical wheel. The value should be between 0 and 255. TapConfirm.

- Adjust another color by selecting the fader value box next to it and repeating steps 1 and 2 above.
- Once all desired values have been entered, tap Confirm or select anywhere outside of the numerical wheel to return to the Fixture page.
Color Preset
The preset mode provides a selection of previously designed colors that the user has saved. There are a total of 14 customizable presets. The default setting does not include any saved presets.
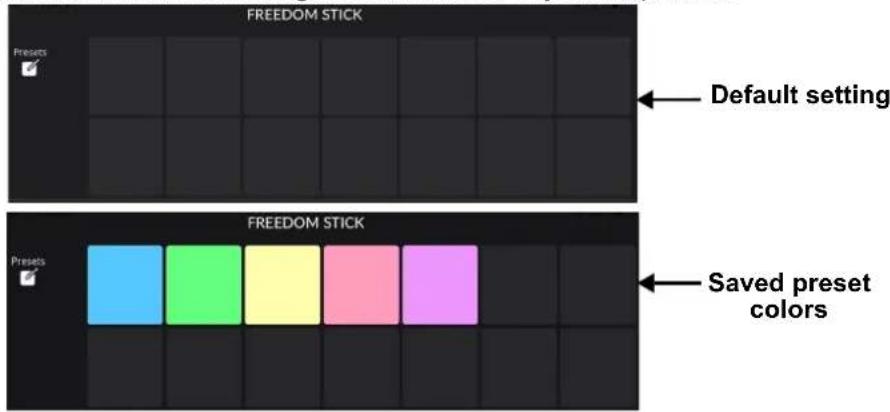
To design a custom preset:
- Tap the desired custom preset box.
- Design a color using the color picker or the color fader (see Add to Show and Color Fader).
- Once the desired color appears in the color box, select the Save Preset icon to the right of the color box.
- Tap another custom preset box to program it. If another custom preset box is not selected, the function will automatically default to the next custom preset box to the right.
To design a custom preset using white, amber, or UV:
- Ensure that the FlareCON app is connected to a fixture with white, amber, and UV options.
-
Navigate to the Static Color menu.
-
In the Static Color menu, 3 additional sliders will appear for white, amber, and UV options.
-
Adjust the colors for white, amber, and/or UV by adjusting the faders or the values in the fader value box (see Color Fader).
-
Once the desired values are set, save the color presets (see Color Preset).

The color picker ONLY customizes red, green, and blue in hex fixtures and not white, amber, or UV colors.
To delete a custom preset:
- Tap and hold the desired custom preset box for 3 seconds. A pop-up box will present the option to delete the preset.
- Select Confirm to delete or Cancel to keep the custom preset.
Add to Show
The FlareCON allows users to create a new show or add to a saved show with multiple steps and scenes by pressing Add to Show after customizing the preset colors and effects.
To create a new show:
- Select a color or colors on the Fixture page (see Static Color for further instructions).
- Tap Add to Show at the bottom of the page.
- In the Fixture page, type the name of the show into the Name of Show bar.
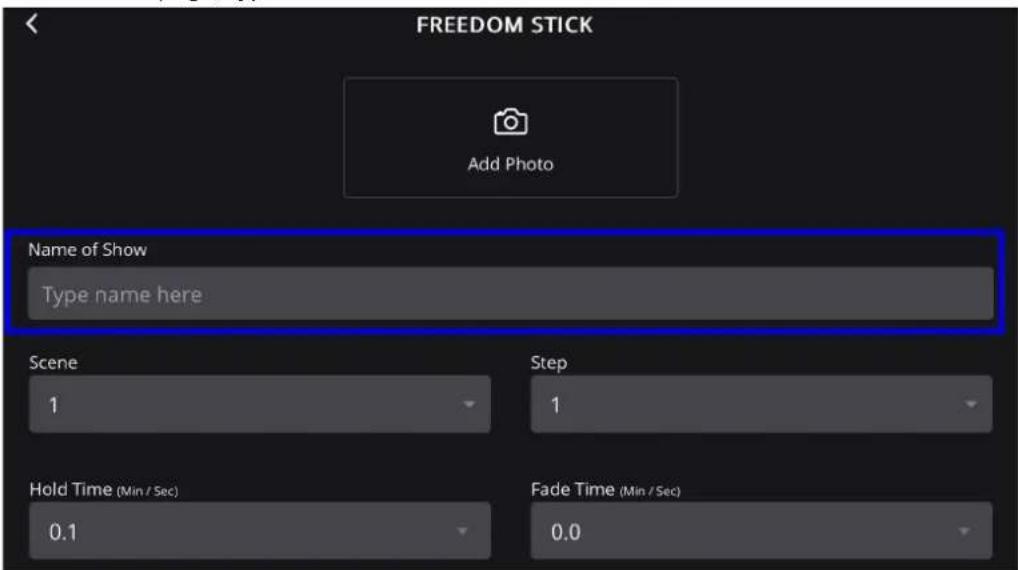
- Select the arrow in the Scene box or Step box to trigger the drop-down menu.

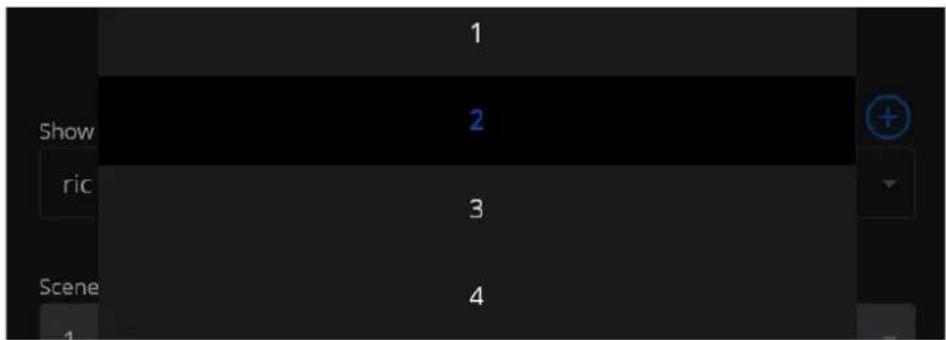

Step is a single effect. Scene is a combination of multiple steps.
- Select the arrow in the Hold Time box or Fade Time box to trigger the drop-down menu and choose the number of minutes and seconds for each function.


Hold time is the amount of time a scene is held. Fade time is how long it takes for the scene to fade in and out. Both are measured in minutes and seconds.
- Once completed, press Add to saved show. The saved show will then become viewable under the PLAYBACK tab.

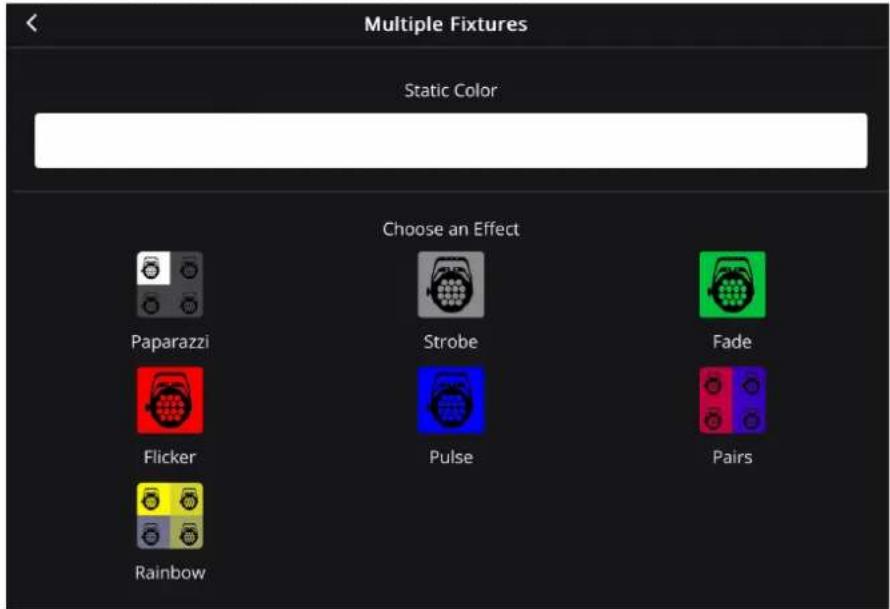
Choose an Effect
The FlareCON allows users to add customizable preset effects to a show.
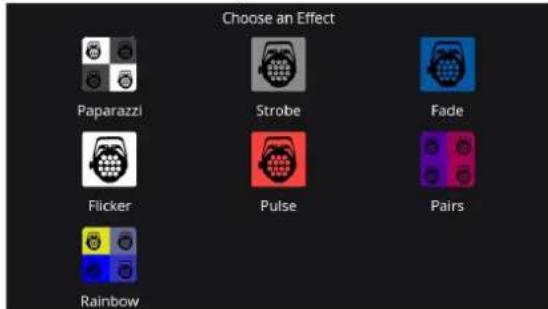
Paparazzi
This effect enables a flickering/flashing function across all selected fixtures at different rates on each fixture. To add the Paparazzi effect:
- Select Paparazzi.
- Select the desired color by selecting the color box.
- Select Add to Show.
Strobe
This effect enables all fixtures to strobe at once. To add the Strobe effect:
- Select Strobe.
- Select the color by selecting the color box.
- Set the speed of the strobe by dragging the slider left or right.
- Select Add to Show.
Fade
This effect enables fading transition between colors. To add the Fade effect:
- Select Fade.
- Choose the colors by selecting the color boxes.
- Change the fade time and hold time by dragging the slider left or right.
- Select Add to Show.
Flicker
This effect alternates between base color and the color of the strobe. To add the Flicker effect:
- Select Flicker.
- Choose the flicker/background color by selecting the color box.
- Set the flicker speed by dragging the slider left or right.
- Select Add to Show.
Pulse
This effect makes the light fade to black first, then transitions to the next selected color. To add the Pulse effect:
- Select Pulse.
- Choose the colors by selecting the color boxes.
- Change the fade time and hold time by dragging the slider left or right.
- Select Add to Show.
Pairs
Every other fixture would be color 1 and the others will be color 2, and it transitions between the two colors. To add the Pairs effect:
- Select Pairs.
- Choose the colors by selecting the color boxes.
- Change the fade time and hold time by dragging the slider left or right.
- Select Add to Show.
Rainbow
This effect applies a rainbow effect to all fixtures. One color per fixture. To add the Rainbow effect:
- Select Rainbow.
- Choose the colors by selecting the color boxes.
- Change the fade time and hold time by dragging the slider left or right.
- Select Add to Show.

To change the names of any of the effects, select the effect and type in a new name in the Name of Effect page.
Advanced
The FlareCON allows users to adjust advanced programming such as the dimmer, auto programs, and color temperature.
To adjust advanced programming:
- Press Advanced.
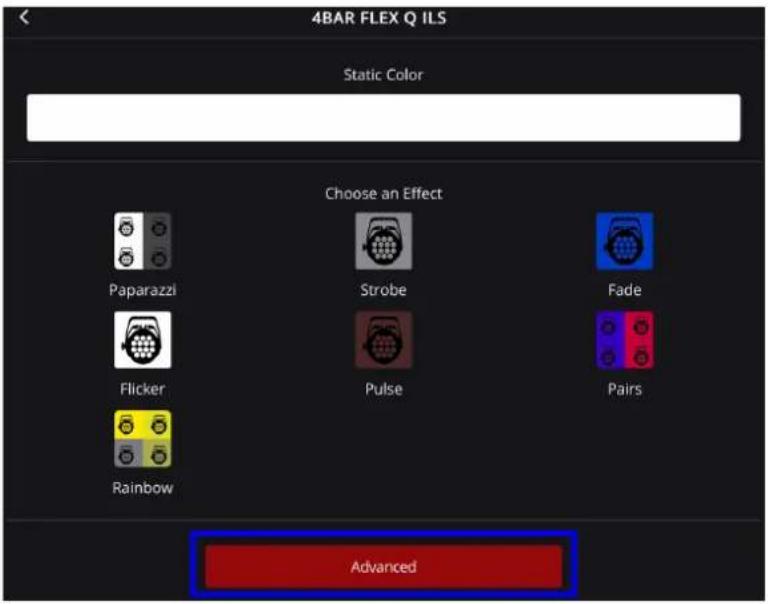
- On the next page:
a. Drag sliders left or right to adjust Master Dimmer, Strobe, Auto Speed, etc.
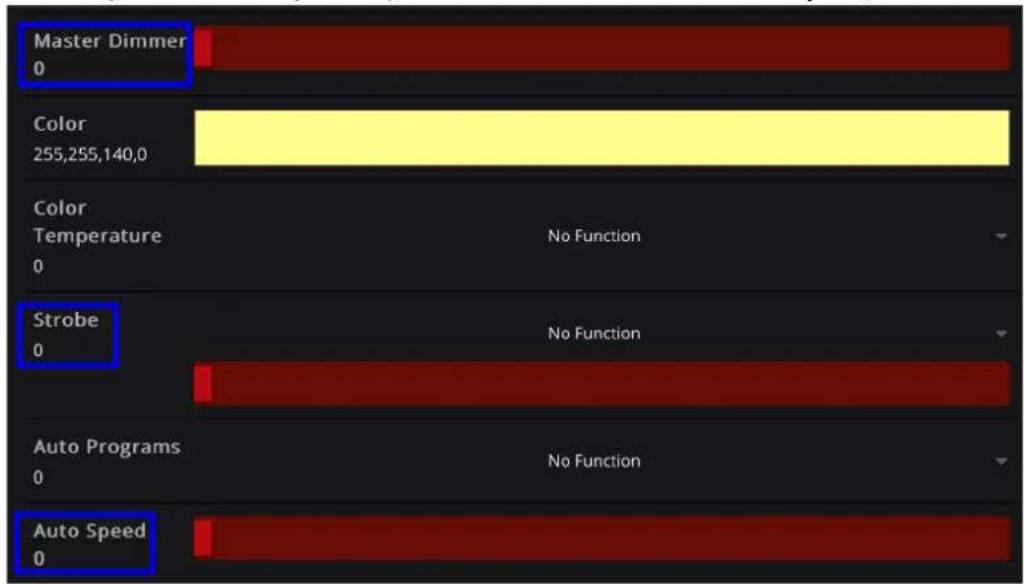

The available programming options will vary depending on the fixtures that are being programmed.
b. Select the Color box to open color options (see Static Color).

c. Adjust the Color Temp, Auto Programs, and/or Dimmer Mode by selecting the arrow on the right to trigger the drop-down menu with preset options for each function.

d. Select Add to Show to save the new settings.

PLAYBACK
The PLAYBACK section lists all of the programmed scenes. Users can apply the blackout function, adjust the master dimmer, play programmed scenes, adjust playback speed, sync to box, view/edit scenes by step, add scenes/steps, and delete shows.
Blackout
The Blackout function sets the master dimmer to 0. To enable/disable the Blackout function:
- Tap Blackout to enable the blackout function.
- Tap Blackout again to disable blackout function.


This function only takes effect after the current scene's step has completed playback.
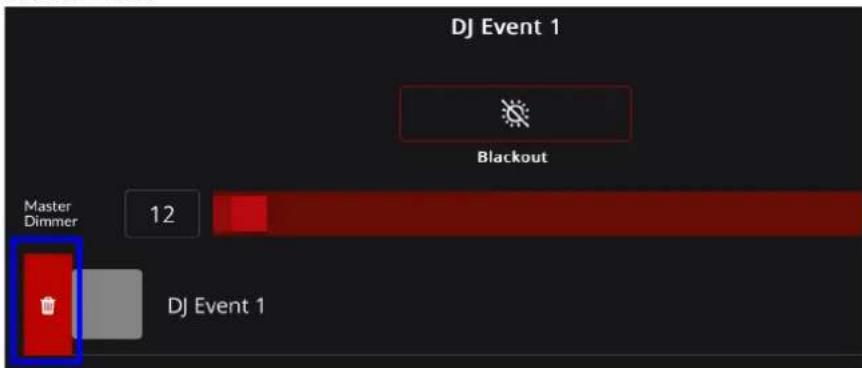
Master Dimmer
The Master Dimmer function controls the minimum and maximum value that all shows can reach. To manually adjust the master dimmer:
- Move the fader left or right to increase or decrease the value.

Playback Shows
The Playback function allows users to play saved or programmed shows. To use this function:
- Select the desired show from the list.
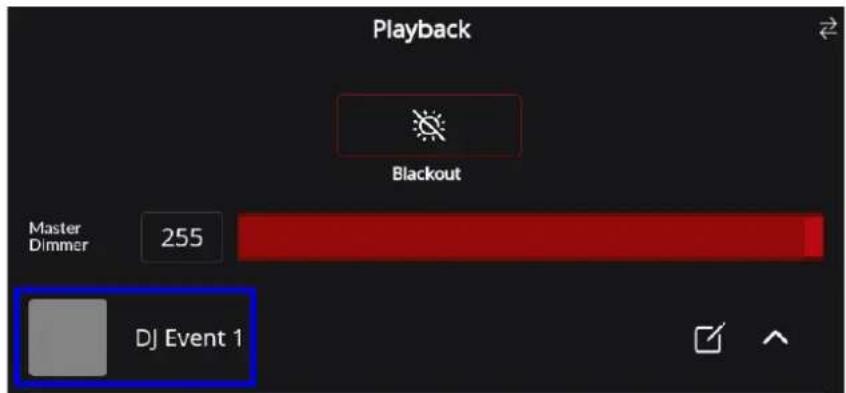
- Once selected, the show name will turn red. The fixture may take several seconds to begin playing the show.
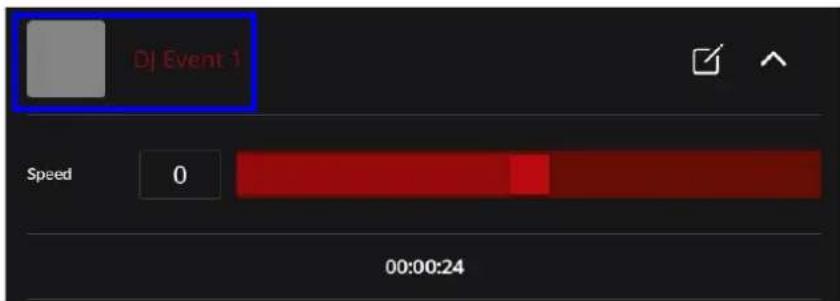
Playback Speed
The Playback Speed functions enable users to adjust speed in which the saved scenes or steps are played. To use these functions:
- Select the arrow next to the show name to trigger the drop-down menu.
- Drag the slider left or right to increase or decrease the show's playback speed.
- Use the BPM (Beats Per Minute) box to manually adjust playback speed. Tap any part of the Tap Sync box, or select the dial to increase or decrease playback speed.
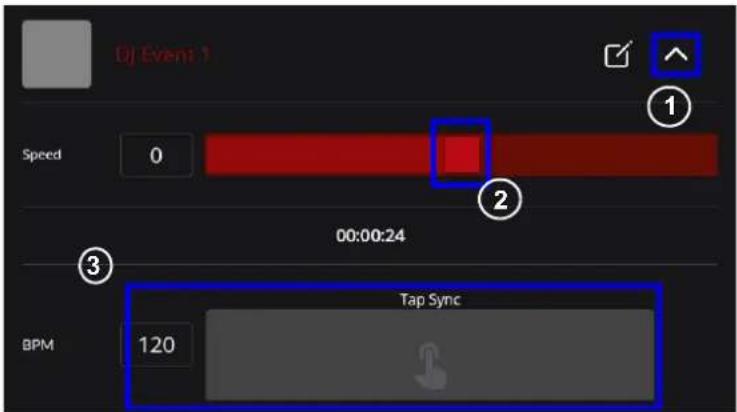

Certain effects (e.g., Pulse and Fade) will trigger the BPM function.
Sync to Box
Even though a scene/step has already been programmed, it may not immediately sync to the FlareCON Air 2. When this occurs, users can choose to sync to the FlareCON Air 2 manually.
To sync to box:
- Locate and tap the sync icon.
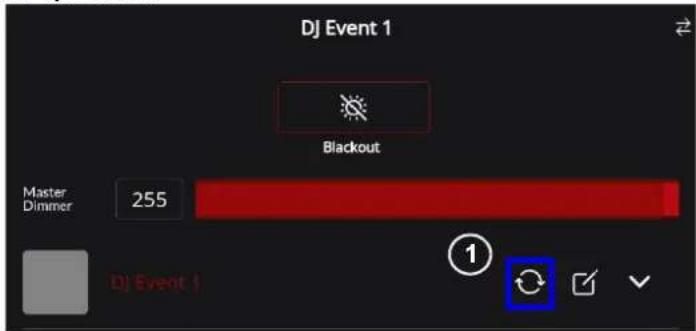
- The loading icon may appear.
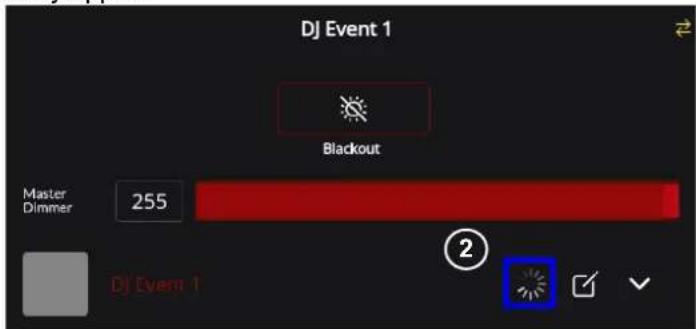
- Once the loading icon has disappeared, the new programming has been synced to box and the show is up to date.

A show should sync to the FlareCON Air 2 upon first playback.
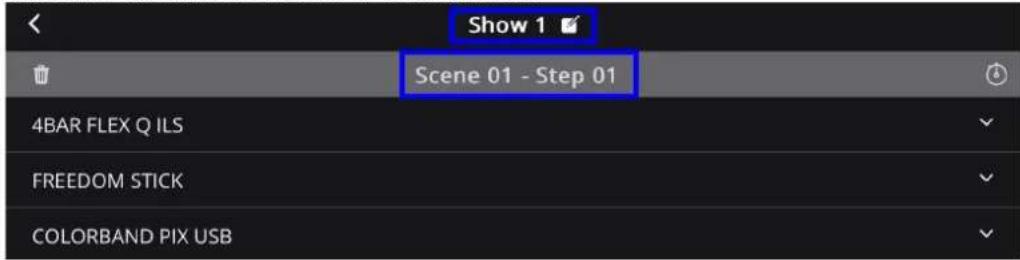
View/ Edit Show
It is possible to edit various settings in the Edit Show page. Users can rename shows, adjust scene/step timing, customize shows, add more scenes and steps to a show, and delete steps.
Edit Show
To open the Edit Show page:
- Select the view/edit icon next to the show name on the Playback page.
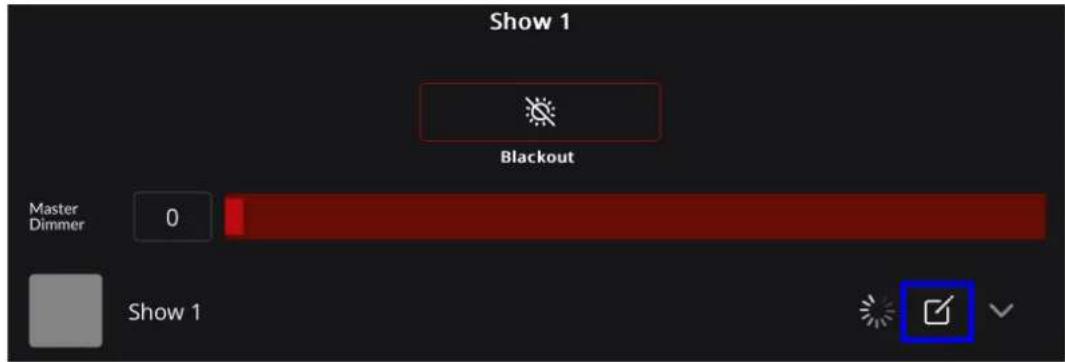
- The page will change to display the name of the show and a list of scenes and steps as well as the fixtures that have been saved for that show.
Rename show
To rename a show:
- Select the edit icon next to the show name at the top of the page.
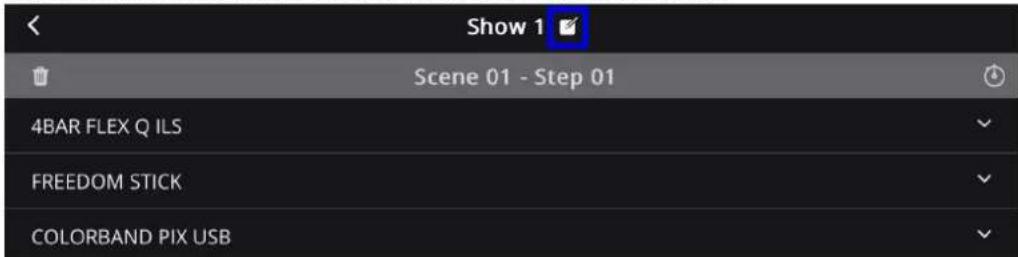
- Change the name of the show on the pop-up page.
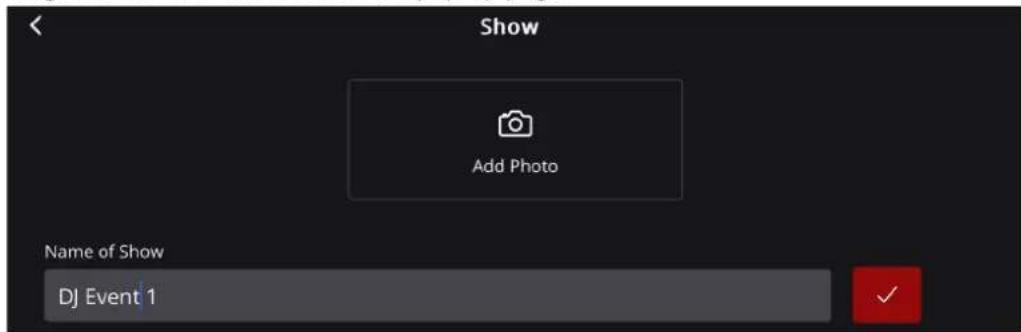

It is also possible to add or edit the photo for a show (see instruction #7 of Add to Show).
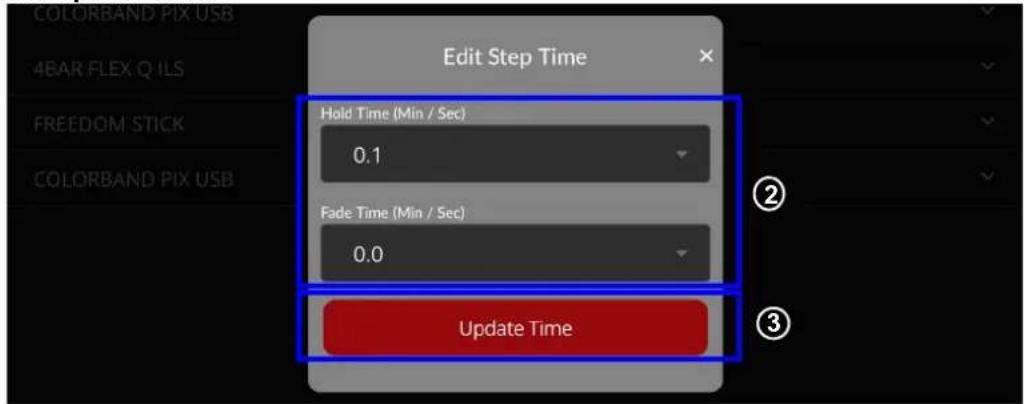
Adjust scene/step timing
- Select the clock icon next to a scene/step to open the Edit Step Time box.
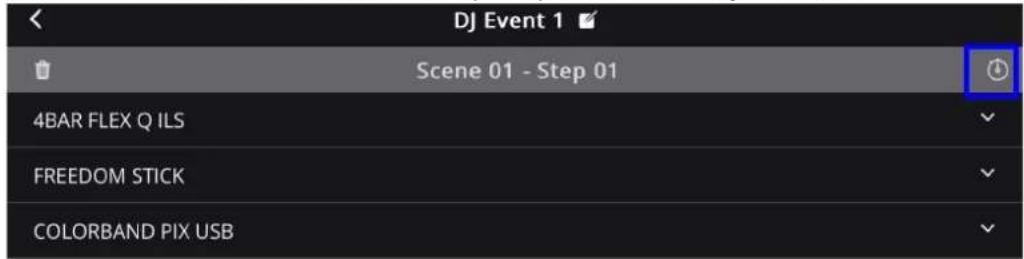
- Select the desired Hold Time and Fade Time from the drop-down menu in the Edit Step Time box.
- Press Update Time.
Customize show
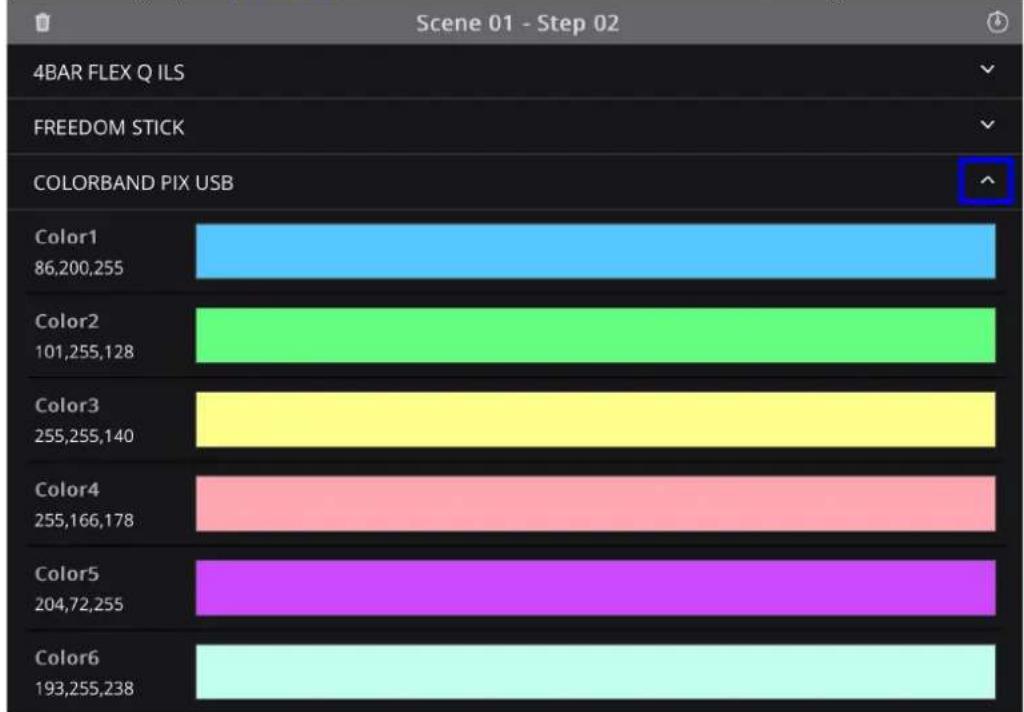
Select the arrow to the right of the fixture name to trigger the drop-down menu. This menu allows users to edit advanced settings (see Advanced for further information on advanced settings and how to edit them).
bar
Scene 01 - Step 02 | Image | Value | |---|---| | Color1 | 86,200,255 | | Color2 | 101,255,128 | | Color3 | 255,255,140 | | Color4 | 255,166,178 | | Color5 | 204,72,255 | | Color6 | 193,255,238 |Add a new scene
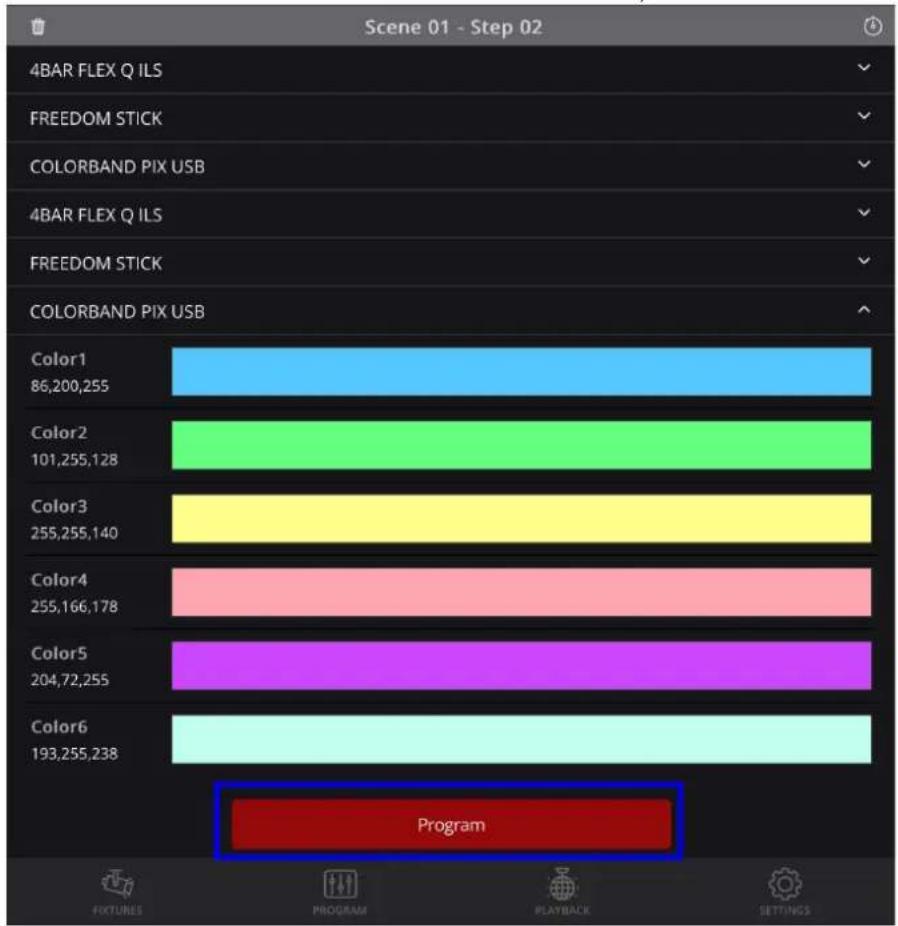
Add a new scene or step to the existing show by pressing Program on the customize show page (see PROGRAM for further instructions on how to create and save a show).
bar
| Color | Value | | :--- | :--- | | Color1 | 86,200,255 | | Color2 | 101,255,128 | | Color3 | 255,255,140 | | Color4 | 255,166,178 | | Color5 | 204,72,255 | | Color6 | 193,255,238 | ProgramDelete a show
- Select the desired show and swipe either left or right until the red trashcan icon appears.
- Tap the trashcan icon.

If there are no saved shows, the Playback page will appear blank. Before attempting to play or edit a show, ensure that the show is saved (see the PROGRAM section to learn more about creating and saving a show).
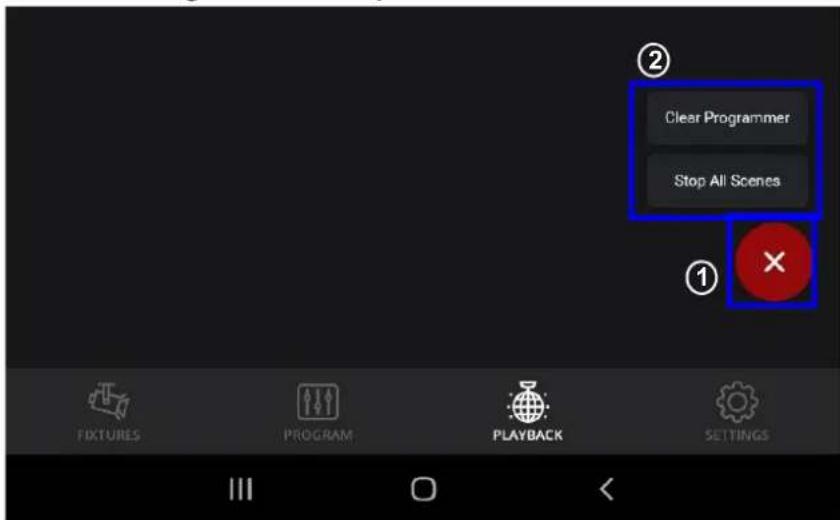
Action Widget
The red action widget is a movable button that appears throughout the FlareCON App. It allows users to clear programming or stop all scenes.

The action widget appears on the FlareCON app in both Android and Apple devices when the device is connected to a fixture.
To move the action widget:
- Tap and hold the action widget.
- Drag the action widget to the desired area of the screen.
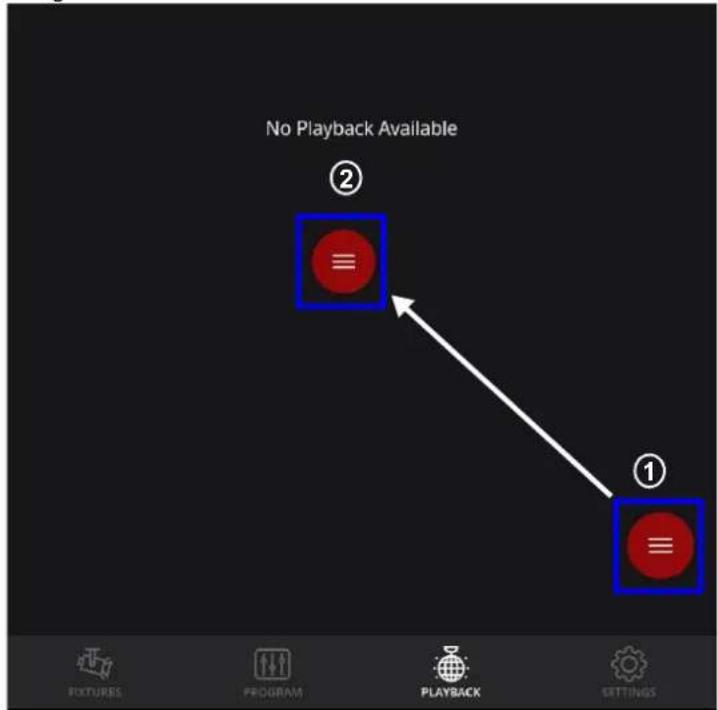
To use the action Widget:
- Tap the action widget to trigger a pop-up menu.
- Select either Clear Programmer or Stop all Scenes.

The action widget appears in all tabs Except the Settings tab.
SETTINGS
The FlareCON allows users to monitor and adjust several settings in the app, including input mode, address chart, and effects preset. It also allows users to import, export, and wipe all data.

Device
Input Mode
This sets the mode in which the FlareCON Air 2 connects to the fixture.
• Wifi works with the FlareCON App.
- DMX allows users to use the FlareCON Air as a wireless transmitter with any console that outputs DMX.
To set up the input mode:
-
Select the arrow to trigger the drop-down menu.
-
Select either Wifi or DMX to adjust the input.
-
Select the arrow to trigger the drop-down menu.
- Select either Wifi or DMX to adjust the input.
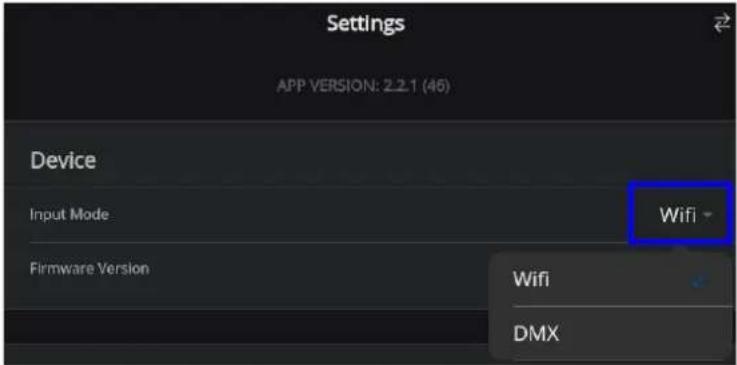

The input mode must be set to Wifi to use the FlareCON app.
Address Chart
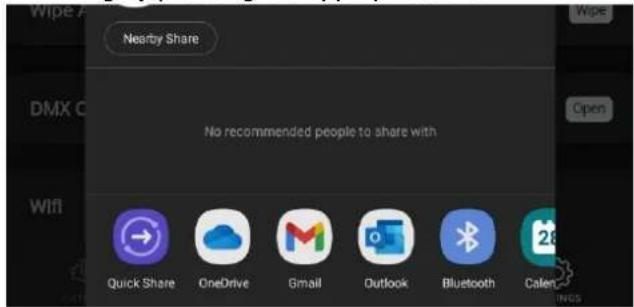
This option allows users to export printable files with fixture list and their respective personalities/DMX start address. To export printable files:
- Press Export.

- Select the method of sharing by pressing the appropriate icon.
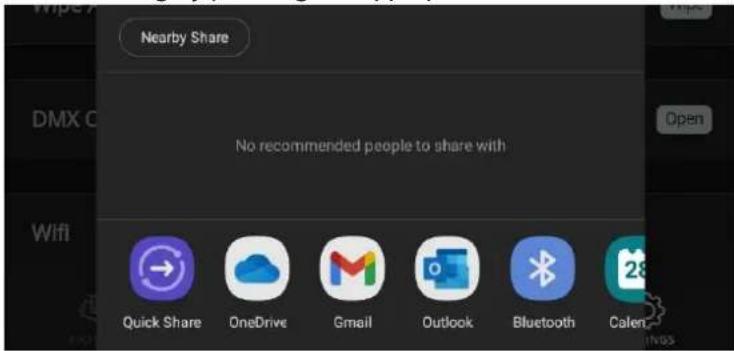
Data Import / Export
This option allows users to import or export entire FlareCON shows, scenes, and steps.
To export data:
- Press Export.
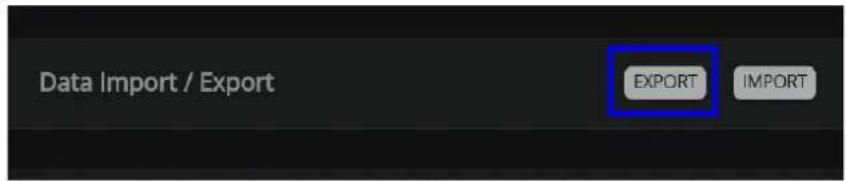
- Select the method of sharing by pressing the appropriate icon.
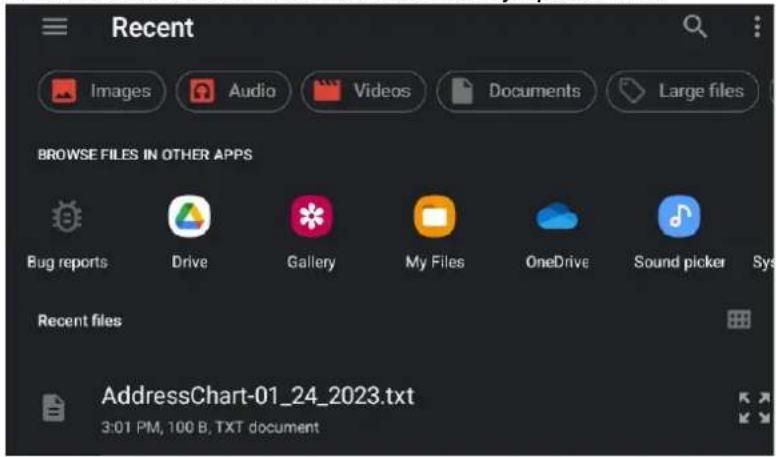
To import data:
- Press Import.
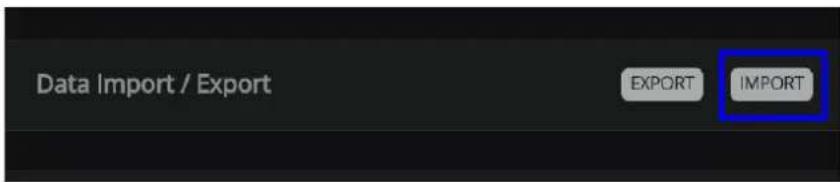
- Choose the file location or choose from the most recently opened files.
Effects Presets
This option displays defaults for different program effects. It allows users to adjust the Color, Strobe, Fade Time, Hold Time, and/or speed of various effects. To change/customize the preset defaults:
- Select the Presets button to open the Effects Editor page.

- On the Effects Editor page, select an effect to customize its settings.
- To adjust the Strobe, Speed, Fade time, or Hold Time on an effect, use the bar and faders to adjust the value from 0 to 255.
- To adjust the color on an effect, select the color to open the Edit Effect box (see Advanced for further instruction on how to use the Color Preset, Color Palette, or Color Mixer in the Edit Effect box).
- Select Save.

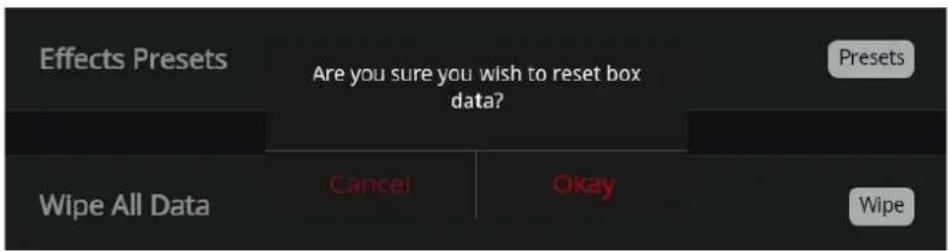
Wipe All Data
This option allows users to wipe all data, wipe all data except patched fixture, or to reset the FlareCON Air 2.
• Wipe all Data wipes all data except the data in the FlareCON Air 2.
- Wipe All Except Patched Fixture wipes all data except the programming in the patched fixture and in the FlareCON Air 2.
- Reset Box resets saved data that may have been stored in the FlareCON Air 2 even after users chose to wipe all data or to wipe all except patched fixture.
To enable any of the three options:
- Press Wipe to trigger a pop up box.

- Select Wipe all Data, Wipe All Except Patched Fixture, or Reset Box from the pop up box.
- One of three pop-up boxes will appear. Select Okay to wipe/reset or Cancel to return to the Settings page.


DMX Output Chart
This option displays a snapshot of the current channel in use.
To view the DMX Output Chart, select Open.

The DMX Output Chart will pop up:
heatmap
DMX Output Chart | | 1 | 2 | 3 | 4 | 5 | 6 | 7 | 8 | |---|---|---|---|---|---|---|---|---| | Row 1 | 1 | 0 | 0 | 0 | 0 | 0 | 0 | 0 | | Row 2 | 0 | 0 | 0 | 0 | 0 | 0 | 0 | 0 | | Row 3 | 9 | 10 | 11 | 12 | 13 | 14 | 15 | 16 | | Row 4 | 0 | 0 | 0 | 0 | 0 | 0 | 0 | 0 | | Row 5 | 17 | 18 | 19 | 20 | 21 | 22 | 23 | 24 | | Row 6 | 0 | 0 | 0 | 0 | 0 | 0 | 0 | 0 | | Row 7 | 25 | 26 | 27 | 28 | 29 | 30 | 31 | 32 | The image contains a grid of numerical values (e.g., '1', '2', etc.) and is not explicitly labeled in the image.Wifi
To edit the SSID and Password:
- Tap the blank space next to SSID and type the desired SSID name using the pop-up keypad.
- Tap the blank space next to Password and type the desired password using the pop-up keypad.
- Tap
on the keypad. A notification saying the SSID and password have been reset will be displayed.

Although both the SSID and Password can be edited, it is not recommended to do so.
Notas de edición

Mientras se conecta a Internet, se mostrará “Checking the quality of your Internet connection...” (Comprobando la calidad de su conexión a Internet...). Una vez conectado a la Wi-Fi de FlareCON, se mostrará “Connected without Internet” (Conectado sin Internet).
DISPOSITIVOS
| Patch Fixtures | ||
| Fixtures | Groups | |
| Name | Personality | Address |
| Add a New Fixture | ||
| 4BAR FLEX Q ILS | 4-CH | 1 |
| Patch Fixtures | ||
| Fixtures | Groups | |
| Name | Personality | Address |
| Add a New Fixture | ||
| 4BAR FLEX Q ILS | 4-CH | 1 |
| FREEDOM STICK | 50-CH | 5 |

Grupos
2. Operación

natural_image
Circular gradient color wheel with a dark center dot, transitioning from green to blue (no text or symbols)natural_image
Color gradient circle with a small dark dot, no text or symbols presentRegulador de color

REPRODUCCIÓN

bar
Scene 01 - Step 02 | Color | Value | |---|---| | Color1 | 86,200,255 | | Color2 | 101,255,128 | | Color3 | 255,255,140 | | Color4 | 255,166,178 | | Color5 | 204,72,255 | | Color6 | 193,255,238 |bar
Scene 01 - Step 02 | Item | Value | |---|---| | 4BAR FLEX Q ILS | ✓ | | FREEDOM STICK | ✓ | | COLORBAND PIX USB | ✓ | | 4BAR FLEX Q ILS | ✓ | | FREEDOM STICK | ✓ | | COLORBAND PIX USB | ✓ | | Color | Value | | :--- | :--- | | Color1 | 86,200,255 | | Color2 | 101,255,128 | | Color3 | 255,255,140 | | Color4 | 255,166,178 | | Color5 | 204,72,255 | | Color6 | 193,255,238 | Program FIXTURES | PROGRAM | PLAYBACK | SETTINGS
- Pulse Export (Exportar).

- Pulse Export (Exportar).
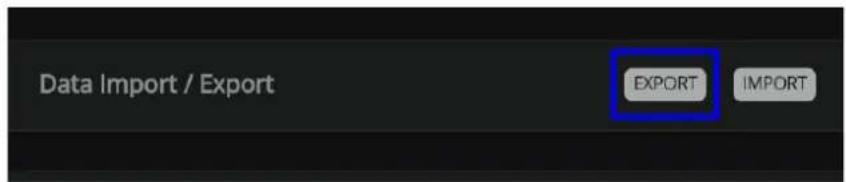

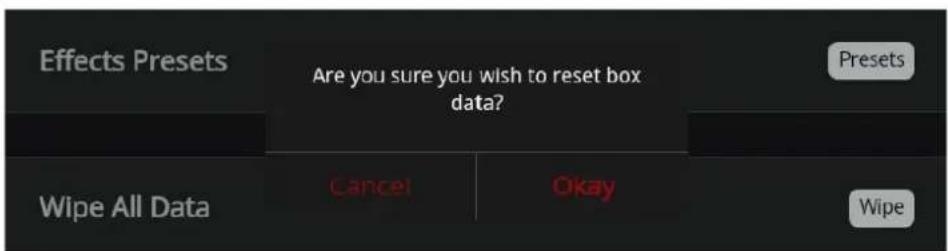
Tabla de salida DMX
heatmap
DMX Output Chart | | 1 | 2 | 3 | 4 | 5 | 6 | 7 | 8 | |---|---|---|---|---|---|---|---|---| | Row 1 | 1 | 0 | 0 | 0 | 0 | 0 | 0 | 0 | | Row 2 | 0 | 0 | 0 | 0 | 0 | 0 | 0 | 0 | | Row 3 | 9 | 10 | 11 | 12 | 13 | 14 | 15 | 16 | | Row 4 | 0 | 0 | 0 | 0 | 0 | 0 | 0 | 0 | | Row 5 | 17 | 18 | 19 | 20 | 21 | 22 | 23 | 24 | | Row 6 | 0 | 0 | 0 | 0 | 0 | 0 | 0 | 0 | | Row 7 | 25 | 26 | 27 | 28 | 29 | 30 | 31 | 32 | The image contains a grid of numerical values (e.g., '1', '2', etc.) and is not explicitly labeled in the image.Wifi


| Patch Fixtures | ||
| Fixtures | Groups | |
| Name | Personality | Address |
| Add a New Fixture | ||
| 4BAR FLEX Q ILS | 4-CH | 1 |

Groupes
2. Fonctionnement

natural_image
Circular gradient color wheel with a central dot, set against a black background (no text or symbols)natural_image
Color gradient circle with a small dot, no text or symbols presentFondu de couleur

LECTURE
Lecture Spectacle
Vitesse de lecture

bar
Scene 01 - Step 02 | Color | Value | |---|---| | Color1 | 86,200,255 | | Color2 | 101,255,128 | | Color3 | 255,255,140 | | Color4 | 255,166,178 | | Color5 | 204,72,255 | | Color6 | 193,255,238 |

heatmap
DMX Output Chart | | 1 | 2 | 3 | 4 | 5 | 6 | 7 | 8 | |---|---|---|---|---|---|---|---|---| | Row 1 | 1 | 0 | 0 | 0 | 0 | 0 | 0 | 0 | | Row 2 | 0 | 0 | 0 | 0 | 0 | 0 | 0 | 0 | | Row 3 | 9 | 10 | 11 | 12 | 13 | 14 | 15 | 16 | | Row 4 | 0 | 0 | 0 | 0 | 0 | 0 | 0 | 0 | | Row 5 | 17 | 18 | 19 | 20 | 21 | 22 | 23 | 24 | | Row 6 | 0 | 0 | 0 | 0 | 0 | 0 | 0 | 0 | | Row 7 | 25 | 26 | 27 | 28 | 29 | 30 | 31 | 32 | The image contains a grid of numerical values (e.g., '1', '2', etc.) and is not explicitly labeled in the image.Wifi

© Copyright 2023 Chauvet & Sons, LLC. All rights reserved.


Leuchtengruppen
2. Bedienung

natural_image
Circular gradient color wheel with a single dark center dot, set against a black background (no text or symbols)natural_image
Color gradient circle with a dark dot at the center, labeled 'Save Preset' (no other text or symbols)Farbübergang
Zur Show hinzufügen

WIEDERGABE

bar
Scene 01 - Step 02 | Image | Value | |---|---| | Color1 | 86,200,255 | | Color2 | 101,255,128 | | Color3 | 255,255,140 | | Color4 | 255,166,178 | | Color5 | 204,72,255 | | Color6 | 193,255,238 |


DMX-Ausgabetabelle
heatmap
DMX Output Chart | | 1 | 2 | 3 | 4 | 5 | 6 | 7 | 8 | |---|---|---|---|---|---|---|---|---| | Row 1 | 1 | 0 | 0 | 0 | 0 | 0 | 0 | 0 | | Row 2 | 0 | 0 | 0 | 0 | 0 | 0 | 0 | 0 | | Row 3 | 9 | 10 | 11 | 12 | 13 | 14 | 15 | 16 | | Row 4 | 0 | 0 | 0 | 0 | 0 | 0 | 0 | 0 | | Row 5 | 17 | 18 | 19 | 20 | 21 | 22 | 23 | 24 | | Row 6 | 0 | 0 | 0 | 0 | 0 | 0 | 0 | 0 | | Row 7 | 25 | 26 | 27 | 28 | 29 | 30 | 31 | 32 | The image contains a grid of numerical values (e.g., '1', '2', etc.) and is not explicitly labeled in the image.Wifi

| Patch Fixtures | ||
| Fixtures | Groups | |
| Name | Personality | Address |
| Add a New Fixture | ||
| 4BAR FLEX Q ILS | 4-CH | 1 |
| Patch Fixtures | ||
| Fixtures | Groups | |
| Name | Personality | Address |
| Add a New Fixture | ||
| 4BAR FLEX Q ILS | 4-CH | 1 |
| FREEDOM STICK | 50-CH | 5 |

Gruppi
2. Uso

natural_image
Circular gradient color wheel with a central dot, set against a black background (no text or symbols)natural_image
Color gradient circle with a small dot, no text or symbols presentFader colori

RIPRODUZIONE
Riprodurre gli show


bar
Scene 01 - Step 02 | Color | Value | |---|---| | Color1 | 86,200,255 | | Color2 | 101,255,128 | | Color3 | 255,255,140 | | Color4 | 255,166,178 | | Color5 | 204,72,255 | | Color6 | 193,255,238 |bar
Scene 01 - Step 02 | Color | Value | |---|---| | Color1 | 86,200,255 | | Color2 | 101,255,128 | | Color3 | 255,255,140 | | Color4 | 255,166,178 | | Color5 | 204,72,255 | | Color6 | 193,255,238 | ProgramEliminare uno show

Preset effetti

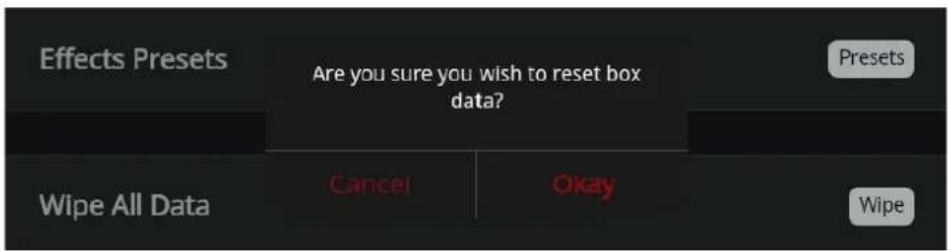
Tabella uscita DMX
heatmap
DMX Output Chart | | 1 | 2 | 3 | 4 | 5 | 6 | 7 | 8 | |---|---|---|---|---|---|---|---|---| | Row 1 | 1 | 0 | 0 | 0 | 0 | 0 | 0 | 0 | | Row 2 | 0 | 0 | 0 | 0 | 0 | 0 | 0 | 0 | | Row 3 | 9 | 10 | 11 | 12 | 13 | 14 | 15 | 16 | | Row 4 | 0 | 0 | 0 | 0 | 0 | 0 | 0 | 0 | | Row 5 | 17 | 18 | 19 | 20 | 21 | 22 | 23 | 24 | | Row 6 | 0 | 0 | 0 | 0 | 0 | 0 | 0 | 0 | | Row 7 | 25 | 26 | 27 | 28 | 29 | 30 | 31 | 32 | The image contains a grid of numerical values (e.g., '1', '2', etc.) and is not explicitly labeled in the image.Wifi
Per modificare SSID e password:


Groepen
2. Bediening
natural_image
Circular gradient color wheel with a central dot, set against a black background (no text or symbols)natural_image
Color gradient circle with a small dot, no text or symbols presentKleurfader
bar
| Color | Value | |---|---| | Red | 86 | | Green | 200 | | Blue | 255 | Faders indicated by arrowToevoegen aan show

AFSPELEN
Shows afspelen
Afspeelsnelheid

bar
Scene 01 - Step 02 | Image | Value | |---|---| | Color1 | 86,200,255 | | Color2 | 101,255,128 | | Color3 | 255,255,140 | | Color4 | 255,166,178 | | Color5 | 204,72,255 | | Color6 | 193,255,238 |
Gegevens importeren/exporteren


DMX-outputtabel

General Information Technical Support
Chauvet World Headquarters
Address: 3360 Davie Rd. Voice: (844) 393-7575
Davie, FL 33314 Fax: (954) 756-8015
Voice: (954) 577-4455 Email: chauvetcs@chauvetlighting.com
Fax: (954) 929-5560
Toll Free: (800) 762-1084 Website: www.chauvetdj.com
Chauvet U.K.
Address: Pod 1 EVO Park Email: UKtech@chauvetlighting.eu
Little Oak Drive, Sherwood Park,
Nottinghamshire, NG15 0EB Website: www.chauvetdj.eu
UK
Voice: +44 (0) 1773 511115
Fax: +44 (0) 1773 511110
Chauvet Benelux
Address: Stokstraat 18 Email: BNLtech@chauvetlighting.eu
9770 Kruishoutem
Belgium Website: www.chauvetdj.eu
Voice: +32 9 388 93 97
Chauvet France
Address: 3, Rue Ampère
91380 Chilly-Mazarin
Email: FRtech@chauvetlighting.fr
France Website: www.chauvetdj.eu
Voice: +33 1 78 85 33 59
Chauvet Germany
(Entrance by Calle 2)
Email: servicio@chauvet.com.mx
Zona Industrial Lerma Website: www.chauvetdj.mx
Visit the applicable website above to verify our contact information and instructions to request support. Outside the U.S., U.K., Ireland, Mexico, France, Germany, or Benelux, contact the dealer of record.
FlareCON UM ML6 Rev. 3
© Copyright 2023 Chauvet
All rights reserved