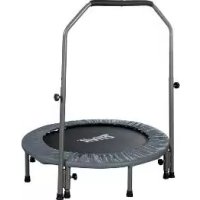
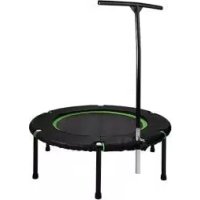
IAN 388638 - Trampoline CRIVIT - Free user manual and instructions
Find the device manual for free IAN 388638 CRIVIT in PDF.

| Brand | Crivit |
| Model | IAN 388638 |
| Product type | Trampoline |
| Dimensions (assembled) | Approx. diameter 180 cm, height approx. 190 cm |
| Total weight (with net) | Approx. 10.8 kg |
| Maximum allowed load | 25 kg |
| Entry height | Approx. 34 cm |
| Recommended age | From 3 years (under adult supervision) |
| Use | Indoor and outdoor, private use |
| Frame material | Metal (steel) |
| Jump mat | Durable fabric with 30 eyelets |
| Safety net | Included, with zipper and safety closure |
| Frame protection | Included (protective skirt + fall protection) |
| Number of elastic straps | 30 |
| Strap tensioner included | Yes |
| Included accessories | Hex key, assembly and use instructions |
| Safety | Safety net, frame protection, mandatory adult supervision, no somersaults |
| Maintenance | Regular checking of screws and parts, replacement of wear parts every 3 years, cleaning with damp cloth |
| Warranty | 3 years (material and manufacturing defects) |
| Customer service | Delta-Sport Handelskontor GmbH (0800 919270 for France) |
| Spare parts available | Yes (contact customer service) |
| Power supply | Not applicable |
Frequently Asked Questions - IAN 388638 CRIVIT
User questions about IAN 388638 CRIVIT
0 question about this device. Answer the ones you know or ask your own.
Ask a new question about this device
Download the instructions for your Trampoline in PDF format for free! Find your manual IAN 388638 - CRIVIT and take your electronic device back in hand. On this page are published all the documents necessary for the use of your device. IAN 388638 by CRIVIT.
USER MANUAL IAN 388638 CRIVIT
natural_image
Black-and-white photo of a trampoline with mesh netting and support structure (no text or symbols visible)
text_image
PDF ONLINE www.lidl-service.comKINDER-TRAMPOLIN MIT SICHERHEITSNETZ KIDS' TRAMPOLINE WITH SAFETY ENCLOSURE TRAMPOLINE ENFANT AVEC FILET DE SÉCURITÉ
DE AT CH
DETSKÁ TRAMPOLÍNA S BEZPEČNOSTNOU SIĚTOU
Navod na použivanie
DK
B∅RNETRAMPOLIN MED SIKKERHEDSNET
Brugervejledning
GB IE
KIDS' TRAMPOLINE WITH SAFETY ENCLOSURE
Instructions for use
NL BE
KINDERTRAMPOLINE MET VEILIGHEIDSNET
Gebruiksaanwijzing
CZ
DĚTSKÁ TRAMPOLÍNA S BEZPEČNOSTNÍ SÍTÍ
Návod k použití
ES
natural_image
Simple icon showing a sad human figure with a red X symbol above a wavy line and a horizontal bar (no text or symbols)
natural_image
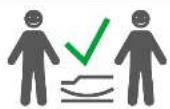
Two human figures with a green checkmark symbol between them, no text or labels present.DE AT CH
- Package contents/parts list (Fig. A) 30
- Technical data ....31
- Intended use .... 31
- Symbols and signal words used ....31
- Safety information 32-33
5.1 Safety information for use 32-33
5.2 Safety information for assembly 33
5.3 Maintenance/care 33
- Selecting a location 34
- Assembly 34-37
7.1 Assembling the base frame 34-35
7.2 Installing the jump mat 35-36
7.3 Securing the frame padding 36
7.4 Installing the safety net ....36
7.5 Securing the safety net ....37
- Use 37-38
8.1 Getting on the trampoline ....37
8.2 Getting off the trampoline ....37
8.3 Using the trampoline ....38
- Disassembly 38
- Transporting 38-39
10.1 Moving the trampoline (to nearby location) 39
10.2 Transporting the trampoline (to distant location) 39
- Weather conditions ....39
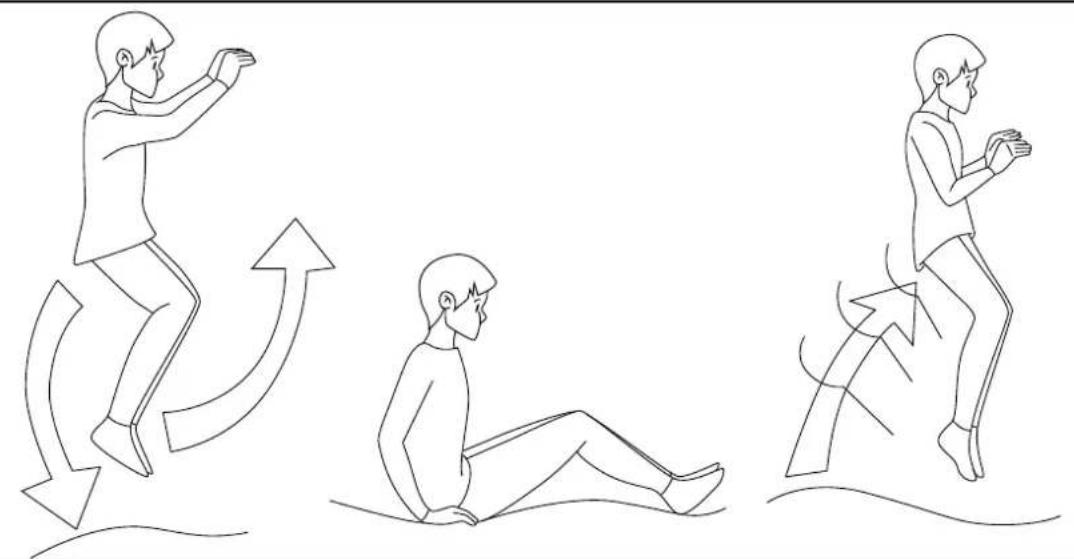
- Jumping techniques ....39-41
12.1 Aborting a jump 40
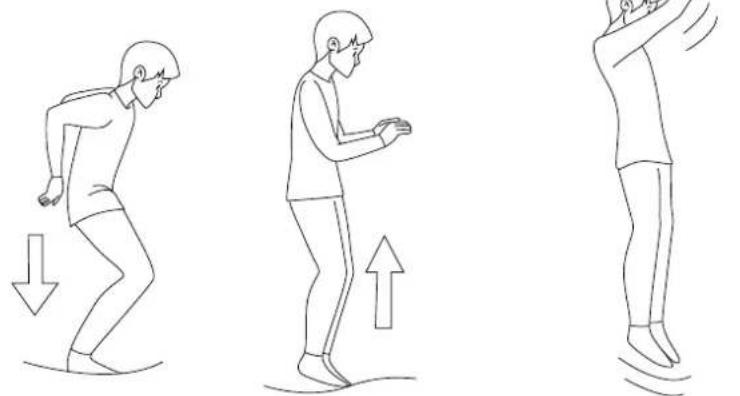
12.2 Basic jump (Fig. 1) 40
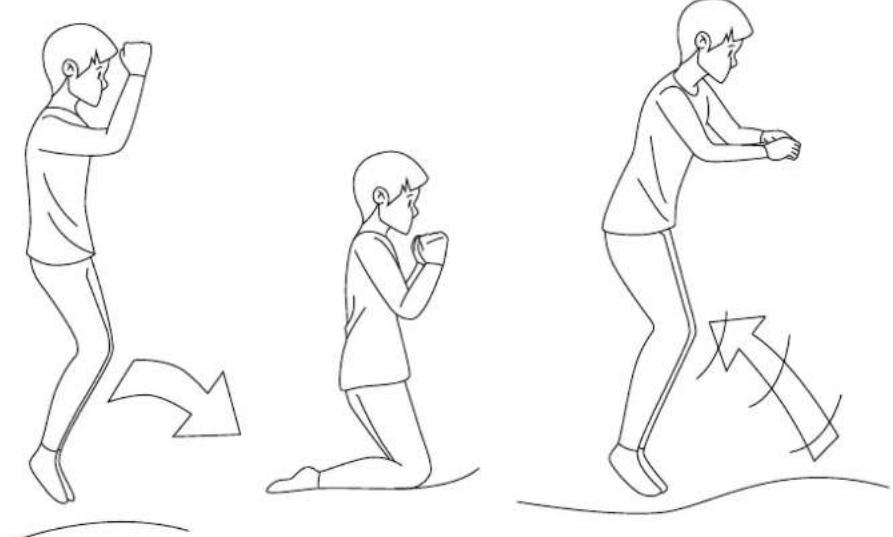
12.3 Knee jump (Fig. 2) 40
12.4 Sitting jump (Fig. 3) ....41
- Maintenance ....41
-
Care 42
-
Storage 42
-
Accessories (optional) 42
- Disposal 43
- Warranty and servicing information ....43
Glossary 44
FR BE
natural_image
Three sequential illustrations of a person performing stretching or stretching exercises, showing different movement directions (down, up, and upward) with no text or symbols.natural_image
Line drawing of three sequential human motion poses: kneeling, striking forward, and rolling forward (no text or symbols)natural_image
Three line drawings showing human motion poses: jumping, sitting, and walking (no text or symbols)13. Wartung
Congratulations! You have chosen to purchase a high-quality trampoline. Familiarise yourself with the trampoline before using it for the first time.

Read the following instructions for use carefully.
The instructions for use are an integral part of the trampoline. Store them carefully, like the packaging, for future reference. If you pass this trampoline on to third parties, please always include these instructions for use. This trampoline must be assembled by at least two adults. This trampoline is a toy for children ages 3 years and up, for indoor and outdoor use. The trampoline is designed for personal use and is not suitable for commercial use.
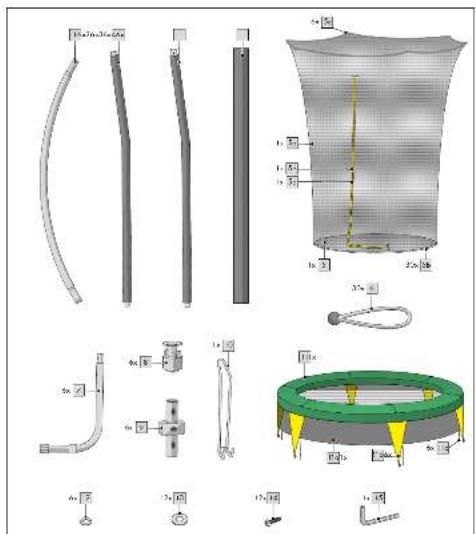
1. Package contents/parts list (Fig. A)
(1) frame pole 6 x
(2) upper net pole 6 x
(3) lower net pole 6 x
(4) pole sleeve 6 x
(5) jump mat 1 x
(5a) safety net 1 x
(5b) eyelet 30 x
(5c) safety net strap 6 x
(5d) safety fastener 1 x
(5e) zip fastener 1 x
(6) rubber strap 30 x
(7) foot 6 x
(8) pole cap 6 x
(9) connector 6 x
(10) strap tensioner 1 x
(11) frame padding 1 x
(11a) crawling guard 1 x
(11b) stumble guard 6 x
(11c) crawling guard bands 6 x
(12) spring ring 6 x
(13) washer 12 x
(14) screw 12 x
(15) hex key 1 x
assembly instructions 1 x
instructions for use 1 x
2. Technical data
Dimensions (assembled): approx. 180 x 190cm (∅ x H)
Weight (incl. safety net): approx. 10.8kg
Height of entrance: approx. 34cm

Max. load: 25kg

Date of manufacture (month/year): 10/2021

Delta-Sport Handelskontor GmbH hereby declares that this trampoline complies with the following fundamental requirements as well as other relevant regulations:
2009/48/EC - Toy Safety Directive
3. Intended use
This trampoline is a toy for children ages 3 years and up, for indoor and outdoor use. The trampoline is designed for personal use and is not suitable for commercial use. The trampoline cannot support more than 25kg! The trampoline is not suitable for therapeutic purposes.
4. Symbols and signal words used

WARNING!
The signal word indicates a hazard with a high risk level, which, if not avoided, can result in serious injury.

Note
Additional information on the use of the device.
5. Safety information
WARNING! Not suitable for children under 36 months. Choking hazard. Small parts.
- The trampoline is suitable for children ages 3 years and up, as children below 3 years of age may be considerably less able to estimate the physical and dynamic characteristics of the jump mat, and may lack the necessary coordination skills.
- The trampoline is not intended for use by persons (including children) with impaired physical, sensory or mental capabilities or with a lack of experience and/or knowledge, unless they are supervised by an individual responsible for their safety or have been instructed by that individual on how to use the trampoline.
- Pregnant women must not use the trampoline.
WARNING!
- Do not perform flips. Landing on your head or neck can result in serious injury, paralysis or even death!
- Do not perform any reckless jumps and do not jump too high or above the safety net!
- Only for domestic use.
- Do not engage in jumping competitions or similar behaviour.
- Never jump directly from the jump mat onto the ground! There is a high risk of injury due to the hard impact!
- Only one user at a time. Risk of collision!
- Do not use the trampoline if you are injured or your health is impaired, e.g. due to ankle injuries, back pain, pregnancy etc.
- Leave the trampoline immediately if you feel dizzy or experience a rapid heartbeat etc., and consult a doctor right away.
• Make sure that there are no sharp hooks, eyelets or similar objects on your clothing. There is a risk of injury! - Never intentionally jump into or beyond the safety net, nor try to climb up onto it or hang from the pole caps. There is a risk of injury!
- Before getting on the trampoline, make sure that there are no persons, animals or objects on or under the trampoline! There is a risk of injury to the animal as well as the user!
5.1 SAFETY INFORMATION FOR USE
• Warning. Maximum 25kg.
This trampoline is designed for a maximum user weight of 25kg. Do not use the trampoline if you weigh more than this.
- Warning. Do not use if the jump mat is wet.
- Warning. Empty your hands and pockets before jumping.
- Warning. Always jump in the middle of the jump mat. Never on the edge!
- Warning. Do not eat while jumping.
- Warning. Do not exit by a jump.
- Warning. Limit the duration of continuous use (take regular breaks).
- Warning. Do not wear shoes while jumping.
- Warning. Secure the trampoline and do not use it in strong wind. (See section '11 Weather conditions'.)
- Warning. Always close the net opening before jumping.
- Check that the foam sleeves are properly fitted before jumping.
• Adult supervision required.
- If you belong to a risk group due to your health, you must consult your doctor before using the trampoline.
- The trampoline is not suitable for therapeutic purposes.
- Check the trampoline for damage, wear, cracks and missing parts before each use! It must not be used if there is visible evidence of damage or defects.
- Before each use, make sure that the trampoline is properly assembled and that the frame padding and safety net are securely attached and properly positioned.
- Always jump from and try to land on the marking on the jump mat. If you land next to the marking, abort your jump immediately and start again from the marking.
- Check the connection between the feet and frame parts before each use.
- Keep your eyes on the middle of the trampoline when jumping. This helps you to stay in control.
• Always make sure that the adult supervising is familiar with the trampoline and its characteristics.
- Only jump under sufficient lighting conditions. Never jump in the dark.
5.2 SAFETY INFORMATION FOR ASSEMBLY
- Warning. The trampoline must be assembled by at least two adults in accordance with the assembly instructions, and then examined before being used for the first time.
- Make sure you use the trampoline only after it has been completely assembled.
- Take care not to get pinched or caught in any parts during assembly! Wear protective gloves when assembling the trampoline. Take care with pinch points.
- Self-locking nuts are used for the assembly. These are suitable for one-time use only and must be replaced after being removed.
- Foreign objects must not be attached to or hung from the safety net.
- Use only original replacement parts and accessories. Contact our customer service to obtain these.
- The trampoline must only be used if it is properly assembled.
5.3 MAINTENANCE/CARE
- Check the screw connections at regular intervals and tighten them.
- Do not make any improper modifications to the trampoline.
- Defective parts must be replaced with original replacement parts only. Contact our customer service to obtain these.
- Replace the safety net, jump mat, frame padding and foam sleeves on the net poles every 3 years.

Note
- If you have long hair, please tie it up with a hair band before getting on the trampoline!
- We recommend wearing a long-sleeved top and long trousers to protect yourself against scratches and scrapes. Your clothing must be close-fitting but comfortable.
- Avoid jumping too high and do not overestimate your abilities. Gradually increase the intensity of your jumps but do not overdo it. Always make sure that you have control over your jumps.
6. Selecting a location
- The trampoline is suitable for indoor and outdoor use.
- Carefully select the location of the trampoline. The trampoline must not be set up over a hard surface.
- The trampoline must not be set up on a smooth (e.g. tiled) surface. It could slip!
- Set up the trampoline on a level surface at least 2m away from other structures and obstacles such as stairs, fences, garages, houses, protruding branches, washing lines or electrical lines. Make sure that there is sufficient room above the trampoline. Do not set it up near windows, walls, trees, etc. There should be a clear space of at least 7.5m above the trampoline.
- The trampoline must not be set up on concrete, asphalt or similarly hard surfaces, nor near colliding structures such as paddling pools, swing sets, slides, jungle gyms, furniture etc.
- The trampoline must not be embedded in the ground.
- Set up the trampoline in a safe location so that it cannot blow away or tip over!
- Locate the trampoline so that others cannot use it unsupervised, and secure it against unauthorised use!
7. Assembly
Remove all parts from the packaging and check whether all parts are fully present. If there are any parts missing, please contact our customer service.

WARNING!
Due to its size, the trampoline must be assembled and installed by at least two adults.

WARNING!
Wear protective gloves when assembling the trampoline and make sure that you are working deliberately and carefully. Make sure that you do not get caught in any parts! There is a risk of injury!

Note
Use the separate assembly instructions for assembly. The necessary information on the individual steps is presented visually.
7.1 Assembling the base frame
The base frame must be made up of multiple frame poles (1). Proceed as follows:
- Find a suitable location for the trampoline. You can find more information in section '6 Selecting a location'.
- Lay one frame pole (1) and one connector (9) in alternating fashion to form a circle.

Note
The frame poles (1) are narrower at one end than at the other. Lay the frame poles (1) and connectors (9) in a circle so that each narrow and broad end of a frame pole (1a/1b) is next to a connector (9). The drill holes of the connectors (9) are facing outwards.
- Insert the broad end of a frame pole (1a) into a connector (9) and, on the other side, the narrow end of another frame pole (1b).

Note
Always insert the broad end of a frame pole (1a) into a connector (9) before inserting the narrow end (1b) on the other side.
- Repeat step 3 until you have formed a complete circle.

Note
The ends of the frame poles (1) must be completely inside the connectors (9).
- Insert one screw (14) with a washer (13) into the drill hole of each connector (9) and tighten the screw with the hex key (15).
- Repeat step 5 until all frame poles (1) are screwed with the connectors (9).
- Place a foot (7) on the bottom openings of the connectors (9) and fasten each with a washer (13), a spring ring (12) and a screw (14).

Note
The feet (7) must be pointing outwards.
- Repeat step 7 until a foot (7) has been fastened under each connector (9).
7.2 Installing the jump mat
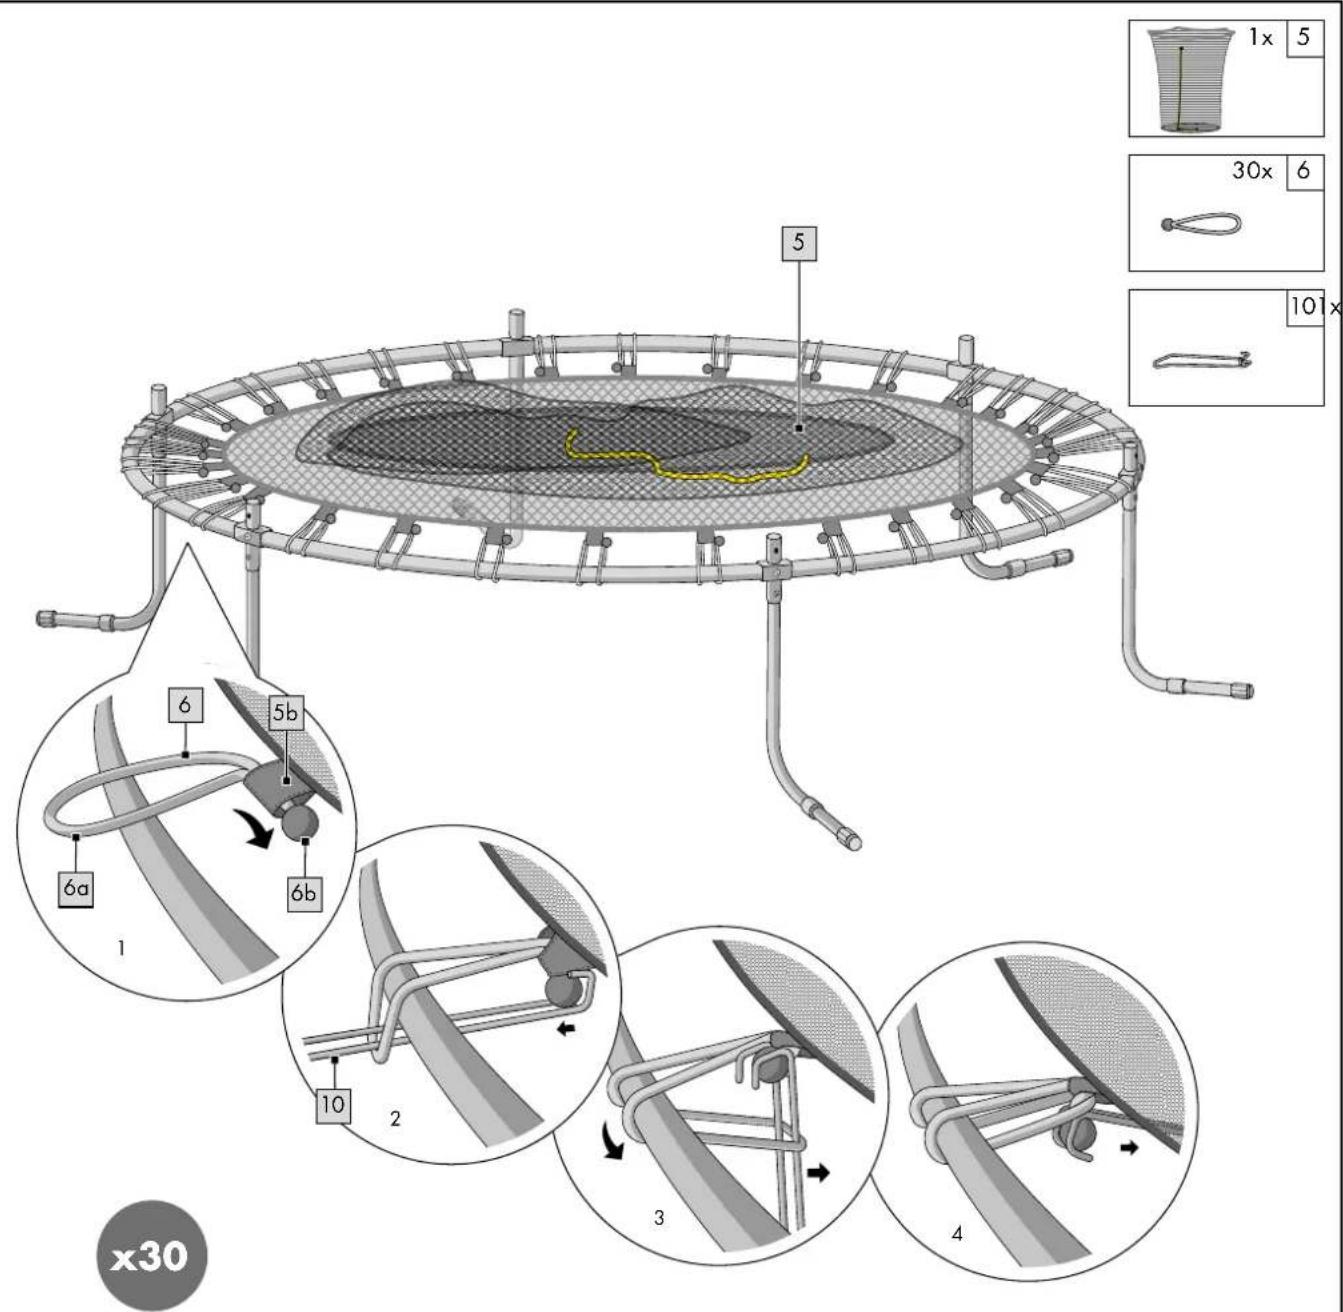
The jump mat (5) is tightened with 30 rubber straps (6). The order of insertion is important for ensuring even distribution of forces. Following the proper order makes assembly easier and safer. Proceed as follows:
- Spread out the jump mat (5) with safety net (5a) within the base frame. Make sure that the safety net (5a) is on top of the jump mat.

WARNING!
Be careful when inserting the rubber straps (6)! The rubber straps (6) are under tension during insertion! There is a risk of injury!

WARNING!
Be careful when inserting the rubber straps (6) and follow the instructions below precisely so that the jump mat (5) is set up properly. Otherwise there is a risk of injury!

Note
The jump mat (5) is equipped with 30 eyelets (5b). Place the jump mat (5) in the middle of the base frame such that the opening of the safety net (5a) is between two feet (7).
- Take the eyelet (5b) (point 0) directly below the entrance to the safety net (5a) and pull the rubber strap (6) with the end of the strap (6a) through it until the ball (6b) of the rubber strap (6) is on the side of the eyelet (5b).
- Place the end (6a) of the rubber strap (6) onto the frame between two feet (7).
- Pass the strap tensioner (10) through the end of the strap (6a) below the frame.
- Grab the ball (6b) of the rubber strap (6) with the hook of the strap tensioner (10) and press the strap tensioner (10) vertically downwards. The rubber strap (6) is tightened towards the jump mat (5) with the strap tensioner (10).
- Lever the strap tensioner (10) all the way back and pull the ball (6b) below the rubber strap (6a) back.
- The end of the strap (6a) contains the ball (6b) of the rubber strap (6), and you can remove the hook of the strap tensioner (10) from the ball (6b) of the rubber strap (6).

WARNING!
Always use the strap tensioner (10) to secure the rubber straps (6). Make sure that the rubber strap (6) is completely pulled around the ball (6b). Otherwise there is a risk of injury!
- Count another 10 eyelets (5b) down and secure the 11th eyelet (5b) to the frame with a rubber strap (6).
- Count another 10 eyelets (5b) down and secure the 21st eyelet (5b) to the frame with another rubber strap (6).
- Starting at point 0, count 5 eyelets (5b) down and secure it to the frame with a rubber strap (6). Then count another 10 eyelets (5b) down and secure the 15th down and secure it to the frame with a rubber strap (6). Repeat this until you have returned to point 0.
- Fasten the rest of the eyelets (5b) to the frame with the rubber straps (6) in any order.
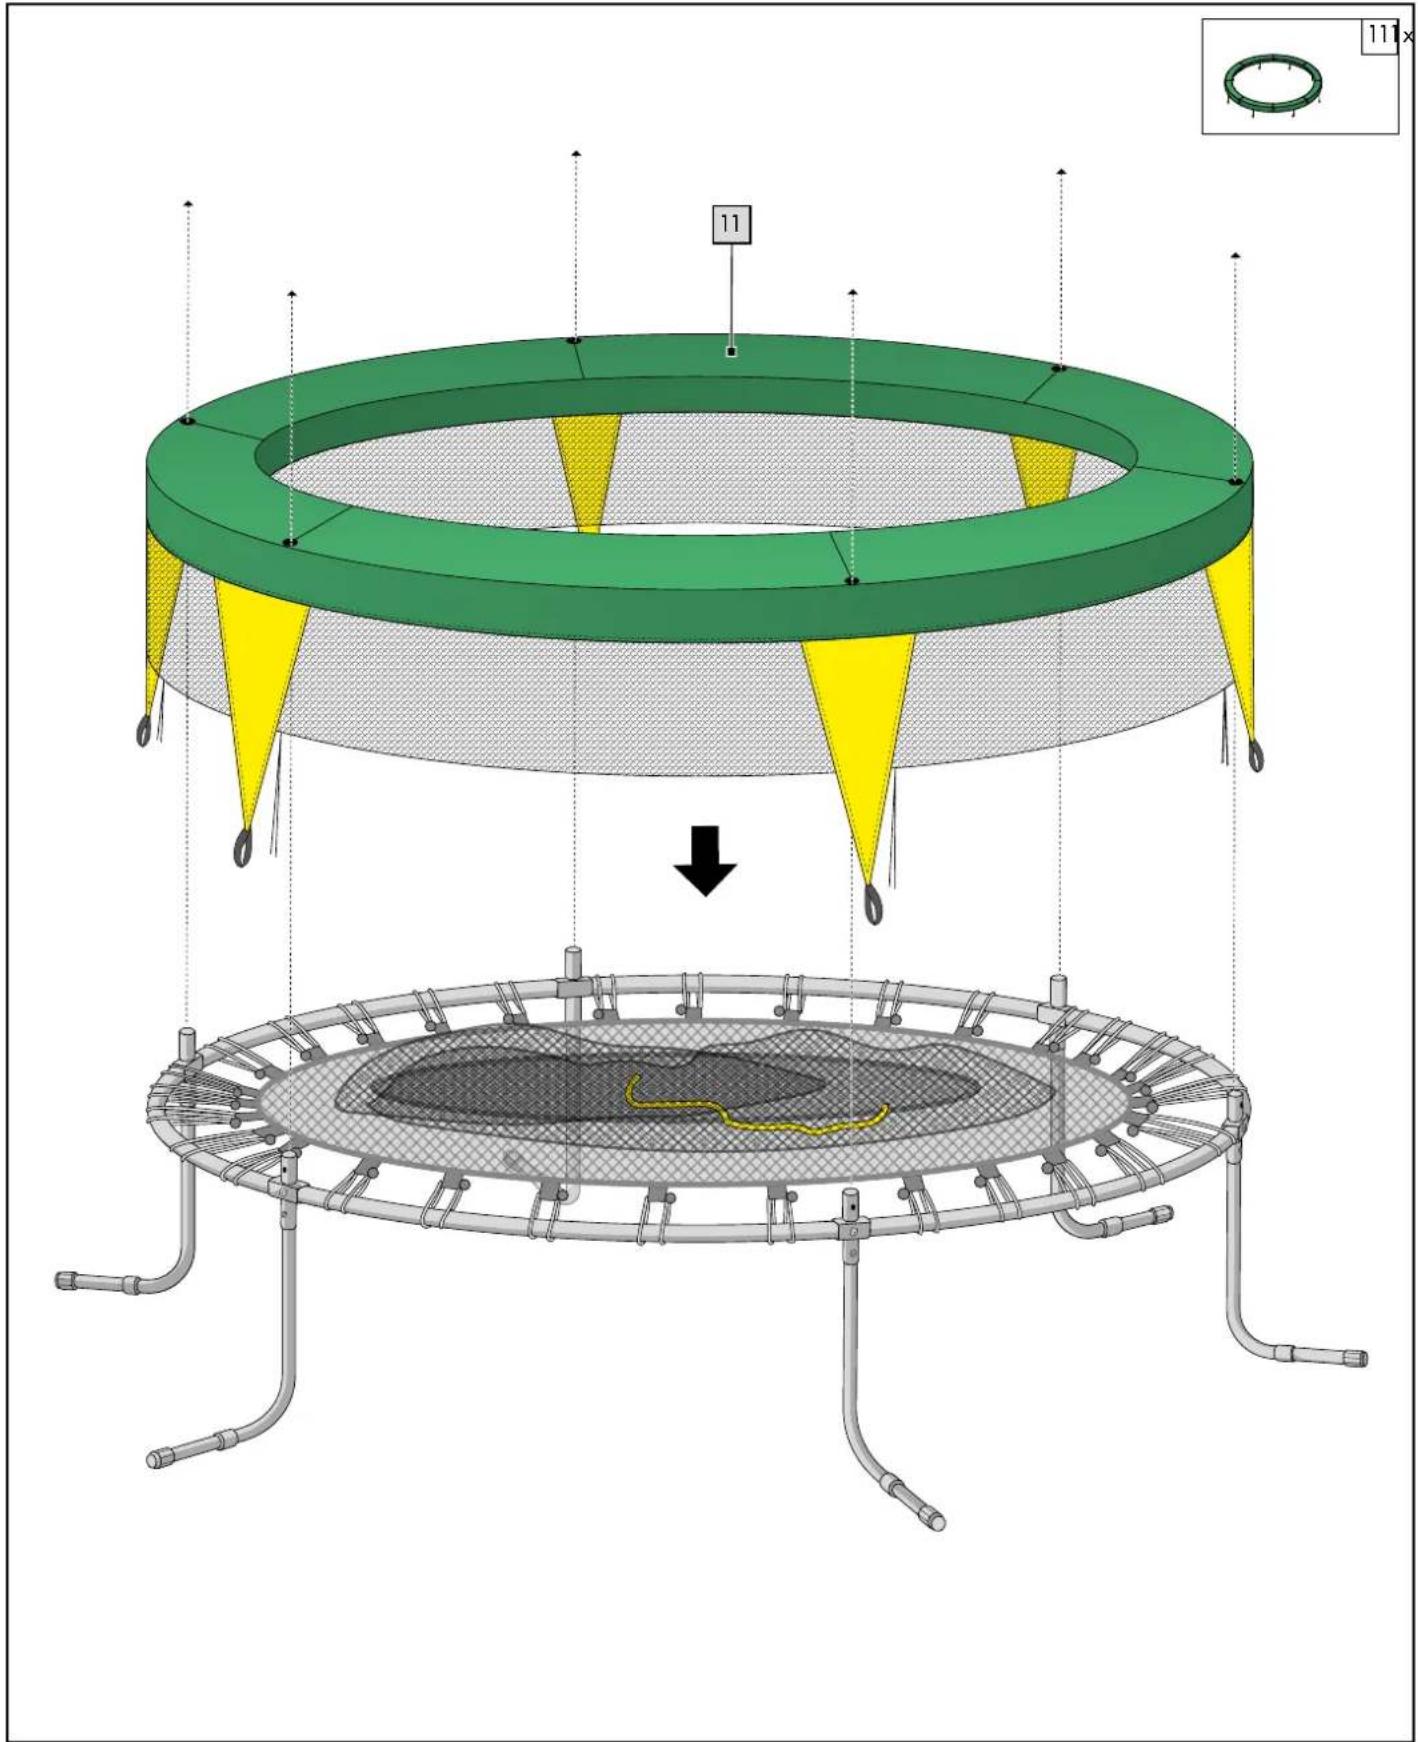
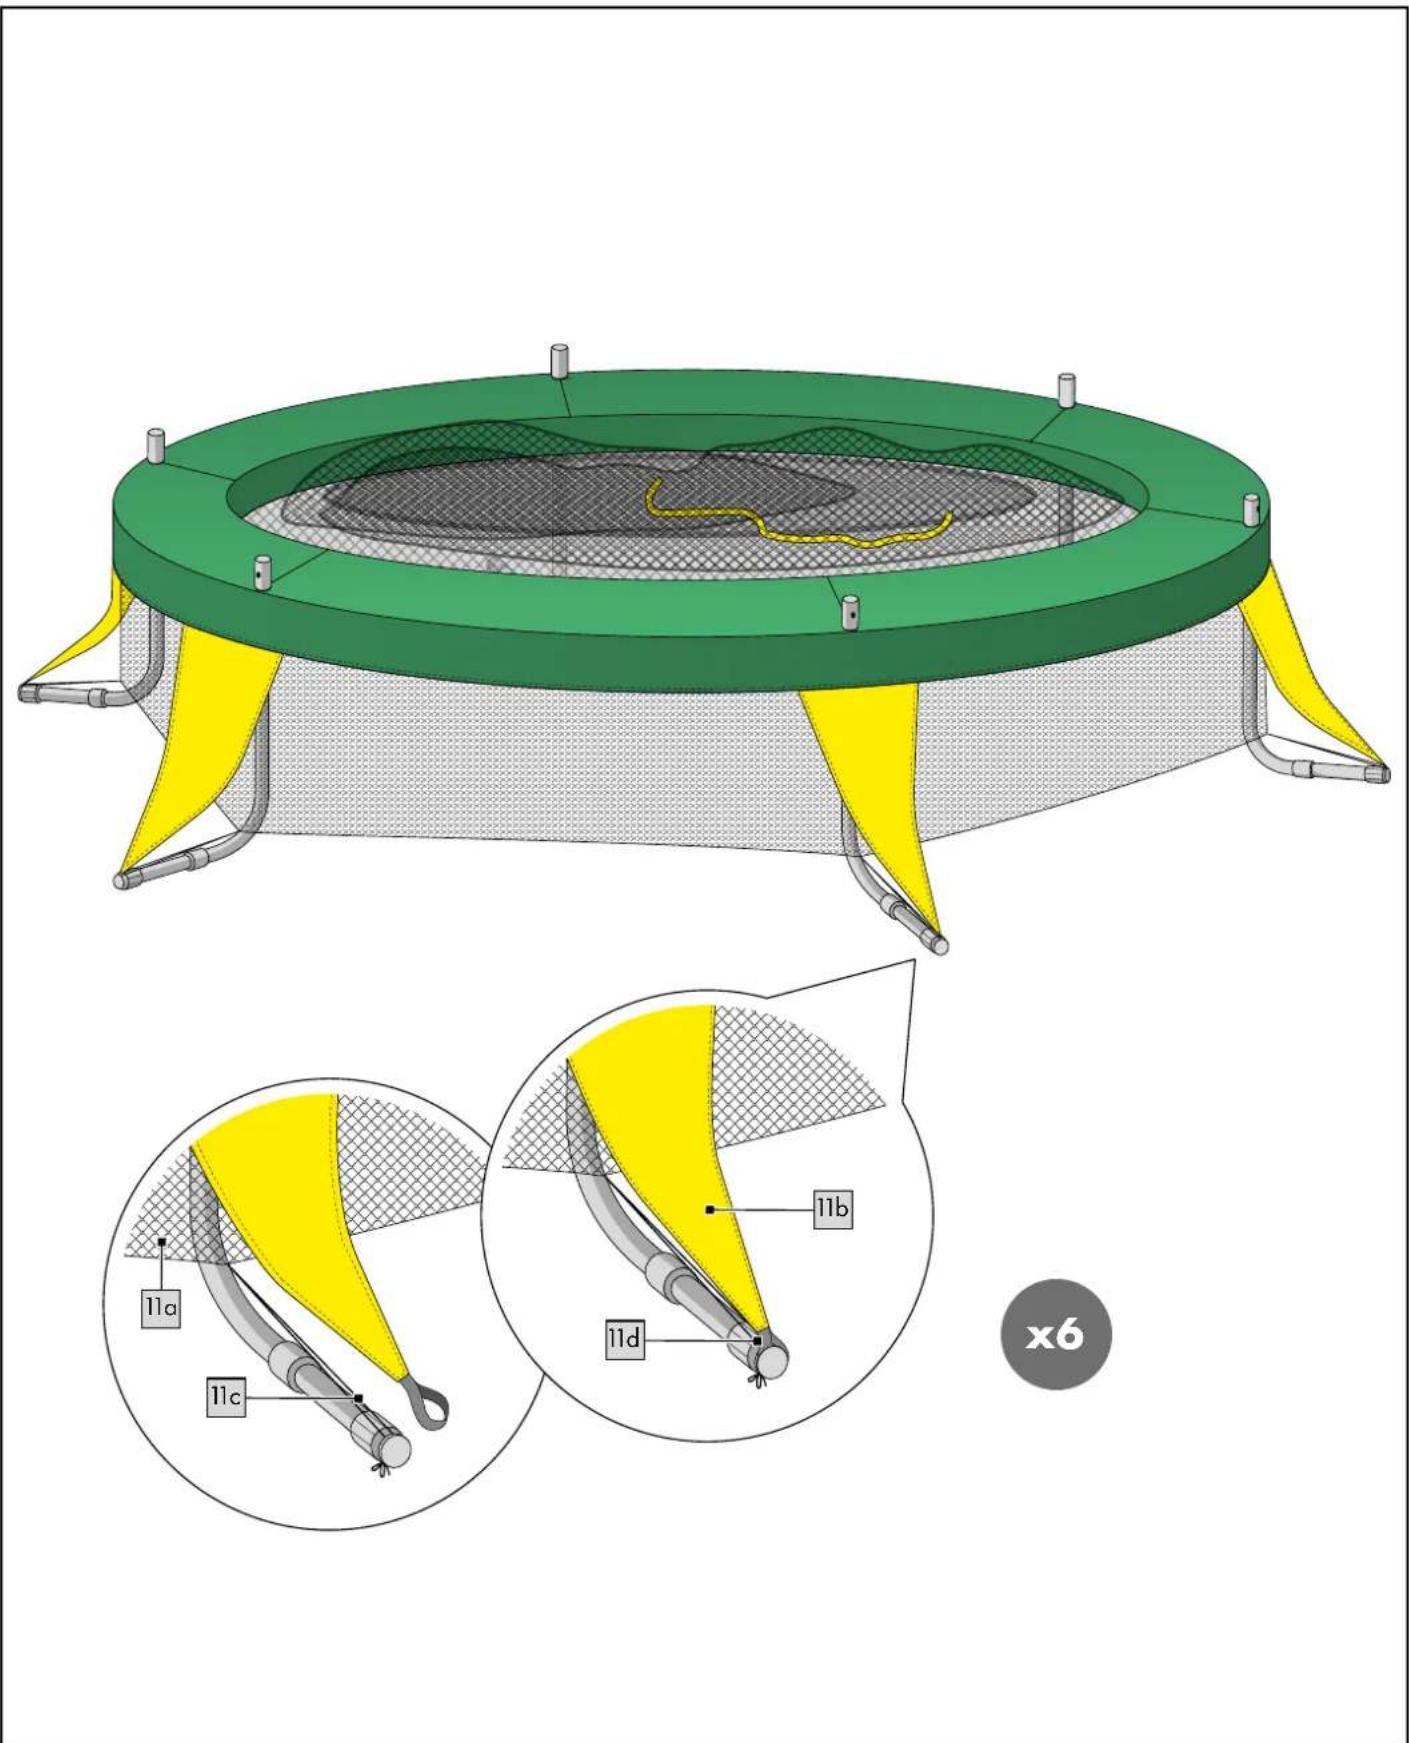
7.3 Securing the frame padding
The frame padding (11) protects against making contact with the rubber straps (6). The additional crawling and stumble guard (11a/11b) ensures extra safety outside of the trampoline. It must be carefully installed so that no injuries can occur while jumping and/or falling. Proceed as follows:
- Place the frame padding (11) on the frame poles (1) so that you can place each opening of the frame padding (11) over an opening of the connector (9a).
- Pull the crawling guard (11a) downward around the trampoline.

Note
There is a stumble guard (11b) over each foot.
- Tie the ends of the crawling guard bands (11c) together and pull them over the end of the foot (7).
- Pull the rubber straps (11d) of the stumble guard (11b) over the end of the foot (7).
- Repeat steps 3 and 4 until the crawling guard bands (11c) and rubber straps (11d) of the stumble guard (11b) are fastened to each foot (7).

Note
The stumble guard (11b) must be positioned over the foot (7).
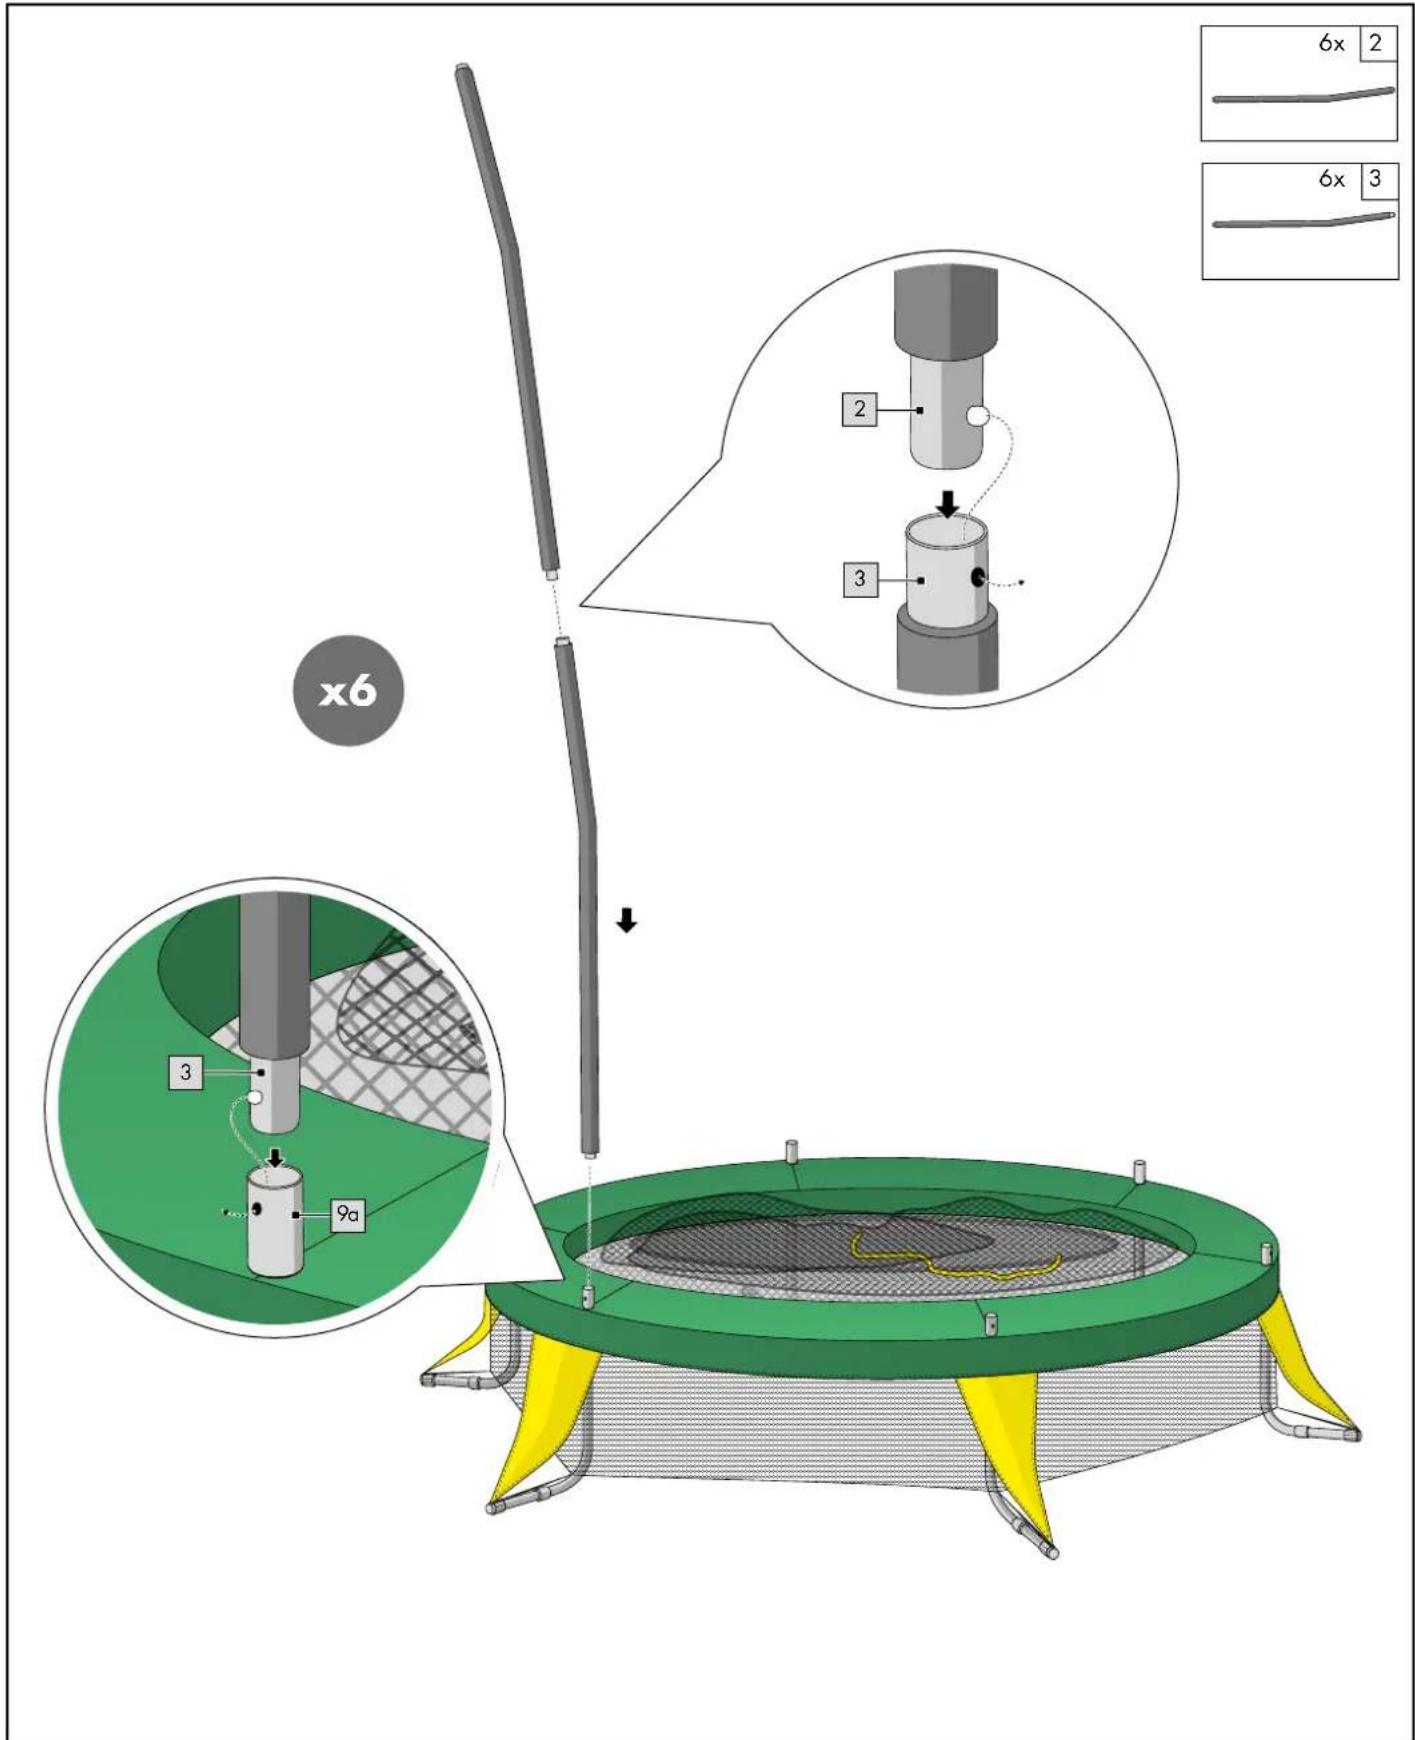
7.4 Installing the safety net
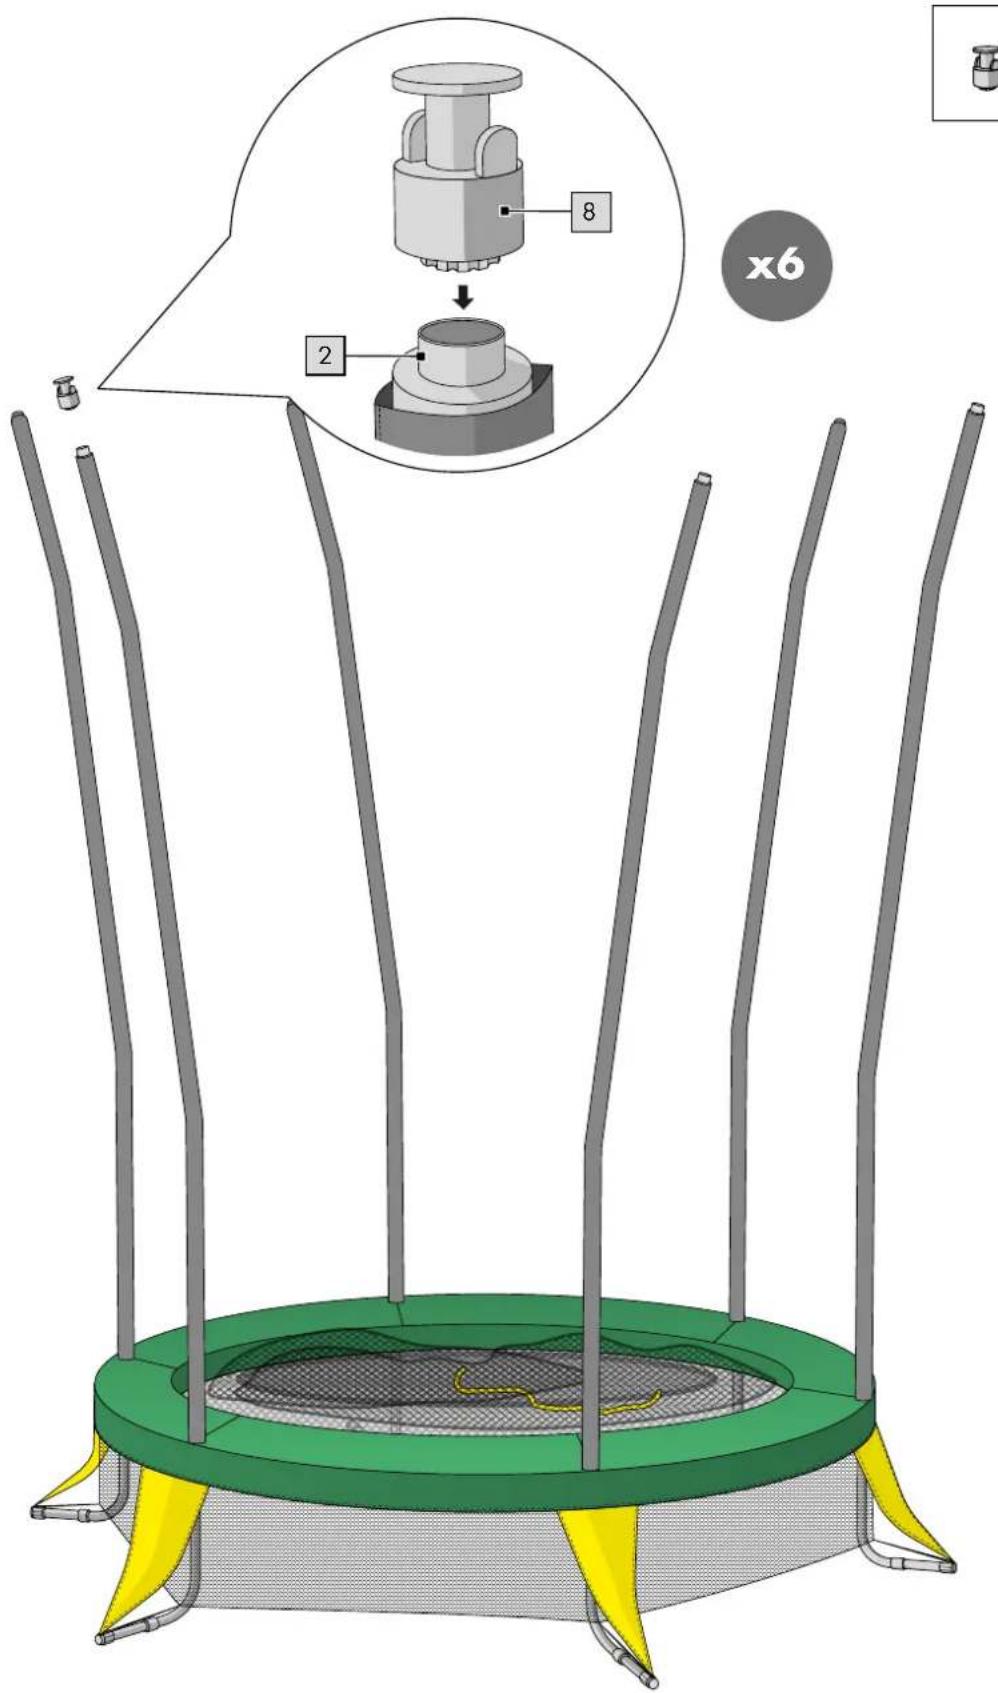
The safety net (5a) is fastened onto the pole caps (8) with safety net straps (5c). The pole caps (8) are placed on the net poles (2) that are fastened onto the connector (9) with the net poles (3). Proceed as follows:
- Connect the net poles (2) and (3) to each other.
- Place the end of the net pole (3) on the opening (9a) of the connector (9).
- Repeat steps 1 and 2 five times.

Note
The net poles (2) and (3) must arch outwards.
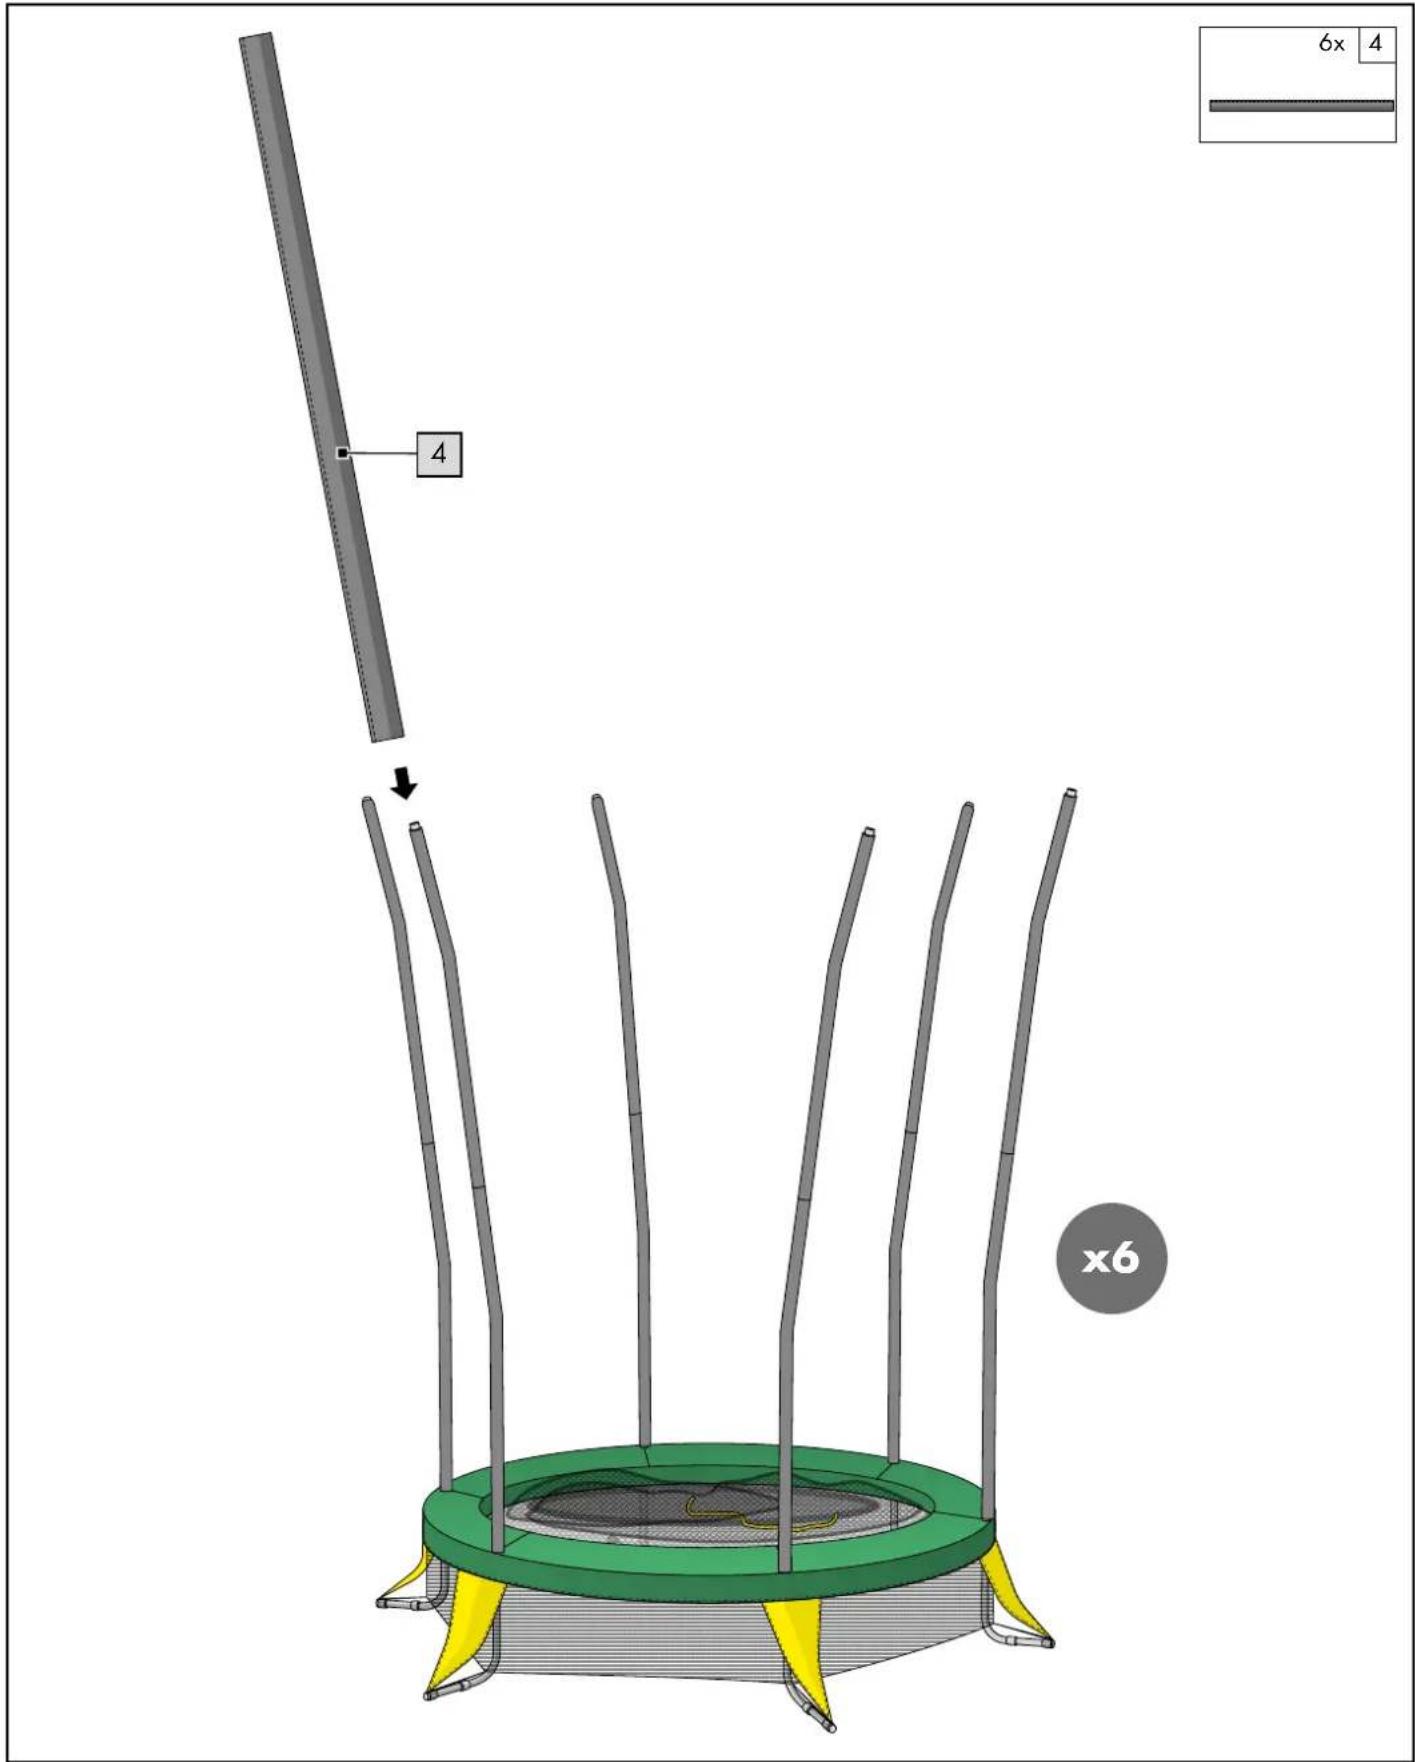
- Pull a pole sleeve (4) over the net poles (2) and (3).
- Repeat this step five times.
- Place a pole cap (8) on the end of the net pole (2).
- Repeat this step five times.
7.5 Securing the safety net
You must fasten the safety net (5a) to the pole caps (8). Proceed as follows:
- Take a safety net strap (5c) and secure it to the nearest pole cap (8).
- Repeat this step until all safety net straps (5c) are fastened to the pole caps (8).

Note
The zip fastener (5e) on the safety net (5a) must be closed.
8. Use
Instructions and help on trampoline use are provided below. The instructions must be carefully followed for the safety of the users, as well as people and animals nearby.

Note
Before getting on the trampoline, perform some stretches to slowly warm up your muscles.
8.1 Getting on the trampoline

WARNING!
Before getting on the trampoline, make sure that there are no persons, animals or objects on or under the trampoline! There is a risk of injury to the animal as well as the user!
- Open the safety fastener (5d) and then the zip fastener (5e) on the safety net (5a).
- Carefully climb through the safety net (5a). Make sure that you do not get stuck in the safety net when climbing in.
- After getting on the trampoline, close the zip fastener (5e) on the safety net (5a) and the safety fastener (5d). This must be checked by the supervising adult!

Note
The safety opening can also be closed from the inside (see section '8.2 Getting off the trampoline'). First close the safety fastener (5d) and then the zip fastener (5e).
8.2 Getting off the trampoline
- Open the zip fastener (5e) and then the safety fastener (5d) of the safety net (5a) to get off the trampoline.
- Sit on the frame padding (11) and pass through the opening of the safety net with your feet first.

WARNING!
Do not exit by a jump.

Note
After getting off the trampoline, first close the zip fastener (5e) and then the safety fastener (5d).
8.3 Using the trampoline
- Never get on the trampoline unsupervised! An adult who is familiar with the trampoline and its characteristics must always be present!
- Do not use the trampoline if the jump mat is wet!
- Check the trampoline for wear, damage or missing parts before each use! The trampoline must only be used if it is in perfect condition!

WARNING!
Before getting on the trampoline, make sure that there are no persons, animals or objects on or under the trampoline! There is a risk of injury to the animal as well as the user!
- Only use the trampoline barefoot, with socks or with gymnastics shoes!

WARNING!
Do not perform flips! Landing on your head or neck can result in serious injury, paralysis or even death! Do not perform any reckless jumps, and do not jump too high or beyond the safety net (5a)! Do not engage in jumping competitions or similar behaviour!
- Only one user at a time. Risk of collision!
9. Disassembly
You must disassemble the trampoline before transporting it (to a distant location) or winter-proofing it.
Use the assembly instructions provided and the steps listed in section '7 Assembly'. Proceed in the reverse order to disassemble the product.
Disassemble the parts in the following order:
- Remove the safety net straps (5c) from the pole caps (8).
- Remove the net poles (2/3) from the openings of the connectors (9a).
- Remove the pole sleeves (4) from the interconnected net poles (2) and (3).
- Disassemble the net poles (2) and (3).
- Remove the bands (11c/11d) of the crawling and stumble guard (11a/11b) from the feet (7).
- Remove the frame padding (11).
- Remove the rubber straps (6) with the strap tensioner (10) from the frame.

WARNING!
Only remove the rubber straps (6) with the strap tensioner (10) provided. Be very careful when removing the rubber straps (6)! The rubber straps (6) are under tension! There is a risk of injury!
- Remove the jump mat (5) with safety net (5a).
- Disassemble the base frame.
10. Transporting
You can move the trampoline to a different location nearby, or transport it over longer distances. The following points must be observed when doing so:
10.1 Moving the trampoline (to nearby location)
If you would like to move the assembled trampoline a few metres, you will need at least two people to do so.
Proceed as follows:
- Make sure that there are no people and/or animals nearby or on or under the trampoline.
- Check the path that you must follow to move the trampoline. Watch out for any obstacles.
- With at least two people, lift the trampoline off the ground slightly.
- Slowly and carefully carry the trampoline horizontally to the ground.
- Set the trampoline on the ground at the desired location. Ensure that the surface is level.
- Make sure that the trampoline is stable and all parts are firmly attached before using it for the first time.
10.2 Transporting the trampoline (to distant location)
You must completely disassemble the trampoline before transporting it across a large distance. You can find more information on disassembling the trampoline in section '9 Disassembly'.
11. Weather conditions
The trampoline must be secured and disassembled in strong weather conditions (rainstorm, thunderstorm, snow or hail). You can find more information on disassembling the trampoline in section '9 Disassembly'.

WARNING!
The trampoline must not be used during a storm, thunder or strong winds! Dismantle the trampoline if stormy weather or winter conditions are forecast.
Disassemble the following parts and store them indoors in the event of a timely forecast of stormy weather:
• net poles (2/3) with pole sleeves (4)
• frame padding (11) with crawling and stumble guard (11a/11b)
- rubber straps (6)
- jump mat (5) with safety net (5a)
The trampoline should be covered in the event of snow or very low temperatures.

Note
If you are using a tarpaulin, it must be secured against wind.
Secure the trampoline against strong winds, e.g. with steel anchors in the ground or weights such as bags of sand or water. Remove wind-catching elements such as the jump mat (5) with safety net (5a), net poles (2/3) and frame padding (11) with crawling and stumble guard (11a/11b).
12. Jumping techniques
Important information on various jumping techniques and tips for how to behave while jumping are provided below.
- Start with a few simple jumps (basic jump) to slowly get used to the characteristics of the trampoline.
- Do not jump too high, and always try to stay in control.
- Always jump from and try to land on the white marking on the jump mat! Make sure that you do not land on the edge!
- You must practise aborting jumps before you attempt more complicated jumps! Slightly bend your knees when you land on the trampoline (see '12.1 Aborting a jump').
- Limit the duration of continuous use. Take regular breaks.
12.1 Aborting a jump
If you would like to abort a jump, slightly bend your knees when landing on the jump mat. This way you slowly lose jumping power.
12.2 Basic jump (Fig. 1)
- Stand in the middle of the trampoline and always keep your eyes on the marking while jumping!
- Slowly raise your arms and push yourself up from the trampoline.
- Land back on the marking. Do not jump too high!
1
natural_image
Three sequential line drawings of a person in different postures, showing walking posture changes (no text or symbols)12.3 Knee jump (Fig. 2)
- Jump up in the same manner as the basic jump. Do not jump too high!
- Try to land on your knees while keeping your upper body upright.
- Try to get back on your feet when jumping back up.
2
natural_image
Three sequential line drawings of a person in motion, showing progressive posture changes (no text or symbols)12.4 Sitting jump (Fig. 3)
- Jump up in the same manner as the basic jump. Do not jump too high!
- Try to land in a sitting position. Do not lock your elbows, but keep your arms and hands loosely by your hips.
- Try to get back on your feet when jumping back up.
3
natural_image
Three sequential line drawings showing a person performing different postures of motion, with arrows indicating movement direction (no text or symbols)13. Maintenance
Maintenance is important for preserving the quality and safety of the trampoline. Observe the following important information to enjoy your trampoline over a long period of time.

WARNING!
You must perform the following checks at regular intervals at the beginning of and during the entire trampolining season. Failure to perform these required checks can lead to serious injury.
-
Keep all sharp-edged and pointy objects away from the trampoline, as they may damage the jump mat.
• Do not use the trampoline: -
If there are holes or tears in the jump mat.
- If the jump mat is not taut.
- If frame parts are broken.
- If the frame padding is damaged, missing or not secured.
- If rubber bands are broken or missing. Replace these immediately.
-
If the screws are loose. Tighten all screws as needed.
-
Check the trampoline for worn or missing parts before each use. The following wearing parts must regularly be checked for signs of wear: all covers and sharp edges, incl. jump mat, frame padding, safety net and foam sleeves of the net poles. Replace defective parts as needed.
- Before each use, check whether the pipes, connectors and safety bolts/pins are undamaged and cannot come loose while the trampoline is being used.
- The safety net must be replaced if signs of wear are detected.
- Replace the safety net, jump mat and protective elements every 3 years.
14. Care
To ensure a long service life of the trampoline, regularly check the cleanliness of the jump mat and interior of the trampoline.
Clean the trampoline as follows:
- Remove all debris from the trampoline, such as leaves.
- Wipe off any build-up caused by rain with a damp cloth.
- Then completely dry the cleaned areas with a dry cloth.
IMPORTANT! Never clean the trampoline with harsh cleaning agents, as these may damage the material.
15. Storage
The following components must be dismantled in order to store parts of the trampoline:
• safety net (5a) from the pole caps (8)
• net poles (2/3) with pole sleeves (4)
These components must then be stored dry, clean and at room temperature. You can find more information on disassembling the trampoline in section '9 Disassembly'.

WARNING!
Improper storage and use of the product could lead to premature wear and tear, and possible breakages in the structure.

Note
To winter-proof the rest of the trampoline, a tarpaulin can be placed over the trampoline which should then be secured against wind and the elements.
Store all parts of the trampoline dry, clean and at room temperature.
16. Accessories (optional)
You can order the following accessories for this trampoline from the service address:
- frame padding
- rubber straps
- net poles
- strap tensioner
- ring poles
- connectors
- pole caps
- jump mat with safety net

Note
Use only original replacement parts and accessories. These may be ordered from the service address.
17. Disposal
Dispose of the trampoline and the packaging materials according to current local regulations.
Packaging materials, such as plastic bags, must be kept away from children.
Keep the packaging materials out of reach of children.

Dispose of the trampoline and packaging in an environmentally friendly manner.

The recycling code serves to identify various materials that are recyclable. The code consists of the recycling symbol and a number that stands for a particular material.
18. Warranty and servicing information
The trampoline was produced with great care and subject to continuous quality control. DELTA-SPORT HANDELS-KONTOR GmbH grants private end consumers of this trampoline a three-year warranty from the date of purchase (warranty period) in accordance with the following terms. The warranty only applies to material and manufacturing defects. The warranty does not apply to parts subject to normal wear, and which are thus considered wearing parts (e.g. batteries), nor to fragile parts such as switches, rechargeable batteries, or parts made of glass.
Claims under this warranty are not valid if the trampoline is improperly used or misused, or has not been used in the intended manner or within the intended scope of use, or if the instructions for the trampoline have not been adhered to, unless the end customer verifies that the trampoline exhibits a material or manufacturing error that is not due to one of the aforementioned causes.
Warranty claims can only be asserted during the warranty period, upon provision of the original receipt. Please keep the original receipt for this purpose. The warranty period will not be extended owing to possible repairs under the terms of the warranty, statutory warranty or good will. This also applies to replaced and repaired parts.
In case of any complaints, please contact the service hotline below or contact us by email. In the event of a warranty case, we will determine whether to repair the trampoline for you for free, replace it, or reimburse you for the purchase price. This warranty excludes any further rights.
Your statutory rights, in particular warranty claims against the respective seller, are not limited by this warranty.
IAN: 388638_2104
GB Service Great Britain
Tel.: 0800 404 7657
E-Mail: deltasport@lidl.co.uk
IE Service Ireland
Tel.: 1890 930 034
(0,08 EUR/Min., (peak))
(0,06 EUR/Min., (off peak))
E-Mail: deltasport@lidl.ie
Glossary
Jump mat
The jump mat is fastened to the trampoline frame with rubber straps. The jump mat is the surface that the user bounces on.
Frame padding
The frame padding is located on top of the trampoline between the jump mat and the trampoline frame. It protects the user from potential injury due to the taut rubber straps.
Safety net
The safety net serves to protect the user from accidentally falling or jumping off the trampoline.
Rubber strap
The rubber straps make it possible to bounce on the jump mat. These form the flexible connection between the jump mat and trampoline frame.
Strap tensioner
The strap tensioner is an important tool that fastens the tensioned rubber straps around the trampoline frame. Rubber straps should never be fastened to the trampoline frame without the strap tensioner! Otherwise there is a risk of injury!
Safety fastener
The safety fastener is located on the zip fastener of the safety net. It also ensures that the trampoline entrance is closed when someone is on the trampoline. The safety fastener must always be closed together with the zip fastener.
natural_image
Three sequential line drawings of a person in different postures, showing walking posture changes (no text or symbols)natural_image
Line drawing of three sequential human motion poses: kneeling, striking forward, and rolling forward (no text or symbols)12.4 Saut assis (fig. 3)
natural_image
Three sequential line drawings showing a person in motion: jumping, kneeling, and running (no text or symbols)13. Maintenance
natural_image
Line drawing of a person in motion, showing posture with a downward arrow (no text or symbols)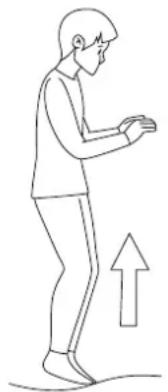
natural_image
Line drawing of a person in standing posture with an upward arrow indicating motion (no text or symbols)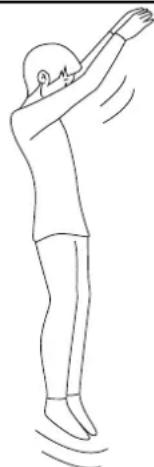
natural_image
Line drawing of a person in motion, possibly dancing or performing a gesture (no text or symbols)12.3 Kniesprong (afb. 2)
natural_image
Three sequential line drawings of a person in a kneeling posture, showing progressive movement from touching to striking (no text or symbols)12.4 Zitsprong (afb. 3)
natural_image
Three sequential line drawings showing a person in motion: jumping, kneeling, and walking (no text or symbols)13. Onderhoud
natural_image
Three sequential line drawings of a person in different postures, showing walking motion with directional arrows (no text or symbols)natural_image
Three sequential line drawings of a person in a kneeling posture, showing progressive movement from exertion to motion (no text or symbols)natural_image
Three sequential line drawings showing a person in motion: jumping, sitting, and running (no text or symbols)13. Konserwacja
natural_image
Line drawing of a person in motion, showing posture with a downward arrow (no text or symbols)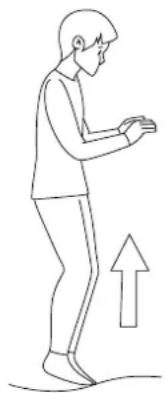
natural_image
Line drawing of a person in standing posture with upward arrow indicating motion (no text or symbols)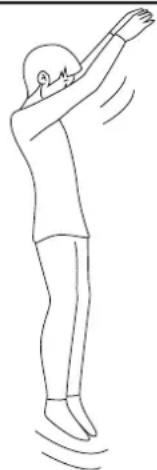
natural_image
Line drawing of a person performing a stretching or martial arts pose (no text or symbols)12.3 Skok na kolenou (obr. 2)
natural_image
Three sequential line drawings of a person in a kneeling posture, showing progressive movement from touching to striking (no text or symbols)natural_image
Three sequential line drawings showing a person in motion: jumping, kneeling, and walking (no text or symbols)13. Údržba
natural_image
Three sequential line drawings of a person performing stretching or stretching exercises (no text or symbols)12.3 Doskok na kolená (obr. 2)
natural_image
Line drawing of three sequential human motion poses: kneeling, striking forward, and rolling forward (no text or symbols)12.4 Doskok v sede (obr. 3)
natural_image
Three sequential line drawings showing a person in motion: jumping, sitting, and running (no text or symbols)13. Údržba
natural_image
Three sequential line drawings of a person in different postures, showing walking posture changes (no text or symbols)12.3 Salto de rodillas (Fig. 2)
natural_image
Line drawing of three sequential human motion poses: kneeling, striking forward, and rolling forward (no text or symbols)12.4 Salto sentado (Fig. 3)
natural_image
Three sequential line drawings showing a person in motion: jumping, sitting, and running (no text or symbols)13. Mantenimiento
natural_image
Line drawing of a person in motion with a downward arrow indicating movement (no text or symbols)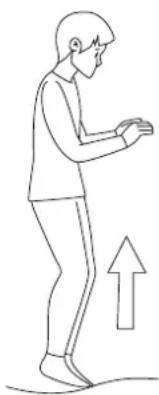
natural_image
Line drawing of a person in standing posture with an upward arrow indicating motion (no text or symbols)
natural_image
Line drawing of a person performing a stretching exercise with arms raised (no text or symbols)natural_image
Three sequential line drawings of a person in a kneeling posture, showing progressive movement from touching to striking (no text or symbols)natural_image
Three sequential line drawings showing a person in motion: jumping, kneeling, and walking (no text or symbols)13. Vedligeholdelse
natural_image
Trumbar frame with black mesh net and green base (no text or symbols)
KINDER-TRAMPOLIN MIT SICHERHEITSNETZ KIDS' TRAMPOLINE WITH SAFETY ENCLOSURE TRAMPOLINE ENFANT AVEC FILET DE SÉCURITÉ
| S. C. D. G. KINDER-TRAMPOLIN MIT SICHERHEITSNETZAufbaufring 0C. D. E. TRAMPOLINE ENFANT AVEC FILET DE SÉCURITÉNotice ce montage 5 TRAMPOLINA DLA DZIECI Z SIATKÄBEZPIECENSTWAInstructe montaje 6 DETSKÄ TRAMPOLÍNA S BEZPĚČNOSTNÚ SIETOUMarkitety výroč 7 BÖRNETRAMPOLIN MED SIKKERHEDSNET | 18. E. KIDS' TRAMPOLINE WITH SAFETY ENCLOSUREAssembly tractsura 90.00 KINDERTRAMPOLINE MET VEILIGHIEDISNETMonkogakadating 4 DETSKÄ TRAMPOLÍNA S BEZPĚČNOSTNÍ SÍTINíroči i kautzona 5 CAMA ELÁSTICA CON RED DE SEGURIDAD PARA NÍNOSInstructiones de montaje 6 CE |
图□
Kappen Sie vor der Leuer die Seite sind den Abblungen aus und wachem. Die sie zuschlebend mit des Funktoren der Arbeit betraus.
(20.2)
"In the meaning, likely to be different from the present of the factors' percent
(20) (3)
Diplo in general with a short amount of water, the water is necessary to opt for the liquid
(3) "0"
(5) This program is a role in the world by an organization of various resources in the contemporary framework.
(2)
The unit of the world's 1-year period was a major market in the U.S. and the U.S.
(2)
Ante se ley, ata la pagaró con las工作的os y entelarose seguidamente con los los funcionos del apoyo.
(60) This older and illustrated owners of the former class of property, including a operation described
| C#1/2 Assembly and safety information, Page 24 | ||
| P/SC Component designations (e.g., 2018) | ||
| H/SC | Municipal designations | Page 25 |
| P | Municipal designations | Fargo 10 |
| S | Municipal designations | Margo 30 |
| D | Municipal designations | Sankey 60 |
| R | Municipal designations | Margo 10 |
| S | Municipal designations | Fargo 75 |
| D | Municipal designations | Sono 15 |
ENGLISH
- 2017年1月1日
32.时间
1
□137061
Lipetel 5V/41
[Unreadable]
8
IAN 388638_2104IAN 388638_2104
text_image
Technical diagram showing mechanical components and dimensions with labeled parts and measurements
SCHRITT/STEP/ÉTAPE/STAP/KROK/KROK/KROK/PASO/TRIN 1
flowchart
graph TD
    A["Component 1b"] --> B["Warning Icon"]
    C["Component 1a"] --> B
    D["Component 9"] --> E["Arrow to next component"]
    F["Component 1"] --> G["Arrow to next component"]
    H["x6"] --> I["Arrow to next component"]
SCHRITT/STEP/ÉTAPE/STAP/KROK/KROK/KROK/PASO/TRIN 2
text_image
Technical diagram showing a circular mechanical component with labeled parts and an inset close-up of the cross-section.SCHRITT/STEP/ÉTAPE/STAP/KROK/KROK/KROK/PASO/TRIN 3
text_image
Technical diagram showing a mechanical assembly with numbered parts and corresponding dimension annotations in Chinese.SCHRITT/STEP/ÉTAPE/STAP/KROK/KROK/KROK/PASO/TRIN 4
text_image
1x 5 30x 6 101x 5 6 5b 6a 6b 1 2 3 4 x30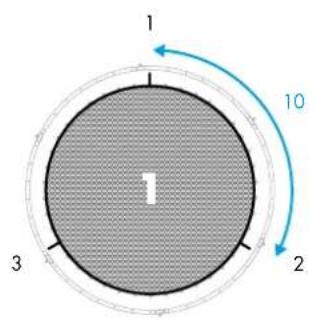
text_image
1 10 2 3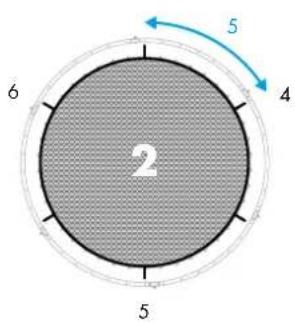
text_image
2 5 6 4 5
text_image
7 8 9 10 3SCHRITT/STEP/ÉTAPE/STAP/KROK/KROK/KROK/PASO/TRIN 5
natural_image
Technical illustration of a trampoline with green and yellow bands, showing structural components and a downward arrow indicating motion (no text or symbols present)SCHRITT/STEP/ÉTAPE/STAP/KROK/KROK/KROK/PASO/TRIN 6
text_image
Technical diagram of a trampoline with labeled components and cross-sectional viewsSCHRITT/STEP/ÉTAPE/STAP/KROK/KROK/KROK/PASO/TRIN 7
text_image
x6 2 3 3 9a 6x 2 6x 3SCHRITT/STEP/ÉTAPE/STAP/KROK/KROK/KROK/PASO/TRIN 8
text_image
6x 4 4 x6SCHRITT/STEP/ÉTAPE/STAP/KROK/KROK/KROK/PASO/TRIN 9
text_image
Diagram of a trampoline with labeled parts and a magnified view showing a mechanical component with numbered parts.
6x
8

SCHRITT/STEP/ÉTAPE/STAP/KROK/KROK/KROK/PASO/TRIN 10

text_image
5a 5d 5e x6 8 5cINHALTSVERZEICHNIS
- Package contents/parts list 25
- Safety information 26-27
2.1 Safety information for use 26-27
2.2 Safety information for assembly 27
2.3 Maintenance/care 27 - Assembling the base frame (steps 1-3) 28
- Installing the jump mat (step 4) 29
- Securing the frame padding (steps 5-6) 30
- Installing the safety net (steps 7-9) 30
- Securing the safety net (step 10) 31
- Opening/closing the safety net 31
These assembly instructions will show you how to assemble your trampoline in 10 easy steps.
We hope you have a lot of fun with your new trampoline for years to come.
The separately enclosed instructions for use contain additional information on the following topics:
- technical data
- intended use
- selecting the right location
• use - disassembly
- transporting
- weather conditions
- jumping techniques
- maintenance
- care
- storage
- accessories (optional)
- disposal
• warranty and servicing information
(1) frame pole 6 x
(2) upper net pole 6 x
(3) lower net pole 6 x
(4) pole sleeve 6 x
(5) jump mat 1 x
(5a) safety net 1 x
(5b) eyelet 30 x
(5c) safety net strap 6 x
(5d) safety fastener 1 x
(5e) zip fastener 1 x
(6) rubber strap 30 x
(7) foot 6 x
(8) pole cap 6 x
(9) connector 6 x
(10) strap tensioner 1 x
(11) frame padding 1 x
(11a) crawling guard 1 x
(11b) stumble guard 6 x
(11c) crawling guard bands 6 x
(12) spring ring 6 x
(13) washer 12 x
(14) screw 12 x
(15) hex key 1 x
assembly instructions 1 x
instructions for use 1 x

WARNING! Not suitable for children under 36 months. Choking hazard. Small parts.
- The trampoline is suitable for children ages 3 years and up, as children below 3 years of age may be considerably less able to estimate the physical and dynamic characteristics of the jump mat, and may lack the necessary coordination skills.
- The trampoline is not intended for use by persons (including children) with impaired physical, sensory or mental capabilities or with a lack of experience and/or knowledge, unless they are supervised by an individual responsible for their safety or have been instructed by that individual on how to use the trampoline.
- Pregnant women must not use the trampoline.

WARNING!
- Do not perform flips. Landing on your head or neck can result in serious injury, paralysis or even death!
- Do not perform any reckless jumps and do not jump too high or above the safety net!
- Only for domestic use.
- Do not engage in jumping competitions or similar behaviour.
- Never jump directly from the jump mat onto the ground! There is a high risk of injury due to the hard impact!
- Only one user at a time. Risk of collision!
- Do not use the trampoline if you are injured or your health is impaired, e.g. due to ankle injuries, back pain, pregnancy etc.
- Leave the trampoline immediately if you feel dizzy or experience a rapid heartbeat etc., and consult a doctor right away.
• Make sure that there are no sharp hooks, eyelets or similar objects on your clothing. There is a risk of injury! - Never intentionally jump into or beyond the safety net, nor try to climb up onto it or hang from the pole caps. There is a risk of injury!
- Before getting on the trampoline, make sure that there are no persons, animals or objects on or under the trampoline! There is a risk of injury to the animal as well as the user!
2.1 SAFETY INFORMATION FOR USE
• Warning. Maximum 25kg.
This trampoline is designed for a maximum user weight of 25kg. Do not use the trampoline if you weigh more than this.
- Warning. Do not use if the jump mat is wet.
- Warning. Empty your hands and pockets before jumping.
- Warning. Always jump in the middle of the jump mat. Never on the edge!
- Warning. Do not eat while jumping.
- Warning. Do not exit by a jump.
- Warning. Limit the duration of continuous use (take regular breaks).
- Warning. Do not wear shoes while jumping.
- Warning. Secure the trampoline and do not use it in strong wind. (See section '11 Weather conditions'.)
- Warning. Always close the net opening before jumping.
- Check that the foam sleeves are properly fitted before jumping.
• Adult supervision required.
- If you belong to a risk group due to your health, you must consult your doctor before using the trampoline.
- The trampoline is not suitable for therapeutic purposes.
- Check the trampoline for damage, wear, cracks and missing parts before each use! It must not be used if there is visible evidence of damage or defects.
- Before each use, make sure that the trampoline is properly assembled and that the frame padding and safety net are securely attached and properly positioned.
- Always jump from and try to land on the marking on the jump mat. If you land next to the marking, abort your jump immediately and start again from the marking.
- Check the connection between the feet and frame parts before each use.
- Keep your eyes on the middle of the trampoline when jumping. This helps you to stay in control.
• Always make sure that the adult supervising is familiar with the trampoline and its characteristics. - Only jump under sufficient lighting conditions. Never jump in the dark.
2.2 SAFETY INFORMATION FOR ASSEMBLY
- Warning. The trampoline must be assembled by at least two adults in accordance with the assembly instructions, and then examined before being used for the first time.
- Make sure you use the trampoline only after it has been completely assembled.
- Take care not to get pinched or caught in any parts during assembly! Wear protective gloves when assembling the trampoline. Take care with pinch points.
- Self-locking nuts are used for the assembly. These are suitable for one-time use only and must be replaced after being removed.
- Foreign objects must not be attached to or hung from the safety net.
- Use only original replacement parts and accessories. Contact our customer service to obtain these.
- The trampoline must only be used if it is properly assembled.
2.3 MAINTENANCE/CARE
- Check the screw connections at regular intervals and tighten them.
- Do not make any improper modifications to the trampoline.
- Defective parts must be replaced with original replacement parts only. Contact our customer service to obtain these.
- Replace the safety net, jump mat, frame padding and foam sleeves on the net poles every 3 years.
i Note
- If you have long hair, please tie it up with a hair band before getting on the trampoline!
- We recommend wearing a long-sleeved top and long trousers to protect yourself against scratches and scrapes. Your clothing must be close-fitting but comfortable.
- Avoid jumping too high and do not overestimate your abilities. Gradually increase the intensity of your jumps but do not overdo it. Always make sure that you have control over your jumps.
3. ASSEMBLING THE BASE FRAME
STEP 1

WARNING!
Due to its size, the trampoline must be assembled and installed by at least two adults.

WARNING!
Wear protective gloves when assembling the trampoline and make sure that you are working deliberately and carefully. There is a risk of injury!
- Lay one frame pole (1) and one connector (9) in alternating fashion to form a circle.

Note
The frame poles (1) are narrower at one end than at the other. Lay the frame poles (1) and connectors (9) in a circle so that each narrow and broad end of a frame pole (1a/1b) is next to a connector (9). The drill holes of the connectors (9) are facing outwards.
- Insert the broad end of a frame pole (1a) into a connector (9) and, on the other side, the narrow end of another frame pole (1b).

Note
Always insert the broad end of a frame pole (1a) into a connector (9) before inserting the narrow end (1b) on the other side.
- Repeat step 2 until you have formed a complete circle.

Note
The ends of the frame poles (1) must be completely inside the connectors (9).
STEP 2
- Insert one screw (14) with a washer (13) into the drill hole of each connector (9) and tighten the screw with the hex key (15).
- Repeat step 1 until all frame poles (1) are screwed with the connectors (9).
STEP 3
- Place a foot (7) on the bottom openings of the connectors (9) and fasten each with a washer (13), a spring ring (12) and a screw (14).

Note
The feet (7) must be pointing outwards.
- Repeat step 1 until a foot (7) has been fastened under each connector (9).
STEP 4
- Spread out the jump mat (5) with safety net (5a) within the base frame. Make sure that the safety net (5a) is on top of the jump mat.

WARNING!
Be careful when inserting the rubber straps (6)! The rubber straps (6) are under tension during insertion! There is a risk of injury!

WARNING!
Be careful when inserting the rubber straps (6) and follow the instructions below precisely so that the jump mat (5) is set up properly. Otherwise there is a risk of injury!

Note
The jump mat (5) is equipped with 30 eyelets (5b). Place the jump mat (5) in the middle of the base frame such that the opening of the safety net (5a) is between two feet (7).
- Take the eyelet (5b) (point 0) directly below the entrance to the safety net (5a) and pull the rubber strap (6) with the end of the strap (6a) through it until the ball (6b) of the rubber strap (6) is on the side of the eyelet (5b).
- Place the end (6a) of the rubber strap (6) onto the frame between two feet (7).
- Pass the strap tensioner (10) through the end of the strap (6a) below the frame.
- Grab the ball (6b) of the rubber strap (6) with the hook of the strap tensioner (10) and press the strap tensioner (10) vertically downwards. The rubber strap (6) is tightened towards the jump mat (5) with the strap tensioner (10).
- Lever the strap tensioner (10) all the way back and pull the ball (6b) below the rubber strap (6a) back.
- The end of the strap (6a) contains the ball (6b) of the rubber strap (6), and you can remove the hook of the strap tensioner (10) from the ball (6b) of the rubber strap (6).

WARNING!
Always use the strap tensioner (10) to secure the rubber straps (6).
Make sure that the rubber strap (6) is completely pulled around the ball (6b). Otherwise there is a risk of injury!
- Count another 10 eyelets (5b) down and secure the 11th eyelet (5b) to the frame with a rubber strap (6).
- Count another 10 eyelets (5b) down and secure the 21st eyelet (5b) to the frame with another rubber strap (6).
- Starting at point 0, count 5 eyelets (5b) down and secure it to the frame with a rubber strap (6). Then count another 10 eyelets (5b) down and secure the 15th down and secure it to the frame with a rubber strap (6). Repeat this until you have returned to point 0.
- Fasten the rest of the eyelets (5b) to the frame with the rubber straps (6) in any order.
5. SECURING THE FRAME PADDING
STEP 5
- Place the frame padding (11) on the frame poles (1) so that you can place each opening of the frame padding (11) over an opening of the connector (9a).
- Pull the crawling guard (11a) downward around the trampoline.

Note
There is a stumble guard (11b) over each foot.
STEP 6
- Tie the ends of the crawling guard bands (11c) together and pull them over the end of the foot (7).
- Pull the rubber straps (11d) of the stumble guard (11b) over the end of the foot (7).
- Repeat steps 3 and 4 until the crawling guard bands (11c) and rubber straps (11d) of the stumble guard (11b) are fastened to each foot (7).

Note
The stumble guard (11b) must be positioned over the foot (7).
6. INSTALLING THE SAFETY NET
STEP 7
- Connect the net poles (2) and (3) to each other.
- Place the end of the net pole (3) on the opening (9a) of the connector (9).
- Repeat steps 1 and 2 five times.

Note
The net poles (2) and (3) must arch outwards.
STEP 8
- Pull a pole sleeve (4) over the net poles (2) and (3).
- Repeat this step five times.
STEP 9
- Place a pole cap (8) on the end of the net pole (2).
- Repeat this step five times.
STEP 10
- Take a safety net strap (5c) and secure it to the nearest pole cap (8).
- Repeat this step until all safety net straps (5c) are fastened to the pole caps (8).

Note
The zip fastener (5e) on the safety net (5a) must be closed.
8. OPENING/CLOSING THE SAFETY NET

WARNING!
Before getting on the trampoline, make sure that there are no persons, animals or objects on or under the trampoline! There is a risk of injury to the animal as well as the user!

WARNING!
Do not exit by a jump.
- Open the safety fastener (5d) and then the zip fastener (5e) on the safety net (5a) in order to get onto the trampoline.
- Close everything before jumping and after getting off the trampoline.