IAN 61132 - Trampoline CRIVIT - Free user manual and instructions
Find the device manual for free IAN 61132 CRIVIT in PDF.

| Product Type | Trampoline with Enclosure |
| Brand | Crivit |
| Model | IAN 61132 |
| Shape | Round |
| Diameter | Approximately 305 cm (10 ft) |
| Jumping Surface Diameter | Approximately 250 cm |
| Frame Material | Galvanized Steel |
| Number of Springs | 72 |
| Spring Material | Galvanized Steel |
| Mat Material | Polypropylene (PP) |
| Safety Padding | Foam Padding on Springs |
| Enclosure Included | Yes |
| Enclosure Material | Polyethylene (PE) |
| Number of Enclosure Poles | 6 |
| Maximum User Weight | 100 kg |
| Recommended Age | 6 years and up |
| Assembly Required | Yes (2 adults recommended) |
| Product Weight | Approximately 42 kg |
| Package Dimensions (L x W x H) | 110 cm x 60 cm x 30 cm |
| Warranty | 2 years |
| Country of Origin | China |
| Certifications | CE, TÜV |
| Maintenance | Check for damage before use, lubricate springs occasionally |
| Safety Notes | Always use with enclosure, no somersaults, supervise children |
| Spare Parts Availability | Springs, mat, padding, net available from manufacturer |
Frequently Asked Questions - IAN 61132 CRIVIT
User questions about IAN 61132 CRIVIT
0 question about this device. Answer the ones you know or ask your own.
Ask a new question about this device
Download the instructions for your Trampoline in PDF format for free! Find your manual IAN 61132 - CRIVIT and take your electronic device back in hand. On this page are published all the documents necessary for the use of your device. IAN 61132 by CRIVIT.
USER MANUAL IAN 61132 CRIVIT
Assembly and safety advice
FI
PIHATRAMPOLIINI
GB / IE Assembly and safety advice Page 3
Description of parts....Page 4
Technical data......Page 4
Safety instructions
Safety instructions for assembly Page 4
Safety instructions for use of the trampoline....Page 5
Assembly
Assembling the lower frame....Page 6
Installing the mat....Page 7
Fitting the safety pad....Page 7
Fitting the top frame Page 7
Fitting the safety net Page 7
Use
Trampolining....Page 8
Cleaning and storage Page 8
Warranty Page 8
Disposal Page 9
Proper use/Description of parts/Technical data/Safety instructions
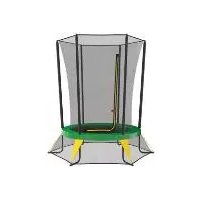
Garden Trampoline
- Proper use
The trampoline and safety net is intended for use as a piece of training equipment in private households. It is only suitable for outdoor use. It is not approved for installation and use for therapy or professional purposes. The trampoline is only suitable for adults and young people of 14 years and above with a maximum weight of 150 kg. The product is not designed for commercial use.
● Description of parts
1 Trampoline mat
2 Safety pad
3 Frame part A (lower frame)
4 Frame part B (lower frame)
5 Centre pole (lower frame)
6 W-shaped stand
7 Spring
8 Cable tie for warning sign
9 Warning sign (lower frame)
10 Spanner
11 Spring tensioner
12 Hexagon key (4 mm)
13 Centre pole frame A
14 Centre pole frame B
15 Spacer
16 Shim
17 Screw
18 Lock nut (M6, 10 mm)
19 Cap
20 Warning sign (top frame)
21 Safety net (top frame)
22 Fastening (centre pole frame)
- Technical data
Dimensions: approx. ∅ 3.04 m × 2.50 m
Weight: 63 kg
Max. load: 150 kg

Safetyinstructions
PLEASE READ THE ASSEMBLY INSTRUCTIONS BEFORE USING THE PRODUCT! PLEASE KEEP THE ASSEMBLY INSTRUCTIONS IN A SAFE PLACE!
■

DANGWARNING! TO LIFE AND DANGER OF ACCIDENTS FOR INFANTS
AND CHILDREN! Never leave children alone and unsupervised with the packaging material. Danger of suffocation. Always keep children away from the product. This product is not a toy!
Children or persons who lack the knowledge or experience to use the device or whose physical, sensory or intellectual capacities are limited must never be allowed to use the device without supervision or instruction by a person responsible for their safety. Children must never be allowed to play with the device.
- Keep the trampoline and all parts out of the reach of young children. They could swallow and choke on small parts, and there is also a risk of injury.

Safety instructions for assembly
!
CAUTION! RISK OF INJURY! Make sure that all parts are undamaged and correctly assembled. Improper assembly may result in injury. Damaged parts could adversely affect safety and function.
The trampoline must only be assembled and put up by adults.
!
CAUTION! RISK OF INJURY! Take care that you do not trap or crush your fingers when putting up the trampoline.
■

Wear protective gloves.
■
Do not assemble and use the trampoline if any parts are missing or damaged. Check the trampoline before every use.
Safety instructions
CAUTION! RISK OF INJURY! Do not modify the trampoline or any of the accompanying parts, and do not carry out any repairs yourself. Any necessary repair work must be carried out by a specialist. Improperly repaired parts can cause accidents.
The trampoline is only designed for outdoor installation and use. Assemble the trampoline on a sufficiently large area of space. Take care that the trampoline is not close to windows, walls or trees. At least 7.5 m of space must be free above the trampoline, otherwise there is a risk of injury.
Assemble the trampoline on a firm and level surface only. Make sure that it is securely and safely positioned. Do not place the trampoline on smooth surfaces, e.g. on tiled floors. Take care with hard, smooth surfaces that the trampoline cannot slip. Use slip-resistant material or similar to prevent slippage.

Safety instructions for use of the trampoline
DANG RITONING! LIFE AND RISK OF INJURY!
Never perform somersaults or flips on the trampoline. Landing on your head or neck can result in serious injury, paralysis or even death. Do not perform dangerous jumps in which you could land on your stomach or back. Do not jump above the height of the safety net. Do not engage in trampolining contests or similar.
CAUTION! RISK OF INJURY! The trampoline must never be used by two or more people at the same time. Use by more than one person at a time increases the risk of injury.
Before beginning training, have your doctor carry out a general medical check-up and clarify any possible heart, circulatory or orthopaedic problems.
Wrong and excessive training can endanger your health. If you feel any pain while exercising, you should stop immediately and consult a doctor.
WARNING! Leave the trampoline immediately if you feel dizzy or your heartbeat becomes rapid. Seek medical advice immediately in such cases.
CAUTION! RISK OF INJURY! Only use the trampoline if you are completely healthy. Do not use the trampoline if you have sprained joints or if you e.g. suffer from back problems.
WARNING! Pregnant women, people suffering from spinal injury, organ damage or injury to the ankle joints are prohibited from using the trampoline.
Before you climb onto the trampoline make sure that the jumping mat 1 and the protective pad 2 are completely dry!
Only ever jump in the middle of the jumping mat, and never at the edge!
■ Make sure that there are no sharp protrusions, hooks and eyes, or similar on your clothing. There is a risk of injury!
Only use the trampoline under supervision. Always observe the safety instructions contained in this manual and the warning signs and stickers on the trampoline. Draw the attention of every user of the trampoline to these safety instructions.
Always make sure that the supervisor is familiar with the trampoline and its features! Never leave the trampoline unattended.
Check before every use that the trampoline is properly and securely assembled and set up and that the safety pad and safety net are securely and firmly in place. Pad the surface under the trampoline with mats or similar material. Do not use the trampoline if it or the safety pad is wet or dirty.
Check the trampoline mat, safety pad and safety net for signs of damage before each use. If you find any signs of damage, stop using the trampoline. Replace the damaged parts immediately.
Check the trampoline for damage, wear, excessive moisture, dirt and missing parts before every use. Do not use the trampoline in the event of visible damage.
CAUTION! RISK OF INJURY! Make sure that there are no sharp, pointed or protruding objects on or in your clothing. These could cause serious injury to you and others. Remove
Safety instructions / Assembly
glasses, jewellery, watches, hair clips and similar objects and empty your pockets before using the trampoline.

CAUTION! RISK OF INJURY! Check before use that no person, animal or object is under the device.

CAUTION! RISK OF INJURY! Before using the trampoline, carry out a few stretching exercises to warm up your muscles.
Always wear close-fitting, comfortable clothing when trampolining. Always wear a long-sleeved t-shirt, shirt and long trousers to protect your skin from scratches and scrapes.
■ Never jump on the trampoline in pointed shoes or outdoor footwear. Always wear gym shoes only. Wearing other footwear could damage the trampoline.
If you have long hair, tie it up before using the trampoline.
No items must be fastened to the safety net – except what is expressly indicated by the manufacturer or the importer!
Do not use the trampoline barefoot.
CAUTION! RISK OF INJURY! Do not jump off the trampoline. You could injure yourself when you hit the ground.
CAUTION! RISK OF INJURY! Do not jump onto the trampoline from a tree or balcony, etc.
Do not use the trampoline under the influence of alcohol or other substances.
Do not smoke when you are using the trampoline
Do not use the trampoline if you are tired. This can easily lead to a loss of control and lack of concentration.
Do not eat or chew gum when using the trampoline, as this can lead to choking.
Do not use the trampoline in the dark.
■ Always close the zip on the safety net after yo have entered the trampoline and make sure that the person supervising closes the safety lock.
Begin slowly with a few simple jumps. Do not bounce too high and do not overestimate your capabilities. Make sure that you are in control of your movements when jumping. Always bounce in the centre of the trampoline on the white mark and try to land in the same position. Try not to land more than 30 cm away from the
white mark. Bounce on the white mark when you jump again. Keep your eye on the centre (white mark) of the trampoline when jumping, as this helps you to bounce with greater control. Never jump on the safety pad.
■ Practise stopping before attempting any complicated jumps.
■ Never jump intentionally into or over the safety net. Do not use the frame of the safety net to pull yourself up or to hang on to.
Never jump for too long. After a while, the risk of high spirits and inattention occurring increases. This in turn increases the risk of injury. Take regular pauses after a couple of jumps.
Do not use the trampoline in strong winds or a storm. Keep the trampoline in a sheltered place during strong winds or stormy weather.
If you are not using the trampoline, make sure that it cannot be used without supervision or without permission.
Check before every use, especially the connection on the w-shaped stand with the frame.
- Assembly
- Assembling the lower frame
Mount the centre po5 on the W-shaped stand 6 (see Fig. A).
Make sure that the fastening nipple engages.
Place the frame parts A on to the centre poles 5 (see Fig. B).
ATTENTION! Ensure that the fastening nipples of the W-shaped stands 6 point inwards while doing this! The construction must form a circle at the end of this step.
Insert the frame parts 8 between the frame parts A 3. When doing this, if necessary lift one end of the frame parts A 3 slightly out of the centre poles 5 and insert it again.
Two people are essential to fit the final frame part B 4: Insert one end of the final frame part B 4 into part A 3. The second person must now fix the frame on the opposite end of the still-open frame. Now press the centre pole 5 under the still-open connection inwards
Assembly
and at the same time fit the open ends of frame parts A 3 and B 4 together.
☐ Attach the warning sign to the lower frame with a cable tie 8 (see Fig. C).
☐ When attaching the sign, ensure that the cable tie 8 also passes around the stand so that the warning sign 9 cannot slip out of place.
- Installing the mat

CAUTION! RISK OF INJURY! Take care when installing the springs 7. The springs 7 are under tension and could cause injury.
1) Spread out the mat 1 inside the lower frame (see Fig. D).
2) Insert the first spring 7 in one of the eyelets in the mat 1 (see Fig. D).
3) Then insert the other end of the spring in Position O on the lower frame (see Fig. D).
4) Insert another spring 7 in the opposite eyelet in the mat 1.
5) Hook the end of the spring in the spring tensioner 11 and pull the spring 7 towards the frame. Hook the spring 7 onto the lower frame in position 32 (see Fig. D).
☐ Proceed in the same way with the remaining springs 7 and hook them onto the lower frame one after the other in the following positions: 16 and 48, 8 and 40, 24 and 56 (see Fig. D).
☐ Hook the remaining springs as described above into the free positions on the lower frame.
● Fitting the safety pad
Place the safety pad on the trampoline so that all the springs 7 as well as the frames A 3 and B 4 (metal parts) are covered.
Fasten the safety pad to the lower frame by wrapping the strap once around the lower frame pole. Hook the hook into one of the eyes of the trampoline mat 1 (see Fig. E).
Note: Do not fasten the strap too tightly. Ensure that there is still some scope for a minimum amount of movement.
Now put the continuous outer skirt of the safety pad over the frame parts A 3 and B 4.
● Fitting the top frame
Fasten the centre poles frame 18 to the centre poles (lower frame) 5 in each case with a fastening (centre pole frame) 22 and the corresponding fastening set (screw 17, shim 16, lock nut 18 and cap 19) (see Fig. F).
☐ To do this, first remove the screw, the shim and the lock nut from the fastening 22. Now guide the centre pole frame A 13 through the locating ring of the fastening 22 and connect it to the centre pole (lower frame) 5 (see Fig. F).
When doing this, place a space at the height of the lower fastening hole. Using the Hexagon key 12 and the spanner, connect the centre pole frame A 13 to the centre pole (lower frame) 5 with the screw 17, shim 16 and lock nut 18. Then protect the exposed screw ends with the caps 19 (see Fig. F).
Fix the connection by fastening the fastening with the screw and the lock nut. The fastening to the centre pole (lower frame) 5 must be attached at the same height as the small feet of frame part A (lower frame) 3 (see Fig. F).
● Fitting the safety net
☐ Spread out the safety net on the trampoline mat 1.
☐ Push the centre poles frame 12 into the pockets on the safety net 21 (see Fig. G) so that the bottom ends of the poles still project.
☐ Fit the centre poles frame 12 on to the centre poles frame A 13 (see Fig. H). Ensure that the safety net does not become trapped. Make sure that the safety nipple engages.
☐ Insert the hooks of the safety net into the eyelets on the mat 1 (see Fig. I).
Assembly / Use / Cleaning and storage / Warranty

CAUTION! Make sure that no large gaps are formed. You or other trampoline users could otherwise get caught in the safety net.
☐ Close the zip on the safety net and close the safety lock until it audibly and noticeably clicks in place (see Fig. 1).
☐ Fix the warning sign ☐ on the top frame with the cable ties 8.
☐ When installing the net, ensure that you do not inadvertently change the position of safety pad. If the safety pad slides down during the installation of the net, the pole ends are unprotected.

Use

Trampolining
☐ Check before every use, especially the connection on the w-shaped stand with the frame.
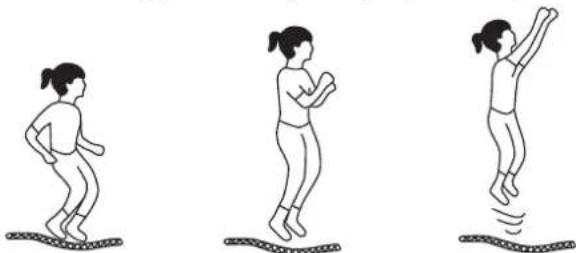
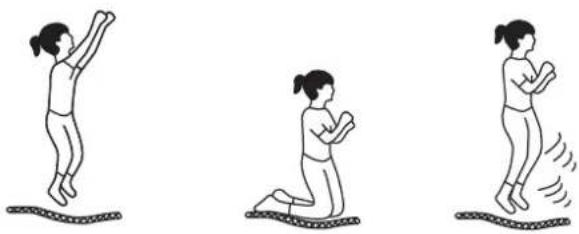
Basic bounce:
Stand on the white mark in the centre of the trampoline.
□ Swing your arms up and jump carefully.
natural_image
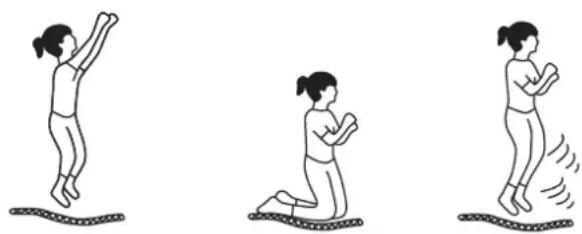
Three sequential illustrations of a person jumping with different motion poses (no text or symbols)Knee bounce:
□ Start with the basic bounce.
After a few jumps, and when you feel confident enough, bend your knees in the air and keeping your upper body in upright position and try to land on your knees.
On the next bounce, try to jump high enough to land back on your feet.
natural_image
Three sequential illustrations of a person performing a kneeling or stretching pose on a mat, with no text or symbols present.Stop bounce:
If you wish to stop jumping, bend your knees slightly when you land to cushion the bounce.

Cleaning and storage
Do not use corrosive or abrasive cleaning agents as they may damage the product.
☐ Use a dry fluff-free cloth when you are cleaning or polishing the product.
Remove any stubborn dirt using a moist cloth.
Store the trampoline and all the accompanying parts in a dry place over the winter. Take care that the trampoline is completely dry before you store it away.
In stormy weather, keep the trampoline in a location that is sheltered from the wind to prevent it from being blown away or falling over.
Keep the trampoline and all parts carefully in the packaging so that no parts can go missing.

Warranty
The warranty period is 36 months from the date of purchase. Please retain the sales voucher as proof of purchase.
The following warranty conditions shall apply: This article has been carefully manufactured and conscientiously checked before delivery. Under the warranty the manufacturer shall rectify free of charge defects that can be attributed to material or manufacturing faults. Defects that result from improper handling, non-observation of the operating instructions, improper assembly, inadequate care or maintenance, moving the article incorrectly, the use of force or normal wear and tear are not
Warranty / Disposal
covered by this warranty. Wear parts excluded from the warranty and the services performed under the warranty. This refers to the following parts of the product: Trampoline mat, safety pad, net, foam sleeves for the support tubes, caps for the support tubes. The performance of services under the guarantee does not extend or renew the 36 months guarantee period.
- Disposal

The packaging is made entirely of recyclable materials, which you may dispose of at local recycling facilities.
Contact your local refuse disposal authority for more details of how to dispose of your worn-out product.

natural_image
Three sequential illustrations of a person performing a jumping exercise, shown in different poses (foot, arm, leg), with no text or symbols present.Knähopp:
natural_image
Three sequential illustrations of a person performing a kneeling or stretching exercise on a mat, with no text or symbols present.Stoppa hoppet:
natural_image
Three sequential illustrations of a person jumping rope, showing different motion states (no text or symbols)Knæ-hop:
natural_image
Three sequential illustrations of a person performing a kneeling or stretching exercise on a mat, with no text or symbols present.Hop affjedres:
natural_image
Three sequential illustrations of a person performing different physical poses: running, jumping, and falling (no text or symbols)Skok na koljena:
□ Počnite sa osnovnim skokom.
Nakon nekoliko skokova, kad postanete sigurniji, savijte koljena u zraku i pokušajte se spustiti na njih. Pri tome rastegnite gornji dio Vašeg tijela.
☐ Pokušajte pri slijedećem skoku tako visoko skočiti, da se uspijete ponovno zaustaviti na Vašim nogama.
natural_image
Three sequential illustrations of a person performing a kneeling or stretching exercise on a mat, with no text or symbols present.


IAN 61132
Milomex Ltd.
c/o Milomex Services
Hilltop Cottage
Barton Road
Pulloxhill
Bedfordshire
MK45 5HP
UK
Model no.: Z30751
Version: 11/2011
© by ORFGEN Marketing
Last information update · Tietojen tila · Informationsstatus