
TP5632 - Trampoline CRIVIT - Free user manual and instructions
Find the device manual for free TP5632 CRIVIT in PDF.

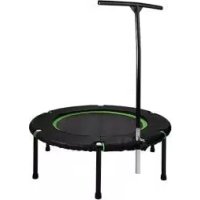
| Product type | Fitness trampoline |
| Brand | CRIVIT |
| Model | TP5632 |
| Dimensions (diameter) | approx. 112 cm |
| Height (without bar) | approx. 35.8 cm |
| Dimensions of training bar | 105 cm x 60 cm (H x W) |
| Weight of trampoline | approx. 9155 g |
| Weight of training bar | approx. 1800 g |
| Maximum load | 120 kg |
| Recommended age | From 14 years old |
| Use | Indoor, private |
| Package contents | Trampoline, edge cover, T-handle, 6 support legs, 6 caps, 1 pair of non-slip socks, 1 DVD, instruction manual |
| Warranty | 3 years |
| Care and cleaning | Clean with water only, dry with a cloth, store in a dry and temperate place |
| Safety | Check before each use, do not use if damaged, do not jump on the cover, do not use if weight > 120 kg |
| Spare parts | Available at www.delta-sport.com, section Service - Lidl spare parts service |
Frequently Asked Questions - TP5632 CRIVIT
User questions about TP5632 CRIVIT
0 question about this device. Answer the ones you know or ask your own.
Ask a new question about this device
Download the instructions for your Trampoline in PDF format for free! Find your manual TP5632 - CRIVIT and take your electronic device back in hand. On this page are published all the documents necessary for the use of your device. TP5632 by CRIVIT.
USER MANUAL TP5632 CRIVIT
Instructions for use


DE AT CH
Lieferumfang 8
Technische Daten 8
Verwendete Symbole 8
Risk of injury! 30-31
Special precaution - risk of injury for children! 31
Hazards due to wear 31
Assembly 31
Disassembly 31
Adjusting the bar 31-32
General exercise notices 32
Warm up 32
Suggested exercises 32-35
Stretching 35
Care and storage 35
Disposal 35
3 Years Warranty 35

With your purchase you have decided on a high-quality product. Get to know the product before you start to use it. Carefully read the following operating instructions.
Use the product only as described and only for the given areas of application.
Keep these instructions safe. When passing the product on to a third party, always make sure that the documentation is included.
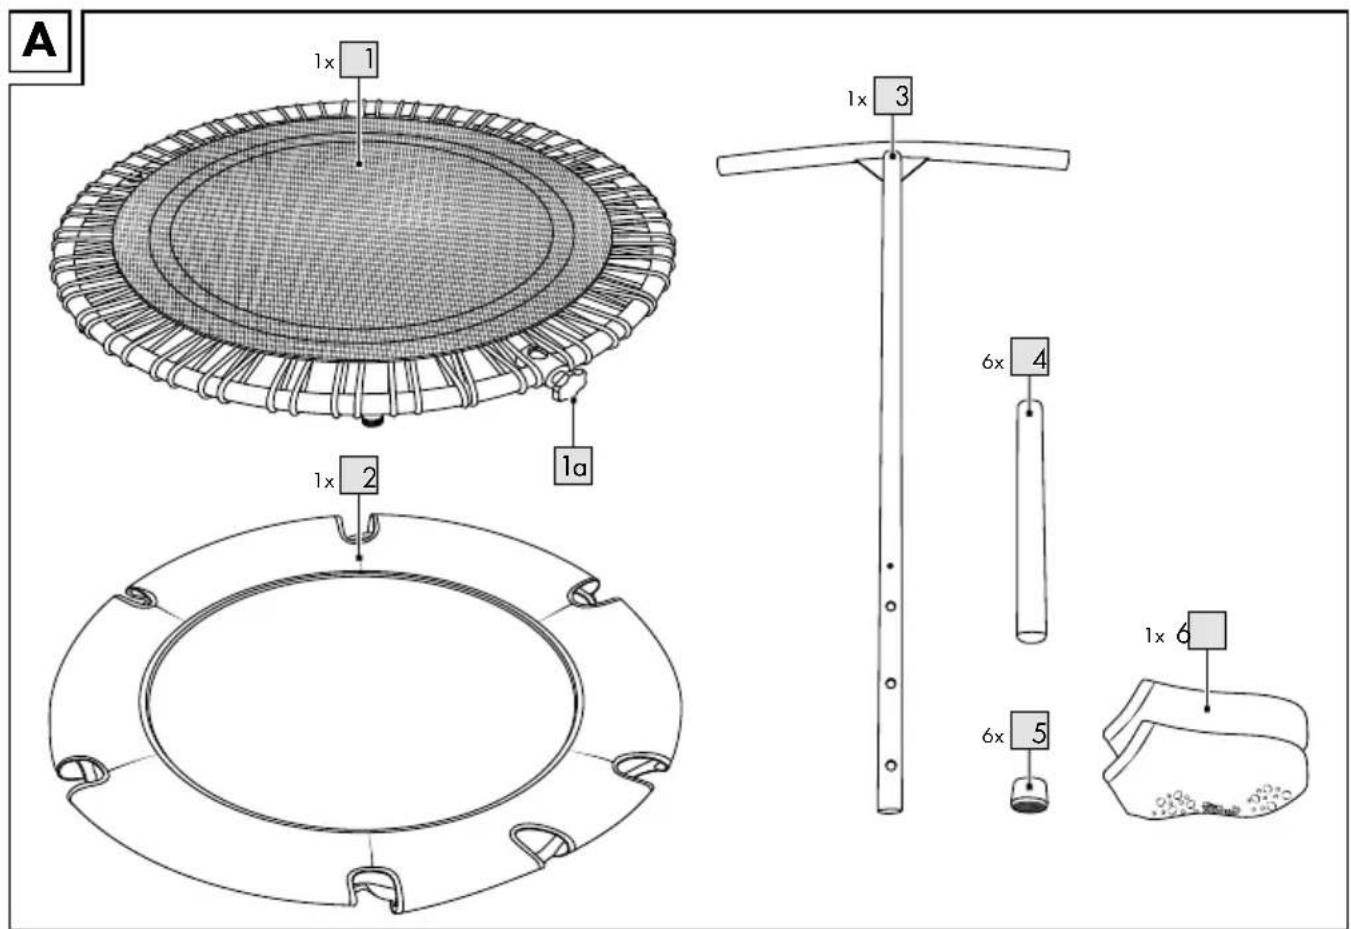
Contents (Fig. A)
1 x Fitness Trampoline (1)
1 x Safety pad (2)
1 x T-handle (3)
6 × Leg (4)
6 x Leg cap (5)
1 Pair non-slip socks (6)
1×DVD
1 x Instructions for use
Technical Data
Dimensions: approx. 112cm
Height (without bar): approx. 35.8cm
Exercise bar: approx. 105cm × 60cm (H × W)
Weight: Trampoline approx. 9155g
Exercise bar approx. 1800g

Maximum weight capacity: 120kg
Symbols used

Date of manufacture (month/year): 12/2016
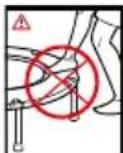
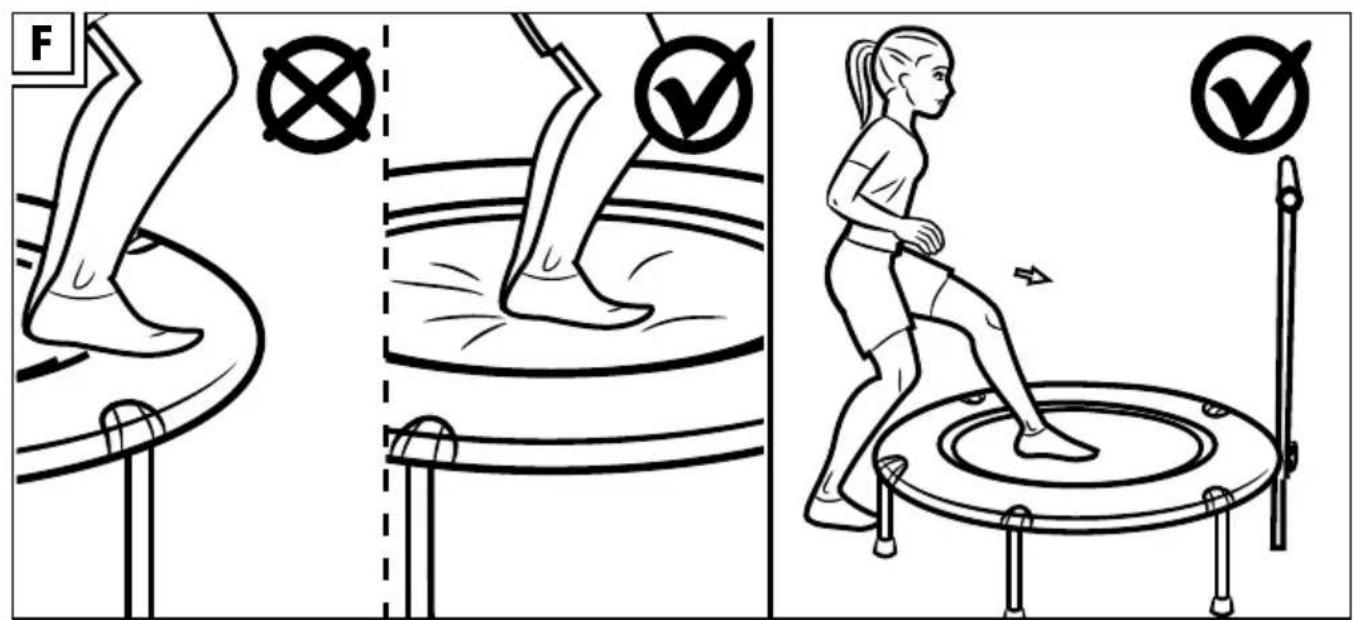
Tipping hazard, do not step on the frame when getting on the trampoline.
Intended Use
This product is a sports equipment for persons 14 years and up and was designed for private use only.
Only use this product in dry interior rooms.
The maximum weight capacity of the product is 120kg

Safety notices
Risk of injury!
- Consult your physician before beginning your exercise program. Verify you are physically fit to exercise.
- Do not use the trampoline if you are injured or have health impairments, e.g. ankle injuries, back problems, weak pelvic floor, balance problems, damage to the eardrum/inner ear, etc.
This product was designed for a maximum body weight of 120kg Do not use this product if you weigh more than that.
Always remember to warm up before exercising and exercise according to your current condition. Overexertion and excessive exercising may result in serious injuries. In the event of discomfort, weakness or fatigue, stop exercising immediately and contact your physician! - Always keep the instructions for use with the exercise instructions handy.
- Pregnant women should consult their physician before exercising.
- This product may only be used by one person at a time.
- This product is not suitable for therapeutic purposes.
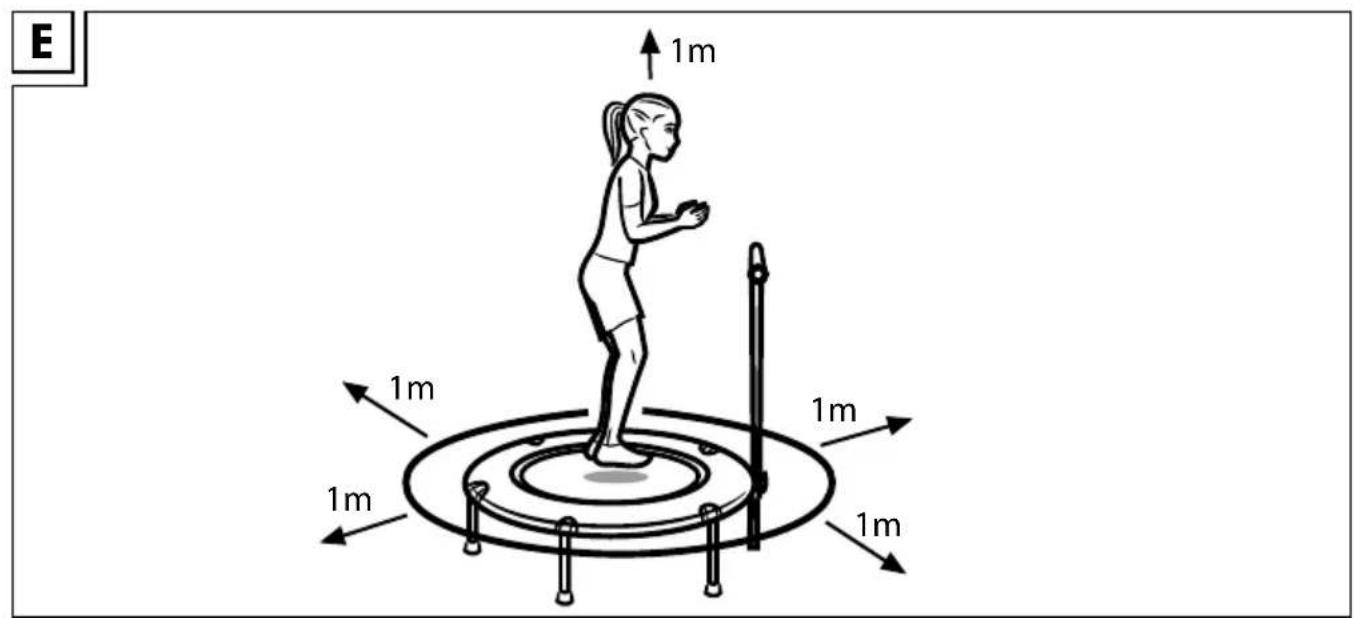
- Keep a clearance of approx. 1m around the area where you are exercising and overhead (Fig. E).
- Also pay attention to objects overhead, e.g. lights, shelves, etc.
- Always exercise on a flat, non-slip surface.
- Do not use the product near stairs or landings.
- Immediately exit the trampoline if you feel faint, experience heart palpitations, etc. Consult a physician immediately.
- Do not eat or chew gum, etc. whilst using the trampoline. Choking hazard!
-
This product is not intended for use by persons (including children under 14 years of age) with physical, sensory or mental impairments or lacking experience and/or knowledge unless supervised by a person responsible for their safety or were instructed by said person on the safe use of the product.
-
Do not use the trampoline with cigarettes or under the influence of alcohol or drugs! Do not use if fatigued! You may lose control due to carelessness!
- Never jump directly from the product onto the floor! The hard impact poses a high risk of injuries!
- Check the connection between the legs and frame parts before every use.
The product must be assembled by an adult to prevent injuries due to incorrect handling. Only use the product once fully assembled. - Do not jump or land on the product's safety pad; always step onto the middle of the mat (Fig. F)
- Do not perform acrobatic jumps, flips, etc.! Particularly make youths aware of this danger.
- Do not attempt to jump from the trampoline onto other persons, objects or the floor. Do not jump onto the trampoline from a higher area (ladder, chair, etc.). Risk of injury!
- Do not exercise if you feel tired or unfocused.
Do not exercise immediately after meals.
Wait approx. 2 hours before exercising. - Ensure the area where you are exercising is well ventilated, but avoid draughts.
Drink plenty whilst exercising. - Always ensure adequate lighting whilst exercising. The area where you area exercising must be well lit.
- Verify the trampoline legs are firmly connected before every use.
- Attention! Only use the product if the locking screw is secured in one of the three adjustment holes on the exercise bar! Do not extend the exercise bar past the mark on the anchor.

Special precaution - risk of injury for children!
- Keep children away from packaging material. Suffocation hazard!
- This product is not suitable as a toy and must be stored out of reach of children when not in use. Children must be out of reach of the product whilst in use to prevent injuries.
- This product is only suitable for use by adults and youths age 14 years who are sufficiently
physically developed and psychologically matured. Ensure the user is familiar with how to use the product or will be supervised. Parents and other supervisors must be aware of their responsibility; due to a child's natural instinct to play and experiment, situations and behaviours must be anticipated for which the trampoline was not designed.
- Particularly advise children this product is not a toy.

Hazards due to wear
- Only use the product in good condition. Check the product for damage or wear before every use. Product safety can only be guaranteed when regularly checked for damage and wear. Discontinue use if damaged.
- When inspecting the product, pay particular attention to parts susceptible to wear, e.g. mat and covering.
- The mat and safety pad must be clean and dry!
Always use genuine replacement parts. - Protect the product from extreme temperatures, sunlight and moisture. Improper storage and product use can cause early wear, resulting in injuries.
Assembly (Fig. B)
- Remove the packaging material.
- Spread the safety pad (2) out on the floor with the reverse facing up.
- Place the trampoline (1) over the safety pad and pull the holes in the safety pad over the threads in the trampoline.
- Screw the legs (4) into the designated threads on the trampoline and attach the leg caps (5) to the ends of the legs.
Disassembly
Disassemble the product in the reverse order.
Adjusting the bar (Fig. C)
The bar can be adjusted to three different heights (3a).
-
Place the trampoline on its feet and unscrew the locking screw (1a) from the anchor on the trampoline.
-
Insert the exercise bar into the anchor and hold it at the appropriate height. Be sure an adjustment hole matches up with the hole in the anchor.
- Insert the locking screw into the anchor and secure the anchor to the exercise bar.
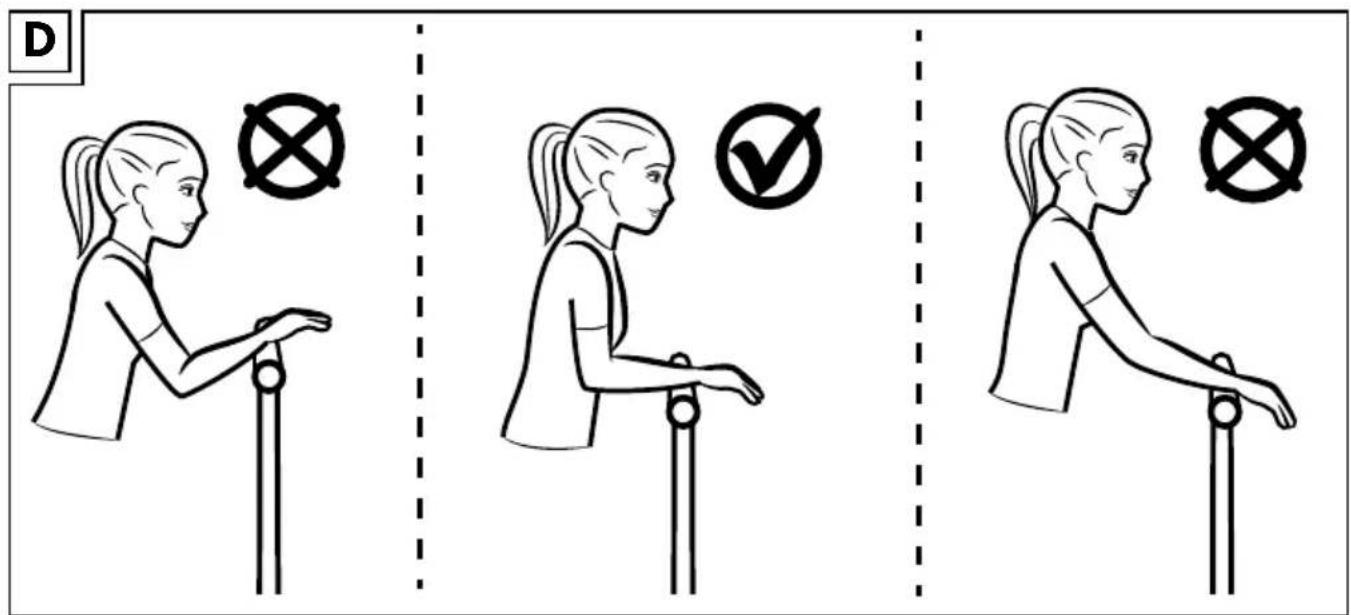
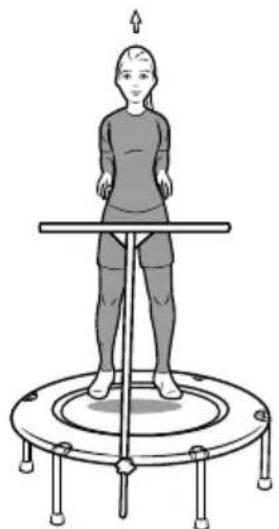
Note: Stand on the product and rest your forearms on the exercise bar. Your arms should be at about a right angle (Fig. D).
Attention! Only use the product if the locking screw is secured in one of the three adjustment holes on the exercise bar! Do not extend the exercise bar past the mark on the anchor.
General exercise notices
Exercise process
- Wear comfortable sportswear and the included socks.
- Always warm up before exercising and slowly cool down.
- Rest adequately between exercises and drink plenty of water.
- As a beginner, never exercise to intensively. Slowly increase the intensity of your workout.
- Perform all exercises smoothly, avoiding jerks and moving too fast.
- Breathe steadily. Exhale with strains and inhale on release.
- Be sure to use the correct posture whilst performing exercises.
- Verify the trampoline legs are firmly connected before every use.
- The mat and safety pad must be clean and dry!
- Immediately exit the trampoline if you feel faint, experience heart palpitations, etc. Consult a physician immediately.
Warm up
Allow adequate time to warm up before exercising. Below you will find some simple warm-up exercises. You should repeat each exercise two to three times.
Neck muscles
-
Slowly turn your head to the left, then to the right. Repeat this movement four to five times.
-
Slowly rotate your head, first to one side, then the other.
Arms and Shoulders
- Cross your hands behind your back and carefully raise them. Bending forward whilst doing so will warm up all muscles optimally.
- Rotate your shoulders forward and after one minute rotate backwards.
- Draw your shoulders up toward your ears and drop your shoulders.
- Rotate your arm forward, alternating between the right and left, and after one minute rotate the arm to the back.
Important: Do not forget to keep breathing steadily!
Suggested exercises
The following show a few of many exercises.
Note: Some of the exercises shown are not suitable for very tall individuals, as they will be unable to perform them correctly.
Exercises without the exercise bar
Basic jump with legs together (Fig. G)
Starting position
- Stand on the mat with the legs slightly closer together than at hip width.
- Bend your knees slightly and bend your upper body slightly forward, bending from the hip.
- Stick your bum slightly out to the back and straighten your pelvis.
- Draw in your navel and your shoulder blades toward the spine.
- Keep your shoulders down and your head in extension of the spine.
End position
- Tighten your arms, glutes and abdomen.
- Jump up off the mat with both legs at the same time, legs together, and move your arms in parallel.
- Perform three sets of 10-15 reps of this exercise.
Important: Do not lock your knees and keep your body tight.
Basic jumping jacks (Fig. H)
Starting position
- Stand on the mat with the legs slightly closer together than at hip width.
- Bend your knees slightly and bend your upper body slightly forward, bending from the hip.
- Stick your bum slightly out to the back and straighten your pelvis.
- Draw in your navel and your shoulder blades toward the spine.
- Keep your shoulders down and your head in extension of the spine.
End position
- Tighten your arms, glutes and abdomen.
- Push off the mat and spread your legs in the air.
- Land on the mat with your legs spread, positioning your feet at the side of the mat.
- Push off the mat again and put your legs together.
- Land on the mat with your feet next to each other in the middle of the mat.
- Perform three sets of 10-15 reps of this exercise.
Important: Do not lock your knees and keep your body tight.
Alternating Upright Heel Kick (Fig. 1)
Starting position
- Place one foot forward and push the heel into the mat. The other foot remains approx. one step behind the front foot.
- Bend your arms. Move the arm diagonal to the front foot forward. Draw the other bent arm back slightly.
- Slightly bend your knees and bend forward slightly, bending from the hip.
- Stick your bum slightly out to the back and straighten your pelvis.
- Draw in your navel and draw your shoulder blades toward the spine.
- Keep your shoulders down and your head in extension of the spine.
End position
- Tighten your arms, glutes and abdomen.
- Push off the mat and switch feet. Push the heel landing in front firmly into the mat.
- Move your arms along accordingly.
- Perform three sets of 10-15 reps of this exercise.
Important: Switch feet quickly and be sure to keep your body tight.
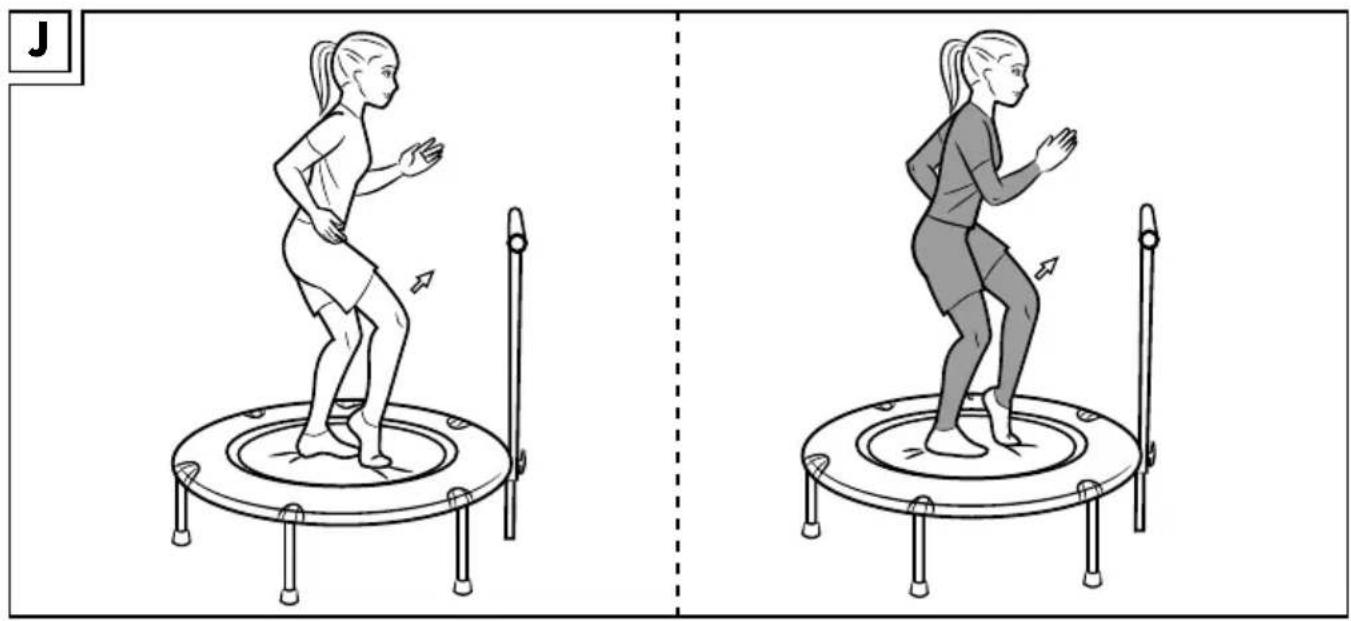
Alternating Toe Taps (Fig. J)
Starting position
- Place one foot in front, touching with your toes. The other foot remains approx. one step behind the front foot.
- Bend your arms. Move the arm diagonal to the front foot forward. Draw the other bent arm back slightly.
- Slightly bend your knees and bend forward slightly, bending from the hip.
- Stick your bum slightly out to the back and straighten your pelvis.
- Draw in your navel and draw your shoulder blades toward the spine.
- Keep your shoulders down and your head in extension of the spine.
End position
- Tighten your arms, glutes and abdomen.
- Push off the mat and switch feet. Tap the toes in front into the mat.
- Move your arms along accordingly.
- Perform three sets of 10-15 reps of this exercise.
Important: Switch feet quickly and be sure to keep your body tight.
Exercises with exercise bar
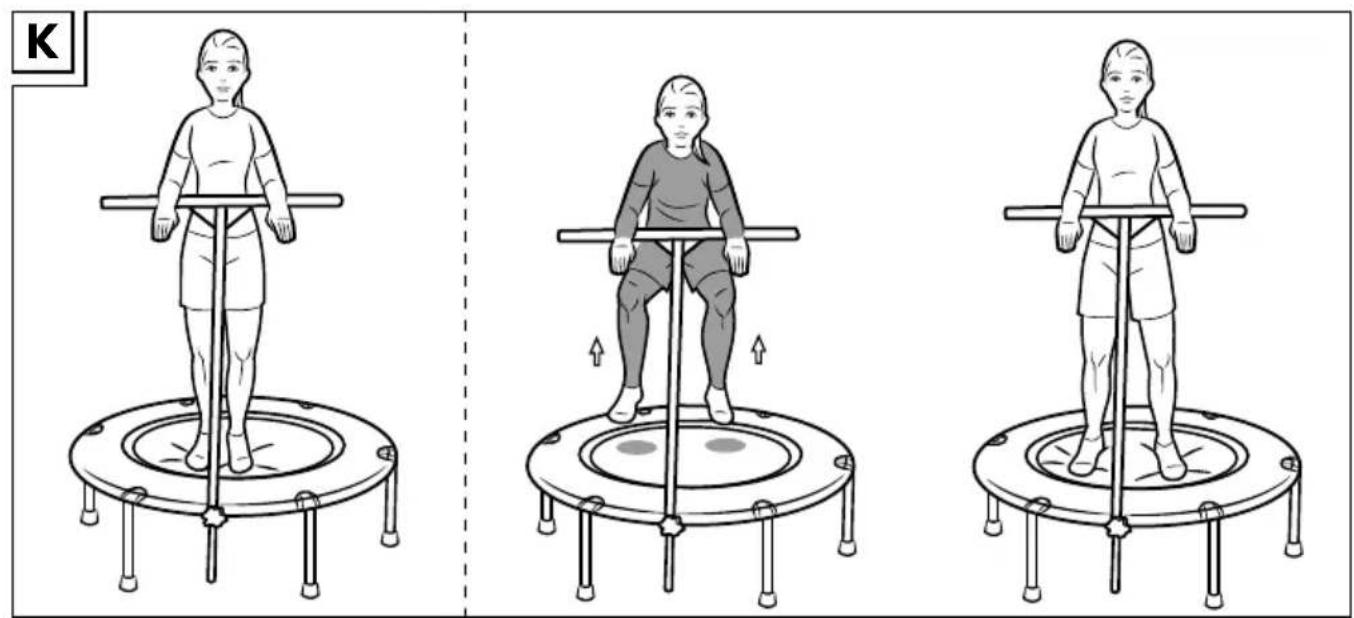
High knee jumping jacks (Fig. K) Starting position
- Stand on the mat with the legs slightly closer together than at hip width.
- Bend your knees slightly and bend your upper body slightly forward, bending from the hip.
-
Loosely rest your forearms on the exercise bar.
-
Stick your bum slightly out to the back and straighten your pelvis.
- Draw in your navel and draw your shoulder blades toward the spine.
- Keep your shoulders down and your head in extension of the spine.
End position
- Tighten your arms, glutes and abdomen.
- Firmly push off the mat and draw your knees up high. Keep your legs apart.
- Land with your feet apart, placing them at the sides of the mat.
- Firmly push off the mat again, draw your knees up high and put your legs together.
- Land with your feet together in the middle of the mat.
- Perform three sets of 10-15 reps of this exercise.
Important: Alternate positions quickly and draw the knees all the way up when pushing off the mat.
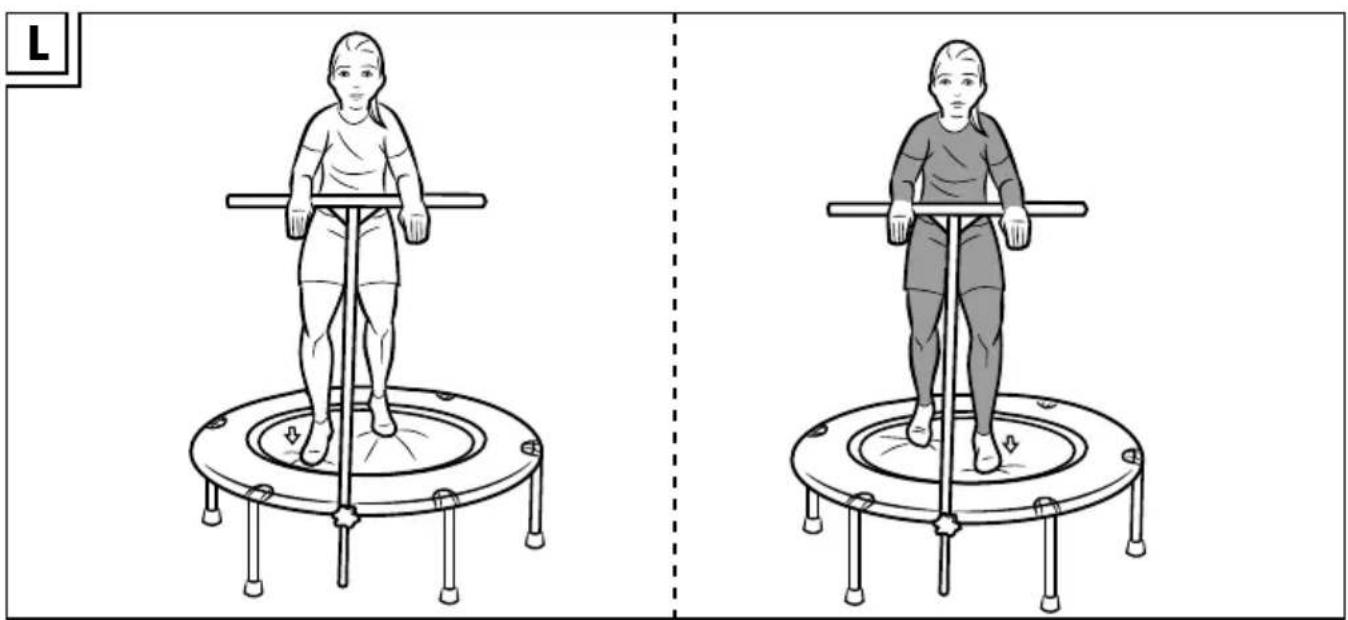
Front Scissors (Fig. L)
Starting position
- Place one foot in front and the ball of the other foot about one step behind the other.
- Lightly rest your forearms on the exercise bar.
- Slightly bend your knees and bend forward slightly, bending from the hip.
- Stick your bum slightly out to the back and straighten your pelvis.
- Draw in your navel and draw your shoulder blades toward the spine.
- Keep your shoulders down and your head in extension of the spine.
End position
- Tighten your arms, glutes and abdomen.
- Firmly push off the mat and switch feet. Move your arms along accordingly.
- Perform three sets of 10-15 reps of this exercise.
Important: Switch your feet quickly and powerfully, keeping your body tight.
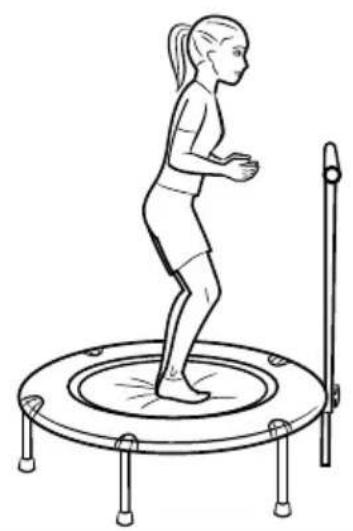
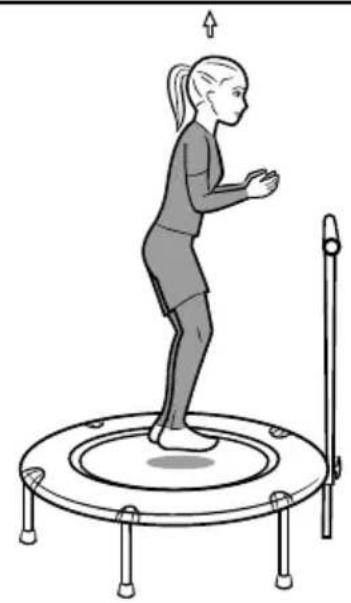
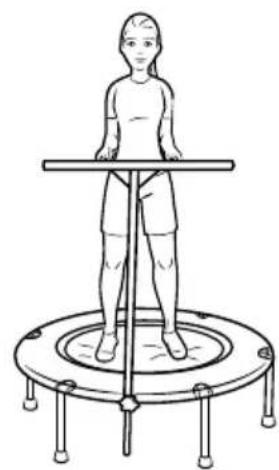
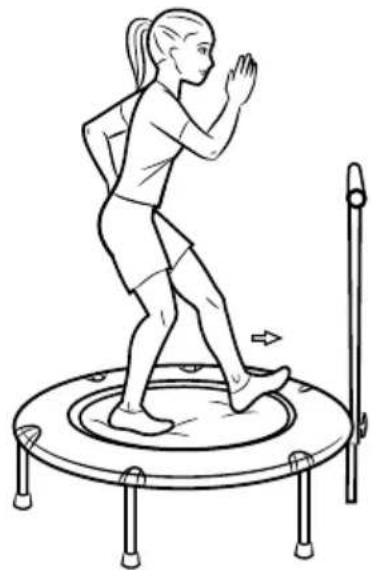
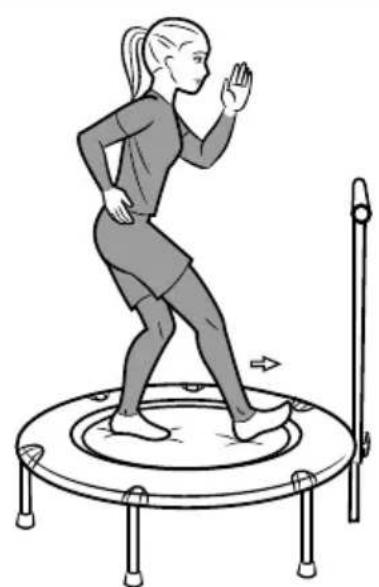
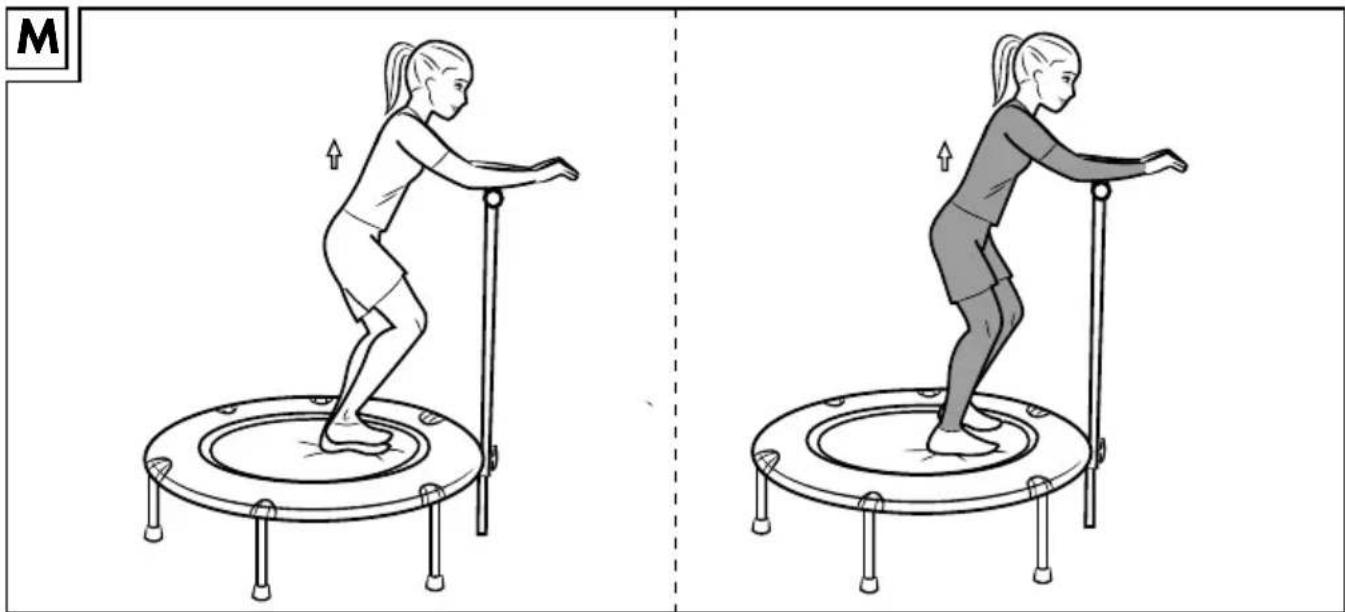
Running in place (Fig. M)
Starting position
- Stand on the mat with the legs slightly closer together than at hip width.
- Lightly rest your forearms on the exercise bar.
- Slightly bend your knees and bend forward slightly, bending from the hip.
- Stick your bum slightly out to the back and straighten your pelvis.
- Draw in your navel and draw your shoulder blades toward the spine.
- Keep your shoulders down and your head in extension of the spine.
End position
- Tighten your arms, glutes and abdomen.
- Firmly push one foot into the mat and lift the other off the mat.
- Switch feet whilst running in place.
- Perform three sets of 10-15 reps of this exercise.
Important: Switch your feet quickly and powerfully, keeping your body tight.
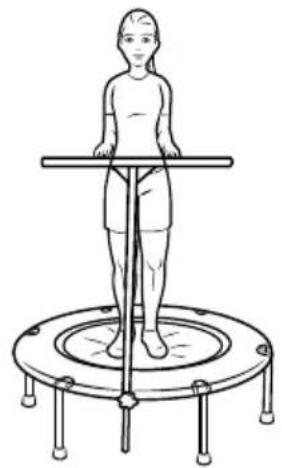
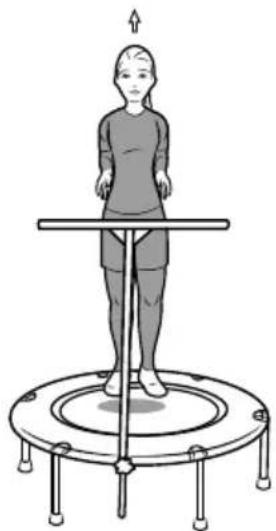
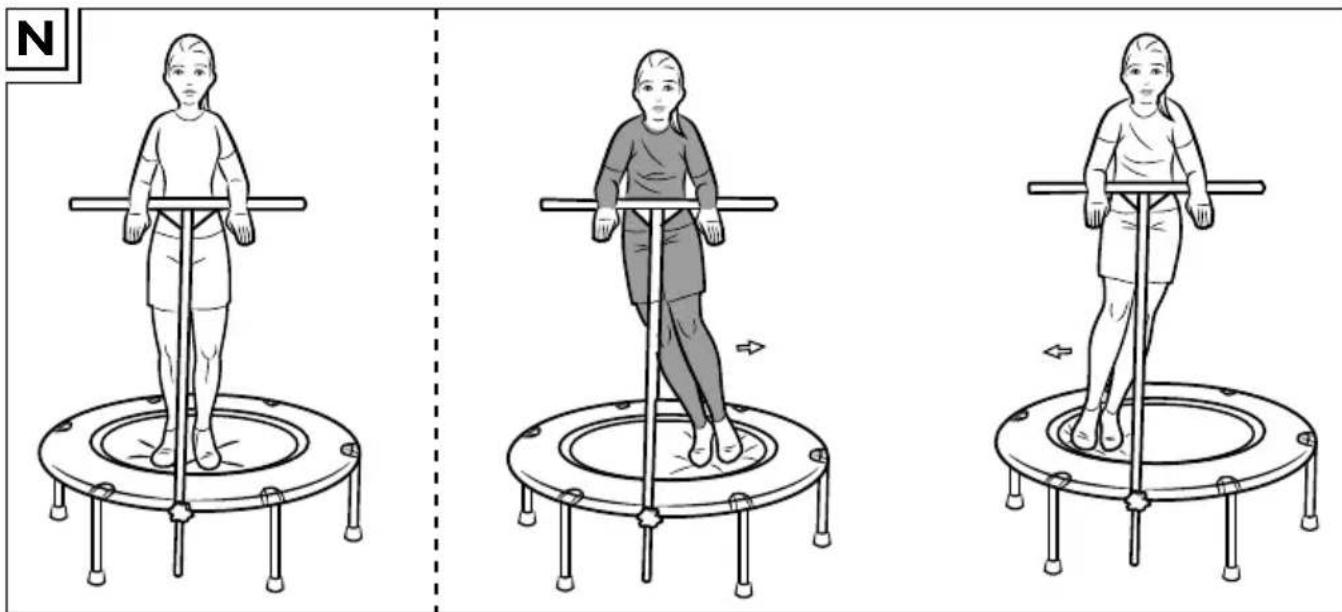
Side to Side Jump (Fig. N)
Starting position
- Stand on the mat with the legs slightly closer together than at hip width.
- Lightly rest your forearms on the exercise bar.
- Slightly bend your knees and bend forward slightly, bending from the hip.
- Stick your bum slightly out to the back and straighten your pelvis.
- Draw in your navel and draw your shoulder blades toward the spine.
- Keep your shoulders down and your head in extension of the spine.
End position
- Tighten your arms, glutes and abdomen.
- Firmly push your feet into the mat and jump to one side of the mat, keeping your legs together.
- Jump to the other side of the mat, keeping your legs together.
- Perform three sets of 10-15 reps of this exercise.
Important: Switch your feet quickly and powerfully, keeping your body tight.
Stretching
Allow plenty of time to stretch after every workout. Below you will find some simple warm-up exercises.
Each exercises should be performed 3 times per side, for about 30-40 seconds.
Neck muscles
- Stand in a relaxed position. Use one hand to first gently move your neck to the left, then the right. This exercise will stretch the side of your neck.
Arms and Shoulders
- Stand up straight with your knees slightly bent.
- Move your right arm behind your head until the right hand is between your shoulder blades.
- Grab your right elbow with your left hand and pull back.
- Switch sides and repeat this exercise.
Leg muscles
- Stand up straight and raise one foot off the ground.
- Rotate it slowly, first in one direction then the other.
- After a while, switch feet.
Important: Be sure to keep your thighs parallel to each other. Shift your pelvis slightly forward, keeping your upper body straight.
Care and storage
Always store the product dry and clean, in a temperate room.
IMPORTANT! Only clean with water, never use aggressive cleaning agents. Then wipe dry with a cleaning cloth.
Store the product in a clean, dry room at room temperature.
Protect the product from direct sunlight and nearby heat sources.
Disposal
Dispose of the article and the packaging materials in accordance with current local regulations. Packaging materials such as foil bags are not suitable to be given to children. Keep the packaging materials out of the reach of children.
3 Years Warranty
The product was produced with great care and under constant supervision. You receive a three-year warranty for this product from the date of purchase. Please retain your receipt.
The warranty applies only to material and workmanship and does not apply to misuse or improper handling. Your statutory rights, especially the warranty rights, are not affected by this warranty.
With regard to complaints, please contact the following service hotline or contact us by e-mail.
Our service employees will advise as to the subsequent procedure as quickly as possible.
We will be personally available to discuss the situation with you.
Any repairs under the warranty, statutory guarantees or through goodwill do not extend the warranty period. This also applies to replaced and repaired parts. Repairs after the warranty are subject to a charge.
IAN:280580
GB Service Great Britain
Tel.: 0871 5000 720
(£ 0.10/Min.)
E-Mail: deltasport@lidl.co.uk
You can also find spare parts for your product at: www.delta-sport.com, category Service - Lidl Spare Parts Service
DELTA-SPORT HANDELSKONTOR GMBH
Wragekamp 6 · D-22397 Hamburg
Version: 12/2016


- DE AT CH
- Contents (Fig. A)
- Technical Data
- Symbols used
- Intended Use
- Safety notices
- Risk of injury!
- Special precaution - risk of injury for children!
- Hazards due to wear
- Assembly (Fig. B)
- Disassembly
- Adjusting the bar (Fig. C)
- General exercise notices
- Exercise process
- Warm up
- Neck muscles
- Arms and Shoulders
- Important: Do not forget to keep breathing steadily!
- Suggested exercises
- Exercises without the exercise bar
- Basic jump with legs together (Fig. G)
- Starting position
- End position
- Important: Do not lock your knees and keep your body tight.
- Basic jumping jacks (Fig. H)
- Alternating Upright Heel Kick (Fig. 1)
- Important: Switch feet quickly and be sure to keep your body tight.
- Alternating Toe Taps (Fig. J)
- Exercises with exercise bar
- High knee jumping jacks (Fig. K) Starting position
- Important: Alternate positions quickly and draw the knees all the way up when pushing off the mat.
- Front Scissors (Fig. L)
- Important: Switch your feet quickly and powerfully, keeping your body tight.
- Running in place (Fig. M)
- Side to Side Jump (Fig. N)
- Stretching
- Leg muscles
- Important: Be sure to keep your thighs parallel to each other. Shift your pelvis slightly forward, keeping your upper body straight.
- Care and storage
- Disposal
- Years Warranty
Brand : CRIVIT
Model : TP5632
Category : Trampoline