NSP285 - Speakers YAMAHA - Free user manual and instructions
Find the device manual for free NSP285 YAMAHA in PDF.
User questions about NSP285 YAMAHA
0 question about this device. Answer the ones you know or ask your own.
Ask a new question about this device
Download the instructions for your Speakers in PDF format for free! Find your manual NSP285 - YAMAHA and take your electronic device back in hand. On this page are published all the documents necessary for the use of your device. NSP285 by YAMAHA.
USER MANUAL NSP285 YAMAHA
Please read the following operating precautions before use. Yamaha will not be held responsible for any damage and/or injury caused by not following the cautions below.
- To assure the finest performance, please read this manual carefully. Keep it in a safe place for future reference.
- Install the speakers in a cool, dry, clean place - away from windows, sources of heat, sources of excessive vibration, dust, moisture or cold. Avoid sources of electrical humming (e.g., transformers and motors). To prevent fire or electric shock, do not expose the speakers to rain or water.
- To prevent the enclosure from warping or discoloring, do not expose the speakers to direct sunlight or excessive humidity.
- Avoid installing the speakers where foreign objects may fall onto them and/or where they may be exposed to liquid dripping or splashing.
-
Do not place the following objects on top of the speakers:
-
Other components, as they might damage or discolor the surface of the speakers.
- Burning objects (e.g., candles), as they might cause fire, damage to the speakers or personal injury.
-
Containers of liquid, as they might spill and cause electric shock to the user or damage to the speakers.
-
Do not place the speakers where they are liable to be knocked over or struck by falling objects. Stable placement will also ensure better sound performance.
- Placing the speakers on the same shelf or rack as the turntable can result in feedback.
- Any time you note distortion, reduce the volume control on your amplifier to lower setting. Never allow your amplifier to be driven into "clipping". Otherwise, the speakers may be damaged.
- When using an amplifier with a rated output power higher than the nominal input power of the speakers, care should be taken not to exceed the maximum input of the speakers.
- Do not attempt to clean the speakers with chemical solvents as this might damage the finish. Use a clean, dry cloth.
- Do not attempt to modify or fix the speakers. Contact qualified Yamaha service personnel when service is needed. The cabinet should never be opened for any reason.
- Be sure to read the "Troubleshooting" section regarding common operating errors before concluding that the speakers are faulty.
- Secure placement or installation is the owner's responsibility. Yamaha is not liable for accidents caused by improper placement or installation of speakers.
For NS-SW280
WARNING TO REDUCE THE RISK OF FIRE OR ELECTRIC SHOCK,DO NOT EXPOSE THIS APPLIANCE TO RAIN OR MOISTURE.
- Do not operate this unit upside down. It may overheat, possibly causing damage.
- Do not use excessive force on switches, controls or connection wires. When moving this unit, first disconnect the power plug and the wires connected to other equipment. Never pull the wires themselves.
- Never put a hand or a foreign object into the port located on the right side of this unit. When moving this unit, do not hold the port, as it might cause personal injury and/or damage to this unit.
- Since this unit has a built-in power amplifier, heat radiates from the rear panel. Place the unit away from walls, allowing at least 20cm (8") of space above, behind and on both sides of the unit to prevent fire or damage. Furthermore, do not position the unit with the rear panel facing down on the floor or other surfaces.
- When using a humidifier, be sure to avoid condensation inside this unit by allowing enough space around the unit and avoiding excess humidification. Condensation might cause fire, damage to the unit, and/or electric shock.
- Do not cover the rear panel of this unit with a newspaper, tablecloth, curtain, etc. to avoid obstructing heat radiation. If the temperature inside the unit rises, it may cause fire, damage to the unit, or personal injury.
- Do not plug this unit into a wall outlet until all connections are complete.
- The voltage to be used must match that specified on the rear panel. Using this unit with a voltage higher than specified is dangerous and may cause fire, damage to the unit, and/or personal injury. Yamaha is not responsible for damage resulting from use of this unit with a voltage other than specified.
- Super-bass sound reproduced by this unit may cause a turntable to generate audio feedback. In this case, move the unit away from the turntable.
- This unit may be damaged if certain sounds are continuously output at high volume level. For example, if 20Hz - 50Hz sine waves from a test disc or bass sounds from an electronic instrument, etc. are continuously output, or if a turntable stylus touches the surface of a disc, reduce the volume level to prevent the unit from being damaged.
- If you hear distorted noise (i.e., unnatural, intermittent "rapping" or "hammering" sounds) from this unit, reduce the volume level. Extremely loud movie soundtrack low frequency, bass-heavy sounds, or similarly loud popular music passages can damage this unit.
- Vibration generated by super-bass sound may distort images on a TV. In this case, move the unit away from the TV set.
- When disconnecting the power cord from the wall outlet, grasp the plug; do not pull the cord.
- When you plan not to use this unit for a long period of time (i.e. vacation, etc.), disconnect the AC power plug from the wall outlet.
- Install this unit near the wall outlet and where the AC power plug can be reached easily.
VOLTAGE SELECTOR
(For China, Korea, Asia and General models)
The voltage selector switch on the rear panel of this unit must be set to your local main voltage BE
FORE plugging this unit into the AC main supply.
Voltages are 110-120/220-240 V AC, 50 / 60Hz
This unit is not disconnected from the AC power source as long as it is connected to the wall outlet, even if this unit itself is turned off. In this state, this unit is designed to consume a very small quantity of power.
For U.K. customers
If the socket outlets in the home are not suitable for the plug supplied with this appliance, it should be cut off and an appropriate 3 pin plug fitted. For details, refer to the instructions described below.
Note: The plug severed from the mains lead must be destroyed, as a plug with bared flexible cord is hazardous if engaged in a live socket outlet.
SPECIAL INSTRUCTIONS FOR U.K. MODEL
IMPORTANT:
THE WIRES IN MAINS LEAD ARE COLOURED IN ACCORDANCE WITH THE FOLLOWING CODE:
Blue: NEUTRAL
Brown: LIVE
As the colours of the wires in the mains lead of this apparatus may not correspond with the coloured markings identifying the terminals in your plug, proceed as follows: The wire which is coloured BLUE must be connected to the terminal which is marked with the letter N or coloured BLACK. The wire which is coloured BROWN must be connected to the terminal which is marked with the letter L or coloured RED. Make sure that neither wire is connected to the earth terminal of a three pin plug.
Information for Users on Collection and Disposal of Old Equipment

This symbol on the products, packaging, and/or accompanying documents means that used electrical and electronic products should not be mixed with general household waste.
For proper treatment, recovery and recycling of old products, please take them to applicable collection points, in accordance with your national legislation and the Directives 2002/96/EC.
By disposing of these products correctly, you will help to save valuable resources and prevent any potential negative effects on human health and the environment which could otherwise arise from inappropriate waste handling.
For more information about collection and recycling of old products, please contact your local municipality, your waste disposal service or the point of sale where you purchased the items.
[Information on Disposal in other Countries outside the European Union]
This symbol is only valid in the European Union. If you wish to discard these items, please contact your local authorities or dealer and ask for the correct method of disposal.
Contents
Package contents. 1
Installing the speakers. 1
Installing the front, center, and surround speakers 2
Installing the subwoofer. 2
Wall-mounting the speakers. 2
Attaching the speaker stands. 2
Connecting the speakers 3
Connection diagram. 3
Connecting the power cables 4
Using the Subwoofer 4
Setting the subwoofer volume. 4
Frequency characteristics. 5
Troubleshooting. 5
Specifications 6
Package contents
Thank you for choosing the Yamaha NS-P285 5.1CH Speaker Package. Make sure the package contains the following items.
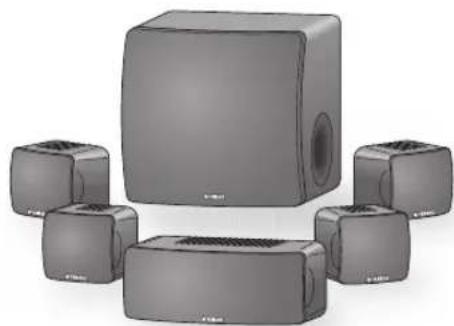
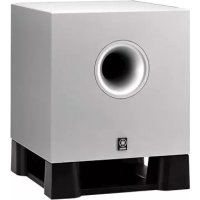
Subwoofer (NS-SW280 x1)
The Subwoofer features a built-in power amplifier and utilizes Advanced Yamaha Active Servo Technology to provide high-quality sub-bass sound that adds real "punch" to your home theater.
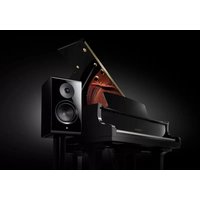
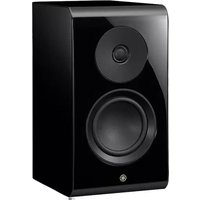
■Front and surround speakers (NS-B285 x4), center speaker (NS-C385 x1)
The front and surround speakers are full-range acoustic-suspension speakers. The center speaker is a 2-way acoustic suspension speaker.
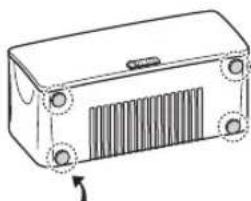
Center speaker
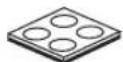
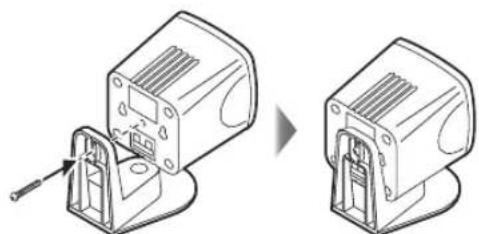
Non-skid pad
Non-skid pads: When placing the center speaker on a flat surface, affix the included non-skid pads to the corners of the speaker undersides, as shown. The pads will prevent the speaker from moving around.
Speaker stand x4
(See page 2)
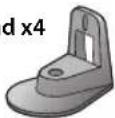
Screw x4 (Speaker stand)
Non-skid pads (4 pcs.) x1 (For the center speaker)
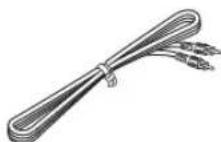
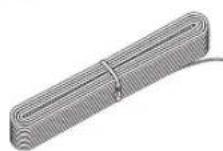
Subwoofer cable 5 m (16 ft.) x1
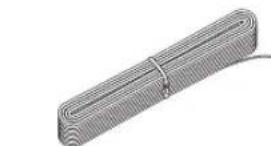
Speaker cable 25 m (82 ft.) x1 (To be cut into 5 lengths for the front, center, and surround speakers. Take care to prevent injury when preparing the cables.)
Installing the speakers
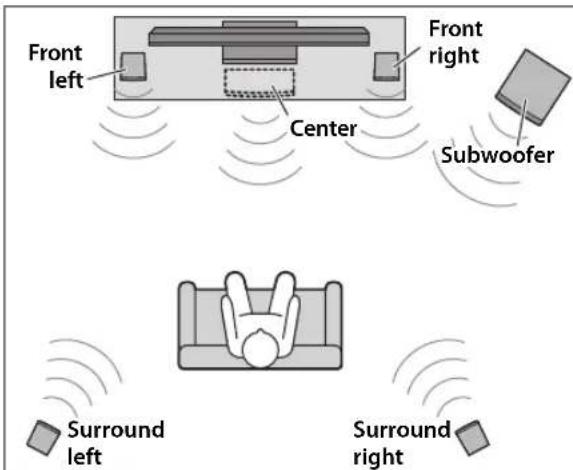
Before you connect the speakers, place each speaker in its respective location. Speaker positioning is very important as it affects the overall sound quality of the system. Place the speakers in locations that will optimize the sound quality at your listening position. Refer to the illustration.
The position of the subwoofer is not as critical as the position of the other speakers because sub-bass sounds are not very directional. Refer to "Installing the subwoofer" on page 2 for more information.
Note
- Placing the speakers too close to a CRT-type TV may impair the picture color or cause a buzzing noise. In this case, move the speakers at least 20cm (8") away from the TV. This is not an issue with LCD and plasma TVs.
Installing the front, center, and surround speakers
Front speakers: Place the two front speakers on the left and right sides of the TV, at approximately the same height as the TV, facing directly forward.
Surround speakers: Place the left and right surround speakers behind your listening position, facing slightly inward.
The front and surround speakers can be placed on a flat surface, in which case you need to attach the included speaker stands, or wall- mounted. See "Wall-mounting the speakers" and "Attaching the speaker stands" for more information.
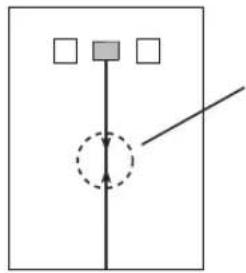
Center speaker: Place the center speaker centrally between the front speakers, facing directly forward.
Installing the subwoofer
Place the subwoofer on the outside of either the right or the left front speaker, as shown in A and B.
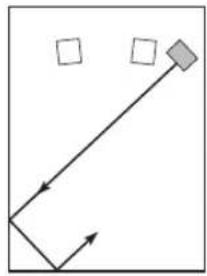
A
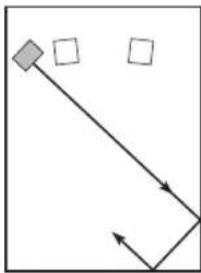
B
C
Note: Standing waves may make it difficult to hear bass sounds here.

Subwoofer Front speaker
The placement shown in C is also possible, however, if the subwoofer is placed directly facing a wall and your listening position is in the center of the room, you may not be able to obtain enough bass sound from the subwoofer. This is because "standing waves" are forming between the two parallel walls and cancelling out the bass sounds. In this case, position the subwoofer at an angle to the wall. It may be necessary to break up parallel wall surfaces by placing bookshelves, etc., along them.
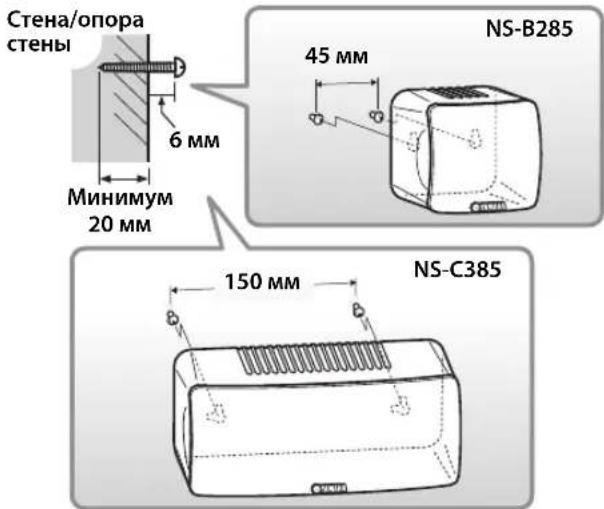
Wall-mounting the speakers
You can mount the speakers on the wall as follows.
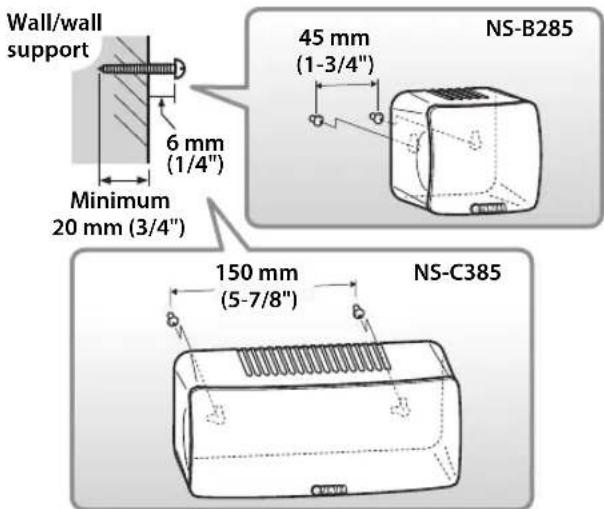
1 Install screws into a solid wall or wall support as shown below. Use 3.5 to 4mm (1/8") diameter self-tapping screws.
2 Hang each speaker by its keyhole slots onto the protruding screws.
Note
- Make sure the shaft of the screw is seated in the narrow part of the keyhole slot. Otherwise, the speaker may fall.
Warnings
NS-B285 speaker weighs 0.45kg (1 lbs.) and NS-C385 speaker weights 1kg (2.2 lbs.). Do not mount the speakers on thin plywood or on a wall with a soft surface material. Otherwise, the screws may pull out of the surface and the speakers may fall, possibly damaging the speakers or causing personal injury.
- Do not affix the speakers to a wall using nails, adhesives, or unstable hardware. Long-term use and vibration may cause the speakers to fall.
- To avoid accidents resulting from tripping over loose speaker cables, affix the cables to the wall.
- Mount the speakers in a wall location that will be unlikely to result in injury to an individual's head.
Attaching the speaker stands
Attach the included speaker stands with screws when placing the front or surround speakers on a flat surface.

Connecting the speakers
Caution: Make sure the power cables for the subwoofer and your other AV components are disconnected from the AC wall outlets before making any connections.
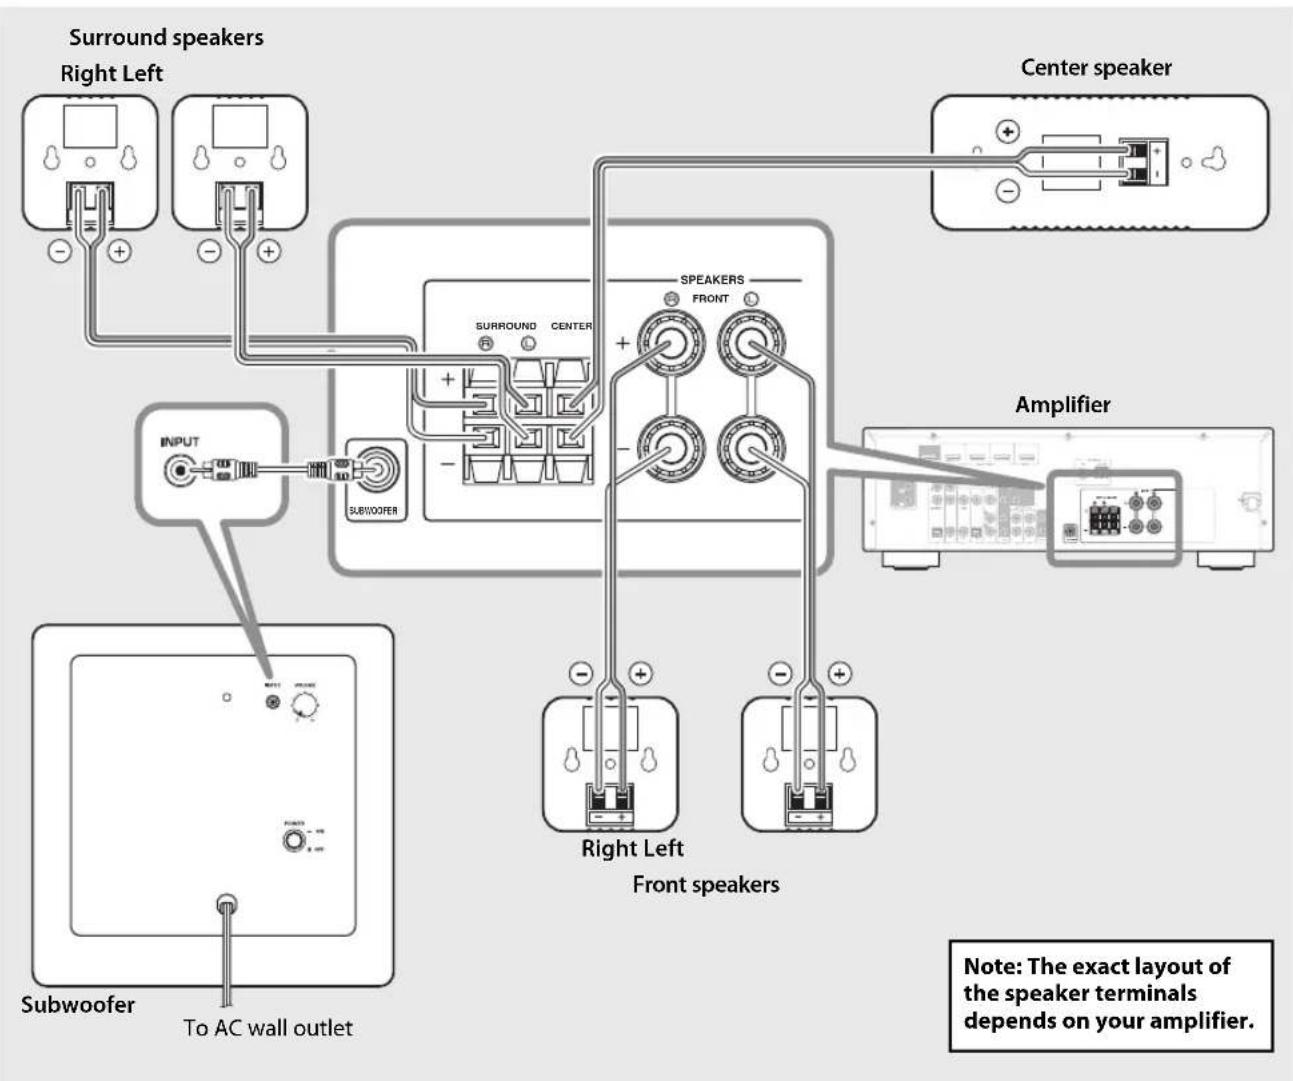
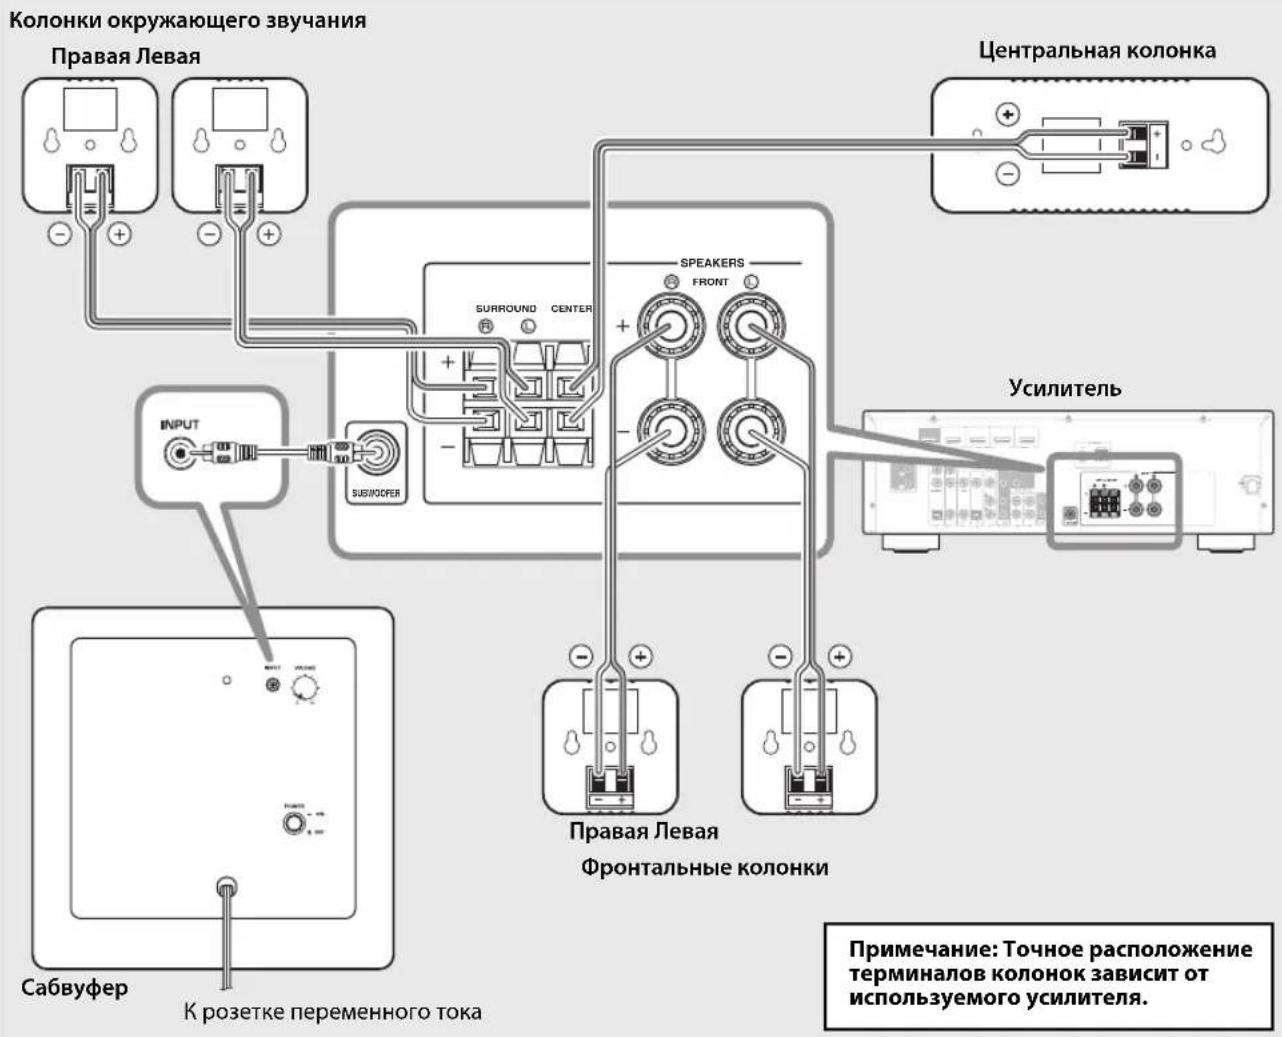
Connection diagram
Preparing the speaker cables
Once you've positioned the speakers, you'll need to cut the 25-meter (82 ft.) speaker cable to make five cables for connecting the two front speakers, center speaker, and the two surround speakers.
1 Cut the included speaker cable to suitable lengths for the front, center, and surround speakers. You need five cables.
2 Remove about 10mm (3 / 8^ ) of insulation from the end of each speaker cable.
3Twist the bare wires tightly.
10 mm (3/8")
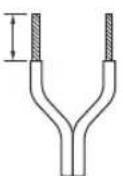
Good No Good

Notes
- Make the speaker cables as short as possible. Do not bundle or roll up excess cable.
- Twist the bare wires tightly so the individual strands are not splayed.
- Be careful not to injure yourself while preparing the speaker cables.
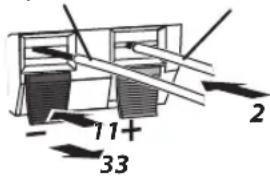
Operating the speaker terminals
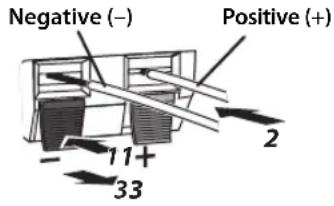
Note: Make sure the terminal is gripping the bare wire, not the insulation.
1Press and hold the terminal tab.
2Insert the bare wire.
3 Release the tab so that it closes securely on the bare wire, not the insulation.
4 Test the security of the connection by pulling gently on the cable.
Notes
- Make sure the bare wires do not touch each other, as this could damage the speaker or the amplifier.
- If the connections are faulty, you will hear no sound from the speakers.
Connecting the speakers
Connect each speaker to the appropriate speaker terminals on your amplifier by using the cables you prepared earlier. See the "Connection diagram" on page 3 for reference.
Make sure you connect the speakers with the correct polarity—positive (+) terminals to positive (+) terminals, and negative (-) terminals to negative (-) terminals. If you get them crossed over, the sound will be unnatural and lack bass.
In your AV receiver's speaker size settings, specify small (or "S") for all of the NS-P285 speakers.
If you're connecting the subwoofer to a Yamaha DSP amplifier or AV receiver, connect to its SUBWOOFER or LOW PASS output.
Connecting the power cables
Once you've completed all of the speaker and subwoofer connections, plug the subwoofer, amplifier, and your other AV components into suitable AC wall outlets.
Using the Subwoofer
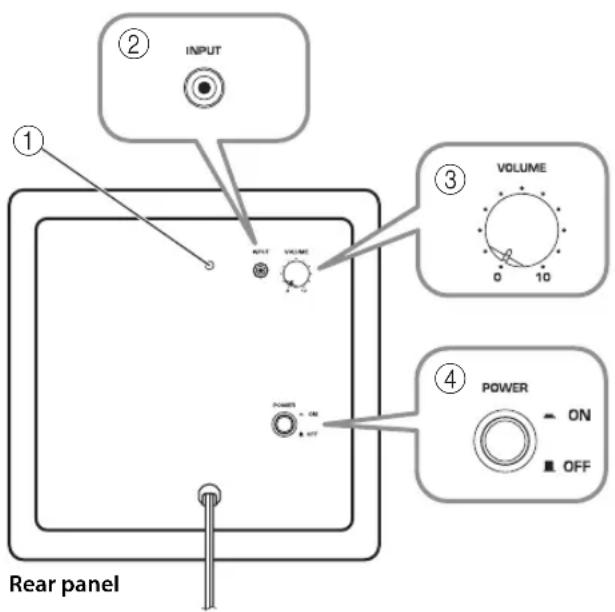
① Power indicator
Lights up when the POWER switch is set to ON; goes off when the POWER switch is set to OFF.
②INPUT jack
Input jack for connecting the line-level subwoofer output on your amplifier.
③ VOLUME control
Adjusts the volume of the subwoofer. Turn it clockwise to increase the volume; counterclockwise to decrease the volume.
④ POWER switch
Set this to ON to turn on the subwoofer. Set it to OFF to turn off the subwoofer.
Setting the subwoofer volume
The very first time you use the subwoofer, you need to set the volume balance between the subwoofer and the front speakers as follows.
1Turn on your other AV components.
2Set the subwoofer's VOLUME control to minimum (0).
3Set the subwoofer's POWER switch to ON. The power indicator on the rear panel lights up.
4 Play a audio source that contains low-frequency bass sounds. Set the amplifier's volume control to a suitable level.
5Turn the subwoofer's VOLUME control up gradually until you achieve a good balance between the subwoofer and the other speakers.
Notes
-
Once the subwoofer volume has been set, you can leave the subwoofer's VOLUME control set as it is and use your amplifier's volume control to adjust the volume of the entire system.
-
If you replace the front speakers (NS-B285) with other speakers, you will need to re-adjust the subwoofer's volume.
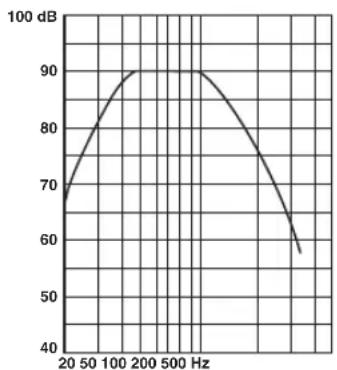
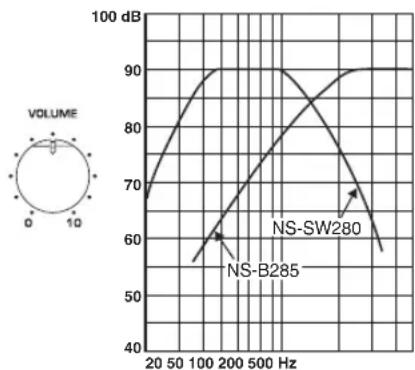
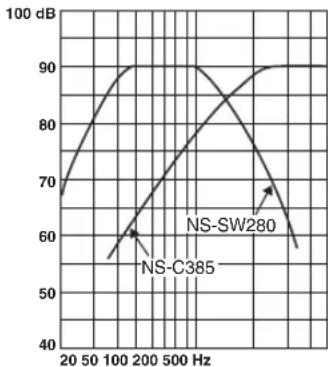
- The frequency characteristics graphs below show how the subwoofer and front speakers work together to provide a full-range sound.
Frequency characteristics
The following graph shows the frequency characteristics of the subwoofer (NS-SW280).
The following graph shows the combined frequency characteristics of the subwoofer (NS-SW280) and front speakers (NS-B285), and center speaker (NS-C385).
Troubleshooting
If this product doesn't work as expected, look for a possible cause below. If the issue you are experiencing is not listed, or you cannot resolve it after reading through these instructions, disconnect the power cable and contact an authorized Yamaha dealer or service center.
| Issue Possible cause Remedy | ||
| There's no sound. The speaker cables are not connected properly. | Make sure the speaker cables are connected properly. | |
| The sound is very quiet. The speaker cables are not connected properly. | Make sure the speaker cables are connected properly: L (left) to L, R (right) to R, “+” to “+” and “-” to “-”. | |
Subwoofer (NS-SW280)
| Issue Possible cause Remedy | ||
| The POWER switch is set to ON but the subwoofer doesn't work. | The power cable is not connected properly. | Set the POWER switch to OFF, then make sure the power cable is connected properly. |
| There's no sound. The VOLU | UME control is set to 0. Turn up the VOLU | VOLUME control. |
| The subwoofer cable is not connected properly. | Make sure the subwoofer cable is connected properly. | |
| The subwoofer is too quiet. | The source material doesn't contain much bass. | Try playing source material that contains more bass. |
| Bass sounds are being cancelled out by standing waves. | Reposition the subwoofer, or break up parallel wall surfaces by placing bookshelves or other large objects along the wall. | |
Specifications
■Front, surround speakers (NS-B285) and center speaker (NS-C385)
Type
NS-B285. Full-range acoustic-suspension non-magnetic shielding type NS-C385. 2-way acoustic suspension non-magnetic shielding type
Driver
NS-B285.6.5 cm (2-1/2") cone speaker NS-C385.Woofer: 6.5 cm (2-1/2") cone speaker x 2 Tweeter: 2.5cm(1^ ) balanced dome speaker
Nominal input power
NS-B285. 30 W NS-C385. 50 W
Maximum input power
NS-B285. 80 W NS-C385. 100 W
Impedance 6Ω
Frequency response 110 Hz-40 kHz
Sensitivity
NS-B285. 81 dB/2.83 V, 1 m
NS-C385. 84 dB/2.83 V, 1 m
Crossover frequency
NS-C385. 8 kHz
Dimensions (W× H× D)
NS-B285.... 90 x 90 x 109 mm (3-1/2" x 3-1/2" x 4-1/4") (without stand) 90 x 120 x 123 mm (3-1/2" x 4-3/4" x 4-7/8") (with stand)
NS-C385 220 x 90 x 109 mm (8-5/8" x 3-1/2" x 4-1/4")
Weight
NS-B285. 0.45kg (1 lbs.) (without stand)
NS-C385 1.0kg (2.2 lbs.)
Subwoofer (NS-SW280)
Type Advanced Yamaha Active Servo Technology
Driver 16 cm (6-1/2") cone woofer non-magnetic shielding type
Output power. 50 W (100 Hz, 5 Ω, 10% T.H.D)
Dynamic power 100 W, 5 Ω
Input impedance.......INPUT (1P RCA pin jack): 10k
Frequency response 30 Hz-160 Hz
Input sensitivity. INPUT (1P RCA pin jack): 80 mV (50 Hz, 50 W/5 Ω)
Power supply
U.S.A. and Canada models.. AC 120 V, 60 Hz
Australia model.. AC 240 V, 50 Hz
U.K. and Europe models.. AC 230 V, 50 Hz
China, Korea, Asia, and
General models.. AC 110-120/220-240 V, 50 / 60Hz
Dimensions (W x H x D) 262 x 264 x 316 mm (10-3/8" x 10-3/8" x 12-1/2")
Weight 6.9 kg (15.2 lbs.)
Specifications are subject to change without notice.
Limited Guarantee for European Economic Area (EEA) and Switzerland
Thank you for having chosen a Yamaha product. In the unlikely event that your Yamaha product needs guarantee service, please contact the dealer from whom it was purchased. If you experience any difficulty, please contact Yamaha representative office in your country. You can find full details on our website (http://www.yamaha-hifi.com/ or http://www.yamaha-uk.com/ for U.K. resident).
The product is guaranteed to be free from defects in workmanship or materials for a period of two years from the date of the original purchase. Yamaha undertakes, subject to the conditions listed below, to have the faulty product or any part(s) repaired, or replaced at Yamaha's discretion, without any charge for parts or labour. Yamaha reserves the right to replace a product with that of a similar kind and/or value and condition, where a model has been discontinued or is considered uneconomic to repair.
Conditions
- The original invoice or sales receipt (showing date of purchase, product code and dealer's name) MUST accompany the defective product, along with a statement detailing the fault. In the absence of this clear proof of purchase, Yamaha reserves the right to refuse to provide free of charge service and the product may be returned at the customer's expense.
- The product MUST have been purchased from an AUTHORISED Yamaha dealer within the European Economic Area (EEA) or Switzerland.
- The product must not have been the subject of any modifications or alterations, unless authorised in writing by Yamaha.
- The following are excluded from this guarantee:
a. Periodic maintenance and repair or replacement of parts due to normal wear and tear. b. Damage resulting from:
(1) Repairs performed by the customer himself or by an unauthorised third party.
(2) Inadequate packaging or mishandling, when the product is in transit from the customer. Please note that it is the customer's responsibility to ensure the product is adequately packaged when returning the product for repair.
(3) Misuse, including but not limited to (a) failure to use the product for its normal purpose or in accordance with Yamaha's instructions on the proper use, maintenance and storage, and (b) installation or use of the product in a manner inconsistent with the technical or safety standards in force in the country where it is used.
(4) Accidents, lightning, water, fire, improper ventilation, battery leakage or any cause beyond Yamaha's control.
(5) Defects of the system into which this product is incorporated and/or incompatibility with third party products.
(6) Use of a product imported into the EEA and/or Switzerland, not by Yamaha, where that product does not conform to the technical or safety standards of the country of use and/or to the standard specification of a product sold by Yamaha in the EEA and/or Switzerland.
- Where the guarantee differs between the country of purchase and the country of use of the product, the guarantee of the country of use shall apply.
- Yamaha may not be held responsible for any losses or damages, whether direct, consequential or otherwise, save for the repair or replacement of the product.
- Please backup any custom settings or data, as Yamaha may not be held responsible for any alteration or loss to such settings or data.
- This guarantee does not affect the consumer's statutory rights under applicable national laws in force or the consumer's rights against the dealer arising from their sales/purchase contract.
Précautions
Dimensions (L x H x P)
Type Advanced Yamaha Active Servo Technology
Skruv x4 (For hegtalarstall)
Dimensioni (L x A x P)
NS-B285. 90 x 90 x 109 mm (senza supporto)
90 × 120 × 123 ~mm (con supporto)
NS-C385 220 x 90 x 109 mm
Peso
NS-B285. 0,45 kg (senza supporto)
NS-C385 1,0 kg
Subwoofer (NS-SW280)
Tipoi Advanced Yamaha Active Servo Technology
Driver . . . . . . . . . . . . . . . . . . . . . . . . . . . . . . . . . . . . . . . . . . . . . . . . . . . . . . . . . . . . . . . . . . . . . . . . . . . . . . . . . . . . . . . . . woofer a cono da 16 cm tipo non a schermatura magnetica
Type Advanced Yamaha Active Servo Technology
2NoBecbTe KaKdIyO KOIOHky WNOHOUHBIM na3OM Ha BbICTynaIOuN BuHT.
PpumeyaHue
Y6eINTECB TOM, YTOOCB BnHTa paCIOIOJKeHa BY3KoIyACTN IINHOHOrO IIa3a. B IIpOTNBOM Cnyac KOIOHKA MOKeT yIaCTb.
PpeynpexdeHua
KoIOHka NS-B285 BeCNT 0,45 Kr , a KOIOHka NS-C385 BeCNT 1 Kr . He MOHTpyTe KOIOHKn Ha TOHKyO fAhepy Nn Ha cTeHbI C MRTKO IOBepxHOCTbIO. B IIPOTNBHOM CIIYae BNHTbI MOryT 6bITb BBITAHyTbI N3 IOBepxHOCTN, IN KOIOHKn MOryT yIaCTb, YTO MoKeT IIpNBecTH N KOIBpeKJeHHO KOIOHOK Nn CTaTb IIpNHNOH TpaBMbl.
He 3aKpeHnTe KOIOHN Ha CteHe c HOMOIOBIO rBO3eH, KIEA HIN HeCTa6NtBHOrO 06OpyIOBaHH. IpoIOJKNTEbHOe NcIOJIb3OBAHne H BN6paHn MOYr IIpNBecTH K NaIeHHIO KOIOHOK.
TTO6bI IpeoTBPaHTb HecuactHbcIyua, Bb3BaHHbc CNOTbikaHMe O He3aKpeIIeHHbIe Ka6eIN KOIOHOK, 3aΦHKpnyTe Ka6eIN Ha CTHe.
KoIOHKn CIEyET MOHTNPOBaTb B TaKOM MecTe CTeHbI, KOTOPoc NCKIIIOHaet TpaBMnPOBaHne IIOBbl.
PpNkpenIeHne nOdCTaBOK KOJOhok
B cIyue paCIOIOKeHnI pOHTaJIbHbIX KOIOHOK nIN K0IOHOK OKpyKaIOIIeRO 3ByaHnHa POBHoi IOBepxHOCTn, IIpIKpeINTE IIpNJlaRaembIE IIOCTaBKN KOIOHOK C IIOMOUbIO BINTOB.
ПоклEquене Колонok
IpeynpexkHe: Ipei BblIOJIHeHem KAKNX-1n6o IOJIKIOUeHn y6eITcB TOM, YTO CNIOBbIE Ka6eN Ca6Byepa HPOuNx ayIOOBnIOEOKOMIOHeHToB OTCOEINHEHb OT p03eTOK IIpepeMeHHOT OKa.
Cxema nodkloucheHna
IoproToBka Ka6eJei KOJHOK
Iocne pa3MeHnK KOIOHOK B MeCTaX yCTaHOBKn Heo6xOIMo pa3pe3aTb 25-MeTPOBHy Ka6eJIb KOIOHOK Ha IIHTb OTpe3KOB, YTO6bl IIOKIIIOHTb IBe pOHTaIbHbIe KOIOHKn, IeHTpaJIbHyO KOIOHky I DBe KOIOHKn OKpyKaioUeTo 3ByaHn.
IopexbTe npnilaraembl Ka6ebk KOHOHOK Ha OTe3Kn Heo6XoDnMOdNINbI dNp cHTpaJIbHO, fpoHTaJIbHbIX KOHOK KONOHOK OKpykaIOJero 3ByaHn. IOnaO6ntc nTb Ka6enei.
2ydaNTe n3OJIaIIO Ha dIIHHe npIMepHO 10 MM Ha KOHcE KaXdOro npOBoda.
3IIOTHO cIIeTHe oroneHHbIe npoBoda.


PpabunbHo HenpaunbHo
Ppumeyanu
Ka6eHN KOIOHOK OJIKHbI 6bITb MAKcIMMaJIbHO KOpOTKMM. He CBaIBaHTe H He cMaTbBAHTe N36bIToHyIO qACTb Ka6eHN.
OroHHeIPOBOHa HcO6XoIMo IIOHTHO cIIeCTN, YTO6bI OTJeHbIe Xnbl He BbICTyIaHn HApKy.
ByIbTeOCTOpOKHbI,HTo6bI IpeIOITbPaTNTb TpaMbI B IPOUecce IOJROTOBKn Ka6eJe.
UnpaBneHne TepMnHaIamN KOHOK
OtpnataeIbHbI (-)
POnoxKteJbHbI(+)
PnmeuHne:Y6eHntecb B TOM, YTO B TepMHane 3aKaTa ORoJIeHHa YAcTb npOBoJa, a He H3OJIaIy.
1HaxmTe u ydepXnBaIte 3aueKny tepMNHaJa.
2BctaBbTe orOleHHyu qactb npOBoJa.
3OTnyctnte 3auejky TaKIM o6pa3OM, yTo6bI OHa HadeJxHO npJxana orOJeHHyU qAcTb npoBODa,a He N30JIauHIO.
4PpOBepbTe HaedXHocTb NOkIIOueHnA, cnerka notaHyB ka6enn.
PpumeyaHua
Y6eINTecbTOM,TO OROJIeHHbIe YAcTHn IPOBOIOB He COIIpNKACAOTcH,IOCKOJIbKy 3TO MOKeT IIpNBecTN K IOJOMKe KOJOHOK NIN YCNIHTeJIa.
EcnIIOIKIOUeHHe BbIOJIHeHO HeIpaBnIbHO,BbI He ycJIbIIITe 3ByKa H3 KOJIOHOK.
IopdklouheNe KOJHOK
IoiKIOUOHTe KaJkyo KOIOHky K COOTBETCTBYIOHM TepMHaIaM KOIOHOK Ha ycIIINTEe C IIOMOIIbIO IOIROTOBJIeHHbIX paHee Ka6eJe. IIOJpO6Hee cm. "Cxema IIOKIIIOUeHHn" Ha cTp.3.
Y6eINTEcB TOM, YTO IINIOKIIIOUeHNN KOIOHOK 6bIa CO6IIOHeHa IIpaBUNbHaa IIOJIpyHOCTb- IIOJOXHTeJIbHbIE (+) TePMNHaJIb K IIOJOKTeJIbHbIM (+) TePMNHaJIaM, a OTrnIaTeJIbHbIe (-) TePMNHaJIb K OTPNIaTeJIbHbIM (-) TePMNHaJIaM. EcIN IN X IIpeIIyTaTb, 3BYK 6yJeT HeecTeCTBeHHbIM N 6yJeT IIOXO CblIIHNO Hn3Kne 3ByKObIe YaCAToTbI.
B Hactpoikax pa3MepOB akyCTHueckO cnCTemb AVpecbepa ykaKnte MaIbI pa3Mep (nIN "S") IIa Bcexa kyCTHuecknx cnCTem NS-P285.
Pn IIOCoEINHHeHHn ca6ByΦepa K DSP-ycnIITeIHO
Yamaha nIN AV-pecBepy,IOIKIOuHTe erO K
BbIXoNy SUBWOOFER nIN LOW PASS.
MaKcHMaJIbHaBxOJHHaMoIHOCTb
NS-B285. 80BT
NS-C385. 100 Br
IMpeIaHc 6Ω
YacrothaXapaKtepncnka. 110Iu-40KU
UyBCTBNTeJIbHOcTb
NS-B285. 81B/2,83B,1M
NS-C385. 84 IB/2,83 B,1 M
Yactota pa3dienenKaHaIOB
NS-C385. 8K
Ta6apHTHbIe pa3MepbI (III x B x Γ)
NS-B285. 90 x 90 x 109 MM (6e3 IIOCTaBKN)
Tun Advanced Yamaha Active Servo Technology
TolOBka.....16-cm KOHnueckn Hn3KOaCTOThB JINHaMk C MaHTnTHbIM 3KpaHnpObaHneM
BbIXoHna MoHIOCTb 50BT (100T,5Ω,IOHbIKo3ΦHnIeHTrapMOHnK10%)
HannMueckma MoHocTb. 100BT,5Ω
BxohmpeaHc.....INPUT (rHe3IO 1PRCA):10K
YactorHaxapakTepehna 30T-160T
BxOHaA yBCTBHTeIbHocTb..... INPUT (rHe3IO 1P RCA): 80 MB (50 Iu, 50 Br/5 Ω)
Питаннe
MoJIINIⅡII CIIIA N KaHaIbI IepeMeHHbI TOK 120 B,60 Iu
MoJIbIABCTpaIIIN....IepeMeHHbI TK 240 B,50 Iu MoJIINIeNko6pTuHnN EbpOII
IepemEnbTOK230B,50
Moennn Knta, Kopen,
A3HH N O6IIHe MoJeHn ....IpeMeHHbTOK 110-120/220-240 B,50/60 T
Fa6apHTbIe pa3MepbI (III x B x Γ) ... 262 x 264 x 316 MM
Macca. 6,9 KI
TexHHeckn XapaKTepeNtKN MOrY T3MeHrTbC8 6e3 yBeJOMJIeHn.