
2517056 - Juicer RUSSELL HOBBS - Free user manual and instructions
Find the device manual for free 2517056 RUSSELL HOBBS in PDF.

| Product type | Slow juicer |
| Brand | Russell Hobbs |
| Model | 2517056 |
| Approx. dimensions | 25 x 20 x 40 cm |
| Approx. weight | 4 kg |
| Power supply | Mains, 220-240 V |
| Power | 200 W |
| Maximum continuous operating time | 15 minutes |
| Required rest time | 30 minutes |
| Main functions | Juice extraction, frozen sorbet preparation |
| Number of filters | 2 (fine strainer and coarse strainer) |
| Included accessories | Pusher, cleaning brush, grinding head, pulp collector, juice collector, sorbet accessory |
| Maintenance and cleaning | Removable parts dishwasher safe (except motor unit); brush provided for hard-to-reach areas |
| Safety | Reset device, automatic stop in case of jam, reverse button |
| Body material | Plastic and stainless steel |
| Warranty | 2 years (standard) |
Frequently Asked Questions - 2517056 RUSSELL HOBBS
User questions about 2517056 RUSSELL HOBBS
0 question about this device. Answer the ones you know or ask your own.
Ask a new question about this device
Download the instructions for your Juicer in PDF format for free! Find your manual 2517056 - RUSSELL HOBBS and take your electronic device back in hand. On this page are published all the documents necessary for the use of your device. 2517056 by RUSSELL HOBBS.
USER MANUAL 2517056 RUSSELL HOBBS
natural_image
Exterior view of a modern Russia Hoobs juice maker with clear glass and black handle (no text or symbols on device)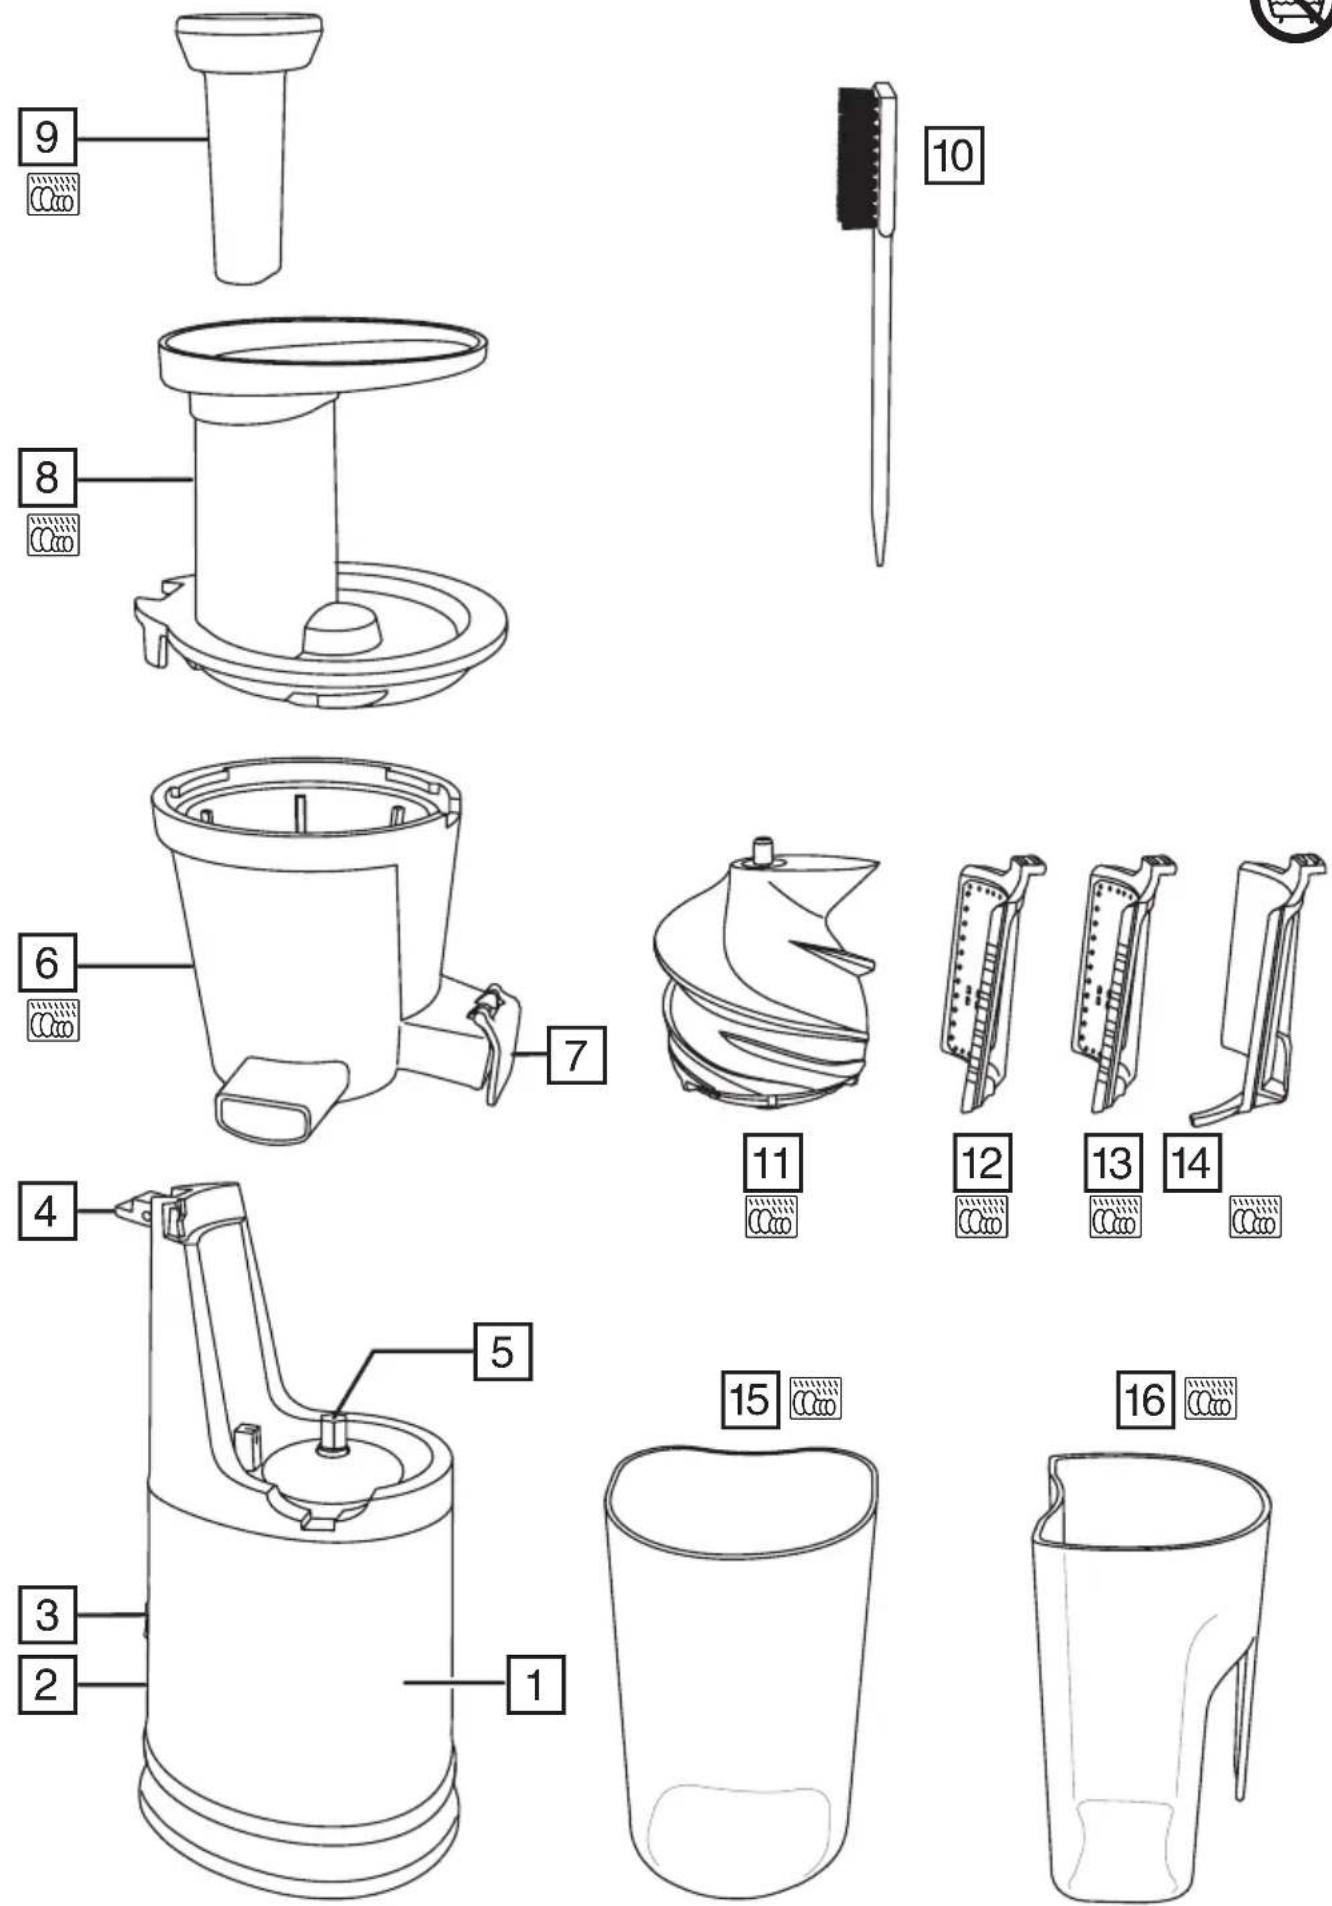
natural_image
Technical line drawing of a mechanical component with a cylindrical housing and connecting rod (no text or symbols)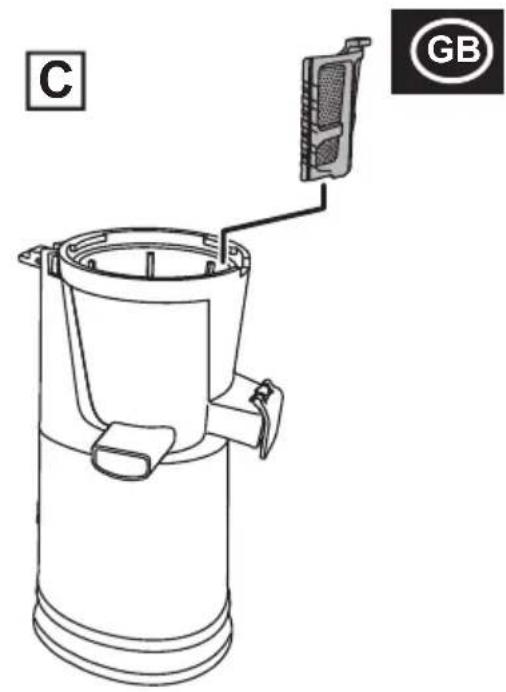
natural_image
Line drawing of a mechanical component with a spiral-shaped top and central shaft (no text or symbols)
natural_image
Line drawing of a mechanical device with a rotating arrow indicating rotation (no text or symbols)
natural_image
Line drawing of a mechanical device with a handle and base, labeled 'H' in the top-left corner (no text or symbols on the device itself)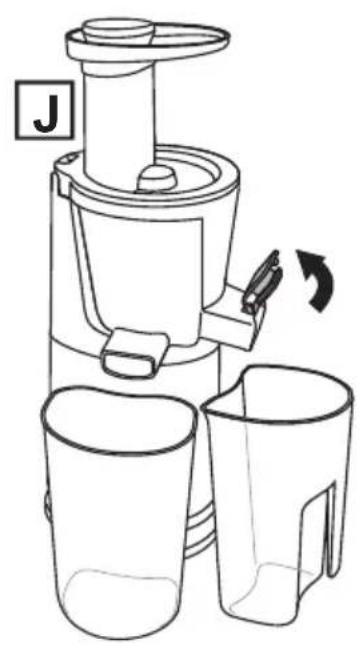
natural_image
Line drawing of a multi-stage juice maker with two cups and a side arm, showing no text or symbols.IMPORTANT SAFEGUARDS
Follow basic safety precautions, including:
This appliance can be used by persons with reduced physical, sensory or mental capabilities or lack of experience and knowledge if they have been supervised/instructed and understand the hazards involved.
Children must not use or play with the appliance. Keep the appliance and cable out of reach of children.
Always disconnect the appliance from the mains supply socket if it is left unattended and before assembling, disassembling or cleaning.
Misuse of the appliance may cause injury.
If the cable is damaged, it must be replaced by the manufacturer, its service agent, or someone similarly qualified, to avoid hazard.
Do not use this appliance near bathtubs, showers, basins or other vessels containing water.
- Don't use fingers or cutlery to push food down the tube – only the pusher.
- Don't use the appliance for any purpose other than those described in these instructions.
- Don't use accessories or attachments other than those we supply.
- Don't operate the appliance if it's damaged or malfunctions.
- Don't leave the appliance unattended while plugged in.
- Don't run the juicer continuously for more than 15 minutes or it may overheat. After 15 minutes switch off and allow it to rest for at least 30 minutes.
HOUSEHOLD USE ONLY
PARTS
- Motor base
- Reset button
- Switch
- Upper container cover latch
- Drive shaft
- Upper container
- Juice spout cover
- Upper container cover
- Pusher
- Cleaning brush
- Grinding head
- Fine filter
- Coarse filter
- Frozen sorbet attachment
- Pulp collector
- Juice collector
Dishwasher safe
BEFORE USING FOR THE FIRST TIME
- Remove any packaging material and labels.
- Wash the removable parts in warm, soapy water. Rinse and dry.
- Wipe the motor base with a damp cloth.
- Place the appliance on a dry, firm, level surface, near a power socket.
ASSEMBLY
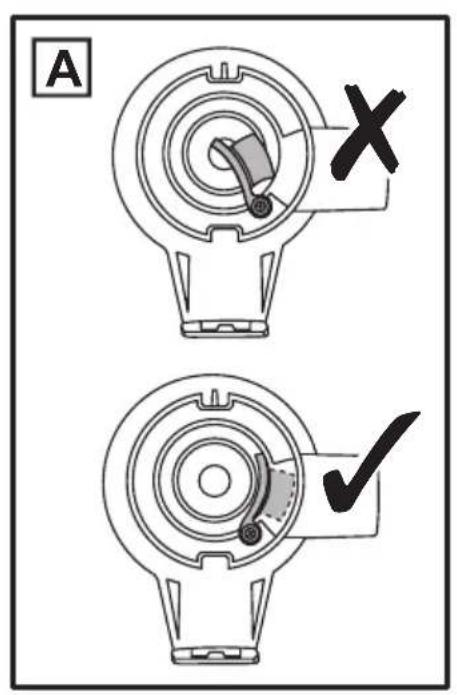
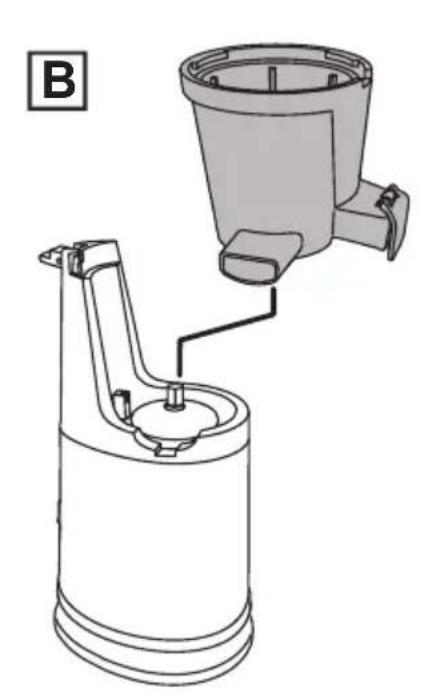
- First, make sure the rubber flap underneath the upper container is pushed inside the juice spout tube (fig A), then fit the upper container onto the motor base (fig B).
- Insert the filter you want to use into the upper container (fig C). The coarse filter allows more of the pulp to mix with the extracted juice.
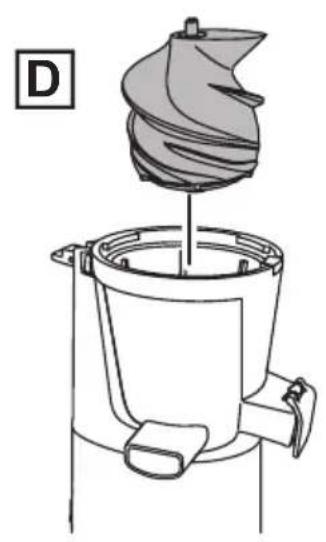
- Insert the grinding head into the upper container (fig D). You may have to rotate the grinding head slightly until it fits over the hexagonal drive shaft correctly. Press the grinding head all the way down. If you don't, you won't be able to fit the upper container cover at the next step.
- Align the upper container cover ▼ mark with the ▲ mark on the motor base (fig E).
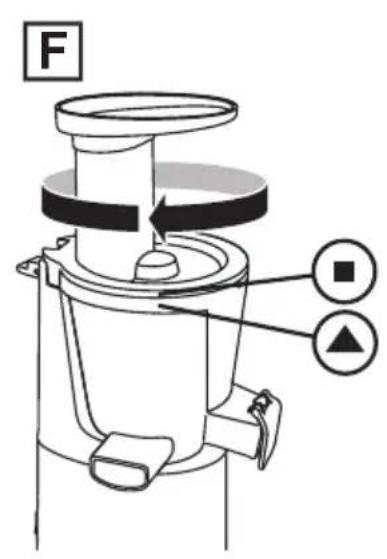
- Rotate the upper cover clockwise until the ■ mark on the upper cover is aligned with the ▲ mark on the motor base (fig F).
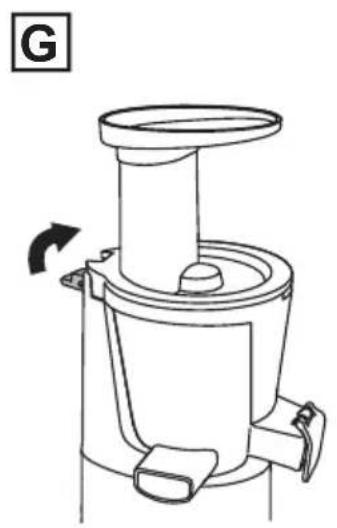
- Flip the upper container cover latch up (fig G).
- Insert the pusher (fig H).
- Place the pulp container under the pulp outlet, then position the juice collector under the juice spout and open the juice spout cover (fig J).
USING - JUICING
Prepare the ingredients before use.
- Buy organically grown produce whenever you can.
- Use good quality, fresh, ripe fruit and vegetables. Soft vegetables or overripe fruit can make the juice thick and cloudy.
- Wash all fruit and vegetables. Use a brush on the harder ones. Remove the outer leaves on non-organic produce. Peel any non-organic or waxed fruit or vegetables. Cut out and discard bruises and blemishes as these may affect the taste of the juice.
- Bunch up leafy greens, parsley, wheat grass, bean sprouts, etc. into a small tight ball and push it down the tube with the pusher.
- Cut fibrous ingredients into slices 3-5 cm long by 1.5 - 2 cm thick.
- Cut longer ingredients such as celery into 3-5 cm pieces.
- Remove stones from fruit like peaches, plums, mangoes, etc.
- Peel hard skinned ingredients.
- Never process ingredients which have a high oil content as this can damage the grinding head.
- Never process hard ingredients such as coconut which will damage your juicer.
-
Don't juice anything strong or pungent, like onions or garlic. No matter how well you clean your juicer, you'll never get rid of the taste.
-
Check that the appliance is switched off (O).
-
Put the plug into the power socket.
-
The switch has three positions: O, I, and ⇔. O is off. I is on. ➕ operates your juicer in the reverse direction and is only used if something becomes stuck. Never move the switch directly from I to ➕ or vice versa. Always stop your juicer by switching to O before changing the operating direction i.e. I to O to ➕.
-
Turn the appliance on (I).
-
Remove the pusher and drop the ingredients down the tube. Do not feed ingredients too fast and do not load too many ingredients at once.
-
Replace the pusher and use it to gently push the ingredients down the tube.
-
Once finished, turn off your juicer (O).
USING - FROZEN SORBET
Prepare the ingredients before use.
- Do not try to process ingredients that are frozen solid. Allow them to thaw sufficiently so that a fork can be inserted into the centre of the ingredient.
- Feed ingredients slowly.
- Do not use excessive force to push the ingredients through the machine.
- Only use the frozen sorbet attachment when making sorbet. Do not fit it when juicing.
- Follow the instructions under ASSEMBLY but fit the frozen sorbet attachment at step 2.
- Process the ingredients as you would when juicing them bearing in mind the above points.
TROUBLESHOOTING
Juicer Stops Operating or Becomes Stuck
- Set the switch to O.
- Press the reset button ✗ at the rear of appliance.
- Press and hold the switch in the position for few seconds then try operating again.
-
If the reverse function does not work, turn your juicer off, disassemble and clean it then reassemble it.
-
After reassembly try operating your juicer again.
Difficulty in Disassembling
- In order to disassemble your juicer more easily, run it without any ingredients in for about 30 seconds after use.
-
If the upper container cover cannot be removed easily, try running your juicer in the following way two or three times:
-
Move the switch from to O to I. With the upper container cover latch in the open position, grasp the upper container and twist it back and forth until it comes free.
-
If the grinding head becomes stuck, invert the upper container and gently push out the grinding head from below.
CLEANING
- Run your juicer without any ingredients in for about 30 seconds after use. Add a little warm water while it is running to aid disassembly.
- Switch the appliance off (O) and unplug it.
- Disassemble the appliance.
- Wipe the outside of the motor unit with a clean damp cloth.
- Wash the removable parts in warm soapy water, rinse well, drain, and air dry.
- Use the pointed end of the supplied cleaning brush to help clean places that are more difficult to reach.
- Open the rubber flap to access the juice spout tube. See figure J for the location of the rubber flap. Close the flap properly after cleaning.
You may wash these parts in a dishwasher.
If you use a dishwasher, the harsh environment inside the dishwasher will affect the surface finishes.
Damage should be cosmetic only, and should not affect the operation of the appliance.
RECYCLING
To avoid environmental and health problems due to hazardous substances, appliances and rechargeable and non-rechargeable batteries marked with one of these symbols must not be disposed of with unsorted municipal waste. Always dispose of electrical and electronic products and, where applicable, rechargeable and non-rechargeable batteries, at an appropriate official recycling/collection point.
RECIPES
SPARKLING EYE POTION
In order to maintain healthy, shiny eyes our bodies require plenty of B vitamins, as well as vitamins C and E and beta-carotene. Try this juice drink now and again as a refreshing and tasty vitamin enriched drink.
- 3 carrots
- 2 green apples
• 12 broccoli - 12 red pepper
APPLE AND STRAWBERRY
- 250g strawberries
- 3 green apples
• 1 small piece ginger, peeled - Serve over ice.
ENERGY DRINK
Fruit and vegetables have natural sweetness and make excellent energy drinks.
- 2 carrots
• 3 apricots, stone removed - 2 apples
- 50ml milk
- 5g wheatgerm
- 5ml honey
Juice the fruit and vegetables. Stir in the milk, wheatgerm, and honey.
VITAMIN DRINK
This drink is high in B group vitamins, vitamin C, and the mineral calcium.
- 1 parsnip
- 12 green pepper
• 1 broccoli - 2 carrots
- 1 sweet potato
- 1 stick celery
For a sweeter taste, add more carrot or parsnip.
SUMMER DRINK
- 3 tomatoes
- 12 cucumber
- 1 stick celery
- 1 / 8 lime
SAVOURY COCKTAIL
- 2 carrots
• 1 handful watercress - 3 tomato
• 1 bunch coriander or basil leaves - 1 stick celery
- 12 red pepper
- A few drops of Tabasco or Worcestershire sauce (optional)
CARROT AND PARSLEY
- 6 carrots
- 5 sprigs parsley
CABBAGE, CELERY AND CARROT
- 12 green cabbage
- 2 stick celery
- 3 carrots
VEGETABLE TONIC
- 1 handful spinach
- 4 sprigs parsley
- 4-6 carrots
SUNSHINE COCKTAIL
- 2 apples
- 100g strawberries
PASSION COCKTAIL
- 50g strawberries
- 14 pineapple
• 1 bunch black grapes
PINEAPPLE AND GRAPEFRUIT
- 12 grapefruit
- 14 pineapple
LEMONADE
- 4 apples
- 14 lemon
- Serve over ice.
PINEAPPLE, STRAWBERRY AND APPLE
- 1 apple
• 14 pineapple - 100g strawberries
APENAS PARA USO DOMÉSTICO
PEÇAS
COUVE, AIPO E CENOURA
- 12 couve verde
- 2 talos de aipo
- 3 cenouras
TÓNICO VEGETAL
- 1 punhado de espinafres
• 4 raminhos de salsa
• 4-6 cenouras
COCKTAIL RAIOS DE SOL
SKINNENDE ∅JNE ELIKSIR
KREMA OD JABUKA I JAGODA
• 250g jagoda
• 3 zelene, kiselkaste jabuke
• 1 mali komad oguljenog dumbira
- Služiti preko leda.
ENERGETSKI NAPITAK
POTIUNE PENTRU OCHI AGERI


- IMPORTANT SAFEGUARDS
- HOUSEHOLD USE ONLY
- PARTS
- BEFORE USING FOR THE FIRST TIME
- ASSEMBLY
- USING - JUICING
- USING - FROZEN SORBET
- TROUBLESHOOTING
- Juicer Stops Operating or Becomes Stuck
- Difficulty in Disassembling
- CLEANING
- RECYCLING
- RECIPES
- SPARKLING EYE POTION
- APPLE AND STRAWBERRY
- ENERGY DRINK
- VITAMIN DRINK
- SUMMER DRINK
- SAVOURY COCKTAIL
- CARROT AND PARSLEY
- CABBAGE, CELERY AND CARROT
- VEGETABLE TONIC
- SUNSHINE COCKTAIL
- PASSION COCKTAIL
- PINEAPPLE AND GRAPEFRUIT
- LEMONADE
- PINEAPPLE, STRAWBERRY AND APPLE
- APENAS PARA USO DOMÉSTICO
- PEÇAS
- COUVE, AIPO E CENOURA
- TÓNICO VEGETAL
- COCKTAIL RAIOS DE SOL
- SKINNENDE ∅JNE ELIKSIR
- KREMA OD JABUKA I JAGODA
- ENERGETSKI NAPITAK
- POTIUNE PENTRU OCHI AGERI
Brand : RUSSELL HOBBS
Model : 2517056
Category : Juicer