
VLSDVBT2FTA1 - Receiver Valueline - Free user manual and instructions
Find the device manual for free VLSDVBT2FTA1 Valueline in PDF.
| Product type | DVB-T2 digital receiver |
| Brand | Valueline |
| Model | VLSDVBT2FTA1 |
| Input voltage | 100 - 240 V AC |
| Frequency | 50 - 60 Hz |
| Power consumption | 8 W |
| Tuning input frequency | 170-230 MHz / 470-860 MHz |
| RF input level | -25 ~ -78 dBm |
| Modulation | QPSK / 16 QAM / 64 QAM |
| Audio formats | MPEG-1 |
| Video formats | MPEG-2 / MPEG-4 |
| Outputs | HDMI, SCART, RF, coaxial audio |
| Inputs | USB, RF antenna |
| Main functions | DTT HD, radio, PVR recording, teletext, subtitles, EPG guide, favorites list |
| Standby | Standby mode and auto standby after 3 h |
| Remote control power | 2 AAA batteries (not included) |
| Care and cleaning | Unplug before cleaning; use a soft, damp cloth; do not use solvents |
| Safety | Do not expose to water, heat, do not open; do not block ventilation openings |
| Warranty | Warranty voided if modified; not liable for incorrect use |
| Disposal | Do not dispose with household waste; take to a collection point |
Frequently Asked Questions - VLSDVBT2FTA1 Valueline
User questions about VLSDVBT2FTA1 Valueline
0 question about this device. Answer the ones you know or ask your own.
Ask a new question about this device
Download the instructions for your Receiver in PDF format for free! Find your manual VLSDVBT2FTA1 - Valueline and take your electronic device back in hand. On this page are published all the documents necessary for the use of your device. VLSDVBT2FTA1 by Valueline.
USER MANUAL VLSDVBT2FTA1 Valueline
Digital set-top box
Remote control
Description
The digital set-top box is a device that allows you to access digital TV and radio channels on your TV.
Front panel

| 1. On/standby indicator | ·The indicator lights green when the device is switched on. ·The indicator lights red when the device is in standby mode. |
| 2. Remote control sensor | ·Point the remote control to the remote control sensor. |
Side panel

-
USB input
-
Connect a USB device to the USB input using a USB cable.
Rear panel
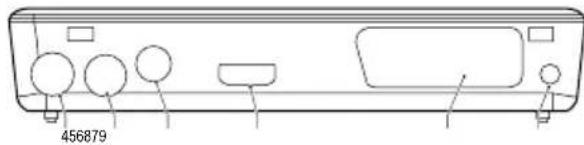
| 4. RF input | • Connect the external antenna to the RF input using a coaxial cable. |
| 5. RF output | • Connect the TV to the RF output using a coaxial cable. |
| 6. Coaxial output | • Connect an audio device to the coaxial output using a coaxial cable. |
| 7. SCART output | • Connect the TV to the SCART output using a SCART cable. |
| 8. HDMI output | • Connect the TV to the HDMI output using an HDMI cable. |
| 9. Mains cable • Connect the mains cable to the mains. | |
Connection scheme

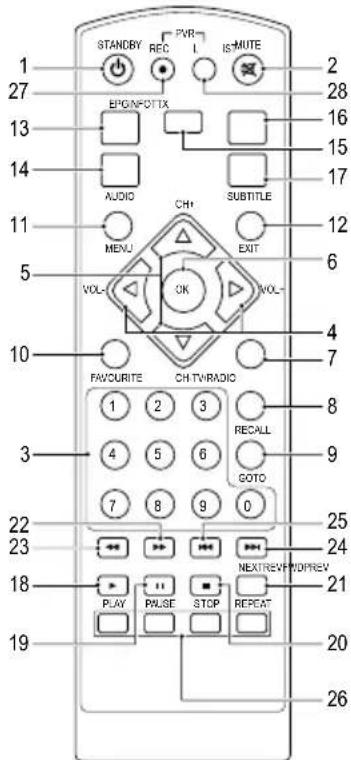
Remote control
| 1. On/standby button | • Press the button to switch on the device. • Press the button again to set the device to standby mode. |
| 2. Mute button | • Press the button to mute the sound. • Press the button again to unmute the sound. |
| 3. Digit buttons | • Press one of the buttons to go to the required channel. • Press one of the buttons to go to the required menu item. |
| 4. Right/left buttons Volume +/- buttons | • Press the buttons to increase or decrease the volume. • Press the buttons to move right or left in the menu. • Press the buttons to move from main menu to submenu or from submenu to main menu. |
| 5. Up/down buttons Channel +/- buttons | • Press the buttons to go to the next or previous channel. • Press the buttons to move up or down in the menu. |
| 6. OK button | • Press the button to confirm the selection. • Press the button to confirm the entered value. • Press the button to open a drop-down list. |
| 7. TV/Radio button | • Press the button to switch between TV mode and radio mode. |
| 8. Recall button | • Press the button to switch between the last two channels. |
| 9. Goto button | • Press the button to select the play time of media. |
| 10. Favourite button | • Press the button to display the favourite menu. |
| 11. Menu button | • Press the button to access the menu. |
| 12.Exit button | • Press the button to go up a level in the menu. • Press the button to exit the menu. |
| 13.EPG button | • Press the button to display the electronic program guide (EPG). |
| 14.Audio button | • Press the button to select the audio language or the audio mode. |
| 15.Info button | • Press the button to display information for the current channel. |
| 16.Teletext button | • Press the button to enter teletext mode. |
| 17.Subtitle button | • Press the button to enter subtitle mode. |
| 18.Play button | • Press the button to play the programme. |
| 19.Pause button | • Press the button to pause the screen picture. |
| 20.Stop button | • Press the button to stop the programme. |
| 21.Repeat button | • Press the button to enter repeat mode. |
| 22.Fast-forward button | • Press the button to fast-forward. |
| 23.Rewind button | • Press the button to rewind. |
| 24.Skip-forward button | • Press the button to skip forward. |
| 25.Skip-backward button | • Press the button to skip backward. |
| 26.Color buttons | • Press the buttons to operate different functions in teletext mode. |
| 27.Record button | • Press the button to record the programme. |
| 28.List button | • Press the button to display the list with recorded programmes. |
VALUELINE
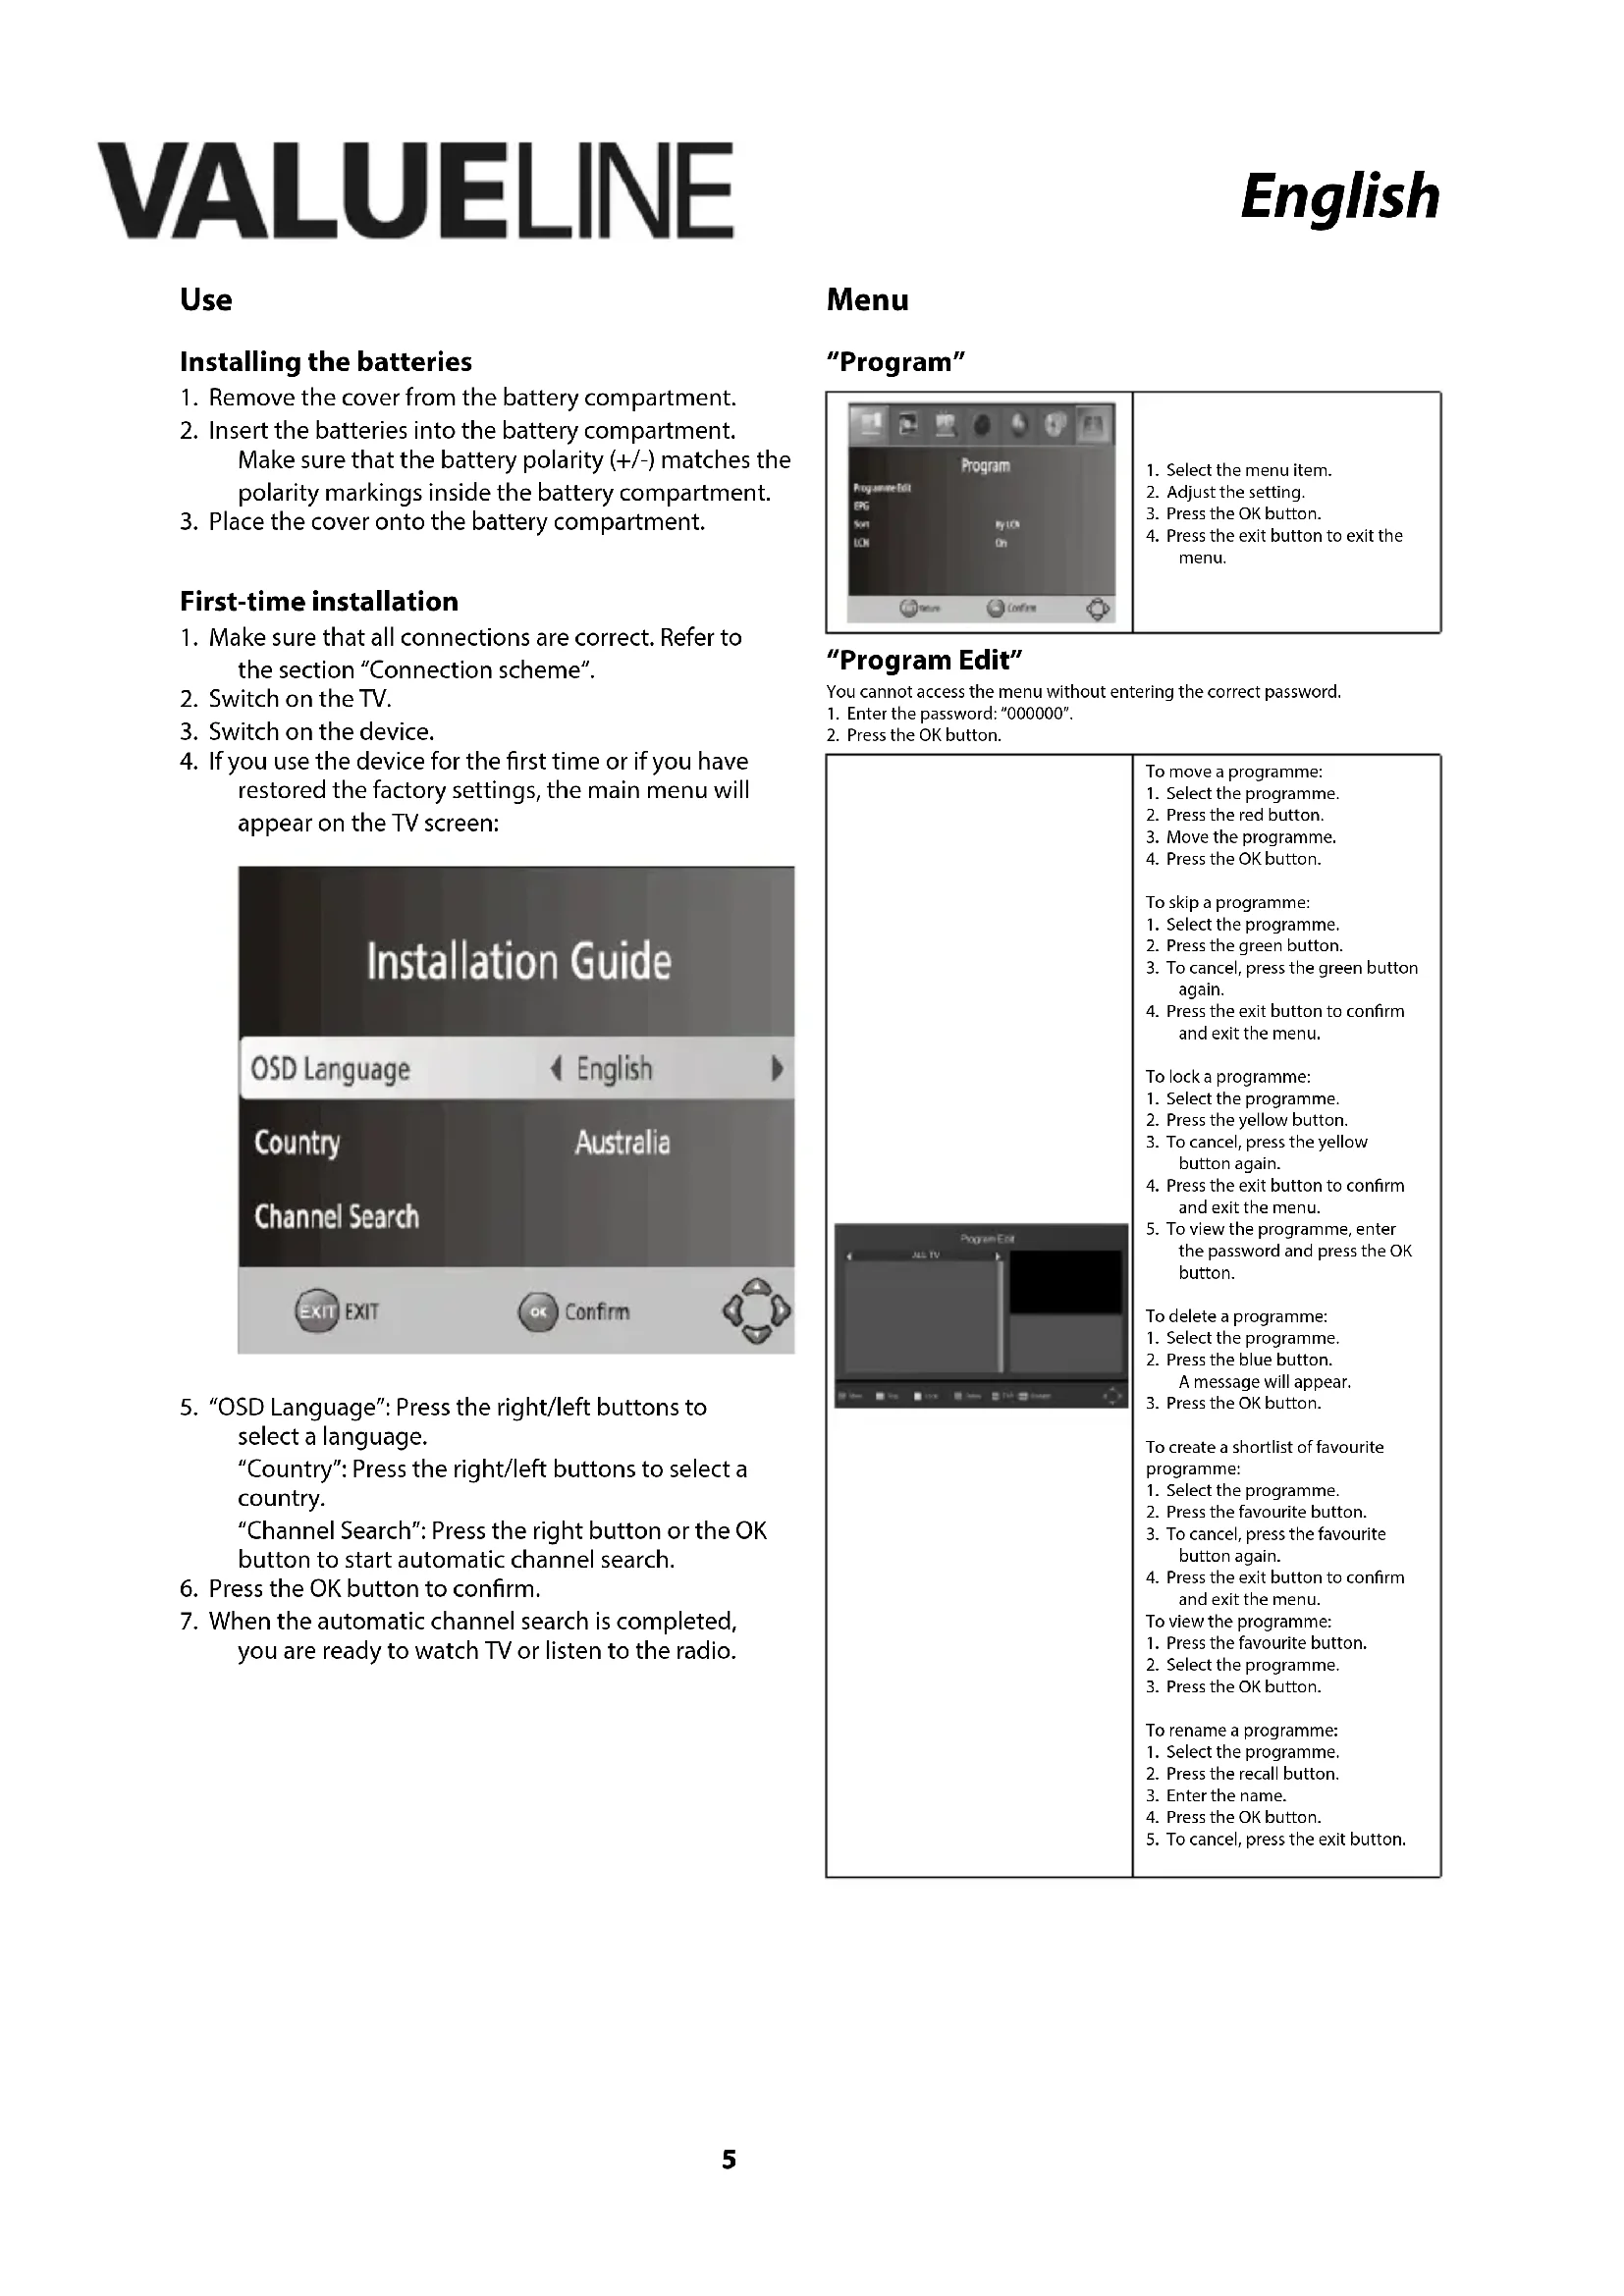
Use
Installing the batteries
- Remove the cover from the battery compartment.
- Insert the batteries into the battery compartment. Make sure that the battery polarity (+/-) matches the polarity markings inside the battery compartment.
- Place the cover onto the battery compartment.
First-time installation
- Make sure that all connections are correct. Refer to the section "Connection scheme".
- Switch on the TV.
- Switch on the device.
- If you use the device for the first time or if you have restored the factory settings, the main menu will appear on the TV screen:

- "OSD Language": Press the right/left buttons to select a language.
"Country": Press the right/left buttons to select a country.
"Channel Search": Press the right button or the OK button to start automatic channel search.
- Press the OK button to confirm.
- When the automatic channel search is completed, you are ready to watch TV or listen to the radio.
Menu
"Program"
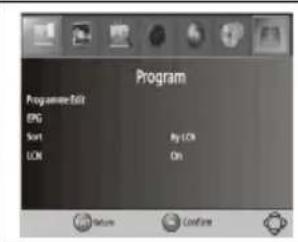
- Select the menu item.
- Adjust the setting.
- Press the OK button.
- Press the exit button to exit the menu.
"Program Edit"
You cannot access the menu without entering the correct password.
- Enter the password: "000000".
- Press the OK button.

To move a programme:
- Select the programme.
- Press the red button.
- Move the programme.
- Press the OK button.
To skip a programme:
- Select the programme.
- Press the green button.
- To cancel, press the green button again.
- Press the exit button to confirm and exit the menu.
To lock a programme:
- Select the programme.
- Press the yellow button.
- To cancel, press the yellow button again.
- Press the exit button to confirm and exit the menu.
- To view the programme, enter the password and press the OK button.
To delete a programme:
- Select the programme.
- Press the blue button.
A message will appear. - Press the OK button.
To create a shortlist of favourite programme:
- Select the programme.
- Press the favourite button.
- To cancel, press the favourite button again.
- Press the exit button to confirm and exit the menu.
To view the programme: - Press the favourite button.
- Select the programme.
- Press the OK button.
To rename a programme:
- Select the programme.
- Press the recall button.
- Enter the name.
- Press the OK button.
- To cancel, press the exit button.
VALUELINE
"Programme Guide"
"EPG" stands for "Electronic Programme Guide". The electronic programme guide is an on-screen TV and radio guide that shows scheduled programmes seven days in advance for every tuned channel.

- Press the EPG button.
- Select the programme.
- Press the blue button to move a page up.
- Press the yellow button to move a page down.
"Sort"
Sort the channels:
- "LCN": Ascending order.
- "Name": Alphabetical order.
- "Service ID": According to the station.
"LCN"
"LCN" stands for "Logical Channel Number".
- "LCN":Select"On" or "Off".
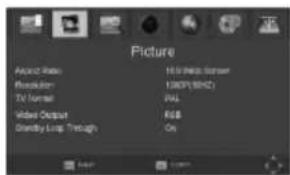
"Picture"

Adjust the photo settings:
- Select the menu item.
- Adjust the setting.
- Press the OK button.
- Press the exit button to exit the menu.
"Aspect Ratio": proportional relationship between the width and the height of an image. Options:
4:3 Pan&Scan
4:3 Letter Box
4:3 Full
"16:9 Widescreen
16:9 Pillar Box
16:9 Pan&Scan
"Auto
"Resolution": number of distinct pixels in each dimension that can be displayed on the screen.
Options:
- NTSC:"4801"/"480p".
PAL:"576i"/"576p" - NTSC/PAL:"720p"/"1080i"/"1080p"
"TV Format": TV encoding system.
- "NTSC"
-PAL
"Video Output": video output.
- "CVBS": CVBS output
“RGB”: RGB output
"Standby loop through":
loop-through for a second receiver when the device is in standby mode.
"On": Enable the function.
- "Off": Disable the function.
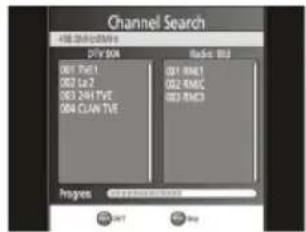
"Channel Search"
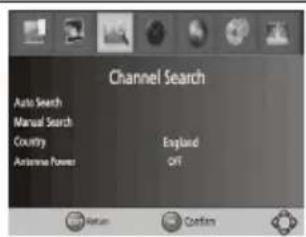
Adjust the settings to search a channel:
- Select the menu item.
- Press the OK button.
- Press the exit button to exit the menu.
"Auto Search": Search and Install all channels automatically. The option overwrites all present channels.
- Press the OK button to start searching.
- Press the exit button to cancel.
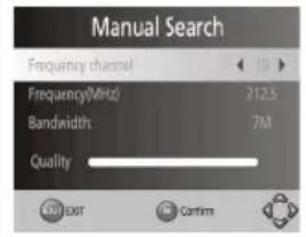
"Manual Search": Search and install all channels manually. The option adds new channels without changing the current channel list.
Press the OK button to start searching. If a channel is found, it will be added to the channel list.
"Country": Select a country.
"Antenna Power": Select "On" or "Off".
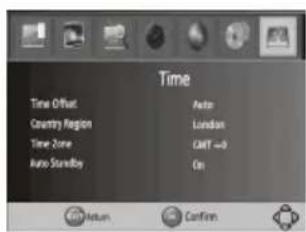
"Time"

Adjust the time settings:
1. Select the menu item.
2. Adjust the setting.
3. Press the OK button.
4. Press the exit button to exit the menu.
"Time Offset": Select "Auto" or "Manual" to adjust the GMT offset.
"Country Region": If "Time Offset" is set to "Auto", select a region.
"Time Zone": If "Time Offset" is set to "Manual", select a time zone offset.
"Auto Standby": Select "On" or "Off". Note: If the setting is set to "On", the device will go to sleep mode after 3 hours. Press the on/standby button to exit the sleep mode.
"Option"

Adjust the option settings:
1. Select the menu item.
2. Adjust the setting.
3. Press the OK button.
4. Press the exit button to exit the menu.
"OSD Language": Select the OSD language.
"Subtitle Language": Select the subtitle language.
"Audio Language": Select the audio language.
"Digital Audio": Select the digital audio output mode.
"System"

Adjust the system settings:
1. Select the menu item.
2. Adjust the setting.
3. Press the OK button.
4. Press the exit button to exit the menu.
"Parental Guidance": Restrict access to channels that are unsuitable for children. To lock the channel, enter the password.
"Set Password": Change the password for locked programs. Enter the old password, followed by the new password. To confirm, enter the new password again.
"Factory Default": Enter the password and press the OK button to return to the factory settings. All channels and settings will be deleted.
Information":View information regarding the model, the hardware and the software.
"Software Update":
- Enable or disable the Over Air Download (OAD) function.
- Upgrade the software via USB.
"USB"

Adjust the USB settings:
- Select the menu item.
- Adjust the setting.
- Press the OK button.
- Press the exit button to exit the menu.
"Photo Configure":
- "Slide Time": Set the slide show interval.
- "Slide Mode": Set the slide show effect.
"Aspect Ratio": Display the photo with its original aspect ratio. - "Discard": Display the photo in full-screen mode.
"Movie Configure":
- "Aspect Ratio":
- "Keep": Play the movie with its original aspect ratio.
- "Discard": Play the movie in full-screen mode.
- "Subtitle Specific": "Small" / "Normal" / "Big": Display subtitles in small mode, normal mode or large mode.
"Subtitle BG": "White"/"Transparent"/"Gray"/ "YellowGreen":Display subtitles in white,transparent,grey or yellow-green background.
"Subtitle FontColor": "Red"/"Blue"/"Green"/"White"/"Black": Display subtitles in red, blue, green, white or black font.
"PVR Configure":
"Record Device": Select the disk for recording.
- "Format": Format the selected disk.
"Multimedia"

"Multimedia":
- Press the up/down buttons to select different files.
- Press the OK button.
- Use the buttons on the remote control to play the multimedia.
Colour buttons:
- When the picture is shown, press the red button in zoom mode to switch between preview and fullscreen.
- Press the green mode to rename the PVR file on the PVR playback page.
- Press the yellow mode to delete the PVR file on the PVR playback page.
- Press the blue button to enter grid show mode.
PVR function
Preparation
- Make sure that all previous data on the USB device is backed up to prevent loss of data.
- Before starting PVR recording, make sure that the device is switched off before you insert a USB device with a minimum of 4 GB of free space.
- Make sure the USB device is correctly inserted to prevent damage to the USB port.
- You can record only one programme at a time.
- To prepare the USB device, follow "PVR Configure" in the "USB" menu.
Recording
- Select the programme.
- Press the record button to start recording. The screen briefly shows the message "Enter record waiting".
- Press the info button once to display the record time indicator. Press the info button twice for further information.
- Press the stop button to stop recording.
- Press the OK button to cancel recording.
- Press the exit button to continue recording.
Playback
- Press the menu button.
- Select "USB". Press the OK button.
- Select "Multimedia". Press the OK button.
- Select "PVR". Press the OK button. The recorded programmes are listed in the HBPVR folder.
- Select the programme. Press the OK button.
- To preview, delete or rename a file, follow the on-screen instructions.
- To delete a file, press the yellow button. Press the OK button. Note: You cannot delete or rename a file in playback mode.
- To move up in the menu, press the exit button.
EPG Schedule Timer
- Press the EPG button to display the electronic program guide (EPG).
- Select the programme. Press the OK button.
- Check the "Event add" information on screen.
- Press the down button to select the mode.
- Press the right button to select "View" or "Record".
"View": An on-screen message will alert you at the time of the scheduled programme. If necessary, you can change the channel.
"Record": To record programmes at a later preset time. An on-screen message will alert you when the recording is due to start. Note: You cannot change the channel without stopping recording.
Book list
The book list function shows a schedule with all programmed recordings.
- To open the book list directly when you are watching a channel, press the blue button.
Cleaning and maintenance
Warning!
- Before cleaning or maintenance, switch off the device, remove the mains plug from the wall socket and wait until the device has cooled down.
- Do not use cleaning solvents or abrasives.
- Do not clean the inside of the device.
- Do not attempt to repair the device. If the device does not operate correctly, replace it with a new device.
- Clean the outside of the device using a soft, damp cloth. Thoroughly dry the outside of the device with a clean, dry cloth.
Technical data
| Input voltage 100 - 240 V AC | |
| Frequency 50 - 60 Hz | |
| Electrical power 8 W | |
| Tuner | |
| Input frequency | 170-230 MHz / 470-860 MHz |
| RF input level | -25 ~ -78 dBm |
| IF bandwidth | 7 MHz / 8MHz |
| Modulation | QPSK / 16 QAM / 64 QAM |
| File format | |
| Audio | MPEG-1 |
| Video | MPEG-2 / MPEG-4 |
Troubleshooting
If you cannot solve the problem, contact your dealer.
| Problem Possible cause Solution | ||
| No sound. | No or incorrect audio cable connection. Connect the audio cable correctly. | |
| The sound is muted. Unmute the sound. | ||
| The device plays an incorrect sound track. Change the sound track. | ||
| No picture. | The mains plug is not inserted into the wall socket. Insert the mains plug into the wall socket. | |
| The device is switched off. Switch on the device. | ||
| The image stops or looks like mosaic. The signal is too weak. Strengthen the signal. | ||
| The screen shows the message "No Signal". | The antenna cable is not connected. | Connect the antenna cable. |
| Incorrect settings. | Change the settings. | |
| The remote control does not work. | The batteries are low. | Replace the batteries. |
| The remote control is not pointing to the device. | Point the remote control to the device. Make sure that nothing blocks the front panel. | |
VALUELINE
English
Safety
General safety
- Read the manual carefully before use. Keep the manual for future reference.
- Only use the device for its intended purposes. Do not use the device for other purposes than described in the manual.
- Do not use the device if any part is damaged or defective. If the device is damaged or defective, replace the device immediately.
- Do not expose the device to water or moisture.
- Do not expose the device to sunlight.
- Keep the device away from heat sources.
- Do not block the ventilation openings.
Electrical safety


- To reduce risk of electric shock, this product should only be opened by an authorized technician when service is required.
- Disconnect the product from the mains and other equipment if a problem should occur.
- Do not use the device if the mains cable or mains plug is damaged or defective. If the mains cable or mains plug is damaged or defective, it must be replaced by the manufacturer or an authorised repair agent.
- Before use, always check that the mains voltage is the same as the voltage on the rating plate of the device.
Make sure that the mains cable cannot become entangled. - Make sure that the mains cable does not hang over the edge of a worktop and cannot be caught accidentally or tripped over.
- Do not touch the device during thunderstorms to avoid electric shocks.
- Switch off the device when it will not be used for a long period.
Battery safety
- Use only the batteries mentioned in the manual.
- Do not use old and new batteries together.
- Do not use batteries of different types or brands.
- Do not install batteries in reverse polarity.
- Do not short-circuit or disassemble the batteries.
-
Do not expose the batteries to water.
-
Do not expose the batteries to fire or excessive heat.
- Batteries are prone to leakage when fully discharged. To avoid damage to the product, remove the batteries when leaving the product unattended for longer periods of time.
- If liquid from the batteries comes into contact with skin or clothing, immediately rinse with fresh water.
Warranty
Any changes and/or modifications to the product will void the warranty. We cannot accept any liability for damage caused by incorrect use of the product.

Disposal
The product is designated for separate collection at an appropriate collection point. Do not dispose of the product with household waste.
- For more information, contact the retailer or the local authority responsible for waste management.
Documentation
The product has been manufactured and supplied in compliance with all relevant regulations and directives, valid for all member states of the European Union. The product complies with all applicable specifications and regulations in the country of sales.
Formal documentation is available upon request. The formal documentation includes, but is not limited to the Declaration of Conformity, the Material Safety Data Sheet and the product test report.
Disclaimer
Designs and specifications are subject to change without notice. All logos, brands and product names are trademarks or registered trademarks of their respective holders and are hereby recognized as such.
VALUELINE
Nederlands
VLS-DVBT2-FTA1
Digitale settopbox
Verpakkingsinhoud
- Digitale settopbox
- Afstandsbediening
Beschrijving
"LCN" stands for "Logical Channel Number" (logisch kanaalnummer).
"LCN": Selecteer "On" of "Off".
"Picture"
NTSC:"480i"/"480p".
PAL:576i"/576p"
- NTSC/PAL:"720p"/"1080i"/"1080p"
"TV Format": TV-coderingssystem.
- "NTSC"
-PAL
"Video Output": video-uitgang.
"CVBS": CVBS-uitgang
“RGB”: RGB-uitgang
"Antenna Power": Selecteer "On" of "Off"
"Time"
NTSC:"4801"/"480p".
PAL:"576i"/576p".
- NTSC/PAL:"720p"/"1080i"/"1080p"
"TV Format": TV-Encodiersystem.
- "NTSC"
-PAL
- NTSC:"480i"/"480p".
PAL:"576i"/"576p" - NTSC/PAL: "720p" / "1080i" / "1080p"
- NTSC:"480i"/"480p".
PAL:"576i"/"576p".
NTSC/PAL:"720p"/"1080i"/"1080p"
"TV Format": Système de codage TV.
- "NTSC"
-PAL
"Video Output": sortie video.
- NTSC: "4801" / "480p".
PAL:"576i"/"576p". - NTSC/PAL:"720p"/"1080i"/"1080p"
"TV Format": TV-kodningsystem.
"NTSC
-PAL
"Video Output": videoudgang.
"CVBS": CVBS-udgang
"RGB": RGB-udgang
- NTSC: "480i" / "480p".
PAL:"576i"/"576p".
NTSC/PAL:720p"/1080i"/1080p".
- NTSC:"480i"/"480p".
PAL:"576i"/"576p" - NTSC/PAL:"720p"/"1080i"/"1080p"
NTSC:480i" / 480p".
PAL:576i" / 576p"
-NTSC/PAL:720p"/'1080i""/1080p"
"TV Format": Sistem de codare TV. NTSC"
PAL
"Video Output": iesire video.
"CVBS": lesire CVBS
"RGB": Iesire RGB
