VLSDVBS2FTA1 - Receiver Valueline - Free user manual and instructions
Find the device manual for free VLSDVBS2FTA1 Valueline in PDF.
| Brand | Valueline |
| Model | VLSDVBS2FTA1 |
| Product type | Digital receiver (set-top box) |
| Main functions | Digital TV and radio reception, electronic program guide (EPG), PVR recording on USB, multimedia playback (photos, music, videos) |
| Connections | RF input, RF output, coaxial audio output, SCART output, HDMI output, USB input, DC input (power) |
| Remote control | Yes, with AAA batteries included |
| Remote control batteries | 2 AAA batteries (included) |
| Power supply | External power adapter (not included) |
| OSD languages | English and other selectable languages |
| Available settings | Language, subtitles, audio, parental control, password, software update |
| Software update | By USB or Over Air Download (OAD) |
| Multimedia | Playback of photos, music and videos via USB device |
| Recording | PVR (Personal Video Recorder) on external USB device |
| Maintenance | Clean the exterior with a soft, damp cloth. Do not use solvents or abrasive products. Disconnect before cleaning. |
| Safety | Do not open the device. Do not expose to water or humidity. Keep away from heat sources. Disconnect during storms. |
| Spare parts / Repairability | Not user-serviceable. In case of malfunction, replace the device. |
| Power consumption | Not specified |
Frequently Asked Questions - VLSDVBS2FTA1 Valueline
User questions about VLSDVBS2FTA1 Valueline
0 question about this device. Answer the ones you know or ask your own.
Ask a new question about this device
Download the instructions for your Receiver in PDF format for free! Find your manual VLSDVBS2FTA1 - Valueline and take your electronic device back in hand. On this page are published all the documents necessary for the use of your device. VLSDVBS2FTA1 by Valueline.
USER MANUAL VLSDVBS2FTA1 Valueline
- Digital set-top box
- Remote control (incl. AAA batteries)
Description
The digital set-top box is a device that allows you to access digital TV and radio channels on your TV.
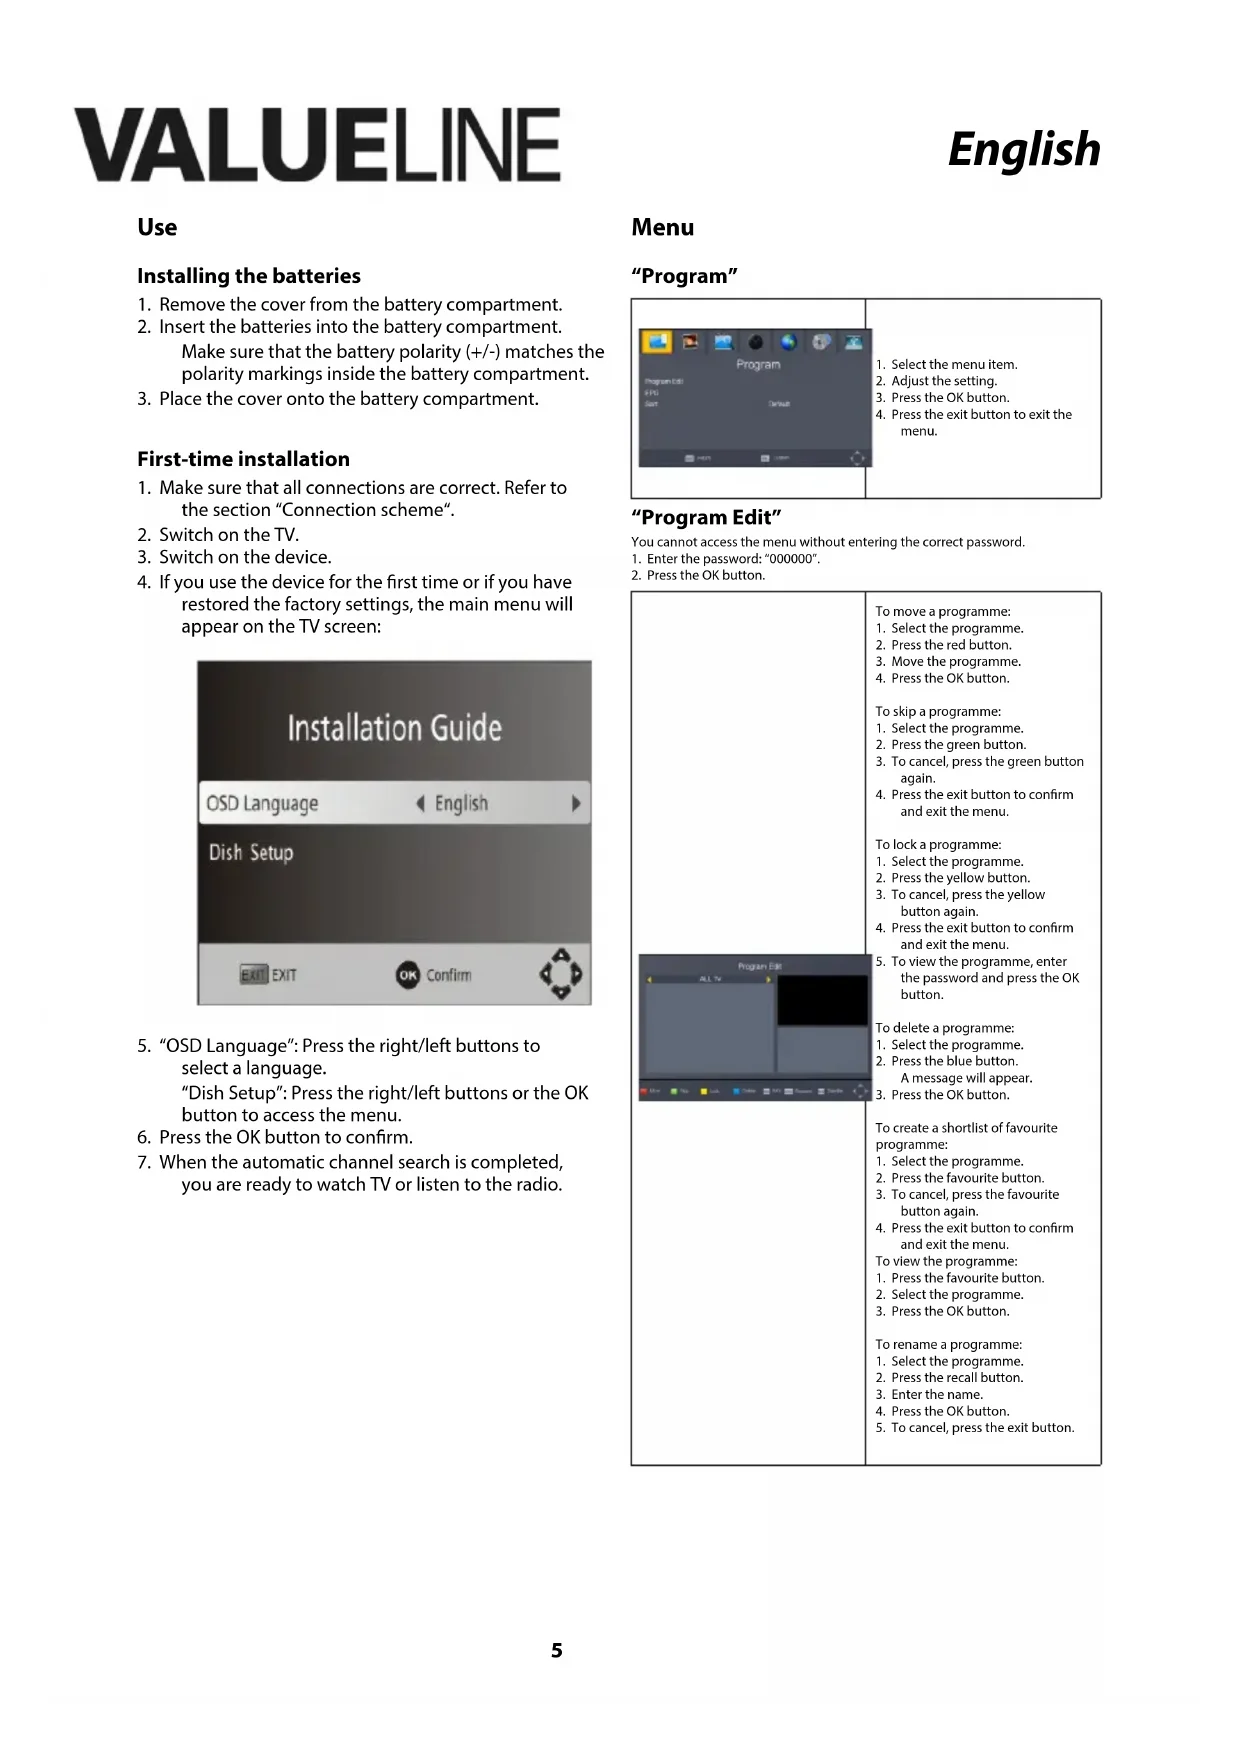
Front panel
natural_image
Line drawing of a rectangular device with labeled parts (1 and 2), no text or symbols present| 1. On/standby indicator | The indicator lights green when the device is switched on.The indicator lights red when the device is in standby mode. |
| 2. Remote control sensor | Point the remote control to the remote control sensor. |
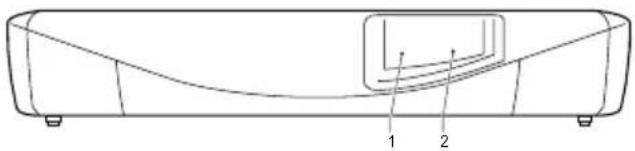
Side panel

natural_image
Line drawing of a device casing with internal components and labeled part '3' (no text or symbols beyond label)| 3. USB input | • Connect a USB device to the USB input using a USB cable. |
Rear panel
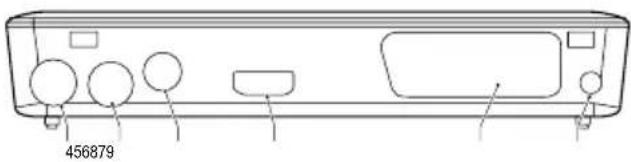
text_image
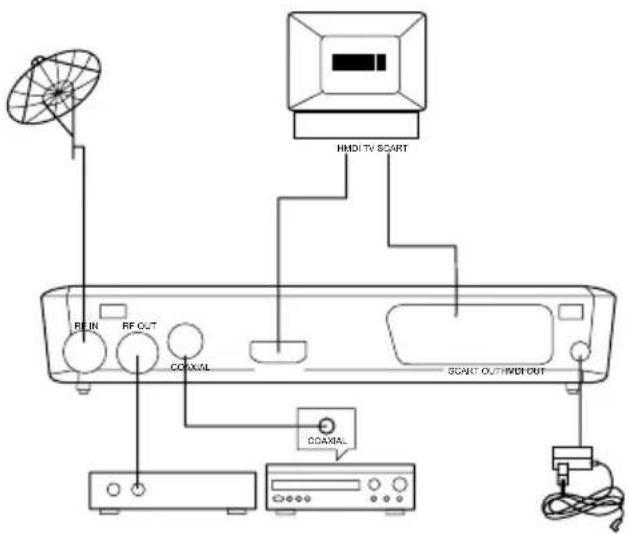
456879| 4. RF input | Connect the external antenna to the RF input using a coaxial cable. |
| 5. RF output | Connect the TV to the RF output using a coaxial cable. |
| 6. Coaxial output | Connect an audio device to the coaxial output using a coaxial cable. |
| 7. SCART output | Connect the TV to the SCART output using a SCART cable. |
| 8. HDMI output | Connect the TV to the HDMI output using an HDMI cable. |
| 9. DC input | Connect the power adapter to the DC input of the device and to the wall socket. |
Connection scheme
text_image
HMO TV START RF IN RF OUT COXIAL COXIAL SCART OUT/INDI OUTVALUELINE
English
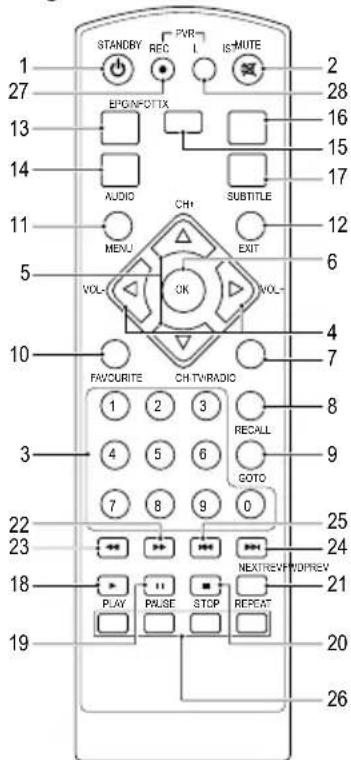
Remote control

text_image
1 27 13 14 11 5 10 3 22 23 18 19 STANDBY REC PVR IS MUTE EPONFOTIX AUDIO CH+ SUBTITLE MENU EXIT VOL- OK VOL- FAVOURITE CH TW RADI 1 2 3 RECALL 8 4 5 6 GOTO 9 7 8 9 0 PLAY PULSE STOP REPEAT 25 NEXTREV NDFREV 24 21 20 26| 1. On/standby button | Press the button to switch on the device.Press the button again to set the device to standby mode. |
| 2. Mute button | Press the button to mute the sound.Press the button again to unmute the sound. |
| 3. Digit buttons | Press one of the buttons to go to the required channel.Press one of the buttons to go to the required menu item. |
| 4. Right/left buttonsVolume +/- buttons | Press the buttons to increase or decrease the volume.Press the buttons to move right or left in the menu.Press the buttons to move from main menu to submenu or from submenu to main menu. |
| 5. Up/down buttonsChannel +/- buttons | Press the buttons to go to the next or previous channel.Press the buttons to move up or down in the menu. |
| 6. OK button | Press the button to confirm the selection.Press the button to confirm the entered value.Press the button to open a drop-down list. |
| 7. TV/Radio button | Press the button to switch between TV mode and radio mode. |
| 8. Recall button | Press the button to switch between the last two channels. |
| 9. Goto button | Press the button to select the play time of media. |
| 10. Favourite button | Press the button to display the favourite menu. |
| 11. Menu button | • Press the button to access the menu. |
| 12. Exit button | • Press the button to go up a level in the menu.• Press the button to exit the menu. |
| 13. EPG button | • Press the button to display the electronic program guide (EPG). |
| 14. Audio button | • Press the button to select the audio language or the audio mode. |
| 15. Info button | • Press the button to display information for the current channel. |
| 16. Teletext button | • Press the button to enter teletext mode. |
| 17. Subtitle button | • Press the button to enter subtitle mode. |
| 18. Play button | • Press the button to play the programme. |
| 19. Pause button | • Press the button to pause the screen picture. |
| 20. Stop button | • Press the button to stop the programme. |
| 21. Repeat button | • Press the button to enter repeat mode. |
| 22. Fast-forward button | • Press the button to fast-forward. |
| 23. Rewind button | • Press the button to rewind. |
| 24. Skip-forward button | • Press the button to skip forward. |
| 25. Skip-backward button | • Press the button to skip backward. |
| 26. Colour buttons | • Press the buttons to operate different functions in teletext mode. |
| 27. Record button | • Press the button to record the programme. |
| 28. List button | • Press the button to display the list with recorded programmes. |
VALUELINE
Use
Installing the batteries
- Remove the cover from the battery compartment.
- Insert the batteries into the battery compartment. Make sure that the battery polarity (+/-) matches the polarity markings inside the battery compartment.
- Place the cover onto the battery compartment.
First-time installation
- Make sure that all connections are correct. Refer to the section "Connection scheme".
- Switch on the TV.
- Switch on the device.
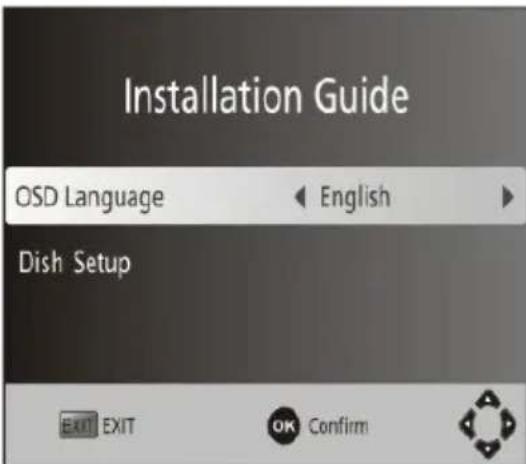
- If you use the device for the first time or if you have restored the factory settings, the main menu will appear on the TV screen:
text_image
Installation Guide OSD Language ← English ► Dish Setup EXIT EXIT OK Confirm- "OSD Language": Press the right/left buttons to select a language.
"Dish Setup": Press the right/left buttons or the OK button to access the menu.
- Press the OK button to confirm.
- When the automatic channel search is completed, you are ready to watch TV or listen to the radio.
Menu
"Program"

text_image
Program Program123 VPS Sort Default- Select the menu item.
- Adjust the setting.
- Press the OK button.
- Press the exit button to exit the menu.
"Program Edit"
You cannot access the menu without entering the correct password.
- Enter the password: "000000".
- Press the OK button.

text_image
Program Edit ALL %To move a programme:
- Select the programme.
- Press the red button.
- Move the programme.
- Press the OK button.
To skip a programme:
- Select the programme.
- Press the green button.
- To cancel, press the green button again.
- Press the exit button to confirm and exit the menu.
To lock a programme:
- Select the programme.
- Press the yellow button.
- To cancel, press the yellow button again.
- Press the exit button to confirm and exit the menu.
- To view the programme, enter the password and press the OK button.
To delete a programme:
- Select the programme.
- Press the blue button.
A message will appear. - Press the OK button.
To create a shortlist of favourite programme:
- Select the programme.
- Press the favourite button.
- To cancel, press the favourite button again.
- Press the exit button to confirm and exit the menu.
To view the programme:
- Press the favourite button.
- Select the programme.
- Press the OK button.
To rename a programme:
- Select the programme.
- Press the recall button.
- Enter the name.
- Press the OK button.
- To cancel, press the exit button.
VALUELINE
"Program Guide"
"EPG" stands for "Electronic Programme Guide". The electronic programme guide is an on-screen TV and radio guide that shows scheduled programmes seven days in advance for every tuned channel.

text_image
Program Guide Box Bookbox Foolbox Page Bars- Press the EPG button.
- Select the programme.
- Press the blue button to move a page up.
- Press the yellow button to move a page down.
"Sort"
Sort the channels:
- "Default": Original order.
- "Encrypt": Encrypt mode.
• "Service Name": Alphabetical order.
• "Service ID": According to the station.
"Picture"

text_image
Picture Aspect Results 15.9 White Screen Resolution 1200 TV format PAL Video Output CY69Adjust the photo settings:
- Select the menu item.
- Adjust the setting.
- Press the OK button.
- Press the exit button to exit the menu.
"Aspect Ratio": proportional
relationship between the width and the height of an image.
Options:
- "4:3 Pan&Scan"
- "4:3 Letter Box"
• "16:9 Widescreen"
• "Auto"
"Resolution": number of distinct
pixels in each dimension that can be
displayed on the screen.
Options:
- NTSC:"480i"/"480p".
• PAL: "576i" / "576p"
• NTSC/PAL: "720p" / "1080i"
"TV Format": TV encoding system.
• "NTSC"
• "PAL"
• "Auto"
"Video Output": video output.
• "CVBS": CVBS output
- "RGB": RGB output
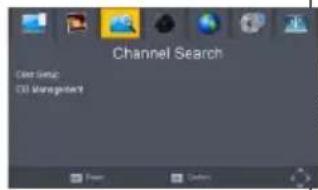
"Channel Search"

text_image
Channel Search Get Setup Get ManagementAdjust the settings to search a
channel:
- Select the menu item.
- Press the OK button.
- Press the exit button to exit the menu.
"Dish Setup"
Configure the settings of satellites:
- "Satellites' list": Select the satellite. The settings of the satellite are shown.
- "LNB Type": View the LNB types as frequencies of local oscillator. Enter the frequency with "User Single" or "User Dual".
- "LNB Power": Set the LNB power.
• "22K": Switch the 22K on or off. - "Toneburst": Enable or disable the toneburst switcher.
- "DiSEqC1.0": Select the correct port up to 4 for the correct LNB.
- "DiSEqC1.1": Select the correct port up to 16 for the correct LNB.
• "Motor": Select "DiSEqC1.2" or "DiSEqC1.3". - "DiSEqC1.2": Move the motor to the correct position to lock the signal.
- "DiSEqC1.3": Move the motor according to the local and satellite positions.
- "Move Auto": Press the right/left buttons to move West or East. The movement will be stopped automatically when the signal is locked.
- "Move Continue": Press the right/left buttons to move West or East. The movement will be stopped when you release the right/left buttons.
- "Move Step[1]": Press the right/left buttons to move just a step.
- "Store Position": Store the current position of the motor.
- "Goto Position": Press the right/left buttons to go to the stored position.
• "Goto Reference": Rest all the positions. - "Goto X": Go to the position calculated from the local and satellite positions.
- "Add satellites": Press the red button to add a new satellite. Enter a unique longitude. Enter the name of satellite.
- "Edit satellites": Press the green button to edit the satellite.
- "Delete satellite": Press the yellow button to delete the satellite. Press the OK button to confirm.
"Single Satellite Scan":
Press the blue button to access the menu.
- "Scan Mode": Select "Default" to scan the default built-in transponders. Select "Blind Scan and Network" to scan with NIT enabled.
- "Crypted": Select "All Channels" or "FTA Channels".
• "Service Type": Select "ALL", "DTV" or "Radio". - Press the OK button to start scanning.
"Multi-Satellite Scan":
Press the OK button to select satellites. Press the blue button to access the menu.
- "Scan Mode": Select "Default" to scan the default built-in transponders. Select "Blind Scan and NetWork" to scan with NIT enabled.
- "Crypted": Select "All Channels" or "FTA Channels".
• "Service Type": Select "ALL", "DTV" or "Radio". - Press the OK button to start scanning.
"Channel Search":
Scan the satellites or transponders according the configurations.
"Blind Scan":
Scan the band to get the transponders which can be locked. After gathering all transponders, scan the transponders one by one to get the programs.
VALUELINE
English
"DB Management"
Press the goto button to show the transponders of the satellite or to go back to satellites' list.
- "Add transponder": Press the red button to add a new transponder. Note: You cannot save an existing transponder under the same satellite.
- "Edit transponder": Press the green button to edit the transponder. Note: You cannot save an existing transponder under the same satellite.
- "Delete transponder": Press the yellow button to delete the transponder. Press the OK button to confirm.
"Single Transponder Scan":
Press the blue button to access the menu. After configuring the settings, press the OK button to start scanning.
"Multi-Transponder Scan":
Press the OK button to select transponders. Press the blue button to access the menu. After configuring the settings, press the OK button to start scanning.
"Time"

text_image
Time Time Offset Auto Country Region Guaranteed Time Zone GMT 40 Size 01Adjust the time settings:
- Select the menu item.
- Adjust the setting.
- Press the OK button.
- Press the exit button to exit the menu.
"Time Offset": Select "Auto" or "Manual" to adjust the GMT offset.
"Country Region": If "Time Offset" is set to "Auto", select a region.
"Time Zone": If "Time Offset" is set to "Manual", select a time zone offset.
"Sleep": Select "On" or "Off". Note: If the setting is set to "On", the device will go to sleep mode after 0-12 hours. Press the on/standby button to exit the sleep mode.
"Option"

text_image
Option CSS Language English Multi Language English Audio Language English Digital Audio PageAdjust the option settings:
- Select the menu item.
- Adjust the setting.
- Press the OK button.
- Press the exit button to exit the menu.
"OSD Language": Select the OSD language.
"Subtitle Language": Select the subtitle language.
"Audio Language": Select the audio language.
"Digital Audio": Select the digital audio output mode.
"System"

text_image
System Parental Guidance Set Password Restore Factory Cebus Information Software License Recall ListAdjust the system settings:
- Select the menu item.
- Adjust the setting.
- Press the OK button.
- Press the exit button to exit the menu.
"Parental Guidance": Restrict access to channels that are unsuitable for children. To lock the channel, enter the password.
"Set Password": Change the password for locked programs. Enter the old password, followed by the new password. To confirm, enter the new password again.
"Restore Factory Default": Enter the password and press the OK button to return to the factory settings. All channels and settings will be deleted.
"Information": View information regarding the model, the hardware and the software.
"Software Update":
- Enable or disable the Over Air Download (OAD) function.
- Upgrade the software via USB.
"Recall List": - Enable or disable the recall list function.
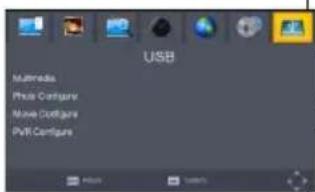
"USB"
text_image
USB Multimedia Phone Configure Move Configure PWR ConfigureAdjust the USB settings:
- Select the menu item.
- Adjust the setting.
- Press the OK button.
- Press the exit button to exit the menu.
"Multimedia":
- Refer to the section "Multimedia" on the next page.
"Photo Configure": - "Slide Time": Set the slide show interval.
- "Slide Mode": Set the slide show effect.
- "Aspect Ratio": Display the photo with its original aspect ratio.
- "Discard": Display the photo in full-screen mode.
"Movie Configure":
- "Subtitle Specific": "Small" / "Normal" / "Big": Display subtitles in small mode, normal mode or large mode.
- "Subtitle BG":
- "White" / "Transparent" / "Gray" / "YellowGreen": Display subtitles in white, transparent, grey or yellow-green background.
- "Subtitle FontColor":
- "Red" / "Blue" / "Green": Display subtitles in red, blue or green font.
"PVR Configure":
- "Record Device": Select the disk for recording.
- "Format": Format the selected disk.
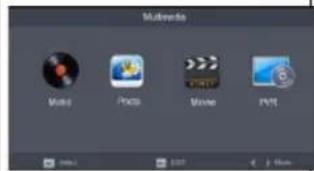
"Multimedia"
text_image
Multimedia Music Photo Movie PPT"Multimedia":
- Press the up/down buttons to select different files.
- Press the OK button.
- Use the buttons on the remote control to play the multimedia.
Colour buttons:
- When the picture is shown, press the red button in zoom mode to switch between preview and fullscreen.
- Press the green mode to rename the PVR file on the PVR playback page.
- Press the yellow mode to delete the PVR file on the PVR playback page.
- Press the blue button to enter grid show mode.
Cleaning and maintenance
Warning!
- Before cleaning or maintenance, switch off the device, remove the mains plug from the wall socket and wait until the device has cooled down.
- Do not use cleaning solvents or abrasives.
- Do not clean the inside of the device.
- Do not attempt to repair the device. If the device does not operate correctly, replace it with a new device.
- Clean the outside of the device using a soft, damp cloth. Thoroughly dry the outside of the device with a clean, dry cloth.
Troubleshooting
If you cannot solve the problem, contact your dealer.
| Problem Possible cause Solution | ||
| No sound. | No or incorrect audio cable connection. Connect the audio cable correctly. | |
| The sound is muted. Unmute the sound. | ||
| The device plays an incorrect sound track. Change the sound track. | ||
| No picture. | The mains plug is not inserted into the wall socket. Insert the mains plug into the wall socket. | |
| The device is switched off. Switch on the device. | ||
| The image stops or looks like mosaic. The signal is too weak. Strengthen the signal. | ||
| The screen shows the message “No Signal”. | The antenna cable is not connected. Connect the antenna cable. | |
| Incorrect settings. Change the settings. | ||
| The remote control does not work. | The batteries are low. | Replace the batteries. |
| The remote control is not pointing to the device. | Point the remote control to the device.Make sure that nothing blocks the front panel. | |
VALUELINE
Safety
General safety
- Read the manual carefully before use. Keep the manual for future reference.
- Only use the device for its intended purposes. Do not use the device for other purposes than described in the manual.
- Do not use the device if any part is damaged or defective. If the device is damaged or defective, replace the device immediately.
- Do not expose the device to water or moisture.
- Do not expose the device to sunlight.
- Keep the device away from heat sources.
- Do not block the ventilation openings.
Electrical safety


• To reduce risk of electric shock, this product should only be opened by an authorized technician when service is required.
- Disconnect the product from the mains and other equipment if a problem should occur.
- Do not use the device if the mains cable or mains plug is damaged or defective. If the mains cable or mains plug is damaged or defective, it must be replaced by the manufacturer or an authorised repair agent.
- Before use, always check that the mains voltage is the same as the voltage on the rating plate of the device.
• Make sure that the mains cable cannot become entangled.
- Make sure that the mains cable does not hang over the edge of a worktop and cannot be caught accidentally or tripped over.
- Do not touch the device during thunderstorms to avoid electric shocks.
- Switch off the device when it will not be used for a long period.
Battery safety
- Use only the batteries mentioned in the manual.
- Do not use old and new batteries together.
- Do not use batteries of different types or brands.
- Do not install batteries in reverse polarity.
- Do not short-circuit or disassemble the batteries.
- Do not expose the batteries to water.
- Do not expose the batteries to fire or excessive heat.
- Batteries are prone to leakage when fully discharged. To avoid damage to the product, remove the batteries when leaving the product unattended for longer periods of time.
- If liquid from the batteries comes into contact with skin or clothing, immediately rinse with fresh water.
English
Warranty
Any changes and/or modifications to the product will void the warranty. We cannot accept any liability for damage caused by incorrect use of the product.

Disposal
- The product is designated for separate collection at an appropriate collection point. Do not dispose of the product with household waste.
- For more information, contact the retailer or the local authority responsible for waste management.
Documentation
The product has been manufactured and supplied in compliance with all relevant regulations and directives, valid for all member states of the European Union. The product complies with all applicable specifications and regulations in the country of sales.
Formal documentation is available upon request. The formal documentation includes, but is not limited to the Declaration of Conformity, the Material Safety Data Sheet and the product test report.
Disclaimer
Designs and specifications are subject to change without notice. All logos, brands and product names are trademarks or registered trademarks of their respective holders and are hereby recognized as such.
VALUELINE
Nederlands
VLS-DVBS2-FTA1
Digitale settopbox
Verpakkingsinhoud
- Digitale settopbox
• Afstandsbediening (incl. AAA-batterijen)
Beschrijving
natural_image
Line drawing of a rectangular electronic device with labeled parts (no text or symbols beyond labels)natural_image
Line drawing of a device casing with internal compartments and a labeled component (no text or symbols)text_image
Program Edit ALL TV- NTSC:"480i"/"480p".
• PAL: "576i" / "576p" - NTSC/PAL:"720p" / "1080i"
"TV Format": TV-coderingssysteem.
• "NTSC"
• "PAL"
• "Auto"
"Video Output": video-uitgang.
• "CVBS": CVBS-uitgang
- "RGB": RGB-uitgang
"Channel Search"

text_image
Channel Search Get Setup Get Management"Multi-Satellite Scan":
"Multi-Transponder Scan":
text_image
Option ODD Language English Mobile Language English Audio Language English Digital Audio Notetext_image
System Parental Guidance Set Password Remote Factory Default Information purchase Update Recall Listnatural_image
Line drawing of a rectangular electronic device with labeled parts (no text or symbols beyond labels)natural_image
Line drawing of a device casing with internal components and a labeled part (3), no text or symbols present.text_image
HINDI TV SCART RIN RF OUT CD/AXL SCART OUT/HIND OUT CD/AXLVALUELINE
Deutsch
Fernbedienung

text_image
1 27 13 14 11 5 10 3 22 23 18 19 STANDBY REC PVR IS MUTE EPON/FOX AUDIO CH+ SUBTITLE MENU EXIT VOL- OK VOL- FAVOURITE CH TW/RADIO 1 2 3 4 5 6 7 8 9 0 PLAY PULSE STOP REPEAT NEXTREV/ND/PREV 20 26 28 16 15 17 12 6 4 7 8 9 25 24 21text_image
Program Edit ALL 7% File Edit Tools Help Tools Help Tools Help Tools Help Tools Help Tools Help Tools Help Tools Help Tools Help Tools Help Tools Help Tools Help Tools Help Tools Help Tools Help Tools Help Tools Help Tools Help Tools Help Tools Help Tools Help Tools Help Tools Help Tools Help Tools Help Tools Help Tools Help Tools Help Tools Help Tools Help Tools Help Tools Help Tools Help Tools Help Tools Help Tools Help Tools Help Tools Help Tools Help Tools Help Tools Help Tools Help Tools Help Tools Help Tools Help Tools Help Tools Help Tools Help Tools Help Tools Help Tools help tools help tools help tools help tools help tools help tools help tools help tools help tools help tools help tools help tools help tools help tools help tools help tools help tools help tools help tools help tools help tools help tools help tools help tools help tools help tools help tools help tools help tools help tools help tools help tools help tools help tools help tools help tools help tools help tools help tools help tools help tools help tools help tools help tools help tools help tools help tools help tools help tools help tools help teams help teams help teams help teams help teams help teams help teams help teams help teams help teams help teams help teams help teams help teams help teams help teams help teams help teams help teams help teams help teams help teams help teams help teams help teams help teams help teams help teams help teams help teams help teams help teams help teams help teams help teams help teams help teams help teams help teams help teams help teams help teams help teams help teams help teams help teams help teams help teams help teams help teams help groups help groups help groups help groups help groups help groups help groups help groups help groups help groups help groups help groups help groups help groups help groups help groups help groups help groups help groups help groups help groups help groups help groups help groups help groups help groups help groups help groups help groups help groups help groups help groups help groups help groups help groups help groups help groups help groups help groups help groups help groups help groups help groups help groups help groups help groups help groups help groups help groups help groups help teams help teams help teams help teams help teams help teams help teams help teams help teams help teams help teams help teams help teams help teams help teams help teams help teams help teams help teams help teams help teams help teams help teams help teams help teams helps to keep the team from all the team. The team is left blank in the image.- NTSC:"480i"/"480p".
- PAL:"576i"/"576p"
• NTSC/PAL: "720p" / "1080i"
"TV Format": TV-Encodiersystem.
• "NTSC"
• "PAL"
• "Auto"
"Video Output": Videoausgang.
• "CVBS": CVBS-Ausgang
- "RGB": RGB-Ausgang
"Channel Search"
text_image
Channel Search Core Setup CD Manager3"Multi-Satellite Scan":
"Multi-Transponder Scan":
text_image
Option Old Language English Basic Language English Audio Language English Digital Audio *04text_image
MultiMedia Music Photo Movie PPTS"Multimedia":
natural_image
Line drawing of a rectangular electronic device with labeled parts (no text or symbols beyond labels)natural_image
Line drawing of a device casing with internal compartments and a labeled component (no text or symbols)text_image
HMI TV START RF OUT CDAXIAL SCART OUT/HMI OUT CDAXIALVALUELINE
Español
Mando a distancia

text_image
1 27 13 14 11 5 10 3 22 23 18 19 STANDBY REC PVR IS-MUTE EPON/FOX AUDIO SUBTITLE MENU EXIT VOL- OK VOL- FAVOURITE CH.TWRADIO 1 2 3 RECALL 8 4 5 6 GOTO 9 7 8 9 0 PLAY PULSE STOP REPEAT 25 NEXTREV/INDPREV 24 21 20 26text_image
Program Edit ALL 74Para mover un programa:
text_image
Picture Aspect Profile 10.9 Wide Screen Resolution 1200 TV Format PAL Video Output C469Opciones:
- NTSC: "480i" / "480p".
• PAL: "576i" / "576p"
• NTSC/PAL: "720p" / "1080i"
text_image
Channel Search Clear Setup CER Management"Multi-Satellite Scan":
"Multi-Transponder Scan":
text_image
Option ODS Language English Auto Language English Auto Language English Digital Audio Postnatural_image
Line drawing of a rectangular device with labeled parts (1 and 2), no text or symbols presentnatural_image
Line drawing of a device casing with internal components and labeled part '3' (no text or symbols beyond label)• NTSC: "480i" / "480p".
- PAL : "576i" / "576p".
- NTSC/PAL: "720p" / "1080i"
"TV Format": Système de codage TV.
• "NTSC"
• "PAL"
• "Auto"
text_image
Channel Search Get Setup Get Management"Multi-Satellite Scan":
"Multi-Transponder Scan":
text_image
Option OSI Language English Mobile Language English Audio Language English Digital Auto Nonetext_image
System Parental Guidance Set Password Restore Factory Cebus Information Apache Update Recall Listnatural_image
Line drawing of a rectangular device with labeled parts (1 and 2), no text or symbols presentnatural_image
Line drawing of a device casing with internal components and labeled part '3' (no text or symbols beyond label)text_image
HMO TV START RF IN RF OUT COXIAL COXIAL SCART OUT/INDI OUTTelecomando

text_image
1 27 13 14 11 5 10 3 22 23 18 19 STANDBY REC PVR IS MUTE EPONFOTIX AUDIO CH+ SUBTITLE MENU EXIT VOL- OK VOL- FAVOURITE CH TW RADIO 1 2 3 RECALL 8 4 5 6 GOTO 9 7 8 9 0 PLAY PULSE STOP REPEAT 25 NEXTREVNDPREV 24 21 20 26text_image
Program Edit ALL 7xtext_image
Project Guide Show Back-up Page Bars Projects- NTSC:"480i"/"480p".
• PAL: "576i" / "576p" - NTSC/PAL."720p" / "1080i"
text_image
Channel Search Case Setup Citi Manager3"Multi-Satellite Scan":
"Multi-Transponder Scan":
natural_image
Line drawing of a rectangular electronic device with labeled parts (no text or symbols beyond labels)natural_image
Line drawing of a device casing with internal compartments and a labeled component (no text or symbols)text_image
HOLD TV SCART SCART OUT HIND OUT COAVAL COAVAL RUN RF OUT COXIALVALUELINE
Dansk
Fjernbetjening
text_image
1 27 13 14 11 5 10 3 22 23 18 19 STANDBY REC PVR IS MUTE EPONFOTIX AUDIO CH+ SUBTITLE MENU EXIT VOL- OK VOL- FAVOURITE CH TW RADIO 1 2 3 RECALL 8 4 5 6 GOTO 9 7 8 9 0 PLAY PULSE STOP REPEAT 25 NEXTREVNDPREV 24 21 20 26text_image
Program Edit ALL 7% Blue Gray Yellow Orange Black Purple GreenSådan flytter du en kanal:
- NTSC:"480i"/"480p".
- PAL: "576i" / "576p".
• NTSC/PAL: "720p" / "1080i"
"TV Format": TV-kodningsystem.
• "NTSC"
• "PAL"
• "Auto"
"Video Output": videoudgang.
• "CVBS": CVBS-udgang
- "RGB": RGB-udgang
"Channel Search"

text_image
Channel Search Get Setup Get Management"Multi-Satellite Scan":
"Multi-Transponder Scan":
text_image
Option ODD Language English SABID Language English Audio Language English Digital Audio Posttext_image
System Parental Guidance Bar Password Ratings Factory Cebus Information Hardware Update Recall Listnatural_image
Line drawing of a rectangular electronic device with labeled parts (no text or symbols beyond labels)natural_image
Line drawing of a device casing with internal components and a labeled part (3), no text or symbols present.text_image
HOLD TV SCART SCART OUT HIND OUT COAMAL COAMAL RUN RF OUT COAMALVALUELINE
Svenska
Fjärrkontroll

text_image
1 27 13 14 11 5 10 3 22 23 18 19 STANDBY REC PVR IS MUTE EPONFOTIX AUDIO CH+ SUBTITLE MENU EXIT VOL- OK VOL- FAVOURITE CH TW RADIO 1 2 3 RECALL 8 4 5 6 GOTO 9 7 8 9 0 PLAY PULSE STOP REPEAT 25 NEXTREVNDPREV 24 21 20 26text_image
Program Edit ALL 7x- NTSC: "480i" / "480p".
- PAL: "576i" / "576p".
• NTSC/PAL: "720p" / "1080i"
text_image
Channel Search Get Setup Get Management"Multi-Satellite Scan":
"Multi-Transponder Scan":
text_image
Option ODD Language English Mobile Language English Audio Language English Digital Audio POSnatural_image
Line drawing of a rectangular device with a curved top and two labeled parts (1 and 2), no text or symbols present.natural_image
Line drawing of a device casing with internal components and a labeled part (3), no text or symbols present.text_image
HOLD TV SCART SCART OUT HIND OUT COAVAL COAVALVALUELINE
Suomi
Kaukosäädin

text_image
1 27 13 14 11 5 10 3 22 23 18 19 STANDBY REC PVR IS MUTE EPONFOTIX AUDIO SUBTITLE MENU EXIT VOL- OK VOL- FAVOURITE CH-TWRADIO 1 2 3 RECALL 4 5 6 GOTO 7 8 9 0 PLAY PULSE STOP REPEAT NEXTREVIEW PREV 20 26text_image
Program Edit ALL 7xtext_image
Channel Search Get Setup Get Management"Multi-Satellite Scan":
"Multi-Transponder Scan":