Antimite UV BX5 - Vacuum Cleaner JIMMY - Free user manual and instructions
Find the device manual for free Antimite UV BX5 JIMMY in PDF.
| Product Type | UV Anti-Moth Vacuum Cleaner |
| Brand | JIMMY |
| Model | UV Anti-Moth BX5 |
| Rated Voltage | 230 V ~ |
| Rated Frequency | 50 Hz |
| Rated Power | 600 W |
| Operating Modes | Strong / Soft |
| UV Light | Yes, with automatic shutoff if distance > 3 cm or tilt > 30° |
| Ultrasonic Generator | Built-in |
| Brush Roller | Removable for cleaning |
| Dust Tank Capacity | 0.5 L (estimated) |
| Filter | MIF (washable, replacement recommended every 30-50 h) |
| Cyclone | With removable metal filter |
| Included Accessories | Mini brush, replacement MIF filter |
| Maintenance | Clean dust tank, filter, and cyclone after each use. Clean brush roller regularly. |
| Safety | Automatic motor shutoff if tank is full or filter is clogged. Do not look directly at UV light. |
| Spare Parts and Repairability | Filter, brush roller, UV tube available. Repair by after-sales service. |
| Dimensions (L x W x H) | 30 x 20 x 15 cm (estimated) |
| Weight | 2 kg (estimated) |
Frequently Asked Questions - Antimite UV BX5 JIMMY
User questions about Antimite UV BX5 JIMMY
0 question about this device. Answer the ones you know or ask your own.
Ask a new question about this device
Download the instructions for your Vacuum Cleaner in PDF format for free! Find your manual Antimite UV BX5 - JIMMY and take your electronic device back in hand. On this page are published all the documents necessary for the use of your device. Antimite UV BX5 by JIMMY.
USER MANUAL Antimite UV BX5 JIMMY
natural_image
Line drawing of a vacuum cleaner device with handle and ventilation slots (no text or symbols)BX5
| User Guide Anti-mite Vacuum Cleaner | |
| Instructions d'utilisation Aspirateur anti-acariens | |
| Gebrauchsanweisung Anti-Milben-Staubsauger | |
| Istruzioni per l'uso Aspirapolvere antiacaro | |
| Manual de Usuario Aspiradora Antiácaros | |
| Руководство по эксплуатации | Пылесос для удаления клещей |
Contents
English 2
Français 9
Deutsch 17
Italiano 25
Español 33
русский язык 41
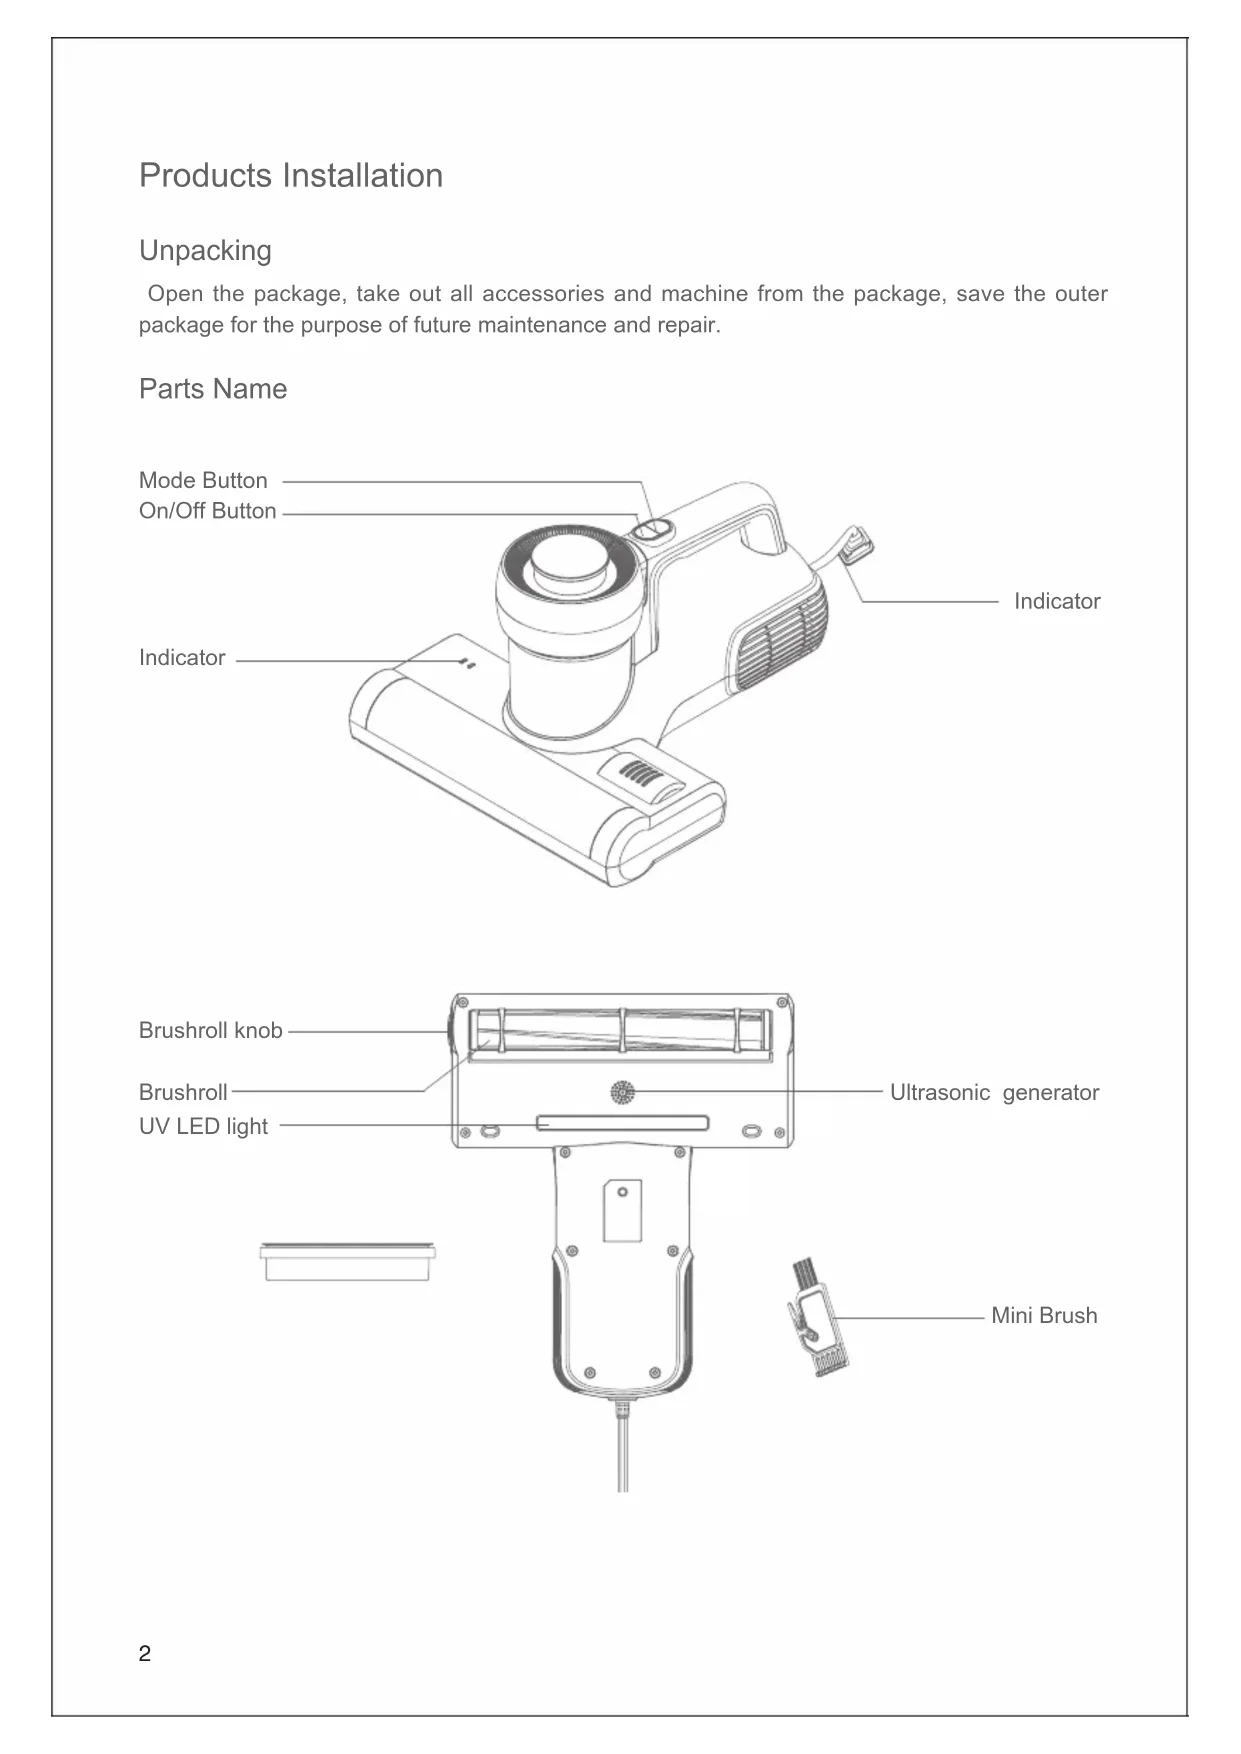
Products Installation
Unpacking
Open the package, take out all accessories and machine from the package, save the outer package for the purpose of future maintenance and repair.
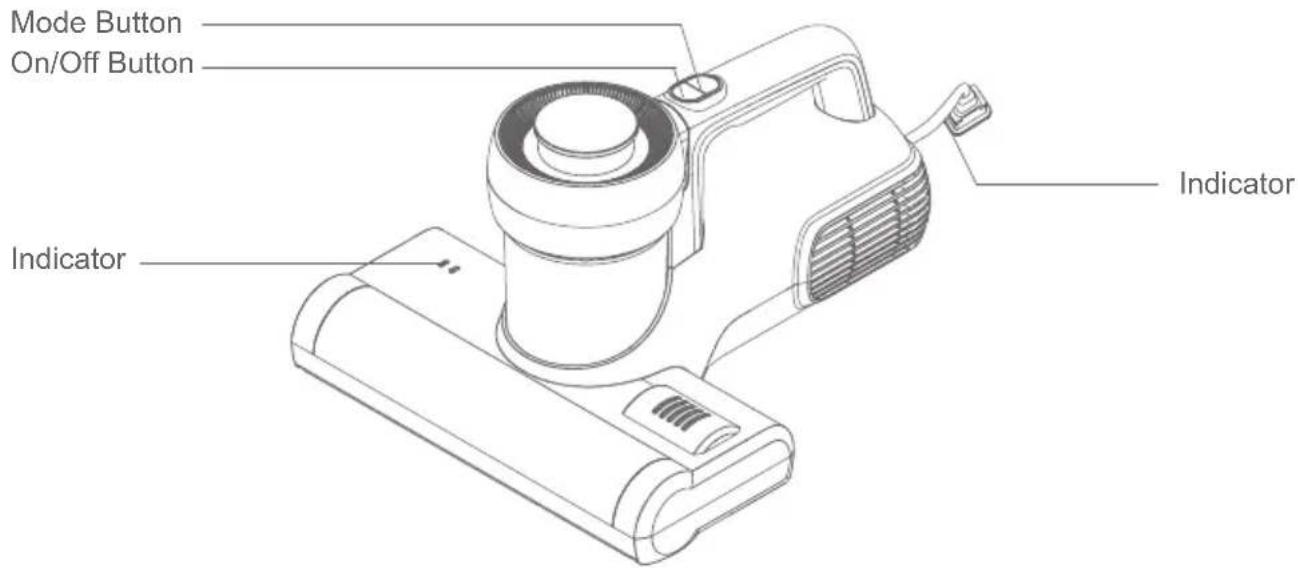
Parts Name
text_image
Mode Button On/Off Button Indicator Indicator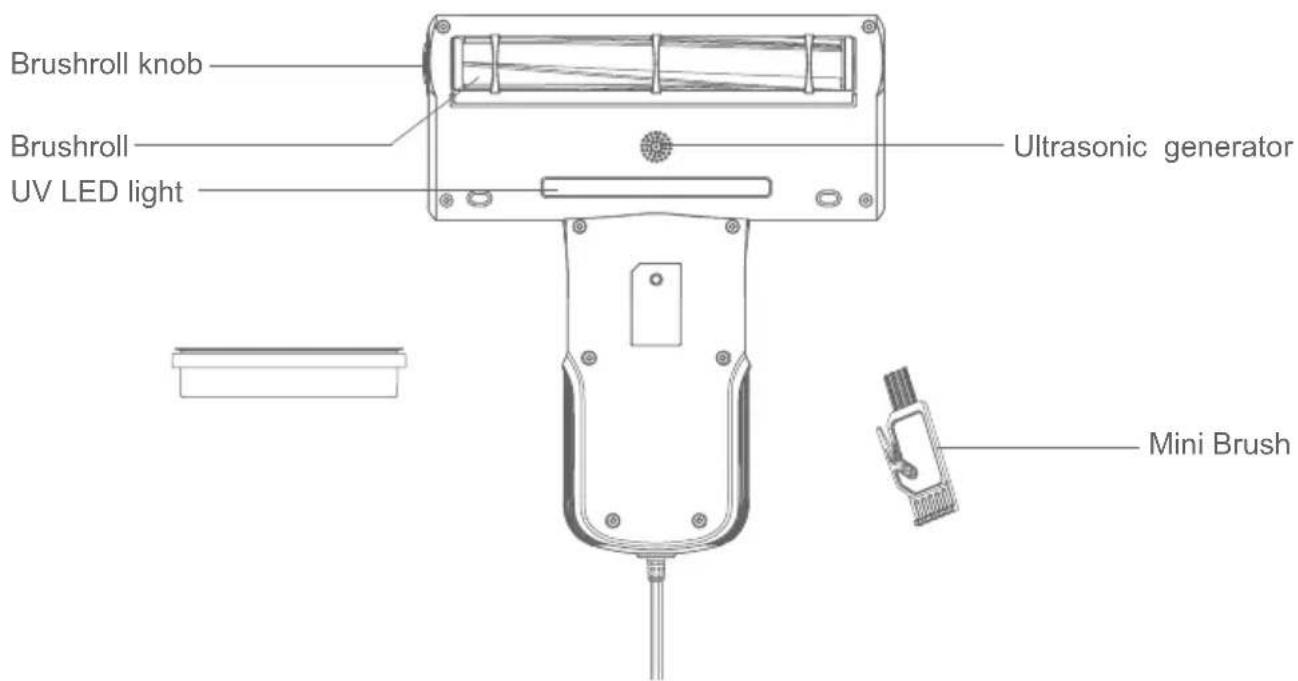
text_image
Brushroll knob Brushroll UV LED light Ultrasonic generator Mini BrushPacking List
| Vacuum Cleaner MIF Filte Mini-brush User Guide | |||
| 1 1 1 1 | |||
Use of the Product
text_image
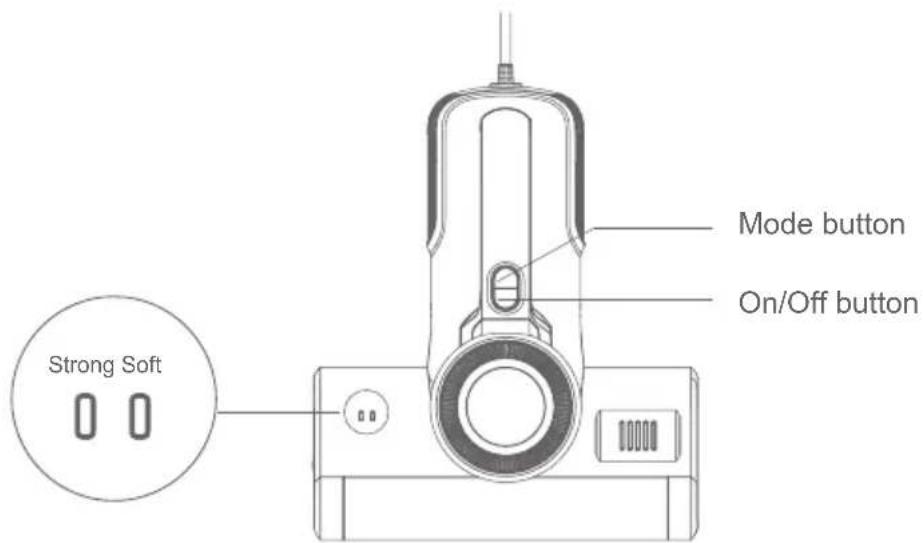
Strong Soft Mode button On/Off buttonFigure 1
Insert the plug into the socket, press on/off button, the machine is in strong mode and strong indicator lights up. Press the mode button to switch the low mode and low indicator lights up. Press on/off button again, the machine stop working (Figure 1)
Notice: For safety reasons, the UV light only works within 3cm above object as well as less than 30 inclination degrees. Otherwise, the UV light will automatically turn off.
Cleaning and Maintenance
Dust Cup Cleaning
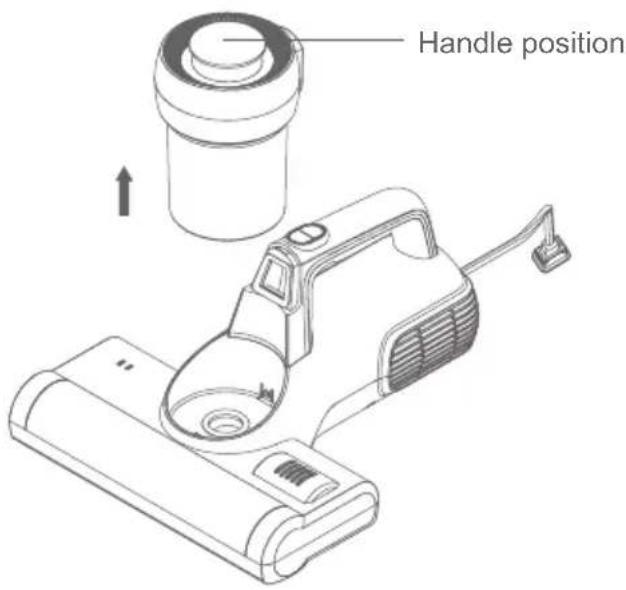
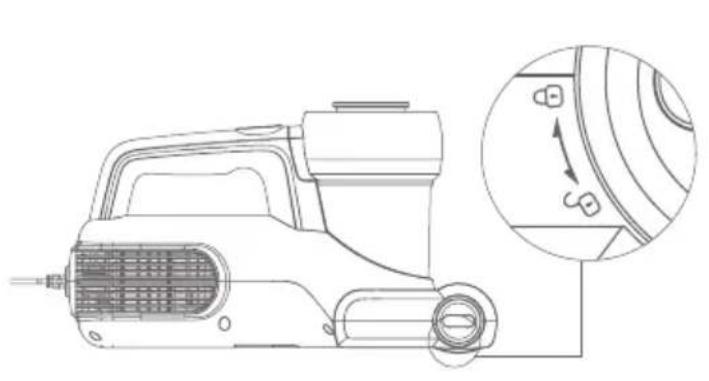
Turn off the machine and unplug the power cord. Then press the release button and lift upward (Figure 2).
text_image
Handle positionFigure 2 Figure 3
natural_image
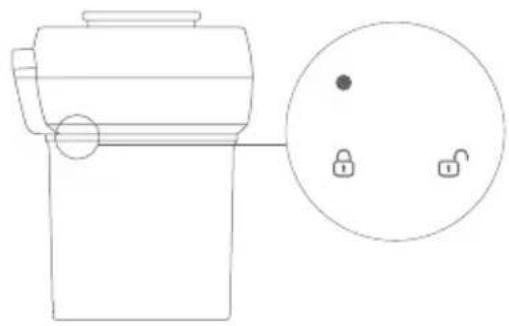
Line drawing of a device with a circular inset showing two locked keys (no text or symbols)Hold the dust cup and dust cup cover separately, twist dust dust lid anticlockwise (Figure 3), remove it from dust cup to clean (Figure 4).
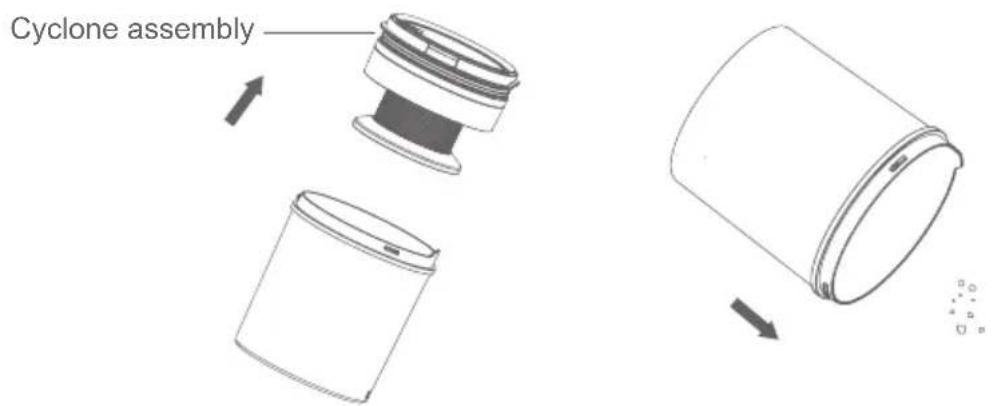
text_image
Cyclone assemblyFigure 4
Filter and Cyclone Cleaning
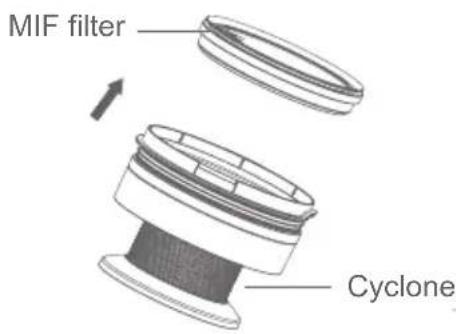
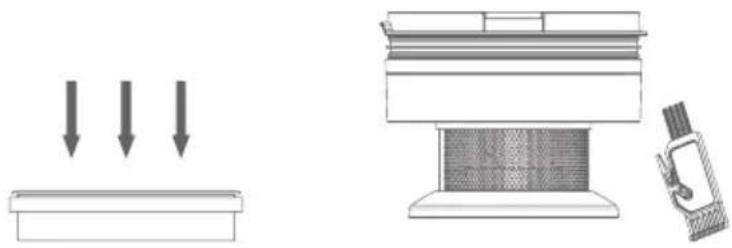
Hold the cyclone in one hand, pinch the "UP" logo with the other hand, and take out filter (Figure 5). Do Not tap the filter in reverse side in case of filter clog(Figure 6).
lean the cyclone metal filter with the attached mini brush(Figure 7).
text_image
MIF filter CycloneFigure 5
natural_image
Technical line drawing showing a mechanical assembly with downward arrows, a flat base, and a device emitting smoke (no text or symbols)Figure 6 Figure 7
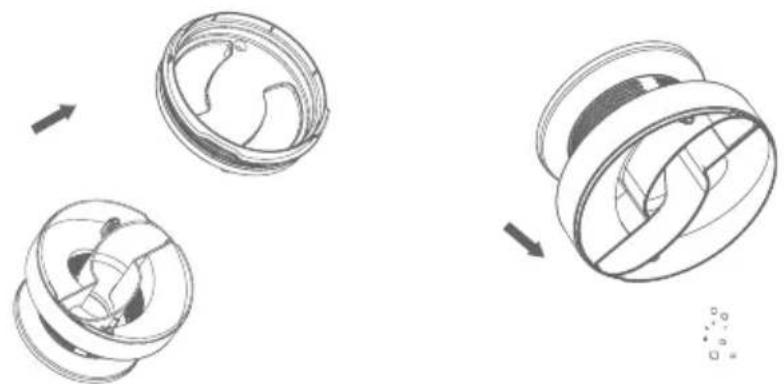
After cleaning filter, remove the two screws on the cyclone cover with a screwdriver to separate the cyclone cover from the cyclone to clean the internal air duct. After cleaning, assemble parts in reverse order. (Figure 8).
natural_image
Technical illustration of a mechanical component with three stages: top, side, and bottom (no text or symbols)Figure 8
After cleaning dust cup, filter and cyclone, assemble in reverse order. Rotate the dust cup cover assembly into the dust cup. After hearing a "click" and the dot mark is aligned with the lock position that is assembled in place.
Notice:
1.Do Not miss the filter!
- Use water or neutral reagents to clean dust cup and wipe with dry cloths. Do not wash the filter until it is necessary. Make sure the filter and dust cup are completely dry before another use.
Brushroll cleaning and installation
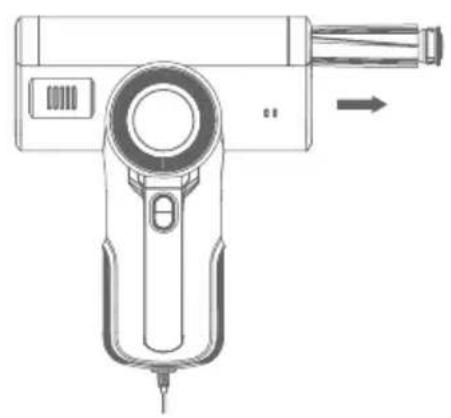
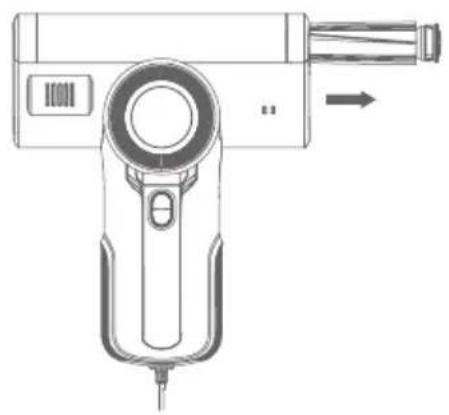
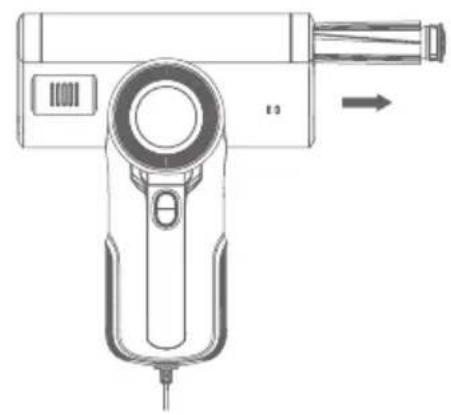
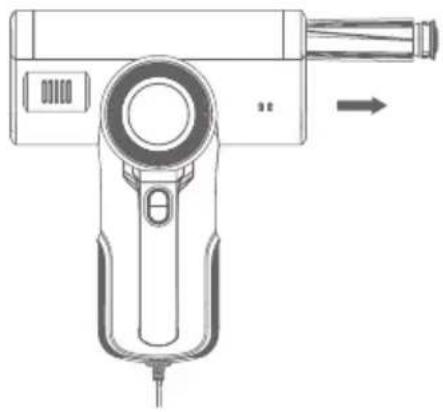
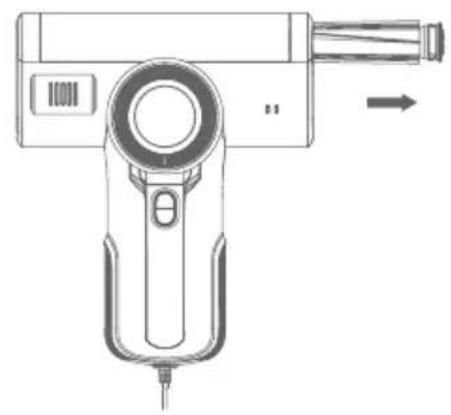
Turn off the machine and unplug the power cord, rotate the right lock knob anticlockwise with hand from locked position to unlock position (Figure 9) to remove the brushroll to clean up(Figure 10).
natural_image
Technical line drawing of a portable electric shaver with a magnified inset showing internal components (no text or symbols)Figure 9
natural_image
Technical line drawing of a handheld device with a circular head and handle, showing a right-hand rule for adjustment (no text or symbols present)Figure 10
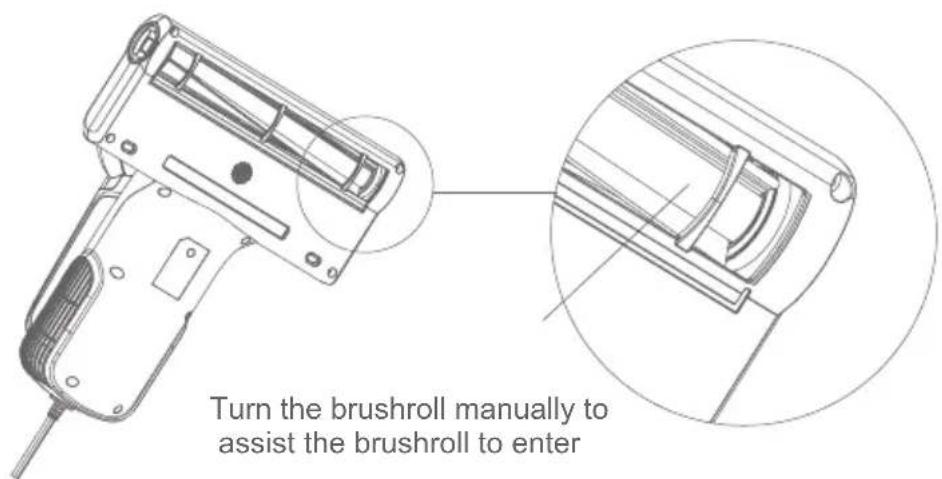
After brushroll cleaning, insert brushroll from the hole on the right. Make sure the left plug of brushroll be fully snapped into the belt (according to Figure 11) to lock brushroll on the window. Otherwise, the brushroll cannot be locked.
Notice:
for safety reasons, please turn off the machine and unplug power cord before cleaning brushroll.
text_image
Turn the brushroll manually to assist the brushroll to enterFigure 11
Maintenance and storage
Please clean dust cup and filter after each use for further use. It is recommended to replace a filter after 30-50 hours of working time (depending on specific situation) for better use.
Any paper, lead glass, plastic will greatly affect the effect of UV light. Please wipe and clean the UV tube regularly for better use.
Put the machine in cool and dry place if the machine is to be idled. Do Not leave it in direct sunlight or humid environment.
Cautions
Please read this instruction manual carefully before use and keep it properly for future use.
Never leave the machine working without supervision.
Please turn off the power switch and unplug the power cord if the machine is to be idled. Do Not unplug the power cord with humid hand in case of electric shock.
Cut the power source in maintenance or off-service.
Keep the power cord away from sharp objects and do not drag the cord to move the machine in case of cord damage.
For safety reasons, please do not use the product to clean hot objects such as carbon, cigarette butts, sharp objects such as broken glass, corrosive liquids, flammable and explosive materials such as gasoline and alcohol. Otherwise it may cause product damage or fire.
Do not use this product to clean water or wet dust. Do Not operate it in humid places (such as bathroom, toilet, laundry room, etc.) to avoid malfunction.
Do Not place the machine near heating appliances or expose it to direct sunlight in case of fire hazard.
Keep this product beyond the reach of special individual such as children without adult's supervision.
Do Not operate this machine with suction port blocked in case of product damage.
The product has UV light, for safety reasons, Do Not look at the bottom of the machine when the power is on in case of ultraviolet rays harming.
Do Not apply this product to plants. Excessive use of UV may cause object damage.
Do Not sit on this product in case of personal injury and product damage.
Do Not remove the brushroll cover or force the cover outward when the machine is powered on for safety reasons.
This product can ONLY use for cleaning of textiles such as mattresses, blankets, pillows, sofas, etc.
If the power cord is damaged, please ask for professional help of the manufacturer and other professionals for safety reasons.
This product can ONLY use for cleaning of textiles such as mattresses, blankets, pillows, sofas, etc.
If the power cord is damaged, please ask for professional help of the manufacturer and other professionals for safety reasons.
Trouble Shooting
If fault remains after adopting the following solutions, contact after sale service or local distributor immediately.
| Problems Possible Reasons Solution | ||
| Power Failure | Power cord is not firmly inserted. Insert the power cord firmly. | |
| No power on socket. Check the socket. | ||
| Power switch not pressed. Press the On/Off button. | ||
| Low suction power | Suction port clogged. Clean up suction port. | |
| Dust accumulation on filter. Clean up the filter. | ||
| Dust accumulation on cyclone. Clean up cyclone. | ||
| Dust accumulation on filter. Clean up filter. | ||
| UV tube failure | The UV function is automatically off for safety reasons or weak reflection of object. | The UV function operates on the condition of less than 5CM height from the object. |
| The machine operates on the same position for a long time. | Move the machine forward and backward | |
| The machine is placed upright. | Machine tilted no more than 30 degrees. | |
| Sensor window is contaminate. | Clean the sensor window with a half-dry cloth. | |
| UV light damage. Contact after-sale service. | ||
| Automatically turned off | Dust cup full. | The machine will automatically turn off to prevent the motor under long operation. If the machine automatically turned off, please clean up the dust cup and filter, unplug power cord and reuse if after 2 hours. |
| Suction port clogged. | ||
| Filter blocked. | ||
| Brushroll failure | Brushroll tangled with foreign matter. | Remove the cover and clean up brushroll according to user guide. |
| Belt broken. | Remove the cover according to user guide and check the belt. If broken, contact after-sale to repair. | |
Product Specification
Parameter
| Model BX5 | |
| Rated voltage 230V~ | |
| Rated frequency 50Hz | |
| Rated power 600W |
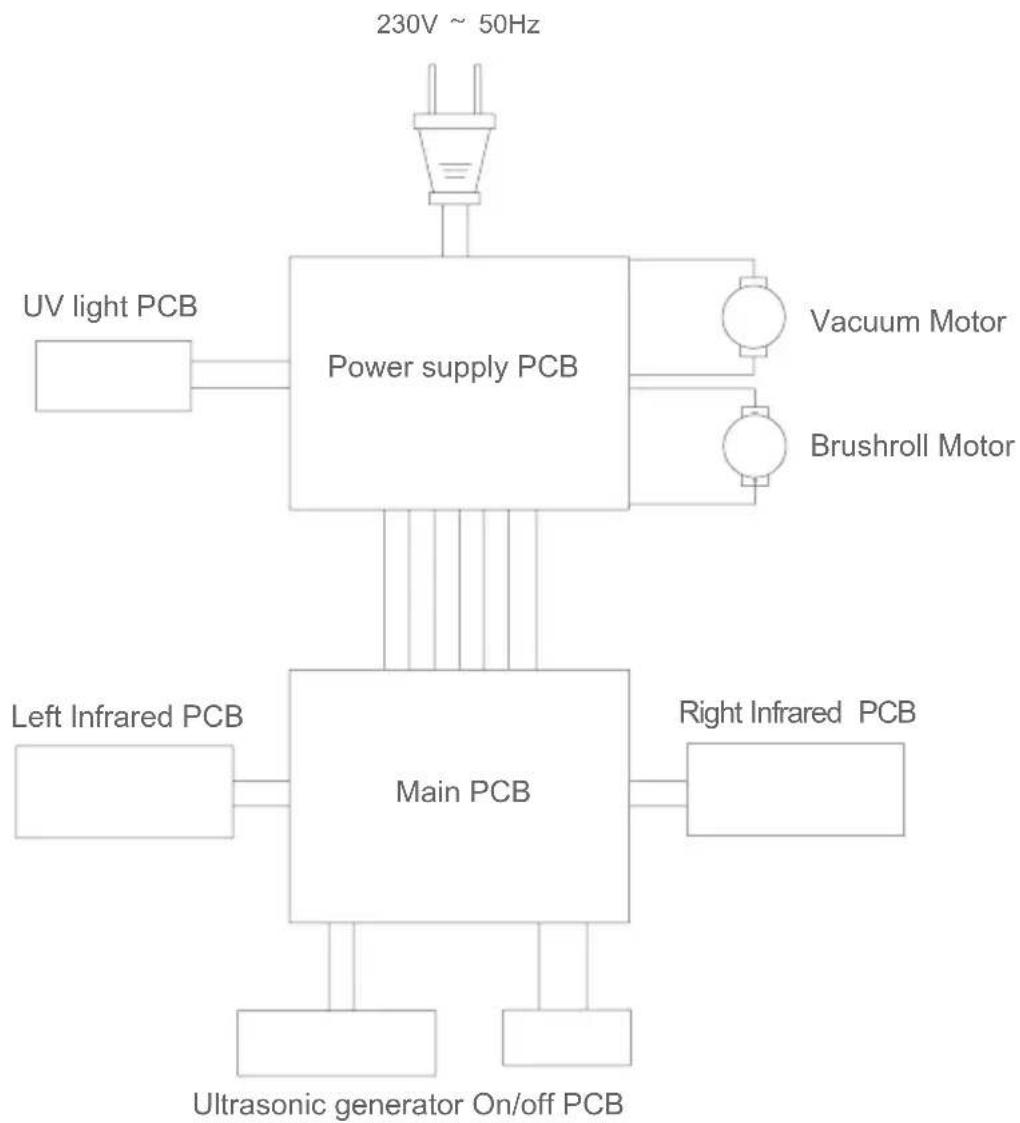
Circuit Diagram
flowchart
graph TD
    A["230V ~ 50Hz"] --> B["Power supply PCB"]
    B --> C["UV light PCB"]
    B --> D["Vacuum Motor"]
    B --> E["Brushroll Motor"]
    B --> F["Left Infrared PCB"]
    B --> G["Main PCB"]
    G --> H["Right Infrared PCB"]
    G --> I["Ultrasonic generator On/off PCB"]
Manufacturer Information
| Manufacturer Kingclean Electric | Co., Ltd |
| Address | No.1 Xiangyang Road, Suzhou New District, Jiangsu Province 215009,China |
Disposal
The machine, accessories and packaging should be sorted for environmental-friendly recycling.

Do not dispose of the machine into household waste!
Only for EC countries: According to the European Guideline 2012/19/EU, machine that are no longer usable, and according to the European Guideline 2006/66/EC, defective or used battery packs/batteries, must be collected separately and disposed of in an environmentally correct manner.
Subject to change without notice.
Warranty Information
This product enjoys one year warranty for the machine service starting from the date of purchase.
Excluded from the guarantee is normal wear, commercial use, alterations to the appliance as purchased, cleaning activities, consequences of improper use or damage by the purchaser or a third person, damage, that can be attributed to external circumstances or caused by the batteries.

natural_image
Technical line drawing showing three components: a flat base with downward arrows, a mechanical device with mesh grille and a handheld device (no text or symbols)Figure 6 Figure 7
natural_image
Technical illustration of a mechanical component with three stages: before, mid, and after assembly (no text or symbols)Figure 8
natural_image
Technical line drawing of a portable electric shaver with a magnified inset showing internal components (no text or symbols)Figure 9
natural_image
Technical line drawing of a handheld hair dryer with no visible text or symbolsFigure 10
Maintenance and storage
Manufacturer Information
| Manufacturer Kingclean Electric | Co., Ltd |
| Address | No.1 Xiangyang Road, Suzhou New District, Jiangsu Province 215009,China |
Disposal
The machine, accessories and packaging should be sorted for environmental-friendly recycling.

Do not dispose of the machine into household waste!
Only for EC countries: According to the European Guideline 2012/19/EU, machine that are no longer usable, and according to the European Guideline 2006/66/EC, defective or used battery packs/batteries, must be collected separately and disposed of in an environmentally correct manner.
Subject to change without notice.
Warranty Information
This product enjoys one year warranty for the machine service starting from the date of purchase.
Excluded from the guarantee is normal wear, commercial use, alterations to the appliance as purchased, cleaning activities, consequences of improper use or damage by the purchaser or a third person, damage, that can be attributed to external circumstances or caused by the batteries.
CE
Produkt installieren
Auspacken
natural_image
Technical line drawing showing a mechanical component being folded into a cylindrical housing (no text or symbols present)Bild 4
natural_image
Technical line drawing of a portable electric shaver with a magnified inset showing internal components (no text or symbols)Bild 9
natural_image
Line drawing of a handheld hair dryer with a button and arrow indicator (no text or symbols)Bild 10
natural_image
Technical line drawing showing a mechanical component being folded into a cylindrical housing (no text or symbols present)Figura 4
natural_image
Three technical line drawings of mechanical components, showing progressive assembly from inner to outer rings (no text or symbols)Figura 8
natural_image
Technical line drawing of a portable electric shaver with a magnified inset showing internal components (no text or symbols)Figura 9
natural_image
Technical line drawing of a handheld hair dryer with no visible text or symbolsFigura 10
natural_image
Technical line drawing showing a cylindrical device being folded into a housing, with arrows indicating assembly direction (no text or symbols)Figura 4
natural_image
Technical illustration of a mechanical component with three stages: top, side, and bottom (no text or symbols)Figura 8
natural_image
Technical line drawing of a handheld electric shaver with a magnified inset showing internal components (no text or symbols)Figura 9
natural_image
Line drawing of a handheld electric hand tool with no visible text or symbolsFigura 10
natural_image
Technical line drawing of a mechanical component with two views and directional arrows indicating assembly (no text or symbols)Рис.4
natural_image
Technical illustration of a mechanical component with three views and a close-up view, labeled 'Prc.8' (no text or symbols on the diagram itself)natural_image
Technical line drawing of a handheld electric shaver and its internal component (no text or symbols)Рис.9 Рис.10