JV63 - Vacuum Cleaner JIMMY - Free user manual and instructions
Find the device manual for free JV63 JIMMY in PDF.
User questions about JV63 JIMMY
0 question about this device. Answer the ones you know or ask your own.
Ask a new question about this device
Download the instructions for your Vacuum Cleaner in PDF format for free! Find your manual JV63 - JIMMY and take your electronic device back in hand. On this page are published all the documents necessary for the use of your device. JV63 by JIMMY.
USER MANUAL JV63 JIMMY
natural_image
Line drawing of a vacuum cleaner with handle and mounting base (no text or symbols)JV63/JV65
| Instruction Manual Vacuum Cleaner | |
| Bedienungsanleitung Staubsauger | |
| Manual de Usuarios Aspiradora | |
| Manuale di istruzioni Aspirapolvere | |
| Mode d'emploi Aspirateur | |
| Руководство по эксплуатации Пылесос |

Contents
English 2
Deutsch 18
Español 36
Italiano 53
Français 71
русский язык 89
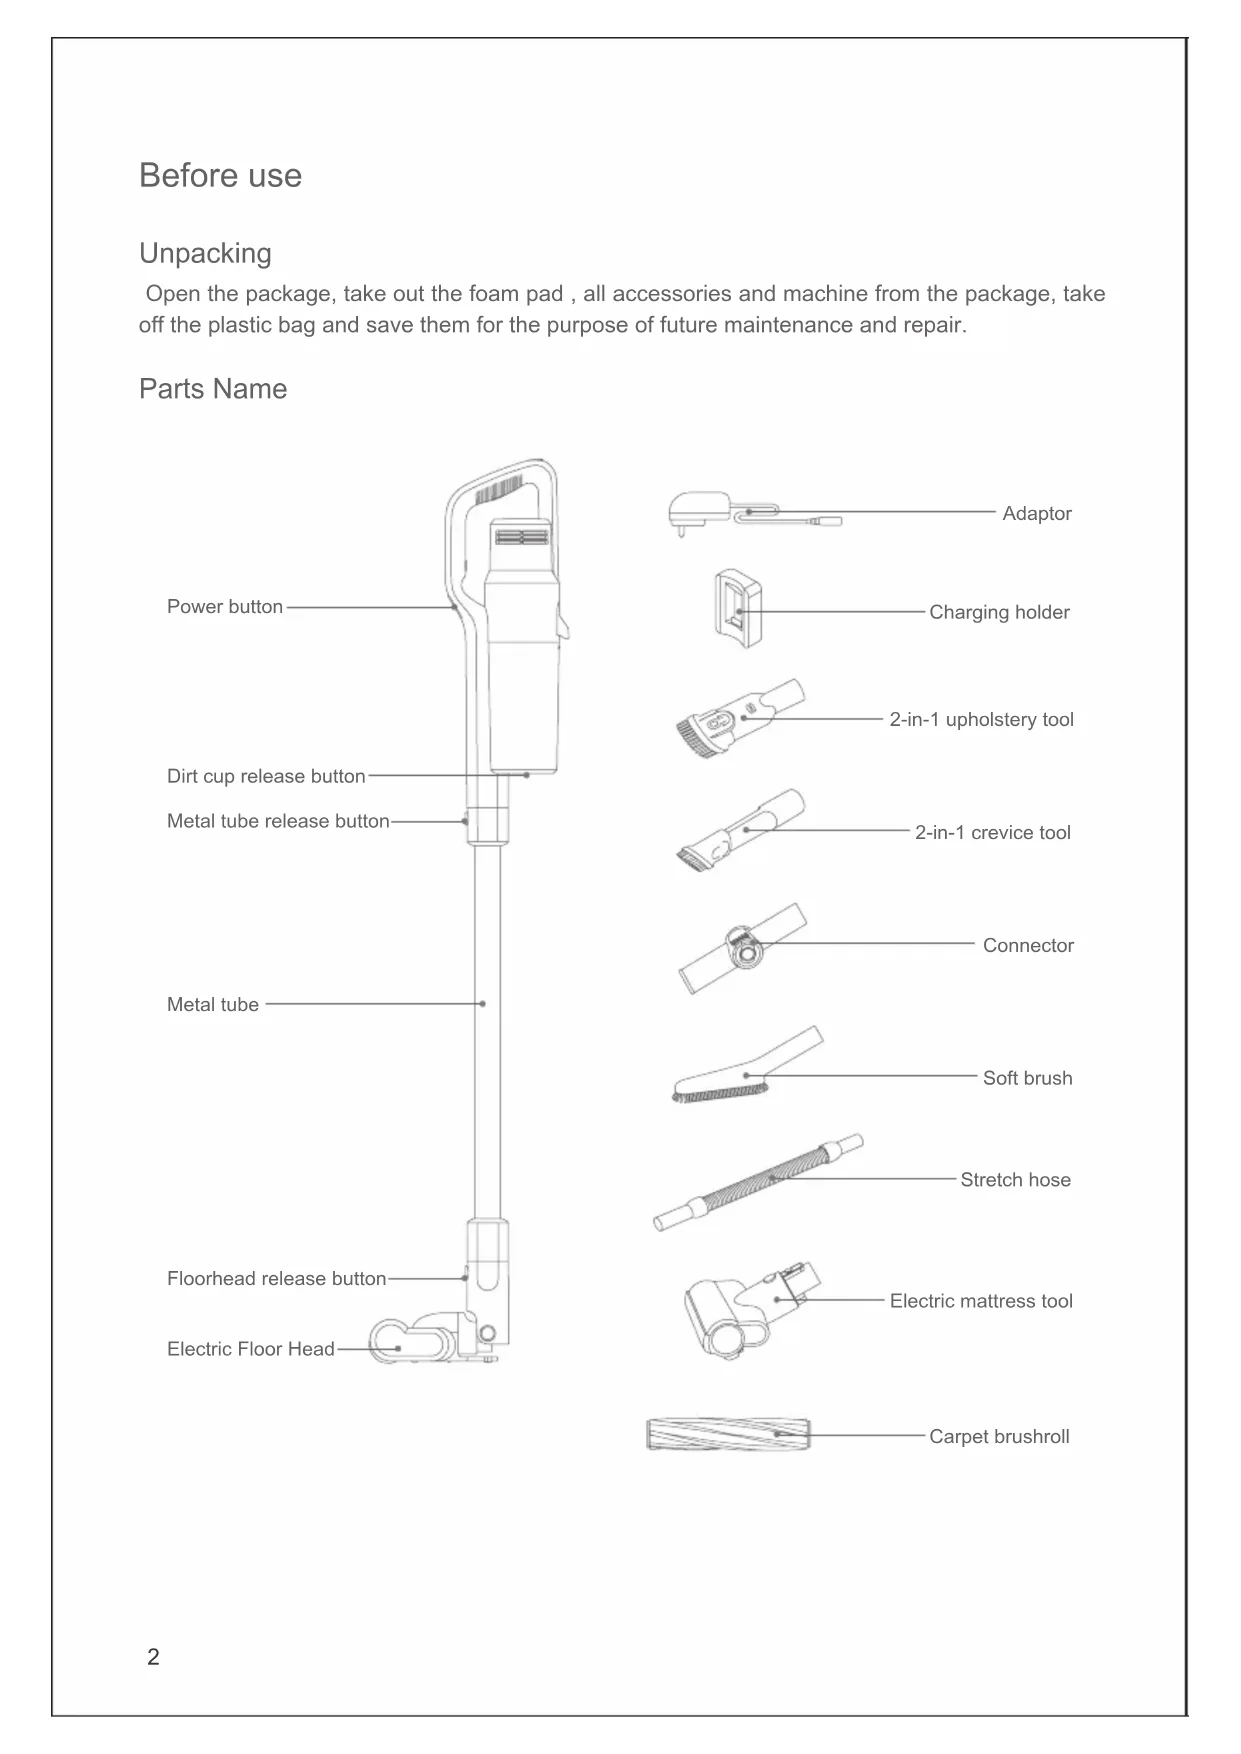
Before use
Unpacking
Open the package, take out the foam pad, all accessories and machine from the package, take off the plastic bag and save them for the purpose of future maintenance and repair.
Parts Name
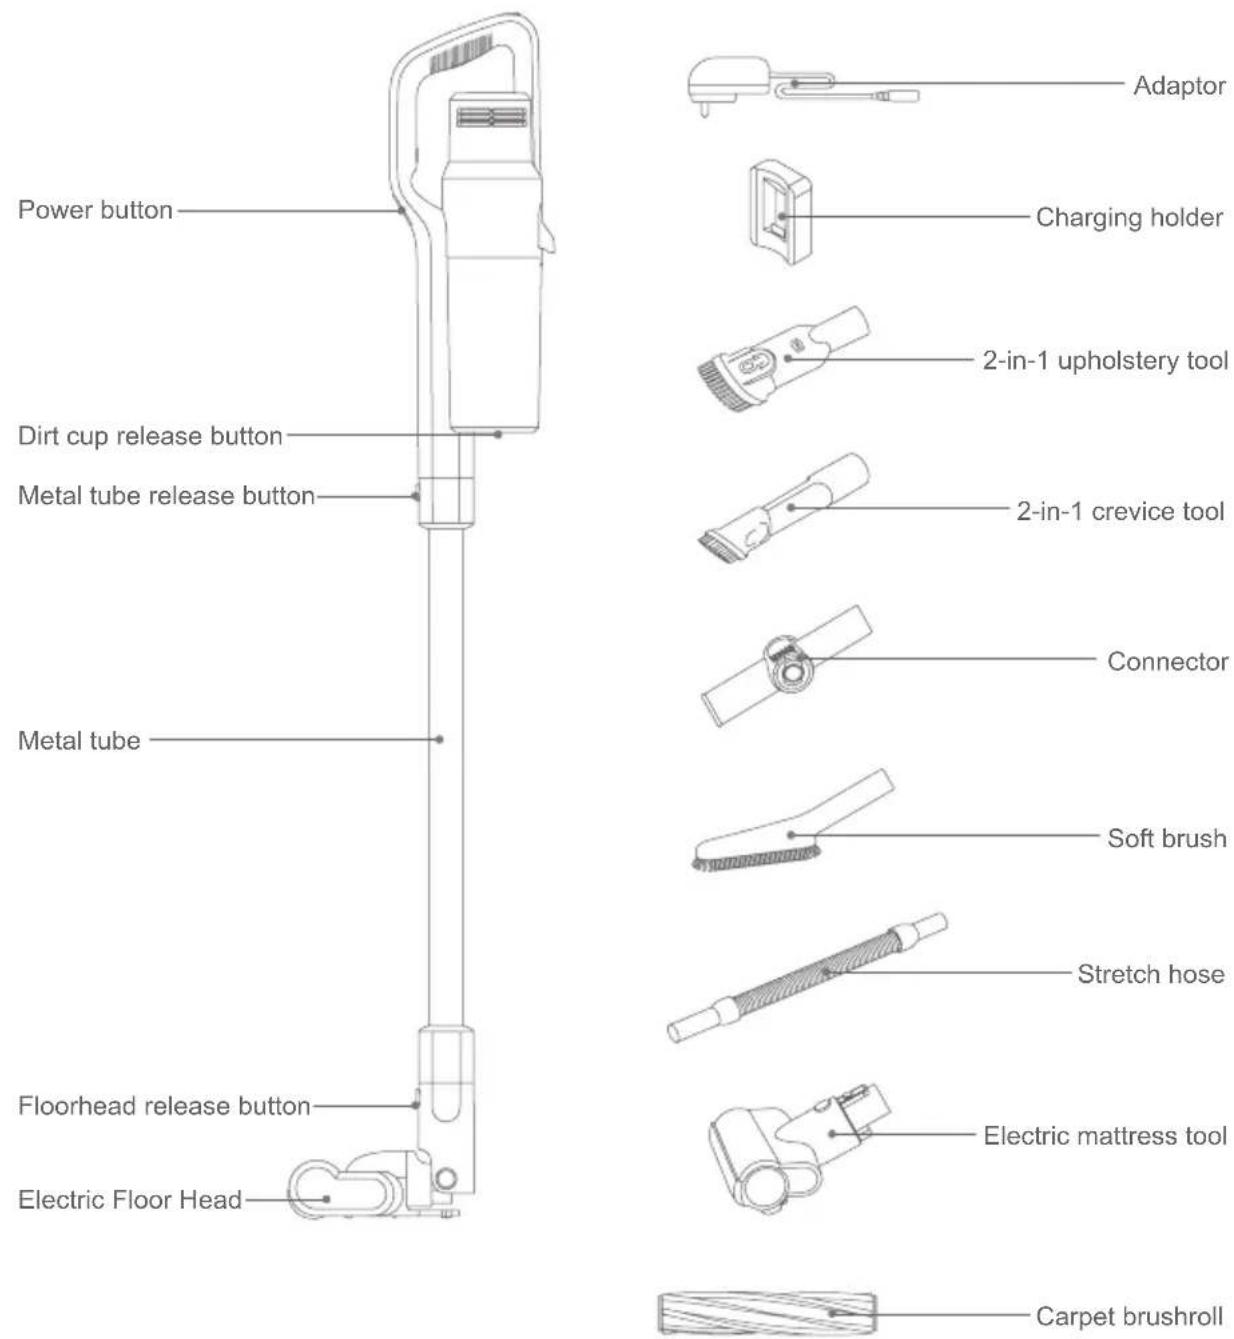
text_image
Power button Dirt cup release button Metal tube release button Metal tube Floorhead release button Electric Floor Head Adaptor Charging holder 2-in-1 upholstery tool 2-in-1 crevice tool Connector Soft brush Stretch hose Electric mattress tool Carpet brushrollPacking List
| Name\Model | JV63 JV65 | |
| Handheld vacuum √√ | ||
| Floorhead √√ | ||
| Metal tube √√ | ||
| 2-in-1 upholstery tool √√ | ||
| Electric mattress tool √√ | ||
| 2-in-1 crevice tool √√ | ||
| Carpet brushroll √√ | ||
| Stretch hose √ | ||
| Soft brush √ | ||
| Connector √ | ||
| Adaptor √√ | ||
| Charging holder √√ | ||
| Instruction manual √√ |
Main-body Assembly
Connect the electric floor head with metal tube
Hold the floor head with left hand, use right hand to insert the metal tube vertically into floor head, align with the conductive needle, press the handle until a "click" sound is heard.
Attention: Keep the handle and floor head in the same direction, conductive needle shall align with the socket.
Assemble the electric head floor, metal tube and handheld vacuum cleaner
First, assemble the floor head and conductive metal tube based on the assembling method of electric floor head and conductive metal tube. Secondly, align the conductive needle of the conductive metal tube with the suction mouth conductivepipe, push upwards until a "click" sound is heard.
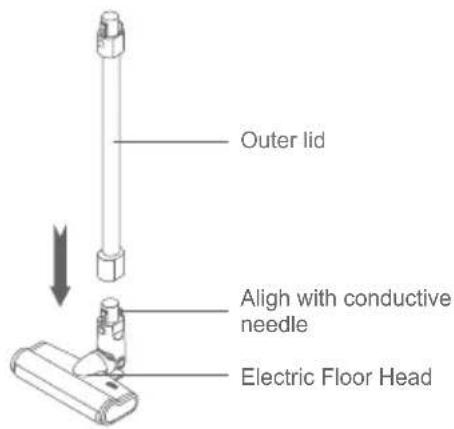
text_image
Outer lid Align with conductive needle Electric Floor Head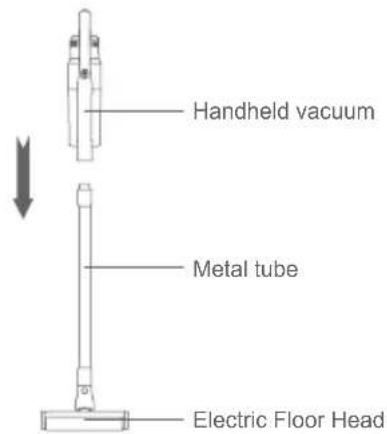
text_image
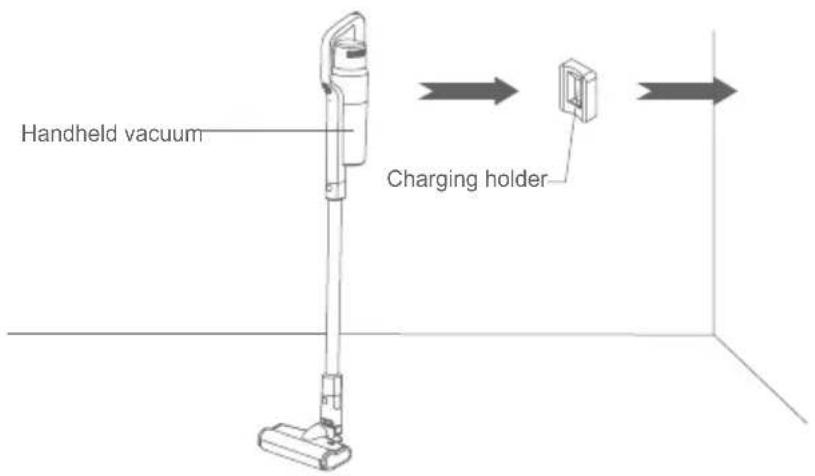
Handheld vacuum Metal tube Electric Floor HeadCharge holder assembly
Remove the adhesive glue cover on the back of the holder and push the holder against a smooth wall with holder height 1-1.1M away from floor. (It is recommended that the installation height of the holder be determined according to the height of the holder off the ground after the whole machine is put on holder.) Press it for 5 seconds with 50N force to make the glue adhere to the wall. It is convenient for the hand-held vacuum cleaner to store on the wall.
text_image
Handheld vacuum Charging holderAssembly of accessories
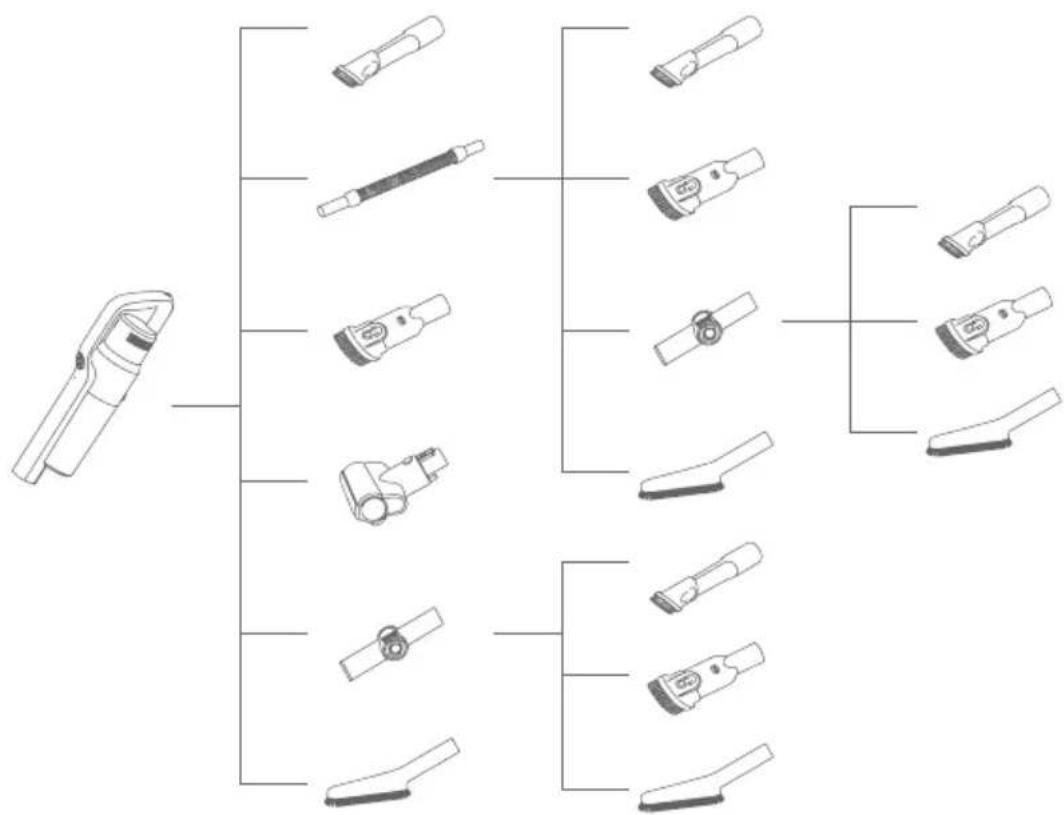
For ease of use, this product is specially equipped with accessories for the hand-held vacuum cleaner. The handheld can connect to different tools for different cleaning purpose.
| Model Name | JV63 JV65 | |
| 2-in-1 crevice tool |  |  |
| Electric mattress tool |  | 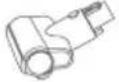 |
| 2-in-1 upholstery tool | 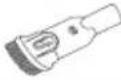 | 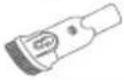 |
| Stretch hose | 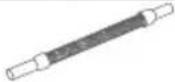 | |
| Soft brush | 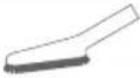 | |
| Connector | 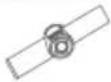 |
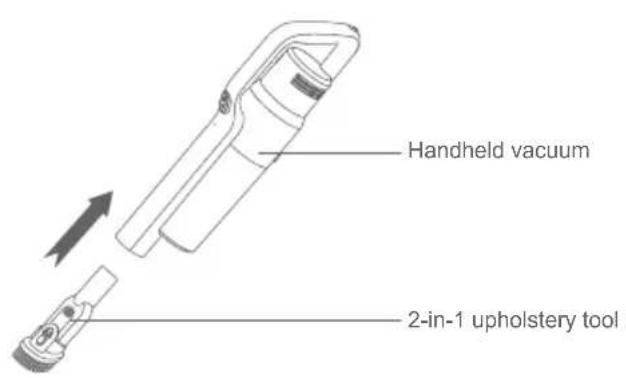
Connect handheld vacuum cleaner with 2-in-1 upholstery tool
Insert 2-in-1 upholstery tool connector into the handheld air inlet until it is tightly fitted.
Attention: The handheld vacuum can also connect other accessories: Electric mattress tool/2-in-1 crevice tool/connector/stretch hose/soft brush. The connecting method is the same as 2-in-1 upholstery tool.
Connect handheld vacuum cleaner with accessories through stretch hose
Align the vacuum cleaner with stretch hose, insert until it is fully tightened; Connect another end of stretch hose with tools.
Attention: The handheld vacuum can connect to these accessories: 2-in-1 crevice tool, 2-in-1 upholstery tool, connector, soft brush. The connecting method is the same as 2-in-1 upholstery tool.
text_image
Handheld vacuum 2-in-1 upholstery tool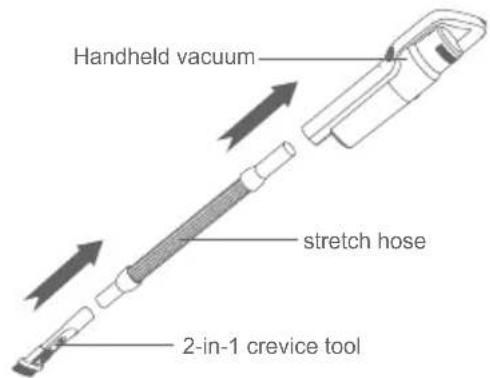
text_image
Handheld vacuum stretch hose 2-in-1 crevice toolAccessories Connection List
flowchart
graph TD
    A["Device 1"] --> B["Device 2"]
    A --> C["Device 3"]
    A --> D["Device 4"]
    A --> E["Device 5"]
    A --> F["Device 6"]
    A --> G["Device 7"]
    A --> H["Device 8"]
    B --> I["Subgroup 1"]
    B --> J["Subgroup 2"]
    C --> K["Subgroup 3"]
    C --> L["Subgroup 4"]
    D --> M["Subgroup 5"]
    D --> N["Subgroup 6"]
    E --> O["Subgroup 7"]
    E --> P["Subgroup 8"]
    F --> Q["Subgroup 9"]
    F --> R["Subgroup 10"]
Use of vacuum cleaner
Charging
During using the vacuum cleaner, when indicator blinks in red, the machine need to be charged. When the voltage is too low, to protect the battery, the vacuum will automatically turn off. At this time, the vacuum must be charged.
Remove the rubber plug on back on handheld vacuum, insert adaptor tail into charging socket on machine. Lean the product on charging holder. Indicator turns red when it starts to charge and turns green when it finishes charging.
Charging time is about 5 hours. When the charging indicator on the hand-held vacuum turns from red to green, it means the vacuum cleaner is fully charged. We recommend continue charging for half an hour to one hour, so that the charging effect is better. After charging, unplug the charger to stop charging.
Attention:
- When using the machine for the first time, the battery capacity is not full, need to charge the machine. The machine is able to be used after the battery is charged fully.
- When using the vacuum cleaner for the first time, fully charge the battery and fully discharge the battery before second charge to increase the battery life.
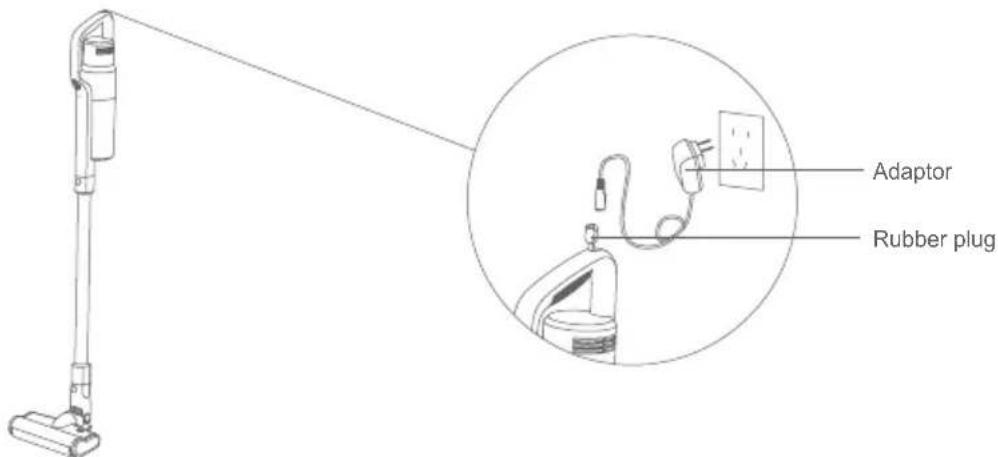
text_image
Adaptor Rubber plug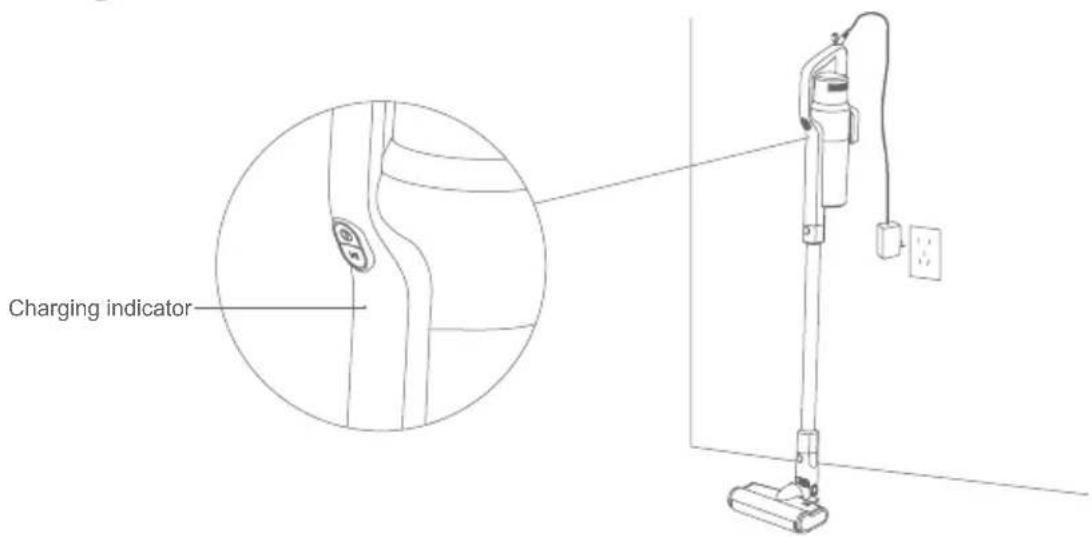
text_image
Charging indicatorUse of Handheld Vacuum Cleaner
Take the handheld vacuum from the charging holder, press the on/off button to turn on and turn off the vacuum. Green indicator lights up, it is normal mode, press the speed control button to strong mode, the speed control button can switch between strong mode and normal mode easily.
Attention: JV63 and JV65 has normal/middle/strong three modes.
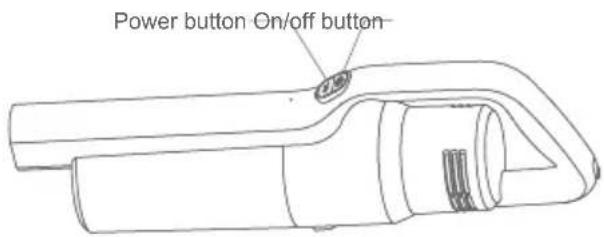
text_image
Power button On/off buttonUse of Electric Floorhead
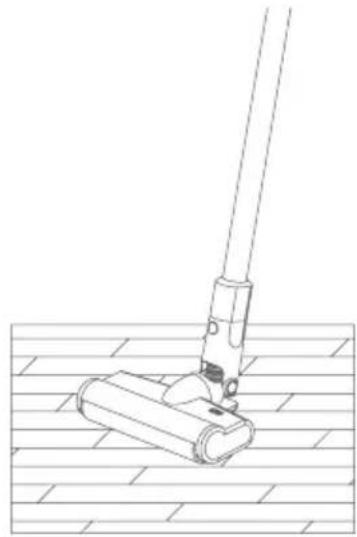
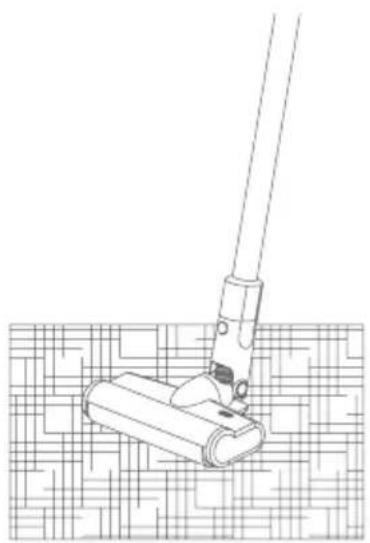
Electric floorhead can clean short hair carpet, hardfloor or tile floor.
Attention:
When the electric floorhead is running, if brushroll stopped running due to big foreign object blockage or excessive fiber entangle, or the child accidentally putting hand into brushroll, the floorhead will stop working to protect personal safety and avoid damage to floorhead motor.
natural_image
Line drawing of a hand operating a mop on a grid-patterned surface (no text or symbols)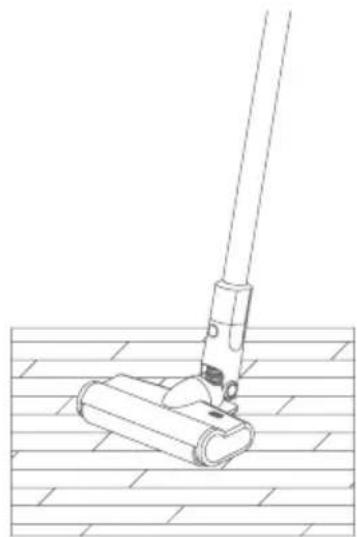
natural_image
Line drawing of a mop handle mounting a wooden frame (no text or symbols)Use of Accessories
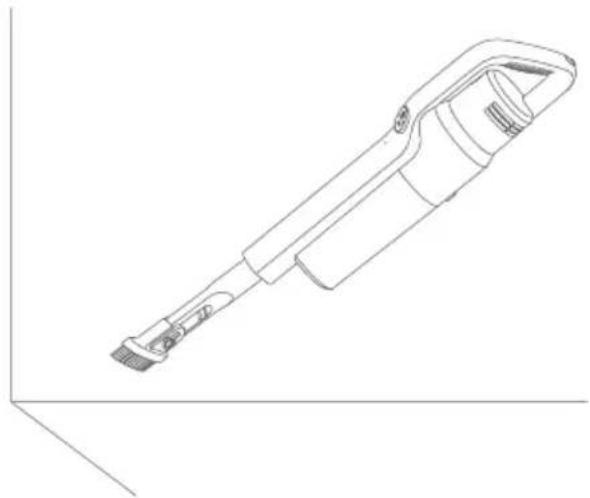
2-in-1 crevice tool: Suitable to clean crevices, corners and other narrow areas.
natural_image
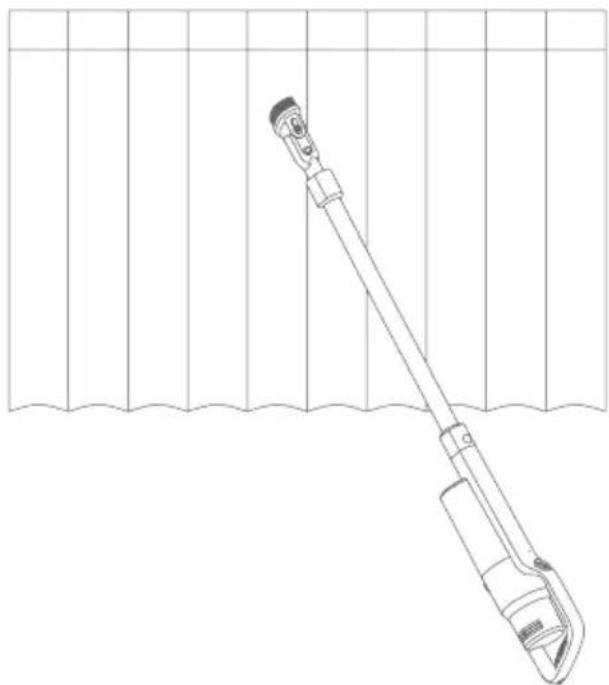
Line drawing of a handheld electronic device with a flat body and handle (no text or symbols)2-in-1 upholstery tool: Suitable to clean dust on closet, sofa, windowsill and table surface.
natural_image
Line drawing of a manual tool extending into a water channel with grid lines (no text or symbols)Electric Mattress Head: Beats up and cleans dust, dust mite and dust mite allergen from sofa and bed.
natural_image
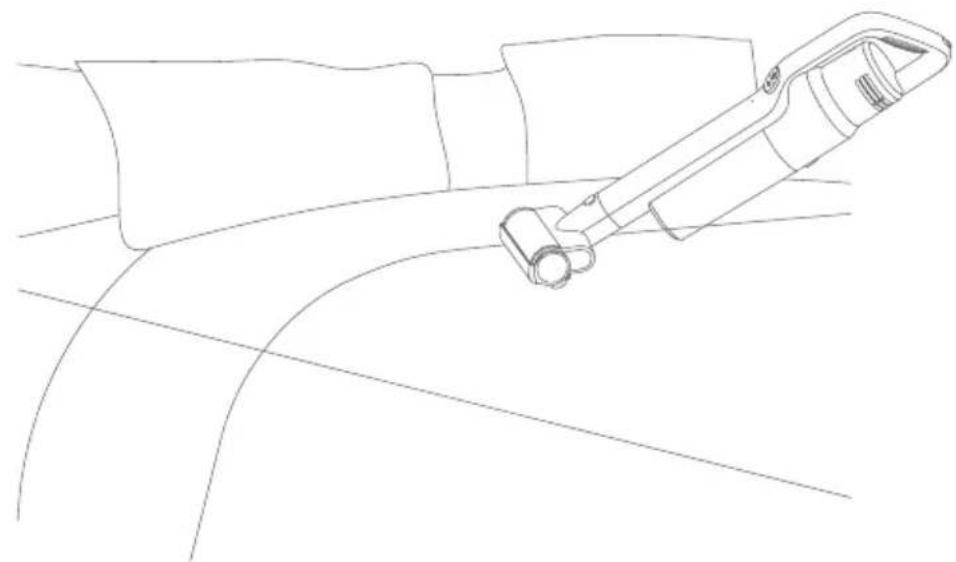
Line drawing of a mechanical device interacting with a curved surface (no text or symbols)Soft brush and stretch: Stretch hose to connect handheld vacuum cleaner and accessories to clean hard to reach areas. Soft bruh is suitable to clean easily scratched furniture, such as book shelf, artworks.

natural_image
Line drawing of a cleaning tool applying material to a rectangular sink (no text or symbols)Cleaning and Replacing Parts
Attention:
- HEPA filter is available for sale from local vacuum cleaner distributors.
- It is recommended to clean the dust cup after each use; When the dust cup is full or the HEPA filter is clogged, it needs to be cleaned and replaced if necessary. Floorhead brushroll might be entangled with hair after long time use, it needs to be cleaned in time to keep the vacuum working more efficiently.
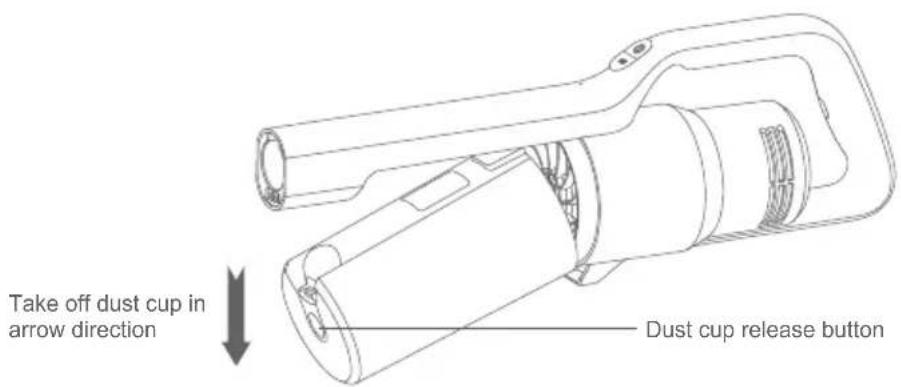
Cleaning Dust Cup
release button, rotate and remove dust cup in the arrow direction.
text_image
Take off dust cup in arrow direction Dust cup release buttonLift out cyclone assembly and empty the dust in dust cup.
natural_image
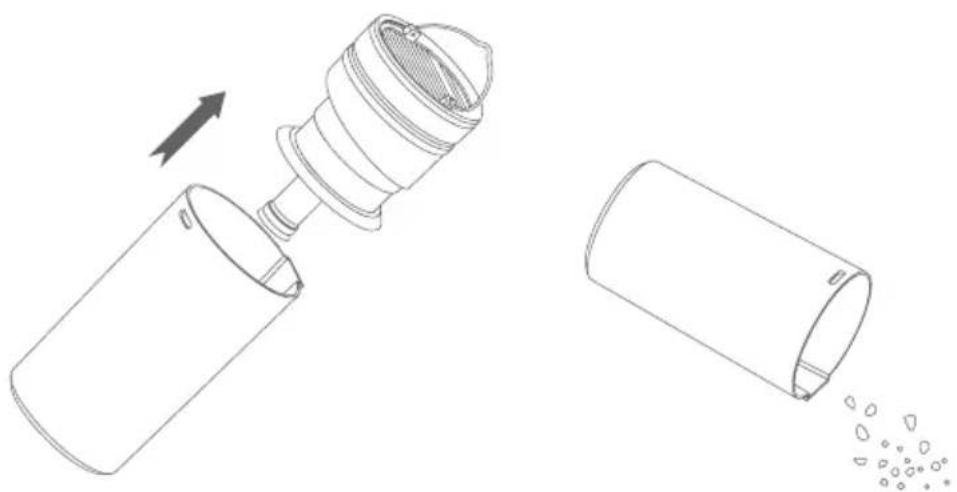
Line drawing of a mechanical device with an open lid and internal structure, showing a transformation from the main component to the other (no text or symbols present)Clean filtration system
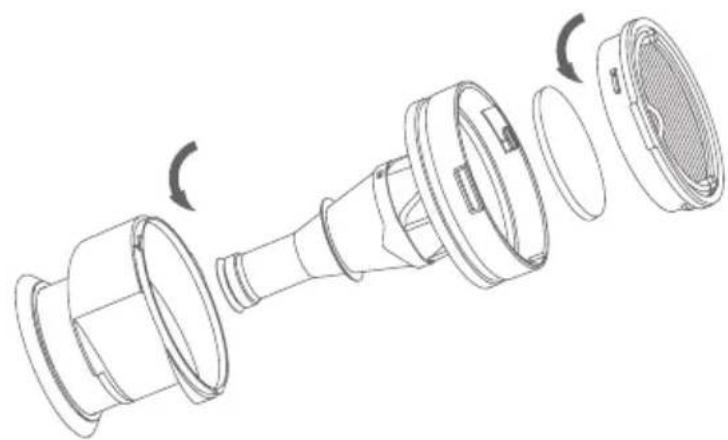
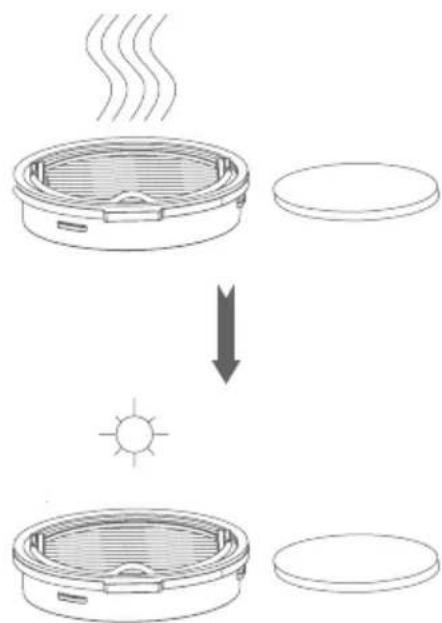
Hold the HEPA and rotate arrow direction. Take out HEPA; Rotate the cyclone in arrow direction to take out cyclone assembly. Clean or wash the HEPA, foam filter, cyclones.
natural_image
Exploded view diagram of a mechanical component showing internal parts and curved arrows indicating rotation (no text or symbols)If HEPA and foam filter are washed, they need to be completely dried to be used again. (Replace if necessary). After cleaning, assemble all parts in the opposite direction as disassembly. Attention:HEPA and fom filter need to be completely dry before assembly.
text_image
Diagram illustrating the process of heat transfer from a steaming appliance to a solar source, with labeled components and directional arrows.Cleaning Electric Brushroll
Take out brushroll to clean brushroll.
- Push brushroll release button, brushroll will automatically bump out.
- Take out one side of the brushroll in the same direction as shown on the picture, then brushroll can be taken out to clean.
- After cleaning and replacing, reassemble it in opposite sequence.
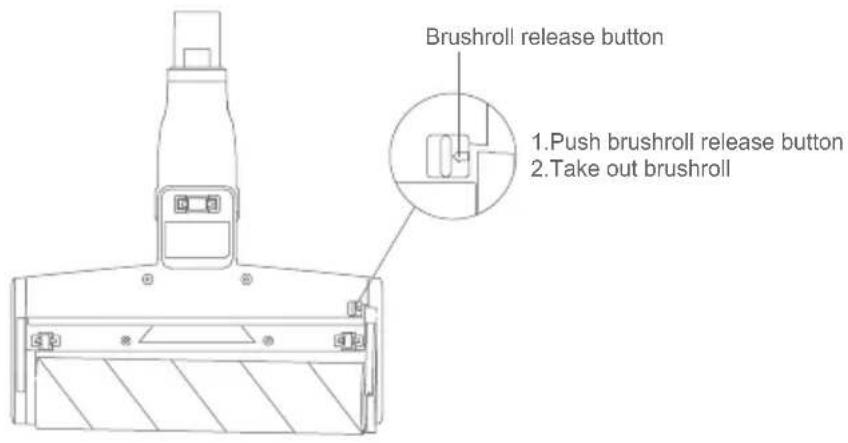
text_image
Brushroll release button 1.Push brushroll release button 2.Take out brushrollStorage of Vacuum Cleaner
Disassemble electric floor head and metal tube
When store or clean the vacuum cleaner, if you need to disassemble the electric floor head, press the electric floor head release button, pull upwards the metal tube.
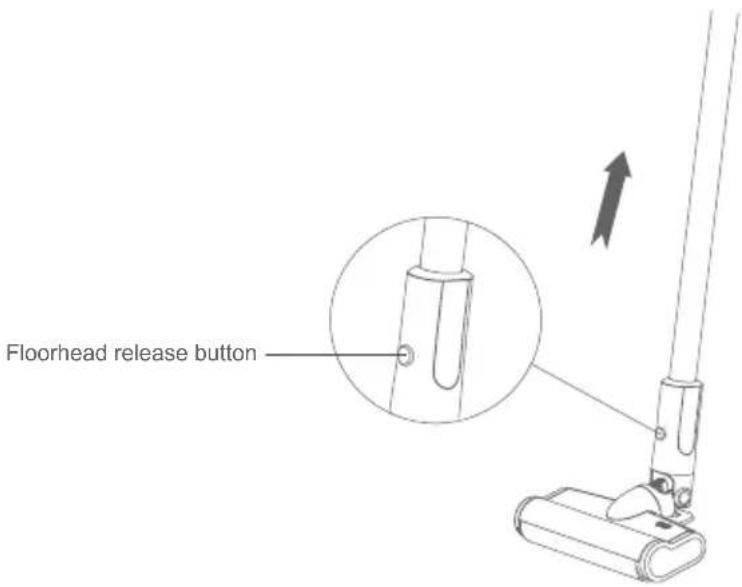
text_image
Floorhead release buttonDisassemble the Handheld Vacuum Cleaner and Metal Tube Hold the handheld, press the release button of metal tube, pull out it.
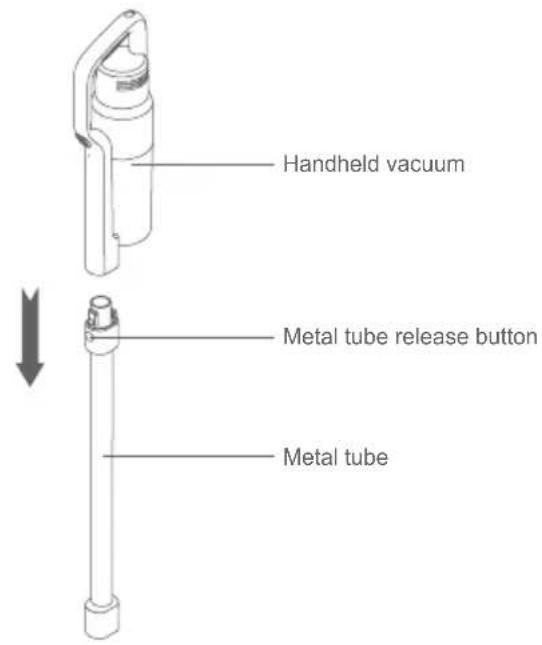
text_image
Handheld vacuum Metal tube release button Metal tubeMachine Storage
If the machine is not used for a long time, properly pack it and store it in cool and dry place, avoiding direct sunlight or humid environment.
Safety Notes
This vacuum cleaner is designed for home use. Do not use it for commercial or other purposes.
Please read this instruction manual carefully before use, properly save and store it for future use.
Do not put the vacuum close to fire or other high temperature facility.
Do not use or store the machine under extreme bad conditions, for example, extreme temperature. It is recommended to use it indoors between the temperature of 5^ C to 40^ C. Store the machine in dry place and avoid direct sunlight.
Fully charge the battery before first use or after long storage.
Before using the vacuum, make sure brushroll is assembled, otherwise, it may lead to motor fan blockage, causing motor burn out.
Please do not use the vacuum to pick up detergent, oil, glass slag, needle, cigarette ash, wet dust, water, matches, etc.
Please do not use the vacuum to pick up tiny particles such as cement, gypsum powder, wall powder, or large objects such as paper balls, otherwise it will cause malfunctions such as blockage and motor burnout.
Avoid blockage to air inlet or brushroll, it may cause motor failure.
Do not put your hand or foot into floorhead inlet to avoid body hurt.
Do not pour or splash water or other liquids into the machine to avoid short circuit to burn out the machine.
If the brushroll is not working, please check whether the brushroll is entangled with hair or other long fiber, clean it in time.
When storing the machine for a long time, ensure that the battery is fully charged before storage and charge the machine at least every three months.
Unplug the charger to clean or repair the machine. Hold the charger when plugging or unplugging it, and do not pull the charging cord.
Use a dry cloth to clean the machine. Liquids like gasoline, alcohol, lacquer thinner will cause crack or colour fading and cannot be used.
If the machine is not working after fully charged, it must be checked and repaired in our designated office, please do not dismantle the machine on your own.
Discarded machine contains batteries. They should be recycled safely. Do not discard them randomly.
If there is damage on power cord, to avoid danger, it should be replaced or repaired by manufacturer, repairing agency or professional person.
Trouble Shooting
Please check the following issues before sending to designated repair offices.
| Symptoms Possible Causes | Solutions | |
| Machine not working | Battery has no power Charge | the vacuum cleaner |
| Metal tube, electric floor had, is not assembled correctly to the vacuum cleaner | Check the accessories are assembled correctly to the vacuum cleaner | |
| Machine stops working during use | Main motor temperature overheat and activates temperature protection | machine for 5 to 10 minutes |
| Check whether cyclone systems needs cleaning | ||
| Brushroll stops running during use | Floorhead overloaded(Such as working on carpet, too much hair entangled around brushroll) | machine for 5 to 10 minutes |
| whether brushroll needs cleaning | ||
| Machine drops from strong to normal mode automatically | Cyclone system is blocked and activates main motor over speed protection | Clean dust cup and cyclone system |
| Suction drops | Dust cup full Clean dust cup and cyclone | |
| Filter blocked Clean or replace filter | ||
| Floorhead air path blocked Clean floorhead air path | ||
| Charging indicators red and green light flickers alternately during charging | contact to machine or power socket | Replug charger to machine and power socket |
| Short working time after charging | Machine not fully charged | Follow instruction manual to fully charge the battery |
| Battery old aging Replace battery | ||
Attention: If any other failures occurred, which need professional tools, in order to avoid danger, the machine must be repaired or replaced by manufacturer, other maintenance offices or professionals from similar offices.
Product Specification
Technical Parameter
| Model No. JV63 JV65 | ||
| Rated Voltage | 25.2V --- | 28.8V --- |
| Rated Power 450W 500W | ||
| Adaptor Input Voltage 100-240V ~ 50-60 Hz 100-240V ~ 50-60Hz | ||
| Adaptor Output Voltage 30V | 600mA 34.2V-600mA | --- |
| Model No of Electric Floor Head | JV63 JV65 | |
| Rated Power of Electric Floor Head | 30W 30W | |
| Model No of Electric Mattress Head | T-CS7.0B T-CS7.0A | |
| Rated Power of Electric Mattress Head | 20W 20W | |
| Battery pack capacity | 2500mAh 2500mAh | |
| Charging time | 5h 5h | |
Circuit diagram
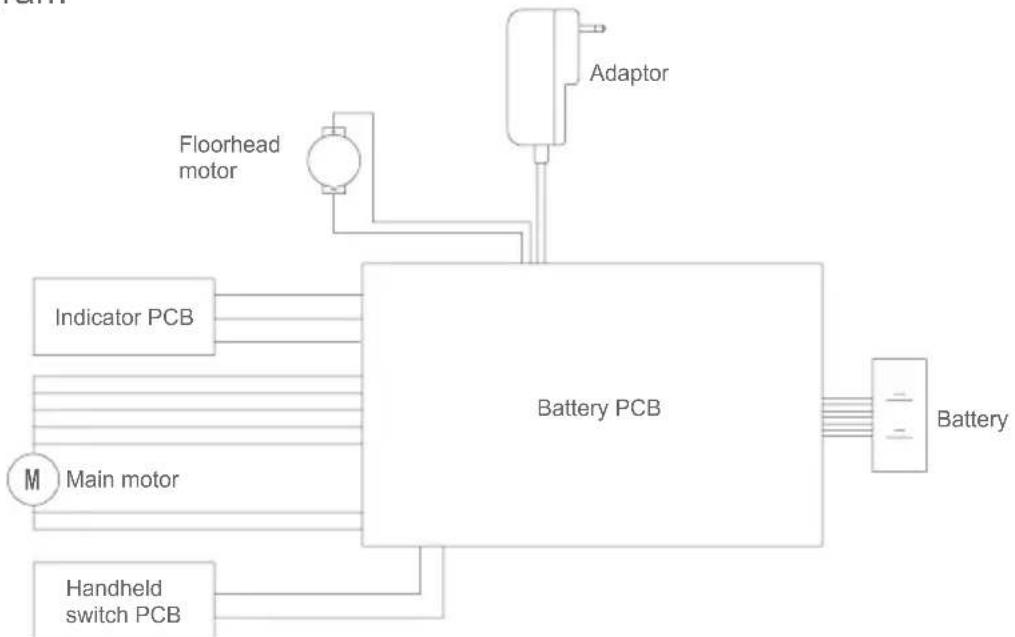
flowchart
graph TD
    A["Main motor"] --> B["Battery PCB"]
    C["Indicator PCB"] --> B
    D["Handheld switch PCB"] --> B
    E["Adaptor"] --> B
    F["Floorhead motor"] --> B
    B --> G["Battery"]
Manufacturer Information
| Manufacturer Kingclean Electric Co., Ltd | |
| Address | No.1 Xiangyang Road, Suzhou New District, Jiangsu Province 215009, China |
Disposal
The machine, accessories and packaging should be sorted for environmental-friendly recycling.
Do not dispose of the machine into household waste!
Only for EC countries: According to the European Guideline 2012/19/EU, machine that are no longer usable, and according to the European Guideline 2006/66/EC, defective or used battery packs/batteries, must be collected separately and disposed of in an environmentally correct manner.
Battery packs/batteries:
Integrated batteries may only be removed for disposal by qualified personnel. Opening the housing shell can damage or destroy the machine.
Do not dispose of battery packs/batteries into household waste, fire or water. Battery packs/batteries should, if possible, be discharged, collected, recycled or disposed of in an environmental-friendly manner.
Subject to change without notice.
Warranty Information
This product enjoys two year warranty from the date of purchase.
Excluded from the guarantee is normal wear, commercial use, alterations to the appliance as purchased, cleaning activities, consequences of improper use or damage by the purchaser or a third person, damage, that can be attributed to external circumstances or caused by the batteries.
Vor dem Gebrauch
Auspacken
natural_image
Technical line drawing of two mechanical clamps mounted on a grid-patterned surface (no text or symbols)Zubehör benutzen
natural_image
Line drawing of a handheld electronic device with a flat body and handle (no text or symbols)natural_image
Line drawing of a manual pole with a handle, against a grid background (no text or symbols)natural_image
Line drawing of a mechanical device positioned on a curved surface (no text or symbols)natural_image
Line drawing of a cleaning tool applying material to a rectangular basin (no text or symbols)natural_image
Diagram showing a mechanical device being inserted into a cylindrical container, with an arrow indicating the process (no text or symbols present)natural_image
Exploded view diagram of a mechanical component showing internal parts and curved arrows indicating motion (no text or symbols)text_image
Diagram illustrating the process of heating a steaming appliance, showing heat transfer from a fan to a sun.natural_image
Technical line drawing of two mechanical components mounted on a platform, shown from top and side views (no text or symbols)Uso de Accesorios
natural_image
Line drawing of a handheld electronic device with a flat body and handle (no text or symbols)natural_image
Line drawing of a manual pole with a handle, against a grid background (no text or symbols)natural_image
Line drawing of a mechanical device interacting with a curved surface (no text or symbols)natural_image
Line drawing of a handheld tool emitting a curved filament from a rectangular box (no text or symbols)natural_image
Line drawing of a mechanical device with an open lid and internal structure, showing a transformation from the main component to the other (no text or symbols present)natural_image
Exploded view diagram of a mechanical component showing internal parts and curved arrows indicating rotation (no text or symbols)text_image
Diagram illustrating the process of heat transfer from a steaming heater to a solar source, with labeled components and directional arrows.Product Specification
Technical Parameter
Assembly of accessories
natural_image
Technical line drawing of two mechanical assembly steps with no visible text or symbolsUso di accessori
natural_image
Line drawing of a handheld electronic device with a textured handle and lever (no text or symbols)natural_image
Line drawing of a manual pole with a handle, against a grid background (no text or symbols)natural_image
Line drawing of a mechanical device positioned on a curved surface (no text or symbols)natural_image
Line drawing of a hand tool interacting with a rectangular device (no text or symbols)natural_image
Diagram showing a mechanical device being inserted into a cylindrical container with liquid spilling out (no text or symbols present)natural_image
Exploded view diagram of a mechanical component showing internal parts and curved arrows indicating motion (no text or symbols)text_image
Diagram illustrating the process of heat transfer from a steaming heater to a solar source, with labeled components and directional arrows.natural_image
Line drawing of a hand using a tool to lift a component on a grid-patterned surface (no text or symbols)