
601161 - Metal shelf BARTSCHER - Free user manual and instructions
Find the device manual for free 601161 BARTSCHER in PDF.
| Product type | Metal wine rack |
| Brand | Bartscher |
| Model | 601161 |
| Material | Chrome-plated steel |
| Number of shelves | 5 height-adjustable shelves |
| Shelf type | Grid with 9 bottle channels per shelf |
| Dimensions (W x D x H) | 900 x 350 x 1390 mm |
| Weight | 12.5 kg |
| Load capacity | Approximately 100 to 130 bottles |
| Mounting system | Plug-in system, two-part pillars with threaded connectors |
| Included accessories | 4 corner pillars, 5 shelves, 20 plastic assembly cones, 4 leveling feet |
| Height adjustment | Screw feet for leveling |
| Care and cleaning | Soft damp cloth, dry thoroughly |
| Precautions | Do not use caustic substances or abrasive cleaners |
| Intended use | Storage of wine bottles |
Frequently Asked Questions - 601161 BARTSCHER
User questions about 601161 BARTSCHER
0 question about this device. Answer the ones you know or ask your own.
Ask a new question about this device
Download the instructions for your Metal shelf in PDF format for free! Find your manual 601161 - BARTSCHER and take your electronic device back in hand. On this page are published all the documents necessary for the use of your device. 601161 by BARTSCHER.
USER MANUAL 601161 BARTSCHER
ENGLISH from page 5 to 8
| Name Store shelf | Store shelf 4500 | |
| Code-No.: | 601182 601192 | |
| Material: Chrome-plated steel | Chrome-plated steel | |
| Design: | ·4 height-adjustable shelves ·shelf design: grid ·set consists of: 4 shelves, 4 corner posts ·push-fit system, easy assembly | |
| Dimensions: W 910 x D 460 x H 1845 mm W 1210 x D 610 x H 1840 mm | ||
| Weight: 14.3 Kg 23.5 Kg | ||
| Load-bearing capacity | 200 kg, evenly distributed | max. 500 kg in total, 125 kg per shelf |
| Name Office shelf Wine rack | ||
| Code-No.: | 601151 601161 | |
| Material: Chrome-plated steel Chrome-plated steel | ||
| Design: | 4 height-adjustable shelvesshelf design: gridset consists of:4 shelves,4 corner postspush-fit system, easyassembly | 4 height-adjustable shelvesshelf design: grid with 9 recesses for bottles per shelfset consists of:5 shelves,4 corner postspush-fit system, easy assembly |
| Dimensions: W 750x D 350 x H1520 mm W 900 | xD 350 x H 1390 mm | |
| Weight: | 10.3 kg | 12.5 kg |
| Load-bearingcapacity | 150 kg,evenly distributed | approx. 100-130 bottles |
Subject to technical changes!
List of parts / scope of delivery


Shelves (4)
Code-No.:
601151/601182/601192
1 Corner post (4)
2 Connecting piece for corner post (4)
3 Shelf (4 or 5)
4 Plastic snap-fit joints (16 lub 20)
5 Feet for adjusting height (levelling) of the rack (4)

Shelves (5)
Code-No.: 601161
each with 9 recesses for bottles
ASSEMBLY
Assembly of the posts
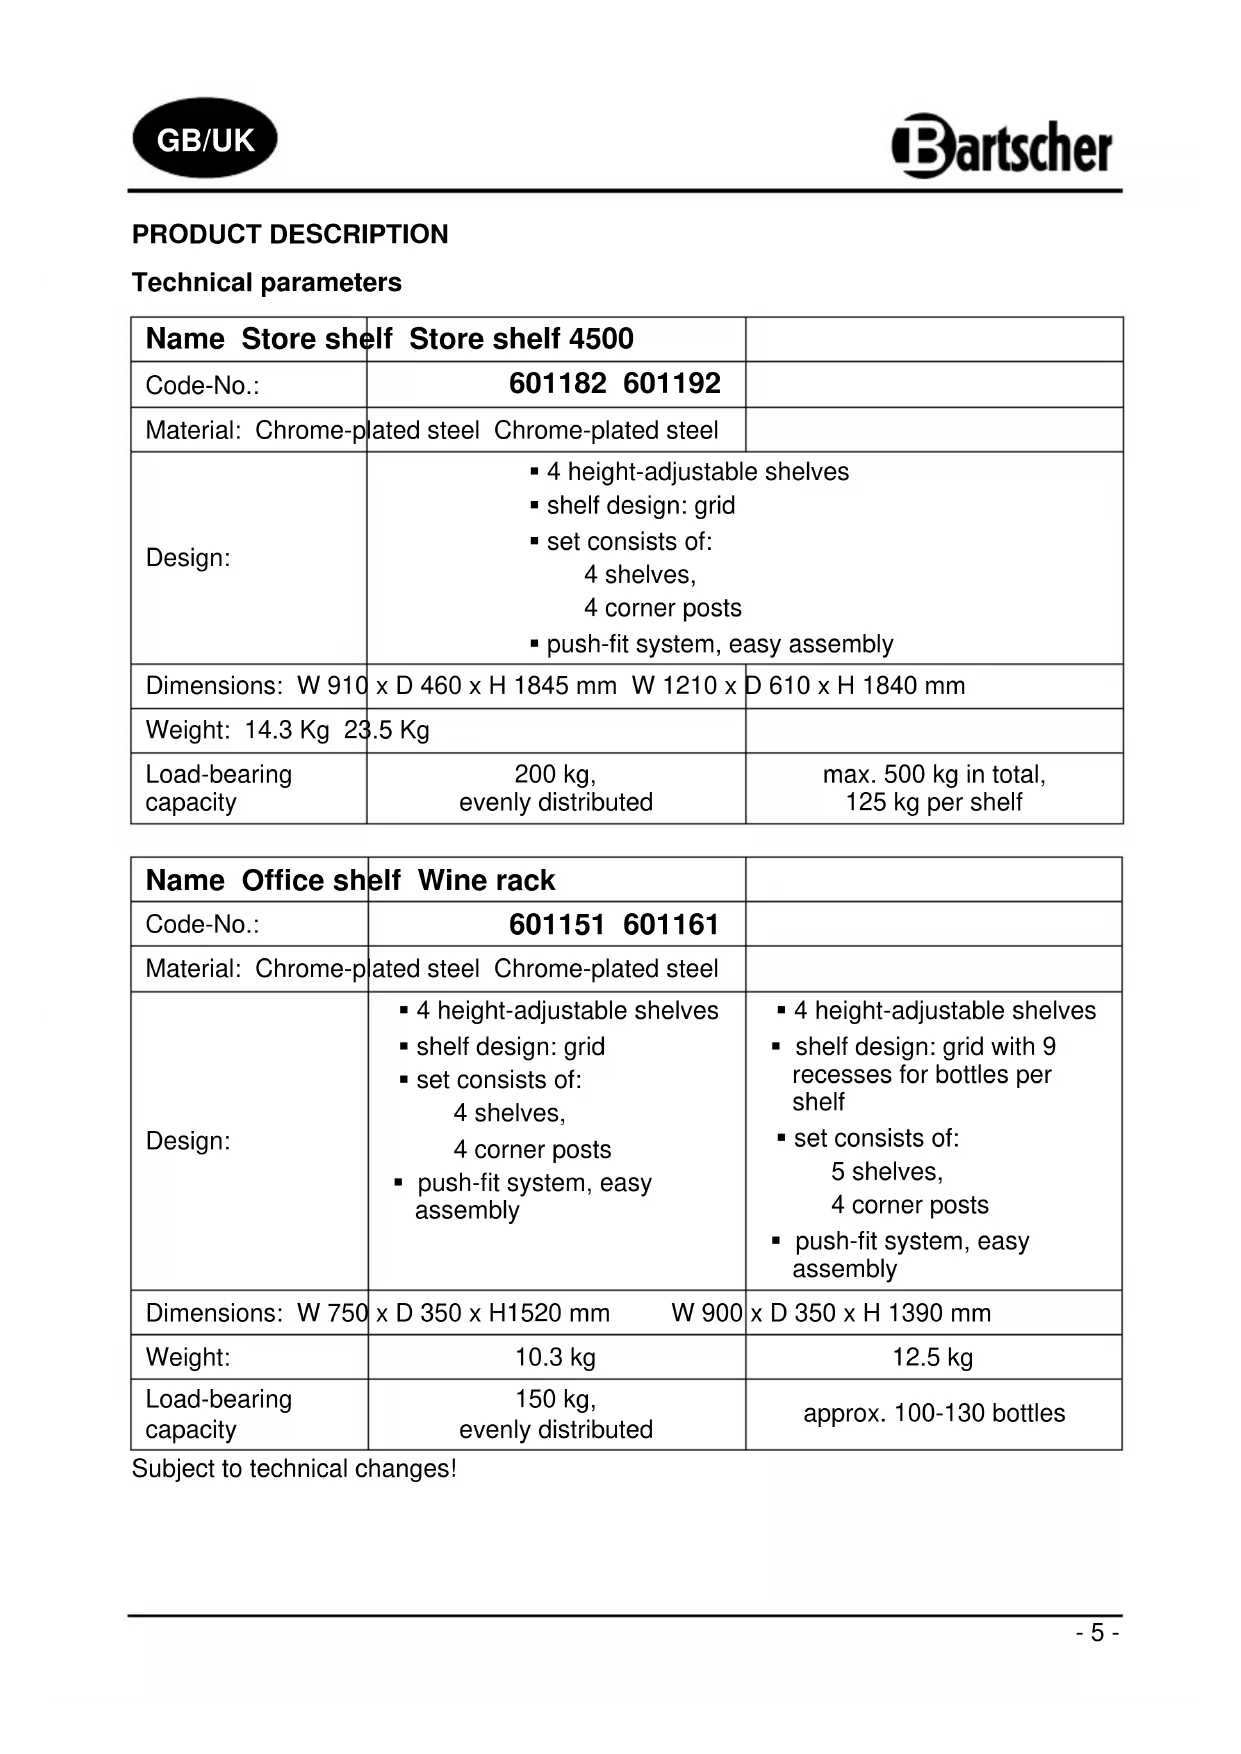
1) All four posts consist of two parts and are screwed together with the help of the connecting pieces with threads that should already have been screwed to one of the two post parts. The upper part of the posts has a plastic cover at the top, the lower part of the post can be levelled at the bottom. Screw together the two parts of the post hand-screwed in a clockwise direction. Should it not be possible to screw the two post parts together easily, then the two thread parts were not joined properly.
Attaching a shelf
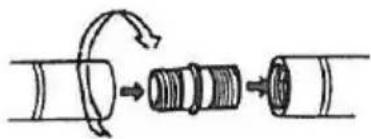
2) Attach the bottom shelf to the corner posts first. It is recommended that the bottom shelf should not be mounted higher than 15cm above the floor. At the desired height, snap the conical plastic snap-fit joints into the grooves on the posts, with the narrower end of the snap-fit joints pointing up and the thicker end of the snap-fit joints pointing down.
3) Tilt the shelf slightly to the side and slide the upper parts of the four posts (with plastic caps) through the openings in the shelf's corners until they are firmly seated at snap-fit joints.
4) Place the entire rack upright and push the shelf down firmly at the corners, to make sure that the shelf lies firmly on the plastic snap-fit joints.


Further assembly
5) Attach the plastic snap-fit joints for the next shelf at the desired height. Slide the shelf down from above over the posts onto the plastic snap-fit joints and press it down firmly again.
6) Repeat step 5) for the other shelves.
7) To adjust the height (levelling) of the rack, rotate the feet on the bottom parts of the posts in and out.
Now, the rack has been completely assembled.
Note: a rubber hammer can make the assembly much easier.
Cleaning
- Clean the rack regularly with a soft, moist cloth and wipe it thoroughly afterwards.

CAUTION!
Never use corrosive or abrasive cleaning agents which may damage the chromed surface of the rack.
DESCRIPTION DU PRODUIT
BESCHRIJVING PRODUCT
Technische parameters


Brand : BARTSCHER
Model : 601161
Category : Metal shelf