510 - Measuring equipment Testo - Free user manual and instructions
Find the device manual for free 510 Testo in PDF.
| Product type | Differential pressure gauge |
| Brand | Testo |
| Model | 510 |
| Dimensions (L x W x H) | 119 x 46 x 25 mm (with protective cap) |
| Weight | 90 g (with batteries and protective cap) |
| Power supply | 2 AAA 1.5 V batteries |
| Battery life | 50 h (without backlight) |
| Measuring ranges | 0…100 hPa, 0…40.15 inH₂O, 2…100 m/s (with Pitot tube) |
| Resolution | 0.01 hPa, 0.01 inH₂O |
| Accuracy | ±0.03 hPa (0…0.30 hPa), ±0.05 hPa (0.31…1.00 hPa), ±(0.1 hPa + 1.5 % of reading) (remaining range) |
| Measurement units | Pa, hPa, mbar, mmH₂O, mmHg, psi, inH₂O, inHg, m/s, fpm |
| Main functions | Differential pressure measurement, flow with Pitot tube, Hold, Min, Max functions, time average, auto-off, screen backlight |
| Protection type | IP40 |
| Operating temperature | 0…50 °C |
| Storage temperature | -40…70 °C |
| Maintenance and cleaning | Clean the housing with a damp cloth (soapy water). Do not use solvents or strong cleaning products. |
| Safety | Magnetic field: keep at least 10 cm away from pacemakers. Avoid damaging other sensitive devices. |
| Spare parts and repairability | Use only original Testo spare parts. Contact Testo after-sales service for any repairs. |
| General information | Manual available in several languages. Accessories and spare parts at www.testo.com. |
Frequently Asked Questions - 510 Testo
User questions about 510 Testo
0 question about this device. Answer the ones you know or ask your own.
Ask a new question about this device
Download the instructions for your Measuring equipment in PDF format for free! Find your manual 510 - Testo and take your electronic device back in hand. On this page are published all the documents necessary for the use of your device. 510 by Testo.
USER MANUAL 510 Testo
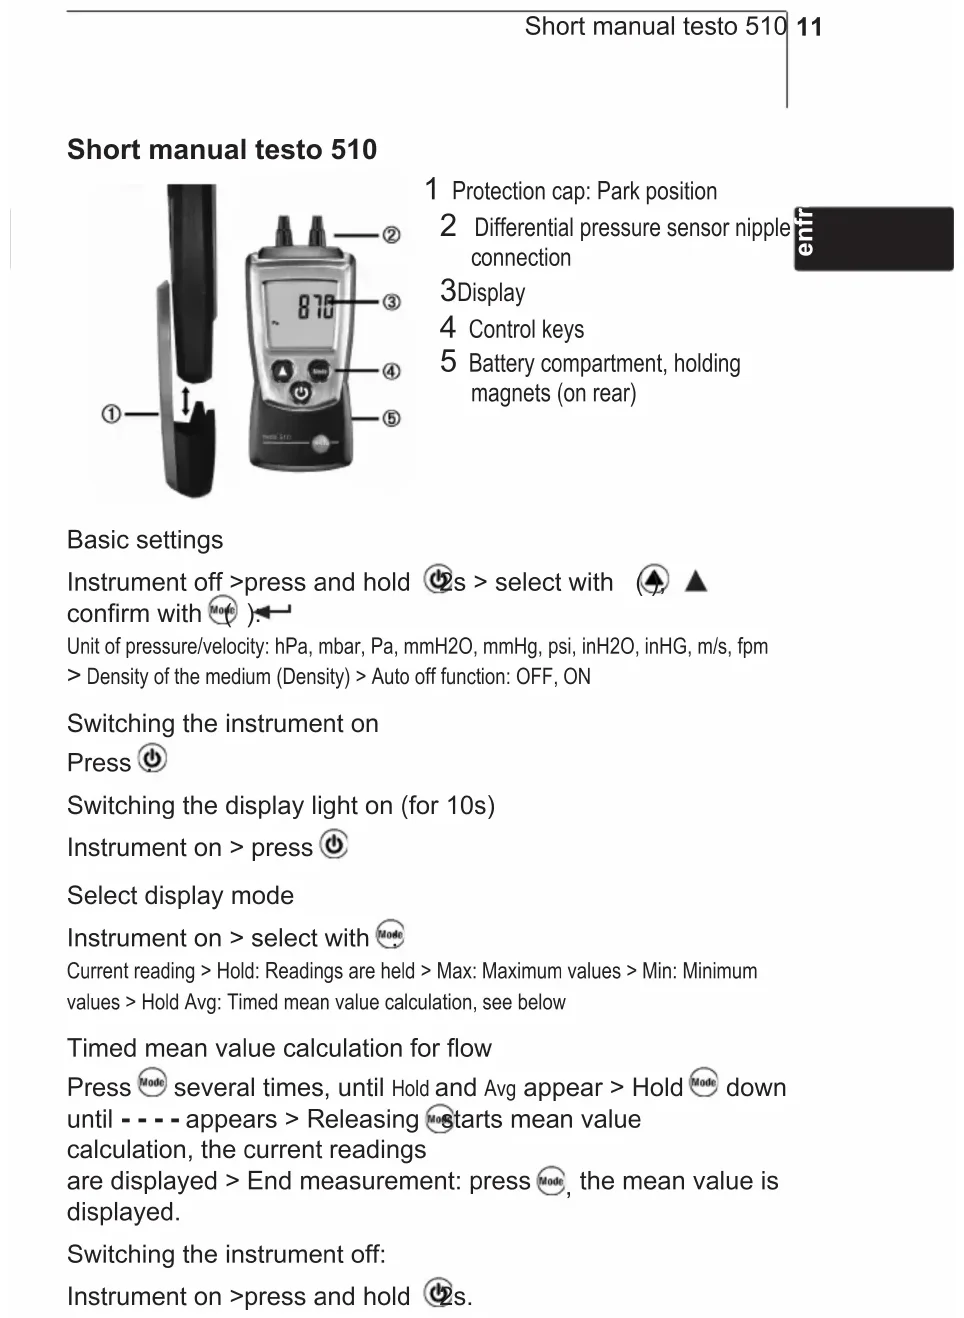
1 Protection cap: Park position
2 Differential pressure sensor nipple connection
3Display
4 Control keys
5 Battery compartment, holding magnets (on rear)
enfr
Basic settings
Instrument off >press and hold ⏻s > select with ⚠️ ▲ confirm with Ⓜ️ ).
Unit of pressure/velocity: hPa, mbar, Pa, mmH2O, mmHg, psi, inH2O, inHG, m/s, fpm > Density of the medium (Density) > Auto off function: OFF, ON
Switching the instrument on Press ⏻
Switching the display light on (for 10s) Instrument on > press ⏻
Select display mode
Instrument on > select with Mode
Current reading > Hold: Readings are held > Max: Maximum values > Min: Minimum values > Hold Avg: Timed mean value calculation, see below
Timed mean value calculation for flow
Press Mode several times, until Hold and Avg appear > Hold Mode down until - - - - appears > Releasing Mode starts mean value calculation, the current readings are displayed > End measurement: press Mode, the mean value is displayed.
Switching the instrument off:
Instrument on >press and hold ⏻2s.
Safety and the environment
About this document
Please read this documentation through carefully and familiarise yourself with the product before putting it to use. Keep this document to hand so that you can refer to it when necessary. Hand this documentation on to any subsequent users of the product.
Pay particular attention to information emphasised by the following symbols:
i Important.
Avoid personal injury/damage to equipment
Only operate the measuring instrument properly, for its intended purpose and within the parameters specified in the technical data. Do not use force.
Never store the product together with solvents, acids or other aggressive substances.
Only carry out the maintenance and repair work that is described in the documentation. Follow the prescribed steps when doing so. Use only OEM spare parts from Testo.

Magnetic field May be harmful to those with pacemakers.
Keep a minimum distance of 10 cm between pacemaker and instrument.

Magneticfield Damage to other devices!
Keep a safe distance away from products which could be damaged by the effects of magnetism (e.g. monitors, computers or credit cards).
Protecting the environment
Take faulty rechargeable batteries as well as spent batteries to the collection points provided for them.
Send the product back to Testo at the end of its useful life. We will ensure that it is disposed of in an environmentally friendly manner.
Specifications
enf
Functions and use
The testo 510 is a differential pressure measuring instrument. It is normally used to measure small differences in pressure (e.g. to check filter permeability), gas flow pressure measurement, fine draught measurement as well as flow velocity measurement with a Pitot tube.
Technical data
Measurement data
- Sensor: Differential pressure sensor
- Parameters: Pa, hPa, mbar, mmH₂O, mmHg, inHG, inH₂O, psi, m/s, fpm
- Measuring ranges: 0...100 hPa, 0...40.15 inH₂O
2 ... 100 m/s /6.6 ... 328.1 ft/s (with Pitot 1 and air density 1.2 kg/m ^3 /1,2 pd/ft ^3 )
· Resolutions: 0.01 hPa, 0.01 inH₂O - Accuracies (Nominal temperature 22 °C, ±1 Digit): ±0.03 hPa (0...0.30 hPa), ±0.05 hPa (0.31...1.00 hPa), ±(0.1 hPa+1.5 % of reading) (rest of range), ±0.01 inH₂O (0...0.12 inH₂O), ±0.02 inH₂O (0.13...0.40 inH₂O), ±(0.04 inH₂O +1.5 % of reading) (rest of range)
- Measuring rate: 0.5 s
Further instrument data
- Protection class: IP40
- Pitot-factor: 1
· Ambient conditions: 0...50 °C, 32...122 °F - Storage/transport conditions: -40...70 °C, -40...158 °F
• Voltage supply: 2x 1.5 V type AAA - Battery life: 50 h (without display light)
- Dimensions: 119x46x25mm / 4.7x1.8x1.0 in (inc. protection cap)
- Weight: 90 g / 3.2 oz (inc. batteries and protection cap)
Directives, standards and tests
· EU Directive: 2014/30/EU
Product description
At a glance
text_image
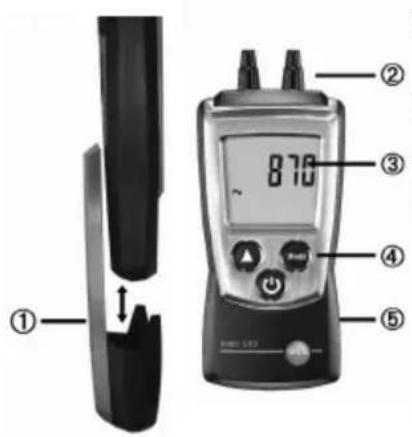
① ② 870 ③ ④ ⑤1 Protection cap: Park position
2 Differential pressure sensor nipple connection
3Display
4 Control keys
5 Battery compartment, holding magnets (on rear)
First steps
- Inserting batteries:
1 To open the battery compartment, push the battery cover down.
2 Insert batteries (2x 1.5 V type AAA). Observe the polarity!
3 To close the battery compartment, push the battery cover back on.
- Basic settings (configuration mode):
Adjustable functions
- Unit of pressure/velocity: hPa, mbar, Pa, mmH2O, mmHg, psi, inH2O, inHG, m/s, fpm
- Only if a unit of velocity is selected: Density of the medium (Density): Adjust flashing numbers with ⚠change to the next number with Mode
- Auto off function: OFF, ON (instrument switches off automatically if no key is pressed for 10 minutes)
1 When switching the instrument on, press and hold until ▲ and ← appear on the display (configuration mode).
- The adjustable function is displayed. The current setting flashes.
2 Press ⬆ (▲) several times until the desired setting flashes.
3 Press Mode (◀) to confirm the input.
4 Repeat steps 2 and 3 for all functions. - The instrument changes to measuring mode.
Using the product
For velocity to be measured, the unit of density and density value must be set correctly, see chapter ,First steps', section ,Basic settings (configuration mode)'.
- Switching the instrument on:
Press ⏻.
- Measuring mode is opened.
- Switching the display light on:
The instrument is switched on.
Press ⏻.
- The display light goes out automatically if no key is pressed for 10 seconds.
- Zeroing the measuring instrument:
The measurement values can be falsified by a change in the position of the measuring instrument. After zeroing, the position of the measuring instrument must not be changed. Carry out zeroing before every measurement in order to compensate faulty positioning or long-term zero-point drift. Zeroing is only possible in a range of 0...10% of the measuring range.
The instrument can only be zeroed in the range up to 10 hPa.
Press ⬆.
- Zeroing takes place.
- Changing the display view:
Adjustable views
- Current reading
- Hold: Readings are held.
- Max: Maximum values since the instrument was last switched on or last reset.
- Min: Minimum values since the instrument was last switched on or last reset.
- Hold Avg: Timed mean value calculation, see below.
Press Mode several times until the desired view appears.
- Timed mean value calculation for flow:
i Function only available when unit m/s or fpm is set.
1 Press Mode several times, until Hold and Avg appear in the display. The last result of mean value calculation is displayed.
- If mean value calculation was carried out since the last time the instrument was switched on, the last result is displayed.
2 Hold Mode down until - - - - flashes. Releasing Mode starts mean value calculation automatically, the current readings are displayed.
3 End measurement: press Mode The mean value is displayed.
For further mean value calculation: hold down Mode
4 End mean value calculation: press briefly.
- Resetting Max/Min values:
1 Press Mode several times until the desired view appears.
2 Press Mode and hold until - - - - appears.
3 Repeat steps 1 and 2 for all values that are to be reset.
- Switching the instrument off:
Press ⏻ and hold until the display goes out.
Maintaining the product
- Changing batteries:
1 To open the battery compartment, push the battery cover down.
2 Remove used batteries and insert new batteries (2x 1.5 V type AAA). Observe the polarity!
3 To close the battery compartment, push the battery cover back on.
- Cleaning the housing:
Clean the housing with a moist cloth (soap suds) if it is dirty. Do not use aggressive cleaning agents or solvents!
Tips and assistance
Questions and answers
| Question Possible causes/solutions | |
| Hi or Lo | Readings outside the measuring range (too high, too low): Keep to the permitted measuring range. |
| Residual capacity <10 min: Change batteries. | |
enf
If we could not answer your question, please contact your dealer or Testo Customer Service. For contact details, please visit www.testo.com/service-contact
Accessories and spare parts
Accessories and spare parts can be found in the product catalogues and brochures or in the internet at: www.testo.com
Notes
Instructions succinctes testo 510

text_image
① ② 870 ③ ④ ⑤Question Causes possibles
Hi ou Lo
- Colocar as pilhas: