Modula M1 - Cooker FALMEC - Free user manual and instructions
Find the device manual for free Modula M1 FALMEC in PDF.
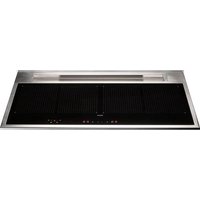
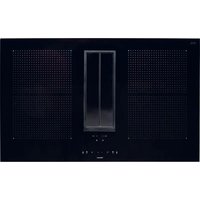
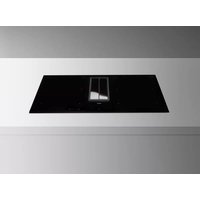
| Product type | Induction hob with integrated hood |
| Brand | Falmec |
| Model | Modula M1 |
| Cooking zones | 2 induction zones (front 1600W, rear 2100W) |
| Total power | 3500 W |
| Power supply | 230 V ~ 50/60 Hz, single phase + N |
| Cable cross-section | 3 x 2.5 mm² |
| Main functions | Booster (P), Keep Warm (42°C), Bridge, Timer, Auto-off |
| Controls | Touch controls with digital display |
| Safety | Control lock, pan detection, overheating, emergency stop |
| Integrated hood | Yes, external ventilation or recirculation (optional charcoal filters) |
| Hood speeds | 9 speeds (1-9) + P speed (boost) |
| Hood filters | Grease metal filters (washable) + activated charcoal (option) |
| Maintenance | Clean surfaces with soft cloth and neutral detergent; metal filters in dishwasher (max 55°C) |
| Dimensions (W x D x H approx.) | 60 x 52 x 5 cm (cooking surface) |
| Approximate weight | 10 kg |
| Certifications | Compliant with CE standards |
Frequently Asked Questions - Modula M1 FALMEC
User questions about Modula M1 FALMEC
0 question about this device. Answer the ones you know or ask your own.
Ask a new question about this device
Download the instructions for your Cooker in PDF format for free! Find your manual Modula M1 - FALMEC and take your electronic device back in hand. On this page are published all the documents necessary for the use of your device. Modula M1 by FALMEC.
USER MANUAL Modula M1 FALMEC
INSTRUCTIONS BOOKLET

Modula M1
IT LIBRETTO ISTRUZIONI
EN INSTRUCTIONS BOOKLET
EN - Measurements for installation.
DK - Mal for installation.
BUILT-IN version:

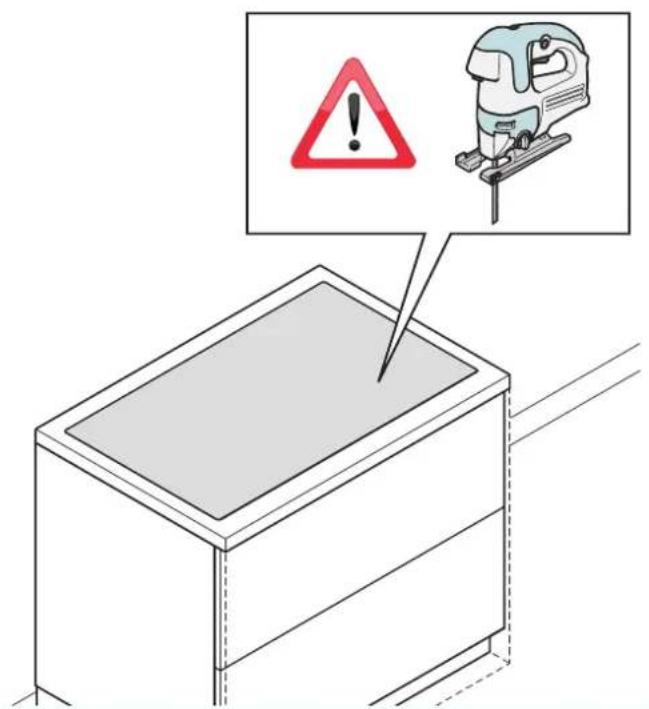
IT-Operazioni preliminari: Taglio del top (1).
EN - Preliminary operations: Cutting the top (1).
DE-VorbereitendeArbeiten: Schneider Sie die Spitze (1).
FR - Opérations préliminaires: Couper le haut (1).
ES - Operaciones preliminares: Cortando la parte superior (1).
RU -П配电Варптельные ореташи: Bырбаане ворхней ча'tn(1).
PL-Operacja wstepne: Ciecie gornej czeci (1).
DK - Indledende handler: Skaer toppen (1).
1
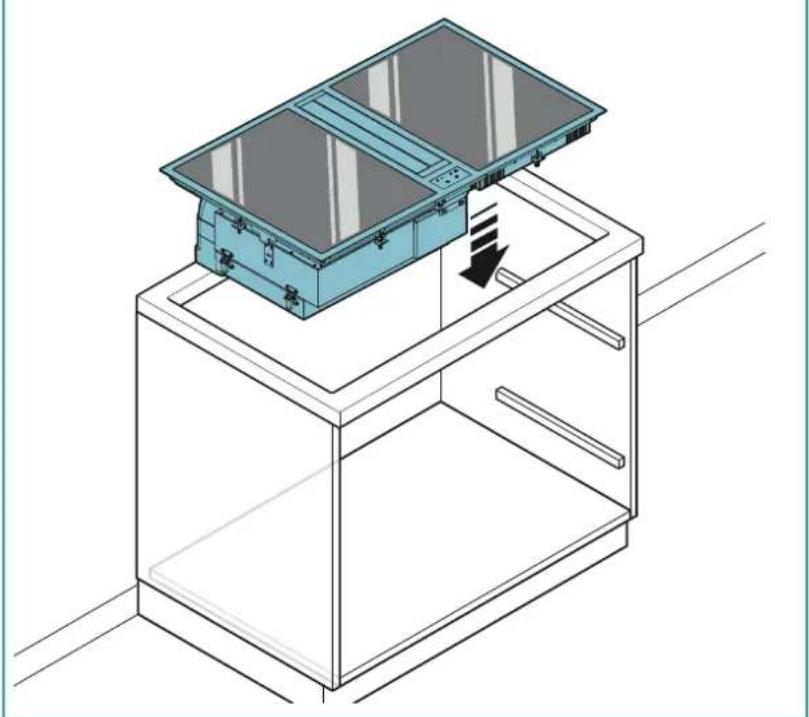
IT - Inserimento cappa su base (2).
EN - Insertion of the hood onto the base (2).
DE - Einsetzen der Haube auf der Basis (2).
FR - Insertion de la hotte sur la base (2).
ES - Inserción de la campana en la base (2).
RU-YcTaHOBKa BbITJxKn Ha OCHOBAHne (2).
PL - Umieszczenie okapu na podstawie (2).
DK - Isæting af emhaetten pa underlaget (2).
2
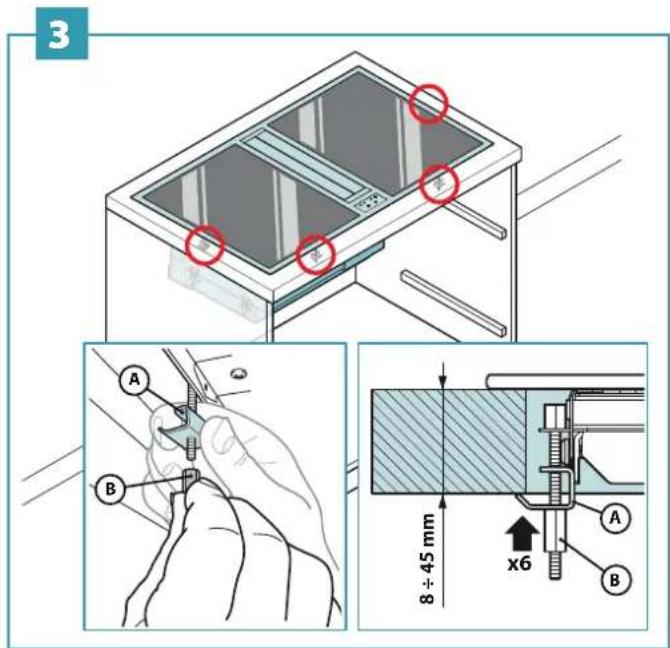
IT - Avvitare piano cottura al piano di lavoro (3).
EN - Screw the cooking hob together with the worktop (3).
DE - Die Kochfläche an der Arbeitsfläche (3) verschrauben.
FR - Visser le plan de cuisson au plan de travail (3).
ES - Atornillar la plaza de cocción a la superficie de trabajo (3).
RU -ПиИВИNTIte BApOHyIO NOBExHOCt b K cToJIeUHmIe (3).
PL - Przykrecic płyte grzewcza do blatu (3).
DK - Skru kogepladen på arbejdsbordet (3).
EN - Motor and hob electrical connections (4).
Installation operations are to be carried out by skilled and qualified installers in accordance with the instructions in this booklet and in compliance with the regulations in force.
DO NOT use the hood if the power supply cable or other components are damaged: disconnect the hood from the electrical power supply and contact the Dealer or an authorised Servicing Dealer for repairs.
Do not modify the electrical, mechanical or functional structure of the equipment.
Do not personally try to carry out repairs or replacements. Interventions carried out by incompetent and unauthorised persons can cause serious damage to the unit or physical and personal harm, not covered by the Manufacturer's warranty.
WARNING FOR THE INSTALLER
TECHNICAL SAFETY
Before installing the hood, check the integrity and function of each part. Should anomalies be noted, do not proceed with installation and contact the Dealer.
Do NOT install the hood if an aesthetic (or cosmetic) defect has been detected. Put it back into its original package and contact the dealer.
No claim can be made for aesthetic (or cosmetic) defects once it has been installed.
During installation, always use personal protective equipment (e.g.: Safety shoes) and adopt prudent and proper conduct.
The installation kit (screws and plugs) supplied with the hood is only to be used on masonry walls: in case of installation on walls of a different material, assess other installation options keeping in mind the type of wall surface and the weight of the hood (indicated on page 2).
Keep in mind that installations with different types of fastening systems from those supplied, or which are not compliant, can cause electrical and mechanical seal danger. Do not install the hood outdoors and do not expose it to atmospheric elements (rain, wind, etc.).
ELECTRICAL SAFETY
The electrical system to which the hood is to be connected must be in accordance with local standards and supplied with earthed connection in compliance with safety regulations in the country of use. It must also comply with European standards regarding radio antistatic properties.
Before installing the hood, check that the electrical mains power supply corresponds with what is reported on the identification plate located inside the hood. The socket used to connect the installed equipment to the electrical power supply must be within reach: otherwise, install a mains switch to disconnect the hood when required.
Any changes to the electrical system must be carried out by a qualified electrician.
The maximum length of the flue fastening screws (supplied by the manufacturer) must be 13mm . Use of non-compliant screws with these instructions can lead to danger of an electrical nature.
Do not try to solve the problem yourself in the event of equipment malfunction, but contact the Dealer or an authorised Servicing Department for repairs.
When installing the hood, disconnect the equipment by removing the plug or switching off the main switch.
FUMES DISCHARGE SAFETY
Do no connect the equipment to discharge pipes of fumes produced from combustion (for example boilers, fireplaces, etc.).
Before installing the hood, ensure that all standards in force regarding discharge of air out of the room have been complied with.
USERWARNINGS
These warnings have been drawn up for your personal safety and those of others. You are therefore kindly asked to read the booklet carefully in its entirety before using the or cleaning the equipment.
The Manufacturer declines all responsibility for any damage caused directly, or indirectly, to persons, things and pets as a consequence of failing to comply with the safety warnings indicated in this booklet.
It is imperative that this instructions booklet is kept together with the equipment for any future consultation.
If the equipment is sold or transferred to another person, make sure that the booklet is also supplied so that the new user can be made aware of the hood's operation and relative warnings.
After the stainless steel hood has been installed, it will need to be cleaned to remove any residues remaining from the protection adhesive as well as any grease and oil stains which, if not removed, can cause irreversible damage to the hood surface. To properly clean the unit, the manufacturer recommends using the supplied moist wipes, which are also available sold separately.
Insist on original spare parts.
INTENDED USE
The equipment is solely intended to be used to extract fumes generated from cooking food in non-professional domestic kitchens: any other use is improper. Improper use can cause damage to persons, things, pets and exempts the Manufacturer from any liability.
The equipment can be used by children over the age of 8 and by persons with reduced physical, sensory and mental abilities, or with no experience or knowledge, as long as they do so under supervision or after having received relative instructions regarding safe use of the equipment and understanding of the dangers connected to it.
Children are not to play with the equipment. Cleaning and maintenance by the user must not be carried out by children without supervision.
USE AND CLEANING WARNINGS
Before cleaning or carrying out maintenance operations, disconnect the equipment by removing the plug or switching off the main switch.
Do not use the hood with wet hands or bare feet.
Always check that all electrical parts (lights, extractor fan) are off when the equipment is not being used.

Do not rest objects on top of the motorised fins.
The maximum overall weight of any objects placed or hung (if applicable) on the hood must not exceed 1.5Kg .
Always supervise the cooking process during the use of deep-fryers: Overheated oil can catch fire.
Do not leave open, unattended flames under the hood.
Do not prepare food over an open flame under the hood.
Never use the hood without the metal anti-grease filters: in this case, grease and dirt will deposit in the equipment and compromise its operation.
Accessible parts of the hood can be hot when used at the same time as the cooking appliances.
Do not carry out any cleaning operations when parts of the hood are still hot.
There can be a risk of fire if cleaning is not carried out according to the instructions and products indicated in this booklet.
Disconnect the main switch when the equipment is not used for long periods of time.
If other appliances that use gas or other fuels are being used at the same time (boiler, stove, fireplaces, etc.), make sure the room where the fumes are discharged is well-ventilated, in compliance with the local regulations.
INSTALLATION
only intended for qualified personnel

Before installing the hood, carefully read the chapter 'SAFETY INSTRUCTIONS AND WARNINGS:
TECHNICAL FEATURES
The technical specifications are exhibited on the labels located inside the hood.
POSITIONING
Do not install the hood outdoors and do not expose it to outdoor environment (rain, wind, etc.).
ELECTRICAL CONNECTION
(only intended for qualified personnel)

Disconnect the equipment from electrical mains power supply before carrying out any operations on the hood.
Ensure that the wires inside the hood are not disconnected or cut: in the event of damage, contact your nearest Servicing Department. Refer to qualified personnel for electrical connections.
Connection must be carried out in compliance with the provisions of law in force.
Before connecting the hood to the electrical mains power supply, check that:
- voltage supply corresponds with what is reported on the data plate located inside the hood;
- the electrical system is compliant and can withstand the load (see the technical specifications located inside the hood);
- the power supply plug and cable do not come into contact with temperatures exceeding 70^ ;
- the power supply system is effectively and properly connected to earth in compliance with regulations in force;
- the socket used to connect the hood is within reach.
In case of:
- devices fitted with cables without a plug: the type of plug to use is a "standardised" one. The wires must be connected as follows: yellow-green for earthing, blue for neutral and brown for the phase. The plug must be connected to an adequate safety socket.
- fixed equipment not provided with a power supply cable and plug, or any other device that ensures disconnection from the electrical mains, with an opening gap of the contacts that enables total disconnection in overvoltage category III conditions.
said disconnection devices must be provided in the mains power supply in compliance with installation regulations.
The yellow/green earth cable must not be cut off by the switch.
The Manufacturer declines all responsibility for failure to comply with the safety regulations.
FUMES DISCHARGE
EXTERNAL EXHAUST HOOD (SUCTION)
In this version the fumes and vapours are discharged outside through the exhaust pipe.
To this end, the hood outlet fitting must be connected via a pipe, to an external output.
The outlet pipe must have:
- a diameter not less than that of the hood fitting.
- a slight slope downwards (drop) in the horizontal sections to prevent condensation from flowing back into the motor.
the minimum required number of bends.
the minimum required length to avoid vibrations and reduce the suction performance of the hood.
You are required to insulate the pipes if it passes through cold environments. In the presence of motors with 800m3/h or higher, a check valve is present to prevent external air flowing back.
Deviation for Germany:
when the kitchen hood is used at the same time as appliances that are powered by energy other than electricity, the negative pressure in the room must not exceed 4 Pa (4 x 10⁻⁵ bar).
HOOD WITH INTERNAL RECIRCULATION (FILTERING)

In this model, the air passes through the charcoal filters (optional) to be purified and recycled in the environment. For assembly, see the instructions.
ASSEMBLY INSTRUCTIONS
only intended for qualified personnel

The hood can be installed in various configurations.
The generic assembly steps apply to all installations; for each case, follow the specific steps provided for the required installation.
OPERATION
WHEN TO TURN ON THE HOOD?
Switch on the hood at least one minute before starting to cook to direct fumes and vapours towards the suction surface.
After cooking, leave the hood operating until complete extraction of all vapours and odours. By means of the Timer function, it is possible to set auto switch-off function which will allow the hood to turn off automatically after 15 minutes of operation.
WHICH SPEED IS TO BE SELECTED?
speed (1-3): maintains the circulation of clean air with low electricity consumption.
speed (4-5): normal conditions of use.
speed (6-7): presence of strong odours and vapours.
speed (8-P): rapid disposal of odours and vapours.
WHEN SHOULD THE FILTERS BE WASHED OR REPLACED?
The metal filters must be cleaned every 30 hours of operation. The active carbon filters must be replaced every 3-4 months, depending on the use of the hood.
For further details see the "MAINTENANCE" chap.
| ① - 9 + L Hood switch ON/OFF | |
| ① | ON/OFF Hood switch ON/OFF |
| + | Speed increase from 1 to...9 (up to "P"). Speed "P": active only for a few minutes, then speed 9. |
| — | Speed decrease from P to 1. |
| L | With hood active (short pulse): TIMER (flashing red LED) Automatic switch-off after 15 min. The function is disabled (red LED OFF) if: - The motor is switched off (button ① - Press the TIMER button ②. |
| With the hood OFF (long pulse 4s): opening the fins for hood and metal filter maintenance ③. | |
| Hold down the key for 4 seconds to exit maintenance mode. | |
| FAT METAL FILTER ALARM Maintenance after about 30 hours' use. Press button ④ 5 seconds to reset the counter. | |
| CARBON.ZEO FILTER ALARM Maintenance after about 2000 hours' use. Press button ⑤ 5 seconds to reset the counter. | |
| To activate the alarm: With the hood OFF, press the buttons + and - for 3 se- conds. The LED lights up. Confirm with button + |
MAINTENANCE

Before cleaning or carrying out maintenance operations, disconnect the equipment by removing the plug or switching off the main switch.
Do not use detergents containing abrasive, acidic or corrosive substances or abrasive cloths.
Regular maintenance guarantees proper operation and performance over time. Special attention is to be paid to the metal anti-grease filters: frequent cleaning of the filters and their supports ensures that no flammable grease is accumulated.
CLEANING OF EXTERNAL SURFACES
You are advised to clean the external surfaces of the hood at least once every 15 days to prevent oily substances and grease from sticking to them. To clean the brushed stainless steel hood, the Manufacturer recommends using "Magic Steel" wipes.
Alternatively and for all the other types of surfaces, it can be cleaned using a damp cloth, slightly moistened with mild, liquid detergent or denatured alcohol. Complete cleaning by rinsing well and drying with soft cloths.

Do not use too much moisture or water around the push button control panel and lighting devices in order to prevent humidity from reaching electronic parts.
The glass panels can only be cleaned with specific, non-corrosive or non-abrasive detergents using a soft cloth.

Do not wash the flaps in a dishwasher.
The Manufacturer declines all responsibility for failure to comply with these instructions.
CLEANING OF INTERNAL SURFACES

Do not clean electrical parts, or parts related to the motor inside the hood, with liquids or solvents.
For the internal metal parts, see the previous paragraph.
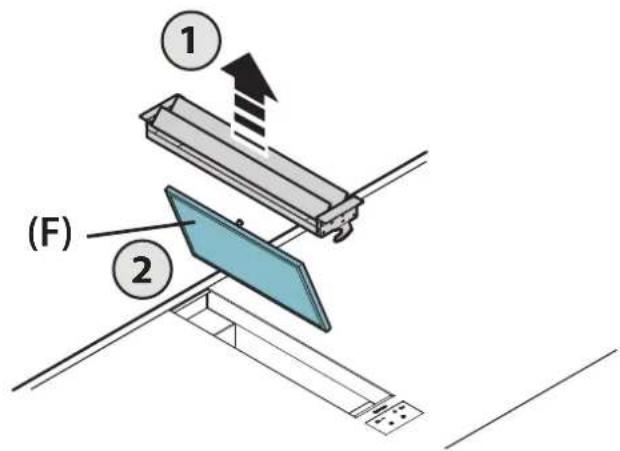
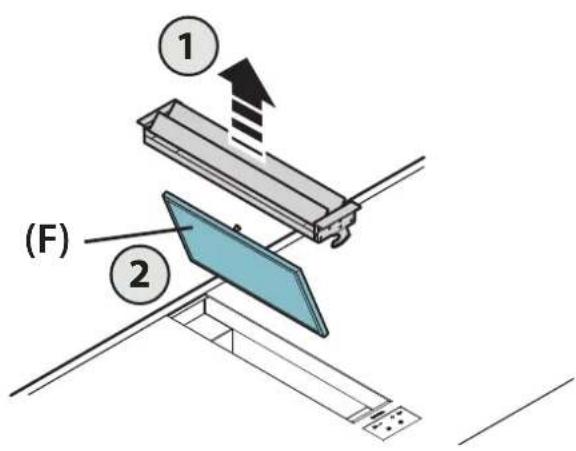
METAL ANTI-GREASE FILTERS
It is advised to frequently wash the metal filters (F) (at least once a month) leaving them to soak in boiling water and cleaning solution for 1 hour, taking care not to bend them.
Do not use corrosive, acid or alkaline detergents.
Rinse them well and wait for them to be completely dry before reassembling them.
Washing in a dishwasher is permitted, however, it may cause the filter material to darken to reduce the possibility of this problem from happening, use low-temperature washes (55°C max.).
To extract and insert the metal anti-grease filters see the assembly instructions.
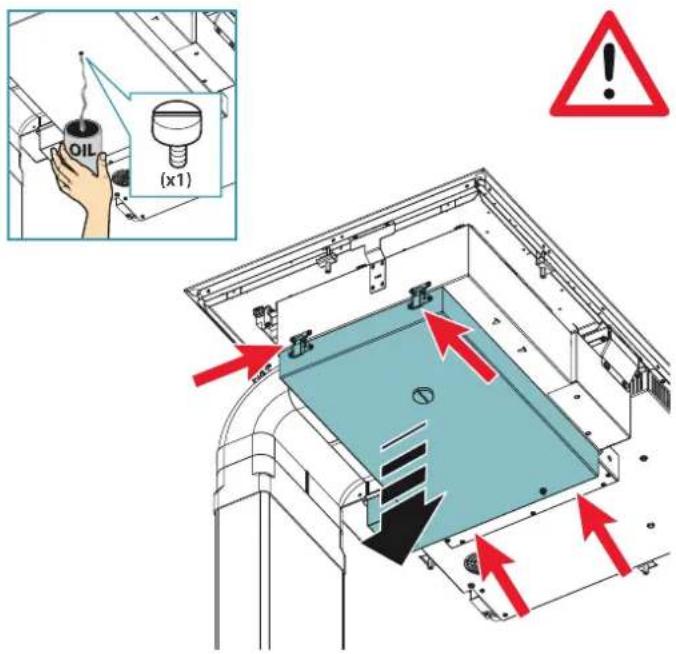
CARBON-ZEO FILTERS
Under normal conditions, they should be regenerated every 18 months and replaced after 3 years. To regenerate the filter, follow the following procedure:
- Remove the filter as described in the instructions (Fig. 12).
- Insert filters A, B and C (if any) in a domestic oven at 200^ for about 2 hours.
- When the filter has cooled down, refit the 4 filters onto the metal structure of the filter.
GREASE DRIP TRAY
It is advisable to clean the tray once a month.
Do not use corrosive, acid or alkaline detergents.
For more thorough cleaning, remove the oil collection tray (see figure) and wash it with hot water and washing up liquid. Rinse it well and wait for it to be completely dry before reassembling it. They are dishwasher safe.

DISPOSAL AFTER END OF USEFUL LIFE

The crossed-out trash or refuse bin symbol on the appliance means that the product is WEEE, i.e. "Waste electrical and electronic equipment", accordingly it must not be disposed of with regular unsort
ed waste (i.e. with "mixed household waste"), but it must be disposed of separately so that it can undergo specific processing for its re-use, or a specific treatment, to remove and safely dispose of any substances that may be harmful to the environment and remove the raw materials that can be recycled. Proper disposal of these products contributes to saving valuable resources and avoid potential negative effects on personal health and the environment, which may be caused by inappropriate disposal of waste.
You are kindly asked to contact your local authorities for further information regarding the designated waste collection points nearest to you. Penalties for improper disposal of such waste can be applied in compliance with national regulations.
INFORMATION ON DISPOSAL IN EUROPEAN UNION COUNTRIES
The EU WEEE Directive was implemented differently in each country, accordingly, if you wish to dispose of this appliance we suggest contacting your local authorities or dealer to find out what the correct method of disposal is.
INFORMATION ON DISPOSAL IN NON-EUROPEAN UNION COUNTRIES
The crossed-out trash or refuse bin symbol is only valid in the European Union: if you wish to dispose of this appliance in other countries, we suggest contacting your local authorities or dealer to find out what the correct method of disposal is.

WARNING!
The Manufacturer reserves the right to make changes to the equipment at any time and without prior notice. Printing, translation and reproduction, even partial, of this manual are bound by the Manufacturer's authorisation.
Technical information, graphic representations and specifications in this manual are for information purposes and cannot be divulged.
This manual is written in Italian. The Manufacturer is not responsible for any transcription or translation errors.
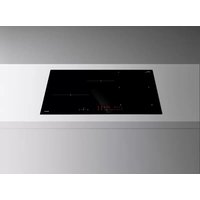
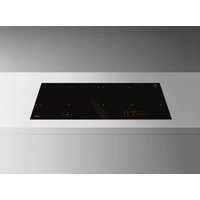
Induction 2Z

SAFETY INSTRUCTIONS ANDWARNINGS
These warnings have been drawn up for your personal safety and those of others. You are therefore kindly asked to read the booklet carefully in its entirety before using or cleaning the equipment.
The Manufacturer declines all responsibility for any damage caused directly, or indirectly, to persons, things and pets as a consequence of failing to comply with the safety warnings indicated in this booklet.
It is imperative that this instructions booklet is kept together with the equipment for any future consultation.

Intended use
- This cooker is intended to be used in domestic environments to prepare and keep dishes warm.
- Do not install the cooker outdoors and do not expose it to outdoor environment (rain, wind, etc.).
- Any other use is not admitted.
- The equipment can be used by children over the age of 8 and by persons with reduced physical, sensory and mental abilities, or with no experience or knowledge, as long as they do so under supervision or after having received relative instructions regarding safe use of the equipment and understanding of the dangers connected to it. Children are not to play with the equipment. Cleaning and maintenance by the user must not be carried out by children without supervision.
- Do not leave the cook top unmanned while it is working.

Danger of burns
- Use the control lock to avoid that unauthorised people can switch on the appliance by themselves.
- Place handles of frying pans and saucepans in a way that children cannot touch them.
- Switch off the cooking areas after use.
- Do not place any metal object on cooking areas that are on.

Technical safety
- Installation operations are to be carried out by skilled and qualified installers in accordance with the instructions in this booklet and in compliance with the regulations in force.
If the power cable or other components are damaged, the cook top shall NOT be used: disconnect the cooker from the power supply and contact the Dealer or an authorised Servicing Department for repairs.
Do not modify the electrical, mechanical or functional structure of the equipment.
Do not personally try to carry out repairs or replacements. Interventions carried out by incompetent and unauthorised persons can cause serious damage to the unit or physical and personal harm, not covered by the Manufacturer's warranty.
- Before installing the cooker, check the integrity and function of each part. Should anomalies be noted, do not proceed with installation and contact the Dealer.

The electrical system to which the cooker is to be connected must be in accordance with local standards and supplied with earthed connection in compliance with safety regulations in the country of use. It must also comply with European standards regarding radio anticlock properties.
- The connection data (voltage and frequency) shown on the data plate of the cooker must match with those of the electric network.
Compare these data before connection. In case of doubts, refer to an electrician. - Do not use the cooker before installing it.
- It is forbidden to use the cooktop on moving equipment.
- Never open the case of the appliance.
- Falmec assures the compliance with the safety standards with original spare parts only.
- The appliance is not intended for use with external timer or remote control.
USEWARNINGS

- Before powering the appliance for the first time, remove any protective films and adhesives.
While using, saucepans and kitchenware can cause noise that can depend on:
- a high power level.
-
different materials of the bottom of saucepans.
-
Never use water to put fire out. Deactivate the cooking area. Choke flames with a cover, a fireproofing blanket or something similar to it.
- Do not keep inflammable objects in the drawers below the cooker. The cutlery tray shall be made up of fire-resistant material.
- Do not heat empty saucepans or frying pans and always check that saucepans have a minimum quantity of liquids inside.
- Switch off the cooker after use.
- Continuously check the cooking in case of greases and oils used, as they can easily catch fire.
- Heat greases and oils at maximum for one minute and never use the Booster function.
- Pay attention not to burn yourself during and after using the device.
- Make sure that no fixed or mobile power cable of the device is in contact with the glass or a hot frying pan.
- Do not use the cooker to heat pots.
- Do not apply any type of cover on the cooktop.
- Electrical cables are not to be in contact with the cooker.
It is recommended to protect hands from heat using pot holders. Only use dry gloves or pot holders. - Only use saucepans and frying pans with a smooth and magnetic bottom.
-
Avoid that sugar, synthetic materials of aluminium, films are in contact with the hot areas. During cooling, those substances can cause cracks or other alterations on the pyroceram surface: switch off the device and immediately remove from the cooking area that is still hot
-
Move kitchenware by lifting it so as not to scrape the surface of the cooker.
- Saucepans and cooker are to be perfectly cleaned before being in contact.
- Do not let objects fall down and do not put any object on it!
Only use saucepans with magnetic bottom. Other materials are not admitted. - Use saucepans of appropriate size to the desired cooking area.
Always use a saucepan or frying pan on each cooking area, even with the BRIDGE function. - Never put on sensor keys and lamps. Hot kitchenware on sensor keys and lamps can damage the electronics.
Keep controls and lamps always clean.
- Pacemaker warning:
For users who have a pacemaker, the magnetic field can affect its operation. It is recommended to refer to the dealer or to a doctor.
- Credit cards, pocket calculators, etc. are not to be in immediate proximity to a cooker switched on.
- Do no keep metal objects directly below the cooker.
- Possibly use always covers to avoid heat dispersion.
Cook with little water.
After starting grilling or cooking dishes bring the power level to a lower one.
SAFETY DEVICES ON THE COOKER
Safety shutdown
If a cooking area exceeds the maximum time for operation at the same power, it is automatically switched off and the indication of the residual heat is shown. To reset the cooking area, touch the necessary keys.
| Power level | 1 | low | 2 | 3 | 4 | 5 | 6 | 7 | 8 | 9 | P | ||||
| Maximum duration of operation in hours | 8.7 | 2.0 | 8.7 | 6.7 | 5.3 | 4.3 | 3.5 | 2.8 | 2.3 | 1.9 | 1.5 |
The cooker switches off automatically if one or more controls stay covered for more than 10 seconds.
To restore the proper operation:
- remove all objects from the control panel.
clean the control panel. - restart the cooker and the concerned area.
Overheating device
Before items of the cooker can overheat, the control reduces the used power by following this procedure for protection measures:
- Deactivation of booster and power booster if turned on.
- Reduction of the power level set.
- Shutdown of the cooking area concerned.
On the display of the cooking area the message "E2" is displayed.
It is possible to restore the cooking area when the default message is off.
ELECTRICAL SAFETY
The electrical system to which the cooker is to be connected must be in accordance with local standards and supplied with earthed connection in compliance with safety regulations in the country of use. It must also comply with European standards regarding radio antistatic properties.
Make sure that it can't be possible to touch the power cable of the cooker after it has been built-in and that it is not subject to mechanical stress.
The socket used to connect the installed equipment to the electrical power supply must be within reach: otherwise, install a mains switch to disconnect the hood when required.
Any changes to the electrical system must be carried out by a qualified electrician.
Do not try to solve the problem yourself in the event of equipment malfunction, but contact the Dealer or an authorised Servicing Department for repairs.
When installing the cooker, disconnect the equipment by removing the plug or switching off the main switch.
ELECTRICAL CONNECTION
(only intended for qualified personnel)

Disconnect the equipment from mains power network before carrying out any operation on the cooker.
Make sure that electric wires inside the cooker are not discon
nected or cut:
in the event of damage, contact your nearest Servicing Department.
Refer to qualified personnel for electrical connections.
Connection must be carried out in compliance with the provisions of law in force.
Before connecting the cooker to the mains power network, check that:
- the mains voltage corresponds with the voltage indicated on the data plate located inside the cooker;
- the electrical system is compliant and can withstand the load (see the technical specifications located inside the cooker);
- the power supply plug and cable do not come into contact with temperatures exceeding 70^ ;
- the power supply system is effectively and properly connected to earth in compliance with regulations in force.
- the socket used to connect the cooker is within reach.
In case of:
- devices fitted with cables without a plug: the type of plug to use is a "standardised" one. The wires must be connected as follows: yellow-green for earth thing, blue for neutral and brown for the phase. The plug must be connected to an adequate safety socket.
- fixed equipment not provided with a power supply cable and plug, or any other device that ensures disconnection from the electrical mains, with an opening gap of the contacts that enables total disconnection in overvoltage category III conditions.
Said disconnection devices must be provided in the mains power supply in compliance with installation regulations.
The yellow/green earth cable must not be cut off by the switch.
The Manufacturer declines all responsibility for failure to comply with the safety regulations.
Connection of the cooker:
| network Connection | Cable section Power cable | Switch gauge |
| 230V~50/60Hz | Single-phase + N | H 05 VV - F H 05 RR - F |
- calculated with the contemporary factor in compliance with EN 60 335-2-6.
POWER:
| Feature | INDUCTION 2Z |
| Total power 3500W | |
| Front position | |
| Rated power 1600W | |
| Booster power 1850W | |
| Back position | |
| Rated power 2100W | |
| Booster power (1/2) 2100/3000W |
| INDUCTION 2Z | ■ | □ | - + | ① | □ |
| Control description | |
| ① | Cooker top ON/OFF. In case no other control is enabled, the cooker switches off automatically after a few seconds |
| ■□ | Selection of the front cooking area. If pressed together with □ it enables the BRIDGE function. |
| □■ | Selection of the back cooking area. If pressed together with i■hables the BRIDGE function. |
| ☐ | Control block: pressed for more than 2 seconds it inhibits all controls. To release controls, repeat the operation. |
| + | Increase of the power level for cooking and booster selection, or increase of cooking time of the TIMER function. |
| — | Decrease of the power level for cooking and booster selection, or decrease of cooking time of the TIMER function. |
| Display display description | |
| Cooking area in stand-by | |
| 1......9 | Levels of power from the lowest to the highest one, which can be selected pressing the keys + and - |
| P | Power boost : 85% of the cooking power |
| P+H(right display only) | Power boost : 100% of the cooking power |
| H | Indication of the residual heat |
| Level of power between 0 and 1, suitable to keep dishes warm | |
| Bridge function enabled (min Ø230mm). | |
| Saucepan not on the cooker or not suitable for material and size (min Ø120mm). | |
| +O(on central display) | Control block function enabled. |
OPERATION AND USE OF THE COOKTOP
When a cooking area is turned on, the bottom of the saucepan heats. The cooking area only heats thanks to the heat given by the saucepan. The cooktop automatically detects the size of the saucepan. The heating power is to be chosen based on what shall be cooked. Please find below a short table:
SETTING AREAS
| 1-2 | Melt Heat | Sauces, butter, chocolate, gelatine Precooked dishes |
| 2-3 | Whisk Defrost | Rice, pudding and cooked dishes Vegetables,fish,frozen food |
| 3-4 | Steam Vegetables,fish,meat | |
| 4-5 | Boil | Boiled potatoes,soups,pasta Fresh vegetables |
| 6-7 | Cook over a low heat | Meat,liver,eggs,sausages Goulash,rolate,tripe |
| 7-8 | Cook Fry | Potatoes,donuts,cakes |
| 9 | Fry,bring to the boil | Steaks, omelettes Boil |
| P | Fry,bring to the boil | Bring to the boil big quantities of water |
Remark: heating time of cooktops is shorter than the gas cookers.
BRIDGE FUNCTION
This function allows for the simultaneous operation of the 2 cooking areas
To enable:
- Enable the cooktop;
press simultaneously the symbols +
-
the symbol will be displayed on the screen of the front cooking area;
-
Push the keys + and - to set power.
DEACTIVATION of the BRIDGE function:
press simultaneously the symbols +
BOOSTER FUNCTION
The Booster strengthens power, so that big quantities can be heated (e.g. water to cook pasta).
This power increase is enabled for max. 10 minutes.
- Turn on the cooker;
- select the cooking area;
- touch (+) until on the screen is displayed on the back cooking area.
Booster Activation
For the back cooking area, it is possible to enable a double booster:
- touch the key (+) until is displayed the symbol P_+ .
KEEP WARM FUNCTION
42^ - Keeping temperature of cooked dishes:
Turn on the cooker;
Select the cooking area;
Touch the key (+) : the symbol is displayed
Shutdown of the cooker
To shutdown the cooking area:
Touch the key (-) until 0 is displayed on the screen of the cooking area.
If the cooking area is still too hot, the residual heat is specified.
Turn off the cooker
Touch the key all cooking areas are deactivated.
On the display of the cooking areas that are still too hot, the symbol is displayed H.

Do not touch the cooking areas until the lamp is on.
TIMER FUNCTION AND AUTOMATIC SHUTDOWN
The timer has two functions:
1-TIMER;
2 - AUTOMATIC SHUTDOWN of one or more cooking areas.
It is possible to set the duration up to 99 minutes.
Once the time set is over, on the display regarding time 00 is shown and a sound warning is activated that can be deactivated pushing keys (+) or (-) .
TIMER
Timer can be used with the cooker being on and off.
To set:
- Press simultaneously the keys (+) and (-).
(on the premium version the lamp is on
- Set the desired time touching keys (+) and (-) .
Timer starts passing.
To modify time repeat the procedure from point 1.
To cancel timer:
- Press simultaneously the keys (+) and (-).
(on the premium version the lamp is on 心
- Touch the key (-) to bring time to 00.
AUTOMATIC SHUTDOWN
For the automatic shutdown function:
1 - turn on the cooker;
2 - select the cooking area;
3 - select the level;
4 - set the timer as described above.
To set the automatic shutdown for another cooking area, repeat the procedure from point 2.
TIMER and AUTOMATIC SHUTDOWN can be used simultaneously.
The cooker or cooking areas do not turn on:
- The cooker is not connected to the electric network.
The protection fuse is released. - Check if the block is not active.
- Keys are covered with water or grease.
An object is placed on the keys.
The symbol is displayed
- There is no saucepan on the cooking area.
The container used is not compatible with cooktops. - The diameter of the saucepan bottom is too small compared to the cooking area.
The symbol [E] is displayed:
- Disconnect and connect the cooker.
- Contact the after-sales centre.
One of the area or the entire cooker turns off:
- The safety overheating system is active;
- The cooker or one cooking area remains on for too long;
one or more keys are covered; - one of the saucepans is empty and the bottom overheated.
The fan keeps on working after the cooker shutdown:
- This is not a malfunction: the fan keeps on protecting the electronic power unit of the device.
The fan stops automatically.
The symbol [E2] or [EH] is displayed:
- The cooker overheated, leave it cool and then turn it on again.
The symbol [E6] is displayed:
- Defective electrical network. Check the network voltage and frequency.
The symbol [E8] is displayed:
The air inlet of the fan is clogged, clean it.
CLEANING AND MAINTENANCE instructions

ATTENTION!
For cleaning, never use a steam equipment.
Before cleaning the cooker, make sure that it is at room temperature. Always clean the cooker after each use with a specific cleanser for pyroceram.
Do not use products containing:
- corrosive agents (soda, acids, ammoniac).
- abrasive agents (dusts or paste).
Do not use pointed or abrasive objects.
After cleaning, dry the appliance with a soft cloth.
If the appliance is built-in over an oven or an electric kitchen fitted with pyrolytic system do not operate it while the pyrolytic procedure is under way, as the overheating protection of the cooker can be released (see relevant chapter).
FILTRES AU CHARBON-ZÉOLITE
Ipn 6nHApUxKeHH DeΦeKToB BHeuHero BnDa HE yctaHaBnBaTb BbITkKy; yIOXHTb ee B nCXoHny OyakOB-Ky I 6paTnTbC K DnCTpN6bIoTepy.
No 3aBepweHn yCTaHOBKn He npHHMaIOTc npTeH3nn no deeKtam BHeuHero Bnda.
Bo Bpem yctaHOBN CneNyET Bcerda NOJb3OBAtbcr CpndTBAMN INHINBUNyAInbHOIN 3aunTb (HaNPmep, 3aunTHa OByB) IN PPOBJIaTb OCTOPOXHOCTb NOCMOTPnTEbHOCTb.
KOMnJIeKT KpeNexHbIX DeTanei (BnHTbl, IIO6en), NOCTaBnIeMbI C BbITJXKOI, MOXHO NcPONb3OBaTb NCKIouHTeNbHO Ha KIpNnUHbIX cTeHax. B cnyae YCTaHOBKn Ha CTeHbI N3 dpyrnx MaTePnaIIOB, CneDyET PpINrTb BO BHIMAHHe dpyrnie KpeNexHbIE CNCTeMbI C yUeTOM IpOuHOCtN CTeHbI N BECa BbITJXKN (Yka3aHO Ha cTp.2).
CneNyET yuHTbIBaTb, YTO yCTaHOBKa C NcNOJb3OBAHNem KpeNEXHBIX CNCTEM OTnUHbIX OT NOCTaBnREMbIX INI He COOTBeTCTByUOxN Ha3HaueHIO, MoKeT pINBecTI K ONaCHOCTN 3JIeKTPnueCKORo XapaKTePa IN MeXaHNUeCKO HAdEHHOCTN.
He yctaHaBnBaTb BbITkky BHe NOMEeHn IN MeCTax, rIe OHa NOBeprAnac 6bl BO3JeNCTBnO aTMOC- ephbx JABeHn (doxNb, BeTeP n T.d.).
3NEKTPUeCKA B3OJACHOCTb
3neKtpocnCTema, K KOtOpoi NOkKnIOuaeTcB BbITJXKA, DOnXHa COOTBeTCTBOBaTb DeIcTBYIOuM HopMaM N DOxHa 6bITb 3a3emNeHa B COOTBeTCTBNN C Tpe6oBaHnA M HOpM, DeIcTBYIOuNX B CTpaHe EKcnnyatau; OHa TaKxe DOnXHa COOTBeTCTBOBaTb Tpe6oBaHnM EBpOeNCKnx HOpM No IpOTNBONOMExOBblm yCTPOINCTBaM.
Y6eINbC, YTO HAnpJKeHne B 3NeKTpocetu COOTBeCTByeT yKa3aHHOMy Ha 3aBOJcKO TaBnUke, KOtOpaHaxOJTcR BHYTpN BbITAKKn.
Po3eKa, nCNoJIb3yEmaJnI NOcOeINHeHnK Cetn 3NeKtPOnNTAHn, DOnXHa 6bITb IerKOoOCTynHa npu yctahOBHeHOM o6OpUdoBaan. B npOTnbHom cnyae Heo6xOdmo IpeDyCMOTpeTb B DOCTynHom Me- tTe rAIBhB bIKNIOATEJB dIg OTKnIOueHnBBiTaKKn Ipn BO3HnKHOBeHn TaKoHcOxOIMOCTn.
IIObIe N3MeHEnHa 3JIeKTPoCnCTeMb IOnJKeH BbINONHrTb TOJIbKO KBaIIuΦNUPOBaHHbI 3JIeKTPnK.
MaKcImaIbHaA DnHa BnHTa IJa KpeJIeHnB bItJxKn (IOCTaBnReTc npOn3BOIDTeIem) COCTaBnReT 13 MM. NcNoJIb3OBaHHe BnHTOB, He COOTBeTCTByUOxN HAcTOrIIM NHCTpyKuIam, MoXeT npINBeCTN K OnacHOCTn 3JIeKTPnueCKOrO XapaKTepa.
B cnyuae HencnpaBHOCTn npnbopa He cneNyet nbTaTbcaMoCTOReTbHO yCTpaHNTb HeNCnpaBHOCTb, HEO6XoIMMO CB8aTbCn C nCTpN6bIOTepOM nIN aBTOPn3OBaHHbIM ceHTpOM TexHNueCKo NODePKn IJRAero pemOHTA.
Bo Bpemr yctaHOBKn BbITJxKn CneDyET OTKIO- uHTb np6Op,doCTAB BnIky n3 po3eTK nnn BOCNoB30BaBwncB rAaBbIM BbIKIOuAteJeM.
BE3OPIACHOCTb OTBODA DbIMOB
He noKIOaTb annapat K nbIMoOTbOam nIy OTBOda dbIMOB, NOyueHHbIX B pe3yJIbTaTe cropaHnra (KOTNOB, KaMHHOB n T.D.).
Ipepe yctahOBKO BbITJXKn CNeJyET y6eNTbcra,TO CO6JIIOJeHb BCE Tpe6oBaHn IeCTByUOxN HOPM IO BBBOy BO3dyxa 3a IpeJebl NOMeueHn.
MEPbI PPEIOCTOPOXHOCTNДЯ NOJIb3OBATEJIa
3TN MepbI npedocopoxHOCTn COCTaBHeHb Iy Baue 6e3oNaCHOCTn, a TaKke Iy 6e3oNaCHOCTn DpyuNX Niu, NO3TOMy Ipocm BAC IN X BHIMATEJbHO IpOueCbI nepeD EKcNpyatauNe HN OuycTKoI np6opa.
U3ROTOBtJIb He HecET HnKaKo OTBeTCTBeHHOCTn 3a yuepe6, npAOM Nn KocBHeHbI, HaHecEHHbI NIOJAM, NmUeCTBy Nn DomaunHM XNBOThbIM NO pnpuHHe HecO6NIODeHn PpeDncaHn, Yka3aHHbIX B HactoI- uem pyKOBOdCTBe.
Baxho, yTo6bI daHoe pyKOBOcTBO c HCTpyKUAMn XpaHIOocB BmecTe C obOpyObaHem dIe NocJeyo- Uero oBaueHn K Hemy npn Heo6xOIMOCtN.
B cnyuae npoajn nnn nepeaun annapata pyromy niuuy, ybeuNbCra, yTO nepeaetcra TaKke n pyKOBOCTBO, uTObI HObI NOJIb3OBaTeJIb MOr O3HaKOMNTcR C fYHKUHOHPOBaHmEBbITAKKN N COOTBETCTBYUHN MnpedynpeJxdeHnMn.
NocIe yCTaHOBKN BbITAKKn I3 H/K CTaJI, Heo6XoIMO OUHCTNTb eEOT OCTaTKOB KIER 3aunTHORO NOKpbITNA IN BO3MOxHBIX PATeH Macna nn Cma3Kn. EcnHe ydaNTb IN, OHMOrT HENOpPABIMO NOBpeDITb NOBepXHOCTb BbITAKK.NJRA 3TOI ONepaCIN N3rTOBOTEnb peKOMeHN dyET NOnb3OBaTbCnCaFETKaMn IN3 KOMnKeTaNOCTaBKN, KOtOpBte TaKke IMeKOTCB INpOdaXe.
Tpe6oBaTb opuHnHaBHe 3aHactn.
HA3HAUHNE
Pnp60 npedHa3HaeH NcknOHTeJbHO nB BbITAKN DbIMOB, 6pb3yUoXxC npn npiroTOBHeHH NnB DOMaunx ycNoBnx, He B npoccecoHaIbHo cpeJe. IIO6oe dpyroep npimeHenE, OTnueHoe ot 3Toro, RBAETCA HeOnyCTmblM, OHO MOKeT HaHeCTn yUep6 IIOdAM, mMyecTBv NDOMaUNM XINBOTbIM, IN CHImaet Cn3ROTOBtEnRA BCkyo OTBeTCTBeHHOCTb.
Pn6opom MoryT NOIb3OBAbCra DeTn He MnaIWe 8-Mn IeTheRo BO3pacta, IIOIN C OrpaHnueHHbIMN n3NueCKIMN, yMCTBeHHbIMN IINI CEHCOPHbIMN BO3MOXHOCTAMN, HeONbITbIE IINI He O6NaJauUne HeO6XoDNMbIMN 3HaHnAIMN IIOIN, PnYcNOBn, YTO HxOJaTcN IO npNCmOTpOM IINI NocJIe CNeuJaNbHOro O6yHeHnNo 6e3OnaChOMy NCnONb3OBaHnIO UcTPOINCTBa NOC3HaHnCBr3aHHbIX C 3TNM ONaCHOCTeN.
IeTN He IOnKbI INpTaB C np6Opom. OunCTky I TeXo6cnyKbHaHne, BblONHReMbI NOJb3OBaTeNem, He IOnKbI OCyUeCTBnTb DeTI 6e3 npuCMOTpa.
MEpbI INPEIOCTOPOXHOCTN IO 3KcPJIyATAUIN OUYCTKE
Ipeed BbINONHeHem IIO6oI onepaunn no 1 n TExO6cnyXuBaHNIO OTCoeHNHTb aannapat OT 3JIeKTPoNITaHnBbIHyB BNkU N3 P03ETKN N C NOMOUsI rIaNBHOrO BbIKJIOUaTeJr.
He npikacatbca K BbITaKke MOKpbIMn pykamn He NOIb3OBaTbCRe en,CTO8 6OCNkOM.
Korda np6op He nCNoB3yeTcR, Bcerda npOBepaTe, UTO BCE 3JIeKtpnueckne KOMNOHeHTbl (CBet, acnpa-Top) BbIKJIOUeHbl.

3anpeaeta KnaCTb KaKne-ln6o npedMeTbHa MexaHn3npoBaHHbIe pe6pa.
O6uN BEc npedMeTob, pa3MeueHHbIX uIN NOBWeHHbIX K BbITJXke (rIe 3TO npedyCMOTpeHO) He dONJxHn peBbIaTb 1,5 Kr.
Ha6nIpaTb 3a φpntOpHncaMBO BpemNcNoB3OBaHHa3OrpeToe MaCIO MoKET BOCnMaEHHTbcra.
He pa3xiratb OTKpbItbI OROH bN D BbITAKKO.
He roTOBNTb NIIu Hy OTKpbITOM OF He NOI BbITAKKO.
HnKoTda He NoIb3OBaTbCBA BbITXKOJ 6e3 MetaJIInuecknx XnpoUyNaBnBaIOxΦnIbTpO8; B 3Tom CnyuaeXnp I 3arP3HeHn OceAHO T npIbope, OtpuataTeNbHO Bnna Ha erOpOty.
IocTyNHbIe yactN BblTgKmMoryT HarpeBaTbcn npnNCNoJIb3OBaHmN BMeCTe C BapOuHbIMn npn6opamn.
He ouhiataBbItTAAKky, KOrdaee yactn eue He OCTblIN.
EcnOuHCTKa BbIINHReTc H Be COOTBeTCTBnC CnOCo6aMn N CnCNoJIb3OBaHnEM CpeIcTB, yKa3aHHbIX B HaCTOJIxN INCHETpyKUnx, BO3MOXeH pNCK NoJapa.
Korda BbTJkKa He NcNoIb3yETcB TeueHne dNITeJIb-Horo nepnoa BpeMeHn, HEO6xOIMo BbIKIOUHTb TnaBHbBbIKIOuAteJIb.
B Cnyae OndHOBpeMeHHoro NcNoJb3OBAHnA Dpyrnx yCTpOienTB (KOTnbI, NeuKN, KaMHbI n T.I.), pa6oTaIOxN Ha ra3y Nnn Dpyrom TOnnBe, nped YCMOTpeTb COOTBeTCTByIOUy BOHTNJaUIO NOMeueHnB, B KOTOpOM PPOUN3BOIDTCB CAcsBHaHne DbIMOB, CoTnaCHO DeIeCTByIOUHM HopMaTINHBbIM Tpe6OBAHnM.
YCTAHOBKA
pa3deI npedHa3NaueHToBko KbaIIuNpOBAHHoMy nepcoHaJy

PpeJeHem Pnctyntb KMOHTaKy BbITaKK, CJIeDyeT BHMaTeNbHo npoeCTb r. "TEXHNA BE3ONACHOCTN MEPbl IPEIOCTOPOXHOCTN;
TEXHUNCHECKHEXAPAKTEPNCNTNKI
TexHueckne daHHbe anektpnpnbopa npuBedeHb Ha aTKKax, KOtOpBHe HxOaTcBByTPn BbTAAKK.
IIO3NIOHOHPOBAHNE
HcTaHaBnBaTb BtAky BHe NmoeHn n MeCax, rOe OHa nOBepranacb 6BO3dECTBnO aMOCepHbIX ABHeHH (IOXdb, BetePnT.D).
3JEKTPUUECKOE NOJKJIOUeyHNE
(pa3dien ppeHa3nauen TOnbKO KbaHnHnnpOBaHHOMy nepcoHany)

Ipei npoBeHnem IIO6bIX OeapuHn Ha BbITaXke CneJeYET OKJIouHTb np6opOT cTeN 3NeKtpOnNTAHNA.
PpOBepeTe,TOBHTPNBtTAKKHeTOTcoeDHHbIXmnpBaHbIX npoBOOB:
B npOTUBHOM cnyuae, 6paTMEcB B 6nKaMHyO cnK6y TeXnueckoN noDepKKn.
3NeKtpnueeCKoe NOkIIOUeHne DOJXHO BbINIOHHTbC KBAINHpOBOaHHbIM NepcoHaIOM.
IopKnOueHne OJnKHO OcyuEcTBnTbC aCo6NIODeHnEM Tpe6oBaHm DeiCTByIOeero 3akoHOdaTeNbCTBA.
Ipeep nooknueHmE BtTAAKK K JNeKtpocTe, npoepebTe, qTo:
Ha npaeHneB 3eKtpocetCu COOTBeTCTByeYka3aHHOMy Ha 3aBOckO Ta6-
CETb 3NEKTPONITAHN COOTBECTBByET Tpe6OBAHNM JIeCTByOUIX HOPM M MOKeT BbIepxIMBaTb HaPy3Ky (CM.TexHueckne XapakTePcNTKN BHyTpN BblrKK);
BnIkaN Ka6eJIb 3neKPTPONTAHNA He DOnJHKb KOHTaKTPoBaTc TemInepatypamCbbie70°C;
CNTEma3NEKTPONHTAHMAOCHAUNHACNpABHBIM3aEMHEHMBCOOTBETCTBNN CJeIcTByUHMMCTAHdPTAMM
pa3bem,NCIOB0BAHHbIINHcOeHNHeHnNtKoIOCTyNEHIOCNEYCTAHOBKN BBITAKN.
B cnyuae:
- np60bpyc kabeem 6e3 pa3bema: nCnoB3yeMbypa3bem donKeH 6bTb "HopMaN3PobAHoro" TnA. PnOoDa onKHHb 6bTb coEduHeH bneDyUOM 6pb3OM: JeIIO-3eNEHb dnn 3a3eMeHHe, CNH Nn HneTpAn i KopuHEBn dnn 4a3b. Pa3bem DonKeH 6bTb noCoedInHe K noXdoJeH 3auTHOH p03ETke.
-ФИКСИРОВАНьnpибор63CINOBOROKa6BЯnpa3bemaMnDpyrOrO yCTpoIcTBA,ObecneYHBAIOUeBO3MOXHOCTbOTcoeIMHEHNAOTcETNCpACCTOHHMEMMeKJypa3OMKHHTbIMKOHTAKTAMN,ObecneYHBAIOUHMMONHoe pa3beHNHeHNEBycNOB8xIIIKaterOpnpeHapraKeHNA.
3Tn pa3bEHNHTenBHe ly cTPOJCTBa JOnKnHb 6bIb npEnyCMOTpeHb B ceTN 3NEKTPOITAHNBA COOTBETCTBN C IpaBnAmn yCTaHOBKn.
XenTo-3eHb npOBd 3aEBnEHn He donKeH OTKnIOHaTcR OTeKaIOUIM BkiOHTeEM.
H3roBntenb He HecET HnKaKoI OTBeTCTBeHHocTN B Cnyae HecobnOeHn npabN 6eOnaHcTn.
BbIOD DbIMOB
KXYOHHAR BbITXKA C BbIbODOM HAPYKy (BCACbIBAOIIA)
B ETOBepn DmMbH napbI BbBOaTcR cep3 BTHBaIOuN BO3DyXooTbOd HApKy.
IINI 10I IN BIXOHOH IATpy6OK BHTAKKIOJIKEN 6BtB COeHNHE NOCPcECTBOM Tpy6bl C HApYXbIM BixOOM.
BixoHnA Tpy6a DonxHa IMeTb.
-ДмAMETР He MeHee DMaMeTp aNaTpyKa BbITAKN.
JENKINHAKIOHNBHN3(nadeHHe)rnpoHTaIbHbXyactKOBBOH6eKaHNE NO-
MHHMAJIbHOE KOINIECTBO HEO6XOIMBIX IN3IIOB.
MIMMaBHO BO3MOKHyO DmHy Bo 36eKaHne Bnopaun N COKpaueHHBAcBbAooJe cTOOC6HOCTN BbTAKN.
Heo6xOIMO H3oInpOBaTB Tpy6y, eCNI OHa npoxoIT Ypee3 XonoHbIe NoMeueHH.
Bo 36exhaHoeBpaTa Bo3yxa ChapyxIMeTeCg 6paTHbKJanaH,yctaHOBneHH npn HauuHm DvraTene Ha 800M3/4nnn Bonee.
Omcynnneon8 nrepeMaHw
npu odnopehenho paobome 8 nomueenu kxyonho 8bimxu u dpyux npu-bopoe,pabomaiouux Ho ucmouhke 3hepuu, omnuHOM om 3neKpmo3ep2uu, ompuaenbe daene hue bmypu nomueehn He doanho npebuam4 Pa(4 x10-56ap).
BbITAXKA CBHTPEHNEPEUPKYJLUEIEN (ΦNbTPYIOUJA)

B 30T BepCN BO3DyX DnE rO OCHTK NOCTyNAETpe3
OINbTpBc AKTINBPOBAHHBM YrnnEM (ONUHOHbH) HBOB NDAeTCB NOMCUEHNC.
Ja 60pnKm. Hctpykmn
HHTPYKUNIO MOHTAXY
pa3dien npedna3auehenTbKKBaIINfUPOBaHOMy nepcoHany

BbTAKKMyOcTHaHbNtBaTbpa3nHbIX KOHpypaunx.
06uue 3tanbl MoNTaxKa DeIcTBntBhl DnB CEx TNOB yCTAHOBk; Heo6xoDmIO npUepKNaBtcb TaKke OTeNbHO yka3aHHbIX 3TANOB, COOTBetCTByOuNX HxHOMY TUNy cTaHOBNk.
ФУHKLIOHNOPBAHNE
KOTDA BKNIOUATb BBITXKY?
BbTJkKy cIeMyET BKnHcyb XOTb6b3a MHyTy DO HauHaN pInrTOBHeHn IINnn 1nO6pa3oBaHnnoTOKa BO3yxa IIN HAnpaBHeHn IbMa n Napa K BCacBbAIO- 1nOBepxHOCTn.
No 3abepeHn npiroTOBHeHn nnu cneyet OCTaBbKIOeHHo BtAky
do nnoHn acnpauHn BCex napOB n 3anXOB. Pn nmoU n yHKUm Taimepa
MOxHO yCTaHOBTb ABOMATuecKoe BIKIOeHHe BtAxxN NO nCTeHn 15
MHyT fYHKUHOHPoBaHn.
KAKYIO BblbPATb CKOPOCTb?
CKOpocTb (1-3): NOAepKINBaET BO3DyX YNCTbIM C HIN3KM NITpe6JIeHnEM 3JNEKTPo3HEpRn.
ckopoctb(4-5):obuHbIe paOohy yCNoBnA.
ckopoctb (6-7):Hannue CnBbix 3aXOB 6oBwOro KOINyecTba npob.
ckopoctb (8-P):6bICTpoe ydaeneHne 3anaXOB nnapoB.
KOTDAMbITbNIMEMHArbDINbTPbl?
MetannneckmeonbtpbHeo6xOIMO npombBaTbKaKdIe 30acobpa6oTb. ΦnBtpcbakTNBnPOBAHHbIMyHEMCNEyETaMeHHTbKaKdIe 3-4 Mecaa B3a-BNCMOCTNOTHTHEHCNBHOCTINNCNOb3OBAHNABBTBAKKN
IcnoHnTeBHa HΦcpMaua npuBeHea B rN."TEXOBCJYKBAHNE".
CEHCOPHARIaHEJIb yIPABJEHHA
OuHCTKA HAPYKhbIX NOBEPXHOCTEIN
PekomeHyetyoHApkyHyoNoBepxHocb BbTAAKKKaM MHHyM KaKdIe 15 dHBo N36exAHme ee NoBpeXdeHnN oD Bo3DeNCTBNEM MacraHbIX HIN XHPoBbX BeueCTB. JnO hNCTKn BbTAAKK NONIOPOBaHHO HEPXabeIOeem CTANI NTOBATEb peKomeHyety TNOB3OBaTbc Canfetkam "Magic Steel".
B KaueCTae aIbTePHaTnBBa TaKke IINB CEx 0ctaBbIX NOBepXHOCTe BBy TAKKN MOXHO NCIOnb3OBaTB BNaXHyO TKaHb, CMoeyHHy OHeITpaJIbHbIM KIN MIOUHN CpeCTBOM INI DeHaTpyPOBaHHbIM CInPTOM.
3aBepuNTb ONUCTKy TuaTeHbIM ONIOJACKMBAHMeM HAcyxo BbIepeTb MANKOBETOUBIO.

He nCnoB3OBAb CnHsKOM MHORO BODI pAOM c naHelenbO ynpaBleHnN OCBETeNBbIMN np6opamn BO n36exKaHne no-nadAHn Bnarn Ha 3NeKtpoHHbe DeTann.
OHTKTAeKINHbixNaHeJEnBbIIOHARETCHTONBKO CNCIOIB3OBaHMeCTIEUNAHLbIXHEKOPP3MOHHbIXnA6p3MBHbIXMOUHXcpeCTB MANKOBeTOWII.

HeMbItbKpbIbB NocydoMoEeHNoMaunHe.
V3rTOBnTeIb He HecetOTBeCTBeHHocTm PnHecobKdEHNnHaHbXnHCTpykU.
OCHCTKA BHYTPEHNX NOBEPXHOCTEIN

3anpeaaetca nCTMB 3nKTPnuueckne KOMNHOHTbI Nnn qactn DBnraTeBn BHTPN BbTTKK CNCIOJIb3OBAHmE MKNKOCTe Nnnpactbopntene. OuyNTKa BHyTPeHHnx MetaIIuuecknx qacteonncAha B npdebyuem Naparpafe.
METAJINHECKNEXHPOYJABJNAIOUOUEΦNJIBTPbI
PekomeHcyTcAactoMbIbMetaJIueckneΦnIbtpf(F)(HeMeHeepa3aBMe- 3aMauHBAHXPiu6BmTeJIbHO B TeueHene1 Yaca BOeHbTopaeyBoede co CpeCTBOMIIBaMbIbNocyD,CTaparCb He CrnbTpB.
He nOolb30BaTb Koppo30HbIbe,KnOToHbIe NmN IeNoCHbIe MOUHcpeDCTBa. TuaTeNbHO OIOIOChyT b IOKdTaBcR, NOKa OHN NIOHOCbKO BHCoxHyT, IpexJe CEM YCTaHABINBaTb IV HA MecTO.
Pa3pe7aeeTcMbTbFmbltpBnocyDmoeHHO MaWHe,HO 30 To MoKet PnBaE cN TIOTEMHEHNO MATEpnaIa FmbltpoB.HTO6bYMeHbWnt EIN NOCTEbn HcONNo3BaTbMoHne NporpammbC Hn3KO Temnepatypo (MaKcMym55°C). NViBeHeNeu yCTAHOBA MeTTAAeCKnx XJPOyUABnBAooXx FmbltpoB ONCAHA B VHCTpykLHX No yCTAHOBKE.
YTOJIbHbIE LEOJINTHbIe FNIJIbTPbl
B HopMaIbHbX yCIOBHX XcKlnyatau nn peKoMeHyETcpeRHeepPOBaTb Hx KaJIbE 18 MeaueB n ZAMeHnB cpe3 3 rOa. Dn peRHeepauu FmIbTa BblnoHHT cneIyUOy npoueDpy:
-CHATbΦHJbTpNo yKa3aHnM B INHCTpyKunx(Pnc.12).
Bctabte fnnbtpbA,BnC (ecnn OH npucytbyo) B6bnoByo Iyoxoyc Temepatypoi 200CnpnbntenbHO Ha 2 yaca.
-10cne oxnaxdeHn HnIbtpa yctaHOBntb Ha MeCTo 4 HnIbTpHa MetaJIWueckyko KOHCTpyKlIO HnIbTpA.
JOTOKДЛЯСБОРAJKINA
PekomeHdyETCAOHHaTbIOTOKpaBMECAU
He IcnoB3oBaT Koppo3HOHbE, KxCNOThBE NINIeNoOHTbe MoIOUe CpeCTBa. DnB6ooee TuaTeBbHO OHcCTK CNeYET DCaTb JOcTb NOToN c6OpA Macna (CM. H3o6paKeH) BmBbTB ETO TopRyB BOIO CO CpeCTBOM DNBA MtbB IOcYb. TuaTeBbHO OONOCHTB NDOXdTaBc, NOKa OHNHOCTbB BoBCOXeH, npeXde Hc yCTAHABINBaTH IH Ha MeTO. P4apeHo HO MbTB B NocyDmoEHO MaWInHE.
YTNIN3AUNIPO 3ABEPUEHNCPOKA CNYKbbl

PpNBeHbHa np6ope 3nak npeepKHytoro MycOpHoro 6aka O3Haay,TOH npHaJNeKNT Kateropnn RAEE,To eCTb "OxObl AektpnHOrO nAektpnueckoro o60pyoBaHn" noTOMy erno H
3Bb6paCbIBaTB BmEcTe C HeuΦepeHcnpoBaHHbIMn OTXoAMn (TOecTb BmEcTe C"b6tOBbIMN OTXoAMn), a Heo6xOdMn cdaBaTb OTDeNbHO, uTo6bMoKHO 6bIIO OcyueCTBnB opeauHn, Heo6xOdMn bIe Iero npepeabOTKn, mIIN CneuaIbHyKO opabotky B cIeHX 6e30aTcHON yTNIIa3aUMn BO3MOHbIX BpeHbIX dIg OKpykaUWe CpeB MaTePvAnOB N 138NeEHeHN CbPbI, KOTOPOE MOHX NOBtropHO NCNOB3OaBt. PpabUNbHa yTNIIa3aUMn ETOrO INJIeJINN NOMOKe TcBepey CEHIEpe pecypbN IIN6ExKaTb NToEHcMaNbHO TPOuTaTeHBOrO B03eCTBNH A IIOpOBe YHeNoBaEKA nOKpykaUWU Cpey, YTOMeKn POINBOITN B peYbIbATE HePpABInbHO yTNIIa3aUMn Poccm Bac o6paNTbc K MeCTbIMB Blactam 3a Bonnee noDpo6HO HnHOpMaJeN Obnkaiwem NyHKe NTpEma Ha yTNIIa3aUMN B COOTBECTBN C rOcydApCTBEHbIM 3AkoHOaTeBJCBOM BO3MOHbI CaHKUIN B CNYae HnPpABInbHO yTNIIa3aUMN 3TNX OTXoAOB.
MHOPMAUJRAOBYTNIN3AUINBCTPAHAXEBPOENCKOFO COIO3A
DipekTBA EBpeneckoro Co103a 06 3neKtpnoHbix NneKtpnuecknx npivbopax (RAEE) B kajdoi n3 cTpaH npHHATA no pa3hOMy, noTOMy npNKeJahmYtININ3npoBaTb HAcTOnAunn pnpO cop COBeyEm OpaTNTBC K MeCTbIM BnactrM INN dctpn6botepy 3a nHphiOpMaune n O npabuHOBY tYNIN3aUN.
HΦOPMAUOBYTNJN3AUUBCTPAHAX3AIPPEDEJAMNEBPOENCKOFOCOIO3A
3NaK nepeepkHyTO MycOpHOro 6aKa DeIcHTBnTeEN ToIbKO B cTpaHax EbpOneckoro Co103a. Pn JenaHnn yTNIN3uPObaTB HAcTOnuN npBopB DpyrNxCpaHax, COeYEm oBpaTInCB K MeCTbM BlAChT M NIN dNCTpN6BtEpy 3a INΦcpMaueo O npabunbHOyTNIN3auN.

BHIMAHHE!
N3ROBATENBOCABNIE3aC6OBnPpABOBHOCITbN3MeHEHNBnPpBOPB1KOBMOmEHTBepeBaAPtEBHO npDynpexHeHn.1eUaT,nepeBOuBOcPON3BedeHn,BTOUMHCNEHaCTNUHoe,HAcToIeero pyKOoDCTBA,03MOHbTOnbKOncnNOUYEHN PpeBaPteHBHO pa3peHnN3ROBtEN
TexHueckaa HOpMaun, rpaHueckne H3o6paKeHn nCneuKauu, npBeHeHHbE B HAcToaIe pyKOBOCTBE, ABJIOTc OpeHInpOBoOHbIMn He IIOJExKaT pa3rAaHEHIO.PyKOBOCTBO COCTaBHeHO Ha NTaIbRcHcOM Ra3bke, mTOBOTaTeHb He Hecet OTBETCTBeHHOCTH 3a BO3MOXHbHe OoneAtKN Nm OwIKKNepeBcDa.
Induction 2Z
YKA3AHNIOBE3OJACHOCTINI PDEUYPEXKDEHNA
Cneyuoume Mepbl npedocopoxhoctn coCTabIeHbI Ira Baueh 6e3onacHO 6e3onachOCTn dpyrnx. Ipocm BHNMaTeJbHO npouecb nx npexde yem nCNoB3OBaTb nn OcyuaceTBnTb ouNCTky np6opa.
I3ROTOBtEnb OTKNOHReT IIO6yO OTBeTCTBeHHoCTn 3a npAOM Nnn KOCBeHHbY uIep6, npNHNHeHHbIM IIOJAM, mMyEcTBy nNn DOMaHNM XNBOTHBIM BCNEcTBue HecO6nIODeHn yKa3aHn NO 6e3OnaCHOCTn, npNBedeHHbIX B HaCTOaem pyKOBOdCTBe.
PekomeHdyetc XpaHHTb pyKOBOCTBO BMeCTe c np6opom o6OpyOBAHnem dnyuero nCNoIb3OBAHn.

Ha3nayeHne
Bapouhna naHeNb npedHa3NaYeHa dI npiroTOBneHn pa3OprpeBa NnB DOMaunx ycNoBnx.
Bapouhyo naneHb HeIb3a yctHaBaNbBaTb Ha OTKpbITOM BO3dyxe Nn B MeCTax, rde OHa MOKeT NOdBepraTbCBAO3JeNCTBNUO aTMOCΦepHbIX ABLeHn (doJx, Betpa N T.D).
JIO6oe NcNoIb3ObaHne, OTNIuAIOUeecBbIweyKa3aHHbIX He OOnyckaETca.
- Pπn6bopom Moryt NOIb3OBA TbCBa DeTn Bo3paCTOM He MeHee 8-Mn Iet, NIOu C OrpaHnueHHbIMN Φn3nuecknMn, YmCTBeHHbIMN NIN CeHCOPHbIMN BO3MOXHOCTAMN, HeONbITbIe NIN He O6naJIoUne Heo6xOJMBiMn 3HaHnAIMN IIOu, PpN UcNoBnN, YTO HaxoJATC NOI pncmOTpOM NIN NocJe CNEuaJIbHOrO o6yehnN NO 6e3OnaChomy NCPOJIb3OBAHIO yCTpoNCTBa N OCO3HaHnA CBra3aHHbIX C 3TmM ONaCHOteN. DeTn HE DoJIxHbI NrpaTb C np6bOpom. OuncTKy n YXoJ naHeN He DOJIxHbI OCUSeCTBIArTb DeTn 6e3 pncmOTpa.
He octablan Te BKIOueHHyIO BAPOHyIO nAHeIb 6e3 npncmOTpa.

Onachoctb oxorob
IcnoIb3yIte KnaBnU 6JIOKInpOBKn KOMaHd IJI npEIoTbPaUeHn BKNIOUeHn npu6opa HeABTOPI3OBAHHbIMN JINCAmN.
- INCNoJb3yEmyIO Nocydy CneIeYET CTaBNTb TaK, yTO6bl pyuKN 6bln OTBePhytbl OT KpaN I DeTn He MOrIN DOTpaRnBaTbcra DO HIX.
BbIKIOaHTe 30HbHaRpeBa nocne NCNoIb3OBAHn.
He KnaIte MeTaNIIueckne npEmdTeHa BkJIIOUeHHbIe 3OHbI HArpeBa.

TexHnka 6e3oNaCHOCTu
- YCTaHOBky DOJXHbI BbINONHHTb KBaINΦuNpOBAHHbIE ONbITHbIe YCTaHOBUN B COOTBETCBN C yKa3aHnA M N HAcTOrUepyKOBODCTBa N DeiCTByIOuIMN HOpMaTHNBbIM Tpe6OBAHnAMN.
B cnyuae nobpekdeHn Hhpya nHTAHn nn Dpynx KOMnoHETOB, Bapouhyo naHeIb HE CneDyET NcNoIb3OBaTb:OTcoeHNHTe ee OT CeTN 3JNeKtpOnNTAHn I O6paTntEc b K MeCTHOMy DInepy nn B aBTOpN3OBAHHbI YeHTp CepBnCHoro O6CnyKBaHn.
He BHOCHTb B np6op 3JNeKtpnueckne, MexaHnueckne n yHKUHOHaBhbIe n3MeHeHn. He nbTaTecb camOCToTeNbHO YHHtB np6op nn 3AmEHtB erO deTaN. Pa60tbl, BbINONHeHHbIe HEKOMNTEHTHBIM IIObMn NN HeKBaIIuPBOBaHHbIM NepcoHaIOM, MOryTHHaHEctNuYsEp6, B TOM uCnE, cepbe3hBn, NMyuSectBy n/nn Nlucam, Ha KOTOpbIX He pacnpocTpapaHrTcra paaHTn u3rotOBnteIa.
Ipejde yem npctynatb K yctahOBke Bapouho nnntbl, y6eINTecb B ceIOCTHOCTN N MCnpaBHOCTN BCex ee cacte. B cnlyae 6hApyKeHn KaKnx- nbo aHomann He npctynaTe K yCTaHOBKe, a 6paTNTecb K dInlepy.

3NeKtpnuecka CnCTema, K KOtOpoI NOkNIOuAeTcB AboUHa NaHeNb, DOnXHa6bITb BbINOLHeHa B COOTBETCTBUN CDeiCTByIOUIMN HopMaMn, IMeTb 3a3eMIAIOOee yCTPOICTBO, OTBeuaIOOe Tpe6OBaHnM CTpaHbI, B KOTOpO YCTaHOBnEHaIIHTa, a TaKxe yIDOBtBOPaTb Tpe6OBaHnM Ebponecknx HOpMaTHOB No paDIOonomExAM.
- Θлкгпческne xapakTePncTnka nHnн элкгponntaHnna (hanpxkeHne n yactota) Должнbl COOTBeTCTBOBaTb ДaHHbIM,Уka3aHHbIM Ha Ta6lnuKe BapOCHNo nAHeN. ПрOBepbTe COOTBeTCTBnE BblIeYka3aHHbIX ДaHHbIX,пржд ЧEM NOДКПIOUHTb nAHeJb K элкгпческо сети. В сlyuae comHeHn O6paNTecb K элкгпнky.
He nCnoIb3yIe BapOHyIO naHEnI do ee· He nCnoJIb3yIe Te BapOHyOI naHEnI dJa UcTaHOBKn. noDOrpeBa 6aHok.
3anpeaetcNcNoIb3OBaTb HNyKIOHHyU naHeB Ha DnIXyuxxCa annapatax.
- Kateropnueckn 3anpeaetcra oTkpbIbTaB KOxy np6opa.
Falmec rapaHTnpyET COOTBETCTBNE np6opacTaHdaptam 6e30nacHOCTN TOIbKO npINcNoB3OBaHIn OPUNHaJIbHbIX 3aNaChbix qacte.
- Pnp6op He paccuTah IJRA NOKluOeHnRA K BHeUHemy TaMepy NIN NCNOB3OBaHnRA NybTa DnCTaHcNoHHoro ynpabNeHnA.
He HaHOCnTe 3aUHTbIX NOKpbTnHa NOBepxHOCTb INHyKcNOHHo NaHeJI.
- 3Jektpnueckne npoBODa He doJHKbI HaxOuNTbcB B KOHTaKTe C NOBepxHOCTbIO BapOCHo NaHeHn.
-ДяЗauntbypykyOTtenlaNcnoNb3yIte npedycMOrpeHHbIeДЯ3ToI cJIIN npNXBaTKn. IcNoB3yITe TOnbKO cyXne nepuATKn n npNXBaTKn.
YKA3AHNIO NOJb3OBAHNIO IPIPUBOPOM

-
Праздуч EM BKNIOHTb np6op nepBbI pa3,CHIMTe 3aUHTbIe PNeHKn N HaKneKN.
-
Ppi pa6oTe npnbopa yCTaHOBnEHnHa Ha HEM Nocya MoXeT CO3DaBaTb Wym, PpUHNOI KOtOpO MOrYT 6bITb:
- BBICOKN yPOBeHb MOUHOCTN.
-MaTePnAblDnHua nocybl.
He nCnoJb3yIte Body dny TuweHnnaMaMeHn. BbIKIOUHTe 30Hy HArpeBa.TuUTe PnAmc NOMOUIKpbIuKN,OrHECToNkONTkAhbIO NJIaHaIOnuHOro MaTePnAna. - He xpaHnte npedMeTbI n3 ropUoyero MaTePnAna B RaunKax NOB BapOuHoi NaHeJIbIO. IOTOK dJa CToJIOBbIX npN6OpOB DoJXKeH 6bITb N3 JkApocToiKOro MaTePnAna.
- I36eraTe nOOrpeBa nycToI nocyDbI; Bcerda npOBepaTe HaJIuHne B HeN DOCTaTOUHOKoJIuYeCTBa XnIDKOCTN.
BbIKIOuaye BapOHyo NaHeIb nocne NCNoJIb3OBaHnI. - NocToHNO cIeIte 3a npiroTOBneHnem 6JIIOc NCNoJIb3OBAHnEM Macna n Knpa, TaK KaK cyueCTByET OnaCHOCTb BO3rOpAHnI.
- Iodorpbe Xupa nn Macna OcyuieCTBnTb B TeueHne He 6oJee OndHmHyTb6e3 nCnoIb3OBAHn6yctepHoHfHKuHn.
- 06paTte BHIMaHne Ha To, yTo6bI He 06xeYbcn oocne nCNoB3OBAHnI npu6opa.
-
Y6eIntecb, yTO 3JIeKTPnueckne Ka6eI npI6opa He HaxoTcB KOHTaKTe CO CTeKlOM nIIN rOpYeINocydoi.
-
IcnoIb3yIe ToIbKO nOcyU c nnOckn m n feppomarHHTbIM dHOM.
-
I36eraTe KOHTaKta caxapa, cnHTeTnuecknx MaTePnaIOB Nnn aIOMHHeBOJ FOJIbn C rOpaymN 3OHAMn HArpeBa. Bblweyka3aHHbIe BeUeCTBa npn OxJaXdEHN MOrY T Bbl3bIBaTb pactpeCKnBaHne Nnn dpyrNe NOBpeXdEHn CTekILOKePaMnuecKO NobepxHOCTn: BblIOuHTe npn6op n HeMeJeHNo ydaJInte nx C rOpaye NOBepxHOCTn.
CopeXaTb KOMaHdbI INHdNkAToPbI B uCTOte.
- PpeDynpexKdEHNe dIa HocHTeJI KApDIOCTMMyJrTOPOB
HopmaIbHoeΦyHKUHOHPOBaHHe CTmUJTopOB cepIe6neHn MoKet 6bITb HapuSeHo MaHNTHbIM IoJIe.M. PekOMeHdyETc ObaaTbcr K dIlepy nII K BpaCy 3a KOHCyNbTaunEi.
KpeiHTbIe KAPTOUKN, KApMaHHbIe KaIbKyJrTOpbl NT.I. He OJIxHbI HaxOuITbcra B6IIN3N BkIIOueHHoB BapouHOI naHeII.
3oHa HarpeBa MoKeT 6bItb BHOBb BKJIouHeHa nOcNe IcYe3HOBeHn COo6eHn O6 Own6Ke.
He xpaHnte MeTaNlueckne npedm HENOCpeDCTBeHHo NOB BapOuHOI NaHENbIO.
3NEKTPNUECKA8E3ONACHOCTb
- По меpe BO3MOxHocTN, ИспОьБуИTe BcerДа КрblшКи Ha nOcyde, YTO6bl NcK5JIQUHTb nOtepNi TENla.
- FOIOBbTe 6JIOna B He6OJIbIOM KOJIuYeCTBe BOJbl.
- Nocne hauana npnroTOBneHna 6Iouda (kapka nn Bapka) nepeKIOUHTe np6Op Ha 6Oone Hn3Kn yPOBeHb MOUHOCTN.
YCTPOICTBA 6E3OIIACHOCTN BAPOUHOI PAHEJIIN
3aunTHoeOTKluoyehne
Bcnyae,ecnnoJHOHn30HnHaPeBa npeBbIaetC BpemBAKIOUeHnPn MaKcImaJIbHOH MOUHOCTN OHA ABTomATuYeCKN OTKIOUaETCn 3aRopaeTc INHdkaTOP OCTaTOUHorO TeNla.
Для NOВTOPHOROBKIIIOUeHINJaHHOJ3OHbIHarpeBa npNKOKCHNTecb K COOTBETCTBYIOUM KJIaBNiMaM.
N3ROTOBANTb He HecET HIKAKOITBETCTBEHHOCTN B CNYaHHeco6nOeHN npabun 6eOnaCHOCT.
3neKtpueckne coeHnHaHeN:
AKTINBaIaIaIaIaIaIaIaIaIaIaIaIaIaIaIaIaIaIaIaIaIaIaIaIaIaIaIaIaIaIaIaIaIaIaIaIaIaIaIaIaIaIaIaIaIaIaIaIaIaIaIaa
- BkIIOUHTe BapOCHyIO naHEnb;
OДНовремно HabKMITEHa CMMBOJIbI


- NaДиСплій NOЯВЛЯТСАСМВОЛ npeДнeу 3оны Hарева;
-PeynpyTe MouHocTb c nOMoU bIO KlaBn+e-
DE3AKTUBALIaФyHKUIM BRIDGE:
OДНовремн HoхмITE Ha CMMBONbl


ФУнкцЯ BOOSTER
Функць Booster Исплььетсдлу ybeиченmaошнocHTN HarpeBa npn noDorpeBe 6oIbIwO KoINuecTBA npOdyKTA (Hapnmep, noDorpeB BObldЯ BapKn MaKApOHbIX n3denn).
ФункцяoctaeTCa kTnBHO B TeueHne He 60JIee 10 MHyT.
-BKIOUHTe BapOCHyIO NaHEnIb;
-BbIbepuTe 30Hy harpeBa;
- HaxMMTe Ha (+) Do NOBHeHn CmBOJa Ha DnCnIe 3aDHe 3OHbHaIpeBa.
AKTUBaUg aYHKuN Booster
B 3aHne 30He HarpBa Moryr 6bItb BkIoueHb IBa 6cyTepa:
- HaxMMTE Ha (+)do NOBJIeHIN CIMBONa P+II.
ФУHKUNA KEEW WARM
Bknouhte bapouny npaHelb;
BbI6epnTe 30Hy HArpeBa;
Haxaht Ha knabuuy (+) :noBbIeTc CMBON
BbikloueHne BapoHn naHenn
ДЯ Вьклоченя 30ны HarpeBa:
Haxmte Ha knabuuy (-)do noBnne 0 Ha nucnnee 3oHbHarpeBa. Ecnn 3oHa HarpeBa eue ropaar, to 3aropaetc HndnkaTOp, noka3bIbaUOIOCTaTOOHoe Tnlo H.
IaBbIKIOeHnBaOpOH naHEN
HaKMTe Ha KnaBnuy Bce 30HbHaRpeBa BbIKIOaIOTc. Ha dncnlee eue ropaux 30H HappeBa NOBnEETCAmbON

He npikacaiTecb K 3OHam HArpeBa Noka INHdkaTop eue TropuT.
ФУHKUЯ TÄIMEPA
I ABTOMATUHECKOTOKJIIOUCHEN
Taimep BbINHaeT DBe fYHKUIN:
1-CYNTbIBAHNE BPEMEH;
2-ABTOMATUHECKOEOTKIOUOHEHNE OJHOIIN HeKOToPbIX 3OH HArpeBa.
Taimep MoKET OcyuceCTBnAByo TcCyTe BpEmHn Do 99 MInHyT.
IIO nCTeueHm 3aDaHnHO BpeMeHH Ha DnCnIe NOpBnEeTc0 Ou IN BkIIIOuaeTc 3ByKOBOu CnHaJI, BbIKIOUeHne KOToPOr IpoNCxoOHT, HaxBa (+) IIN (-)
ФУHKUЯСЧИТБИBAHAЯВРЕМЕHI
(Ha moDeni premium 3aropaeTc INHdkaTop
- PerynpnyTe Bpemn PO JeKaHaHIO C NOMOuBIO KlaBmU (+) n (-).
Taimep HaunHaeT OTCueT BpemeHn.
ДлгИЗМЕнEHЯСТРОКINOBTOPTeОпациЮункTA1.
C6poc TaMepa:
- OndHOBpeMeHHo HaxMnTe Ha KJIaBmU(+)n(-).
(HaMoDEni premium 3aropaetcHnDnKaTOp
2.CnomoBIOKnabNUI(-)yCTaHOBHTeBpEmHa00.
ФУHKUABTOMATNUECKOTOOTKIIQUEHN
AKTUBaCnpyHKLmABTOMATNueCKOROTKJIIOUeHnA:
1-BKIOUHTe BAPOHyI NaHEnb;
2-Bb6epTe 30Hy HarpBa;
3-Bb6epnteMoHocTbHaPpeBa;
4-BbIOnHInTe HacTpoNky TaMepa, KaK OINcaHO BbiJe.
ДяakTbauqmФyHKuINABTOMaTHueCKOToOTKIOUeHnIpyrO3OHbHaRpeBaNoBTOpTe BblweONiCaHHbIe ONEpaUN,HaunHaNcnykTA2.
Функци CЧтбIBAHЯ BPEMEHи ABTOMATUeCKOTO
OTKIOUeyHMOyT 6bIb NcNoJb3OBAHb OdHOBpeMeHHO.
Bapouha naHelb mnn 30hbl HarpeBa He BkIIOaIOTc:
BapouhnaHnHeNoKluOeHaK3JeKtpueeckoCetN.
- Neperopen npedoxpauHteJb.
KnaBnua 6NoKnpoBkn KOMaHn Haxkata.
HaHnue BoDb nnr rpa3n Ha nobepxHOCTN KnaBn.
-ПocToPOHHn ПpeMTe Ha KnaBnax.

PonBnHe nmbola
OTCYTCTBNE NOCyDbI B 30He HaPeBa.
-MatepnaI nocdyI He noDxOaNT Iy INHydkUHOHHO naHeJI.
MaIeHbKm DnAmEtpr dHa NocyDbI NO OTHoWeHnIO K 3OHe HarpBa.
IoBHeHne cmbbola [E]:
- OTKHOUHTe IN BHOBb NOKIIHOUHTe BAPOCHyIO naHEnb.
-06paTntecb B LcHTp CepBnCHOrO 06cnyxnbHnA.
Onda 30H Hara BnBc naHeB BbIKIOaIOTCA:
- AktnBupoBaHa cnCTema 3aunItbI OT nepepeBa;
Bapouhna naHnIb nIOnHa n3 3OH HaraepBa HaxOduNcB CNIJKOM DONTO B KNIUoyEHHom COCTOHN; - ODA HIN HeKOTOpBie KlaBnH YeM-To npNKpbTbI;
nyctanocya n neperpeB dHa.
BentnAToP npoJOnJaet pa6oTaTb nocIe BblKnUoyEnna naHENT:
- ΘTO HopMaJIbHo: BeHTnIaTOp 3aUINuaeT ΕJIeKTpOHHbI 6Iok ynpaBHeHЯ np6opa O T BbICOKx TempeAtyp.
- BeHTNJIaTOP OCTaHOBnTcA ABtOMaTHueckn.
IIOBHeHne cunBOJOB [E2]nnn [EH]:
- PerperpeB NaHeN; DaTb eH OctbTb, 3aTeM BHOBb BKIOHTb ee.
PonBleHne cunmbona [E6]:
- HenncpabHocb 3eKtpuecko cetn. PpoBepbTe HapPaeHne uactOty 3eKtpuecko cetn.
IIOBHeHne CmBbOa [E8]:
3acopene BxOJHOro OTBepCTnBaHTnJIaTopa; YIcTnTe BxOJHoe OTBepCTne.
OuHCTKA UYXOD

BHIMAHHE!
He ncoNob3yIe npoBbI MaunHb Ia OuHcTK naHen.
Ipekde yem npon3bOoNTb oucTky Bapouho nHaen, y6eHntc6b, TTO OHA OXlaaIacb do TeMnepaTpyb okpymaOuoe cpebl.
06a3eIbHo uCTnTe BapOHyo naHEnb nocne kaoDoro
NCIOB3OBaHn npIMHeHEm qCTaJero cpeCTBa dna
CTeKIOKePAmKN.
He npimehnre yinctaune cpectba codepkaune:
-Koppo3nOHHbIe BeuecTba (Coda, KICNTobl, aMMNaK).
- a6pa3nBhIe BeIecTBA (nopoiK nn NaCTbl).
He nCnoJIb3yIte ocTpbiNn a6pa3nBHy nHcTppyMeHT.
Iocne ounctkn npotnpaTe noBepxHoctb np6opa MraKo TkaHbIO.
Ecnn npnbop yctaHaBnBaetcna Hnd 3neKtpueckm DyXOBbIM Wkafoom C cnCTeMOI NpOJIInTuYeCKo OOnCTKn, He BKIOUaHTe erO BO BpeMpa60Tb 3ToN CnCTeMbI, T.K. 3TO MOxET Bbl3iBaTb cpa6aTBiBAHne yCtpoINCTBa 3auNTbI OT neperpeBa (cm. COOTBeTCTByIOuIpa3dE).
WSKAZÖWKI DOTYCZACE BEZPIECZENSTWA ORAZ OSTRZEŽENIA
FILTRY WEGLOWO-ZEOLITOWE
EMHAETTE MED INTERN RECIRKULATION (FILTRERENDE)