
Videobar VBS - Video conferencing system BOSE - Free user manual and instructions
Find the device manual for free Videobar VBS BOSE in PDF.

| Product type | Video conferencing system |
| Brand | Bose |
| Model | Videobar VB-S |
| Dimensions (H × W × D) | 48 × 267 × 87 mm |
| Net weight | 1.0 kg |
| Power supply | Power adapter 24 V DC, 1.9 A (input 100-240 V AC, 50/60 Hz) |
| Standby power consumption | < 0.5 W |
| Network standby power consumption | < 2 W |
| Camera field of view | 115° horizontal, 81° vertical |
| Camera functions | Pan, tilt, zoom, auto framing, presets |
| Connectivity | USB-C, Bluetooth, Wi-Fi (for management) |
| Built-in microphones | Yes |
| Built-in speaker | Yes |
| Remote control | Infrared included |
| Mounting | Table, wall, tripod (1/4"-20 UNC insert) |
| Included accessories | Wall mount, camera cover, cable cover, USB-A to USB-C adapter, cables, power supply, screws |
| Management software | Videobar Configuration, Administration, Mobile (iOS/Android) |
| Care and cleaning | Wipe with a soft, dry cloth. Do not let moisture penetrate. |
| Safety | Read the safety instructions. Do not expose to rain or moisture. Use only the supplied adapter. |
| Spare parts and repairability | Contact Bose Professional customer service. Limited warranty. |
Frequently Asked Questions - Videobar VBS BOSE
User questions about Videobar VBS BOSE
0 question about this device. Answer the ones you know or ask your own.
Ask a new question about this device
Download the instructions for your Video conferencing system in PDF format for free! Find your manual Videobar VBS - BOSE and take your electronic device back in hand. On this page are published all the documents necessary for the use of your device. Videobar VBS by BOSE.
USER MANUAL Videobar VBS BOSE
Please read and keep all safety, security, and use instructions.
Important Safety Instructions
Refer to the owner's guide for more information about your Bose Professional Videobar VB-S (including accessories and replacement parts) atboseprofessional.com/VB-S or contact Bose Professional customer service.
Keep these instructions.
Heed all warnings.
Clean only with a dry cloth.
This product includes a 1/4'' -20 UNC threaded insert. If you use the insert, ensure the accessory attached to it can support the weight of the product without creating a tipping or falling hazard. Refer toboseprofessional.com/VB-S for information on other attachments and accessories for use with this product.
When a cart is used, use caution when moving the cart/apparatus combination to avoid injury from tip-over.
Refer all servicing to qualified personnel. Servicing is required when the apparatus has been damaged in any way such as power-supply cord or plug is damaged, liquid has been spilled or objects have fallen into the apparatus, the apparatus has been exposed to rain or moisture, does not operate normally, or has been dropped.
WARNING/CAUTIONS

This symbol on the product means there is uninsulated, dangerous voltage within the product enclosure that may present a risk of electrical shock.

This symbol on the product means there are important operating and maintenance instructions in this guide.

This product contains magnetic material. Consult your physician on whether this might affect your implantable medical device.

Contains small parts which may be a choking hazard. Not suitable for children under age 3.
All Bose Professional products must be installed in accordance with local, state, federal and industry regulations. It is the installer's responsibility to ensure installation of the loudspeakers and mounting system is performed in accordance with all applicable codes, including local building codes and regulations. Consult the local authority having jurisdiction before installing this product.
When positioning the product, make sure it is not blocking any ventilation openings on your display. Refer to the owner's guide for your display and install it in accordance with the manufacturer's instructions.
Do NOT make unauthorized alterations to this product.
When replacement batteries are needed, use only AAA/LR03 alkaline batteries.
The battery provided with this product may present a risk of fire, explosion or chemical burn if mishandled, incorrectly replaced or replaced with an incorrect type. Do not recharge, disassemble, heat, or incinerate.
Keep batteries out of reach of children.
If a battery leaks, do not allow the liquid to come in contact with the skin or eyes. If contact is made, seek medical advice.
Do not expose products containing batteries to excessive heat (e.g. from storage in direct sunlight, fire or the like).
Only use the included hardware to wall-mount this product.
Only for wall-mounting on the following surfaces: Wallboard ≥ 3/8 in (10 mm)
If mounted on surfaces other than stated above, please contact a professional installer.
The interconnect cables included with this system are not approved for in-wall installation. Please check your local building codes for the correct type of wire and cable required for in-wall installation.
Do not mount on surfaces that are not sturdy, or that have hazards concealed behind them, such as electrical wiring or plumbing. Ensure the bracket is installed in accordance with local building codes. If you are unsure about installing this bracket, please contact a professional installer.
Do NOT use in vehicles or boats.
Due to ventilation requirements, Bose Professional does not recommend placing the product in a confined space such as in a wall cavity or in an enclosed cabinet.
Do not place or install the bracket or product near any heat sources, such as fireplaces, radiators, heat registers or other apparatus (including amplifiers) that produce heat.
Keep the product away from fire and heat sources. Do NOT place naked flame sources, such as lighted candles, on or near the product.
To reduce the risk of fire or electrical shock, do NOT expose the product to rain, liquids, or moisture.
Do NOT expose this product to dripping or splashing and do not place objects filled with liquids, such as vases, on or near the product.
This product is not intended for installation or use in indoor water facility areas (including, without limitation, indoor pools, indoor water parks, hot tub rooms, saunas, steam rooms and indoor skating rinks).
Do not mount the product in locations where condensation may occur.
Do NOT use a power inverter with this product.
Use this product only with the power supply provided.
Regulatory Information
Dimensions (H× W× D) .. 48× 267× 87mm(1.9× 10.5× 3.4in)
Net Weight: 1.0kg (2.2 lb)
Input Rating: 24 VDC =1875 A
This equipment should be installed and operated with a minimum distance of 20cm between radiator and your body.
Shielded cables connected to the USB port are required to maintain regulatory compliance.
CANICES-3(B)/NMB-3(B)
Information About Products That Generate Electrical Noise (FCC Compliance Notice for US)
Note: This equipment has been tested and found to comply with the limits for a Class B digital device, pursuant to Part 15 of the FCC Rules. These limits are designed to provide reasonable protection against harmful interference in a residential installation. This equipment generates, uses, and can radiate radio frequency energy and, if not installed and used in accordance with the instructions, may cause harmful interference to radio communications. However, there is no guarantee that interference will not occur in a particular installation. If this equipment does cause harmful interference to radio or television reception, which can be determined by turning the equipment off and on, the user is encouraged to try to correct the interference by one or more of the following measures:
Reorient or relocate the receiving antenna.
Increase the separation between the equipment and receiver.
Connect the equipment into an outlet on a circuit different from that to which the receiver is connected.
Consult the dealer or an experienced radio/TV technician for help.
Changes or modifications not expressly approved by Bose Professional could void the user's authority to operate this equipment.
This device complies with part 15 of the FCC Rules and with ISED Canada's license-exempt RSS standard(s). Operation is subject to the following two conditions: (1) This device may not cause harmful interference, and (2) this device must accept any interference received, including interference that may cause undesired operation.
Management Regulation for Low-power Radio-frequency Devices
Article XII: According to "Management Regulation for Low-power Radio-frequency Devices", without permission by the NCC, any company, enterprise, or user is not allowed to change frequency, enhance transmitting power, or alter original characteristics, as well as performance, to an approved low power radio-frequency device.
Article XIV: The low power radio-frequency devices shall not influence aircraft security and interfere with legal communications; If found, the user shall cease operating immediately until no interference is achieved. The said legal communications means radio communications in compliance with the Telecommunications Act.
The low power radio-frequency devices must be susceptible with the interference from legal communications or ISM radio wave radiated devices.

Bose Professional hereby declares that this product is in compliance with the essential requirements and other relevant provisions of Directive 2014/53/EU and all other applicable EU directive requirements. The complete declaration of conformity can be found at: www.Bose.com/compliance.

This product conforms to all applicable Electromagnetic Compatibility Regulations 2016 and all other applicable UK regulations. The complete declaration of conformity can be found at: www.Bose.com/compliance.
Bose Professional hereby declares that this product is in compliance with the essential requirements per Radio Equipment Regulations 2017 and all applicable UK regulations. The complete declaration of conformity can be found at: www.Bose.com/compliance.
This device for operation in the 5150-5250 MHz is only for indoor use to reduce the potential for harmful interference to co-channel mobile satellite systems.
For Europe:
Frequency band of operation 2400 to 2483.5 MHz:
Bluetooth®/Wi-Fi: Maximum transmit power less than 20 dBm EIRP.
Bluetooth Low Energy: Maximum power spectral density less than 10 dBm/MHz EIRP.
Frequency bands of operation 5150 to 5350 MHz and 5470 to 5725 MHz:
Wi-Fi: Maximum transmit power less than 20 dBm EIRP.
This device is restricted to indoor use when operating in the 5150 to 5350 MHz frequency range in all EU Member States listed in the table.
| BE B G CZ D K DE E E IE PT FI UK (NI) EL ES FR HR | |||||||||||||
| IT | CY | LV | RO | SK | LT | LU | HU | MT | NL | AT | PL | SI | SE |
This symbol means the product must not be discarded as household waste, and should be delivered to an appropriate collection facility for recycling. Proper disposal and recycling helps protect natural resources, human health, and the environment. For more information on disposal and recycling of this product, contact your local municipality, disposal service, or the shop where you bought this product.

Please dispose of used batteries properly, following any local regulations. Do not incinerate.

SDoc

China Restriction of Hazardous Substances Table
| Names and Contents of Toxic or Hazardous Substances or Elements | ||||||
| Toxic or Hazardous Substances and Elements | ||||||
| Part Name | Lead(Pb) | Mercury(Hg) | Cadmium(Cd) | Hexavalent(CR(VI)) | PolybrominatedBiphenyl (PBB) | Polybrominated diphenylether(PBDE) |
| PCBs X O O O | 0 0 | |||||
| Metal Parts X | 0 0 0 0 | 0 | ||||
| Plastic Parts | 0 0 0 0 | 0 | ||||
| Speakers X O | 0 0 0 0 | |||||
| Cables X O O | 0 0 0 | |||||
| This table is prepared in accordance with the provisions of SJ/T 11364. O: Indicates that this toxic or hazardous substance contained in all of the homogeneous materials for this part is below the limit requirement of GB/T 26572. | 5 | |||||
| X: Indicates that this toxic or hazardous substance contained in at least one of the homogeneous materials used for this part is above the limit requirement of GB/T 26572. | ||||||
Taiwan Restriction of Hazardous Substances Table
| Equipment name: Bose Videobar VB-S Type designation: 433869 | ||||||
| Restricted substances and its chemical symbols | ||||||
| Unit | Lead (Pb) | Mercury (Hg) | Cadmium (Cd) | Hexavalent chromium (Cr+6) | Polybrominated biphenyls (PBB) | Polybrominated diphenyl ethers (PBDE) |
| PCBs | - | ○ | ○ | ○ | ○ | ○ |
| Metal Parts | - | ○ | ○ | ○ | ○ | ○ |
| Plastic Parts | ○ | ○ | ○ | ○ | ○ | ○ |
| Speakers | - | ○ | ○ | ○ | ○ | ○ |
| Cables | - | ○ | ○ | ○ | ○ | ○ |
| Note 1: “○” indicates that the percentage content of the restricted substance does not exceed the percentage of reference value of presence. Note 2: The “-” indicates that the restricted substance corresponds to the exemption. | ||||||
Product Power State Table
The product, in accordance with the Ecodesign Requirements for Energy Related Products Directive 2009/125/EC and the Ecodesign for Energy-Related Products and Energy Information (Amendment) (EU Exit) Regulations 2019, is in compliance with the following norm(s) or document(s): Regulation (EC) No. 1275/2008, as amended by Regulation (EU) No. 801/2013.
| Required Power State Information | Power Modes | |
| Standby Networked Standby | ||
| Power consumption in specified power mode, at 230 V/50 Hz input | < 0.5 W Wi-Fi, | Bluetooth< 2.0 W |
| Time after which equipment is automatically switched into mode | < 2.5 hours < 20 minutes | |
| Power consumption in networked standby if all wired network ports are connected and all wireless network ports are activated, at 230 V/50 Hz input | < 2.0 W < 2.0 W | |
| Network port deactivation/activation procedures. Deactivating all networks will enable standby mode. | Wi-Fi: Reactivate from networked standby via the Videobar Mobile application. Deactivate by restoring the factory default settings: Press and hold the Home and Autoframe buttons on the remote control simultaneously for 5 seconds. Bluetooth: Reactivate from networked standby by restarting audio from a Bluetooth source. Deactivate by restoring the factory default settings: Press and hold the Home and Autoframe buttons on the remote control simultaneously for 5 seconds. | |
External Power Supply Technical Information
The external power supply provided with the product, in accordance with the Ecodesign Requirements for Energy Related Products Directive 2009/125/EC, is in compliance with the following norms(s) or documents(s): Commission Regulation (EU) 2019/1782.
| Manufacturer Bose Products B.V. | |
| Commercial registration number 36037901 | |
| Address Gorslaan 60 | 1441 RG Purmerend The Netherlands |
| Model identifier DT24V-1.8C-DC | |
| Input voltage 100 V-240 V | |
| Input AC frequency 50 Hz/60 Hz | |
| Output voltage 24 VDC | |
| Output current 1.9 A | |
| Output power | 45 W |
| Average active efficiency | 89.9% |
| Efficiency at low load (10%) | 87.0% |
| No-load power consumption | 0.07 W |
Date of Manufacture: The eighth digit in the serial number indicates the year of manufacture; "3" is 2013 or 2023.
China Importer: Bose Electronics (Shanghai) Company Limited, Level 6, Tower D, No. 2337 Gudai Rd. Minhang District, Shanghai 201100
EU Importer: Bose Products B.V., Gorslaan 60, 1441 RG Purmerend, The Netherlands
Mexico Importer: Bose de Mexico, S. de R.L. de C.V., Paseo de las Palmas 405-204, Lomas de Chapultepec, 11000 Mexico, D.F. Phone Number: +5255 (5202) 3545
Taiwan Importer: Bose Taiwan Branch, 9F-A1, No. 10, Section 3, Minsheng East Road, Taipei City 104, Taiwan. Phone Number: +886-2-2514 7676
UK Importer: Bose Limited Bose House, Quayside Chatham Maritime, Chatham, Kent, ME4 4QZ, United Kingdom
Bose Corporation, Framingham, MA 01701, U.S.A. 1-877-230-5639
Licenses and Legal Information
Bose is a trademark of Bose Corporation.
Videobar is a trademark of Transom Post OpCo LLC.
Android and Google Play are trademarks of Google LLC.
The Bluetooth® word mark and logos are registered trademarks owned by Bluetooth SIG, Inc. and any use of such marks by Bose Professional is under license.
macOS is a trademark of Apple Inc.
USB Type-C and USB-C are registered trademarks of USB Implementers Forum and are only intended for use with products based on and compliant with the USB Type-C cable and connector specification.
Wi-Fi is a registered trademark of Wi-Fi Alliance.
All other trademarks are the property of their respective owners.
To view the license disclosures that apply to the third-party software packages included as components of the Bose Professional Videobar VB-S:
Videoobar VB-S: Download and open the Videobar Mobile application, tap the Settings icon, and then tap End User License Agreement.
Videobar Mobile application: Tap the Settings icon, and then tap End User License Agreement.
Videobar Configuration application or WebUI: Click the Settings icon, and then click End User License Agreement.
Videobar Administration application: Click the menu (三), click About Videobar Administration, and then click End User License Agreement.
The Bose Professional privacy policy is available atboseprofessional.com.
Security Information

You are responsible for installing security updates that Bose Professional makes available. To install security updates, you must follow the firmware update instructions provided in the Videobar Configuration or Videobar Administration applications.
©2023 Transom Post OpCo LLC. No part of this work may be reproduced, modified, distributed or otherwise used without prior written permission.
Please complete and retain for your records.
The serial and model numbers are located on the rear panel of the product.
Serial number:
Model number:
Warranty Information
This product is covered by a limited warranty.
For warranty details, visitboseprofessional.com/warranty.
WHAT'S IN THE CARTON
Contents 12
SETUP
General Mounting Guidelines 14
Mount the VB-S on a Table, Shelf, or Credenza 15
Wall-mount the VB-S 16
Mount the VB-S on a Camera Stand or Tripod 20
Camera Privacy Cover 20
Cable Connections 21
Cable Management 22
SOFTWARE APPLICATIONS
Videobar Configuration App and WebUI 24
Videobar Administration App 26
Videobar Mobile App 26
PRODUCT DETAILS
Panels 27
Front Panel 27
Rear Panel 27
Remote Control 28
Status 29
OPERATION
Start a Meeting 33
Make a Call 34
Adjust the Camera 35
Reset the Camera 35
Adjust the Pan and Tilt Angles 36
Adjust the Zoom Ratio 36
Save and Recall a Preset 37
Enable/Disable Autoframing 38
Manage Audio Levels 39
Local Audio Playback 39
Meeting Audio 39
Adjust Audio Levels 40
Manage Bluetooth Devices 41
Pair a Bluetooth Device with VB-S 41
Disconnect a Bluetooth Device from the VB-S 42
Low-Power/Standby Modes 43
CARE AND MAINTENANCE
Clean the VB-S 44
Replacement Parts and Accessories 44
Limited Warranty 44
Serial Number Locations 44
Restore the Factory Default Settings 45
Forgotten Password 45
Update the Software 45
TROUBLESHOOTING
Try these solutions first. 46
WHAT'S IN THE CARTON
Contents

Videobar VB-S
3
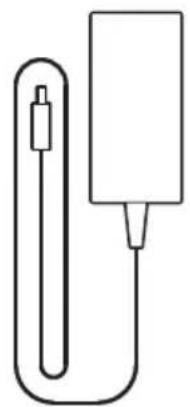
Power supply

O

USB-C-to-A cablePower cor
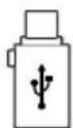
USB-A-to-C adapter
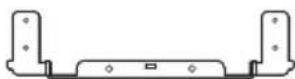
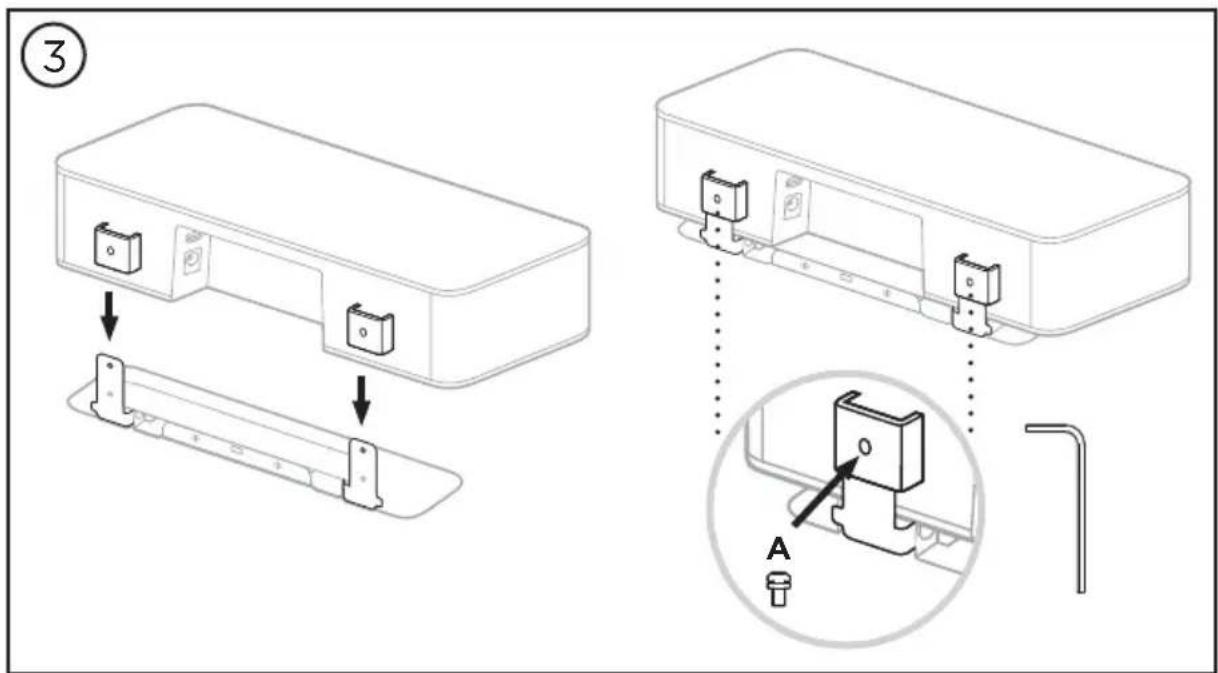
Mounting bracket

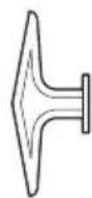
Hex key

Tabletop stand
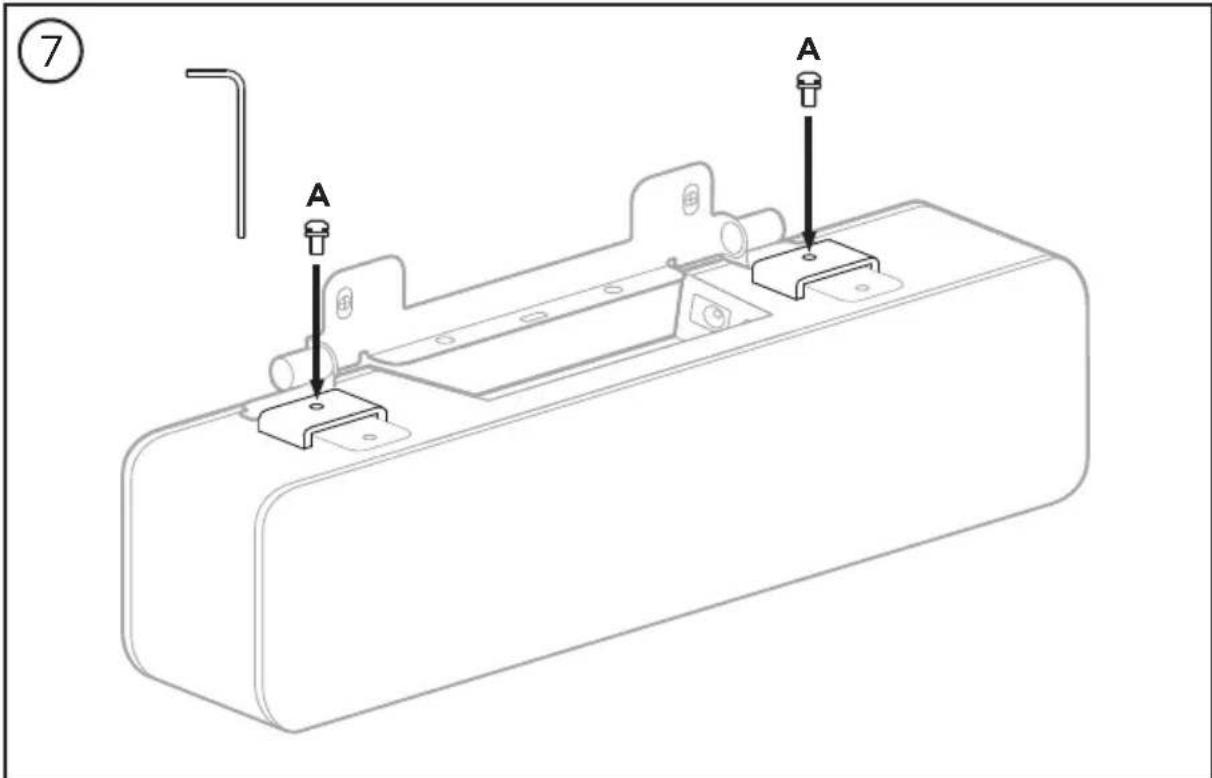
A

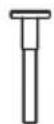
Mounting bracket screw (2)
B

Table stand screw (2)
C
Large drywall anchor (2)
D
Drywall anchor pushpin

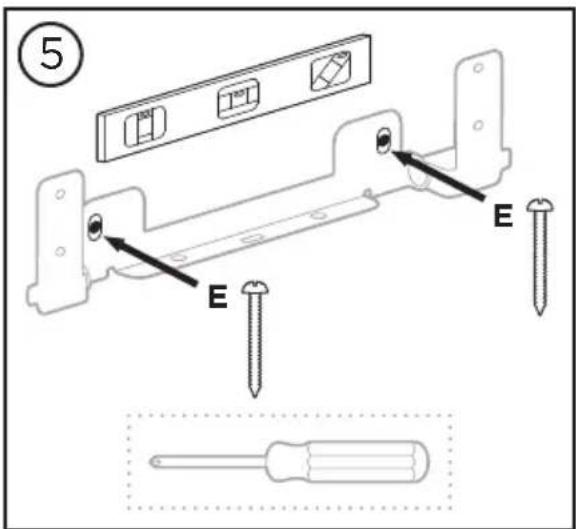
E
Pan-head screw (2)

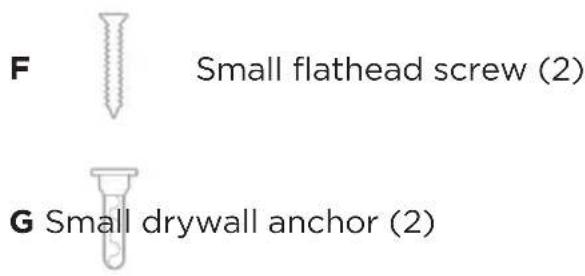
F
Small flathead screw (2)

G
drywall anchor (2)
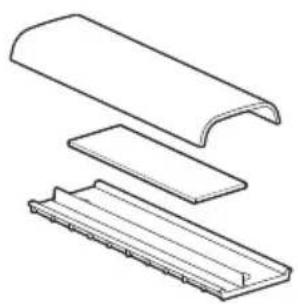
Cable management plate, foam, and cover


Quick start guide
Wall-mount setup guide
Safety instruction guide
SETUP
General Mounting Guidelines
Do NOT place the VB-S on its front, back or top when in use.
Do NOT place any objects on top of the VB-S.
Avoid placing the VB-S near air conditioning vents, heaters or radiators, fans, or other sources of noise or vibrations.
To avoid wireless interference, keep other wireless equipment 0.3-0.9 m (1-3 ft) away from the VB-S. Place the VB-S outside and away from metal cabinets, other audio/video components and direct heat sources.
Make sure there is an AC (mains) outlet nearby.
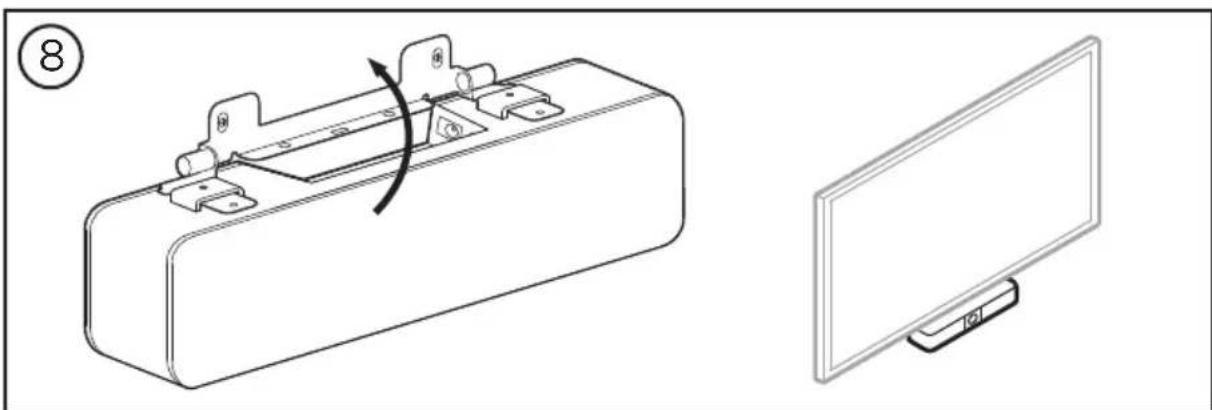
Mount the VB-S directly below (preferred) or above a display with the grille facing into the room. If you mount the VB-S above a display, ensure there is sufficient airflow from the heat vents of the display.
For best sound and microphone performance, do NOT place the VB-S in an enclosed cabinet or diagonally in a corner.
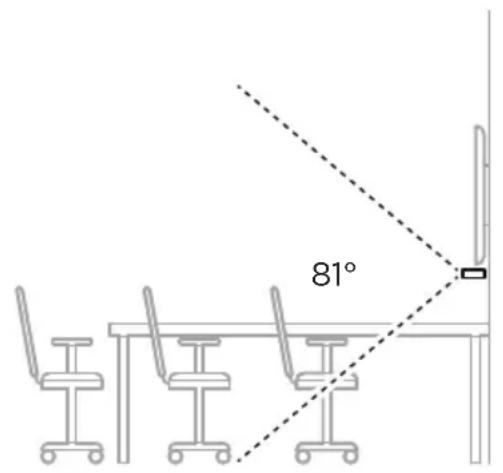
Make sure the seating area of all meeting participants fits within the camera's field of view (FOV). All meeting participants must be in the FOV in order for the autoframing feature to work properly (see Enable/Disable Autoframing (Page 38)).
The FOV of the VB-S camera is 115^ horizontal, 81^ vertical.
Make sure the meeting room can be well lit during a meeting.

Mount the VB-S on a Table, Shelf, or Credenza
For best performance, when setting up the VB-S on a table, shelf, credenza, etc., follow these recommendations:
See General Mounting Guidelines (Page 14) first.
Place the VB-S in its table stand on a stable and level surface.
Position the front of the VB-S so the supporting surface is not visible in the camera's image. Make sure the meeting room can be well lit during a meeting.
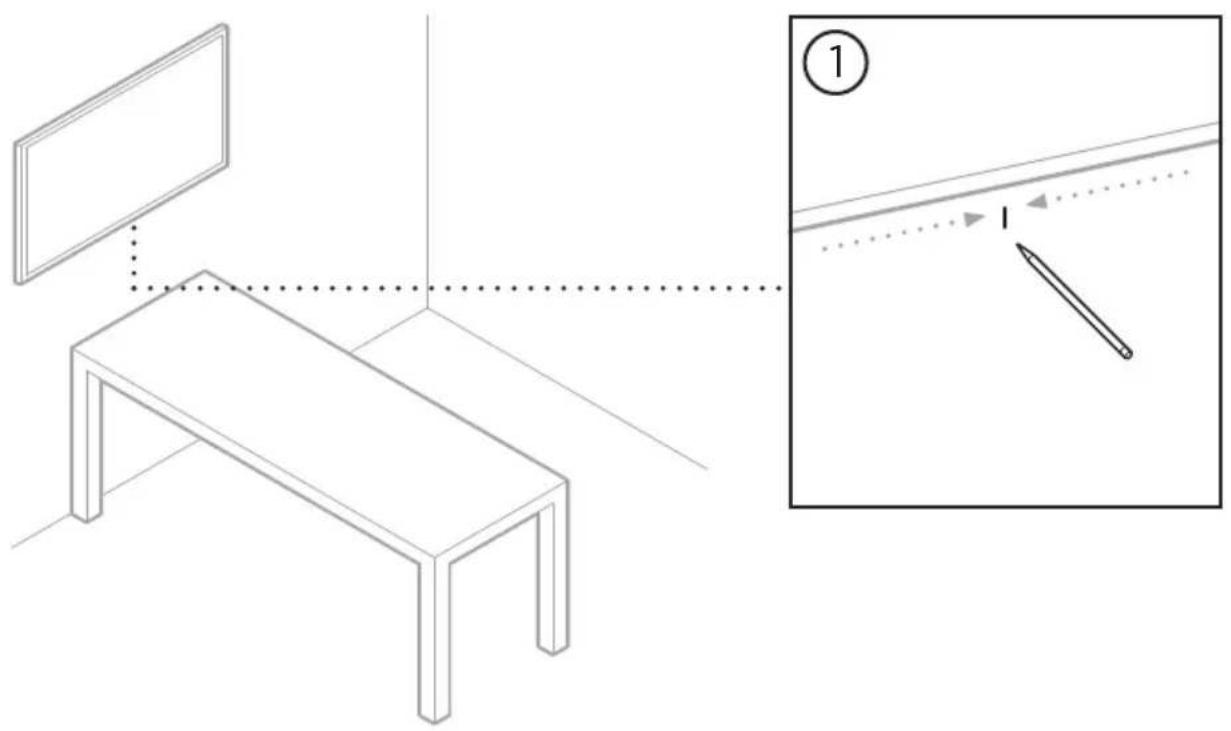
Wall-mount the VB-S
For best performance, follow these recommendations when setting up the VB-S on a wall:
See General Mounting Guidelines (Page 14) first.
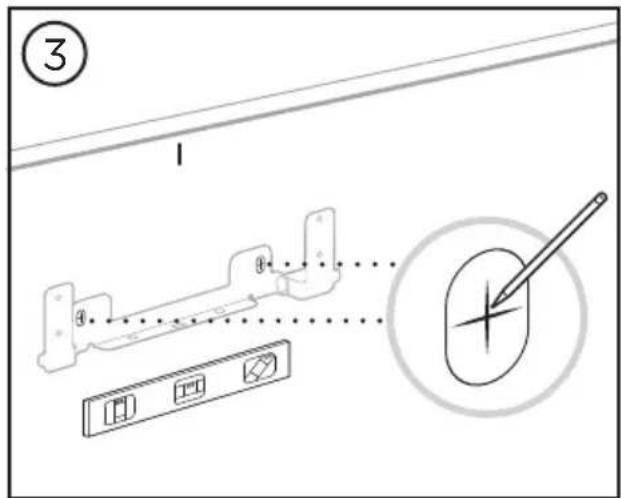
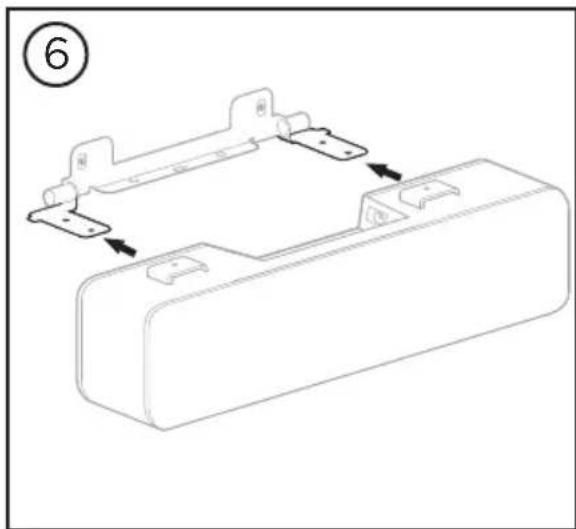
When determining where to attach the wall-mount bracket to the wall, make sure there is enough space around the bracket to fit the VB-S:
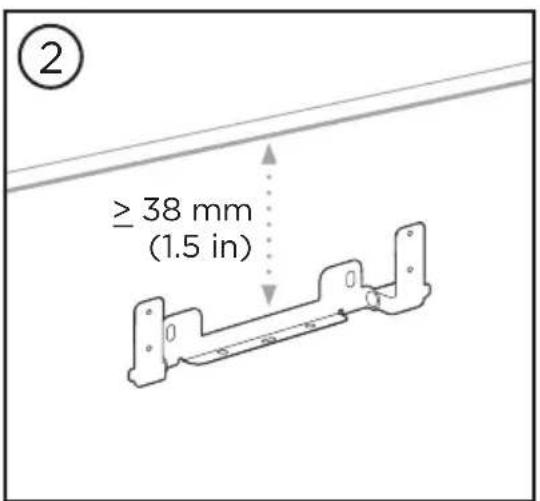
There must be at least 3.8cm (1.5 in) above the wall-mount bracket. This will allow you to "hang" the VB-S on it (Step 6) and to adjust the angle of the VB-S. It will also provide enough space to access the rear-panel connections on the VB-S.
There must be at least 11.4 cm (4.5 in) below the wall-mount bracket. This will allow you to hang the VB-S vertically during installation to insert cables and to adjust the angle of the VB-S.
The space must be at least 31.8cm (12.5 in) wide with the wall-mount bracket in the center of it. This is necessary to accommodate the VB-S plus space to access the acoustic port on the sides of the VB-S (there should be 2.5cm (1.0 in) on each side).
Only use the included hardware to wall-mount this product.
Note: Some additional tools are required.
Note: Read the included Important Safety Instructions before continuing.
(4)

WARNING:
Do not mount on surfaces that are not sturdy, or that have hazards concealed behind them, such as electrical wiring or plumbing. If unsure, please contact a professional installer.
The included hardware is not suitable for masonry surfaces.
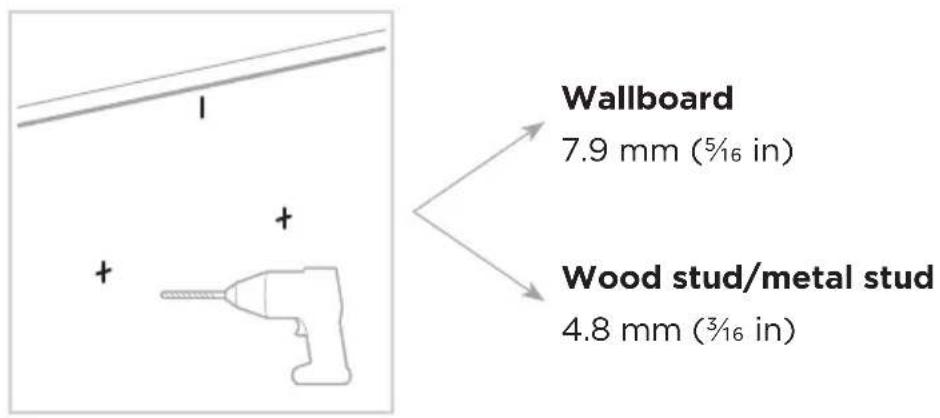

Wallboard
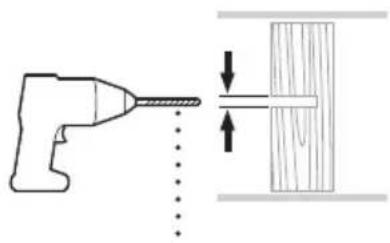
Wood stud Metal stud
4.8 mm (3/16 in)
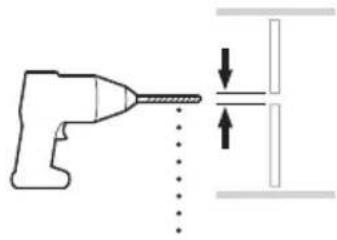
4.8 mm (3/6 in)
Mount the VB-S on a Camera Stand or Tripod
14'' - 20 × 9 ~mm (0.35 in)
On the underside of the VB-S, there is a 1/4'' -20 UNC-threaded insert with a depth of 9 mm (0.35 in).
As an alternative to tabletop-mounting or wall-mounting the VB-S, you can use this insert to attach the VB-S to a camera stand, tripod, or other mounting device.
If you use this insert, ensure the mounting device attached to it can support the weight of the VB-S without creating a tipping or falling hazard. Also, do not overtighten the screw in the insert, which could cause damage.
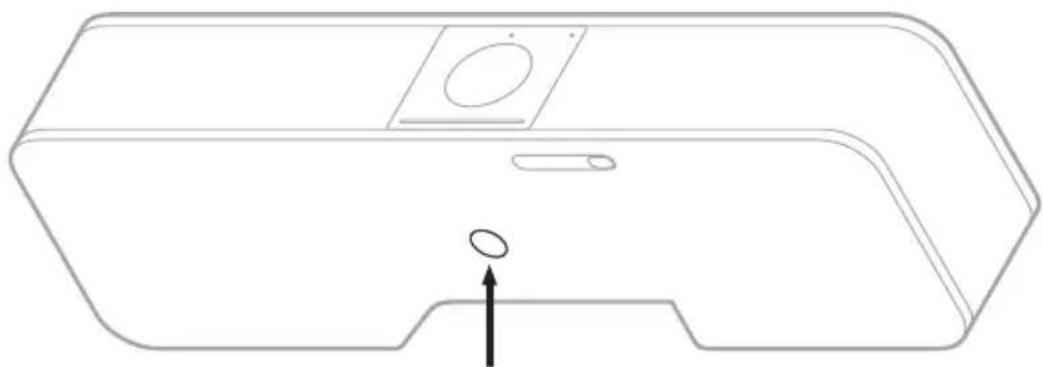
Camera Privacy Cover
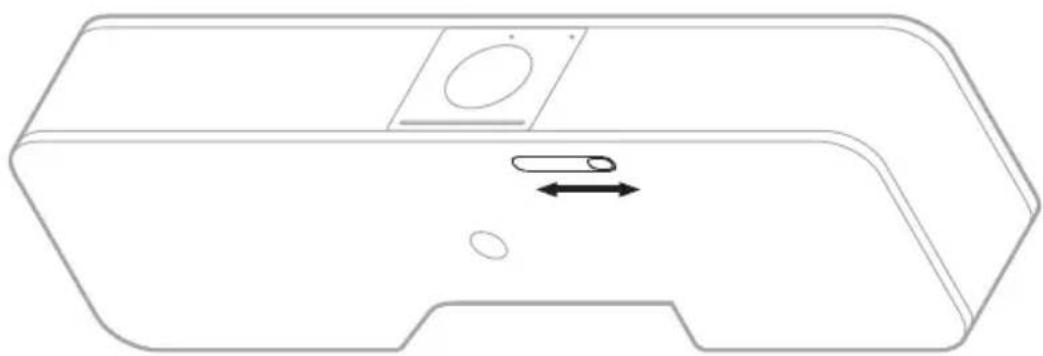
The camera privacy cover enables you to completely cover the camera's field of view without hiding the indicators or the light bar.
Slide the small switch on the underside of the VB-S (to the right of the camera) left or right to cover or uncover the camera.
Cable Connections
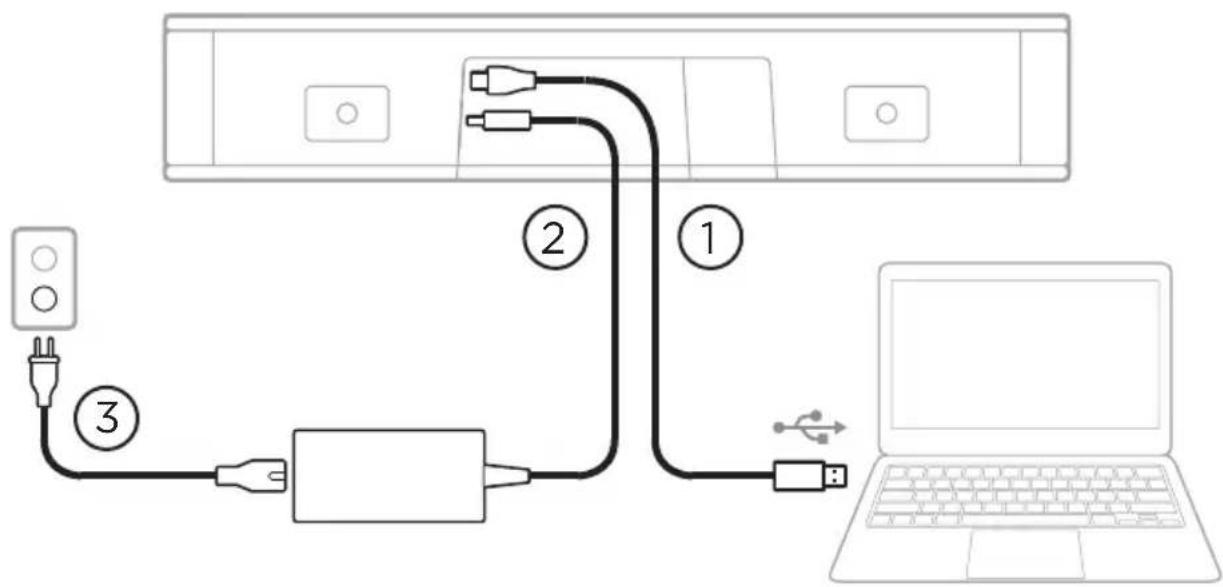
- Connect the included USB-C cable to the USB-C port.
Leave the other end of this cable on the table, so the meeting host can easily connect or disconnect their computer each meeting.
Note: If a computer hosting a meeting has USB-C ports only, attach the included USB-A-to-C adapter to the computer end of the USB cable.
- Connect the included power supply to the Power input.
- Use the included power cable to connect the power supply to a power outlet. The VB-S will power on automatically when connected to a power source.
There are several software apps that enable you to configure the Videobar VB-S for optimal performance. See Software Applications (Page 23) for more information.
If you need to use a USB extender, or a USB hub to connect your Videobar VB-S to a display, visitboseprofessional.com/VB-S for a list of recommended third-party accessories for use with VB-S.
Note: If you also own Bose Professional Videobar VB1, do not use the USB cable included with the VB1 to connect the VB-S to a computer. (The VB1 USB cable is designed specifically for that model.)
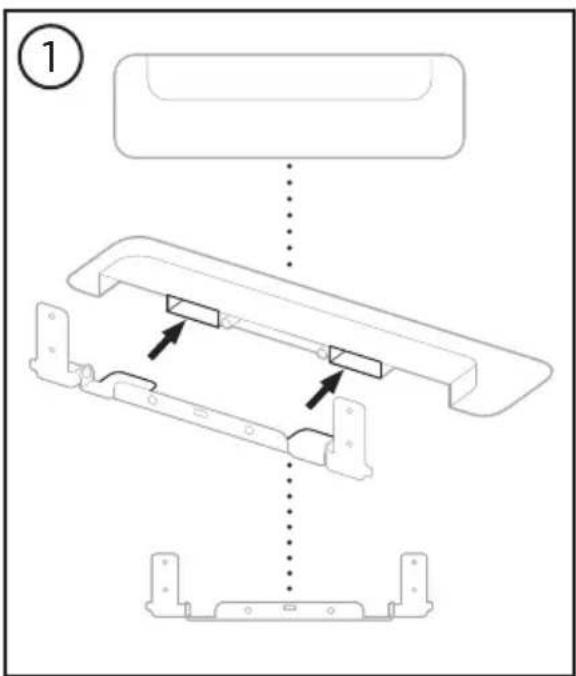
Cable Management
The included cable management cover can hold all permanent cabling in place against a wall.
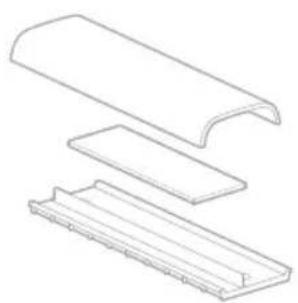
Cable management plate, foam, and cover
To install the cable management cover:
- Place and hold the back of the cable cover (the piece with the screw holes) against desired location on wall.
- Mark the center of the two screw holes on wall, and remove the back of the cable cover.
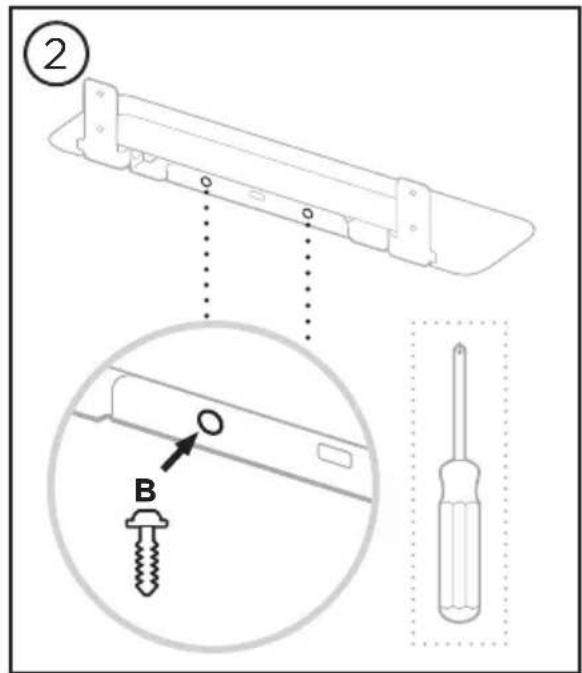
- If that part of the wall has a stud behind it, drill two 2.4mm (^3/2 in) holes into the wall.
If that part of the wall has no stud behind it, drill two 5mm (3/16 in) holes into the wall.
- If that part of the wall has no stud behind it, drive the two small drywall anchors (G) into the wall.
- Align the back of the cable cover with the screw holes.
- Drive the two small flat-head screws (F) into the back of the cable cover to secure it to the wall.
- Gather the cables and place along the "guide" of the back of the cable cover (on the wall).
- Remove the adhesive strip from the cable cover foam.
- Firmly place the foam strip on the back of the cable cover, next to the gathered cables.
- Place the front of the cable cover over gathered cables and foam so it adheres.
SOFTWARE APPLICATIONS
Three software applications enable you to configure the Videobar VB-S:
Use Videobar Configuration software - available for Windows and macOS or via web browser - for device setup and configuration.
Features:
Control camera: pan, tilt, zoom, presets, and autoframing
Password-protected administration and configuration
Install firmware updates, create and apply configuration profiles, adjust Bluetooth and advanced camera settings, and more
Notifies you if a Videobar device software update is available
Available for Windows and macOS or via web browser, which provides all the functionality of the desktop software over a network connection
Use Videobar Administration software for remote management, for single-device or enterprise-wide, multi-device changes, and to view device status in real time.
Features:
See device status and control critical functions of all your Bose Professional Videobar devices from a single location
Schedule firmware updates to all or only selected devices
View, edit, save parameters by device or group of devices
Discover all devices on the network; create, save, and apply device profiles
Available for Windows
The Videobar Mobile app allows anyone in the room to control the Videobar VB-S with their smartphone - adjust volume, mute, pan, tilt, zoom, zoom presets, and Bluetooth pairing.
Features:
Real-time control of volume, mute, pan, tilt, zoom, zoom presets, and Bluetooth pairing from your mobile device
Uses Bluetooth pairing to discover and communicate with the Videobar VB-S
Available for iOS and Android
Videobar Configuration App and WebUI
To download and install the Videobar Configuration app on your computer:
- On your computer, visitboseprofessional.com/VB-S.
- Download and install the Videobar Configuration Software app.
To access and use the Videobar Configuration app to configure the VB-S:
- Connect your computer to the USB-C port on the VB-S.
- Open the Videobar Configuration app.
- To access the Administrator configuration settings to configure the VB-S, Click the Administrator icon in the navigation panel and enter the factory default password: Bose123!
Note: We recommend changing the password after gaining access.
To access and use the browser-based Videobar Configuration WebUI to configure the VB-S over a network connection:
- Connect your computer and the VB-S to the same network. (See the user guide in the Videobar Configuration app to learn how to learn how to do this.)
- Enter the IP address of the VB-S into the address bar of a web browser on your computer, and press Enter. (You can determine the IP address of the VB-S using the Videobar Configuration app over USB or using the Videobar Administration app which automatically discovers VB-S devices on the network.) The Videobar Configuration WebUI will open.
Note: On some browsers, you may see a security warning like this:

Your connection is not private.
Attackers might be trying to steal your information from 169.254.32.128 (for example, passwords or credit card information). Learn more.
[ERROR: CERTIFICATE AUTHORITY INVALID.]
Advanced
Back
This is normal and not a security risk. Click Advanced. (If you are ever unsure about performing an operation on your computer, in a web browser, etc., check with your IT/system administrator first.)
You may then receive a follow-up message:
This server could not prove it is 169.254.32.128. Its security certificate is not trusted by your computer's operating system. This may be caused by a misconfiguration or an attacker intercepting your connection.
Proceed to 169.254.32.128 (unsafe).
This is also normal. Click the Proceed to... link to proceed to the Videobar Configuration WebUI login page.
The factory default administrator password is: Bose123!
Note: We recommend changing the password after gaining access.
To access the user guide for the Videobar Configuration app or WebUI, see the Settings page in the app or WebUI.
Videobar Administration App
To download the Videobar Administration software:
- On your computer, visitboseprofessional.com/VB-S.
- Download and install the Videobar Administration app.
To access and use the Videobar Administration app to configure one or more VB-S devices over a network connection:
- Connect your computer and each VB-S to the same network. (See the user guide in the Videobar Administration app to learn how to learn how to do this.)
- Open the Videobar Administration app.
To access the user guide for the Videobar Administration app, see the About Videobar Administration page in the app.
Videobar Mobile App
The Videobar Mobile app provides the functions of the infrared remote control conveniently on your mobile device. To download the Videobar Mobile app:
- Search for and download the Videobar Mobile app from the App Store or Google Play.
- Open the app on your mobile device and enable location tracking.
- On your mobile device, connect to Videobar VB-S.
To access the user guide for the Videobar Mobile app, see Settings page in the app.
PRODUCT DETAILS
Panels
Front Panel

- Status indicator: See Status (Page 29) to learn more about this.
- Camera
- Light bar: See Status (Page 29) to learn more about this.
- Bluetooth indicator: This light indicates the current status of VB-S Bluetooth connectivity:
Slowly pulses blue: The VB-S is available to pair to a Bluetooth mobile device.
Lit solid white: The VB-S is connected to a Bluetooth mobile device for use of the Videobar Mobile or for calls and audio playback.
Off: No Bluetooth connectivity.
Rear Panel
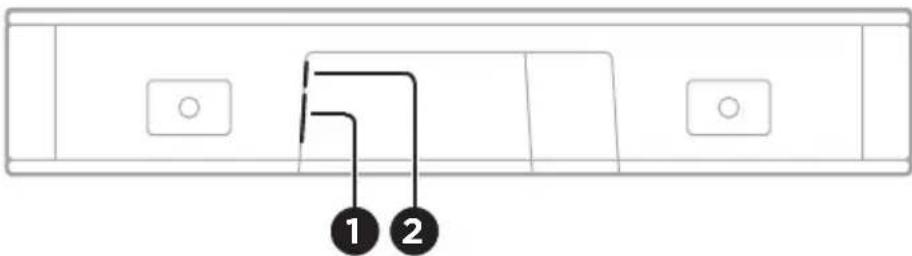
-
Power: Connect the included power supply.
-
USB-C: Connect this port to the computer hosting the meeting.
Note: If you also own Bose Professional Videobar VB1, do not use the USB cable included with the VB1 to connect the VB-S to a computer. (The VB1 USB cable is designed specifically for that model.)
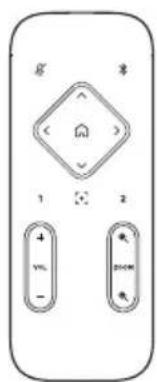
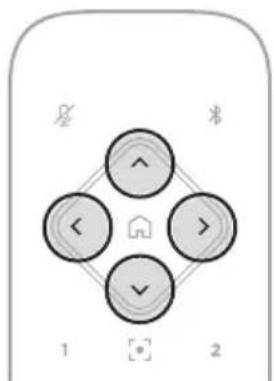
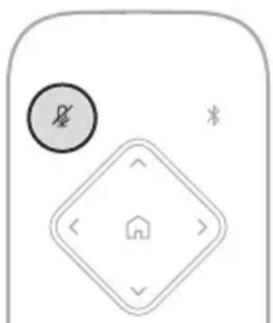
Remote Control
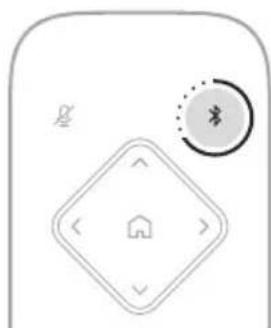
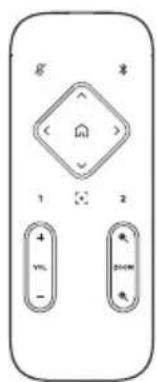
The Videobar VB-S includes an infrared remote control that enables you to adjust camera and volume settings, mute the microphones, and put the VB-S in Bluetooth pairing mode.
Note: All remote-control functions are also available in the software apps that enable you to configure the Videobar VB-S. See Software Applications (Page 23) for more information.
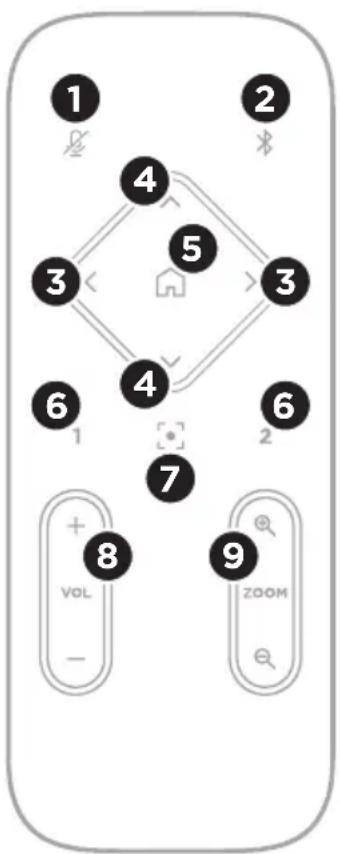
- Mute: Mute/unmute the VB-S microphones.
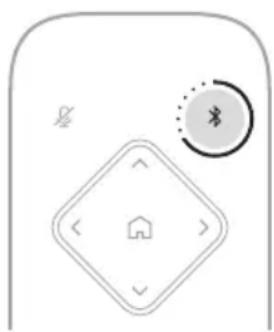
- Bluetooth: Press and hold for 3 seconds to enter pairing mode. If already paired to a device, press and hold to disconnect.
- Camera Pan: Press to pan the camera left and right (< or >), or press and hold for continuous adjustment.
- Camera Tilt: Press to tilt the camera up and down (A or V), or press and hold for continuous adjustment.
- Home Preset: Return Pan, Tilt, and Zoom (PTZ) camera settings to the Home position. The Home position can be changed in the Videobar Configuration app.
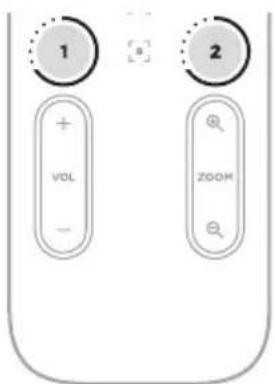
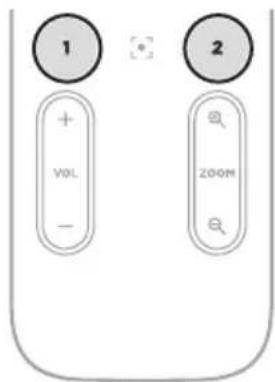
- Presets 1 & 2: Press to select Preset 1 or 2 for the camera. Press and hold to save the current Pan, Tilt, and Zoom (PTZ) camera settings as Preset 1 or 2.
- Autoframe: Turn autoframing on/off. When on, the pan, tilt, and zoom (PTZ) camera settings will adjust automatically to include all participants in the field of view at all times.
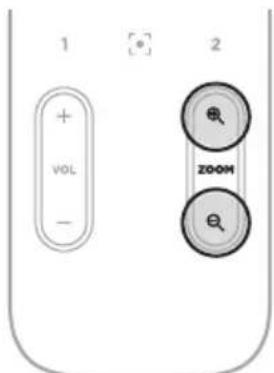
- Volume: Raise or lower volume (+ or -).
- Camera Zoom: Increase or decrease (+ or -) the zoom ratio of the camera.
Status

The status indicator above the camera and the light bar below the camera indicate the status of the VB-S.
| Appearance Activity System State | ||
| A small section of lights in the center of the light bar is bright white. Status indicator is off. | No active meeting. VB-S is powered on and “awake.” | |
| A small section of lights in the center of the light bar is dim white. Status indicator is on. | No active meeting. Camera is on. | |
| The whole light bar is lit solid white. Status indicator is off. | Meeting is active. Camera is off. | |
| The whole light bar is lit solid white. Status indicator is on. | Meeting is active. Camera is on with autoframing off. | |
| A small section of lights in the center of the light bar is lit solid white. Status indicator is on. | Meeting is active. Camera is on with autoframing on. | |
| The leftmost light on the light bar blinks once. The status indicator may be on or off. | The volume has been lowered by one increment. | |
| A small section of lights on the leftmost end of the light bar blinks once. The status indicator may be on or off. | The volume has been set to its lowest level. | |
| The rightmost light on the light bar blinks once. The status indicator may be on or off. | The volume has been raised by one increment. | |
| A small section of lights on the rightmost end of the light bar blinks once. The status indicator may be on or off. | The volume has been set to its highest level. | |
| All lights in the light bar are lit solid red. (The status indicator may be on or off.) | The VB-S microphone is muted. | |
| A small section of lights in the center of the light bar pulses white once and then fades off. Status indicator is off. | No active meeting. The VB-S has connected to a Wi-Fi network or has detected a new audio source connected to its USB port. | |
| A small section of lights in the center of the light bar is blinking white rapidly. | The VB-S is searching for a Wi-Fi network. | |
| Two small sections of lights in the light bar are solid red. The rest of the light bar is solid amber. The status indicator is off. | The VB-S is not functioning properly. This may be due to a connection issue or a firmware/software issue. Make sure the VB-S is connected to a network. (See the user guide in the Videobar Configuration app or Videobar Administration app to learn how to do this.) If that does not solve the issue, please contact Bose Professional technical support. | |
| White lights in the light bar move repeatedly from right to left and then from left to right. | The VB-S is downloading and installing a firmware update. Do not disconnect the VB-S from its power outlet or network. When the update is complete, the light bar will stop moving, and the VB-S will play an audio tone. | |
Appearance Activity System State

A small section of lights in the center of the light bar pulses white repeatedly. The lights then move outward from the center until the whole light bar is lit solid white. The lights then fade out.
The VB-S is restarting after restoring its factory default settings.

A small section of lights in the center of the light bar pulses purple repeatedly.
The Videobar Administration app is sending an "Identify Device" message to the VB-S.
OPERATION
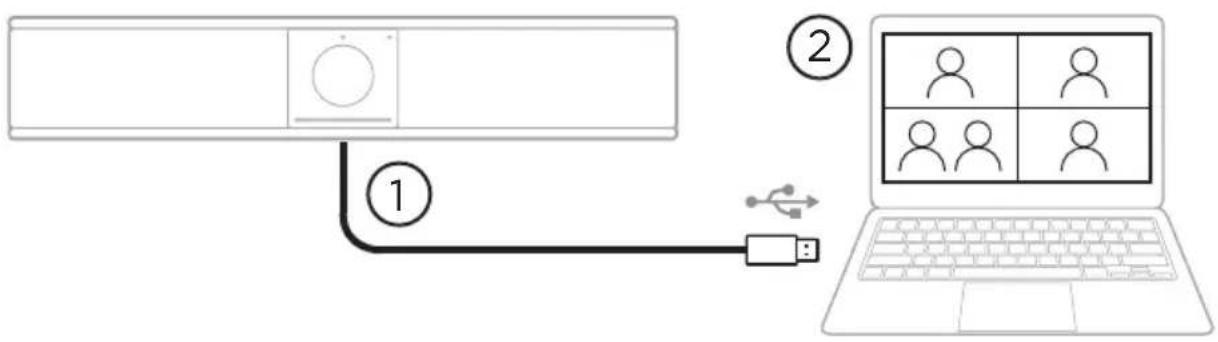
Start a Meeting
3
To start a meeting using the VB-S:
- Connect the included USB cable between the VB-S and your computer. Use the included USB-A-to-C adapter, if needed.
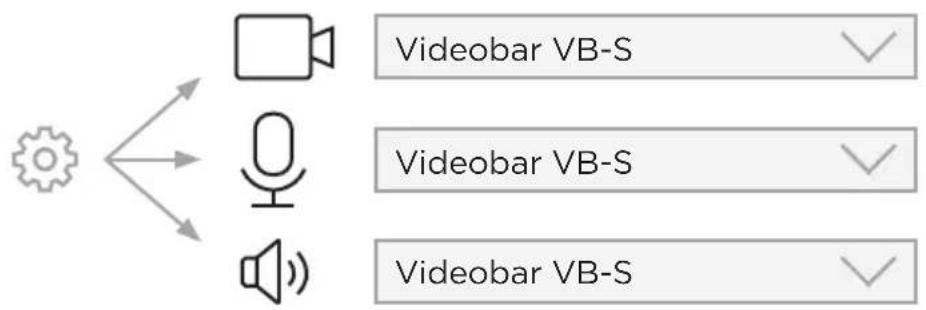
- Start the meeting in your preferred meeting software.
- In the device settings of your meeting software, select Videobar VB-S as the device for the microphone, speaker, and camera.
Make a Call
1
2
3
To make a call using the VB-S as a speakerphone:
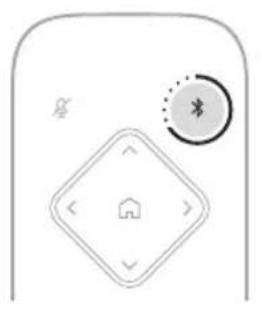
- Press and hold the Bluetooth button on the remote control for 3 seconds to put the VB-S into pairing mode.
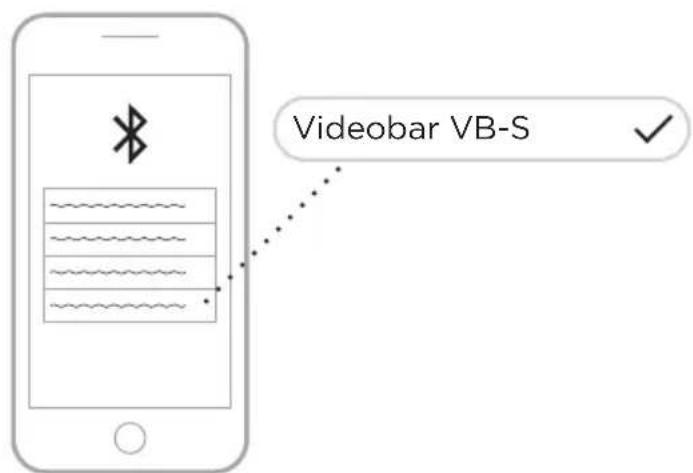
- On your mobile device, scan for available Bluetooth devices and select the VB-S.
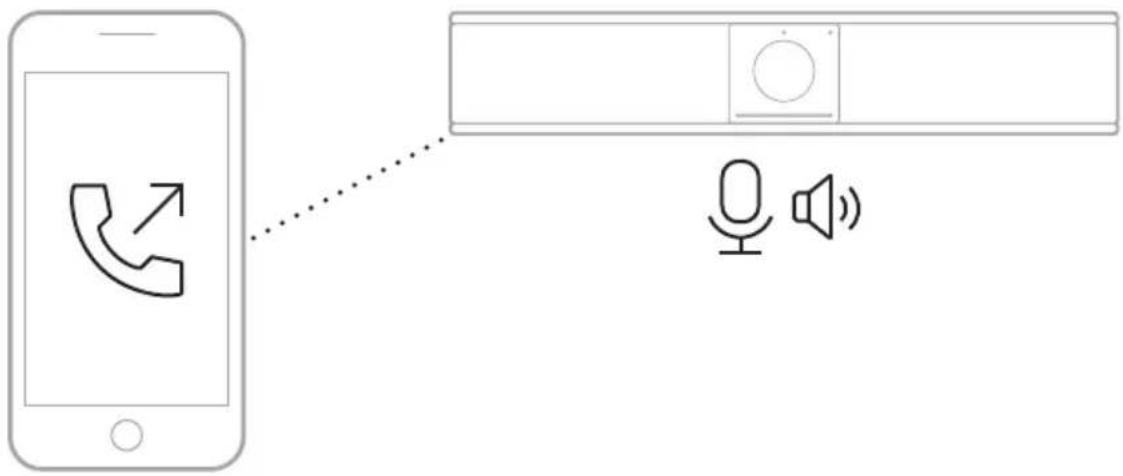
- Make a call from your mobile device. (On some mobile devices, you may need to select the VB-S once more when you use it for a call for the first time.)
The audio will be automatically routed from your mobile device to the VB-S speaker and microphones.
Adjust the Camera

The status indicator above the camera and the light bar below the camera indicate the status of the VB-S. When the camera is on, the status indicator will also be on (whether or not there is an active meeting).
Note: All remote-control functions are also available in the software apps that enable you to configure the Videobar VB-S. See Software Applications (Page 23) for more information.
Tip: For quick and simple adjustments to the camera settings, we recommend using the Videobar Mobile app on your mobile device. See Videobar Mobile App (Page 26).
Reset the Camera
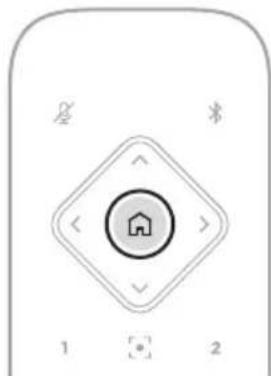
To return the camera to its default pan, tilt, and zoom settings, press the Home button on the remote control.
Adjust the Pan and Tilt Angles
Note: You can adjust the pan and tilt angles only if the camera is not fully zoomed out.
To adjust the pan (left-right) angle of the camera, press one of the camera pan buttons (< or >) on the remote control.
To adjust the tilt (up-down) angle of the camera, press one of the camera tilt buttons (A or V) on the remote control.
Press a button once to adjust the camera in increments, or press and hold it for continuous adjustment.
Adjust the Zoom Ratio
To adjust the zoom ratio of the camera, press one of the Zoom buttons (+ or -) on the remote control.
Press a button once to adjust the camera in increments, or press and hold it for continuous adjustment.
Save and Recall a Preset
You can save the camera's pan, tilt, and zoom settings to a preset: Preset 1 or Preset 2. When you recall a saved preset, the camera will immediately return to the saved pan, tilt, and zoom settings.
To save a preset:
- Adjust the pan, tilt, and zoom settings as desired.
- Press and hold the desired preset button on the remote control (Preset 1 or Preset 2) for 3 seconds. The camera settings will be saved to that preset.
To recall a saved preset, press the desired preset button on the remote control (Preset 1 or Preset 2). The camera will immediately change the pan, tilt, and zoom settings to those saved to that preset.
Enable/Disable Autoframing


To enable or disable the camera's autoframing feature, press the Autoframe button on the remote control.
When autoframing is enabled, the camera will automatically and continuously adjust the pan, tilt, and zoom settings to include all participants in the room in the field of view. A small section of lights in the center of the light bar will be lit solid white.
Note: Adjusting the pan, tilt, or zoom settings or selecting Home, Preset 1, or Preset 2 will automatically disable autoframing.
When autoframing is disabled, adjust the camera's pan-tilt-zoom (PTZ) settings manually. The whole light bar will be lit solid white.
Manage Audio Levels
The Videobar VB-S has three audio inputs: its microphones, USB audio, and Bluetooth audio.
The VB-S also has two audio outputs: its speaker and USB audio.
The real-time levels of all of these signals can be seen in the Meters tab of the Videobar Configuration app or WebUI.
Local Audio Playback
Music or audio over the USB or Bluetooth inputs are played back through the VB-S speaker (the near end).
During meetings, this USB audio will not be sent to the other participants (the far end), but Bluetooth audio will be sent to the far end if the meeting audio and Bluetooth audio are "bridged." Bridging is enabled in the VB-S by default, but you can disable or reenable it by using the Videobar Configuration app or WebUI or the Videobar Administration app (see Software Applications (Page 23)).
Meeting Audio
The VB-S microphone audio is sent to the other participants (the far end) via the USB output after the Acoustic Echo Cancellation (AEC) feature.
If local audio playback is sent over the USB input, it will play over the VB-S speaker, but the AEC feature will remove the music from the VB-S microphone audio pick-up before sending it to the far end.
If you wish to send local audio playback to the far end, share the audio playback app within your meeting software.

To mute or unmute the VB-S microphone, use the Mute button on the remote control. When the microphone is muted, all lights in the light bar will be lit solid red.
Adjust Audio Levels
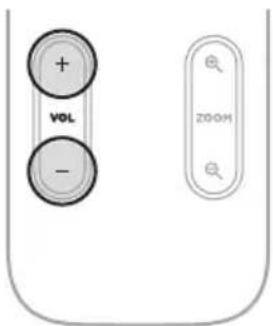

To adjust the volume of the VB-S speaker, use the Volume + or - buttons on the remote control, adjust the volume of the host computer, or adjust the volume of the Bluetooth audio. The light bar will indicate when the volume has been raised, lowered, or set to its highest or lowest level. See Status (Page 29) for more information.
These three volume levels are always synchronized, so adjusting one of them adjusts the others as well.
Note: All remote-control functions are also available in the software apps that enable you to configure the Videobar VB-S. See Software Applications (Page 23) for more information.
Manage Bluetooth Devices
The VB-S can be paired with one Bluetooth device at a time. For instance, it cannot be paired with one device using the Videoobar Mobile app and another device for calls or audio playback.

The Bluetooth indicator on the front panel indicates the current status of VB-S Bluetooth connectivity:
Slowly pulses blue: The VB-S is available to pair to a Bluetooth mobile device.
Lit solid white: The VB-S is connected to a Bluetooth mobile device for use of the Videobar Mobile app or for calls and audio playback.
O: No Bluetooth connectivity.
The VB-S will not automatically reconnect to a previously paired Bluetooth device. Once the Bluetooth connection is lost (due to distance, intentional disconnection, etc.), you will need to follow the steps to pair again.
Pair a Bluetooth Device with VB-S
To pair a Bluetooth device with the VB-S for calls or audio playback:
- Press and hold the Bluetooth button on the remote control for 3 seconds to put the VB-S in its pairing mode. The Bluetooth indicator on the front panel of the VB-S will slowly pulse blue.
- On your Bluetooth device, scan for other available Bluetooth devices and select the VB-S. The Bluetooth indicator on the front panel of the VB-S will light solid white when connected.
The Videobar Mobile app can pair your Bluetooth device with the VB-S using Bluetooth Low Energy (BLE). The app will automatically "discover" VB-S units nearby.
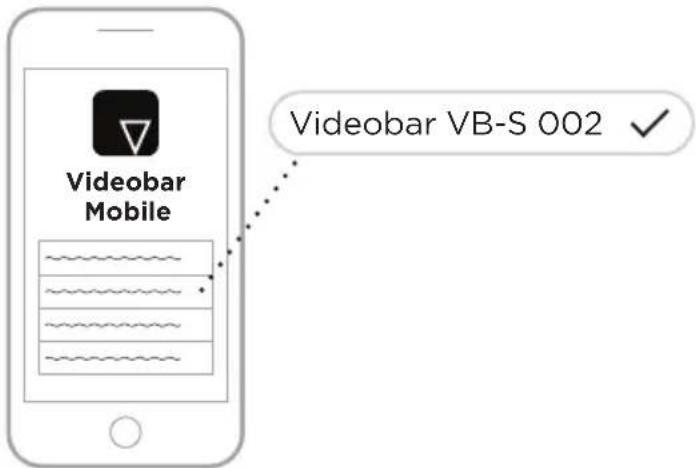
To pair a Bluetooth device with the VB-S using the Videobar Mobile app, open the app and select the desired VB-S. The Bluetooth indicator on the front panel of the VB-S will light solid white when connected. (See Videobar Mobile App (Page 26) for more information.)
Disconnect a Bluetooth Device from the VB-S
To disconnect a Bluetooth device from the VB-S, do one of the following:
Disable the Bluetooth connection on your mobile device.
Press and hold the Bluetooth button on the remote control for 3 seconds.
Move your Bluetooth device away from the VB-S until it is out of range of its Bluetooth signal (which can vary based on the transmission strength of your Bluetooth device as well as environmental factors like physical obstructions or other signal interference).
Low-Power/Standby Modes
Some countries' energy regulations require products like the VB-S to enter a standby mode, a low-power state of operation that saves energy while the product is inactive. This low-power mode is enabled in the VB-S by default, but you can disable or reenable it by using the Videobar Configuration app or WebUI or the Videobar Administration app (see Software Applications (Page 23)).
Note: Disabling the low-power mode will cause the VB-S to consume more energy while it is inactive.
When the low-power mode is enabled:
If the VB-S is connected to a network, the VB-S will enter a networked standby mode after 18 minutes of inactivity.
If the VB-S is not connected to a network, its standby mode has two stages. The VB-S will enter an initial low-power state after 18 minutes of inactivity. After two more hours of inactivity, the VB-S will enter its lowest-power state. In both states, the light bar on the front of the VB-S will be off. To enter this non-networked standby mode, the VB-S must be disconnected from any USB device and its Bluetooth and Wi-Fi connectivity must be disabled.
When the low-power mode is disabled, the VB-S will not enter the standby mode or networked standby mode.
Certain actions or commands can prevent the VB-S from entering its standby mode or can return the VB-S to its normal operation by "waking" it from its standby mode or networked standby mode:
| Action or Command Prevents the VB-S from entering its networked standby mode. | “Wakes” the VB-S from its standby mode. | |
| Buttons Button press on the remote control | ✓ | ✓ |
| USB Connecting device to the USB-C port | ✓ | ✓ |
| Communication from Videobar Configuration | ✓ | |
| Audio playback | ✓ | |
| Bluetooth Active connection | ✓ | |
| Audio playback | ✓ | |
| Wi-Fi Communication from Videobar Configuration | ✓ | |
| Communication from Videobar Administration | ✓ | |
CARE AND MAINTENANCE
Clean the VB-S
The VB-S may require periodic cleaning.
Wipe the outside surfaces with a soft, dry cloth.
Do not allow moisture to get inside the grille or any cable/wire connections.
Replacement Parts and Accessories
Replacement parts and accessories can be ordered through Bose Professional customer service. Visitboseprofessional.com.
Limited Warranty
The Videobar VB-S is covered by a limited warranty. Visit our website atboseprofessional.com/warranty for details of the limited warranty.
Serial Number Locations
The serial and model numbers are located on the rear panel of the product.
You can also view the serial number in the Videobar Configuration app or WebUI or in the Videobar Administration app (see Software Applications (Page 23)).
Restore the Factory Default Settings
Restoring the factory default settings will do the following:
Clear the list of Bluetooth devices paired to the VB-S.
Clear the camera presets (Home, Preset 1, and Preset 2).
Return all camera, microphone, and speaker settings to their default values. (Many of these settings are configured in the Videobar Configuration software or Videobar Administration software.)
Reset the administrator password to Bose123!
Note: We recommend changing the password after resetting it.
To restore all settings of the VB-S to their factory defaults, press and hold the Home button and Autoframe button on the remote control simultaneously for 5 seconds.
A small section of lights in the center of the light bar will pulse white repeatedly. The lights will then move outward from the center until the whole light bar is lit solid white. The lights will then fade out. When this process is completed, the VB-S will restart with its factory default settings.
Forgotten Password
If you have forgotten the password to access the Administrator configuration settings, you must restore the factory default settings to reset the password (see Restore the Factory Default Settings (Page 45)).
Note: We recommend changing the password after resetting it.
Update the Software
You can use the Videobar Configuration app and Videobar Administration app to check for and install VB-S firmware updates. See Software Applications (Page 23) to learn how to download and access these software apps.
If you are using the Videobar Configuration WebUI to configure the VB-S, you may not be able to automatically check or update the firmware from the online server unless your computer is also connected to the internet.
If you cannot access firmware updates while using the WebUI, do one of the following instead:
Use the Videobar Configuration app.
Use the Videobar Administration app.
Download the firmware file directly to your computer, and then use the Videobar Configuration WebUI to update the firmware as if it were a previous version.
TROUBLESHOOTING
Try these solutions first.
If you experience problems with the VB-S, try these solutions first:
Make sure the VB-S is connected to power.
Make sure any cables connected to the rear panel are securely connected. See Cable Connections (Page 21).
Check the status indicators. See Front Panel (Page 27).
Make sure your mobile device supports Bluetooth connections.
Check for available VB-S software updates. See Update the Software (Page 45).
Move your Bluetooth device closer to the VB-S and away from any interference or obstructions.
Adjust the volume on the VB-S, computer, Bluetooth device, or any other audio sources. See Manage Audio Levels (Page 39).
If you could not resolve your issue, see the table below to identify symptoms and solutions to common problems. If you are unable to resolve your issue, contact Bose Professional customer service. Visitboseprofessional.com.
| Problem What to Do | |
| I hear music but my computer is not connected. | Check if the Bluetooth indicator is lit solid white. If so, someone's Bluetooth device may already be paired with the VB-S. Press and hold the Bluetooth button on the remote control for 3 seconds to disconnect it. |
| The sound is too quiet or not audible at all. | The volume may be too low. Raise the volume using: the VB-S remote control your Bluetooth mobile device (if you are using one) your meeting software (speaker volume) If you still hear no sound, make sure Videobar VB-S is selected as the speaker in your meeting software. |
| The sound is distorted. | The volume may be too high. Lower the volume using: the VB-S remote control your Bluetooth mobile device (if you are using one) your meeting software (speaker volume) |
| Adjusting the volume on my computer has no effect on the volume of the VB-S. | Your computer may not have the VB-S selected as the default audio playback device (even if your meeting software is working properly with the VB-S). Windows: Click the speaker icon in the system tray (in the taskbar) and select Videobar VB-S as the playback device. macOS: Click the Apple icon in the upper-left corner of the screen, and select System Preferences, click Sound, and then click Output. Select Videobar VB-S in the list of devices. |
| The volume level of my computer or mobile device changed suddenly when I connected my computer or mobile device to the VB-S. | This is normal. The VB-S automatically synchronizes the volume level of all devices when they connect to it. |
| Videobar VB-S is not listed as a microphone, speaker, or camera in my meeting software. | Wait approximately 30 seconds for your computer to register the VB-S as a microphone, speaker, and camera device. If this still does not work, try the following solutions: Make sure the USB cable is connected securely to your computer. Try connecting to a different USB port on your computer. Make sure the VB-S is powered on (connected securely to its power outlet). Make sure the USB cable is connected securely to the USB-C port on the rear panel of the VB-S. Try using a shorter USB cable. If you also own Bose Professional Videobar VB1, make sure you are not using the USB cable included with the VB1 to connect the VB-S to a computer. (The VB1 USB cable is designed specifically for that model.) |
| My meeting software is displaying a message that the video is not working or cannot start. | This is usually caused when the Videobar Configuration app or another unified communications client is already using and controlling the camera. Close the other app that is using the video. |
| When I try to connect to the VB-S using the Videobar Configuration WebUI, my browser displays a security warning. | This is normal as the VB-S does not provide a security certificate based on a dynamically allocated IP address. See Videobar Configuration App and WebUI (Page 24) for specific instructions. (If you are ever unsure about performing an operation on your computer, in a web browser, etc., check with your IT/system administrator first.) |
| The camera zooms in or out even when I am not manually adjusting it. | The camera's autoframing feature may be enabled. Press the Autoframe button on the remote control to disable it. Some meeting software apps have built-in autoframing, which may be cropping the image or changing the camera zoom ratio. If possible, disable this feature in your meeting software. |
| The camera moves around a lot when the autoframing feature is enabled. | The camera's autoframing feature might not be set to the best mode for the meeting space. Use the Videobar Configuration app or Videobar Administration app (see Software Applications (Page 23)) to change the autoframing mode from Individual ("Follow Me") mode to Group ("Conferencing") mode or vice versa. Refer to the user guide in the app for more information. |
| The Bluetooth indicator is blinking blue. | This is normal. This indicates the VB-S is in Bluetooth pairing mode (The Bluetooth button on the remote control may have been accidentally pressed.) |
| The Bluetooth indicator is lit solid white. | This is normal. This indicates the VB-S is connected to a Bluetooth mobile device for music or calls or to the Videobar Mobile app. |
| The light bar is on. If the whole light bar is lit, then there is an active meeting. See Status (Page 29) for more information. | |
| The indicator above the camera lens is lit solid green. | This is normal. This indicates the VB-S camera is on. (If the light bar is lit white, then there is an active meeting. If the light bar is off, then there is no active meeting.) See Status (Page 29) for more information. |
No permitted that are in the region of the city.
APPLICATIONS LOGICIELLES
Application et version navigateur Web Videobar Configuration 24
Application Videobar Administration 26
Application Videobar Mobile 26
CHARACTERISTIQUES DU PRODUIT
Panneaux 27
Panneau avant 27
Panneauarriere 27
Télécommande 28
Lecture audio locale 39
- Telecommande Piles AA LRO3 (2)
APPLICATIONS LOGICIELLES
Application Videobar Administration
CARACTERISTIQUES DU PRODUIT
Panneaux
Panneau avant

Lecture audio locale
Videobar Administration App 26
Videobar Mobile App 26
PRODUKTDETAILS
Seiten 27
Vorderseite 27
Rückseite 27
Fernbedienung 28
Status 29
BEDIENUNG
Videobar Administration App
App Videobar Administration 26
App Videobar Mobile 26
App Videobar Administration
Per scaricare il software Videobar Administration:
- Dal computer, visitareboseprofessional.com/VB-S.
- Scaricare e installare la app Videobar Administration.
De software van Videobar Administration downloads:
- Ga op uw computeraarboseprofessional.com/VB-S.
- Download en installeur de Videobar Administration-app.
STELL OG VEDLIKEHOLD
Litten flathodeskrue (2)

G
psanker (2)
Plate, skum og deksel for kabelhandtering
Fjernkontroll AAA/LRO3-batterier (2)
Hurtigveiledning
STELL OG VEDLIKEHOLD
Rengjore VB-S
Mafty wkrct z ftem plaskim (2)
G
Domyślne haslo administratora to: Bose123!
英国进口商:Bose Limited, Bose House, Quayside Chatham Maritime, Chatham, Kent, ME4 4QZ, United Kingdom
Bose Corporation, Framingham, MA 01701, U.S.A. 1-877-230-5639
许可证和法律信息
许可证和法律信息
於:www.Bose.com/compliance.

This equipment should be installed and operated with a minimum distance of 20~cm between radiator and your body.
Shielded cables connected to the USB port are required to maintain regulatory compliance.
CANICES-3(B)/NMB-3(B)
Information About Products That Generate Electrical Noise (FCC Compliance Notice for US)
Note: This equipment has been tested and found to comply with the limits for a Class B digital device, pursuant to Part 15 of the FCC Rules. These limits are designed to provide reasonable protection against harmful interference in a residential installation. This equipment generates, uses, and can radiate radio frequency energy and, if not installed and used in accordance with the instructions, may cause harmful interference to radio communications. However, there is no guarantee that interference will not occur in a particular installation. If this equipment does cause harmful interference to radio or television reception, which can be determined by turning the equipment off and on, the user is encouraged to try to correct the interference by one or more of the following measures:
Reorient or relocate the receiving antenna.
Increase the separation between the equipment and receiver.
Connect the equipment into an outlet on a circuit different from that to which the receiver is connected.
Consult the dealer or an experienced radio/TV technician for help.
Changes or modifications not expressly approved by Bose Professional could void the user's authority to operate this equipment.
This device complies with part 15 of the FCC Rules and with ISED Canada's license-exempt RSS standard(s). Operation is subject to the following two conditions: (1) This device may not cause harmful interference, and (2) this device must accept any interference received, including interference that may cause undesired operation.
Management Regulation for Low-power Radio-frequency Devices
Article XII: According to Management Regulation for Low-power Radio-frequency Devices", without permission by the NCC, any company, enterprise, or user is not allowed to change frequency, enhance transmitting power, or alter original characteristics, as well as performance, to an approved low power radio-frequency device.
Article XIV: The low power radio-frequency devices shall not influence aircraft security and interfere with legal communications; If found, the user shall cease operating immediately until no interference is achieved. The said legal communications means radio communications in compliance with the Telecommunications Act.
The low power radio-frequency devices must be susceptible with the interference from legal communications or ISM radio wave radiated devices.

Bose Professional hereby declares that this product is in compliance with the essential requirements and other relevant provisions of Directive 2014/53/EU and all other applicable EU directive requirements. The complete declaration of conformity can be found at: www.Bose.com/compliance.

This product conforms to all applicable Electromagnetic Compatibility Regulations 2016 and all other applicable UK regulations. The complete declaration of conformity can be found at:
www.Bose.com/compliance
Bose Professional hereby declares that this product is in compliance with the essential requirements per Radio Equipment Regulations 2017 and all applicable UK regulations. The complete declaration of conformity can be found at: www.Bose.com/compliance
This device for operation in the 5150-5250 MHz is only for indoor use to reduce the potential for harmful interference to co-channel mobile satellite systems.
For Europe:
Frequency band of operation 2400 to 2483.5 MHz:
Bluetooth/Wi-Fi: Maximum transmit power less than 20 dBm EIRP.
Bluetooth Low Energy: Maximum power spectral density less than 10 dBm/MHz EIRP.
Frequency bands of operation 5150 to 5350 MHz and 5470 to 5725 MHz:
Wi-Fi: Maximum transmit power less than 20 dBm EIRP.
This device is restricted to indoor use when operating in the 5150 to 5350 MHz frequency range in all EU Member States listed in the table.
| BE | BG | CZ | DK | DE | EE | IE | PT | FI | UK(NI) | EL | ES | FR | HR |
| IT | CY | LV | RO | SK | LT | LU | HU | MT | NL | AT | PL | SI | SE |
This symbol means the product must not be discarded as household waste, and should be delivered to an appropriate collection facility for recycling. Proper disposal and recycling helps protect natural resources, human health, and the environment. For more information on disposal and recycling of this product, contact your local municipality, disposal service, or the shop where you bought this product.

Please dispose of used batteries properly, following any local regulations. Do not incinerate.

SDoc

中国制限てる有害/危険物質一覽
The product, in accordance with the Ecodesign Requirements for Energy Related Products Directive 2009/125/EC and the Ecodesign for Energy-Related Products and Energy Information (Amendment) (EU Exit) Regulations 2019, is in compliance with the following norm(s) or document(s): Regulation (EC) No. 1275/2008, as amended by Regulation (EU) No. 801/2013.
| Required Power State Information | Power Modes | |
| Standby Networked Standby | ||
| Power consumption in specified power mode, at 230 V/50 Hz input | < 0.5W Wi-Fi, | Bluetooth< 2.0 W |
| Time after which equipment is automatically switched into mode | < 2.5 hours < 20 minutes | |
| Power consumption in networked standby if all wired network ports are connected and all wireless network ports are activated, at 230 V/50 Hz input | < 2.0W < 2.0W | |
| Network port deactivation/activation procedures.Deactivating all networks will enable standby mode. | Wi-Fi: Reactivate from networked standby via the Videobar Mobile application.Deactivate by restoring the factory default settings: Press and hold the Home and Autoframe buttons on the remote control simultaneously for 5 seconds. Bluetooth: Reactivate from networked standby by restarting audio from a Bluetooth source.Deactivate by restoring the factory default settings: Press and hold the Home and Autoframe buttons on the remote control simultaneously for 5 seconds. | |
外部電源アダフローの技術情報
The external power supply provided with the product, in accordance with the Ecodesign Requirements for Energy Related Products Directive 2009/125/EC, is in compliance with the following norms(s) or documents(s): Commission Regulation (EU) 2019/1782.
| Manufacturer Bose Products B.V. | |
| Commercial registration number 36037901 | |
| Address Gorslaan 60 | 1441 RG Purmerend The Netherlands |
| Model identifier DT24V-1.8C-DC | |
| Input voltage 100 V-240 V | |
| Input AC frequency 50 Hz/60 Hz | |
| Output voltage 24 VDC | |
| Output current 1.9 A | |
| Output power 45 W | |
| Average active efficiency 89.9% | |
| Efficiency at low load (10%) | 87.0% |
| No-load power consumption | 0.07 W |
製造日:「山人」的「日」是「山」的「日」。
中国におる輸入元:Bose Electronics (Shanghai) Company Limited, Level 6, Tower D, No. 2337 Gudai Rd. Minhang District, Shanghai 201100
EUIにおける輸入元:Bose Products B.V., Gorslaan 60, 1441 RG Purmerend, The Netherlands
MEXICO
MEXICO
MEXICO
MEXICO
MEXICO
MEXICO
MEXICO
MEXICO
MEXICO
MEXICO
MEXICO
MEXICO
MEXICO
MEXICO
MEXICO
MEXICO
MEXICO
MEXICO
MEXICO
MEXICO
MEXICO
MEXICO
MEXICO
MEXICO
MEXICO
MEXICO
台湾におる輸入元:Bose Taiwan Branch, 9F-A1, No. 10, Section 3, Minsheng East Road, Taipei City 104, Taiwan. Phone Number: +886-2-2514 7676
英国における輸入元:Bose Limited Bose House, Quayside Chatham Maritime, Chatham, Kent, ME4 4QZ, United Kingdom
Bose Corporation, Framingham, MA 01701, U.S.A. 1-877-230-5639
ライSenスお願い法的情報
Your connection is not private.
Attackers might be trying to steal your information from 169.254.32.128 (for example, passwords or credit card information). Learn more.
[ERROR: CERTIFICATE AUTHORITY INVALID.]
Advanced
Back
This server could not prove it is 169.254.32.128.Its security certificate is not trusted by your computer's operating system.This may be caused by a misconfiguration or an attacker intercepting your connection.
Proceed to 169.254.32.128 (unsafe).
| 外観 光り方 斯テムの状態 | ||
| ライトバ一中央の大小な範圍で白いranplが明る<点灯ります。Stef-夕stransplは才Fです。 | アケデイフな会议のはんだ。VB-Sの電源は才に『スタにリバイ解除』の状態です。 | |
| ライトバ一中央の大小な範圍で白いranplが暗<点灯):(Stef-夕stransplは才Fです。 | アケデイフな会议のはんだ。カメラが才Fです。 | |
| ライトバ一全体が白<点灯):(Stef-夕stransplは才Fです。 | 会议がアケデイFです。カメラは才Fです。 | |
| LAIVIBA全体が白<点灯):(Stef-夕stransplは才Fです。 | 会议がアケデイFです。カメラが才F、才一トflre- モンダは才Fです。 | |
| LAIVIBA中央の大小な範圍でlanplが白<点灯):(Stef-夕stransplは才Fです。 | 会议がアケデイFです。カメラが才F、才一トflre- 一ツングも才Fです。 | |
| ○/● | ラートバイ一左端の/smallな範圍でラ ��が1回点減ります。 | 音量が1段階下,Noisy。 |
| Stevateraslonsはallonたは 才さです。 | ||
| ○/● | ラートバイ一左端のラートが1回点 滅ります。 | 音量が最小に設定いたします。 いります。 |
| Stevateraslonsはallonたは 才さです。 | ||
| ○/● | ラートバイ一右端の小微な範圍でラ ��が1回点減ります。 | 音量が1段階上,Noisy。 |
| Stevateraslonsはallonたは 才さです。 | ||
| ○/● | ラートバイ一右端のラートが1回点 滅ります。 | 音量が最大に設定いたします。 いります。 |
| Stevateraslonsはallonたは 才さです。 | ||
| ○/● | ラートバイ全体が赤く点灯ります。 | VB-SのマイクがMuhtarさ れいます。 |
| Stevateraslonsはallonたは 才さです。 | ||
| ○/● | ラートバイ中小の小微な範圍で白 いラートが1回点減し、ゆ的权利 消灯ARDS。 | アケチフな会議のはんだ せん。 |
| Stevateraslonsはallonたは 才さです。 | VB-SがWi-Finotifunaに 接続くださいますか、付けはUSB ローツに接続くださいます音 源を検出来いたします。 | |
| 拉动脱贫攻坚中央の大小な範圍で白いLANPが速く点滅ります。 | VB-SがWi-Finellフローを探いたします。 | |
| 拉动脱贫攻坚2か所の大小な範圍でLANPが赤く点灯,Th1。拉动脱贫攻坚残り部分は才聾色に点灯,Th1。Stef-ralanPは才Fです。 | VB-Sが正し機能しますせん。接続の問題か、Frau- MWAER/ANLFTWAERの問題が発生してる可能性が �ります。VB-Sがnellフロー接続いたします。ご確認いたします。You are the most successful video game players in Japan. Configurationアリ= リ= Administrationアリの UNAERGAIDTo be viewed by you. It is important to keep your computer and keyboard clean. It is important to keep your computer and keyboard clean. You can use this system for all purposes. You can use this system for all purposes. You can use this system for all purposes. You can use this system for all purposes. You can use this system for all purposes. You can use this system for all purposes. You can use this system for all purposes. You can use this system for all purposes. You can use this system for all purposes. You can use this system for all purposes. You can use this system for all purpose. You can use this system for all purpose. You can use this system for all purpose. You can use this system for all purpose. You can use this system for all purpose. You can use this system for all purpose. You can use this system for all purpose. You can use this system for all purpose. You can use this system for all purpose. You can use this system for all purpose. You can use this system for allpurpose. You can use this system for all purpose. You can use this system for all purpose. You can use this system for all purpose. You can use this system for all purpose. You can use this system for all purpose. You can use this system for all purpose. You can use this system for all purpose. You can use this system for all purpose. You can use this system for all purpose. You can use this system for all-purpose. You can use this system for all purpose. You can use this system for all purpose. You can use this system for all purpose. You can use this system for all purpose. You can use this system for all purpose. You can use this system for all purpose. You can use this system for all purpose. You can use this system for all purpose. You can use this system for all purpose. You can use this system for allPurpose. You can use this system for all purpose. You can use this system for all purpose. You can use this system for all purpose. You can use this system for all purpose. You can use this system for all purpose. You can use this system for all purpose. You can use this system for all purpose. You can use this system for all purpose. You can use this system for all purpose. You can use this system for all Purpose. You can use this system for all purpose. You can use this system for all purpose. You can use this system for all purpose. You can use this system for all purpose. You can use this system for all purpose. You can use this system for all purpose. You can use this system for all purpose. You can use this system for all purpose. You can use this system for all purpose. You can use this system for allurpose. You can use this system for all purpose. You can use this system for all purpose. You can use this system for all purpose. You can use this system for all purpose. You can use this system for all purpose. You can use this system for all purpose. You can use this system for all purpose. You can use this system for all purpose. You can use this system for all purpose. You can use this system for all purposes. You can use this system for all purpose. You can use this system for all purpose. You can use this system for all purpose. You can use this system for all purpose. You can use this system for all purpose. You can use this system for all purpose. You can use this system for all purpose. You can use this system for all purpose. You can use this system for allpurpose. You can use this system for allpurpose. You can use this system for all purpose. You can use this system for all purpose. You can use this system for all purpose. You can use this system for all purpose. You can use this system for all purpose. You can use this system for all purpose. You can use this system for all purpose. You can use this system for all purpose. You can use this system for allpurpose. You can use this system for allPurpose. You can use this system for all purpose. You can use this system for all purpose. You can use this system for all purpose. You can use this system for all purpose. You can use this system for all purpose. You can use this system for all purpose. You can use this system for all purpose. You can use this system for all purpose. You can use this system for allpurpose. You can use this system for all Purpose. You can use this system for all purpose. You can use this system for all purpose. You can use this system for all purpose. You can use this system for all purpose. You can use this system for all purpose. You can use this system for all purpose. You can use this system for all purpose. You can use this system for all purpose. You can use this system for allpurpose. You can use this system for all-purpose. You can use this system for all purpose. You can use this system for all purpose. You can use this system for all purpose. You can use this system for all purpose. You can use this system for all purpose. You can use this system for all purpose. You can use this system for all purpose. You can use this system for all purpose. You can use this system for allpurpose. You can use this system for allurpose. You can use this system for all purpose. You can use this system for all purpose. You can use this system for all purpose. You can use this system for all purpose. You can use this system for all purpose. You can use this system for all purpose. You can use this system for all purpose. You can use this system for all purpose. You can use this system for allpurpose. You can use this system for all purposes. You can use this system for all purpose. You can use this system for all purpose. You can use this system for all purpose. You can use this system for all purpose. You can use this system for all purpose. You can use this system for all purpose. You can use this system for all purpose. You can use this system for all purpose. You can use this system for allPurpose. You can use this system for allpurpose. You can use this system for all purpose. You can use this system for all purpose. You can use this system for all purpose. You can use this system for all purpose. You can use this system for all purpose. You can use this system for all purpose. You can use this system for all purpose. You can use this system for all purpose. You can use this system for allPurpose. You can use this system for allPurpose. You can use this system for all purpose. You can use this system for all purpose. You can use this system for all purpose. You can use this system for all purpose. You can use this system for all purpose. You can use this system for all purpose. You can use this system for all purpose. You can use this system for all purpose. You can use this system for allPurpose. You can use this system for all-purpose. You can use this system for all purpose. You can use this system for all purpose. You can use this system for all purpose. You can use this system for all purpose. You can use this system for all purpose. You can use this system for all purpose. You can use this system for all purpose. You can use this system for all purpose. You can use this system for allPurpose. You can use this system for all Purpose. You can use this system for all purpose. You can use this system for all purpose. You can use this system for all purpose. You can use this system for all purpose. You can use this system for all purpose. You can use this system for all purpose. You can use this system for all purpose. You can use this system for all purpose. You can use this system for allPurpose. You can use this system for allurpose. You can use this system for all purpose. You can use this system for all purpose. You can use this system for all purpose. You can use this system for all purpose. You can use this system for all purpose. You can use this system for all purpose. You can use this system for all purpose. You can use this system for all purpose. You can use this system for allPurpose. You can use this system for all purposes. You can use this system for all purpose. You can use this system for all purpose. You can use this system for all purpose. You can use this system for all purpose. You can use this system for all purpose. You can use this system for all purpose. You can use this system for all purpose. You can use this system for all purpose. You can use this system for all Purpose. You can use this system for allPurpose. You can use this system for all purpose. You can use this system for all purpose. You can use this system for all purpose. You can use this system for all purpose. You can use this system for all purpose. You can use this system for all purpose. You can use this system for all purpose. You can use this system for all purpose. You can use this system for all Purpose. You can use this system for all Purpose. You can use this system for all purpose. You can use this system for all purpose. You can use this system for all purpose. You can use this system for all purpose. You can use this system for all purpose. You can use this system for all purpose. You can use this system for all purpose. You can use this system for all purpose. You can use this system for all Purpose. You can use this system for allpurpose. You can use this system for all purpose. You can use this system for all purpose. You can use this system for all purpose. You can use this system for all purpose. You can use this system for all purpose. You can use this system for all purpose. You can use this system for all purpose. You can use this system for all purpose. You can use this system for all Purpose. You can use this system for all-purpose. You can use this system for all purpose. You can use this system for all purpose. You can use this system for all purpose. You can use this system for all purpose. You can use this system for all purpose. You can use this system for all purpose. You can use this system for all purpose. You can use this system for all purpose. You can use this system for all Purpose. You can use this system for allurpose. You can use this system for all purpose. You can use this system for all purpose. You can use this system for all purpose. You can use this system for all purpose. You can use this system for all purpose. You can use this system for all purpose. You can use this system for all purpose. You can use this system for all purpose. You can use this system for all Purpose. You can use this system for all purposes. You can use this system for all purpose. You can use this system for all purpose. You can use this system for all purpose. You can use this system for all purpose. You can use this system for all purpose. You can use this system for all purpose. You can use this system for all purpose. You can use this system for all purpose. You can use this system for all-purpose. You can use this system for allPurpose. You can use this system for all purpose. You can use this system for all purpose. You can use this system for all purpose. You can use this system for all purpose. You can use this system for all purpose. You can use this system for all purpose. You can use this system for all purpose. You can use this system for all purpose. You can use this system for all-purpose. You can use this system for all Purpose. You can use this system for all purpose. You can use this system for all purpose. You can use this system for all purpose. You can use this system for all purpose. You can use this system for all purpose. You can use this system for all purpose. You can use this system for all purpose. You can use this system for all purpose. You can use this system for all-purpose. You can use this system for allpurpose. You can use this system for all purpose. You can use this system for all purpose. You can use this system for all purpose. You can use this system for all purpose. You can use this system for all purpose. You can use this system for all purpose. You can use this system for all purpose. You can use this system for all purpose. You can use this system for all-purpose. You can use this system for all-purpose. You can use this system for all purpose. You can use this system for all purpose. You can use this system for all purpose. You can use this system for all purpose. You can use this system for all purpose. You can use this system for all purpose. You can use this system for all purpose. You can use this system for all purpose. You can use this system for all-purpose. You can use this system for all purposes. You can use this system for all purpose. You can use this system for all purpose. You can use this system for all purpose. You can use this system for all purpose. You can use this system for all purpose. You can use this system for all purpose. You can use this system for all purpose. You can use this system for all purpose. You can use this system for all purposes. You can use this system for all purposes. You can use this system for all purposes. You can use this system for all purposes. You can use this system for all purposes. You can use this system for all purposes. You can use this system for all purposes. You can use this system for all purposes. You can use this system for all purposes. You can use this system for allPurpose. You can use this system for allPurpose. You can use this system for allPurpose. You can use this system for allPurpose. You can use this system for allPurpose. You can use this system for allPurpose. You can use this system for allPurpose. You can use this system for allPurpose. You can use this system for allPurpose. You can use this system for allPurpose. You can use this system for all purpose. You can use this system for all purpose. You can use this system for all purpose. You can use this system for all purpose. You can use this system for all purpose. You can use this system for all purpose. You can use this system for all purpose. You can use this system for allpurpose. You can use this system for allpurpose. You can use this system for allpurpose. You can use this system for allpurpose. You can use this system for allpurpose. You can use this system for allpurpose. You can use this system for allpurpose. You can use this system for allpurpose. You can use this system for allpurpose. You can use this system for allpurpose. You can use this system for all purpose. You can use this system for all purpose. You can use this system for all purpose. You can use this system for all purpose. You can use this system for all purpose. You can use this system for all purpose. You can use this system for all purpose. You can use this system for allpurpose. You can use this system for all purpose. You can use this system for allpurpose. You can use this system for all purpose. You can use this system for all purpose. You can use this system for all purpose. You can use this system for all purpose. You can use this system for all purpose. You can use this system for all purpose. You can use this system for all purpose. You can use this system for allpurpose. You can use this system for allpurpose. You can use this system for allPurpose. You can use this system for allpurpose. You can use this system for all purpose. You can use this system for all purpose. You can use this system for all purpose. You can use this system for all purpose. You can use this system for all purpose. You can use this system for all purpose. You can use this system for all purpose. You can use this system for allpurpose. You can use this system for allPurpose. You can use this system for allpurpose. You can use this system for all purpose. You can use this system for all purpose. You can use this system for all purpose. You can use this system for all purpose. You can use this system for all purpose. You can use this system for all purpose. You can use this system for allpurpose. You can use this system for allPurpose. You can use this system for all purpose. You can use this system for allpurpose. You can use this system for all purpose. You can use this system for all purpose. You can use this system for all purpose. You can use this system for all purpose. You can use this system for all purpose. You can use this system for all purpose. You can use this system for all purpose. You can use this system for allPurpose. You can use this system for all purpose. You can use this system for allpurpose. You can use this system for all purpose. You can use this system for all purpose. You can use this system for all purpose. You can use this system for all purpose. You can use this system for all purpose. You can use this system for all purpose. You can use this system for allpurpose. You can use this system for all purpose. You can use this system for all purpose. You can use this system for allpurpose. You can use this system for all purpose. You can use this system for all purpose. You can use this system for all purpose. You can use this system for all purpose. You can use this system for all purpose. You can use this system for all purpose. You can use this system for allpurpose. You can use this system for allpurpose. You can use this system for all purpose. You can use this system for allpurpose. You can use this system for all purpose. You can use this system for all purpose. You can use this system for all purpose. You can use this system for all purpose. You can use this system for all purpose. You can use this system for all purpose. You can use this system for allpurpose. You can use this system for allPurpose. You can use this system for allpurpose. You can use this system for allpurpose. You can use this system for all purpose. You can use this system for all purpose. You can use this system for all purpose. You can use this system for all purpose. You can use this system for all purpose. You can use this system for all purpose. You can use this system for all purpose. You can use this system for allPurpose. You can use this system for allpurpose. You can use this system for allpurpose. You can use this system for all purpose. You can use this system for all purpose. You can use this system for all purpose. You can use this system for all purpose. You can use this system for all purpose. You can use this system for all purpose. You can use this system for allpurpose. You can use this system for all purpose. You can use this system for allpurpose. You can use this system for allpurpose. You can use this system for all purpose. You can use this system for allpurpose. You can use this system for all purpose. You can use this system for allpurpose. You can use this system for all purpose. You can use this system for allpurpose. You can use this system for all purpose. You can use this system for allpurpose. You can use this system for all purpose. You can use this system for allpurpose. You can use this system for allpurpose. You can use this system for all purpose. You can use this system for allpurpose. You can use this system for all purpose. You can use this system for allpurpose. You can use this system for allpurpose. You can use this system for all purpose. You can use this system for allpurpose. You can use this system for all purpose. You can use this system for all purpose. You can use this system for allpurpose. You can use this system for all purpose. You can use this system for allpurpose. You can use this system for all purpose. You can use this system for allpurpose. You can use this system for all purpose. You can use this system for allpurpose. You can use this system for all purpose. You can use this system for all purpose. You can use this system for allpurpose. You can use this system for all purpose. You can use this system for allpurpose. You can use this system for all purpose. You can use this system for all purpose. You can use this system for allpurpose. You can use this system for all purpose. You can use this system for allpurpose. You can use this system for allpurpose. You can use this system for all purpose. You can use this system for allpurpose. You can use this system for all purpose. You can use this system for all purpose. You can use this system for all purpose. You can use this system for all purpose. You can use this system for allpurpose. You can use this system for all purpose. You can use this system for all purpose. You can use this system for all purpose. You can use this system for all purpose. You can use this system for allpurpose. You can use this system for all purpose. You can use this system for all purpose. You can use this system for allpurpose. You can use this system for all purpose. You can use this system for allpurpose. You can use this system for all purpose. You can use this system for allpurpose. You can use this system for allpurpose. You can use this system for all purpose. You can use this system for allpurpose. You can use this system for allpurpose. You can use this system for all purpose. You can use this system for allpurpose. You can use this system for all purpose. You can use this system for allpurpose. You can use this system for all purpose. You can use this system for all purpose. You can use this system for allpurpose. You can use this system for all purpose. You can use this system for all purpose. You can use this system for all purpose. You can use this system for all purpose. You can use this system for allpurpose. You can use this system for all purpose. You can use this system for allpurpose. You can use this system for all purpose. You can use this system for allpurpose. You can use this system for all purpose. You can use this system for allpurpose. You can use this system for allpurpose. You can use this system for allpurpose. You can use this system for all purpose. You can use this system for allpurpose. You can use this system for all purpose. You can use this system for allpurpose. You can use this system for all purpose. You can use this system for allpurpose. You can use this system for all purpose. You can use this system for all purpose. You can use this system for all purpose. You can use this system for all purpose. You can use this system for all purpose. You can use this system for allpurpose. You can use this system for all purpose. You can use this system for allpurpose. You can use this system for all purpose. You can use this system for allpurpose. You can use this system for allpurpose. You can use this system for all purpose. You can use this system for all purpose. You can use this system for allpurpose. You can use this system for all purpose. You can use this system for allpurpose. You can use this system for all purpose. You can use this system for allpurpose. You can use this system for all purpose. You can use this system for all purpose. You can use this system for allpurpose. You can use this system for allpurpose. You can use this system for all purpose. You can use this system for allpurpose. You can use this system for all purpose. You can use this system for allpurpose. You can use this system for all purpose. You can use this system for allpurpose. You can use this system for allpurpose. You can use this system for allpurpose. You can use this system for allpurpose. You can use this system for allpurpose. You can use this system for allpurpose. You can use this system for allpurpose. You can use this system for allpurpose. You can use this system for all purpose. You can use this system for allpurpose. You can use this system for allpurpose. You can use this system for allpurpose. You can use this system for allpurpose. You can use this system for allpurpose. You can use this system for allpurpose. You can use this system for allpurpose. You can use this system for all purpose. You can use this system for allpurpose. You can use this system for all purpose. You can use this system for allpurpose. You can use this system for allpurpose. You can use this system for allpurpose. You can use this system for allpurpose. You can use this system for allpurpose. You can use this system for all purpose. You can use this system for allpurpose. You can use this system for allpurpose. You can use this system for allpurpose. You can use this system for all purpose. You can use this system for allpurpose. You can use this system for allpurpose. You can use this system for allpurpose. You can use this system for allpurpose. You can use this system for allpurpose. You can use this system for all purpose. You can use this system for allpurpose. You can use this system for all purpose. You can use this system for allpurpose. You can use this system for all purpose. You can use this system for allpurpose. You can use this system for allpurpose. You can use this system for all purpose. You can use this system for all purpose. You can use this system for all purpose. You can use this system for all purpose. You can use this system for all purpose. You can use this system for all purpose. You can use this system for allpurpose. You can use this system for allpurpose. You can use this system for allpurpose. You can use this system for all purpose. You can use this system for allpurpose. You can use this system for all purpose. You can use this system for all purpose. You can use this system for all purpose. You can use this system for all purpose. You can use this system for all purpose. You can use this system for allpurpose. You can use this system for allpurpose. You can use this system for all purpose. You can use this system for allpurpose. You can use this system for allpurpose. You can use this system for all purpose. You can use this system for all purpose. You can use this system for all purpose. You can use this system for all purpose. You can use this system for all purpose. You can use this system for allpurpose. You can use this system for all purpose. You can use this system for all purpose. You can use this system for all purpose. You can use this system for allpurpose. You can use this system for all purpose. You can use this system for all purpose. You can use this system for all purpose. You can use this system for all purpose. You can use this system for all purpose. You can use this system for allpurpose. You can use this system for all purpose. You can use this system for all purpose. You can use this system for allpurpose. You can use this system for allpurpose. You can use this system for all purpose. You can use this system for all purpose. You can use this system for all purpose. You can use this system for all purpose. You can use this system for all purpose. You can use this system for allpurpose. You can use this system for allpurpose. You can use this system for all purpose. You can use this system for all purpose. You can use this system for allpurpose. You can use this system for all purpose. You can use this system for allpurpose. You can use this system for all purpose. You can use this system for all purpose. You can use this system for allpurpose. You can use this system for allpurpose. You can use this system for all purpose. You can use this system for all purpose. You can use this system for allpurpose. You can use this system for all purpose. You can use this system for allpurpose. You can use this system for allpurpose. You can use this system for allpurpose. You can use this system for allpurpose. You can use this system for allpurpose. You can use this system for allpurpose. You can use this system for all purpose. You can use this system for allpurpose. You can use this system for allpurpose. You can use this system for all purpose. You can use this system for allpurpose. You can use this system for allpurpose. You can use this system for allpurpose. You can use this system for allpurpose. You can use this system for allpurpose. You can use this system for allpurpose. You can use this system for all purpose. You can use this system for all purpose. You can use this system for allpurpose. You can use this system for allpurpose. You can use this system for allpurpose. You can use this system for allpurpose. You can use this system for allpurpose. You can use this system for allpurpose. You can use this system for allpurpose. You can use this system for all purpose. You can use this system for all purpose. You can use this system for allpurpose. You can use this system for all purpose. You can use this system for allpurpose. You can use this system for allpurpose. You can use this system for allpurpose. You can use this system for all purpose. You can use this system for allpurpose. You can use this system for allpurpose. You can use this system for allpurpose. You can use this system for all purpose. You can use this system for allpurpose. You can use this system for all purpose. You can use this system for allpurpose. You can use this system for allpurpose. You can use this system for allpurpose. You can use this system for all purpose. You can use this system for allpurpose. You can use this system for allpurpose. You can use this system for all purpose. You can use this system for allpurpose. You can use this system for allpurpose. You can use this system for all purpose. You can use this system for allpurpose. You can use this system for allpurpose. You can use this system for allpurpose. You can use this system for all purpose. You can use this system for allpurpose. You can use this system for allpurpose. You can use this system for all purpose. You can use this system for all purpose. You can use this system for allpurpose. You can use this system for all purpose. You can use this system for allpurpose. You can use this system for allpurpose. You can use this system for all purpose. You can use this system for allpurpose. You can use this system for allpurpose. You can use this system for allpurpose. You can use this system for all purpose. You can use this system for all purpose. You can use this system for allpurpose. You can use this system for allpurpose. You can use this system for allpurpose. You can use this system for allpurpose. You can use this system for all purpose. You can use this system for allpurpose. You can use this system for allpurpose. You can use this system for allpurpose. You can use this system for allpurpose. You can use this system for all purpose. You can use this system for allpurpose. You can use this system for allpurpose. You can use this system for allpurpose. You can use this system for all purpose. You can use this system for all purpose. You can use this system for allpurpose. You can use this system for all purpose. You can use this system for allpurpose. You can use this system for all purpose. You can use this system for allpurpose. You can use this system for allpurpose. You can use this system for allpurpose. You can use this system for allpurpose. You can use this system for all purpose. You can use this system for allpurpose. You can use this system for allpurpose. You can use this system for all purpose. You can use this system for allpurpose. You can use this system for all purpose. You can use this system for allpurpose. You can use this system for allpurpose. You can use this system for allpurpose. You can use this system for allpurpose. You can use this system for all purpose. You can use this system for all purpose. You can use this system for allpurpose. You can use this system for allpurpose. You can use this system for allpurpose. You can use this system for all purpose. You can use this system for allpurpose. You can use this system for allpurpose. You can use this system for allpurpose. You can use this system for allpurpose. You can use this system for all purpose. You can use this system for all purpose. You can use this system for allpurpose. You can use this system for all purpose. You can use this system for allpurpose. You can use this system for all purpose. You can use this system for all purpose. You can use this system for all purpose. You can use this system for all purpose. You can use this system for allpurpose. You can use this system for all purpose. You can use this system for allpurpose. You can use this system for allpurpose. You can use this system for allpurpose. You can use this system for allpurpose. You can use this system for allpurpose. You can use this system for all purpose. You can use this system for all purpose. You can use this system for allpurpose. You can use this system for allpurpose. You can use this system for all purpose. You can use this system for allpurpose. You can use this system for allpurpose. You can use this system for allpurpose. | |
外觀 光り方 小斯テムの状態

URL:boseprofessional.com
