PDB1910 - TV Soundmaster - Free user manual and instructions
Find the device manual for free PDB1910 Soundmaster in PDF.
| Product Type | TV with built-in DVD player |
| Brand | Soundmaster |
| Model | PDB1910 |
| Power Supply | 12 V DC mains adapter; built-in rechargeable battery |
| Power Consumption | Automatic standby after 30 minutes of inactivity |
| Tuner | DVB-T2 (HD digital terrestrial) with supplied telescopic antenna |
| Supported Video Formats | DVD, CD, files via USB/SD (Photo, Music, Movie) |
| Connectivity | USB port, SD card slot, AV input, AV output, 3.5 mm headphone jack, game port |
| Main Features | DVB-T2 reception, DVD/CD playback, USB recording, time shift, CD to SD encoding, 300 built-in games on CD |
| Display | LCD screen with adjustments for brightness, contrast, hue, saturation, sharpness |
| Audio | Built-in speakers, treble/bass adjustment, balance, sound mode |
| Remote Control | Yes, with AAA batteries (not included) |
| Package Contents | Main unit, mains adapter, remote control, DVB-T2 antenna, game disc, game controller, audio/video cable, 12 V adapter, instruction manual |
| Care and Cleaning | Clean with a dry cloth; do not use detergents or abrasive cloths |
| Safety | Do not open (risk of electric shock); refer servicing to qualified personnel; keep batteries out of reach of children; do not expose to moisture or heat |
| Batteries | AAA batteries for remote control; do not dispose of with household waste |
| General Information | Manual downloadable from www.soundmaster.de; compliant with Directive 2014/53/EU |
Frequently Asked Questions - PDB1910 Soundmaster
User questions about PDB1910 Soundmaster
0 question about this device. Answer the ones you know or ask your own.
Ask a new question about this device
Download the instructions for your TV in PDF format for free! Find your manual PDB1910 - Soundmaster and take your electronic device back in hand. On this page are published all the documents necessary for the use of your device. PDB1910 by Soundmaster.
USER MANUAL PDB1910 Soundmaster
natural_image
Black-and-white photo of a portable electronic device with a palm tree beach and two remote control devices (no text or symbols visible)DEUTSCH
ENGLISH
FRANÇAIS
NEDERLANDS
ITALIANO
ČEŠTINA
SLOVENSKÝ
text_image
Diagram showing audio connection setup with labeled ports and audio/Video inverter connectionsAV OUT
Do not dispose of this product with the normal household waste at the end of its life cycle. Return it to a collection point for the recycling of electrical and electronic devices. This is indicated by the symbol on the product, user manual or packaging
The materials are reusable according to their markings. By reusing, recycling or other forms of utilization of old devices you make an important contribution to the protection of our environment.
Please contact your local authorities for details about collection points.
WARNING
Risk of electric shock Do not open!

Caution: To reduce the risk of electric shock, do not remove the cover (or back). There are no user serviceable parts inside. Refer servicing to qualified service personnel.

This symbol indicates the presence of dangerous voltage inside the enclosure, sufficient enough to cause electric shock.

This symbol indicates the presence of important operating and maintenance instructions for the device
Used batteries are hazardous waste and NOT to be disposed of with the household waste! As a consumer you are legally obligated to return all batteries for environmentally responsible recycling – no matter whether or not the batteries contain harmful substances*)
Return batteries free of charge to public collection points in your community or shops selling batteries of the respective kind.
Only return fully discharged batteries ^* ) marked Cd = cadmium, Hg = mercury, Pb = lead
- Only use mercury and cadmium-free batteries.
- Used batteries are hazardous waste and NOT to be disposed of with the household waste!!!
- Keep batteries away from children. Children might swallow batteries.
- Contact a physician immediately if a battery was swallowed.
- Check your batteries regularly to avoid battery leakage.
- Batteries shall not be exposed to excessive heat such as sunshine, fire or the like.
- CAUTION: Danger of explosion if battery is incorrectly replaced
- Replace only with the same or equivalent type

WARNING
DO NOT INGEST BATTERY, CHEMICAL BURN HAZARD
This product contains a coin/button cell battery. If the coin/button cell battery is swallowed, it can cause severe internal burns in just 2 hours and can lead to death.
Keep new and used batteries away from children. If the battery compartment does not close securely, stop using the product and keep it away from children.
If you think batteries might have been swallowed or placed inside any part of the body, seek immediate medical attention.
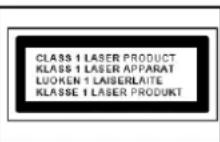
CAUTION - INVISIBLE LASER RADIATION WHEN OPENING THE COVER OR PRESSING THE SAFETY INTERLOCK. AVOID EXPOSURE TO THE LASER BEAM.
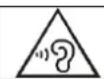
To prevent possible hearing damage, do not listen at high volume levels for long periods
Safety, Environmental and Setup Instructions
- Use the device in dry indoor environments only.
- Protect the device from humidity.
- This apparatus is for moderate climates areas use, not suitable for use in tropical climates countries.
- No objects filled with liquids, such as vases, shall be placed on the apparatus.
- The mains plug or an appliance coupler is used as the disconnect device, the disconnect devices shall remain readily operable.
- Connect this device to a properly installed and earthed wall outlet only. Make sure the mains voltage corresponds with the specifications on the rating plate.
- Make sure the mains cable stays dry during operation. Do not pinch or damage the mains cable in any way.
- A damaged mains cable or plug must immediately be replaced by an authorized service center.
- In case of lightning, immediately disconnect the device from the mains supply.
- Children should be supervised by parents when using the device.
- Clean the device with a dry cloth only.
- Do NOT use CLEANING AGENTS or ABRASIVE CLOTHS!
- Do not expose the device to direct sunlight or other heat sources.
• Install the device at a location with sufficient ventilation in order to prevent heat accumulation.
- Do not cover the ventilation openings!
- Install the device at a safe and vibration-free location.
- Install the device as far away as possible from computers and microwave units; otherwise radio reception may be disturbed.
- Do not open or repair the enclosure. It is not safe to do so and will void your warranty. Repairs only by authorized service/ customer center.
- No naked flame sources, such as lighted candles, should be placed on the unit.
- When you are necessary to ship the unit store it in its original package. Save the package for this purpose.
- In case of malfunction due to electrostatic discharge or fast transient (burst), remove and reconnect the power supply.
- If the unit is not using for a long period of time, disconnect it from the power supply by unplugging the power plug. This is to avoid the risk of fire.
- The device is equipped with a "Class 1 Laser". Avoid exposure to the laser beam as this could cause eye injuries.
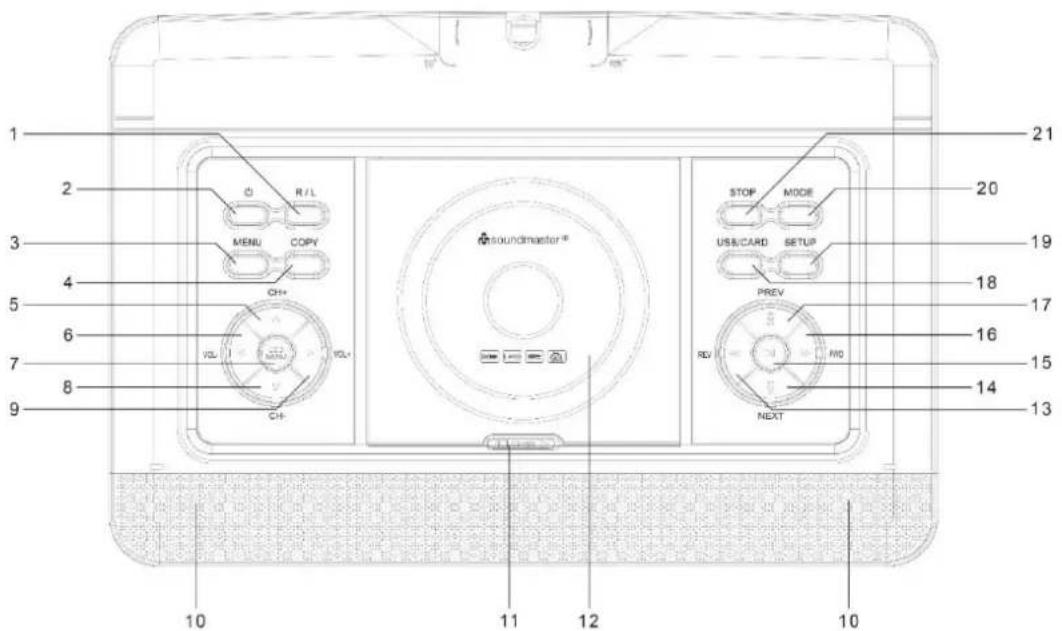
LOCATION OF CONTROLS
TOP VIEW

text_image
90° / 180° 1 2 3 4 5 6 7 8 9 10 11 NICKER PUL OFFSET LIF RUE MEMLI UNREADD OPEN OPEN 16 15 14 12 131 MODE button
2 VOL-button
3 VOL+ button
4 - Search back / - Cursor left
5 Skip back / ▲ Cursor up
6 ▶▶ Search forward / ▶ Cursor right
7 PLAY / PAUSE / OK button
8 ▶ Skip forward / ▼ Cursor down
9 STOP button
10 COPY
11 USB/CARD button
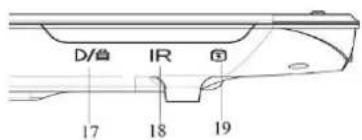
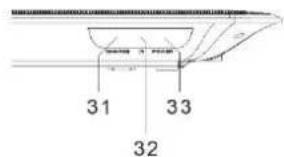
FRONT VIEW
text_image
D/管 IR 17 18 1917 Charge indicator
18 IR sensor
19 Power indicator
12 MENU button
13 R/L button
14 ⏻ / SETUP
15 DVD/CD Tray
16 Tray door release key
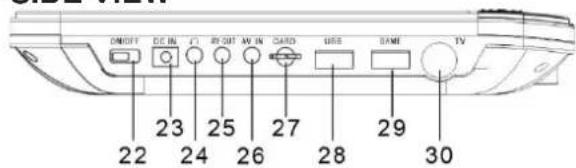
SIDE VIEW

text_image
OFF ON DC DC OFF CARE DAVE TU 20 21 22 23 24 25 26 27 2820 ON/OFF switch
21 DC IN jack
22 Headphone jack
23 AV OUT
24 AV IN
25 SD CARD socket
26 USB socket
27 GAME socket
28 TV socket
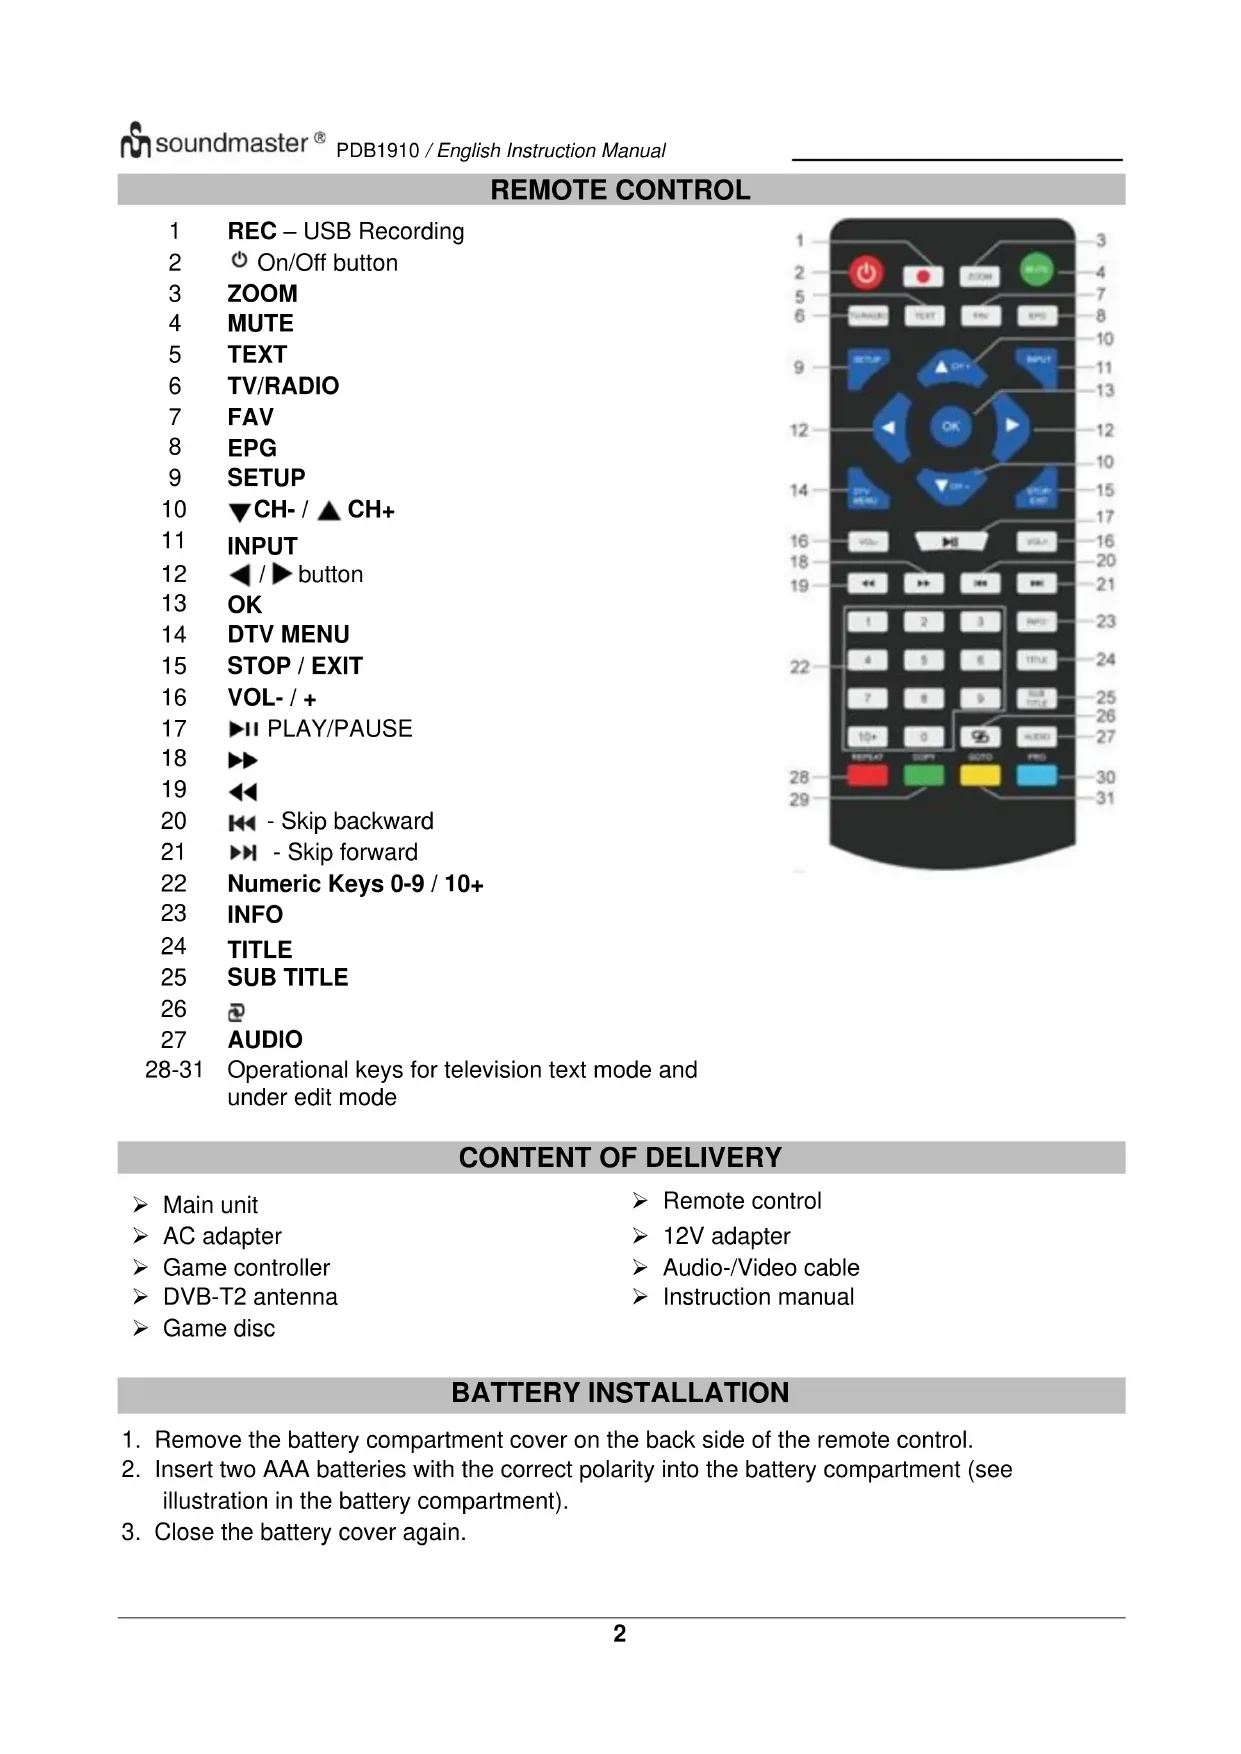
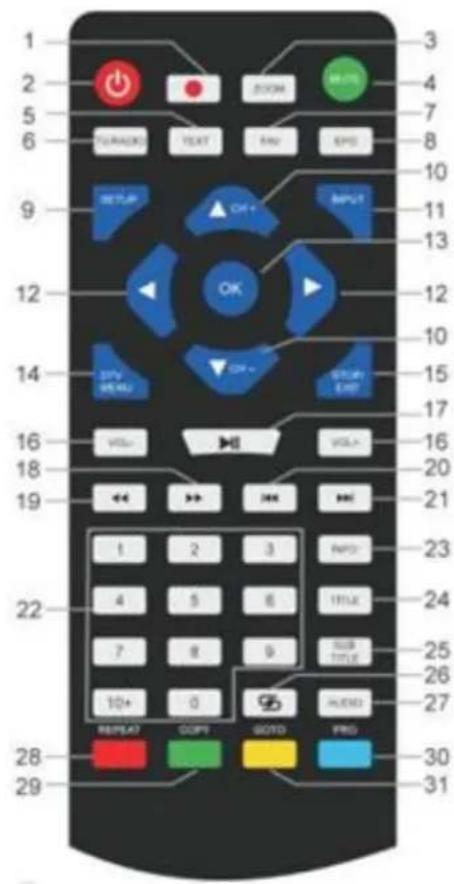
REMOTE CONTROL
1 REC – USB Recording
2 On/Off button
3 ZOOM
4 MUTE
5 TEXT
6 TV/RADIO
7 FAV
8 EPG
9 SETUP
10 ▼CH- / ▲CH+
11 INPUT
12 ◀ / ▶ button
13 OK
14 DTV MENU
15 STOP / EXIT
16 VOL-/+
17 ▶ II PLAY/PAUSE
18
19
20 - Skip backward
21 ▶▶ - Skip forward
22 Numeric Keys 0-9 / 10+
23 INFO
24 TITLE
25 SUB TITLE
26
27 AUDIO
28-31 Operational keys for television text mode and under edit mode
text_image
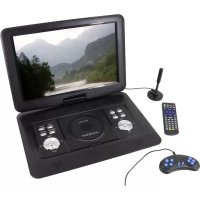
1 2 5 6 TURADO TEXT NAV EPD 9 SETUP OK 12 OK 14 SPV 20 21 16 VOLT 18 19 1 2 3 INFO 22 4 5 6 TITLE 7 8 9 USB 10+ 0 AUTO 28 REPEAT COPY GOOD PRO 29 30 31 4 7 8 10 11 13 15 17 16 20 21 23 24 25 26 27CONTENT OF DELIVERY
Main unit
AC adapter
Game controller
DVB-T2 antenna
Game disc
Remote control
12V adapter
▶ Audio-/Video cable
Instruction manual
BATTERY INSTALLATION
- Remove the battery compartment cover on the back side of the remote control.
- Insert two AAA batteries with the correct polarity into the battery compartment (see illustration in the battery compartment).
- Close the battery cover again.
INSTALLATION
Use only the supplied power adapter!
Make sure that the mains voltage corresponds to that on the rating label of the AC adapter.
Connect the AC adapter to the right side of the device and to an electrical outlet. The charging indicator on the device lights up:
LED on: The built-in batterie is charging.
LED off: Built-in batterie is fully loaded
Switch on the device with the ON / OFF switch on the right side.
To prevent accidental discharge of the built-in battery, please slide the on / off switch to the OFF position when the device is not in use.
ERP power management
The device automatically switches to standby after 30 minutes if no playback takes place. To turn the device back on, turn the power off and on again.
BASIC OPERATION
SWITCH ON/OFF
Long press the button “ ⏻ / SETUP” to switch the unit into standby. The power indicator is off. Press again the button „ ⏻ / SETUP“ to switch the unit on. The power indicator lights.
SOURCE SELECTION
At the unit:
Press the "MODE" button and select with the "◀ / ▶" "the desired function. Confirm the selection with the "OK" button.
With remote control:
Press the "INPUT" button and select the desired function with "▼CH- / ▲CH+". Confirm the selection with "OK".
VOLUME ADJUSTMENT
Press the "VOL –" or "VOL +" button on the remote control or on the unit to decrease or increase the volume.
MUTE
Press the „MUTE“ button on the remote control to switch off the volume.
Press the button again to switch on the volume.
DVD SETUP MENU
In DVD mode, press "SETUP" button to enter the setup menu. Use cursor buttons ▲▼◀▶ to select the preferred item. After finishing settings, press "SETUP" again to go back to normal display. The following menu items can be changed:
SYSTEM SETUP
LANGUAGE SETUP
AUDIO SETUP
VIDEO SETUP
DIGITAL SETUP
SYSTEM SETUP
TV SYSTEM : Select the TV standard format (PAL, NTSC, Auto).
PAL: Select this if the connected TV is PAL system. It will change the video signal of a NTSC disc and output in PAL format.
NTSC: Select this if the connected TV is NTSC system. It will change the video signal of a PAL disc and output in NTSC format.
AUTO: Change the video signal output automatic according to the playing disk format.
POWER RESUME: Starts the DVD playback at the last position.
TV TYPE: Adjustment of the display format (4:3PS, 4:3LB or 16:9).
PASSWORD: Set password for the lock function.
RATING: Some DVDs may have a parental level assigned to the complete disc or to certain scenes on the disc. This feature lets you set a playback limitation level. The rating levels are from 1 to 8 and are country dependent. You can prohibit the playing of certain discs that are not suitable for your children or have certain discs played with alternative scenes.
DEFAULT: Settings will be restored
LANGUAGE SETUP
OSD LANGUAGE: Select your own preferred language setting.
AUDIO LANGUAGE: Selects a language for audio, if available.
SUBTITLE LANGUAGE: Selects a language for subtitle, if available.
MENU LANGUAGE: Selects a language for the disc menu, if available.
AUDIO SETUP
AUDIO OUT: Select the format of the audio output.
KEY: Pitch of the language.
VIDEO SETUP
VIDEO: No selection possible!
BRIGHTNESS: Adjustment of brightness.
CONTRAST: Adjustment of contrast.
HUE: Adjustment of hue.
SATURATION: Adjustment of saturation.
SHARPNESS: Adjustment of sharpness.
DIGITAL SETUP
OP MODE: Select audio output (fixed or regulated).
DYNAMIC RANGE: Dynamic range compression.
DUAL MONO:
Stereo: Left mono sound will send output signals to left speaker and right mono sound will send output signals to right speaker.
Mono L: Left mono sound will send output signals to left speaker and right speaker.
Mono R: Right mono sound will send output signals to left speaker and right speaker.
Mix-Mono: Left and right mixed mono sound will send output signals to left and right speakers.
DVB-T2
Connect the supplied antenna to the antenna socket on the right side of the device. Set the antenna upright.
FIRST TIME INSTALLATION
After all connections have been made properly, switch on the unit. Press "INPUT" and select with "▼ CH- / ▲ CH+" the function "DTV". Confirm the selection with "OK". If you are using the function for the first time or restored to factory default, the install menu will appear on the display.
- Select the "OSD Language" with "▲▼◀▶" and press "OK" to confirm the language.
- Choose the "Country" with "▲▼◀▶" and confirm again with "OK".
- The unit starts the automatic scan. During the scan the display show a slide bar that indicate the process of the scan and a number of stations that have been found.
- When the scan is complete, you are now ready to watch TV.
ATTENTION! With this device, only free-to-air programs can be played! If no or only a few stations are found, this can have several causes:
➢ Bad reception. Move the antenna or the complete device to another location and restart the search.
The connected antenna is not sufficient for the current reception range of the device. Connect an outdoor or roof antenna to the device.
In the current reception area, no DVB-T2 reception is possible.
Do not place the device or the antenna in the vicinity of possible sources of interference, e.g. microwaves, refrigerators, etc.
For further information and the receivability of the transmitters, please contact the provider of the respective country (for example www.dvb-t2hd.de for Germany).
SELECT A STATION
To select a TV channel, press the buttons “▼CH- / ▲CH+” on the unit or on the remote control, or use the number buttons 0-9 on the remote control to directly select the channel position.
PROGRAM EDIT
To edit your program preferences (lock, skip, favourite, move or delete), you must enter the DVB-T2 menu with "DTV/MENU". Select the point "Channel" and press the "▶" button. Choose the function "Programme Edit" and press "OK".
Move TV or Radio program
- Select the preferred program. Then press the YELLOW button. A move symbol will appear.
- Press "▲▼" to move the program.
- Press "OK" to confirm.
- Repeat the above steps to move more channels.
Skip TV or Radio program
- Select the program you would like to skip and press the BLUE button. A skip symbol is displayed.
- Repeat the previous step to select more programs.
Disable a skip TV or Radio Program:
Press the BLUE button on the skip program with the skip symbol.
Delete a TV or Radio program
- Select the program and then press the RED button.
- Repeat the previous step to select more programs to delete.
Set TV or Radio program as favourite
- Select the program you would like to set to favourite list and press the "FAV" button. A favourite symbol is displayed.
- Repeat the previous step to select more programs.
Remove a favourite TV or Radio Program:
In the DVB-T channel list press the "FAV" button to remove the station from the favourite station list.
NOTE:
During normal DVB-T2 use, press the "FAV" button to enter the favourite program list. Press the "FAV" button again to exit the favourite program list.
EPG (Electronic Program Guide)
The EPG is an on-screen TV guide that shows program information for each tuned channel. Press the "EPG" button on the remote control to access the guide.
During the EPG guide is shown in the display, press the GREEN button to show more information (if available).
Press the "EPG" button again to go back to the normal TV mode.
USB-RECORDING
You can use the USB Recording function to record and watch TV programs at a later date or to use the Timeshift function. This function is only functional with an existing USB stick.
Before use (Format the USB stick)
- Insert a USB stick into the USB socket on the right side of the device.
- In DVB-T2 mode, enter the main menu. Select the function "OPTION" and confirm with the "▶" button.
- Choose the point "PVR File System" and confirm with the "OK" button.
- Select „Format“ and press again the „OK“ button. In the following menu, select the format and confirm again by pressing "OK".
- Start the process with the "◀" button.
IMPORTANT: All stored files will be deleted!
Start a recording
- Set the desired TV station on the unit.
- Press on the remote control the "REC" button. The control buttons are shown in the display and the recording starts. Press the "REC" button again, the control buttons will disappear of the display and the REC icon is shown in the display in the upper left corner.
- To stop the recording, press on the remote control the "REC" button again. The control buttons are shown again in the display.
NOTE: If the record icon is not shown in the display, press the "REC" button twice.
- Select the "STOP" icon and confirm with "OK".
Watch a recording
- Press the „INPUT“ button and select the point „USB“.
- Select with the “◀▶” button the point „Movie“ and press „OK“ for confirmation.
- Mark the item "_MSTPVR" and press the "OK" button again.
- Use the ▲▼◀▶ button to select the desired file and press the "OK" key. The playback starts on the screen.
Timeshift
This function requires a connected USB stick on the right of the device!
- While a TV program is playing, press the "▶II" button on the remote control. The device pauses and continues recording the current program to USB.
- To continue watching the program press the "▶II" button again. To end the process, press the "REC" button. The control elements are shown in the display. Select the "STOP" icon on the screen and confirm by pressing "OK". The current program can now be seen again.
SYSTEM SETTINGS DVB-T2
This settings are only available for DVB-T2 mode!
In DVD mode, press "DTV MENU" to enter the setup menu. Use cursor buttons ▲▼◀▶ to select the preferred item. After finishing settings, press "DTV MENU" again to normal display.
The following menu items can be changed:
PICTURE
SOUND
TIME
OPTION
LOCK
CHANNEL
PICTURE
Picture Mode: Adjustment for Standard, Soft, User. If user is selected, you can adjust contrast, brightness, color and sharpness.
Color Temperature: Adjustment for color temperature of the display (warm/cool/medium).
Aspect Ratio: Adjustment for display format (Auto, Panorama, Zoom2, Zoom1, 16:9 or 4:3 to get the maximum display when watching TV).
Noise Reduction: Adjustment for picture noise reduction.
SOUND
Sound Mode: Adjustment for defined sound setting. If user is selected, you can adjust treble and bass.
Balance: Set the volume level for each speaker. Normally both speaker have the same volume level.
Auto Volume: Setting to adjust the volume.
Surround sound: Switch sound broadening on or off
TIME
Off time: Setting for switch off to a defined time.
On Time: Setting for switch on to a defined time. For this, the unit must be in standby mode.
Sleep Timer: Set the time after which the device automatically switches to standby.
Auto Sleep: Set the time after which the device automatically switches to standby.
Time Zone: Select the country region.
OPTION
OSD Language: Select an OSD language.
Audio Languages: Here you set the audio language for the TV channels. If the selected language is not available, the default language of the channel will be used.
Subtitle Language: Select the preferred subtitle language.
Hearing Impaired: Adjustment for language support for hearing Impaired (If available!).
PVR File System: Adjustment and setting for USB recording and timeshift.
Restore Factory Default: Set all settings in factory default. After the factory reset, the unit starts again with the install menu.
Information: Show the current installed hardware and software version
LOCK
Set a password and block the mode. The default password is 0000.
CHANNEL
Auto Tuning: Search and install all channels automatically.
DTV Manual Tuning: Manual tuning of the TV channels.
Programme Edit: Function to moving or deleting of the TV channels.
Signal Information: Signal information of channel, quality and strength.
5V antenna power: Enables supply voltage for DVB-T antenna (if needed).
You can use this device to play back images, music or movies via USB stick.
The corresponding selection is made in the menu under the function "USB". Here you will find the respective options for "Photo", "Music" or "Movie".
GAME FUNCTION
The device has a game function with 300 games on a CD. The game function is intended for 1 player.
- Connect the game controller into the jack "GAME" on the right side.
- Insert the CD with the games into the DVD/CD Tray.
- Press the "INPUT" button and select the function "DVD". After a few seconds, the display shows an overview of the first 10 games.
- Use the “◀◀ / ▶◀” buttons on the remote control to select the page of the games. Press the buttons “0-9” to select the desired game. After one moment, the unit starts the game.
- To exit the selected game, press the "STOP / EXIT" button on the remote control. You will get back to the game overview.
ENCODING
The unit can encode an audio CD to SD CARD.
Using the menu: Select with “▲▼” the option. With “◀” go back to previous point of the menu. Press “OK” to enter or set the function.
- Insert a CD into the DVD/CD Tray and an empty SD card into SD CARD socket.
- Press the "COPY" button the unit. The encode menu will be displayed.
- Set the encode options:
➢ SPEED: Set the encoding speed.
BITRATE: Set the quality of the track.
CREATE ID3 TAG: Create the ID3 tags of the encoded files (if available).
CREATE PLAYLIST: Create a playlist of the encoded files.
➢ STORAGE: Set the desired location for the recording (ONLY SD CARD available!).
- TRACKS: Select the desired tracks.
- START: Press "OK" to start the encoding.
- QUIT: Select "QUIT" and press "OK" to exit the encoding function.
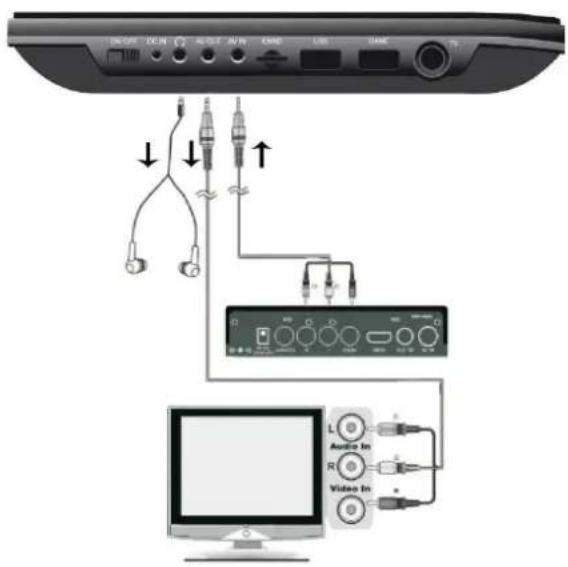
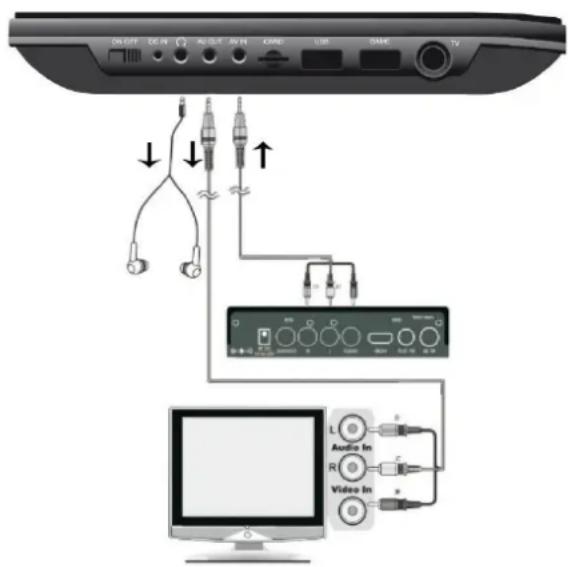
EXTERNAL CONNECTIONS
AV IN
You can connect an external video source to the device (for example external DVD player, satellite receiver, etc.).
- Insert the jack plug of the enclosed AV cable into the AV-IN socket of the device and the 3 RCA plugs of the cable into the external device. If the device does not have these connections, you will find corresponding adapters in the specialized trade.
- Select the function "AV". Turn on the connected device and start playback.
text_image
ON/OFF DC/IN AC/OUT AU/IN CHAND LBS CHAND TP ↓ ↓ ↑ Audio In Audio In Video InAV OUT
You can connect the device to an external device (such as TV, projector, etc.) to view content on the device. NOTE: AV OUT is only possible at DVD or SD playback!
-
Insert the jack plug of the enclosed AV cable into the "AV-OUT" socket of the device and the 3 RCA plugs of the cable into the external device. If the device does not have these connections, you will find corresponding adapters in the specialized trade.
-
Switch the connected device to the corresponding input and start playback on the device.
HEADPHONE
You have the possibility to connect headphones to the device. Plug the headphones into the headphone jack on the right side of the unit with a 3.5mm jack plug. The sound via the built-in speakers is switched off.
The current instruction manual can be downloaded from www.soundmaster.de
Technical changes and misprints reserved.
Copyright by Woerlein GmbH, 90556 Cadolzburg, www.soundmaster.de
Duplication only with the permission of Woerlein GmbH

text_image
CEPROTECTION DE L'ENVIRONNEMENT

SYSTEM SETUP
LANGUAGE SETUP
AUDIO SETUP
VIDEO SETUP
DIGITAL SETUP
text_image
ON/OFF 3G IN IN OUT IN SARS USE SWE C TV ↓ ↓ ↑ 0 Audio In L Video InSORTIE AV
SYSTEM SETUP
LANGUAGE SETUP
AUDIO SETUP
VIDEO SETUP
DIGITAL SETUP
SYSTEEMINSTELLINGEN
text_image
IN OFF DC IN AW OUT AV IN CARD USB Quick TV ↓ ↓ ↑ Audio In L Audio In R Video InAV OUT
SYSTEM SETUP
LANGUAGE SETUP
AUDIO SETUP
VIDEO SETUP
DIGITAL SETUP
SETUP DEL SISTEMA
text_image
USB OFF DC IN INTOUT AV IN CHINT USB SMART TV ↓ ↓ ↑ D Audio In R Video InUSCITA AV
text_image
ON/OFF DC/IN AC/IN AV/IN GND/IN USB GND/IN TV ↓ ↓ ↑ Audio In Video InVÝSTUP AV
Cadolzburg, www.soundmaster.de
text_image
Diagram showing audio connection setup with labeled ports and audio/Video inverter connectionsVýstup AV
D 90556 Cadolzburg, Germany
Tel: +49 9103 71 67 0
Fax: +49 9103 71 67 12
E-Mail: info@soundmaster.de
Internet: www.soundmaster.de
Hereby, Wörlein GmbH declares that this device is in compliance with the essential requirements and other relevant provisions of Directive 2014/53/EU.
A copy of the declaration of conformity can be obtained from the above address.
natural_image
Black-and-white photo of a portable TV stand with a scenic lake view and a remote control (no visible text or symbols)DEUTSCH
ENGLISH
FRANÇAIS
NEDERLANDS
ITALIANO
ČEŠTINA
SLOVENSKÝ
text_image
ON OFF USB AD/SEAT AD IN GND LAM CHINT TV ↓ ↓ ↑ D Audio In Video In L R +AV OUT
Do not dispose of this product with the normal household waste at the end of its life cycle. Return it to a collection point for the recycling of electrical and electronic devices. This is indicated by the symbol on the product, user manual or packaging
The materials are reusable according to their markings. By reusing, recycling or other forms of utilization of old devices you make an important contribution to the protection of our environment.
Please contact your local authorities for details about collection points.

WARNING
Risk of electric shock Do not open!

Caution: To reduce the risk of electric shock, do not remove the cover (or back). There are no user serviceable parts inside. Refer servicing to qualified service personnel.

This symbol indicates the presence of dangerous voltage inside the enclosure, sufficient enough to cause electric shock.

This symbol indicates the presence of important operating and maintenance instructions for the device

Used batteries are hazardous waste and NOT to be disposed of with the household waste! As a consumer you are legally obligated to return all batteries for environmentally responsible recycling – no matter whether or not the batteries contain harmful substances*)
Return batteries free of charge to public collection points in your community or shops selling batteries of the respective kind.
Only return fully discharged batteries ^* ) marked Cd = cadmium, Hg = mercury, Pb = lead
- Only use mercury and cadmium-free batteries.
- Used batteries are hazardous waste and NOT to be disposed of with the household waste!!!
- Keep batteries away from children. Children might swallow batteries.
- Contact a physician immediately if a battery was swallowed.
- Check your batteries regularly to avoid battery leakage.
- Batteries shall not be exposed to excessive heat such as sunshine, fire or the like.
- CAUTION: Danger of explosion if battery is incorrectly replaced
- Replace only with the same or equivalent type

WARNING
DO NOT INGEST BATTERY, CHEMICAL BURN HAZARD
This product contains a coin/button cell battery. If the coin/button cell battery is swallowed, it can cause severe internal burns in just 2 hours and can lead to death.
Keep new and used batteries away from children. If the battery compartment does not close securely, stop using the product and keep it away from children.
If you think batteries might have been swallowed or placed inside any part of the body, seek immediate medical attention.

CAUTION - INVISIBLE LASER RADIATION WHEN OPENING THE COVER OR PRESSING THE SAFETY INTERLOCK. AVOID EXPOSURE TO THE LASER BEAM.

To prevent possible hearing damage, do not listen at high volume levels for long periods
Safety, Environmental and Setup Instructions
- Use the device in dry indoor environments only.
- Protect the device from humidity.
- This apparatus is for moderate climates areas use, not suitable for use in tropical climates countries.
- No objects filled with liquids, such as vases, shall be placed on the apparatus.
- The mains plug or an appliance coupler is used as the disconnect device, the disconnect devices shall remain readily operable.
- Connect this device to a properly installed and earthed wall outlet only. Make sure the mains voltage corresponds with the specifications on the rating plate.
- Make sure the mains cable stays dry during operation. Do not pinch or damage the mains cable in any way.
- A damaged mains cable or plug must immediately be replaced by an authorized service center.
- In case of lightning, immediately disconnect the device from the mains supply.
- Children should be supervised by parents when using the device.
- Clean the device with a dry cloth only.
- Do NOT use CLEANING AGENTS or ABRASIVE CLOTHS!
- Do not expose the device to direct sunlight or other heat sources.
• Install the device at a location with sufficient ventilation in order to prevent heat accumulation.
- Do not cover the ventilation openings!
- Install the device at a safe and vibration-free location.
- Install the device as far away as possible from computers and microwave units; otherwise radio reception may be disturbed.
- Do not open or repair the enclosure. It is not safe to do so and will void your warranty. Repairs only by authorized service/ customer center.
- No naked flame sources, such as lighted candles, should be placed on the unit.
- When you are necessary to ship the unit store it in its original package. Save the package for this purpose.
- In case of malfunction due to electrostatic discharge or fast transient (burst), remove and reconnect the power supply.
- If the unit is not using for a long period of time, disconnect it from the power supply by unplugging the power plug. This is to avoid the risk of fire.
- The device is equipped with a "Class 1 Laser". Avoid exposure to the laser beam as this could cause eye injuries.
LOCATION OF CONTROLS
TOP VIEW
text_image
1 2 3 4 5 6 7 8 9 10 11 12 13 14 15 16 17 18 19 20 21 R/L MENU COPY CH+ VOL CH+ VOL+ STOP MODE USB/CARD SETUP PREV REV W/O NEXT1 R/L button
2 STANDBY/ON button
3 MENU
4 COPY
5 CH+ / ▲ - Cursor up
6 VOL-/◀-Cursor left
7 LCD MENU
8 CH- / ▼ - Cursor down
9 VOL+ / ▶ - Cursor right
10 Speaker
11 Tray door release key
SIDE VIEW
text_image
ON/OFF DC IN FR OUT AV IN CARD USB BAME TV 23 25 27 29 22 24 26 28 3022 ON/OFF switch
23 DC IN jack
24 Headphone jack
25 AV OUT
26 AV IN
27 SD CARD socket
28 USB socket
29 GAME socket
30 TV socket
12 DVD/CD Tray
13 - Search back
14 - Skip back
15 - Play/Pause
16 ▶▶ - Search forward
17 - Skip forward
18 USB/CARD button
19 SETUP button
20 MODE button
21 STOP button
FRONT VIEW
text_image
31 33 3231 Charge indicator
32 IR sensor
33 Power indicator
REMOTE CONTROL
1 REC – USB Recording
2 On/Off button
3 ZOOM
4 MUTE
5 TEXT
6 TV/RADIO
7 FAV
8 EPG
9 SETUP
10 ▼CH- / ▲ CH+
11 INPUT
12 ◀ / ▶ button
13 OK
14 DTV MENU
15 STOP / EXIT
16 VOL-/+
17 ▶ II PLAY/PAUSE
18
19
20 - Skip backward
21 ▶▶ - Skip forward
22 Numeric Keys 0-9 / 10+
23 INFO
24 TITLE
25 SUB TITLE
26
27 AUDIO
28-31 Operational keys for television text mode and under edit mode

text_image
1 2 5 6 TURADO TEXT NAV EPD 9 SETUP OK INPUT 12 OK 14 STV 20 21 16 VOLT VOLT 18 19 1 2 3 INFO 22 4 5 6 TITLE 7 8 9 USB 10+ 0 AUTO 28 REPEAT COPY GOOD PRO 29 30 31 4 7 8 10 11 13 15 17 20 23 24 25 26 27CONTENT OF DELIVERY
Main unit
AC adapter
Game controller
DVB-T2 antenna
Game disc
Remote control
12V adapter
▶ Audio-/Video cable
Instruction manual
BATTERY INSTALLATION
- Remove the battery compartment cover on the back side of the remote control.
- Insert two AAA batteries with the correct polarity into the battery compartment (see illustration in the battery compartment).
- Close the battery cover again.
INSTALLATION
Use only the supplied power adapter!
Make sure that the mains voltage corresponds to that on the rating label of the AC adapter.
Connect the AC adapter to the right side of the device and to an electrical outlet. The charging indicator on the device lights up:
LED on: The accu is charging.
LED off: Accu is fully loaded
Switch on the device with the ON / OFF switch on the right side.
To prevent accidental discharge of the built-in battery, please slide the on / off switch to the OFF position when the device is not in use.
ERP power management
The device automatically switches to standby after 30 minutes if no playback takes place. To turn the device back on, turn the power off and on again.
BASIC OPERATION
SWITCH ON/OFF
Press the button "ON/OFF" to switch off the unit in standby. The power indicator is off.
Press again the button „ON/OFF“ to switch on the unit. The power indicator lights.
SOURCE SELECTION
At the unit:
Press the "MODE" button and select with the "◀◀ / ▶▶" the desired function. Confirm the selection with the "▶▶" button.
With remote control:
Press the "INPUT" button and select the desired function with "▼CH- / ▲CH+". Confirm the selection with "OK".
VOLUME ADJUSTMENT
Press the "VOL –" or "VOL +" button on the remote control or on the unit to decrease or increase the volume.
MUTE
Press the „MUTE“ button on the remote control to switch off the volume.
Press the button again to switch on the volume.
DVD SETUP MENU
In DVD mode, press "SETUP" button to enter the setup menu. Use cursor buttons ▲▼◀▶ to select the preferred item. After finishing settings, press "SETUP" again to go back to normal display. The following menu items can be changed:
SYSTEM SETUP
LANGUAGE SETUP
AUDIO SETUP
VIDEO SETUP
DIGITAL SETUP
SYSTEM SETUP
TV SYSTEM : Select the TV standard format (PAL, NTSC, Auto).
PAL: Select this if the connected TV is PAL system. It will change the video signal of a NTSC disc and output in PAL format.
NTSC: Select this if the connected TV is NTSC system. It will change the video signal of a PAL disc and output in NTSC format.
AUTO: Change the video signal output automatic according to the playing disk format.
POWER RESUME: Starts the DVD playback at the last position.
TV TYPE: Adjustment of the display format (4:3PS, 4:3LB or 16:9).
PASSWORD: Set password for the lock function.
RATING: Some DVDs may have a parental level assigned to the complete disc or to certain scenes on the disc. This feature lets you set a playback limitation level. The rating levels are from 1 to 8 and are country dependent. You can prohibit the playing of certain discs that are not suitable for your children or have certain discs played with alternative scenes.
DEFAULT: Settings will be restored
LANGUAGE SETUP
OSD LANGUAGE: Select your own preferred language setting.
AUDIO LANGUAGE: Selects a language for audio, if available.
SUBTITLE LANGUAGE: Selects a language for subtitle, if available.
MENU LANGUAGE: Selects a language for the disc menu, if available.
AUDIO SETUP
AUDIO OUT: Select the format of the audio output.
KEY: Pitch of the language.
VIDEO SETUP
VIDEO: No selection possible!
BRIGHTNESS: Adjustment of brightness.
CONTRAST: Adjustment of contrast.
HUE: Adjustment of hue.
SATURATION: Adjustment of saturation.
SHARPNESS: Adjustment of sharpness.
DIGITAL SETUP
OP MODE: Select audio output (fixed or regulated).
DYNAMIC RANGE: Dynamic range compression.
DUAL MONO:
Stereo: Left mono sound will send output signals to left speaker and right mono sound will send output signals to right speaker.
Mono L: Left mono sound will send output signals to left speaker and right speaker.
Mono R: Right mono sound will send output signals to left speaker and right speaker.
Mix-Mono: Left and right mixed mono sound will send output signals to left and right speakers.
DVB-T2
Connect the supplied antenna to the antenna socket on the right side of the device. Set the antenna upright.
FIRST TIME INSTALLATION
After all connections have been made properly, switch on the unit. Press "INPUT" and select with "▼ CH- / ▲ CH+" the function "DTV". Confirm the selection with "OK". If you are using the function for the first time or restored to factory default, the install menu will appear on the display.
- Select the "OSD Language" with "▲▼◀▶" and press "OK" to confirm the language.
- Choose the "Country" with "▲▼◀▶" and confirm again with "OK".
- The unit starts the automatic scan. During the scan the display show a slide bar that indicate the process of the scan and a number of stations that have been found.
- When the scan is complete, you are now ready to watch TV.
ATTENTION! With this device, only free-to-air programs can be played! If no or only a few stations are found, this can have several causes:
➢ Bad reception. Move the antenna or the complete device to another location and restart the search.
The connected antenna is not sufficient for the current reception range of the device. Connect an outdoor or roof antenna to the device.
In the current reception area, no DVB-T2 reception is possible.
Do not place the device or the antenna in the vicinity of possible sources of interference, e.g. microwaves, refrigerators, etc.
For further information and the receivability of the transmitters, please contact the provider of the respective country (for example www.dvb-t2hd.de for Germany).
SELECT A STATION
To select a TV channel, press the buttons “▼CH- / ▲CH+” on the unit or on the remote control, or use the number buttons 0-9 on the remote control to directly select the channel position.
PROGRAM EDIT
To edit your program preferences (lock, skip, favourite, move or delete), you must enter the DVB-T2 menu. Select the point "Channel" and press the "▶" button. Choose the function "Programme Edit" and press "OK".
Move TV or Radio program
- Select the preferred program. Then press the YELLOW button. A move symbol will appear.
- Press "▲▼" to move the program.
- Press "OK" to confirm.
- Repeat the above steps to move more channels.
Skip TV or Radio program
-
Select the program you would like to skip and press the BLUE button. A skip symbol is displayed.
-
Repeat the previous step to select more programs.
Disable a skip TV or Radio Program:
Press the BLUE button on the skip program with the skip symbol.
Delete a TV or Radio program
- Select the program and then press the RED button.
- Repeat the previous step to select more programs to delete.
Set TV or Radio program as favourite
- Select the program you would like to set to favourite list and press the "FAV" button. A favourite symbol is displayed.
- Repeat the previous step to select more programs.
Delete a favourite TV or Radio Program:
Press the "FAV" button on the skip program with the skip symbol.
EPG (Electronic Program Guide)
The EPG is an on-screen TV guide that shows program information for each tuned channel.
Press the "EPG" button on the remote control to access the guide.
During the EPG guide is shown in the display, press the GREEN button to show more information (if available).
Press the "EPG" button again to go back to the normal TV mode.
USB-RECORDING
You can use the USB Recording function to record and watch TV programs at a later date or to use the Timeshift function. This function is only functional with an existing USB stick.
Before use (Format the USB stick)
- Insert a USB stick into the USB socket on the right side of the device.
- In DVB-T2 mode, enter the main menu. Select the function "OPTION" and confirm with the "▶" button.
- Choose the point "PVR File System" and confirm with the "OK" button.
- Select „Format“ and press again the „OK“ button. In the following menu, select the format and confirm again by pressing "OK".
- Start the process with the "◀" button.
IMPORTANT: All stored files will be deleted!
Start a recording
- Set the desired TV station on the unit.
- Press on the remote control the "REC" button. The control buttons are shown in the display and the recording starts. Press the "REC" button again, the control buttons will disappear of the display and the REC icon is shown in the display in the upper left corner.
- To stop the recording, press on the remote control the "REC" button again. The control buttons are shown again in the display.
NOTE: If the record icon is not shown in the display, press the "REC" button twice.
- Select the "STOP" icon and confirm with "OK".
Watch a recording
- Press the „INPUT“ button and select the point „USB“.
- Select with the “◀▶” button the point „Movie“ and press „OK“ for confirmation.
- Mark the item "_MSTPVR" and press the "OK" button again.
- Use the ▲▼◀▶ button to select the desired file and press the "OK" key. The playback starts on the screen.
Timeshift
This function requires a connected USB stick on the right of the device!
- While a TV program is playing, press the "▶II" button on the remote control. The device pauses and continues recording the current program to USB.
- To continue watching the program press the "▶II" button again. To end the process, press the "REC" button. The control elements are shown in the display. Select the "STOP" icon on the screen and confirm by pressing "OK". The current program can now be seen again.
SYSTEM SETTINGS DVB-T2
This settings are only available for DVB-T2 mode!
In DVD mode, press "DTV MENU" to enter the setup menu. Use cursor buttons ▲▼◀▶ to select the preferred item. After finishing settings, press "DTV MENU" again to normal display. The following menu items can be changed:
PICTURE
SOUND
TIME
OPTION
LOCK
CHANNEL
PICTURE
Picture Mode: Adjustment for Standard, Soft, User. If user is selected, you can adjust contrast, brightness, color and sharpness.
Color Temperature: Adjustment for color temperature of the display (warm/cool/medium).
Aspect Ratio: Adjustment for display format (Auto, Panorama, Zoom2, Zoom1, 16:9 or 4:3 to get the maximum display when watching TV).
Noise Reduction: Adjustment for picture noise reduction.
SOUND
Sound Mode: Adjustment for defined sound setting. If user is selected, you can adjust treble and bass.
Balance: Set the volume level for each speaker. Normally both speaker have the same volume level.
Auto Volume: Setting to adjust the volume.
Surround sound: Switch sound broadening on or off
TIME
Off time: Setting for switch off to a defined time.
On Time: Setting for switch on to a defined time. For this, the unit must be in standby mode.
Sleep Timer: Set the time after which the device automatically switches to standby.
Auto Sleep: Set the time after which the device automatically switches to standby.
Time Zone: Select the country region.
OPTION
OSD Language: Select an OSD language.
Audio Languages: Here you set the audio language for the TV channels. If the selected language is not available, the default language of the channel will be used.
Subtitle Language: Select the preferred subtitle language.
Hearing Impaired: Adjustment for language support for hearing Impaired (If available!).
PVR File System: Adjustment and setting for USB recording and timeshift.
Restore Factory Default: Set all settings in factory default. After the factory reset, the unit starts again with the install menu.
Information: Show the current installed hardware and software version
LOCK
Set a password and block the mode. The default password is 0000.
CHANNEL
Auto Tuning: Search and install all channels automatically.
DTV Manual Tuning: Manual tuning of the TV channels.
Programme Edit: Function to moving or deleting of the TV channels.
Signal Information: Signal information of channel, quality and strength.
5V antenna power: Enables supply voltage for DVB-T antenna (if needed).
You can use this device to play back images, music or movies via USB stick.
The corresponding selection is made in the menu under the function "USB". Here you will find the respective options for "Photo", "Music" or "Movie".
GAME FUNCTION
The device has a game function with 300 games on a CD. The game function is intended for 1 player.
- Connect the game controller into the jack "GAME" on the right side.
- Insert the CD with the games into the DVD/CD Tray.
- Press the "INPUT" button and select the function "DVD". After a few seconds, the display shows an overview of the first 10 games.
- Use the “◀◀ / ▶◀” buttons on the remote control to select the page of the games. Press the buttons “0-9” to select the desired game. After one moment, the unit starts the game.
- To exit the selected game, press the "STOP / EXIT" button on the remote control. You will get back to the game overview.
ENCODING
The unit can encode an audio CD to SD CARD.
Using the menu: Select with “▲▼” the option. With “◀” go back to previous point of the menu. Press “OK” to enter or set the function.
- Insert a CD into the DVD/CD Tray and an empty SD card into SD CARD socket.
- Press the "COPY" button the unit. The encode menu will be displayed.
- Set the encode options:
➢ SPEED: Set the encoding speed.
BITRATE: Set the quality of the track.
CREATE ID3 TAG: Create the ID3 tags of the encoded files (if available).
CREATE PLAYLIST: Create a playlist of the encoded files.
➢ STORAGE: Set the desired location for the recording (ONLY SD CARD available!).
- TRACKS: Select the desired tracks.
- START: Press "OK" to start the encoding.
- QUIT: Select "QUIT" and press "OK" to exit the encoding function.
EXTERNAL CONNECTIONS
AV IN
You can connect an external video source to the device (for example external DVD player, satellite receiver, etc.).
- Insert the jack plug of the enclosed AV cable into the AV-IN socket of the device and the 3 RCA plugs of the cable into the external device. If the device does not have these connections, you will find corresponding adapters in the specialized trade.
- Select the function "AV". Turn on the connected device and start playback.
text_image
ON/OFF EX-INT AG-OUT AV-IN CABLE USB CABLE TV ↓ ↓ ↑ Audio In L R Video In L R VAV OUT
You can connect the device to an external device (such as TV, projector, etc.) to view content on the device. NOTE: AV OUT is only possible at DVD or SD playback!
-
Insert the jack plug of the enclosed AV cable into the "AV-OUT" socket of the device and the 3 RCA plugs of the cable into the external device. If the device does not have these connections, you will find corresponding adapters in the specialized trade.
-
Switch the connected device to the corresponding input and start playback on the device.
HEADPHONE
You have the possibility to connect headphones to the device. Plug the headphones into the headphone jack on the right side of the unit with a 3.5mm jack plug. The sound via the built-in speakers is switched off.
The current instruction manual can be downloaded from www.soundmaster.de
Technical changes and misprints reserved.
Copyright by Woerlein GmbH, 90556 Cadolzburg, www.soundmaster.de
Duplication only with the permission of Woerlein GmbH

text_image
CEWörlein GmbH
Gewerbestraße 12
D 90556 Cadolzburg, Germany
Tel: +49 9103 71 67 0
Fax: +49 9103 71 67 12
E-Mail: info@soundmaster.de
Internet: www.soundmaster.de
Hereby, Wörlein GmbH declares that this device is in compliance with the essential requirements and other relevant provisions of Directive 2014/53/EU.
A copy of the declaration of conformity can be obtained from the above address.
SYSTEM SETUP
LANGUAGE SETUP
AUDIO SETUP
VIDEO SETUP
DIGITAL SETUP
text_image
ONLINE DCIN AVELT AP IN GARS LINE GAML TV ↓ ↓ ↑ Audio In Audio In Video InSORTIE AV
SYSTEM SETUP
LANGUAGE SETUP
AUDIO SETUP
VIDEO SETUP
DIGITAL SETUP
SYSTEEMINSTELLINGEN
text_image
Diagram showing audio connection setup with microphone, audio inverter, and monitor interfaceAV OUT
SYSTEM SETUP
LANGUAGE SETUP
AUDIO SETUP
VIDEO SETUP
DIGITAL SETUP
SETUP DEL SISTEMA
text_image
Diagram showing audio connection setup with microphone, audio inductor, and computer interface components labeled in EnglishUSCITA AV
text_image
1 2 5 6 7 8 9 10 11 13 12 12 10 14 15 17 16 16 20 18 19 21 23 22 24 25 26 27 28 29 30 31 RESET OK ON STOCK EXIT VOUT CALL ADD ADD ADD ADD ADD ADD ADD ADD ADD ADD ADD ADD ADD ADD ADD ADD ADD ADD ADD ADD ADD ADD ADD ADD ADD ADD ADD ADD ADD ADD ADD ADD ADD ADD ADD ADD ADD ADD ADD ADD ADD ADDOBSAH DODÁVKY
Zařízení
Adaptér AC
Herní ovladač
Anténa DVB-T2
Herní disk
Dálkový ovladač
12V adaptér
Audio- a videokabel
Návod k obsluze
VLOŽENÍ BATERIÍ
text_image
Diagram showing audio and video connection setup with labeled ports and connections to a computer monitorVÝSTUP AV
Cadolzburg, www.soundmaster.de
text_image
ON OFF DC IN 2P-3P AC B GATE USB GATE TV ↓ ↓ ↑ Audio In Audio In Video InVýstup AV
D 90556 Cadolzburg, Germany
Tel: +49 9103 71 67 0
Fax: +49 9103 71 67 12
E-Mail: info@soundmaster.de
Internet: www.soundmaster.de
Hereby, Wörlein GmbH declares that this device is in compliance with the essential requirements and other relevant provisions of Directive 2014/53/EU.
A copy of the declaration of conformity can be obtained from the above address.