IAN 398788 - Inflatable game Playtive - Free user manual and instructions
Find the device manual for free IAN 398788 Playtive in PDF.
| Product Type | Inflatable splashing game (cactus) with throwing accessories |
| Brand | Playtive |
| Model | IAN 398788 |
| Dimensions inflated (L x H x W) | approx. 98 x 65 x 105 cm |
| Weight | Not specified (estimated 1-2 kg) |
| Age range | From 2 years, under adult supervision |
| Usage | Outdoor, water play and ring tossing |
| Inflation | Using a manual foot pump (compressor not recommended) |
| Water filling | Lower chamber: clean tap water for stability |
| Hose connection | Adapter included for standard garden hose |
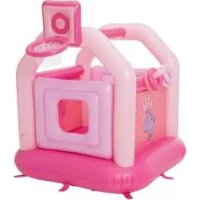
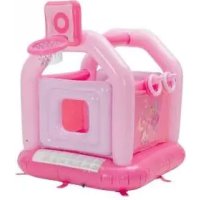
| Delivery contents | 1 x water toy, 3 x rings, 1 x hat, 2 x repair patches, 1 x adapter, 1 x manual |
| Material | PVC (sensitive to cold and alcoholic products) |
| Maintenance and cleaning | Water or soapy water only; dry completely before storage |
| Storage | Deflated, dry, at room temperature, valves closed |
| Repair | Repair patches provided for small leaks; wait 20 min after repair |
| Safety | Adult supervision required; do not climb/sit; minimum distance 2 m from obstacles; check for damage before each use |
| Warranty | 3 years (material and manufacturing defects) |
| After-sales service (France) | Tel. 0800 919270, Email deltasport@lidl.fr |
| Date of manufacture | 01/2022 |
| Standards | Directive 2009/48/EC (toy safety) |
Frequently Asked Questions - IAN 398788 Playtive
User questions about IAN 398788 Playtive
0 question about this device. Answer the ones you know or ask your own.
Ask a new question about this device
Download the instructions for your Inflatable game in PDF format for free! Find your manual IAN 398788 - Playtive and take your electronic device back in hand. On this page are published all the documents necessary for the use of your device. IAN 398788 by Playtive.
USER MANUAL IAN 398788 Playtive
AUFBLASBARER WASSERSPRINKLER KAKTUS INFLATABLE WATER SPRINKLER CACTUS ARROSEUR GONFLABLE CACTUS

DE AT CH
AUFBLASBARER
WASSERSPRINKLER KAKTUS
Gebrauchsanweisung
FR BE
ARROSEUR GONFLABLE CACTUS
Instructions for use
NL BE
OPBLAASBARE WATERSPROEIER CACTUS
Gebruiksaanwijzing
Cz
NAFUKOVACI VODNI POSTRIKOVAC KAKTUS
Návod k použití
ES
You have chosen to purchase a high-quality product. Familiarise yourself with the product before using it for the first time.

Read the following instructions for use carefully.
Use the product only as described and only for the given areas of application. Store these instructions for use carefully. When passing the product on to third parties, please also hand over all accompanying documents.
Scope of delivery
1 × garden sprinkler
3 × ring
1xcap
2 × repair patch
1xadapter
1 x instructions for use
Technical data
Dimensions (inflated):
approx. 98 × 65 × 105cm (w × h × d)

Date of manufacture (month/year): 01/2022

Delta-Sport Handelskontor GmbH hereby declares that this product conforms to the following basic
requirements and other applicable regulations:
Directive 2009/48/EC of the European Parliament on the safety of toys

UK Conformity Assessed
Intended use
This product is a toy for children over the age of 2 and is for use outdoors.
The product is intended only for private and not for commercial use.
Safety instructions

Warning.
None of the packaging and fastening materials are considered part of the toy and must always be removed for safety reasons before the product can be given to children to play with.

Risk of injury!
- Do not allow your child to use the product unsupervised since children are unable to judge potential dangers. Use only under the direct supervision of an adult.
- Adult assembly required.
- To prevent damage to the product and injuries to people the product may not be used until it is fully inflated.
- Speak to your children about how to use the product while playing safely.
- Do not climb on the product.
- Do not sit on the product.
- Do not modify the product in any way.
- Use only clean tap water. Contaminated water can endanger the health of users.
- The product should be assembled on a flat lawn without any stones, sticks, bumps or hollows. Please ensure that the product is at an appropriately safe distance of at least two metres away from buildings, steps, fences, walls, waterways, overhanging branches, washing lines, electrical cables, and any other obstacles.
- Check the product for damage or wear before each use. The product may be used only when in good working order and condition!
- Do not use the product if air is leaking.

Avoiding material damage!
- All inflatable are susceptible to cold. For this reason never unfold and inflate the product at a temperature lower than 15^ C
- Warning. Avoid using sunscreen and skin care products containing alcohol. Sunscreen and skin care products containing alcohol can cause the colour coating of this PVC inflatable product to peel. This can lead to stains on your body, your clothing and other objects that are in contact.
- In the event that the air pressure increases in the hot sun, it must be balanced accordingly by letting out air.
- Make sure that the product, especially when inflated, does not come into contact with stones, gravel, or sharp objects and does not rub or scrape against anything as this can cause damage to the plastic foil.
- Use only the correct pump adapters to insert into the safety valves. The valves might otherwise be damaged.
- Do not over-inflate because you then risk tearing open the welded seams. Close the valves properly after inflating.
- Avoid contact with sharp-edged, hot, pointed, or dangerous objects.
Assembly
An adult should always assemble the product. Please follow the individual assembly steps in the order indicated.
1. Selecting the location
Choose a suitably flat and clean surface with plenty of space to unpack and unfold the product. Spread the product out in the place where it will later be used.
Check that all individual parts are present and in good order and condition.
2. Inflation
Warning!
- Always inflate the air chambers fully!
- Avoid inflating the air chambers too much because there is the risk of over-stretching the welded seams or even tearing them open.
- Use standard commercial foot pumps or double-stroke piston pumps with matching adapter attachments to inflate the product.
- Do not use a compressor or compressed air bottles to inflate the product. This can lead to damage to the product.
- Make sure that the chambers are filled with air uniformly.
- Inflate each air chamber until it feels firm to the touch. When you press with your thumb against the air chamber it should still give a little.
3. Inflation
- Fill the lower chamber with water first for better stability. To do so, open the seal of the water chamber and let clean water run in (fig. A). Next also inflate the same chamber to prevent any folds from forming.
- To fill the product with air, open the valve seal and inflate the air chambers. Close the valve seal and push in the valve by pressing lightly (fig. B). When you press with your thumb against the air chambers they should still give a little.
4. Garden hose connection
Screw the adapter onto the product's water connection. Connect a garden hose using a suitable hose coupling (not supplied) and attach this to the water connection with the product's adapter (fig. D).
Emptying the product
To do so, open the seal of the water chambers and let the water run out (fig. A).
Disassembly
Allow the product to dry completely before folding it up.
Remove the garden hose.
Deflate the product as follows:
- To deflate the main chamber rapidly, open the lower seal (fig. E).
- To deflate the other components pull out the valve and squeeze the valve stem lightly so that the air can escape or insert the deflation tube into the valve to allow the air to escape rapidly.
Repairs
Minor leaks or holes can be repaired with the repair patch supplied.
Important!
Do not inflate the product for 20 minutes after repair! Do not use the patch for leaks or holes on the seam.
- Let the air out of the product completely.
- Clean the area around the leak thoroughly. The area must be dry and free from grease.
- Cut out a piece of the repair material that is big enough for its edges to overlap the damaged area by about 1.3cm
- Peel the patch off the paper, place it on the damaged area and press tight.
Storage, cleaning
When not in use, always store the product clean, dry and uninflated at room temperature. The valves should always be closed during storage.
Clean the product only with water or soapy water, never with abrasive detergents. When storing for the winter do not put any sharp objects on the product and do not apply talcum powder.
Disposal
Dispose of the article and the packaging materials in accordance with current local regulations. Packaging materials such as foil bags are not suitable to be given to children. Keep the packaging materials out of the reach of children.

Dispose of the products and the packaging in an environmentally friendly manner.

The recycling code is used to identify various materials for recycling.
The code consists of the recycling symbol - which is meant to reflect the recycling cycle - and a number which identifies the material.
Notes on the guarantee and service handling
The product was produced with great care and under continuous quality control. DELTA-SPORT HANDELSKONTOR GmbH gives private end customers a three-year guarantee on this product from the date of purchase (guarantee period) in accordance with the following provisions.
The guarantee is only valid for material and manufacturing defects. The guarantee does not cover parts subject to normal wear and tear that are thus considered wear parts (e.g. batteries) or fragile parts such as switches, rechargeable batteries, or parts made of glass.
Claims under this guarantee are excluded if the product has been used incorrectly, improperly, or contrary to the intended purpose, or if the provisions in the instructions for use were not observed, unless the end customer proves that a material or manufacturing defect exists that was not caused by one of the aforementioned circumstances.
Claims under the guarantee can only be made within the guarantee period by presenting the original sales receipt. Please therefore keep the original sales receipt. The guarantee period is not extended by any repairs carried out under the guarantee, under statutory guarantees, or as a gesture of goodwill. This also applies to replaced and repaired parts.
If you wish to make a claim please first contact the service hotline mentioned below or contact us by e-mail. If there is a guarantee case, then the product will be repaired or replaced free of charge to you or the purchase price will be refunded, depending on our choice.
Your legal rights, in particular guarantee claims against the respective seller, are not limited by this guarantee.
IAN:398788_2107

Service Great Britain
Tel.: 0800 404 7657
E-Mail: deltasport@lidl.co.uk

Service Ireland
Tel.: 1890 930 034
(0,08 EUR/Min., (peak))
(0,06 EUR/Min., (off peak))
E-Mail: deltasport@lidl.ie
Felicitations!