IAN 311501 - Inflatable game Playtive - Free user manual and instructions
Find the device manual for free IAN 311501 Playtive in PDF.
| Product type | Inflatable castle (bouncy castle) |
| Brand | Playtive |
| Model | IAN 311501 |
| Dimensions (L x W x H) | Approx. 160 x 160 x 180 cm |
| Maximum user weight | 50 kg |
| Recommended age | From 36 months (3 years) |
| Usage | Private outdoor use |
| Capacity | 1 person at a time |
| Package contents | 1 inflatable castle, 1 floor chamber, 2 side arches, 2 side walls, 2 crossbars, 1 basketball hoop with target, 1 ball, 4 rings, 8 stakes, 2 repair patches, 1 instruction manual |
| Material | PVC (estimated) |
| Inflation method | Manual (air inflation) |
| Recommended pump type | Foot pump or piston pump, suitable adapter |
| Main functions | Jumping, basketball game with hoop and ball |
| Maintenance and cleaning | Clean with water or soapy water, no strong detergents; store dry and uninflated at room temperature |
| Safety | Adult supervision required; do not use in wind, rain or snow; minimum distance of 2 m from obstacles; flat surface without sharp objects; remove shoes and jewelry |
| Repairability | Patches provided for small leaks; do not use on seams; wait 20 minutes after repair |
| Warranty | 3 years from date of purchase, subject to the instructions |
| Customer service (France) | Phone: 0800 919270, email: deltasport@lidl.fr |
Frequently Asked Questions - IAN 311501 Playtive
User questions about IAN 311501 Playtive
0 question about this device. Answer the ones you know or ask your own.
Ask a new question about this device
Download the instructions for your Inflatable game in PDF format for free! Find your manual IAN 311501 - Playtive and take your electronic device back in hand. On this page are published all the documents necessary for the use of your device. IAN 311501 by Playtive.
USER MANUAL IAN 311501 Playtive
text_image
www.lidl-service.com PDF onlineHÜPFBURG BOUNCY CASTLE CHÂTEAU GONFLABLE
DE AT CH
HÜPFBURG
Gebrauchsanweisung
FR BE
CHÂTEAU GONFLABLE
Instructions for use
NL BE
SPRINGKUSSEN
Gebruiksaanwijzing
CZ
SKÁKACÍ HRAD
Návod k obsluze
CE
IAN 311501
DE AT CH GB IE FR
BE NL PL CZ SK

DE AT CH
Lieferumfang 6
Technische Daten 6
Scope of delivery 10
Technical data 10
Intended use 10
Safety instructions 10 - 11
Risk of injury 10
Avoiding material damage 11
Assembly 11
Inflation 11
Tethering the bouncy castle 11
Dismantling 12
Storage, cleaning 12
Repairs 12
Disposal 12
Notes on the guarantee and service handling .... 12
NL BE
You have chosen to purchase a high-quality item. Familiarise yourself with the item before using it for the first time.

Read the following instructions for use carefully.
Only use this item in the manner described and for the purpose for which it is intended. Store these instructions for use carefully. When passing the item on to third parties, please also hand over all accompanying documents.
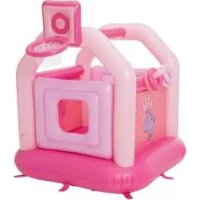
Scope of delivery (fig. A)
1 x bouncy castle
1 x floor chamber (1)
2 x side arch (2)
2 x side wall (3)
2 x cross brace (4)
1 x basketball basket with target board (5)
1 x ball (6)
4 x ring (7)
8 x peg (8)
2 x repair patch
1 x instructions for use
Technical data
Bouncy castle: approx. 160 x 160 x 180cm (l x w x h)

Max. user weight: 50kg

Date of manufacture (month/year): 02/2019
Intended use
Warning. Only for domestic use.
This product is a toy and has been designed for private use outdoors for children over the age of 36 months with a maximum weight of 50kg. It is not suitable for use on water or in snow.
Safety instructions
- Warning. None of the packaging and fastening materials are considered part of the toy and must always be removed for safety reasons before the product can be given to children to play with.

Risk of injury!
- Warning. Not suitable for children under 36 months of age. Danger of choking since small pieces can be swallowed or inhaled!
- Do not allow your child to use the product unsupervised because children are unable to assess the potential dangers.
- Assembly should always be undertaken by an adult.
- The product may only be used by one person at a time.
- During bouncing no sharp and hard objects such as toys may be inside the castle.
Do not wear or carry jewellery, watches, or keys. Before bouncing remove your shoes and take off glasses if necessary.
- To protect the product against damage and to protect people from injury, the bouncy castle may be used only when it is fully inflated.
- The bouncy castle should be assembled on an even grass surface free from stones, sticks, bumps, and depressions.
The castle should be at an appropriate safe distance of 2m from buildings, steps, hedges, walls, bodies of water, overhanging branches, clotheslines, and other obstacles.
- Do not assemble the bouncy castle on concrete, asphalt, or other hard surfaces.
- Do not use the castle in windy weather, rain, or snow.
- Check the product before use each time for damage and wear.
The product may be used only when in good working order and condition!
- The surfaces must always be clean and dry.
- Inform your children regarding the instructions for use so that they play safely.
- The bouncy castle may not be used as a bed because children might slip between the floor and side walls and suffocate.

Avoiding material damage!
- All inflatables are susceptible to cold.
For this reason never unfold and inflate the product at a temperature lower than 15^ Cl! - In the event that the air pressure increases in the hot sun, it must be balanced accordingly by letting out air.
- Make sure that the product, especially when inflated, does not come into contact with stones, gravel, or sharp objects and does not rub or scrape against anything; this can cause damage to the plastic foil.
- Use only the correct pump adapters to insert into the safety valves. The valves might otherwise become damaged.
- Do not over-inflate because you then risk tearing open the welded seams. Close the valves properly after inflating.
- Avoid contact with sharp, hot, pointed, and dangerous objects.
Assembly
Assembly should always be undertaken by an adult. Follow the individual assembly steps in the order indicated.
- Choose an even and clean surface with enough room to unpack and unfold the castle.
- Check that all the individual parts are there and in good order and condition.
• After assembling for the second time you should check the bouncy castle for any damage, holes and tears and seal them.
Inflation
Warning!
• Always inflate the air chambers completely!
- Avoid inflating the air chambers too much because there is the risk of over-stretching the welded seams and even tearing them open.
- To inflate the product use standard commercial foot pumps or double-stroke piston pumps with the appropriate pump adapters
- To inflate the product do not use a compressor or compressed air bottles. This can lead to damage to the product.
• Make sure that the chambers are evenly inflated. - Inflate each air chamber until it feels firm. When you press with your thumb against the air chamber it should still give a little.
Avoid using sunscreen and skin care products containing alcohol. Sunscreen and skin care products containing alcohol can cause the colour coating of this PVC inflatable product to peel. This can lead to stains on your body, your clothing, and other objects that are in contact.
- WARNING!
Sequence WARNING!
Follow the correct sequence when inflating the air chambers. Always inflate all air chambers fully.
- Floor chamber (1)
- Side arches (2)
- Side walls (3)
- Cross braces (4)
- Basketball basket and target board (5)
Inflation
-
Fill the floor chamber (1) with air and close the cap (fig. C). Inflate the air chamber until it feels firm. When you press with your thumb against the air chamber it should still give a little. Close the valve seal and push in the valve by pressing gently.
-
To fill components 2-5 open the valve seal and inflate the air chambers (fig. B). Close the valve seal and push in the valve by pressing gently.
Tethering the bouncy castle
Fasten the product securely at the eight fastening loops (1a) using one peg (8) each on an even grass surface (fig. A).
Dismantling
Deflate the castle as follows:
- To deflate the floor chamber quickly, open the seal (fig. D).
- To deflate the side arches, side walls, cross braces, target board, and basketball ring, pull the plug valve out of the recess and squeeze the stem gently.
- Deflate the ball (6) and the rings (7) as described under point 2.
Storage, cleaning
Always store the product clean, dry, and uninflated at room temperature.
The valves should always be closed during storage. Clean the product only with water or soapy water, never with abrasive detergents.
When storing for the winter do not place any sharp-edged objects on the product and do not powder with talc.
Repairs
Small leaks or holes can be repaired with the repair patches supplied.
Important! After repair do not inflate the product for 20 minutes! Do not use the patch for leaks or holes on the seam.
- Allow the air to escape from the product completely.
- Clean the area around the leak thoroughly! The area must be dry and free of grease.
- Cut out a piece of repair material big enough to have its edges protruding about 1.3cm over and beyond the damaged area.
- Pull the patch off the paper, place it on the damaged area, and press it down firmly.
Disposal
Dispose of the article and the packaging materials in accordance with current local regulations. Packaging materials such as foil bags are not suitable to be given to children. Keep the packaging materials out of the reach of children.

Dispose of the products and the packaging in an environmentally friendly manner.

The recycling code is used to identify various materials for recycling.
The code consists of the recycling symbol - which is meant to reflect the recycling cycle - and a number which identifies the material.
Notes on the guarantee and service handling
The product was produced with great care and under constant supervision. You receive a three-year warranty for this product from the date of purchase. Please retain your receipt.
The warranty applies only to material and workmanship and does not apply to misuse or improper handling. Your statutory rights, especially the warranty rights, are not affected by this warranty.
With regard to complaints, please contact the following service hotline or contact us by e-mail.
Our service employees will advise as to the subsequent procedure as quickly as possible.
We will be personally available to discuss the situation with you.
Any repairs under the warranty, statutory guarantees or through goodwill do not extend the warranty period. This also applies to replaced and repaired parts.
Repairs after the warranty are subject to a charge.
IAN: 311501

Service Great Britain
Tel.: 0800 404 7657
E-Mail: deltasport@lidl.co.uk

Service Ireland
Tel.: 1890 930 034
(0,08 EUR/Min., (peak))
(0,06 EUR/Min., (off peak))
E-Mail: deltasport@lidl.ie
Félicitations!