
HG09124 - Gazebo Livarno Lux - Free user manual and instructions
Find the device manual for free HG09124 Livarno Lux in PDF.

| Product type | Pergola |
| Brand | Livarno Lux |
| Model | HG09124 |
| Dimensions (W x D x H) | Approximately 3.5 x 3.5 x 3.05 m |
| Weight | Approximately 30 kg |
| Frame material | Steel |
| Canopy material | Polyester |
| Intended use | Outdoor sun protection, non-professional use |
| Recommended number of people for assembly | At least 2 people |
| Maximum recommended wind speed for use | 40 km/h (disassemble if exceeded) |
| Important safety instructions | Do not assemble or disassemble in strong wind or rain; do not use fire nearby; do not lean on or hang weights; leave a space of 3 m between pergolas |
| Care and cleaning | Clean the canopy with a soft sponge and clean water; do not machine wash; dry completely before storage |
| Delivery contents | 2 short corner rods, 2 long corner rods, 4 lower rods, 4 feet, 4 short top rods, 4 long top rods, 8 screws M8x55, 20 screws M8x45, 28 nuts M8, 4 tensioners, 1 Allen key, 1 tightening wrench, 1 canopy, 36 elastic pompoms, 12 foot screws |
| Repairability | Spare parts available via after-sales service (reference IAN 398148_2107) |
| Warranty | Not specified in the manual |
| Support | Full manual available at www.lidl-service.com by entering IAN 398148_2107 |
Frequently Asked Questions - HG09124 Livarno Lux
User questions about HG09124 Livarno Lux
0 question about this device. Answer the ones you know or ask your own.
Ask a new question about this device
Download the instructions for your Gazebo in PDF format for free! Find your manual HG09124 - Livarno Lux and take your electronic device back in hand. On this page are published all the documents necessary for the use of your device. HG09124 by Livarno Lux.
USER MANUAL HG09124 Livarno Lux
text_image
PDF ONLINE www.lidl-service.comPAVILLON/PAVILLON/TONNELLE
DE AT CH
PAVILLON
Kurzanleitung
FR BE
TONNELLE
GB/IE Short manual Page 17
natural_image
Five line drawings of different objects: a human figure, a hammer, pliers, a measuring tool, and scissors (no text or symbols)Sie benötigen · You need · Il vous faut · U hebt nodig · Wymagane Potřebujete · Potrebujete · Necesita · Du skal bruge · Vi servono Szüksége van · Potrebujete:

text_image
N M E H F A E H F H B I G H A B I G C G I D M8*55 G x8 M8*45 H x20 M8 I x28 J x4 K x1 L x1 M x1 N x36 O x12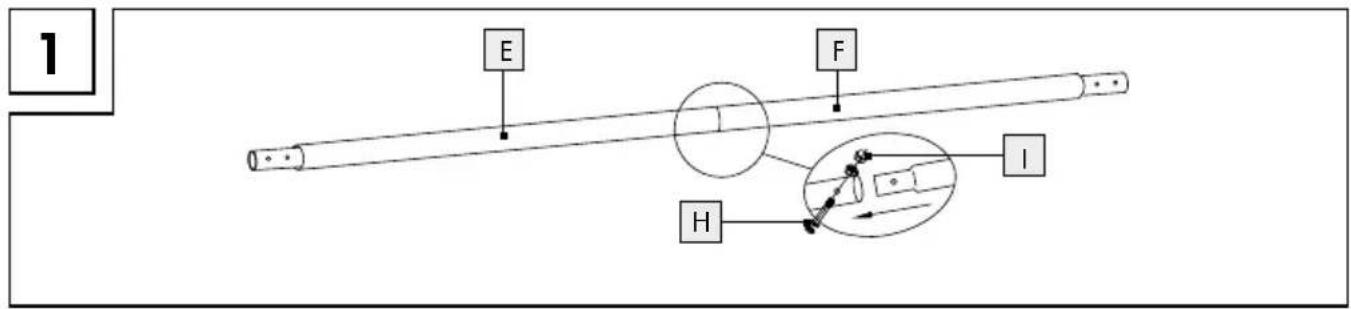
text_image
1 E F H I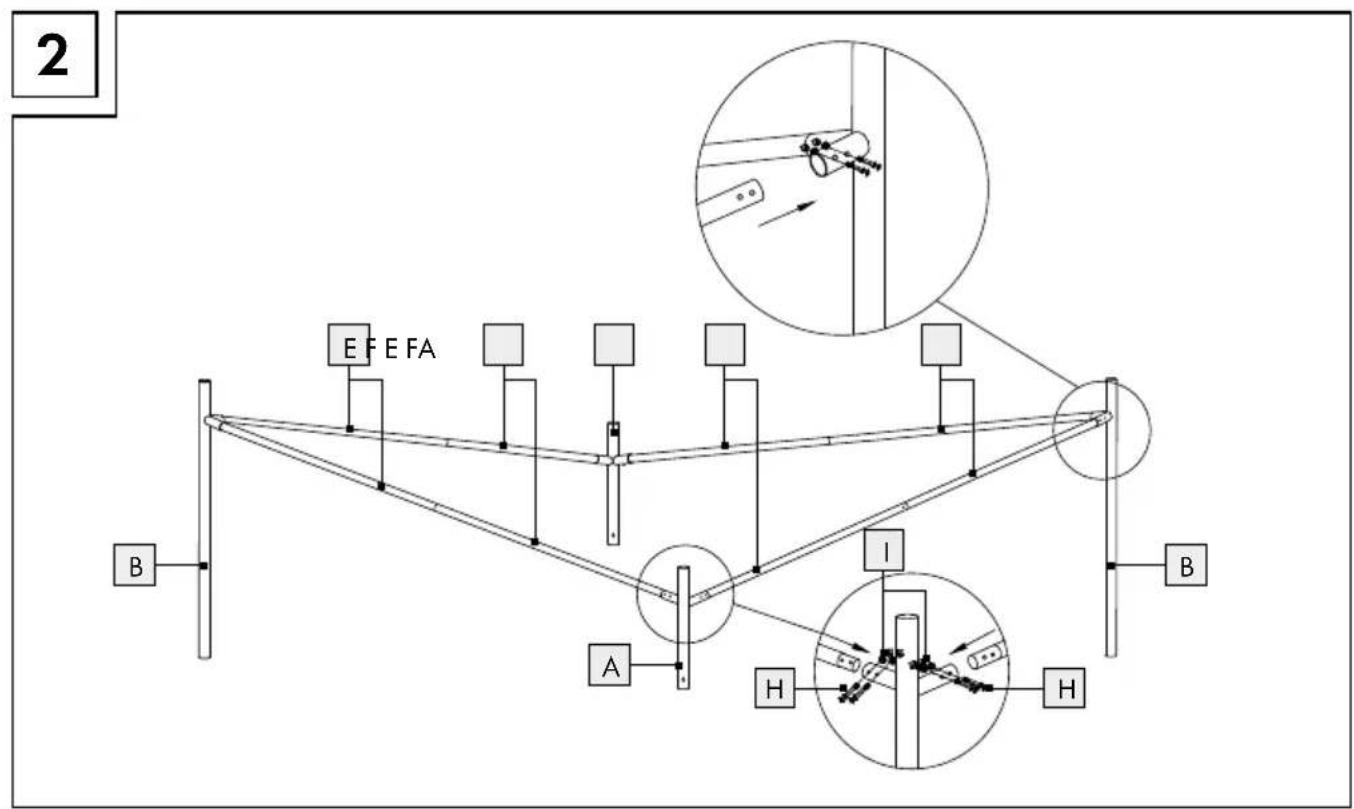
text_image
2 E F E F A B A I H H B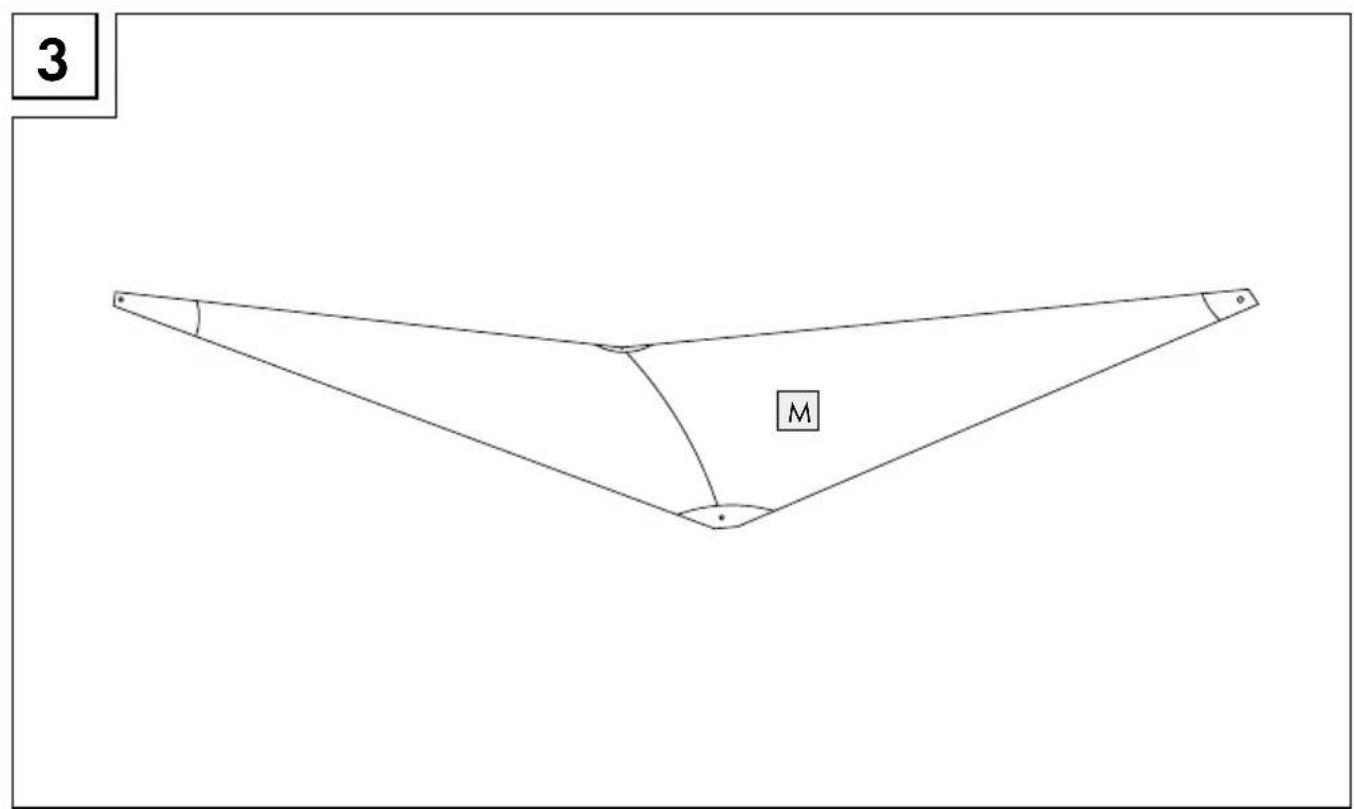
text_image
3 M4
text_image
E E F M A J N M5

text_image
5 C D C I G D B A A B C I C C G D O1 Schraubenschlüssel L
1 Plane M
Scope of delivery and parts description......Page 18
Technical data ...... Page 19
Safety advice ...... Page 19
Assembly Page 22
Assembling the product......Page 23
Dismantling the product....Page 23
Cleaning Page 24
Disposal Page 24
Pavillon
- Introduction

This document is a shorter printed version of the complete instruction manual. By scanning the QR code, you will be taken straight to the Lidl service website (www.lidl-service.com) where you can view and download the complete instruction manual by entering the article number (IAN) 398148_2107.
WARNING! Observe the complete instruction manual and safety notes to prevent personal injury and property damage. The short guide forms an integral part of this product. Prior to using the product, familiarize yourself with all operation and safety notes. Keep the short manual well preserved and if you hand the product on to third parties, all documentation should be passed on as well.

text_image
PDF ONLINE www.lidl-service.com• Properuse
This product is suitable for providing protection against the sun in outdoor areas. The product is not intended for commercial use.
- Scope of delivery and parts description
2 short corner pole A
2 long corner pole B
4 lower leg pole C
4 feet D
4 short common pole E
4 long common pole F
8 M8*55 bolts G
20 M8*45 bolts H
28 M8 nuts 1
4 turnbuckle J
1 hexagonal key K
1 wrench L
1 canopy M
36 elastic bobbles N
12 bolts (feet) ☐
- Technical data
Dimensions: approx. 3.5 x 3.5 x
3.05 m (L x W x H)
Weight: approx. 30 kg

Safety advice
PLEASE READ THE ASSEMBLY INSTRUCTIONS BEFORE USING THE PRODUCT! PLEASE KEEP THE ASSEMBLY INSTRUCTIONS IN A SAFE PLACE! PLEASE READ ALL SAFETYNOTESAND INSTRUCTIONS. FAILURETOCOMPLY
WITH THESE MAY RESULT IN SEVERE INJURIES.
■ DANGER TO LIFE AND RISK OF ACCIDENTS FOR INFANTS AND CHILDREN! Never leave children alone and unsupervised with the packaging material. It poses a danger of suffocation. ■ Keep children away from the work area when the product is being assembled. It poses a risk of suffocation as children
may swallow or in- hale small parts or plastic film.
⚠️ CAUTION! RISK OF INJURY! En- sure that all parts are undamaged and have been as- sembled appropriately. Risk of injury exists if assembled incorrectly. Dam- aged parts can affect safety and function.
- Check regularly that all parts are firmly in position. Tighten the ring bolts if necessary using a pair of pliers.
Take care that you do not trap or crush your fingers while assembling the product.
■ The pavilion protects you against direct sun impact. Nevertheless take care about a sufficient sun protection for your skin.
⚠️ CAUTION!RISK OF INJURY!
Never under any circumstances as- semble the product in a strong wind or rain.
■ Select a piece of land that is as flat
and firm as possible to erect your pavilion.
■ Assembly in the wrong order could damage the pavilion. The manufacturer accepts no liability of any kind.
■ The product has a dimension of 3.5 x 3.5 m, and further requires space for the guy lines.
⚠️ CAUTION! DANGER OF POISONING AND DAMAGE TO PROPERTY!
Do not light any fires underneath the product and keep it
away from sources of heat.
■ No open fires, grills, patio heaters in or near the pavilions.
■ You should also familiarise yourself with the local fire protection regulations (e.g. camping site, tent pitch).
■ Do not lean and climb on the product.
■ Do not load any weight on the product.
■ No combining - connecting several pavilions.
- Allow at least 3 metres of space between pavilions.
Take note of the effects of the weather and climate
■ Dismantle the pavilion before heavy snowfall or a storm or rain.
■ Damaged poles or other components should be replaced by new ones.

WARNING!
Water pockets must be emptied as they form.
■ The pavilion must be constructed so that water can run off.
■ Never under any circumstances
assemble the prod- uct in a strong wind or rain.
■ Tighten the turn-buckles and make sure no sagging of canopy.
- Assembly
Note: Product assembly requires at least 2 persons.
- Verify that the scope of delivery is complete.
- Do not leave unattended in the built-up state.
The sun shade sail must be constructed so that water can run off.
text_image
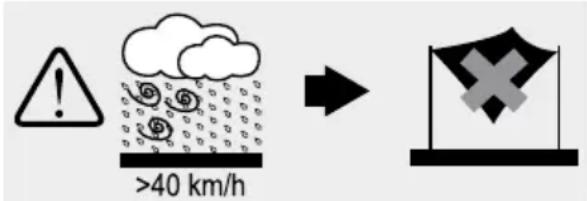
! >40 km/h →Dismantling the pavilion when wind speeds of more than 40 km/h are anticipated (brisk wind, large branches and trees moving, and the wind is plainly audible)
- Do not lean and climb on the product.
- Do not load any weight on the product.
• Assembling the product
Note: Spread out the canopy M in front of the assembly site and use a measuring tape to transfer the length of the canopy M to the ground on which it will be mounted.
☐ Mark the positions for feet on the ground.
☐ Tighten the bolts (feet) using the hexagonal key K.
Figure 1:
□ Connect the common poles
+ F.
Tighten up by using boils and nuts 1 as shown.
Figure 2:
Connect the common poles F into corner poles A + B.
☐ Tighten up by using bolts and nuts ☐ as shown.
Figure 3:
☐ Unfold the canopy ^M completely. The fabric might be stuck together.
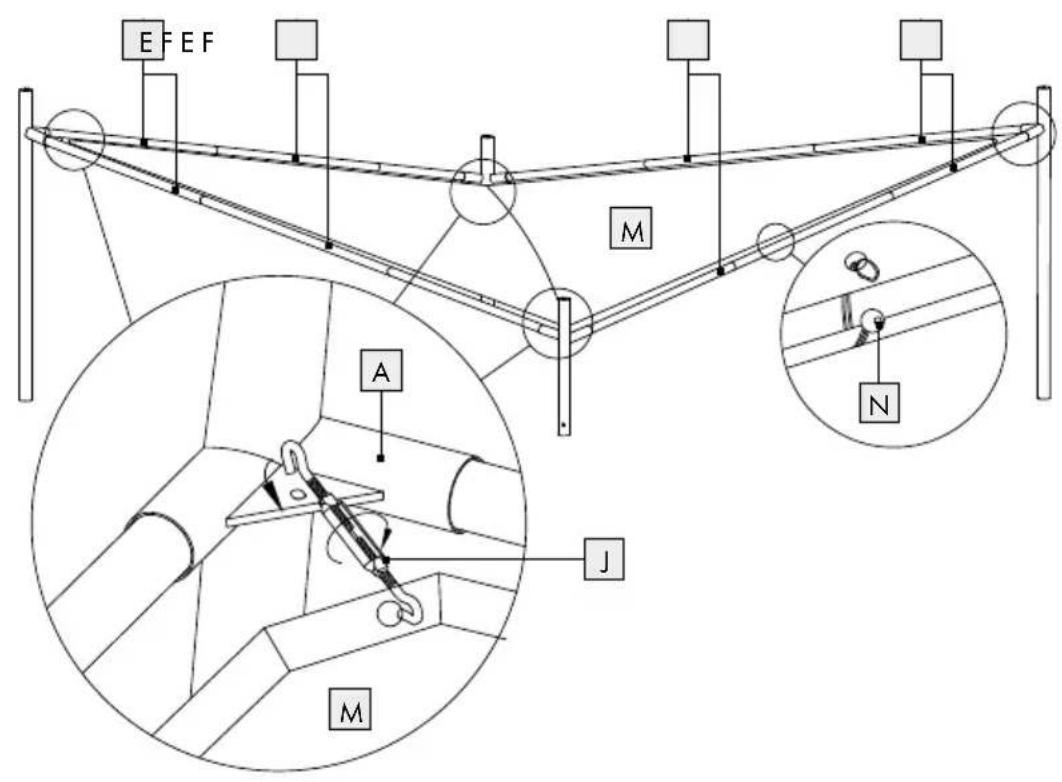
Figure 4:
☐ Connect corners of the canopy M to the corner of poles A + B with the turnbuckles J.
☐ Secure the edges of canopy along with assembled common poles E + F with elastic bobbles N.
☐ Tighten the turnbuckles by rotating.
Figure 5:
☐ Lift the assembled upper selection of pavilion and insert the lower poles ☐ into corner poles ☐ + ☐.
☐ Secure the connections with bolts G and feet D.
Once erect, ensure the product is firmly secured to a stable surface, where you can use feet bolts ☐.
●Dismantlingthe product
☐ Disassemble the product in the reverse order.
- Cleaning
■ Never wash the canopy M in a washing machine.
- Do not use any sharp objects as these will damage the coating.
☐ Remove dirt from the canopy M with a soft sponge and clean water.
☐ Allow all parts dry thoroughly before you pack the canopy M away again. This will prevent mould, odours and colour changes.
- Disposal
The packaging is made entirely of recyclable materials, which you may dispose of at local recycling facilities.
Contact your local refuse disposal authority for more details of how to dispose of your worn-out product.