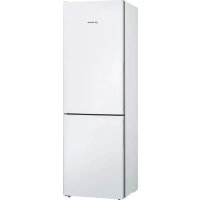
KGV362WEAS - Fridge BOSCH - Free user manual and instructions
Find the device manual for free KGV362WEAS BOSCH in PDF.



User questions about KGV362WEAS BOSCH
0 question about this device. Answer the ones you know or ask your own.
Ask a new question about this device
Download the instructions for your Fridge in PDF format for free! Find your manual KGV362WEAS - BOSCH and take your electronic device back in hand. On this page are published all the documents necessary for the use of your device. KGV362WEAS by BOSCH.
USER MANUAL KGV362WEAS BOSCH
4.12 CMraHa Ha pasteraTeHHnKoHTeHep 21
4.12.1 3BaXJaHe Ha pasteraTeHHKoTHeHep 21
4.12.2 MoHTnpaHe Ha pasterateHHN KOHTeHep 21
4.13 CmHa Ha LED ocBETneHneto OTrope 22
4.13.1 CbAJaHe Ha LED ocBETneHHeTo 22
4.13.2 MoHTpaHe Ha LED ocBETneHMeTo OTrope 23
OTHOCHO To3n DokyMeHT
1.1 Baxha nHΦopMaζη
1.1.1 Uen
TeHc cBbETn 3a pEmOH T NOMarat Ha Ntpe6nTEnla DpemOHtnpa Cam ypeiB C bOeTBeTcBHe C pernameHTa 3a ekONOrocBo6paHO npoeKtnpaHe Ha ypeiNe (OT 03.2021 r.).
Te cbIbpxk HnHOpMaunKa Ka Da CMeHrTe ONpeDeneHn pe3epBn YactN, BKIOHTENHO npdynpckdHn n PnCKOBE.
Ako IMATE HRAKAKINBbNPoC,MOJIa CbPjKeTe Ce c HAUNO OTDeN 3a OBCNYBAHe Ha KIMENTH. Hne HOCIM OTROBOPHOCT 3a UeTH, CAMO AKO CbBeNTe 3a peMOHT ca cna3eHN npabInHO.
1.2 06aCHeHne Ha cHMBOJInTe
1.2.1 HbHa onaCHOCT
IpeynpeintenHnBaCe cBcTOrT OT CmBOJ nCnHaHa Dyma.CnrHaHaTa yMa noka3Ba cepno3HOCTTA Ha onaCHOCTTA.
CIMBOHTE3aONACHOCTCa CIMBOHNUH N3o6paXeHNA, KOHTO DaBaT INDINKAUHA 3a BnDa ONACHOCT.
BTo3n DOKyMeHCTe H3N013BaT CNEdHInTe CMBOIN 3a OnaCHOCT:
| Симboл за опасост за чужения | ОвноPre dedуриdentелно сбоб Shedи Опасост от[elektrovesко наразожения |
| Пuck ot[eckлосnia] | |
| Опасost от[nорязвania] |
OTHOCHO To3n DokyMeHT
| Симbol 3a onachoct 3начени | Опachoct ot пемарази Опachoct ot горец поьрхости |
| Опachoct ot симно магнисто пл; Опachoct ot неонисяцу лычени |
Ta5nuu2: CumbOnu 3a onachocm
1.2.3 CtpyKtpa Ha npéDynpexkdeHnra
PepynpexdHnraT BTO3N DOKMeHT IMaT CTAHapTN3npaH BbHwE Hn I CTaHapTN3npaH CTpykTypa.


ONACHOCT
BnHn3ToyHKn Ha onaCHOCTTla!
Bb3mOHHnocpeHnO tNfHopapaHeHa onaHocTt/npedynpckdHeHe
Mepkn 3a6paHn 3a npDoTbpaTbaHe Ha onaChocTta.
CneHnIaPnMep NOKaBA npEynpEKeHHe, KoTo yBcOmRA 3a TOKOB Yap, npeIN3BnKAn OH TaCTN NOd HApEKeHHe. CnOmeHabe Ce MpaKaTa 3a N36RbAe Ha onacHOCTA.


ONACHOCT
Pnck OT TokOB yap npaH nuactn noH anpekeHne!
CmbptOT TOKOB ynap
K3NkhOteyeHtEeOEtEeONKTHe 3aXpaHbAne H06 ce8c HnI npEe3aONBaHa He aPeMOHa.
1.2.4 06uCNMBOJI
BTO3NIOKYMENTCEH3NON3BATCNEDHNTeO6UINCNMBONI:
| Оьш симвов Зачени | |
| I | Иденихицаре на спесиален сьвет (Текст w/ллграфика) |
| I | Иденихицаре на постс сьвет (самоTekст) |
| I | Иденихицаре на врьзka Кьм Вideоурок |
| I | Иденихицаре на необхочимite ИСТрумени |
| I | Иденихицаре на необхочимiteпраздарителни ус自主创新 |
| I | Иденихицаре на ус自主创新 (ako ...,Тогава ... ) |
| I | Иденихицаре на рezуntат |
| [Стар] | Иденихицаре на Клиочни 6ытуон |
| [00123456] | Иденихицаре на Кatableожен Homep |
| [Статус] | Иденихицаре на по��аизяп Текст/ празорец (надиспега на урEDA) |
Ta6nua3:06u cumeonu

Be3onachocT
2.1 06uHnHCTpyKu3a6e3onacHOCT
2.1.1 BcHKn DoMaunHn ypeiN
Puck OT TOKOB yap nopadn qactn noh HanpexeHne!
- PrguKPi pR eMOHTN, BKNIOHbAaN eNEKTPnEeCKN KOMHOHeHtN, MOrat Da doBedeAt Do TOKOB ydAp!
- Pankahe te yepda o t e nektpnuecka ta mpeka 3a nohe 60 cekyHdi, npde da 3a-noqhepe pa60ta.
Cnepe moHHTA TpRABa da ce HbPnpoBepeka 3a 6eOanchoCT bIraNACHO VDE 0701 INH B cOETBTBc bC cneHINHNTHe 3a CTPAHATA PAHOpE6b
Puck OT HapaHbAbe OTOCTPNp b6oBe!
Hocete npedn3n pbkabn
PCK OT pme3A8Na BO peme HA pMeOH, NOpIbJbKHa,OTcPraBaBA Ha HnE3PbABHOCTN andepBn3npaIe TkHn DBeWKeu CE KOMNoHEHTn
Hocete3aunTHn06yBKn.
3akpenete TeXKNTe KOMNOHEHTN, Taka Ye Da He naHaT.
He no3BONRABaTe KOHTaKT Ha YAcTn OT TAnOTo C DmXeUc Ce KOMNoHEHTN.
Pnck 3a 6e3oanacocTtA/foHKuHraTa h ypeDa!
- 13no3BaIte cmo opunHaJIH pe3epBHN qactN.
Pnck OT NOBpeHa eNekTpocTaTuHc YbCTBtENH KOMnoHeHTN (ESD)
HeDOKOcBaTeMoDyInTe,BKNIOHTeHnHO Bp3Kn IN PNOBOHNKOBNbTtua.

IhctpymEnTu n NOMOuHcpeDCTBa
| посочане Роббости Избражения | |
| Зашатна Кьрпа [00342013] | 60 см x 50 см |
| Плесka OTberpта Врьх 2,4 ММ x 0,4 ММ x 60 ММ, В кOMПЕКТа [00341820] | ① |
| Спесален Ист- румент [00342180] | |
| Смужателна чаша [00342224] | Ø50 MM |
| Нakраимник Торх TX20 [00340865] | 6,3 MM (1/4") |
| Плесka OTberpта Врьх 10 ММ x 1,6 ММ x 200 MM | ① |
MoHTnpaTeB o6paTeH peI.

PemOH
4.3 CmHa Ha rOpHata NaHTa Ha BpaTaTa
Cneunannn HNCTpyMeHTN:
HakpaHHK Torx TX20 6,3 MM (1/4") [00340865]

PNEyPPEKDEHNE
Teekn, o6emncTuypeu!
HpaHbAHe npaPi Naaun Yactn
3akpeneteKOMNOEHTa,Taka He da He naHe.
BHIMAHHEI
Pnck OT nadaun yactn nopadpa3xna6eHN BnHTOBe!
IobpeHa HpyrHuactn Ha ypea nnB DoMa Ha KneHTa, Hap. bHO
TO.
3akpenTe KOMnOHeHTa, Taka Ye da He naHe.
N3nCKBaHe:
YpeBt en3KIOueHOT 3axpaHbHeTo.
BbtpewHnTe pHTnHnHa ypeDa ca oTcpaHeHn.
4.3.1 CbajrHe Ha rohpata naHa BpaTaTa
- NocTabete ypeda nergan Ha 3aHaTc cn cTpaHa.

PemOH
2.1.HaTnCHETe KanaHTo Ha ropHATA NaHTa OT DBeTe CtpAHN (1).
2.ИЗваде КанаЧЕТа На РорнATA NaHTA (2).
3. 3aBbptete Kanayeto Ha naHTata (3).
4.Cbanete kanaheTo Ha rohpata naHTa (4).
5. Pa3BnTe Dbata BnHTa (5).
6. CbaneTe rophata naHTa (6).

Toghata nHaTa e CbaneHa.
4.3.2 MoTHnPaHe Ha roPHaTa naHTa Ha BpaTaTa
MoHTnpaIteB06paTeHpeI.

PemOH
4.4 CmHa Ha cpeHata naHTa Ha Bpata
Cneunannn HNCTpyMeHTN:
HakpaHHK Torx TX20 6,3 MM (1/4") [00340865]

A PDEyIpeXJdHHe
Texk, o6emnctuypei!
MoHTnpaIteB06paTeHpeI.

PemOH
4.5 CmHa Ha donHaTa nHa HbPaTa
Cneunannn HNCTpyMeHTN:
HakpaHHK Torx TX20 6,3 MM (1/4") [00340865]
PDEYIPKXDEHNE
Teekn, o6emncTuypeu!
MoHTnpaIteB06paTeHpeI.

PemOH
4.6 CmHa Ha paΦTa
N3nCKBaHe:
BpaTaTa e oTbopeHa.
4.6.1 N3BaXdAne Ha paΦTa
H3dbpnaTepaTa.
PaftbtecbaneH.
4.6.2 MoThupaHe Ha paΦTa
MOHTnpaTeB06paTeH peI.
PeMoHT
4.7 CmHa Ha Ta6nKaTa 3a 6yTnIKN
M3nCKBaHe:
BpaTaTa e oTBopeHa.
4.7.1 CbAHe Ha Ta6nKata 3a 6yTnKn
H3dbpnaTe Ta5nHkata 3a 6ytnkn.
Ta5nukata3a6ytnknecbaneHa.
4.7.2 MoThiPaHe Ha Ta6JnUkata 3a 6yTnIkn
MoHTnpaIteB06paTeHpeI.

PemOH
4.8 CmHa Ha cTeJaXa Ha BpaTaTa
M3nCKBaHe:
BpaTaTa e OTBopeHa.
4.8.1 N3Baxdahe Ha CTenaxa Ha BpaTata
NobHHeTcTeJaxHaBaPaTaHarope.

CTenakbTaHaBpaTaTaeCBaneH.
4.8.2 MoNTupaHc HcTeNaKa Ha BpaTaTa
MOHTnpaTBeBobpaTepeI.

PemOH
4.9 CmHa Ha peryInpyemna cTeJaX Ha BpaTaTa
N3nCKBaHe:
BpTaTa e TbOpeHa.
4.9.1 CbIaHHe Ha perynpyemnna cTeJax Ha BpataTa
PpeMeCTePeYnIPyEMIaTNO BnCOuHbA CTENaK HA BpataTA HArOpe, DOKaTO CE OcbOboN ot DbXbaKa.
PerynpyemnTcTeJAAHbPaTaTaeCBaJIeN.
4.9.2 MoNTnpaHae Ha peryInpyeMn cTeJax Ha BpTaTa
MOHTpauTeB o6paTeH pei.

PemOH
4.10 CMHa Ha KOHTeHepa 3a 3ampa3eHN XpaHNTeHH npOdykTN
N3nCKBaHe:
BpaTaTa e oTBopeHa.
4.10.1 3BaXdaHe Ha KOHTeHepa 3a 3ampa3EH XpaHHTEN npOdykTN
- 13dbpnaTe DOKpaI KOHTeHepa 3a 3aMPa3EHx pHaHTeHIN npOdykTN (1). 2. N3BaTe KOHTeHepa 3a XpaHHTeHIN npOdykTN (2).
KoHTeHepb3a 3aMPa3EHn XpaHHTeHn npOpykTN e N3BaJeH.
4.10.2 MoHTnpaHe Ha KOHTeHepa 3a 3ampa3eHxpaHn TpOdykTN
MOnTnpaTaeB06paTeHpeJ.
MOnTnpaIteB06paTeHpeI.

PemOH
4.12 CmHa Ha pa3TeratEnHnKoHTeHep
M3nCKBaHe:
BpaTaTa e oTbopeHa.
4.12.1 3BaXdaHepaTaTeRaTeHHnKoTHeHep
- N3dbpnaTe HambnHO pa3rTaTeHHN KOHeHep(1).
2.ИЗbaTepea3TeraTeHnHaKoTHeHep(2).
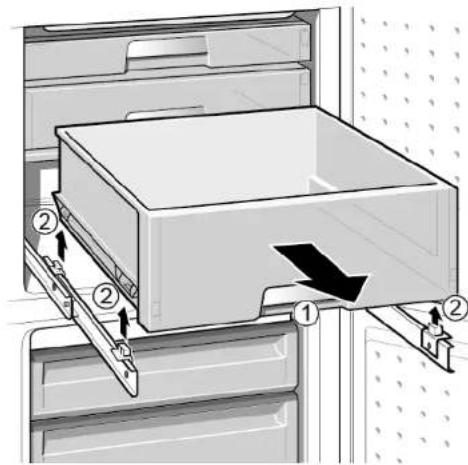
PaTteratENHnT KOHTHepe n3BaHeh.
4.12.2 MoHTnpaHe Ha pa3TeRaTeHHra KOHTeHep
MOHTnpaTaTeB06paTeHpeI.

PemOH
4.13 CMraHa Ha LED oCBetneHneTo otrope
CneuaJIHHHnCTpymeHTN:
NnockaOTBeptKaBpbx2,4MMX0,4MMX60MM,B KOMPnEeTa[00341820]

BaWnAT ype n cHa6dene C LED ocBtneHme, KoTe He H3NcKbNa noD- DpbXkKa. Toba ocBtneHme MOKe Da 6bJe peMOHTnpaHO CaMo O t CneuHaIunctu ot cnykbaTa 3a 0cbNyXbaHe Ha KIneHTn NnOt KBaNfKnUpaHn TexHnui!


ONACHOCT
Pmck ot TKOB yub npoprna tactn noanHanpexkHe!
OnAnOHCT 3a KWBOTA ot TKOB yub aB city nHenPBAP
EeKtPrnTeKteTneAactn TpRbBa da ce pEmOHnpat OT KBAIINPHUNPAHn EeKToTeXHn.
CnepemoHTA Tp8Ba 1a Ce n3bBpiN npOBepKa 3a 6e30NaCHOCTcRlachO VDE 0701 mnn B cBtBeTCTBHe CbC cneunHnHnTe 3a cTpaHATA paope6m.


ONACHOCT
PnCK OT TOKOB ydap npaHn qactn noHanpeXeHHe!
CmbptOT TOKOB ydap
N3KNUOYE ypeIne O t eENKPTHcNECKOTo 3axpaHbAhe noe 60 ceKHynnpEa3noaBaHa He pMeHTA.


BHIMATEJIHO
Octpn pb6oBe!
HapaHbHaMOnTnnp3BaHe
Hocete npedna3n pkaBn.
N3nCKBaHe:
YpeBt E N3KIOUeH OT 3axpaHbAHHeTO.
BpaTata e OTbopeha
TopHnTe BbTpewHnФmTNHn Ce OToCTpaHBAt.
4.13.1 CbajnHe Ha LED ocBtJeHneTo
- Ppemectete LED ocBETneHneto HnABO.
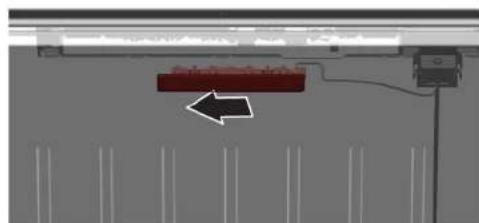
CbpbbaHTo KbEm ENEKtpnueckaT Mpeka H LED OCBETneHHeTo e npekbcHATO.
2.Ocbo6oTe KyKte HaLEDocBeTneHMeTo.
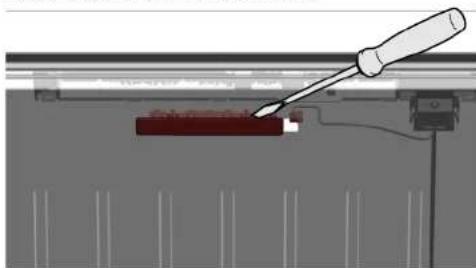

PemOH
3.CBaIeTeLEDocBETHeHnETo,pNIMBKBaIKnroHanpei.
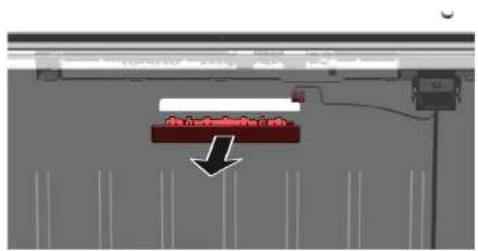
LEDOCBETHeHMeToeCBaneHo.
4.13.2 MoHTnpaHe Ha LED ocBETneHnTo oTrope
MoHTnpaIteB06paTeHpeI.
Sorg for at sikre apparater mod at glide.


PAS PAI
Fare for nedfaldende dele pga. Iosnede skruer!
ronskade pga. nedfaldende dele
Sorg for at sikre componenten mod at falde ned.

BEMERKI
Fare for nedfaldende deleg pga. Iosnede skruer!
Sorg for at sikre componenten mod at falde ned.
Preindstilling:
Sorg for at sikre apparater mod at glide.

Fare for nedfaldende dele pga. Iosnede skruer!
rsonskade pga. neddendene dele
Sorg for at sikre componenten mod at falde ned.


Fare for nedfaldende dele pga. Iosnedeskruer!
Sorg for at sikre componenten mod at falde ned.
Preindstilling:
Sorg for at sikre apparater mod at glide.


PAS PAI
Fare for nedfaldende dele pga. Iosnede skruer!
Personskade pga. nedfaldende delete
Sorg for at sikre componenten mod at falde ned.

BEM/ERK!
Fare for nedfaldende dele pga. Iosnede skruer!
Sorg for at sikre componenten mod at falde ned.
Preindstilling:
Repair hints - Fridge-freezer
1 Concerning this document. 113
1.1 Important information 113
1.1.1 Purpose 113
1.2 Explanation of symbols 113
1.2.1 Danger levels 113
1.2.2 Hazard symbols 113
1.2.3 Structure of the warnings 114
1.2.4 General symbols 114
Safety 115
2.1 General Safety instructions 115
2.1.1 All domestic appliances 115
Tools and aids. 116
Repair 117
4.6 Replacing shelf. 125
4.6.1 Removing shelf 125
4.6.2 Installing shelf 125
4.7 Replacing bottle tray. 126
4.7.1 Removing bottle tray 126
4.7.2 Installing bottle tray 126
4.8 Replacing door rack 127
Concerning this document
1.1 Important information
1.1.1 Purpose
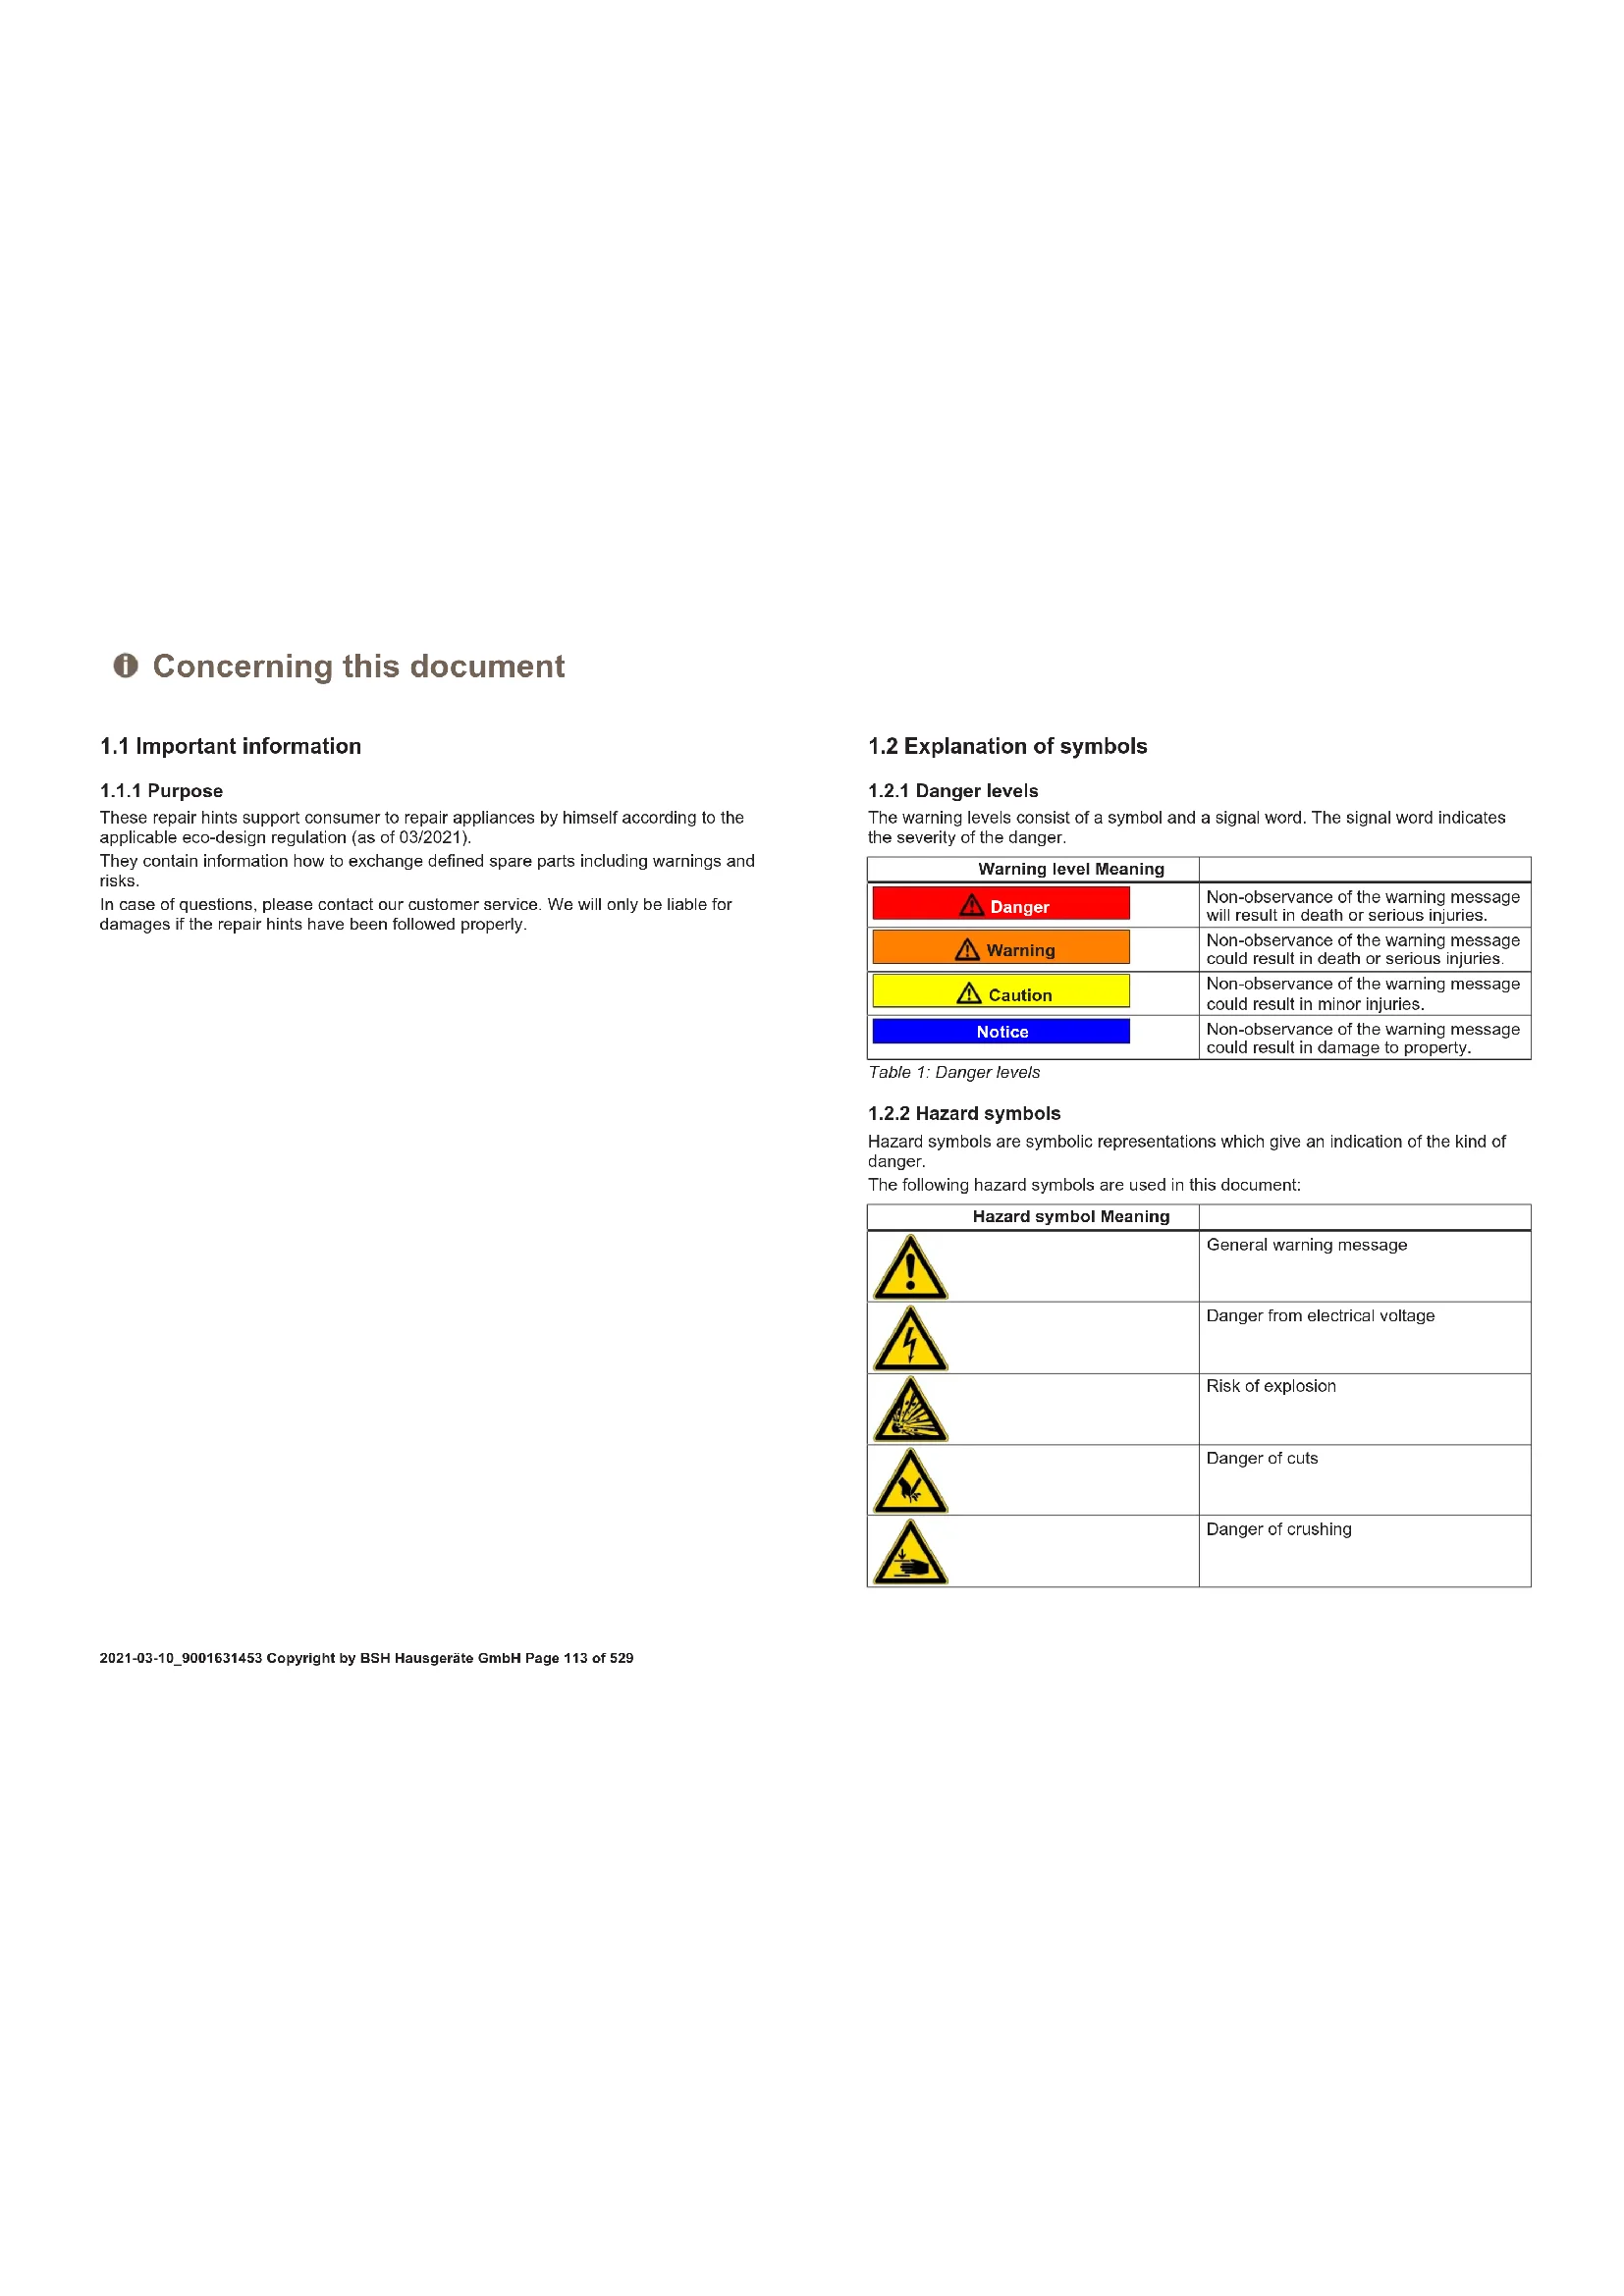
These repair hints support consumer to repair appliances by himself according to the applicable eco-design regulation (as of 03/2021).
They contain information how to exchange defined spare parts including warnings and risks.
In case of questions, please contact our customer service. We will only be liable for damages if the repair hints have been followed properly.
1.2 Explanation of symbols
1.2.1 Danger levels
The warning levels consist of a symbol and a signal word. The signal word indicates the severity of the danger.
| Warning level Meaning | |
| Danger | Non-observation of the warning message will result in death or serious injuries. |
| Warning | Non-observation of the warning message could result in death or serious injuries. |
| Caution | Non-observation of the warning message could result in minor injuries. |
| Notice | Non-observation of the warning message could result in damage to property. |
Table 1: Danger levels
1.2.2 Hazard symbols
Hazard symbols are symbolic representations which give an indication of the kind of danger.
The following hazard symbols are used in this document:
| Hazard symbol Meaning | |
| ! | General warning message |
| Danger from electrical voltage | |
| Risk of explosion | |
| Danger of cuts | |
| Danger of crushing |
Concerning this document
| Hazard symbol Meaning | |
| Danger from hot surfaces | |
| Danger from strong magnetic field | |
| Danger from non-ionizing radiation |
Table 2: Hazard symbols
1.2.3 Structure of the warnings
Warnings in this document have a standardised appearance and a standardised structure.
Danger
Type and source of danger!
Possible consequences of ignoring the danger / warning.
Measures and prohibitions for preventing the danger.
The following example shows a warning that warns against electric shock due to live parts. The measure for avoiding the danger is mentioned.
Danger
Risk of electric shock due to live parts!
Death by electrocution
- Disconnect appliances from electrical supply at least 60 seconds before disconnecting repairs.
1.2.4 General symbols
The following general symbols are used in this document:
| Gen. symbol Meaning | |
| 1 | Identification of a special tip (text and/or graphic) |
| i | Identification of a simple tip (only text) |
| Identification of a link to a video tutorial |
| Gen. symbol Meaning | |
| Identification of required tools | |
| Identification of required preconditions | |
| Identification of a condition (if ..., then ...) | |
| Identification of a result | |
| [Start]Identification of a key or button | |
| [00123456] Identification of a material number | |
| Status Identification of displayed text / window(in the appliance's display) | |
Table 3: General symbols
Safety
2.1 General Safety instructions
2.1.1 All domestic appliances
Risk of electric shock due to live parts!
Errors by repairs involving electrical components can lead to electrical shock!
- Disconnect the appliance from the mains for at least 60 seconds before starting work.
After the repair have a safety test according VDE 0701 or country-specific regulations performed.
Risk of injury from sharp edges!
Wear protective gloves.
Risk of crushing during repair, maintenance, troubleshooting and service due to heavy and moving components
Wear protective shoes.
- Secure heavy components from falling down.
- Do not stick body parts into moving components.
Risk to the appliance's safety / function!
Only use original spare parts.
Risk of damage to electrostatically sensitive components (ESDs)!
- Do not touch the modules, including connections and conductor paths.

Tools and aids
| Designation Details Images | ||
| Protection cloth [00342013] | 60 cm x 50 cm |  |
| Slotted screwdriver | Blade 2.4 mm x 0.4 mm x 60 mm, in the kit [00341820] |  |
| Special tool [00342180] | ||
| Suction cup [00342224] | Ø50 mm | |
| Torx Bit TX20 [00340865] | 6,3 mm (1/4") |  |
| Slotted screwdriver | Blade 10 mm x 1.6 mm x 200 mm |  |

Repair
Prerequisite:
Door is open.
- Release door gasket from the groove on right and left corner.
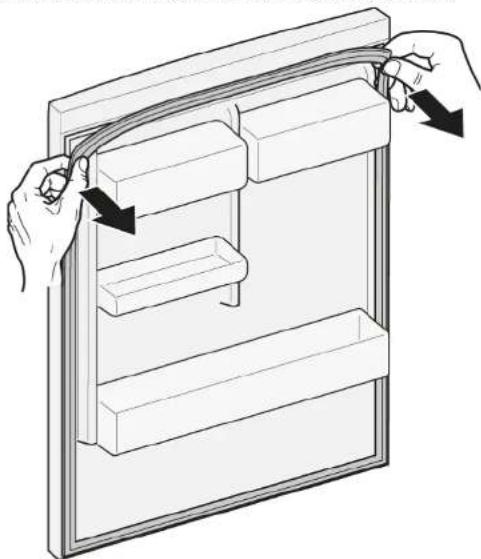
- Pull out door gasket from groove.
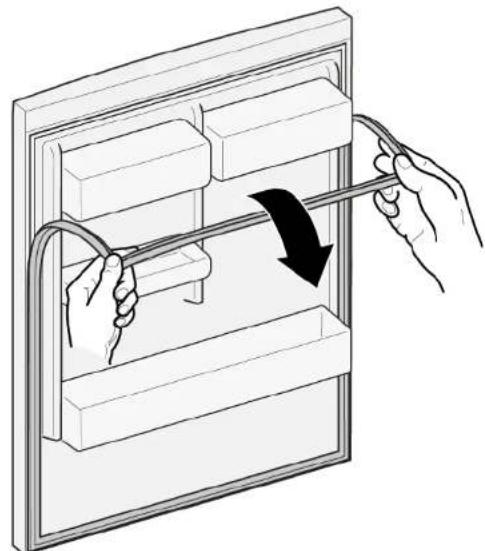

Door gasket is removed.
| Thickness of new door gasket may deviate slightly from thickness of old door gasket. This will not affect closing behavior and long-term function. | |
| If your appliance has adjustable hinges or hinge attachments, you can optimize the closing behavior subsequently. | |
| Small side holes in door gasket are functional (required for ventilation). These are not production faults. |

Repair
- Check groove for gasket for damage.
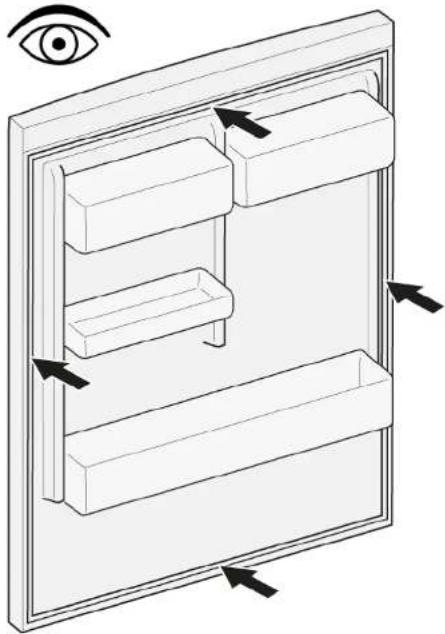
- If groove for gasket is it is damaged.
- Contact customer service.
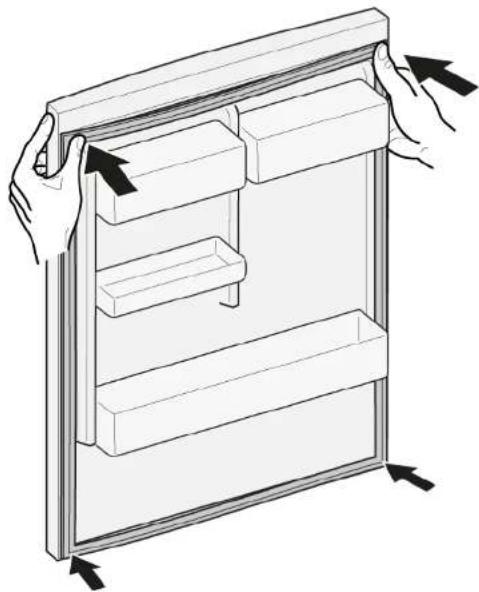
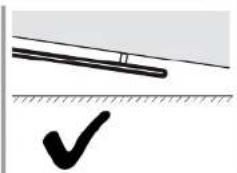
- Slight deformation of door gasket is normal and does not affect its function. It is recommended to straighten door gasket before inserting it into appliance.
Heat door gasket with a hair dryer or hot water and manually reshape it.
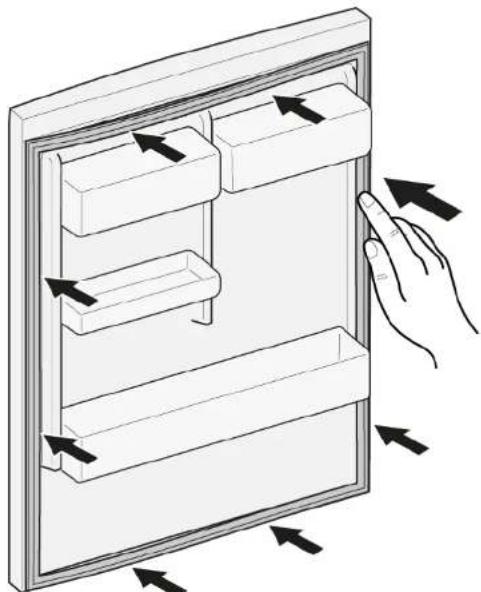
- Push corners of gasket at the top and bottom to the groove.

Repair
- Press whole gasket step by step into the groove.
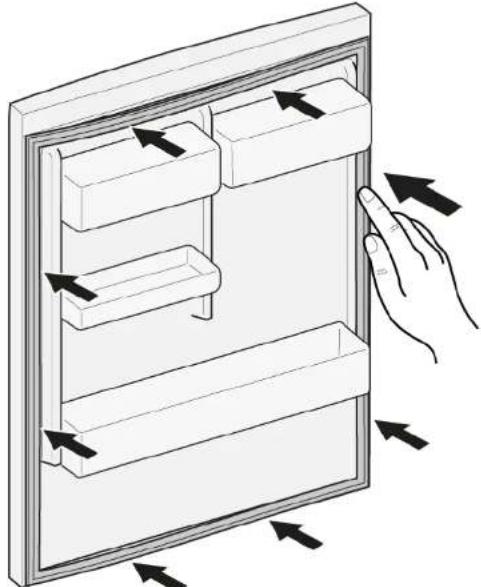

Door gasket is installed.

Repair
4.2 Replacing door handle
Required tools:
Torx Bit TX20 6,3 mm (1/4") [00340865]
Slotted screwdriver Blade 10 mm x 1.6 mm x 200 mm
Prerequisite:
Appliance is disconnected from power supply.
Door is open.
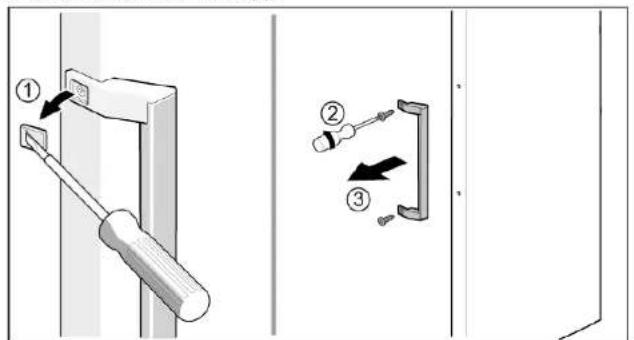
4.2.1 Removing door handle
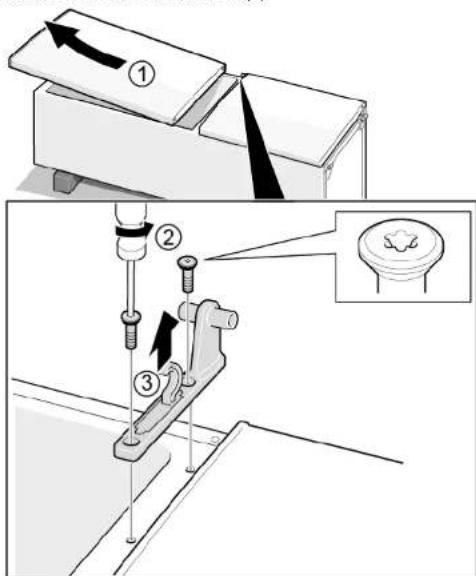
-
Remove two screw caps (1).
-
Unscrew two screws (2).
- Remove door handle (3).
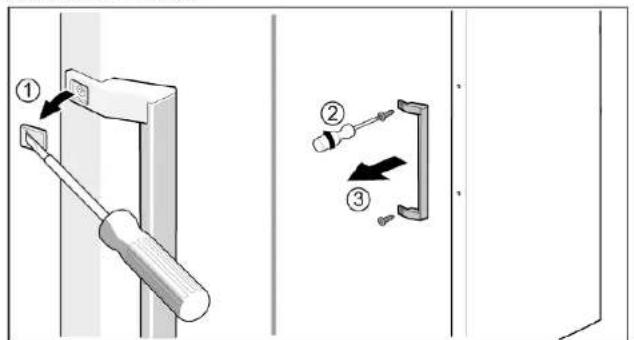

Door handle is removed.

Door handle for the second door can be removed in the same manner.
Install in reverse order.

Repair
Heavy, bulky appliances!
Back and muscle injuries
Appliance door removal operation should only be carried out by
trained specialists.
To move the appliance, two people are required.
Use only suitable tools and equipment.


Sharp edges!
Cut injuries
Wear protective gloves.


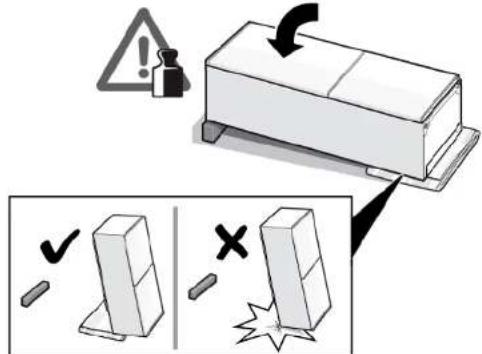
Slipping of tilted appliances!
Bone fractures / crush injuries
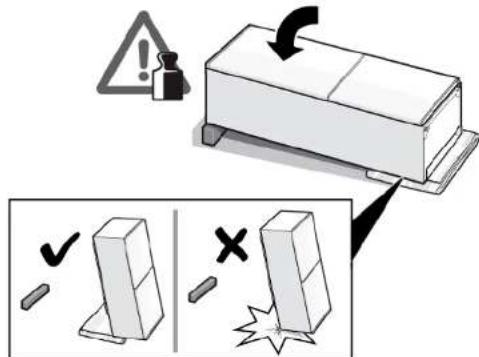
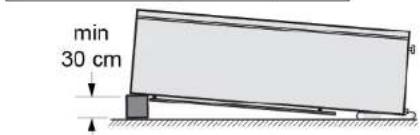
- Secure appliances against slipping

Risk of falling parts due to released screws!
ury because of falling parts.
- Secure component from falling down.

Risk of falling parts due to released screws!
Damage to other parts of the appliance or at customers home e.g. bot
tom.
- Secure component from falling down.
Prerequisite:
Appliance is disconnected from power supply.
Appliance interior fittings are removed.
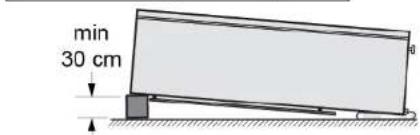
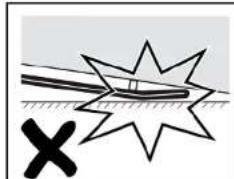
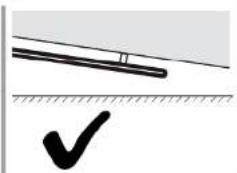
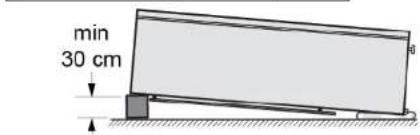
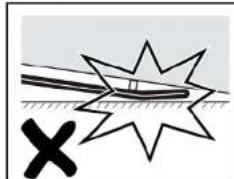
- Place appliance on the back side.
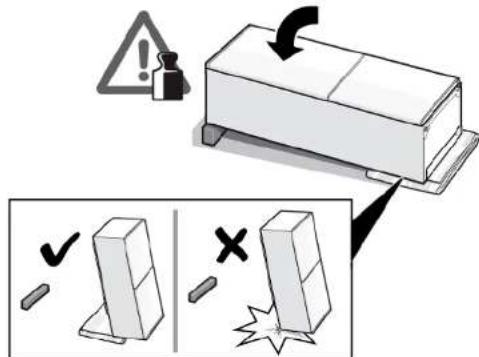

Repair
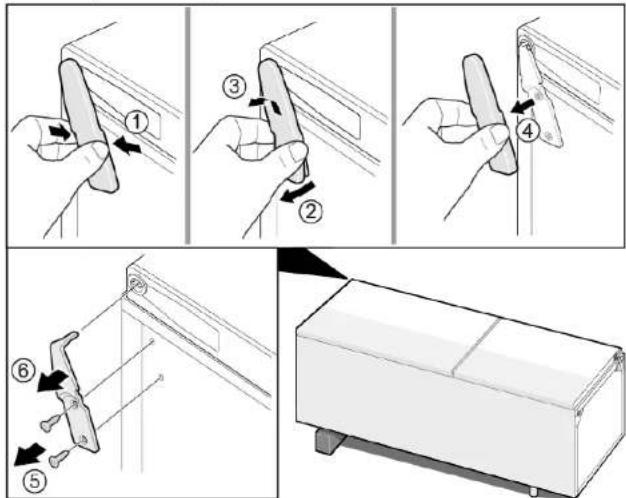
2.1. Press upper hinge cover on both sides (1).
- Move out upper hinge cover (2).
- Rotate hinge cover (3).
- Remove upper hinge cover (4).
- Unscrew two screws (5).
- Remove upper hinge (6)
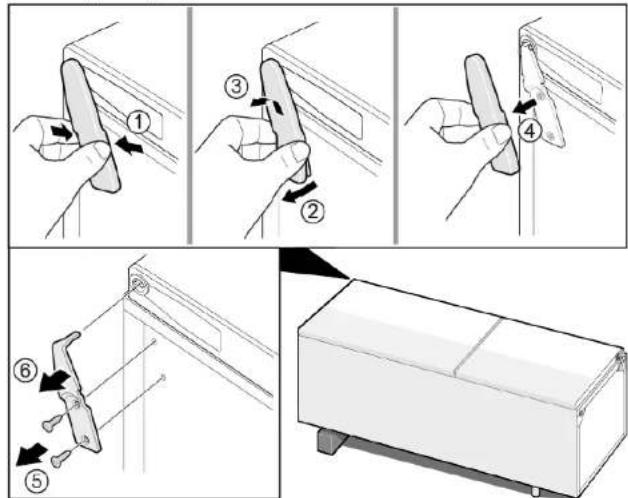

Upper hinge is removed.
Install in reverse order.

Repair
4.4 Replacing door middle hinge
Required tools:
Torx Bit TX20 6,3 mm (1/4") [00340865]


Heavy, bulky appliances!
Back and muscle injuries
- Appliance door removal operation should only be carried out by
trained specialists.
To move the appliance, two people are required.
Use only suitable tools and equipment.


Sharp edges!
Cut injuries
Wear protective gloves.


Slipping of tilted appliances!
Bone fractures / crush injuries
Secure appliances against slipping


Risk of falling parts due to released screws!
ury because of falling parts.
- Secure component from falling down.

Risk of falling parts due to released screws!
Damage to other parts of the appliance or at customers home e.g. bot
tom.
- Secure component from falling down.
Prerequisite:
Appliance is disconnected from power supply.
Appliance interior fittings are removed.
Door upper hinge is removed.
4.4.1 Removing door middle hinge
- Remove fridge compartment door (1).
- Unscrew two screws (2).
- Remove middle hinge (3).
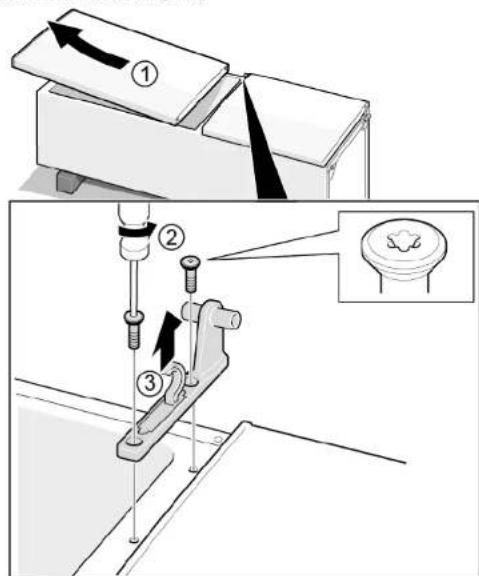
Middle hinge is removed.
Install in reverse order.

Repair
4.5 Replacing door lower hinge
Required tools:
Torx Bit TX20 6,3 mm (1/4") [00340865]

Heavy, bulky appliances!
Back and muscle injuries
Appliance door removal operation should only be carried out by
trained specialists.
To move the appliance, two people are required.
Use only suitable tools and equipment.


Sharp edges!
Cut injuries
Wear protective gloves.


Slipping of tilted appliances!
Bone fractures / crush injuries
- Secure appliances against slipping

Risk of falling parts due to released screws!
Injury because of falling parts.
- Secure component from falling down.

Damage to other parts of the appliance or at customers home e.g. bot
tom.
- Secure component from falling down.
Prerequisite:
Appliance is disconnected from power supply.
Appliance interior fittings are removed.
Upper hinge is removed.

Middle hinge is removed.
4.5.1 Removing door lower hinge
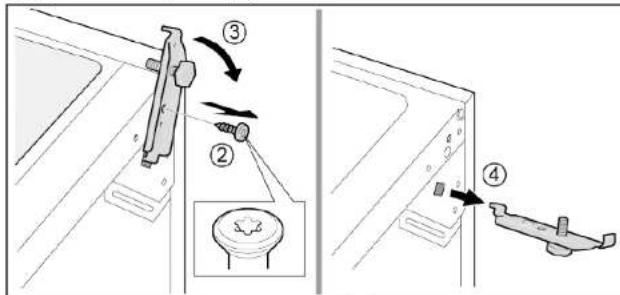
- Remove freezer compartment door (1).
- Unscrew the screw (2).
- Turn lower hinge out (3).
- Remove lower hinge (4).
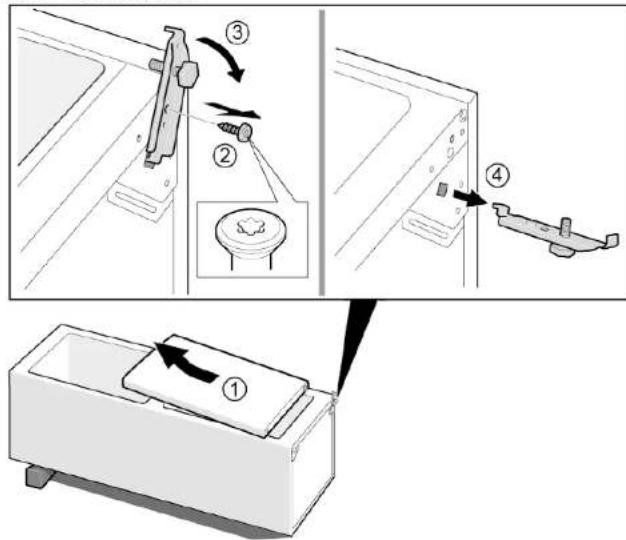

Door lower hinge is removed.
4.5.2 Installing door lower hinge
Install in reverse order.

Repair
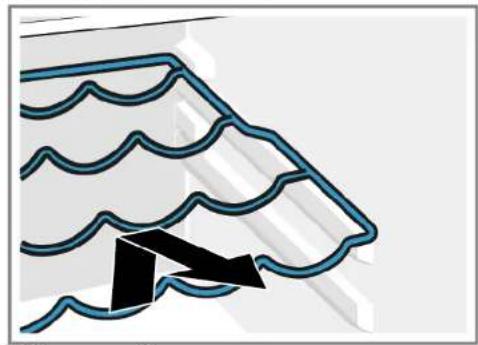
4.6 Replacing shelf
Prerequisite:
Door is open.
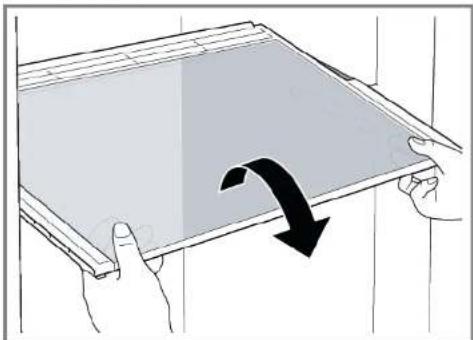
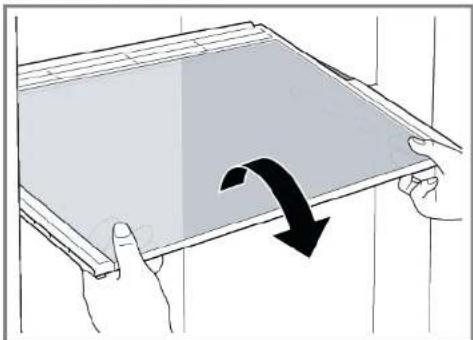
4.6.1 Removing shelf
Pull out shelf.
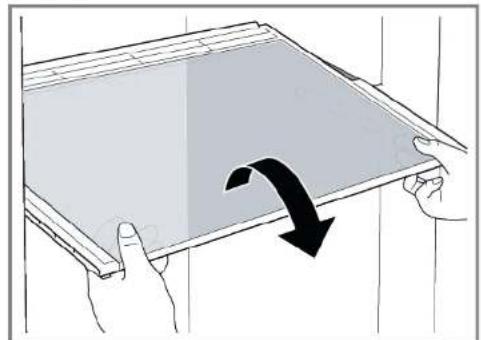
Shelf is removed.
4.6.2 Installing shelf
Install in reverse order.

Repair
4.7 Replacing bottle tray
Prerequisite:
Door is open.
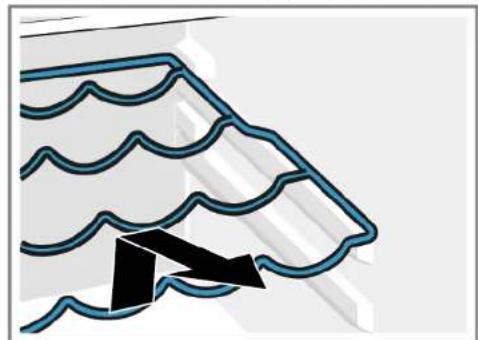
4.7.1 Removing bottle tray
Pull out bottle tray.
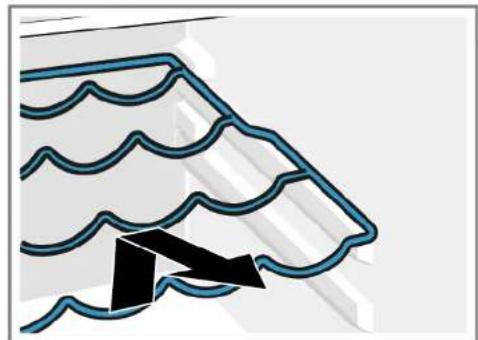
Bottle tray is removed.
4.7.2 Installing bottle tray
Install in reverse order.

Repair
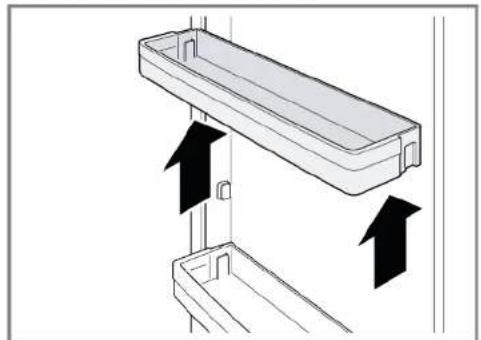
4.8 Replacing door rack
Prerequisite:
Door is open.
- Lift door rack upwards.
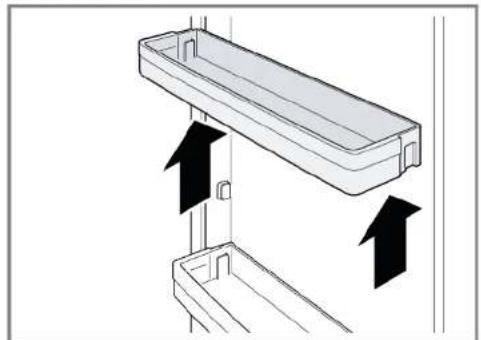
Door rack is removed.
Install in reverse order.

Repair
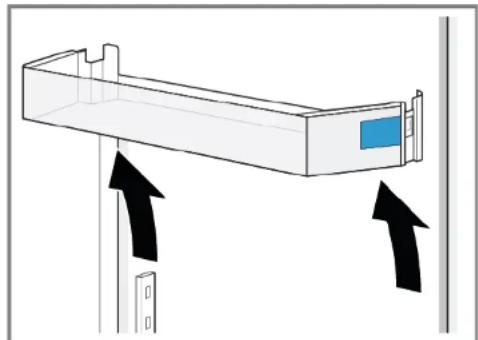
4.9 Replacing adjustable door rack
Prerequisite:
Door is open.
4.9.1 Removing adjustable door rack
- Move high-adjustable door rack upwards until the door rack is released from the holder.
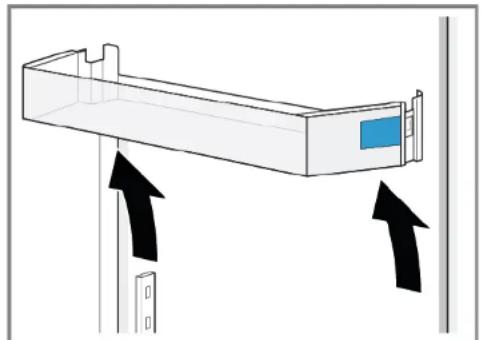

Adjustable door rack is removed.
Install in reverse order.
Repair
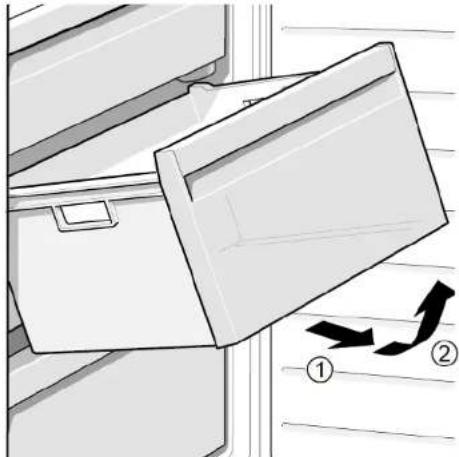
4.10 Replacing frozen food container
Prerequisite:
Door is open.
4.10.1 Removing frozen food container
- Pull out frozen food container all the way (1). 2. Remove food container (2).
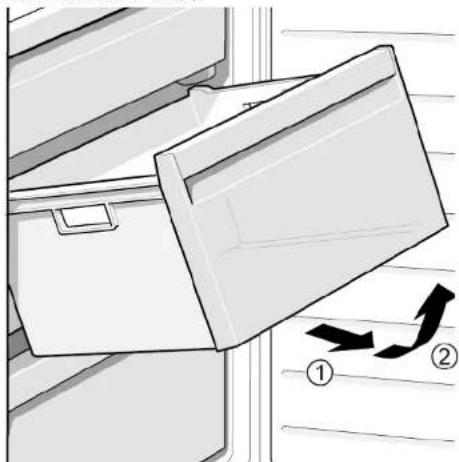
Frozen food container is removed.
4.10.2 Installing frozen food container
Install in reverse order.

Repair
4.11 Replacing container
Prerequisite:
Door is open.
4.11.1 Removing container
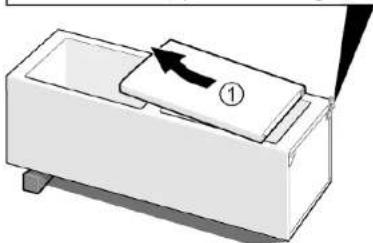
- Move out lower fridge container (1).
- Move out upper fridge container (2).
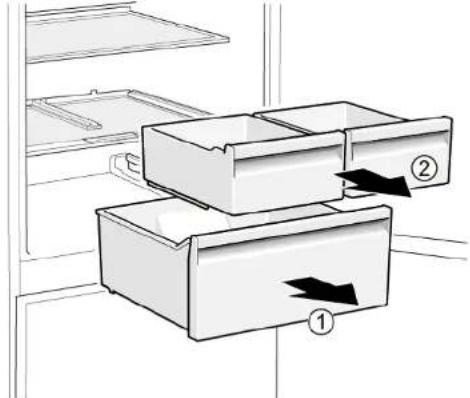

Containers are removed.
4.11.2 Installing container
Install in reverse order.

Repair
4.12 Replacing extendable container
Prerequisite:
Door is open.
4.12.1 Removing extendable container
1.Pull extendable container out all the way (1).
2. Remove extendable container (2).
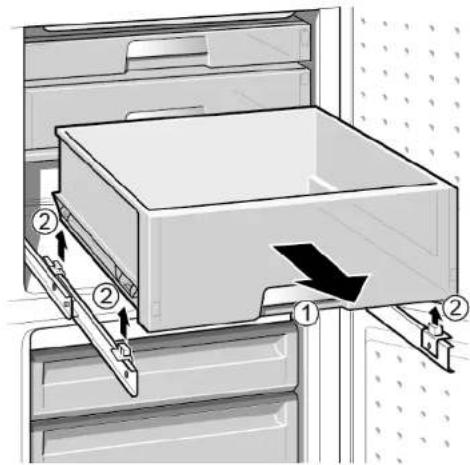

Extendable container is removed.
4.12.2 Installing extendable container
Install in reverse order.

Repair
4.13 Replacing LED top light
Required tools:
Slotted screwdriver Blade 2.4 mm x 0.4 mm x 60 mm, in the kit [00341820]

Your appliance features a maintenance-free LB
These lights may be repaired by customer service or authorised technicians only!


Danger
Risk of electric shock due to live parts!
Danger to life through electric shock in case of improper repair
Electric parts should be repaired by a qualified electricians.
After the repair have a safety test according VDE 0701 or country-specific regulations performed.


Danger
Risk of electric shock due to live parts!
Death by electrocution
- Disconnect appliances from electrical supply at least 60 seconds before starting repairs.


Caution
Sharp edges!
Cut injuries
Wear protective gloves.
Prerequisite:
Appliance is disconnected from power supply.
Door is open.
Upper interior fittings are removed.
4.13.1 Removing LED light
- Move the LED light to the left side.
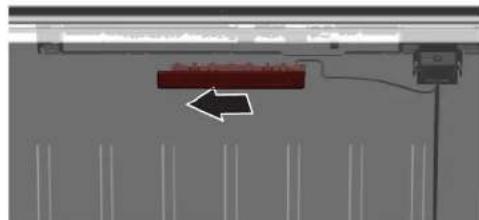
LED light electrical connection is disconnected.
- Release LED light hooks.
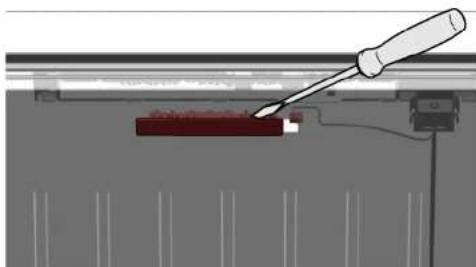

Repair
- Remove LED light moving it forward.
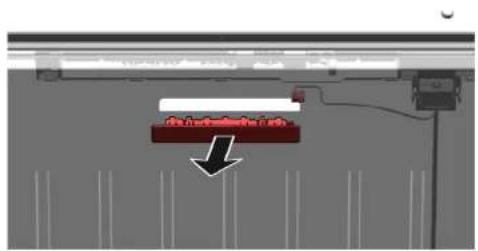
LED light is removed.
4.13.2 Installing top LED light
Install in reverse order.
Remonditeave - Kombikülmik
1 Selle dokumendiga seoses 135
1.1 Tahtis teave 135
1.1.1 Eesmark 135
1.2 Sumbolite selgitus 135
1.2.1 Ohutased 135
1.2.2 Ohusumbolid 135
1.2.3 Hoiatuste struktuur 136
1.2.4 Üldised sumbolid 136
Ohutus. 137
2.1 Uldised ohutusiuhised 137
2.1.1 Koki kodumasinad 137
Tabel 1: Ohutasedmed
1.2.2 Ohusumbolid
m = 311
Mun Torx TX20 6.3 mm (1/4") [00340865]
PⅡaekKaataαβiδI Aεπiδa 10 mm x 1,6 mm x 200 mm
PouTo6eOg:
Houokekunivataoosuvdeevn anTnynapoxnpofoofoiaac
H tripta elva aoivxtn.
4.2.1 Aqaipeoan aBnns tropras
- ApaipoeTe Ta duo Tiuura Tioa (1).
- 3εβδωτε δύο βίδες (2).
3.ApaipoeTnAaBnTns npra3

HaaanTnTPOtaeExaapapeB

HaaBn npTg yia Tn 8eutepn npTa mtopei va apaiepeei eTov iio tpoTO.
4.2.2 ToTOrBcTeHnAaBns TnOptas
Eykaataotne 1y nV aVfTeN oipd.

EMIOKEUN
4.3 Avikataoan Eavw Meveoe TOpas
EiikαβonθηrKaμεσa:
Mun Torx TX20 6,3 mm (1/4") [00340865]

A PPOEIOONIH
Bapie,oykwdeis oukeuec
Tpaunpatiogoi eonkaipuwv
Hdiakiaqa apaipeoN Tn Tropa Tn oukeun npettei va
EKTAEIATI MOVO aTTO EKTAIDEUVEVOCIOKOUC
Hmuetakivnon tsoukeunpipei vaekaleitai aio doaota
XpnoiopoioieIe movo katalaanaa epyaia kai eonlaouo.

PPOEQXH
AixunpeS aKpE5!
Tpaunatipoi afo kton
ΦopATE IppoatauteiKa yavTia.

A DPOEIAOIOIHSH
Oia0nKeKaipevovoukeuov!
Katayupaata ootaw/tpaupatiaooi ouvBaiiug
AopaaIATE Tc oukeuec aTIO aIaon.

A PPOOxH
Kivduvoi ano mwn npw v faia c hao apw biov!
auatipos eanias mwns tmuwv.
Aoaiote ta eapntmuata ano Twnon.


PPOOXXHI
Kivuvwv ano Twnn eapntmuw vgaia xalapw biow!
Znuae aaaa aepn ts ouokueu n otyn oikia tou Taeatn, x. datteo
AopaaioTe ta eapntmuataaTO TTOWn.
PountoEa:
Houkeunivataoovdbéevnanto IVpoxnpofoocia
ApaipouviTa eowtepiKa eapntmuata oukeunc.
4.3.1 Aqaipeoennravw mevtetop
- TOnoBcHnTne n ouakeun otyn niow nIeupa.

EMIOKEUN
2.1. Ieote 10 eavw kaumu paevteo kai otic duo naeupc (1).
auatipos eaiia twns npuataw
Aoaiote ta eapntmuata ano Twnon.


PPOZOXHI
Kivuvwv ano Twnn eapntmuw vqatc xalapwBidwV
Znmu e aaaaepn nns ouakeun ng otnv oikia tou telaatn, T.x. datteno
AopaaioTe ta eapntmuataaTO TTOWn.
PountoEaŋ:
H ouokevi eivai aotouovdeepevn atnoTny npoxn Tpofoooiaac.
Apaipouviata Ta eowtepiKa eapntnata OoKEuNc.
O EπáwμeVTεoεç éxααpαeθei.
4.4.1 Apaipoeon meaoiou evtote troptac
- ApaipoeTe nV npOa xwpou yuyeiou (1).
- 三εβδωτε δuδβδε(2).
- ApaipoeToVmuoAo uveTe(3).
Oμeaoic μevteocé exiaopaeBef.
4.4.2 ToTOnTeIOn Peaaiou EvTeOe Tropas
Eykataaotnote nTvntvnttneip

EMIOKEUN
4.5 Avtikataaotaon katw mevtote troptac
Eioka Bonntika eo:
Mun Torx TX20 6,3 mm (1/4") [00340865]

A PPOEIOONIH
Bapie,oykwdeis oukeuec
Tpaunpatiogoi eonkaipuwv
Hdiakiaqa apaipeo nTn Tropa Tn oukeun npettei va
EKTAEIATI MOVO aTTO EKTAIDEUVEVOCIOKOUC
H uetakinyon nnc oukeuhc TOpTeI y eKTeAeiTa oTo duo atoua.
XonoiotoiieTe movKaataaAn aepyaaia Kai EoTIAIO.


PPOOxH
Aixunpeaekes!
Tpaunatipoi afo kton
ΦopATE TPOOATUKAYVIA.


NPOEIAOIOIHEN
Oia0nON KEKlpevov OoKEuov!
Katayupaata ootaw/tpaupatiaooi ouvBaiu
AopaaIATE Tc oukeuec aTIO aIaon.

A P0eoxH
Kivduvoi ano mwn npw v faia c hao apw biov!
auatipos eaiia twns npuataw
Aoaiote ta eapntmuata ano Twnon.


PPOZOXHI
Kivuvwv ano Twnn eapntmuw vqatc xalapwblswl
Znmu e aaaaepn nns ouakeun ng otnv oikia tou taeatn, T.x. datteno
AopaaioTe ta eapntmuataaTO TTOWn.
PountoEaŋ:
H ouokevi eivai aotouovdeepvntn tnpoxtnpoooiaac.
Apaipouvta ta eowtepiKa eapntmuata ouokeun.
O EπáwμeVTεoεεχεi apaipeBéi.
O μeaoos evtaeEexe aepoeBef.
4.5.1 Apaipoeon katoe e tropos
- ApaipoeTe Tny npTa xwpou Karauuugns (1).
2.3εβiδωτεπβiδα(2). - FupioTe Tov KATW MEVTeTtPOc Ta E5w (3).
- ApaipoeTe Tov KAtw (4).
O KATU MEVTEOE CnpTAC Ee iqaipEeI.
4.5.2 ToTtoBttnon katw vteoTnptos
EykaataoThee TnV aTtBtneipa.
EπIOKεUN
4.6 AvtikataoTaon paiou
PouT6eOg:
H Tóptá εíval avoiXtN.
4.6.1 Apaipaeon paipou
TpaBnETo papi npoc Ta eew.
To paoaipéθnke.
4.6.2 ToToeTnO npaipou
Eykaataaote eTnV aTtEeTn eipa.
EπIOKEUN
4.7 AvikataoTaon Eriapaveiae evantoBcns qaiwv
PouT6eOg:
H Tóptá éival avoiXtN.
4.7.1 Apaipoeon Etniapevias Evanroeons piaaw
TpaBnE TPOs ta Ew Tnv EtnpAveia evanOeogcn piauwv.
H EtniPnAveia EvanToeOnc piauW exaeppeBt.
4.7.2 Tomoettnon emipavexic evamoeos φiaaw
Eykaataaote eTnV aTtEeTn eipa.
EπIOKεUN
4.8 Avtikataoan papoiu troptas
PouT6eOg:
H Tóptá éival avoiXtN.
4.8.1 Apaipexan paipou npoprac
Avoankwote To pao Tnpa TPOC Ta eTavw.
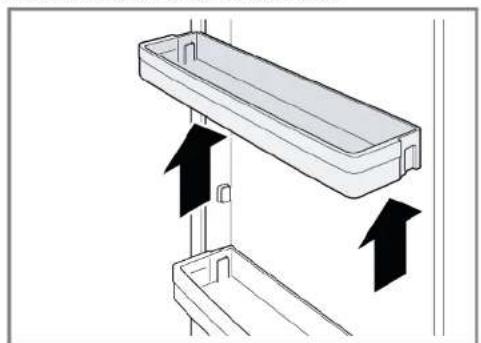
To papi TnpaTc Exe1 apaipeBt.
4.8.2 ToToBtEtnn papiou nprops
Eykaataaote eTnV aTtEeTn eipa.

ETIOKEUN
4.9 Avtikataaon paipou troptac duvatotnta pubuons
Pouu68eση:
H Tóptá εíval avoiXnI.
4.9.1 Apaipoeon papiou npotac uduvatotnta puoi
Metakivnote to papi troptac me duvatotnta puouianus uouc, tpoa etavw mexpi to papi troptac va ateuethetaepwei anto to otniipvma.
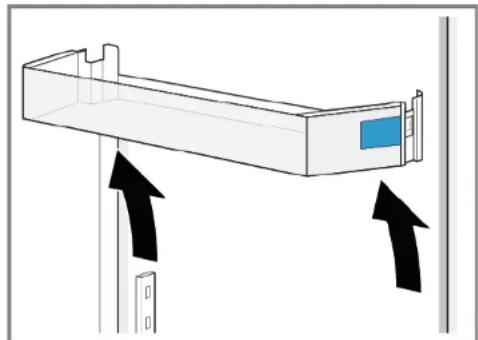
To paqi npiae duvatotnpaouhionx eaiapaehei.
4.9.2 ToTbeTnO npapoiu npotac duvarotnta puo
Eykaataotne tynavtihein oipa.

EMIOKEUN
4.10 Avikataoan ouptapoiou kateyuivwTpOipw
PouT6eOg:
H Tóptá éival avoiXtN.
4.10.1 Aapieeon ouptapiou kateyuuyevuv Tpopipuw
m = 311 ;

PERIGO
Risco deCHOque eltrico devidao a partes sob tensao!
Cap torx TX20 6.3 mm (1/4") [00340865]
Surubelinita platá Lama de 10 mm x 1,6 mm x 200 mm
Cerintă:
Cap torx TX20 6.3 mm (1/4") [00340865]

AVERTISMENT
Aparate grele, masive!
Accidentarea spatelui si leziuni musculare
Cap torx TX20 6.3 mm (1/4") [00340865]

AVERTISMENT
Aparate grele, masive!
Accidentarea spatelui si leziuni musculare
Cap torx TX20 6.3 mm (1/4") [00340865]

A VERTISMENT
Aparate grele, masive!
Accidentarea spatelui si leziuni musculare
- Tryck in hela packningen i sparet bit for bit.

Torbits TX20 6.3 mm (1/4") [00340865]

Vassa kanter!
Skärskador