
Frankfurt RCM 82 DAB - Car stereo BLAUPUNKT - Free user manual and instructions
Find the device manual for free Frankfurt RCM 82 DAB BLAUPUNKT in PDF.

| Product type | Car radio with DAB+/FM/AM receiver |
| Power supply | 10.5 - 14.4 V DC, fuse 10A |
| Speaker impedance | ≥ 4 Ohms per channel |
| Connectivity | Front and rear USB, microSD, AUX 3.5 mm, SWC input, preamp outputs (RF, LF, RR, LR), subwoofer output, external microphone, FM/AM and DAB antenna |
| Radio functions | FM/AM with RDS, DAB/DAB+, PTY, TA, AF, Travelstore, manual and automatic search |
| Audio functions | 14-band equalizer, bass/treble settings, balance/fader, adjustable subwoofer (gain, frequency, slope), Sound Preset (Pop, Rock, Classic) |
| Bluetooth | Hands-free, audio streaming A2DP/AVRCP, Twin Connect (2 phones), phonebook, voice dialing |
| USB/SD playback | Formats MP2, MP3, WMA, FLAC, M4A (AAC), APE, WAV; file systems FAT16/32/exFAT |
| Display | Backlit LCD, manual or automatic day/night brightness adjustment, RGB color (16x16x16) |
| Remote control | Infrared (optional, compatible with RC-08/09/10) |
| Safety | Automatic shutdown after 1 hour without ignition, mute function, battery protection |
| Cleaning | Dry or slightly damp cloth, avoid solvents and abrasives |
| Repairability | Repairs by a specialist; no user-serviceable internal parts |
| Included accessories | External microphone, ISO A/B cable, mounting frame, removal tool, DIN-ISO antenna adapter |
Frequently Asked Questions - Frankfurt RCM 82 DAB BLAUPUNKT
User questions about Frankfurt RCM 82 DAB BLAUPUNKT
0 question about this device. Answer the ones you know or ask your own.
Ask a new question about this device
Download the instructions for your Car stereo in PDF format for free! Find your manual Frankfurt RCM 82 DAB - BLAUPUNKT and take your electronic device back in hand. On this page are published all the documents necessary for the use of your device. Frankfurt RCM 82 DAB by BLAUPUNKT.
USER MANUAL Frankfurt RCM 82 DAB BLAUPUNKT
⑧ Stationstasten 1-5:
Bluetooth®- Audiostreaming 13
PTY TYPES (PTY LISTE):
PTY LANG (PTY SPRACHE):
FM SENS HI/ LO (FM EMPF +/-):
FM HICUT OFF, 1, 2, 3 (FM HICUT AUS, 1, 2, 3):
DAB SERVICE SCAN (DAB SERVICE SUCHE):
HPF (High Pass Filter)
LPF (Low Pass Filter)
STREAMING LIST (STREAMING-LISTE):
DIAL NEW NUMBER (NEUE NR. WÄHLEN)
BT NAVI MIX:
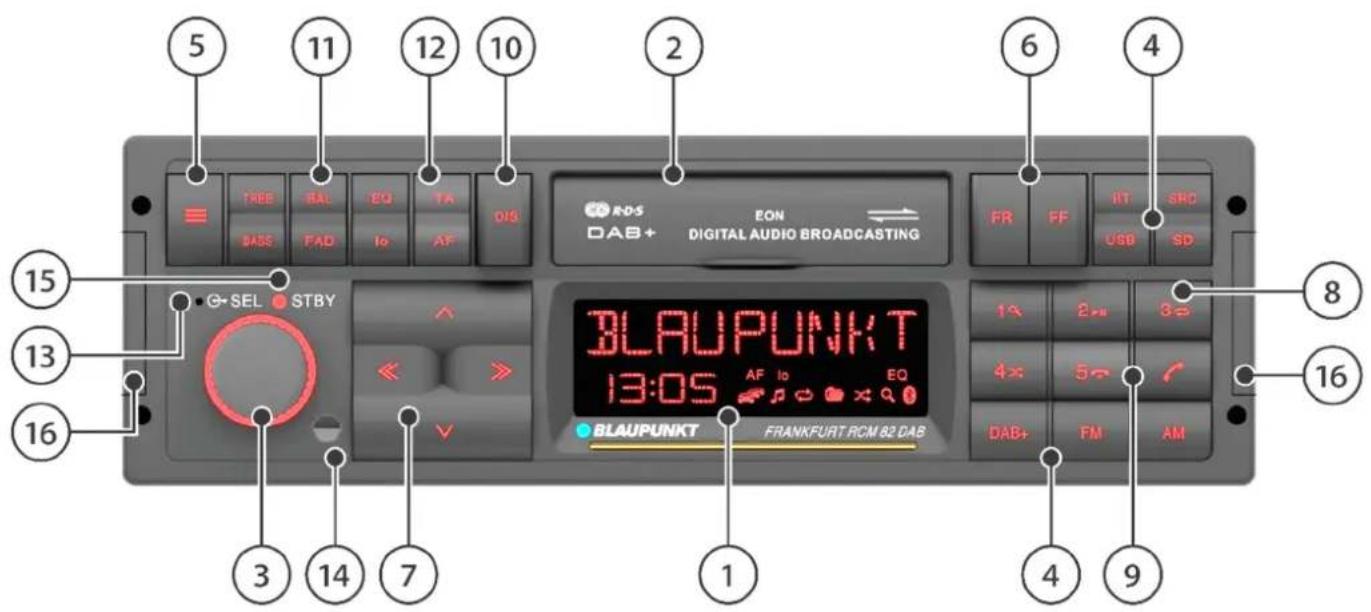
① LC display
Displays information including the source, current station, track, time and setting options
② Hidden microSD/USB and AUX inputs (left to right) Open the flip cover by pulling lightly from the bottom by the protruding bottom edge.
③ Volume control/on/off dial
Turn to adjust the volume up/down
Short press to turn on the car radio, mute the car radio
Long press to turn off the car radio
④ SRC button / direct selection source buttons BT, USB, SD, DAB+, FM, AM
Short press to selects the audio source.
Press SRC to toggle through the available audio sources. Some of the sources may be disabled (see "SETTINGS") or will not be available if no device is connected (e.g. AUX). Long press SRC to play a station/track (SCAN)
⑤ Menu button
Short press to open/close the menu (see "SETTINGS")
Long press to enable preset stations (P-SCAN) for VHF/DAB
⑥ FR / FF buttons
Control the source-specific functions (PTY search, fast rewind, fast forward, band search)
⑦ Multifunction rocker switch
Controls source-specific functions.
A / v for toggling through manual search, folder change, band change, menu navigation, menu settings change << / >> for toggling through search, track change, service change, setting selection or acknowledging/one step back in the menu.
⑧ Station buttons 1-5
Short press to select a station or a stored telephone number or to display a secondary function/special function such as track search (browsing), play/pause, repeat function, random playback, depending on the source selected Long press to search preset radio stations and phone numbers
⑨ Phone handset
"Answer" button
Short press to answers calls/dial a number Long press to enable the Softkey option (see "BLUETOOTH® HANDS FREE")
"Disconnect" button
Short press to ends/reject a call Long press ./.
⑩ DIS button
Short press to toggle between different information to be displayed depending on the source selected
Long press to toggle between the display brightness settings (if the brightness is set to MANUAL in the menu, see "SETTINGS")
⑪ Direct access keys TREB, BASS, BAL, FAD, EQ for sound settings
Short press EQ to display the SOUND PRESET option Long press EQ to display the EQUALIZER
⑫ Direct access radio function keys (lo, TA, AF)
⑬ Microphone
A hands-free system microphone (only active when no external microphone is connected)
⑭ IR LED
A receiver for an optional infrared remote control.
⑮ STBY LED (see "SETTINGS")
⑯ Caps covering the holes for the unlocking tool, see "INSTALLATION, DISSASEMBLY AND CONNECTIONS"
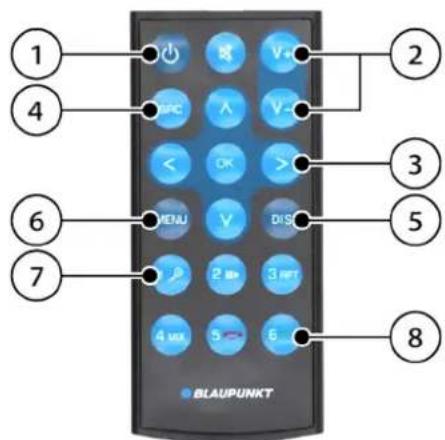
2. Controls, Remote Control (Optional Accessories)
The car radio can be operated remotely using the remote control sensor built into the front of the unit. This is possible with a remote control that is available as an accessory to the radio, or using older Blaupunkt remote controls (RC-08, RC-09, RC-10, RC-10H, RC-12H).
text_image
1 2 4 3 6 5 7 8 BLAUPUNKT① On/Off button
Tip: use the remote control to turn on the car radio only when you start the ignition. The remote function increases the quiescent current of the car radio so it cannot be used without the ignition on to protect the vehicle battery.
② Volume/mute buttons
③ Multifunction buttons Control source-specific functions
④ SRC (source) button
Audio source selection: toggle between the available audio sources. Some of the sources can be deactivated, see "SETTINGS".
⑤ DIS button Switches over the display
⑥ MENU button Enters the menu
⑦ Preset station buttons
Selecting a station or the secondary function such as pause/repeat/random playback, depending on the source selected
⑧ Phone buttons: Answer and end calls.
3. Congratulations
Congratulations on the purchase of your new Blaupunkt product. Please read this User Manual carefully to enjoy it for a long time.
However, if unexpected problems arise, check this User Manual to see if you can solve the issues yourself. Please also read the TROUBLESHOOTING section at the end of this User Manual.
Your Blaupunkt dealer and the Blaupunkt Service Department will be happy to help you if you cannot solve a problem yourself. Our contact information can be found at www.blaupunkt.com.
NOTE: This manual may apply to different models with different features, so some features and options may not be available on your model or may differ.
Furthermore, technical changes for further development and improvement of the product are reserved.
Contents Section
Car Radio Controls 1
Controls, Remote Control (Optional Accessories) 2
Congratulations 3
Safety 4
General Information | Package Contents | Software Update 5
Switching On/Off | Adjusting Volume 6
Analogue Radio VHF/Medium Wave (FM/AM) 7
Digital Radio: DAB/DAB+ 8
Playback from External Devices and Media: USB/microSD 9
Playback from External Devices and Media: iPod/iPhone 10
Playback from External Devices and Media: AUX 11
Bluetooth® Connection Setup 12
Bluetooth® Audio Streaming 13
Playback of Navigation Messages via Bluetooth® 14
Bluetooth® Hands-Free System 15
Sound Settings 16
Clock 17
Steering Wheel Remote Control (SWC) 18
Settings | Menu 19
Installation | Disassembly | Connections 20
Useful Information | Technical Data 21
Troubleshooting 22
4. Safety
Safety
The car radio has been manufactured according to the current state of the art and specified safety guidelines. However, hazards may occur if the safety instructions in this User Manual are not followed. Read this User Manual to learn the major features and operation of the device.
. Read this manual carefully before installing or using the car radio.
- Keep the User Manual in a place that is accessible to all users.
. When selling the car radio on to another user, include this User Manual.
. Follow the manuals of the devices (if any) used together with the car radio.
Symbols
The following symbols are used throughout this User Manual.

DANGER! Warns of injuries

CAUTION! Warns of the risk of damage to the DVD/CD drive or media in use

WARNING! High volume warning

The CE mark certifies compliance with EU directives

Tip
3333333333
Road traffic safety
Please follow the road traffic safety instructions provided below

DANGER! Use the car radio in such a way that you can drive safely at all times.
Using the car radio functions when driving can
distract you from the situation on the road and lead to serious accidents!
Avoid all activities that distract you from the traffic situation and from driving your vehicle carefully.

Use the car radio in such a way that you can drive safely at all times. If necessary, stop the vehicle in a safe place and operate the radio with the vehicle
stationary. The drivers of the vehicle must not use any apps that distract them from driving.

Always listen to the radio at a moderate volume to protect your hearing and be able to hear audible warning signals (e.g. from the police). When you
use the Mute feature (e.g. when toggling through the sound sources), adjusting the volume cannot be heard. Do not increase the volume after you use the Mute feature.
General safety
Do not modify or open the car radio. There are no user-serviceable parts inside.
Use as intended
This car radio is intended for installation and operation in a vehicle with 12 V supply voltage and must be installed in a DIN slot. It is necessary to observe the performance limits of the car radio.
Have repairs and, if necessary, installation done by a professional.
5. General Information | Package Contents | Software Update
Declaration of conformity
Blaupunkt Competence Center Car Multimedia Evo Sales GmbH hereby declares that the car radio complies with the essential requirements and other relevant provisions of Directive 2014/53/EU.
Find the Declaration at www.blaupunkt.com. Should it be unavailable there, we will provide them upon request.
Trademark information
All other trademarks and their logos, brand names or company names mentioned in this User Manual are used for identification purposes only and are the property of their respective owners.
Cleaning
Solvents, cleaning and abrasive agents, as well as cockpit sprays, air fresheners and plastic care products can contain substances that will damage the surface of your car radio. Use only a dry or slightly damp cloth to clean the car radio.
Disposal

Do not dispose of the used radio in household waste! Use available return and collection systems to dispose of your old radio and accessories.
Package contents
The package includes the following items:
. Car radio
.User Manual
. External microphone
.ISO A/ISO B connection cable
. Mounting frame + disassembly tool
. DIN-ISO antenna adapter
Software updates
The car radio software can be updated from external storage media.
You can download all available updates for your radio from www.blaupunkt.com. Update instructions and further information are included with the update.
Tip: if your car radio is working properly, an update is not necessary. Every update carries some risk of errors occurring during the process, and in some very rare cases – despite careful testing – new or different bugs may appear.
Tip: individual components and functions of the car radio may differ from those stated in the Manual, as features may have been changed, added or even removed due to further software development. This is not a defect nor a reason for complaint.
Tip: please provide as many details about issues you encounter in your radio as possible when requesting an update from Blaupunkt. The support consultant will also need the details of your currently installed software version (see "SETTINGS"). Unfortunately, we cannot help or provide updates unless we are given this information.
6. Switching On/Off | Adjusting Volume
Switching on/off
Press the volume control dial to turn the device on.
To turn it off, press and hold the volume control dial for more than one second. Note that it may take a few seconds after turning the radio on before you can turn it off again, as the internal boot processes are still active in the background.
Tip: the radio can also be switched on with the ignition off. If so, the display will then briefly show "1 HOUR ON". The
radio automatically shuts off after one hour to protect the vehicle battery.
Switching on/off by means of the vehicle ignition
If the ignition is turned off while the car radio is running, it will automatically turn off and turn on again the next time the ignition is turned on.
If the car radio has been turned off by pressing the volume control dial, it will remain permanently turned off after the ignition is turned on/off until it is manually turned on again.
Tip: If the function does not work as described, the car
radio has not been properly connected.
Adjusting the volume
The volume can be adjusted using the volume control dial from 0 (no sound) to 40 (full volume).
The display shows the set volume level for a few seconds. Depending on the setting, the car radio saves the last volume or the preset volume when it is turned on again (see "SETTINGS").
Setting the playback volume
Rotate the volume control dial during music playback to change the volume.
Setting the volume of traffic announcements (traffic announcements must be active in the settings, see "SETTINGS")
Turn the volume control dial during a traffic message to change the volume; the value is automatically saved and can be adjusted at any time in the settings (see "SETTINGS").
Setting the Bluetooth ^® (telephone calls) volume
Turn the volume control dial during a phone call to change the volume. This value is saved automatically and can be adjusted at any time in the settings (see "SETTINGS").
In addition to that, you can, if needed, adjust the volume of the call and ringtone on the cell phone – refer to the phone manufacturer's manual.
Bluetooth®-BT-Navi-Mix volume control (messages from a connected cell phone with active navigation) In the Bluetooth® menu, you can set the volume level for navigation messages if the Bluetooth®-BT-Navi-Mix option is active. The volume can also be adjusted on the cell phone. Follow the instructions of the phone's manufacturer (see "PLAYING NAVIGATION MESSAGES THROUGH BLUETOOTH®").
Muting your car radio
Press the volume control dial briefly to mute the car radio or return to the previous volume.

Always listen to the radio at a moderate volume to protect your hearing and be able to hear audible warning signals (e.g. from the police).
When you use the Mute feature (e.g. when toggling through the sound sources), adjusting the volume cannot be heard. Do not increase the volume after you use the Mute feature.
7. Analogue Radio VHF/Medium Wave (FM/AM)
Select one of the FM1, FM2, FMT or AM sources/memory levels using the SRC button or the FM/AM buttons
Tip: some memory sources/levels are inactive depending on the setting; for example, only the FM1 memory level is active by default. See "SETTINGS".
Tip: there are 5 memory slots available for each memory level.
Station search
Press << or >> on the multifunction rocker switch to start searching for channels down or up. The search stops automatically at the next station found.
Tip: the search sensitivity can be set in the settings, see "SETTINGS".
You can also set the frequency manually if your desired station signal is too weak and the search does not stop at the desired frequency. To do this, press the buttons on the multifunction rocker switch A or V until the desired frequency is tuned.
PTY search (FM only)
If the PTY (program type) function is active (see "SETTINGS"), press the FR/FF buttons to start the search for a preset PTY ID (presetting PTY types, see "SETTINGS").
Storing/selecting saved stations
You can save your favourite stations in the station memory using the 1-5 buttons. Each memory level can store up to 5 stations.
Follow the procedure in "STATION SEARCH" to set the desired station. Then press and hold the preset station button for the selected station for more than one second until you can hear a sound acknowledging that the station has been saved; after the beep, release the button.
You can recall your saved station by briefly pressing the preset station button.
Saving stations automatically (Travelstore)
In the memory levels marked with T (FMT, AMT), you can store up to 5 stations with the best signal strength using the automatic search (Travelstore). To do this, press and hold the FM or AM button for more than one second until the display shows FM TSTORE/AM TSTORE.
Tip: if you run Travelstore at another memory level the system will automatically switch to the Travelstore memory level and automatically activate it in the settings if necessary. Only the stations at the Travelstore memory level are saved/changed.
Playing saved stations (P-SCAN)
You can play back all stations at the selected memory level. To do this, press and hold the MENU button for more than one second until the display shows P-SCAN. The display will now show P-SCAN and the current frequency/radio station. The P-SCAN message is displayed until cleared by pressing the button again.
Playing the available stations (SCAN)
You can play all stations available in the selected frequency band. To do this, press and hold the SRC source selection button for more than one second until the display shows SCAN.
The display shows SCAN and the current radio frequency/station flashes.
SCAN will flash until the button is pressed again to stop it.
Changing the display
Use the DIS button to toggle between different display content below.
- Station designation
- PTY (program type)
- Radio text
- Memory/memory level + frequency
. Memory/memory level + time
Tip: availability of the specific display function depends on the selected band, transmitter and reception quality
Further features/options: see "SETTINGS".
8. Digital Radio: DAB/DAB+
Digital Audio Broadcasting (DAB or DAB+) is the digital successor to analogue VHF broadcasting. Digital transmission differs from the familiar analogue VHF radio in the following ways.
Several stations are broadcast on one channel, the so-called multiplex (ENSEMBLE) (= program packages).
The stations that fall within a given MULTIPLEX are called SERVICES (= stations and/or data services).
In Germany, for example, the MULTIPLEXES are available regionally from public broadcasters; moreover, there are currently two MULTIPLEXES that can be received throughout Germany: DR DEUTSCHLAND and ANTENNE DE. The stations do not output disagreeable noises known from VHF; a station is either heard with a consistent quality or breaks up when error correction is no longer able to reconstruct the signal, accompanied by short, so-called "burbling" noises.
Starting to play the DAB/DAB+ radio
Use the SRC or DAB+ button to select the DAB1, DAB2 or DAB3 source.
If necessary, run a scan using the DAB SERVICE SCAN menu option (DAB SERVICE SUCHE) to find stations available in
your location (see "SETTINGS").
Tip: some of the memory sources/levels are inactive depending on the setting; only the DAB1 memory level is active by default. See "SETTINGS".
Tip: there are 5 memory slots available for each memory level.
Browsing services
Press << or >> on the multifunction rocker switch to browse the services available for your car radio.
When selected, a new service will be displayed; when the browse activity is discontinued, the currently displayed service will be recalled and played.
Browsing multiplexes
Press or V on the multifunction rocker switch to select the multiplex available on your radio.
When selected, a new multiplex will be displayed; when the browse activity is discontinued, the first service of the selected multiplex will be recalled and played.
Searching for multiplexes

Press the FR or FF buttons to start a search, go back to the previous multiplex, or skip to the next received multiplex. The display shows a current channel during the search until you find a new multiplex.
Tip: this option is not available if PTY is enabled in the menu (see "SETTINGS").
PTY Search
If the PTY (program type) function is active (see "SETTINGS"), you can toggle through stations known to your car radio with the corresponding PTY ID by pressing the FR/FF buttons (to pre-select the PTY type, see "SETTINGS").
Searching lists of services/multiplexes (browse mode)
Press and hold A or V on the multifunction rocker switch for more than one second to activate the browse mode. A magnifying glass icon will flash on the display and, depending on the content being displayed, a folder symbol (multiplex) or a note symbol (service).
Selecting a new service from a currently selected multiplex Start the browse mode (the display will now show the note symbol and a flashing magnifying glass).
Now, press A/V on the multifunction rocker switch to browse services from the current multiplex. After finding the desired service, press >> on the multifunction rocker switch to play it.
Selecting a new service from a different multiplex than the one currently being played Start the browse mode (the display will now show the note symbol and a flashing magnifying glass).
Press << on the multifunction rocker switch; the car radio will switch to the multiplex list (the display now shows the folder symbol and a flashing magnifying glass). Press /V on the multifunction rocker switch to select a multiplex, press >> to display the services included in the displayed multiplex (the display now shows a note symbol and a flashing magnifying glass).
Now, press /V on the multifunction rocker switch to browse services from the current multiplex. After finding the desired service, press >> on the multifunction rocker switch to play it.
Exiting the browse mode
The browse mode goes off automatically after 15 seconds if no button is pressed. Alternatively, press << when multiplexes are displayed or double press << when services are displayed to exit the browse mode of the car radio.
Tip: the browse mode displays all services/multiplexes that are available on the respective car radio; the
multiplexes that are not currently available are also displayed. You can use the menu (see "SETTINGS") to start DAB SERVICE SCAN that updates the list of multiplexes and removes inactive multiplexes/services from it.
Tip: you can choose the browsing mode as the default setting, see "SETTINGS".
Saving services/recalling saved services
Favourite services can be stored under the preset stations buttons 1-5. Every memory level can store up to 5 stations. Set the desired service as described above.
Then press and hold the preset station button for a selected service for more than one second until you can hear a sound acknowledging that the service has been saved; after the beep, release the button. You can recall a saved service by briefly pressing the preset station button.
Playing saved stations/services (P-SCAN)
You can play any station from the selected memory level. To do this, press and hold the MENU button for more than one second. The display will show P-SCAN and a current service.
The P-SCAN message is displayed until cleared by pressing the button again.
Playing available services (SCAN)
Any available service can be played.
To do this, press and hold the SRC button for more than one second.
The radio will first update the service list performing a scan, and then display SCAN and a current service.
SCAN will flash and will go off when the button is pressed again.
Changing the display
Use the DIS button to toggle between different display content below.
. Service name (station)
. PTY (program type)
. Radio text
. Multiplex name (program package)
. Memory/memory level + channel
- Memory/memory level + time
Tip: the data display function availability depends on the service.
Further features/options: see "SETTINGS".
9. Playback from External Devices and Media: USB/microSD
Overview
Data media/media types used:
. USB storage media with FAT16, FAT32, exFAT file system
- File formats: MP2, MP3, WMA, FLAC, M4A (AAC), APE, WAV
Tip: the trouble-free functioning of all media files, including those listed above, cannot be guaranteed due to the variety of software these files may be created with.
Tip: the USB port supports USB storage media (also known as USB sticks) which are classified as Mass Storage Devices (MSD). Direct connection of MP3 players or cell phones to play music is not possible.
USB/microSD
This car radio has two USB ports and a microSD reader.
• Find the USB port behind the flip cover on the front of the car radio (see "CAR RADIO CONTROLS")
. Find the USB port on the back panel of the car radio (see "INSTALLATION")
- Find the microSD reader behind the flip cover on the front of the car radio (see "CAR RADIO CONTROLS")
Connecting USB storage media/starting USB playback
Open the flip cover by pulling lightly from the bottom by the protruding bottom edge.
Plug the USB data carrier into the USB port carefully without forcing or bending the USB data carrier.
The radio automatically switches to the USB mode. The data is loaded and the playback begins with the first media file recognised by the radio.
If a USB data carrier has been connected before, switch to the USB source with the SRC button or the USB button; the car radio will resume playback from the last track played.
Inserting a microSD card/starting microSD playback
Open the flip cover by pulling lightly from the bottom by the protruding bottom edge.
Slide the microSD card into the card reader with the contacts facing down until it clicks into place. Be careful not to let go the card before it snaps, otherwise it may pop out and get lost. Do not force or twist the card when inserting it. The radio automatically switches to the SD
mode. The data is loaded and the playback begins with the first media file recognised by the radio.
If a microSD card has been inserted earlier, switch to the SD source using the SRC button or the SD button; the car radio will resume playback from the last track played.
USB/microSD playback
Press << or >> on the multifunction rocker switch to play the previous or next track. Press and hold << or >> on the multifunction rocker switch to rewind or fast-forward a current track.
Press or v to move backward or forward one folder on the storage media.
You can use the station buttons 1-4 to activate/deactivate the special functions: TRACK SEARCH (select/search for a track using the multifunction rocker switch), PLAY/PAUSE, REPEAT (TRACK or DIRECTORY), and RANDOM (ALL or DIRECTORY).
Changing the display
Use the DIS button to toggle between different display content below.
- File name
- Folder name
- Track (ID3)
. Artist (ID3)
. Album (ID3) - Playback time
- Total time
. Hour
. All information one by one (ALL INFO)
Tip: the availability of the display function depends on the files used.
Tip: after changing the title, the file name is always displayed first, followed by the selected information. If the folder is changed, the name of the folder will also be displayed.
Playback function (SCAN)
You can play back tracks from the data carrier.
To do this, press and hold the SRC source selection button for more than one second until the display shows SCAN.
The display will show SCAN message and the current track. SCAN will flash and will go off when the button is pressed again.
Unplugging USB storage device/microSD card

If needed: open the flip cover by pulling lightly from the bottom by the protruding bottom edge.

Unplug the USB data carrier carefully or gently press on the microSD card (for example, with your fingernail) until it is
unlocked (audible click). Ensure you do not let go of the card suddenly, as this can cause it to pop out and get lost. Remove the microSD card carefully from the reader. In case of difficulties, you can use tweezers, for example.
Tip: never remove the data carrier without first turning the radio off, otherwise the data carrier or the data on it may be damaged.
Tip: if you plug microSD cards or small enough USB flash drives, you can close the flip covers.
Never close the flap if the microSD card is not fully inserted or the USB flash drive is too large.
When using small USB flash drives or microSD cards, keep in mind that, depending on the shape, they may be difficult to grasp for removal again. In such cases, do not use force or any pointed/sharp objects that could damage the car radio!
10. Playback from External Devices and Media: iPod/iPhone
Apple iPod/iPhone
This car radio has two USB ports compatible with Apple's iPod/iPhone.
. Find the USB port behind the flip cover on the front of the car radio (see "CAR RADIO CONTROLS")
. Find the USB port on the back panel of the car radio (see "INSTALLATION")
Connecting an iPod/Apple iPhone/Starting playback
Insert the iPod/Apple iPhone connection cable into the USB port carefully, do not force or bend the connector.
The radio will automatically switch to the Apple's iPod/iPhone mode.
Playback starts with the last file played on the iPod/iPhone or with media playback from the last application used.
If an Apple iPod/iPhone is already connected, use the SRC or the USB button to switch to the IPOD source to start
playback.
Playback from an Apple's iPod/iPhone
Press << or >> on the multifunction rocker switch to play the previous or next track.
Press and hold << or >> on the multifunction rocker switch to rewind or fast-forward a current track.
Press or V on the multifunction rocker switch to move up or down one folder.
You can use the station buttons 1-4 to activate/deactivate the special functions: TRACK SEARCH (select/search using the multifunction rocker switch), PLAY/PAUSE, REPEAT (TRACK or DIRECTORY), and RANDOM (ALL or
DIRECTORY).
Changing the display
Use the DIS button to toggle between different display content.
Tip: The functionality and control via radio may change and not all the features described may be available depending on the Apple device you are using and the media playback applications available on it.
Removing an Apple iPod/iPhone device
Do not remove the data carrier without first turning off the radio, otherwise the device or the data stored on it may be damaged.
11. Playback from External Devices and Media: AUX
AUX mode
The radio is provided with an AUX port:
. Find the AUX port behind the flip cover on the front of the unit (see "CAR RADIO CONTROLS").
Open the flip cover by pulling lightly from the bottom by the protruding bottom edge.
Connect the desired device, such as an external CD player, MP3 player or cassette player, using the appropriate adapters from the accessory range. The car radio will automatically switch to the AUX source when the plug is inserted. Use the
SRC button if you want to change the source or reselect it later.
If necessary, adjust the volume on the external device if the output of it is adjustable.
12. Bluetooth® Connection Setup
Bluetooth®
The Bluetooth ^® functionality enables wireless pairing of cell phones and media players with your car radio. To pair a supported device with your car radio, use the functions described in the following sections.
Establishing a Bluetooth® connection
Turn the radio on, open the Bluetooth® settings on your Bluetooth® device, search for available devices, and follow the Bluetooth® device's manual to pair them. After a successful connection is established, the car radio briefly displays "CONNECTED (VERBUNDEN)", followed by the name of the connected device, and the small Bluetooth® symbol on the display lights up.
Tip: confirm any messages prompted on your phone
Tip: the AUX connector is automatically activated when the plug is inserted. If the AUX connector is free, the AUX source is not available through the SRC button.
Tip: to prevent damage to the radio, use only plugs and cables that are not defective.
immediately, otherwise some features may be limited, unavailable, or pairing may not work.
Tip: this is required only once, the devices will automatically reconnect one to another when they are in range.
Tip: at the time of its launch, the Bluetooth® functionality was tested extensively with various phones and media players to ensure the highest possible compatibility. However, some features may be limited or not work at all, depending on the device in use. In case of such problems, please check if an update is available for your device or car radio.
Tip: up to 5 Bluetooth ^® devices can be paired, but they cannot be connected simultaneously. One or two devices can be connected to the device simultaneously after you enable the TWIN CONNECT. Before connecting another Bluetooth ^® device, disconnect
the already connected device.
Bluetooth® Twin Connect
If the TWIN CONNECT option is enabled, two cell phones can be connected simultaneously. Depending on the operation mode, various enhanced functions are available.
To use them, enable the TWIN CONNECT option in the Bluetooth® settings.
Bluetooth® Hands-Free System Twin Connect
In the Bluetooth® settings, use >> to select PHONE LIST and the master cell phone, then, select the ALS MASTER
AKTIVIEREN option there.
The asterisk (*) symbol will appear next to the Bluetooth® name of the master phone in the phone list.
You will use this phone to access the phonebook and make outgoing calls, and the other connected device only for incoming calls.
Bluetooth® audio streaming with Twin Connect
active connection
In the Bluetooth® settings, select STREAMING-LISTE and use >> to select the cell phone to be used for this feature, confirm the CONNECT (VERBINDEN) option. If the device has been successfully activated for this function,
CONNECTED (VERBUNDEN) will appear on the display after a short time. A plus symbol (+) is displayed now next to the Bluetooth® name of the connected streaming device in the phone list.
Tip: if you have two cell phones connected to your car radio, select one of them as the "master" phone. When Twin Connect is enabled, the currently connected cell phone is automatically defined as the master. If none of the cell phones are connected to the car radio, the last connected cell phone will be defined as the master.
The asterisk (*) symbol will appear next to the Bluetooth® name of the master phone in the phone list. The plus symbol (+) appears next to the cell phone connected to the audio streaming feature.
13. Bluetooth® Audio Streaming
Tip: the cell phone must be connected to the car radio (see "BLUETOOTH® CONNECTION SETUP")
Tip: the connected Bluetooth® device must support A2DP and AVRCP functions to play music on the car radio and to control playback.
Bluetooth® playback (audio streaming)
To start playback, switch to the BLUETOOTH ^® source using the SRC or BT button.
Press << or >> on the multifunction rocker switch to play the previous or next track.
The PLAY/ PAUSE special function can be activated/deactivated with the station button 2.
Tip: if playback does not start or is started by wrong application on the phone, start/select the appropriate audio player on the connected cell phone you want to
use the streaming broadcast with.
The car radio does not interfere with the selection of applications on the cell phone.
Changing the display
Depending on the Bluetooth ^® device or the music playback application used on it, different track content can be displayed using the DIS button.
Tip: it is not possible to stream from this car radio via Bluetooth® to another device (e.g. Bluetooth® speaker boxes, etc.), as this car radio only supports Bluetooth® music signal reception.
Tip: if the TWIN CONNECT feature is active, two cell phones can be connected to the car radio simultaneously. In this case, select/define the device to be used for audio streaming.
See "BLUETOOTH® CONNECTION SETUP"
14. Playback of Navigation Messages via Bluetooth®
Tip: the cell phone must be connected to the car radio (see "BLUETOOTH® CONNECTION SETUP")
Tip: if the TWIN CONNECT feature is active, two cell phones can be connected to the car radio simultaneously. In this case, select/define the device to be used for audio streaming.
See "BLUETOOTH® CONNECTION SETUP"
Bluetooth®-BT Navi Mix Operation
The messages of the navigation application active on the connected cell phone can be played from a current audio source. To use this feature, turn on the BT NAVI MIX option. You can then adjust the volume level with the BT NAVI GAIN (BT NAVI MIX PEGEL) option (see "SETTINGS"). In addition, you can, if needed, also adjust the volume on the cell phone; refer to the phone manufacturer's manual.
Tip: if the BT NAVI MIX option is active, all audio signals from the connected cell phone are mixed with a current audio source; it is not possible to separate or distinguish the navigation messages from other audio signals from the cell phone.
15. Bluetooth® Hands-Free System
Tip: the cell phone must be connected to the car radio (see "BLUETOOTH® CONNECTION SETUP")
Tip: to start using the phonebook, load it with the DOWNLOAD P-BOOK (T-BUCH LADEN) function.
Incoming calls
Incoming calls are indicated by a ringing tone and a message on the car radio display. You can take or reject the call using the phone buttons.
Outgoing calls

You can make a call in several ways using the BLUETOOTH menu.
PB SEARCH (TB SUCHE)
Use the multifunction rocker switch to select the initial character, and then, a phonebook entry moved from your cell phone. PHONEBOOK (TELEFONBUCH)
Use the multifunction rocker switch to select a phonebook entry moved from your cell phone.
VOICEDIAL (SPRACHWAHL)
Selecting this function activates the phone's voice assistant to perform a function, such as dialling a phone number.
Tip: for information on the functions and activation of the voice assistant, refer to your cell phone manual.
Tip: voice dialling/recognition is performed/processed by the voice assistant on the connected phone, not by the car radio. DIAL NEW NUMBER (NEUE NR. WÄHLEN):
The number to be dialled can be entered using the multifunction rocker switch. Select the desired digit with A or V, and switch between digits using << and >>.
Press the ANSWER CALL/DIAL button to dial the number after it has been fully entered.
Using the phonebook of a connected phone
The DOWNLOAD P-BOOK (T-BUCH LADEN) and DELETE P-
BOOK (T-BUCH LÖSCHEN) options allow you to use the phonebook of a currently connected phone on the car radio.
Tip: to access the phonebook, the phone must be connected.
Tip: if the message PHONEBOOK FULL (TELEFONBUCH VOLL) appears, delete the phonebook of the phone that is no longer in use. To do this, connect a relevant phone to the car radio and delete the phonebook with DELETE P-BOOK (T-BUCH LÖSCHEN) or clear the phone completely from the car radio with PHONE LIST (TELEFON-LISTE).
Tip: access to the numbers of a connected phone is device-specific and may not be supported, depending on the phone you are using. Note that access to the phonebook must be enabled on the cell phone (depending on the model of the phone).
Storing a phone number/Dialling a stored number
A manually entered number (see "DIAL NEW NUMBER" above) can be stored by long pressing one of the memory buttons (1-5). After storing the number, you can also enter a name, then long press the corresponding memory button again to save. If saving the name is not completed, only the number will be saved.
Press the ANSWER CALL/DIAL button and then the memory button (1-5) to recall the stored number. The call is then
answered/dialled by pressing the ANSWER CALL/DIAL button.
Tip: the numbers stored will be available on all connected phones.
Secondary function of the "Answer call" button (soft key)
The "Answer call" button can be assigned in the menu to a desired function to start it without having to call up the Bluetooth menu. The selected function can be activated by long pressing the ANSWER CALL/DIAL button. Possible options include
16. Sound Settings
3
In the AUDIO (KLANG) menu, you can set parameters of the sound.
See "SETTINGS" for details on the setting items and their functions.
The car radio provides treble and bass adjustment for each source separately, and a 14-band equalizer for all sources together. The equalizer is additionally adjustable separately for the front and rear channels.
The equalizer is used to adjust the sound of the car radio
PB SEARCH (TB SUCHE), PHONEBOOK (TELEFONBUCH), VOICEDIAL (SPRACHWAHL) and DIAL NEW NUMBER (NEUE NR. WÄHLEN).
See "SETTINGS" and "EXTERNAL CONNECTIONS".
Bluetooth® Twin Connect
Two cell phones can be connected to the car radio at the same time. The cell phone set as MASTER will be used for the phonebook function and outgoing calls. Incoming calls can be answered from either of the connected cell phones. See "BLUETOOTH® CONNECTION SETUP"
for the speakers used in the vehicle as needed, and then make further adjustments, depending on the source, with the treble and bass setting option.
The setting options for treble, bass, balance and fader can be called up directly using the TREB, BASS, BAL and FAD buttons (see "CAR RADIO CONTROLS") or via the menu (see "SETTINGS").
The equalizer can be called up through the menu (see
"SETTINGS") or directly by pressing and holding the EQ button (see "CAR RADIO CONTROLS").
A SOUND PRESET can also be used as an alternative to the equalizer.
This function can be called up through the menu (see
17. Clock
The car radio has an internal clock. You can view the time on the display by repeatedly pressing the DIS button.
The time can also be displayed when the radio is turned off, see "SETTINGS".
To display the time when the car radio is turned off, the
"SETTINGS") or directly by pressing the EQ button (see "CAR RADIO CONTROLS").
Tip: only one audio control option can be used at a time (manual control of the equalizer, sound graph or volume – these source crossover options can then be combined with source-specific bass and treble settings).
vehicle's ignition must be on, whereas if the ignition is turned off, the display goes off completely to reduce power consumption.
To set up the clock, see "SETTINGS".
18. Steering Wheel Remote Control (SWC)
With this car radio, you can freely assign the steering wheel remote control buttons (if available) to existing functions in the car radio's SWC configuration.
Storing functions
In the car radio settings, open the VARIOUS
(VERSCHIEDENES) -> SWC menu. Now, use A or V the multifunction rocker switch to select the function you want to set up, and confirm with the >> button.
The car radio will now wait for a signal from the steering wheel remote control, and display PRESS BUTTON AT STEERING WHEEL FOR 1SEC (TASTE FUER 1 SECOND
DRUECKEN). Press a desired button on the steering wheel remote control.
If the button has been successfully set up, the display will show OK. Repeat the procedure if the unit displays FAIL (FEHLER) or does not respond at all. Repeat this step for all buttons to be set up.
Tip: if storing is not possible even after several attempts or is not performed correctly, check the radio connections or the compatibility of the interface used. If FAIL
(FEHLER) is always displayed, the error is probably in the remote control or in the interface. If the radio does not respond at all, make sure that the remote control/interface is (properly) connected.
Tip: the programmable SWC interface of the radio includes analogue steering wheel presets. The car radio works with analogue remote controls that control functions through different resistance values (resistance matrix) at the connector (up to two control lines and 1x GND).
Some remote controls are directly compatible, others require an SWC interface. The steering wheel remote controls cannot be connected via CAN without an interface.
For more information on the accessories suitable for your vehicle, contact your specialist dealer or the vehicle manufacturer.
19. Settings | Menu
Navigating menus and changing/adjusting settings Select the settings by pressing the menu button (see "CAR RADIO CONTROLS").
Use the multifunction rocker switch to navigate through the settings or change a setting as described below.
On the multifunction rocker switch, press the A or V buttons to navigate through the settings.
If you want to select an option or change a setting, select it by pressing the >> button on the multifunction rocker switch.
The setting will flash. On the multifunction rocker switch, press the or V buttons to change the selected option.
Then exit the options by pressing the << button on the multifunction rocker switch.
Selecting <<< on the display moves up one level, selecting <<< on the highest level exits the settings. You can also exit the settings menu by pressing the MENU button again.
The following settings can be entered or customised (the settings are arranged by different categories).
TUNER (RADIO)
In this submenu, you can set up the radio receiver.
TRAF: Enable/disable traffic message prioritisation. This function can also be turned on and off directly with the TA button (see "CAR RADIO CONTROLS"). When this function is activated, the radio will switch to the station last heard, and then, return to the previously active source, when it receives a traffic announcement. When the function is active, a small symbol with three vehicles appears on the display. TRAFFIC (VERKEHR) appears on the display during a traffic message.
Tip: this feature must be supported by the radio station.
Tip: volume changed during a traffic message is saved for the future traffic messages. To adjust the volume, refer to the VOLUME
(LAUTSTAERKE) menu option.
Tip: if the reception of a station is interrupted, the radio automatically seeks a new station with traffic information.
Enabling this feature also limits your search to the VHF stations that support this feature.
Tip: the current traffic announcement can be interrupted by pressing the SRC button.
REG
When this function is on, only stations with the same regional programme are selected if automatic station switching is required due to poor reception.
Tip: the RDS AF function must be set to ON (EIN), and the function must be supported by the radio station.
PTY
When this function is active, the PTY feature is available by pressing the FR/FF buttons to search for a specific type of station/music genre.
PTY TYPES (PTY LISTE)
Active only when PTY is ON (EIN).
Selects the station type/music genre for the PTY function.
PTY LANG (PTY SPRACHE)
Active only when PTY is ON (EIN).
Setting the PTY language.
Tip: this only changes the displayed PTY types, not stations or other settings.
FM SENS HI/LO (FM EMPF +/-)
Sets the VHF search sensitivity. HI (+) also tunes to stations with weak signal, LO (-) tunes only to local stations with strong signal. This function can also be activated and deactivated directly using the LO button (see "CAR RADIO CONTROLS").
FM HICUT OFF, 1, 2, 3 (FM HICUT AUS, 1, 2, 3)
To improve the sound of weak/distorted VHF station signals (in the case of noises/interference), you can automatically lower the treble range according to the reception strength by activating this function.
RDS AF
When this function is active, the radio always switches to the best transmission frequency (alternative frequency). This function can also be turned on and off directly with the AF button (see "CAR RADIO CONTROLS").
Tip: this feature must be supported by the radio station.
Tip: if the AF sign flashes on the display, the car radio is not receiving AF data because the signal is too weak.
FM PRESETS (FM
Turns memory levels or FM2, FMT sources on/off. If the SRC button is inactive, the corresponding memory level cannot be selected with the SRC button.
DAB PRESETS (DAB SPEICHEREBENEN)
Activates/deactivates memory levels DAB2,
DAB3. If the SRC button is inactive, the corresponding memory level cannot be selected with the SRC button.
DAB MODE:
It is used to specify the basic setting of the multifunction rocker switch in the DAB mode. Options: SERVICE (default setting) or BROWSE. Refer to "DIGITAL RADIO OPERATION".
DAB SERVICE SCAN (DAB SERVICE DRY)
Updates the station list to DAB, scans the entire DAB band and removes multiplexes/services that cannot be received from the list. This does not affect memory locations.
SERVICE LINK:
When you activate the DAB/FM/ALL function, the radio switches, if available, to another DAB channel (if available DAB is selected) or also to FM frequencies (if FM or ALL is selected) to continue playing the station if DAB reception is weak.
SERVICE NAME
Switches the DAB SERVICE/DAB ENSEMBLE option display to 16 or 8 digits.
DAB ANTENNA (DAB ANTENNE):
Enables phantom power supply for active DAB antennas. If the DAB antenna is active, set 12 V to ON (AN).
AREA (REGION):
Sets the receiving region where the radio is used.
AUDIO (KLANG)
In this submenu, you can adjust the sound source by source.
Tip: the 14-band equalizer works for all sources simultaneously and can be adjusted separately for front and rear channels.
The equalizer allows you to customise the sound of your
car radio to your speakers, and then you can adjust the sound separately for each sound source using the BASS (TIEFEN) and TREBLE (HOEHEN) settings if necessary.
Tip: the range of tone control is subject to certain limitations, which are technically determined and are intended to avoid extreme settings possibly resulting in distortion and interference. For example, you cannot increase a single frequency setting by 12 dB with the equalizer and by another 12 dB by adjusting the LOW or HIGH settings – this leads to a very unnatural sound and, possibly, to distortion and clipping.
Tip: only one tone control option can be used at a time (manual equalizer setting, sound graph or volume – these options for different sound sources can then be combined with the BASS (TIEFEN) and TREBLE (HOEHEN) settings for that source).
BASS (TIEFEN)
Boosts or reduces low frequency range.
Tip: this setting can be adjusted individually for each audio source.
TREBLE (HOEHEN)
Amplifies or reduces high frequency range.
Tip: this setting can be adjusted individually for each audio source.
BAL
Adjusts the left/right balance of the audio signal.
FADER
Adjusts the audio signal of the front/rear speakers.
EQUALIZER
Activates the SOUND PRESET option or the EQUALIZER function.
SOUND PRESET
Turns on the POP, ROCK, CLASSIC preset sounds. This function can also be activated directly with the EQ button (see "CAR RADIO CONTROLS").
Tip: when the sound graph is on, the manual EQUALIZER setting has no function and is disabled. EQUALIZER
Activates and adjusts the 14-band equalizer. This function can also be activated directly by pressing and holding the EQ button (see "CAR RADIO CONTROLS").
Activate the equalizer with the ON (AN) option to enable the adjustment of the following frequencies from -12 to +12 dB for FRONT
(VORNE) and REAR (HINTEN): 32 Hz, 50 Hz, 90 Hz, 125 Hz, 150 Hz, 250 Hz, 550
Hz, 1 kHz, 2 kHz, 4 kHz, 8 kHz, 10 kHz, 12 kHz and 16 kHz.
In addition, in the Q-FACTOR item, you can adjust the filter quality/drop of 1.00, 1.41 and 2.00 (a lower value means better filter quality/bigger drop).
Tip: when the equalizer is on, the SOUND PRESET setting has no function and is disabled.
HPF (High Pass Filter)
The split frequency (50, 63, 80, 100, 125, 160 or 200 Hz) and filter slope 6 or 12 dB) can be set separately for the FRONT (VORNE) front speaker channels and/or REAR (HINTEN) rear speaker channels to cut low frequencies, e.g. if an additional subwoofer or other channels are used at the subwoofer output, or if the connected speakers cannot sufficiently reproduce the lower frequency spectrum.
LPF (Low Pass Filter)
The split frequency (50, 63, 80, 100, 125, 160 or 200 Hz) and filter slope (6 or 12 dB) can be set separately for the FRONT (VORNE) front speaker channels and/or REAR (HINTEN) rear speaker channels to cut high frequencies, for example, if only a subwoofer is connected to the respective outputs (or to the respective preamplifier or speaker outputs).
LOUD
Loudness On/Off (bass enhance).
SUB-OUT
Adjusts the output level (GAIN), split frequency (FREQ) and filter slope (SLOPE) of the subwoofer output.
AMP
Delays the switching output activation within the range of 0-2.5 seconds to avoid interference when switching on external amplifiers.
DISPLAY (ANZEIGE)
In this submenu, you can make settings for the display.
DIM MAN/AUTO
Toggling between the display brightness settings manually/automatically.
AUTO: the ILLUMINATION input (see "INSTALLATION/CONNECTIONS") automatically toggles the display brightness between the preset DAY (TAG) and NIGHT (NACHT) values, depending on the lighting in the vehicle.
MAN: press and hold the DIS button for 2 seconds to toggle between preset DAY (TAG) and NIGHT (NACHT) values.
DAY (TAG)
Sets the brightness of the display for the day.
NIGHT (NACHT)
Sets the display brightness for the night.
SCROLL
Scrolls the displayed content if it is too long to be displayed at a time. Options: scrolling through new information once (1X) or always (ON (AN)).
MODE
Display setting. The second line can continuously display the CLOCK (UHR) time or also a selected SOURCE (QUELLE).
STBY-LED
Options for the red LED marked STBY on the front of the car radio.
FLASH: when the car radio is turned off, the LED flashes approx. every 15 seconds if this option is active.
TIMER: if the hour logic is active (ignition plus is turned off, the car radio plays for an hour and then turns off automatically), the LED lights up when this option is active.
LANGUAGE (SPRACHE)
Selects the menu language. Available languages:
DEUTSCH, ENGLISH.
COLOR (FARBE)
Setting options R (red), G (green), B (blue): create your desired colour by changing the brightness values of each colour (possible 16x 16x 16 colours, each colour intensity can be changed by 16 increments).
In this submenu, you can adjust volume settings for the car radio.
ON VOLUME (AN LAUTST)
Select your desired option to restart the car radio with the value last used LAST VOL (LETZTE LAUTSTÄRKE) or with the value set AN VOL (ONVOL).
Tip: the starting volume is always limited to max. 30.
TA VOL
Sets the volume of traffic announcements. If the volume of the active traffic announcement is adjusted, this setting will be updated or overwritten.
HF VOL
Sets the volume of the hands-free system.
If the volume is adjusted during a phone call, this setting will be updated or overwritten.
BEEP
Sets the audible feedback (beep) when a key is pressed.
Tip: saving a station is always confirmed by a beeping sound, even when the BEEP function is set to OFF (AUS).
CLOCK (UHR)
In this submenu, you can adjust settings for the clock. See also "CLOCK".
CLOCK (UHR)
Enables/disables the time display when the unit is turned off. When the car radio is off and the ignition is on, a clock appears on the display when set to ON (AN).
MODUS
Toggles between the 12/24 hour display.
SET 00:00
Manual time setting. Set minutes by pressing the switch up, set hours by pressing the switch down.
Tip: if RDSCLOCK (RDSUHR) is active, the time
set manually is overwritten.
RDSCLOCK (RDS UHR)
Activates automatic time settings using the radio data signal.
VARIOUS (DIVERSES)
You can adjust various settings in this menu.
DEMO
Enables/disables demo function/sales mode (if no button is pressed for a certain period of time, the message with radio functions appears and the display colour changes continuously).
SCAN
Sets the playback function time (4/8/12/16/60 seconds).
SWC
Stores the steering wheel remote control (see "STEERING WHEEL REMOTE CONTROL (SWC)").
VERSION
Requests car radio software version.
NORMSET
Restores the car radio to factory settings. Select confirm to restore factory settings for the car radio.
BLUETOOTH®
In this submenu, you can adjust settings for the Bluetooth® function. See also "BLUETOOTH® HANDS-FREE SYSTEM".
PB SEARCH (TB SUCHE)
Searching for a name in the phonebook.
PHONEBOOK (TELEFONBUCH)
Calling up a phonebook transferred from a cell phone.
TWINCONNECT
Activates the option to connect two Bluetooth ^® devices simultaneously.
PHONE LIST (TELEFON-LISTE)
Available phones/phones paired with the car radio with options to be removed/disconnected/set as the master phone.
STREAMING LIST (STREAMING-LISTE)
A2DP-enabled mobile devices available/paired with the car radio with option to be removed/disconnected/selected as an active

A2DP device.
SOFTKEY
Configures the secondary function of the "Answer Call" button. Available options include
PB SEARCH (TB SUCHE)
PHONEBOOK (TELEFONBUCH)
VOICEDIAL (SPRACHWAHL)
DIAL NEW NUMBER (NEUE NR. WÄHLEN)
BT NAVI MIX
Activates the BT NAVI MIX function.
BT NAVI MIX GAIN (BT NAVI MIX PEGEL)
Available only if BT NAVI MIX is activated. Sets the volume of the mixed signal from the phone.
DELETE P-BOOK (T-BUCH LÖSCHEN)
Deletes the phonebook of a phone currently connected to the car radio.
DOWNLOAD P-BOOK (T-BUCH LADEN)
Loads the phonebook from a currently connected cell phone.
VOICE DIAL (SPRACHWAHL)
Performs voice dialling of a phone number.
DIAL NEW (NEUE NR WAEHLEN)
Entering the phone number to be dialled manually
20. Installation | Disassembly | Connections
3
Installation guide

Install the unit only if you have experience installing car radios and are familiar with the vehicle's electrical system. Pay attention to the information given at the actions of the car radio. Connect the car radio using
appropriate adapters; ensure that all wires transfer the correct signals or voltages. The plugs in the vehicle must not be connected directly to the car radio.
The installation of the car radio must not interfere with or prevent the activation of airbags and other safety devices and/or controls. Before installing the car radio, disconnect
the vehicle battery (negative terminal, ground), otherwise malfunctions or even damage to the car radio or vehicle's electronics may occur.
Observe the vehicle manufacturer's safety instructions (airbag, alarm system, on-board computer, immobiliser, etc.). Depending on the vehicle in which the car radio is to be installed, optional and specific connection adapters and/or mounting accessories such as mounting frames, covers, etc. are required.
Installation errors can result in damage to the car radio or vehicle's electronics.
The housing of the car radio gets hot during
operation. Make sure no cables are in contact or pressed with the housing.
If you need help installing the radio, consult a car Hi-Fi specialist.
To remove the radio, loosen the side covers (see "CAR RADIO CONTROLS") by lifting them from the side with a fingernail. Insert the release handles (accessories included) into the holes until they snap into place. Now, carefully remove the car radio from the socket. Make sure no wires are damaged.
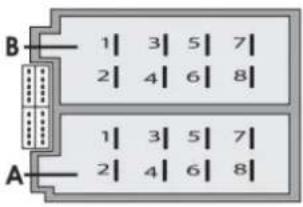
Rear of Unit
text_image
B 1 | 3 | 5 | 7 | 2 | 4 | 6 | 8 | A 1 | 3 | 5 | 7 | 2 | 4 | 6 | 8 || A | B | ||
| 1 | NC | 1 | Speaker RR+ |
| 2 | Radio Mute | 2 | Speaker RR- |
| 3 | NC | 3 | Speaker RF+ |
| 4 | Perm.+12V(KL30) | 4 | Speaker RF- |
| 5 | Auto Antenna* | 5 | Speaker LF+ |
| 6 | Illumination | 6 | Speaker LF- |
| 7 | Ignition(KL15) | 7 | Speaker LR+ |
| 8 | GND(KL31) | 8 | Speaker LR- |


text_image
3 3 4 1 5 STEER EYTM 6 7 2 3 8 3Connection Names and Designations
① SWC: a connection to the steering wheel remote control – external adapter/interface may be required, see "STEERING WHEEL REMOTE CONTROL (SWC)"
② SUB/SW: a subwoofer output for connecting an active subwoofer
③ PREAMP- OUT (RF, LF, RR, LR): preamp outputs for connecting an external amplifier
④ USB: a rear USB port (REAR USB)
⑤ EXT-MIC: a connection for an external microphone; switched automatically when microphone is connected
⑥ DAB antenna: an SMB connector with 12 V phantom power (max. 150 mA, switchable in the menu, see "SETTINGS")
⑦ FM/AM Antenna: a DIN connection
⑧ Terminal block with section A (power supply), section B (speaker) and radio fuse (10 A flat car fuse, red)
MUTE: mutes the car radio by contacting ground BATT (cl. 30): the battery
ANTENNA/SWITCHING OUTPUT (REMOTE): a switchable power supply for active antennas or control voltage for external power amplifiers/subwoofers (12 V, max. 150 mA)
DIMMER/LIGHTING (cl. 58): the vehicle lighting input, required for automatic button/display brightness switching. The input requires 0 V/12 V. PWM signals may cause the display to flicker and must not be used.
ACC/IGNITION PLUS (CI. 15): switches the ignition plus from the ignition lock
GND/GROUND (cl. 31): Ground
Tip: the car radio does not support CD changers, interfaces or other components compatible with older Blaupunkt car radios.
Tip: ensure you connect the ignition and fixed positive pole correctly, otherwise the car radio will consume increased current and will not shut down completely, which can discharge the car battery!
21. Useful Information | Technical Data
Warranty
For current warranty terms and conditions, please visit www.blaupunkt.com. If no additional information is provided there, local regulations apply.
Servicing
Contact the Blaupunkt dealer from whom you purchased the product if you need repair service. For more information on service partners in your country, please visit www.blaupunkt.com Information on service partners in your country.
Technical data
Supply voltage
Remote control: 3 V, CR2025
Operating voltage: 10.5–14.4 V
Power consumption
Working mode: <10 A
Off state (cl. 15/ACC off): < 5 mA
Speaker impedance: >4 Ohms/channel
Antenna/amplifier switching output 12 V: max. 150 mA
DAB 12 V antenna: max. 150 mA
USB connector 5 V: max. 1 A
AUX 3.5 mm stereo jack connector
SWC 3.5 mm stereo jack connector 0-3.3 V
Tip: ensure you connect the ignition and fixed positive pole correctly, otherwise the car radio will consume increased current and will not shut down completely, which can discharge the car battery!
22. Troubleshooting
Malfunctions and possible remedies are listed below.
If you continue to have problems with the car radio, please contact your dealer or Blaupunkt Service.
In the event of problems, have the installation inspected or completed by a professional.
Most problems occur due to incorrect connection and operation.
- When installed, the airbag indicator lights on the dashboard come on/speedometer stops working etc.
The car radio has probably been incorrectly connected. Immediately disconnect the vehicle battery and remove the radio. Have the installation performed/checked by a professional.
- The car radio displays 1 HOUR (1 STUNDE) when turned on and turns off after one hour
The ignition positive pole is not connected or is not activated. Check the connections.
- At a higher volume, the display/car radio flickers or the sound turns off
Check the cross section of the power supply wire. Do not go below an impedance of 4 Ohms/channel. Have the installation performed/checked by a professional.
• The remote control does not work
Check if the battery is properly seated, remove the small plastic wrap, point the remote control at the car radio to keep the line of sight.
- The car radio does not turn on/does not respond to ignition/ always turns off automatically after a certain period of time/ cannot be turned on without ignition
Is the ignition/fixed positive pole connected properly? The ignition positive pole must switch properly between 0 V/12 V, there must be no residual voltage on the ignition positive in the "ignition off" state.
Check the car radio for correct connection, under no circumstances should you connect the car plugs directly to the car radio without first checking the PIN-to-PIN assignment.
Have the installation performed/checked by a professional.
- Settings and/or preset stations are lost, the time is not displayed properly
As a rule, the car radio saves the settings permanently, even without power supply. However, some settings are not permanently saved until properly turned off, so make sure you properly turn off your car radio.
The functions such as the time, last source, last USB/CD playback position require constant power supply. For proper operation, the car radio must be properly connected to a permanent power source which must not be interrupted.
In addition, some radio stations may transmit incorrect time signal via RDS. If this is the case, disable the RDS function responsible for the time in the menu, and set the clock manually.
- The car radio does not receive a radio signal or the signal is weak
Check the antenna for your reception range.
Check if a phantom power supply adapter may be needed.
Is the antenna installed correctly? Many antennas require a counterpole (car body).
LED lights or other electrical components may interfere with radio reception, so such interference should be excluded.
When using the car radio for the first time, make sure the radio is set to the correct radio region (see "SETTINGS").
- NO SIGNAL or NO SERVICE is suddenly displayed in the DAB mode
The current MULTIPLEX (program package) signal is too weak and audio signal decoding is not possible. Select another MULTIPLEX or check the DAB antenna. The radio suddenly displays SEEK PI (SUCHE PI)/SEEK TA (SUCHE TA) or changes stations during operation
Check your antenna and car radio settings. If necessary, deactivate the alternative frequency function (see "SETTINGS").
If the communication radio function has been enabled, poor reception may cause the radio to change stations itself, disable the communication radio function or select another station.
- The car radio displays station name in the radio mode incorrectly
Adjust the display as required with the DIS button. Check reception (check the antenna).
Note: some stations send additional information instead of the RDS station name; this is not affected by the radio.
• USB, CD, SD or other storage media do not work
Check other storage media for correct functioning, format storage media, and play different files.
- Bluetooth® problems (phonebook is not displayed, the phone does not connect, the caller cannot be heard)
Check for software updates for your cell phone and/or car radio.
Clear the car radio from the the cell phone list, and then re-establish the connection.
Confirm all authorisation requests on the cell phone with YES or check them manually in case of a connected car radio.
Use another cell phone to cross-check.
• The caller does not hear me
Check the external microphone for correct connection. Check the microphone setting in the Bluetooth® settings (if available).
Use another cell phone to cross-check.
- SUB-OUT or its setting options on the car radio do not work Make sure the subwoofer is properly connected to the SUB-Out output of the car radio, otherwise the options in the sound settings do not have any effect.
- The issue/malfunction is not specified in this case. A car radio function does not work as expected/The car radio does not behave as expected
Reset the device to factory defaults in MENU ->
VARIOUS -> NORMSET.
Verify that the software is up to date. Current software updates are available on our website or can be ordered through our service.
Note: a detailed description of the malfunction and the current car radio software version is required when contacting the service.
1. Betjeningselementer - bilradio
text_image
5 11 12 10 2 6 4 TREE BAL EQ TA DIS DASS FAD Io AF EON DIGITAL AUDIO BROADCASTING FR FF IT SPC USB SD 15 G-SEL STBY BLAUPUNKT 13:05 AF Io EQ BLAUPUNKT FRANKFURT RCM 82 DAB 16 3 14 7 1 4 9 8① LC-display:
Viser information såsom kilde, station, melodi, tidspunkt og indstillingsmuligheder
⑧ Stationstaster 1-5:
PTY TYPES (PTY LISTE):
PTY LANG (PTY SPRACHE):
FM SENS HI/LO (FM EMPF +/-):
FM HICUT OFF, 1, 2, 3 (FM HICUT AUS, 1, 2, 3):
DAB SERVICE SCAN (DAB SERVICE SUCHE):
32 Hz, 50 Hz, 90 Hz, 125 Hz, 150 Hz, 250 Hz, 550 Hz, 1 kHz, 2 kHz, 4 kHz, 8 kHz, 10 kHz, 12 kHz og 16 kHz.
HPF (High Pass Filter)
Crossover-frekvens (50, 63, 80, 100, 125, 160 eller 200 Hz) og filterhældning på (6 eller 12 dB) kan indstilles separat for de forreste FRONT (VORNE)
LPF (High Pass Filter)
STREAMING LIST (STREAMING-LISTE):
DIAL NEW NUMBER (NEUE NR. WÄHLEN)
BT NAVI MIX:
④ SRC-toets (source/bron):
Door services bladeren
PTY TYPES (PTY LISTE):
PTY LANG (PTY SPRACHE):
FM SENS HI/LO (FM EMPF +/-):
FM HICUT OFF, 1, 2, 3 (FM HICUT AUS, 1, 2, 3):
DAB SERVICE SCAN (DAB SERVICE SUCHE):
STREAMING LIST (STREAMING-LISTE):
DIAL NEW NUMBER (NEUE NR. WÄHLEN)
BT NAVI MIX:
Navigation de services
FM HICUT OFF, 1, 2, 3 (FM HICUT ARRET, 1, 2, 3):
32 Hz, 50 Hz, 90 Hz, 125 Hz, 150 Hz, 250 Hz, 550 Hz, 1 kHz, 2 kHz, 4 kHz, 8 kHz, 10 kHz, 12 kHz et 16 kHz.
HPF (High Pass Filter)
LPF (Low Pass Filter)
PTY TYPES (PTY LISTE):
PTY LANG (PTY SPRACHE):
FM SENS HI/LO (FM EMPF +/-):
FM HICUT OFF, 1, 2, 3 (FM HICUT AUS, 1, 2, 3):
DAB SERVICE SCAN (DAB SERVICE SUCHE):
32 Hz, 50 Hz, 90 Hz, 125 Hz, 150 Hz, 250 Hz, 550 Hz, 1 kHz, 2 kHz, 4 kHz, 8 kHz, 10 kHz, 12 kHz y 16 kHz.
HPF (High Pass Filter)
LPF (Low Pass Filter)
STREAMING LIST (STREAMING-LISTE):
DIAL NEW NUMBER (NEUE NR. WÄHLEN)
BT NAVI MIX:
PTY LANG (PTY SPRACHE):
FM SENSE HI/LO (FM EMPF +/-):
FM HICUT OFF, 1, 2, 3 (FM HICUT AUS, 1, 2, 3):
DAB SERVICE SCAN (DAB SERVICE SUCHE):
32 Hz, 50 Hz, 90 Hz, 125 Hz, 150 Hz, 250 Hz, 550 Hz, 1 kHz, 2 kHz, 4 kHz, 8 kHz, 10 kHz, 12 kHz e 16 kHz.
HPF (High Pass Filter)
LPF (Low Pass Filter)
PESQUISA PB (TB SUCHE):
Pesquisar o nome na lista telefónica.
STREAMING LIST (STREAMING-LISTE):
DIAL NEW NUMBER (NEUE NR. WÄHLEN)
BT NAVI MIX:
Ricerca PTY (solo FM)
PTY TYPES (PTY LISTE):
PTY LANG (PTY SPRACHE):
FM SENS HI/LO (FM EMPF +/-):
FM HICUT OFF, 1, 2, 3 (FM HICUT AUS, 1, 2, 3):
DAB SERVICE SCAN (DAB SERVICE SUCHE):
HPF (High Pass Filter)
LPF (Low Pass Filter)
STREAMING LIST (STREAMING-LISTE):
DIAL NEW NUMBER (NEUE NR. WÄHLEN)
BT NAVI MIX:
PTY TYPES (PTY LISTE):
PTY LANG (PTY SPRACHE):
FM SENS HI/LO (FM EMPF +/-):
FM HICUT OFF, 1, 2, 3 (FM HICUT AUS, 1, 2, 3):
DAB SERVICE SCAN (DAB SERVICE SUCHE):
32 Hz, 50 Hz, 90 Hz, 125 Hz, 150 Hz, 250 Hz, 550 Hz, 1 kHz, 2 kHz, 4 kHz, 8 kHz, 10 kHz, 12 kHz i 16 kHz.
HPF (High Pass Filter)
STREAMING LIST (STREAMING-LISTE):
DIAL NEW NUMBER (NEUE NR. WÄHLEN)
BT NAVI MIX:
PTY TYPES (PTY LISTE):
PTY LANG (PTY SPRACHE):
FM SENS HI/LO (FM EMPF +/-):
FM HICUT OFF, 1, 2, 3 (FM HICUT AUS, 1, 2, 3):
DAB SERVICE SCAN (DAB SERVICE SUCHE):
32 Hz, 50 Hz, 90 Hz, 125 Hz, 150 Hz, 250 Hz, 550 Hz, 1 kHz, 2 kHz, 4 kHz, 8 kHz, 10 kHz, 12 kHz a 16 kHz.
HPF (High Pass Filter)
LPF (Low Pass Filter)
STREAMING LIST (STREAMING-LISTE):
DIAL NEW NUMBER (NEUE NR. WÄHLEN)
BT NAVI MIX:
DE, EN, DA, NL, FR, ES, PT, IT, PL, CS
All rights reserved. This material may be reproduced, copied or distributed for personal use only.