43Vario E - Lawn mower SABO - Free user manual and instructions
Find the device manual for free 43Vario E SABO in PDF.
Download the instructions for your Lawn mower in PDF format for free! Find your manual 43Vario E - SABO and take your electronic device back in hand. On this page are published all the documents necessary for the use of your device. 43Vario E by SABO.
USER MANUAL 43Vario E SABO
Read and follow the operator's manual and safety instructions! Risk caused by thrown elements when the motor is running - Maintain the safety gap / Keep others away! Keep all persons outside the danger area! Caution, sharp cutting blades. Keep hands and feet away from the blades! - Switch the motor off and disconnect the spark plug connector before performing any cleaning and maintenance work. Read and observe the safety instructions for handling the battery and charger. Before using the equipment for the first time, wake the battery up and charge it fully. Batteries and chargers should not be disposed of with household waste. Return the battery or the charger to your dealer or take them to a public collecting point. Engine STOP Switch the drive on Noise hazard - Ear protection recommended for extended use. Beware of hot surfaces - do not touch the engine and exhaust. Risk of burns! Exhaust fumes are toxic - do not have the engine running in closed rooms. Risk of poisoning! Petrol is highly inflammable - keep away from sparks and open flame, do not smoke. Fire hazard! This appliance must not be disposed of as household waste. Send equipment, accessories and packaging for environmental recycling.
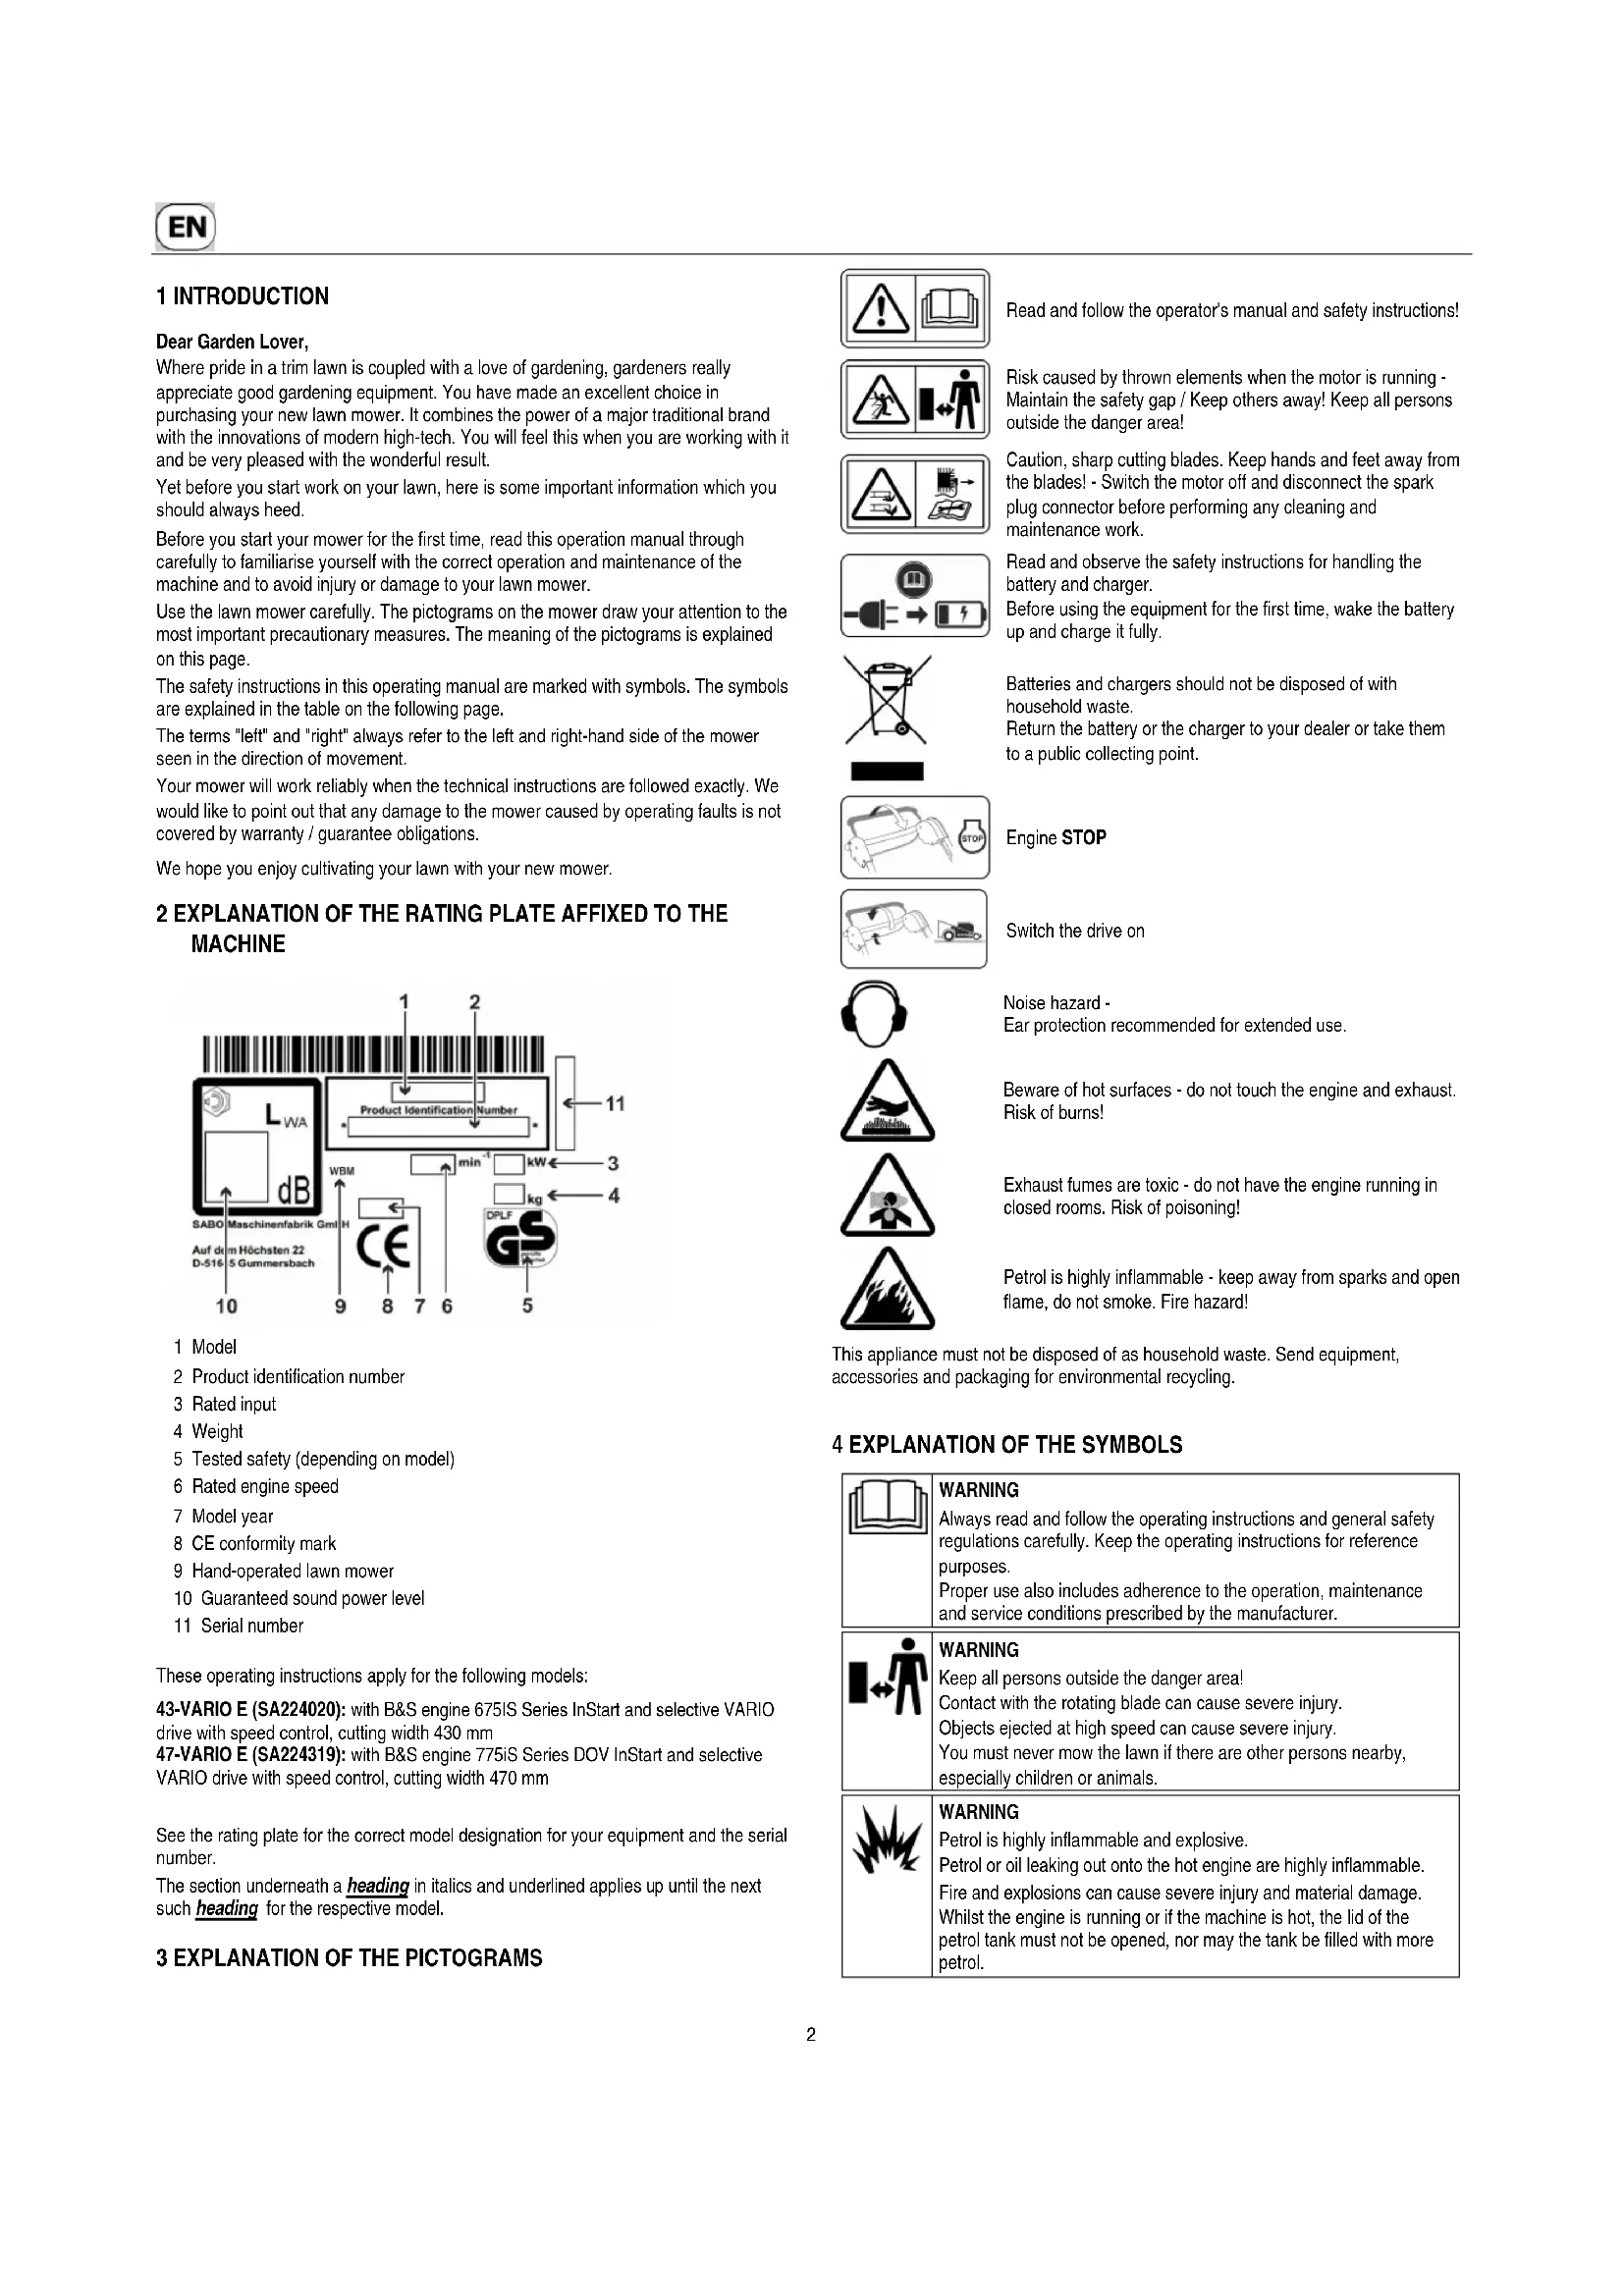
4 EXPLANATION OF THE SYMBOLS
WARNING Always read and follow the operating instructions and general safety regulations carefully. Keep the operating instructions for reference purposes. Proper use also includes adherence to the operation, maintenance and service conditions prescribed by the manufacturer. WARNING Keep all persons outside the danger area! Contact with the rotating blade can cause severe injury. Objects ejected at high speed can cause severe injury. You must never mow the lawn if there are other persons nearby, especially children or animals. WARNING Petrol is highly inflammable and explosive. Petrol or oil leaking out onto the hot engine are highly inflammable. Fire and explosions can cause severe injury and material damage. Whilst the engine is running or if the machine is hot, the lid of the petrol tank must not be opened, nor may the tank be filled with more petrol.3 When the engine is running, the dipstick must always be screwed in firmly. WARNING Petrol is highly inflammable and explosive. Fire and explosions can cause severe injury and material damage. No smoking and no naked flames while filling the tank. WARNING Watch out for sharp blades! Contact with the rotating blade can cause severe foot injuries. Only start the engine when standing behind the mower. Ensure that your feet do not get under the housing. WARNING Watch out for sharp blades! Contact with the rotating blade can cause severe hand and foot injuries. When the engine is running, always observe the safety distance to the machine which is maintained by the handlebar. Ensure that your hands and feet do not get under the housing. WARNING Objects thrown upwards can cause serious injuries. Before mowing areas covered in leaves in particular, remove all stones, sticks, wires, toys and other objects from the lawn. Never use the equipment with the protective devices damaged or missing. Missing or damaged safety and protective devices are a safety hazard for both you and other people. Before initial operation, check that the cutting blade screw is fastened, then examine the cutter bar for a tight fit, wear and damage every time you intend to use the mower. Have an authorised workshop replace a worn or damaged blade. Have an authorised workshop tighten the cutting blade screw. Before starting the engine, check whether the tools have been removed. WARNING Electric shock can lead to serious injuries. Never move over live wires when the cutting tool is switched on. Before and during the mowing process, check the area for live wires and remove them if possible. If a live wire is damaged, switch off the equipment and disconnect the wire from the supply grid. CAUTION Exhaust and engine get very hot during operation. Risk of burns! Never remove the battery from the battery compartment or insert it with the engine running. Allow the mower to cool down for at least 15 minutes before maintenance and cleaning work is carried out. Never use the equipment with the exhaust protection grid damaged or missing. CAUTION If the spark plug connector and the ignition key are not disconnected during work on the equipment, the motor may start up and this can result in serious injuries. Switch the engine off, pull the spark plug connector off and remove the ignition key before carrying out any maintenance and repair work. Never pull the plug connector off with the engine running. Risk of electric shock! Consult the operating instructions for respective cleaning or maintenance instructions. Insufficient equipment maintenance will lead to safety-related faults. WARNING Contact with the rotating cutting blade can lead to serious hand and foot injuries. Objects thrown upwards can cause serious injuries. Stop the engine and wait until the cutting tool comes to a standstill; remove the ignition key: – if the mower needs lifting or tilting e.g. for transport purposes; – when driving outside the lawn on paths or streets; – if the mower is left unsupervised for a short time; – before setting the cutting height; – before removing the grass collecting bag; – before the mulching plug is removed; – before filling with fuel. Only fill with fuel with the engine is cold; – before the battery is removed from the battery compartment on the engine or inserted there CAUTION Contact with the sharp edges of the blade and other sharp edges of the machine can cause severe injury. Protective gloves must be worn at all times during maintenance and cleaning work. CAUTION Noise hazard - Ear protection recommended for extended use. 5 PROPER USE
- The equipment is exclusively designed for mowing grass and lawn areas within the context of gardening and landscape care ("Proper use"). Any use going beyond this is considered not proper; the manufacturer is not liable for any damage resulting from such use, the risk is borne by the user alone. Proper use also includes adherence to the operation, maintenance and service conditions prescribed by the manufacturer.
- Special care is required during use in public areas, parks, sports facilities, on roads and in agricultural and forestry operations.
- The mower must not be used in particular for trimming bushes, hedges and shrubs, for cutting twining plants or greenery on roofs and in flower baskets or boxes, for extraction or blowing on pavements.
- The use of any additional equipment and attachments not approved by the manufacturer is prohibited. If such additional equipment and attachments are used, the CE conformity and guarantee are considered null and void. Unauthorised modifications to this lawn mower exclude the manufacturer from liability for any damage resulting from these modifications.
6 GENERAL SAFETY GUIDELINES FOR THE HAND-HELD
ROTARY LAWNMOWER (PETROL) General safety instructions Always read the operating instructions carefully for your own protection and to guarantee perfect function. Familiarise yourself with the operating elements and correct machine operation. Keep the operating instructions for reference purposes.
- Remember that the machine operator or user is responsible for accidents with other persons or their property.
- These operating instructions belong to the machine and must be handed over to the new owner in the event of the machine being sold.
- Never allow children and persons under 16 years of age or other persons not familiar with the operating instructions to use the machine. Local regulations can specify the minimum age of the user.
- Explain the potential hazards and how to avoid accidents to all those who are to use the equipment. This equipment may only be used, serviced and repaired by persons who are familiar with it and have been informed about the hazards.
- This equipment is not intended to be used by persons with limited physical, sensory or mental aptitude or lack of experience and/or knowledge unless they are supervised by a person responsible for their safety and have received instructions from this person as to how the equipment is used. This supervisor must decide in advance whether the person with limited physical, sensory or mental aptitude is suitable for this task. Never use the mower while persons, particularly children, or animals are nearby.
- Keep your machine safely! Unused equipment should be kept in dry, closed rooms inaccessible to children.
- Remove the ignition key and store it in a safe place inaccessible to children and unauthorised persons.
- Machine safety and protective devices must not be manipulated or disabled.
- The laying of cables must not be manipulated, e.g. by removing cable clamps or attaching additional cable ties! The cables must lie against the outside of the bar in such a way that they are neither crushed nor overstretched when the bar is folded. A damaged cable may result in a technical defect of the equipment.4 Preparatory measures
- When mowing you must always wear a strong pair of shoes or safety shoes and long trousers. Avoid wearing loose clothing or clothing with cords or belts hanging down. Do not mow whilst you are barefooted or wearing sandals. Wear protective goggles to protect your eyes.
- Loud noises can lead to hearing impairments. Wear ear protection. Before and during mowing, check the whole area the equipment is being used on and remove all stones, sticks, wires, toys and other objects which can be caught and catapulted out. Before and during the mowing process, check the area for live wires and remove them if possible. Never move over live wires when the cutting tool is switched on. Risk of electric shock! If a live wire is damaged, switch off the equipment and disconnect the wire from the supply grid. If you also use a robotic mower for lawn care, the following safety instructions must be heeded with regard to the working area of the robotic mower: – Before working on these areas (mowing, scarifying etc.) always check the range of the boundary wire. – If the wires are laid in the ground they must be checked, no wires may be visible, with particular attention necessary at the charging station. – If the boundary wires are laid above ground they should be routed tight directly on the ground and not lie loose in the grass. The wires must be sufficiently fixed using boundary staples, see the operating manual. – The boundary staples must not project, if this is the case push them firmly in place. – Remove any residual wires that are lying around before starting to mow. In the cases described above, there is a risk of the wire being pulled in and wound up by the tool; this can lead to serious injury.
- Low-hanging branches and similar obstacles can injure the operator or interfere with the mowing operation. Before mowing, identify potential obstacles such as low-hanging branches, and trim back or remove those obstacles. WARNING – Petrol is highly inflammable and highly explosive. Fire and explosions can cause serious injuries and property damage. – Always store petrol in an approved container and inaccessible for children. – Do not fill the container in the vehicle, on a loading surface or trailer with plastic lining. Before filling the container with fuel, do not put it down near the vehicle and always on the ground. – Only refuel outside and when the engine is cold. Smoking and open flames are prohibited during refuelling. – Fuel operated equipment, which is positioned on a load floor or a trailer, must not be refuelled from a filling pump, a portable plastic canister must be used for this purpose. – Fill with petrol before starting the engine. – The fuel cap must not be opened or petrol be refilled while the engine is running or the mower is still hot. – If petrol overspills, do not attempt to start the engine. Instead, remove the mower from the petrol-soiled area and wipe the overspilled fuel off the engine. Any fuel that overspills under the battery must also be wiped off. Do not attempt ignition until the petrol fumes have volatilised. – Petrol tank and petrol canister must be sealed carefully for safety reasons. – Petrol tank and fuel cap must be replaced if damaged.
- Before use, always carry out a visual inspection to see whether the cutting tool, attachment screws and the complete cutting unit are worn or damaged. To avoid unbalance, worn or damaged blades and attachment screws must be replaced by an authorised workshop.
- The condition of the pictograms must be checked every time the device is used. Worn or damaged pictograms must be replaced. Handling
- The machine must not be operated in potentially explosive surroundings.
- The internal combustion engine must never be used in enclosed rooms in which dangerous exhaust fumes can build up - danger of poisoning.
- People with pacemakers must not touch any parts of the engine which might be live.
- Attention! Do not operate the unit in front of the extraction openings of air conditioning systems.
- Do not mow in bad weather when lightning could strike.
- Never remove the spark plug connector when the motor is running. Risk: Electric shock!
- Disconnect the spark plug connector only when the engine has cooled down. Danger of burns!
- Do not wear radio or music headphones. Safe service and operation requires your full attention.
- Only mow during daylight or if the lighting is good. Always push the machine at walking pace.
- Please adjust the driving speed depending on the person and the terrain. Increase speed gradually until you have reached a suitable driving speed, switch the motor drive off if necessary.
- Use care when approaching blind corners, shrubs, trees, or other obstacles that may obscure vision.
- Do not move too closely to compound steps, trenches and banks. The equipment can suddenly topple over when a wheel suddenly gives way over the edge of a cliff or trench or when an edge suddenly yields.
- Please be careful when mowing underneath playground equipment (e.g. swings). The equipment could get into an unsafe position. This may result in risk of injury.
- Do not operate the equipment when you are sick, tired or under the influence of alcohol, medicine or drugs.
- Avoid using the machine if possible on wet grass, in order to avoid the danger of slipping.
- Always make sure that you are standing securely whilst mowing slopes. Always mow at right angles to the slope, never mow straight up or down. Please be especially careful when you change direction when mowing on a slope.
- Do not mow excessively steep slopes! Mowing slopes always means additional risks. Your lawnmower is powerful enough to mow on slopes with a gradient of up to 46% (25° angle of slope). For safety reasons, however, we urgently recommend you do not exploit this theoretical performance potential. Always make sure you have a firm stance. Manually guided lawnmowers should never be used for slopes with a gradient in excess of 26% (15° angle of slope). Stability may be lost.
- Please be especially careful when turning the machine or pulling it towards yourself.
- If you walk backwards whilst using the machine, you can easily stumble so this should be avoided. Avoid unnatural body positions. Ensure that you are standing securely and keep your balance at all times.
- Always observe the safety distance to the machine which is maintained by the handlebar.
- In order to avoid the machine slipping when being carried, always hold the machine by the grip devices provided (carrying handle, housing, handlebar ends or transverse bar of the lower handlebar section). Do not grasp the machine by the ejection flap!
- Note the weight of the machine before lifting or carrying it (see technical data). Lifting heavy weights can lead to health problems.
- Never lift or carry the machine when the engine is running.
- Never use the machine with safety and protective devices damaged or missing. Missing or damaged safety and protective devices are a safety hazard for both you and other people. Safety equipment includes (see chapter Component description): – Motor stop safety control bar (1) The lawn mower is equipped with a motor stop device. During operation and in the event of a hazard, the engine is switched off by releasing the motor stop bar. The engine and the blade must come to a standstill within 3 seconds. After release, the bar must always return to the position shown in the "component description" diagram. If this is not the case, it must be checked immediately by an authorised workshop. Risk of injury! If the blade run
on time is longer, stop using the equipment and take5 it to an authorised workshop. Measuring run-on time After the engine has been started, the blade rotates and a wind-like noise can be heard. The run-on time corresponds to the duration of the wind-like noise after the engine has been stopped, it can be measured using a stopwatch. The function of the safety control bar must never be put out of operation. It is important to make sure that the safety control bar functions correctly. If this is not the case, have it repaired by an authorised specialist workshop. – Ignition key (15) (for 47-VARIO E) or (16) (for 43-VARIO E) This safety device prevents injuries caused by unintentional starting of the engine. To prevent the starter or mower being started up unintentionally, the ignition key must be removed during all work on the equipment, before maintenance and repair work, when the mower is left and during storage. Protective equipment includes (see chapter Component description): – Housing, grass collecting bag, ejection flap (14) and deflector plate The protective devices protect the user against objects being ejected at high speed. The machine must not be operated with a damaged housing or without a properly fitted collecting bag or deflector plate, or ejection flap on the housing. – Housing This protection unit protects against injuries through contact with the rotating cutting blade bar. The equipment must not be operated with a damaged housing. Please make sure that hands and feet are not placed underneath the housing. – Belt drive covers (11), engine covers (6) (for 47-VARIO E) or (5) (for 43- VARIO E) These protection units protect against injuries through moving parts. The equipment must not be operated with damaged covers or without correctly attached covers. – Exhaust protection grid (10) (for 43-VARIO E) or (9) (for 47-VARIO
The engine/exhaust gets very hot. The protection grid protects from burning. Do not use the equipment without the exhaust protection grid. The safety devices must not be modified.
- Do not change the basic settings of the engine or operate the engine at excessive speed.
- During the starting process, do not switch on the drive if available. When you start the machine, make sure that your feet are at a sufficiently safe distance away from the cutting blades. When the engine is started, the machine must not be tilted on end, if necessary it must be tilted by pressing the guide bar down so that the cutting tool is pointing in the direction away from the user, but only as far as absolutely necessary. For as long as the equipment has not been lowered to the ground again, both your hands must be on the top part of the bar. Do not start the engine when persons or animals are standing in front of the mower. When using equipment with a side ejector, do not start the engine when you are standing in front of the ejector channel or other people/animals are located in the ejection area. Never put your hands or feet near or under revolving parts. Always make sure that your hands or feet do not get under the housing. Always maintain a safe distance from the ejector opening. Stop the engine by releasing the motor stop bar, pull the plug connector off, make sure that the moving parts have all come to a complete standstill and the ignition key has been removed: – when the mower is left; – before you check or clean the machine or carry out work on it; – before you clear jams or eliminate blockages in the ejection channel; – if an object has been hit; – if the mower starts to vibrate unusually.
- If a foreign object has been encountered or if the machine becomes blocked, e.g. by driving onto an obstacle, a specialist dealer must check whether parts of the machine have been damaged or deformed. Any necessary repairs must also be carried out by an authorized specialist workshop.
- If the machine starts to vibrate unusually heavily or to make unusual noises, please have it checked immediately by an authorised workshop. Heavy vibrations on your hands can damage your health. Please contact an authorised workshop immediately if heavy vibrations occur.
- WARNING The noise and vibration levels shown in these operating instructions are the maximum levels for use of the machine. The use of an unbalanced cutting element, the excessive speed of movement, or the absence of maintenance have a significant influence on noise emissions and vibrations. Consequently, it is necessary to take preventive steps to eliminate possible damage due to high levels of noise and stress from vibration. Maintain the machine well, wear ear protection devices, and take breaks while working. Adhere to the maintenance work listed in this operating manual and have the equipment checked and serviced regularly by an authorised workshop. Stop the engine by releasing the motor stop bar, make sure that all moving parts have come to a complete standstill and the ignition key has been removed, – if you have to lift or tilt the mower e.g. for transport purposes; – when you need to transport the machine to and from the area to be mowed – when driving off the lawn; – if you have to leave the machine for a short time; – when you wish to adjust the cutting height; – before you remove the grass collecting bag; – before you remove the mulching plug; – before you fill it with fuel. Only refill when the engine is cold!
- If the engine is equipped with a petrol shut-off valve, this should be closed after mowing. Maintenance and storage
- Insufficient equipment maintenance will lead to safety-related faults.
- Ensure that all screws have been tightened securely and that the machine is in a safe working condition. The ejection flap must only be opened and the grass collector or mulch stopper removed when the engine is turned off. Never store a machine which still contains petrol inside a building where petrol fumes may come into contact with naked flames or sparks or where they may ignite. The engine and exhaust reach very high temperatures during operation. Allow the machine to cool down for at least 15 minutes before starting any maintenance or cleaning work.
- To avoid a fire hazard, keep the engine, muffler (exhaust) and fuel tank free of grass, leaves or escaping oil (grease). When tilting the mower upwards or placing it on its side, make sure no oil or petrol escapes. Fire hazard! Allow the engine to cool down before you store the mower in closed rooms. Do not store the mower near open flames or sources of fire such as boilers or heating systems. Before you start mowing, always check the grass collecting equipment for wear or loss of functionality. Before you start mowing, always check the condition and firm attachment of the cutting blade. The blade attachment screw must always be tightened by an authorised workshop. If the blade screw is too tight or too loose, the blade coupling and cutter bar can become damaged or loose which can lead to serious injuries. A worn or damaged blade must always be replaced. Changing, regrinding and balancing the cutting blade must be carried out by an authorised professional workshop. A wrongly assembled cutting blade coupling can allow the cutting blade bar to get loose and cause severe injuries. An improperly ground and imbalanced cutting blade can cause strong vibrations and damage the lawn mower.
- For reasons of safety, always replace worn or damaged parts.6 Protective gloves must be worn at all times during maintenance and cleaning work. Maintenance and cleaning work may only be carried out on level surfaces with the engine switched off, spark plug connector disconnected and ignition key removed. Regular maintenance is essential for safety and top performance.
- Never remove the spark plug connector when the motor is running! Risk: Electric shock.
- Disconnect the spark plug connector only when the engine has cooled down. Danger of burns!
- Make sure that the spark plug connector is firmly seated! Risk: Electric shock.
- If the tank has to be emptied, this should be done in the open, and with a cold engine. Take care to ensure that no fuel is spilt. Always store the equipment in a clean state in a closed, dry room and inaccessible to children. Always remove the ignition key during storage to prevent unauthorised actuation of the starter or mower. For reasons of warranty and safety, only genuine spare parts may be used. Non-equivalent spare parts can damage the machine and are a safety hazard.
7 DESCRIPTION OF COMPONENTS
47-VARIO E 1 Safety control bar for motor stop 2 Knob for Vario actuation 3 Drive control bar 4 Oil refill neck with dipstick 5 Battery compartment with battery 6 Engine cover 7 Cutting height adjustment 8 Spark plug 9 Exhaust protection grid 10 Carrying handle 11 Belt drive covers 12 Air filter 13 Tank cap 14 Ejector flap 15 Starter key 43-VARIO E 1 Safety control bar for motor stop 2 Vario actuation 3 Drive control bar 4 Tank cap 5 Engine cover 6 Cutting height adjustment 7 Air filter 8 Spark plug 9 Carrying handle 10 Exhaust protection grid 11 Belt drive covers 12 Oil refill neck with dipstick 13 Battery compartment with battery 14 Ejector flap 15 Fast release (depending on the model) 16 Starter key All models 8 PREPARATION The following unit parts are included in the package for mower assembly:
- Mower with pre-assembled guide bar
- Grass catch, collecting bag frame
- Tool bag containing the following: – Operator’s manual with Declaration of Conformity – Warranty conditions – Diverse attachment parts. Should a part be missing, please contact your professional dealership. NOTE Always remove the spark plug connector before fitting the bar. Following assembly, at the latest before starting the engine, push the spark plug connector back in place. Raise the handlebar (Illustration A1 + B1 + V4 + E1 ) IMPORTANT Make sure the throttle cables are not kinked or jammed when lifting the handlebars. IMPORTANT Make sure that the cables are not pinched, squeezed, twisted or overstretched when the handlebars are folded apart or collapsed! Always run the cables along the outside of the bar connection. A damaged cable may result in a technical defect of the equipment. Pull the handlebar which is collapsed in a Z-shape upwards into place in the following sequence: – First lift the bottom part of the handlebar A1 , push the ends of this bottom part as far apart as necessary for the locking cams facing the inside to lock into the respective bore holes B1 . Three different handlebar heights can be set. – Tighten the wing nuts on both sides by hand B1 .7 – Lift the top part of the handlebar until the top part and the bottom part of the handlebar are on the same level. 43-VARIO E, 47-VARIO E (Illustration E1 ) – When the top and bottom parts of the handlebar are on the same level, firmly tighten the wing nuts by hand. – Insert the throttle cables into the cable guide. This avoids the throttle cables being jammed when the handlebar is folded down. CAUTION When you activate the bar height adjustment, when loosening the wing nuts B1 used to secure the bar bottom to the housing (only loosen sufficiently to ensure that the bar can be moved freely) and snapping the locking cams out of the drilled holes in the housing, it is possible that unintentional upsetting of the bar may occur. In addition, this may result in crushed areas between the bar bottom and the housing. This may result in a risk of injury! All models Attaching the grass collector to the mower (Illustration R1 + S1 ) – Insert the collection bag frame with the bar first into the grass catch. Align the upper seams of the grass catch on the bar. – Press the holding profile onto the frame of the collection bag frame R1 . – Open the ejection flap of the mower upwards. – Lift the grass collection bag on the carrier bar, insert the chute (1) R1 on the collection bag opening into the ejection flap and hang the grass collection bag with the two side hooks to the top of the mower housing S1 . – Fold the ejection flap onto the grass collection bag. Adjusting the cutting height (Illustration I ) Safety instruction! See table for explanation of symbols page 3 You can set the desired cutting height with the adjustment lever (1) on the left of the mower. – Pull the lever out of the catch and latch again after a lateral move into the desired position. – The marking on the left of the housing indicates the cutting height. IMPORTANT Mowing at the lowest cutting height should only be carried out on level and plane lawns! Please note that the lower cutting height settings may only be used for optimum conditions. If you select cutting height that is too low, the turf may be damaged and under certain circumstances even destroyed. Besides the cutting height, the driving speed also influences the cutting pattern and collection result. Adapt the cutting height and driving speed to the grass height to be cut, the motor drive may not need to be switched on. Installing the charged battery (Illustration N2 + W1 + T4 + V1 + U1 ) Read and observe the safety instructions for handling the battery and charger. Before using the equipment for the first time, wake the battery up and charge it fully. – Release the battery (1) by pressing the button at the side, pull the battery out of the battery compartment on the engine N2 . – Plug the battery charger into a 230V socket. – Push the battery (1) into the charger (2) W1 . If the red charge control lamp (3) T4 does not light up, take the battery out and insert it again. Make sure the battery is firmly in the charger. NOTE The lithium ion battery has been partly charged before delivery. To maintain the charge and avoid damage during storage, the battery has been programmed to “sleep mode”. In order to wake up a new battery, an initial fast charge lasting approx. 10 seconds is necessary. We recommend leaving the battery in the charger until it has been completely charged. See the section “Charging the starter battery” for information on charging the battery. – After the battery (1) has been charged, pull it out of the charger and push it firmly back into the battery compartment (5) on the engine V1 . Make sure the battery is fixed firmly in place. – First, check the battery compartment on the top of the engine to make sure it is free of objects and clean it with a brush or cloth if necessary. For initial assembly – Remove the yellow adhesive tape from the battery connector U1 . – Connect the battery connector with the mating connector on the cable harness. 9 BEFORE USING THE LAWNMOWER FOR THE FIRST TIME Safety instruction! See table for explanation of symbols page 3 Check all screw connections and the spark plug connector for a tight fit. Tighten the screws if necessary! Attachment of the cutter bar must be checked in particular (refer here to the chapter "Cutter bar care"). The blade attachment screw must always be tightened by an authorised workshop. If the blade screw is too tight or too loose, the blade coupling and cutter bar can become damaged or loose which can lead to serious injuries. The lawn mower is equipped with a motor stop device. Before using the equipment for the first time, make sure that the motor stop safety control bar is working perfectly. When the control bar is released, the motor and cutter bar must come to a standstill within three seconds. After release, the bar must always return to the position shown in the "component description" diagram. If this is not the case, it must be checked immediately by an authorised workshop. Risk of injury! If the blade run-on time is longer, stop using the equipment and take it to an authorised workshop. Measuring run-on time After the engine has been started, the blade rotates and a wind-like noise can be heard. The run-on time corresponds to the duration of the wind-like noise after the engine has been stopped, it can be measured using a stopwatch. Machine safety and protective devices must not be manipulated or disabled! Make sure that all protective devices have been attached properly and are not damaged. Charging the battery All safety information regarding the handling, storage, safekeeping, transport, disposal of the lithium-ion battery and first-aid measures and measures for combating fires is contained in the "Product safety datasheet" at www.sabo-online.com under Instructions. Information hotline for lithium ion batteries +49 (0) 2261 704-0 When is the battery charged For the first time – The lithium ion battery has been partly charged before delivery. To maintain the charge and avoid damage during storage, the battery has been programmed to “sleep mode”. – In order to wake up the battery, a fast charge lasting approx. 10 seconds is necessary. – We recommend leaving the battery in the charger until it has been completely charged. For information about charging the battery see the section “How is the battery charged, Illustration W1 + T4 ”. When required – In order to check the available charge, press the battery status display button (see section “Battery status display, Illustration U4 ”) and charge the battery accordingly. How is the battery charged (Illustration W1 + T4 ) Use the charger supplied only for charging the respective mower battery. Equally, do not try to charge your battery using a different charger. You could endanger yourself or damage your equipment. Incorrect use of the battery and charger can lead to electric shock or fire. For safety reasons and to avoid damage to the charger and battery, the charger may only be used indoors and in dry rooms. Do not expose the battery or charger to rain or humidity. The battery must not be charged in direct sunlight. When removing the charger, do not pull on the cable, pull on the connector, since otherwise connector or cable could become damaged. Do not use an extension cable unless absolutely necessary. There may be a fire hazard and risk of electric shock if an unsuitable extension cable is used. If an extension cable must be used, heed the following:8 – Number, size and shape of the contacts on the extension cable plug must correspond to the charger plug. – The connection cable must be in a good condition and be connected properly. – The wire thickness must be at least 16 AWG (1.3 mm
) for the AC rated input of the charger. The charger must not be used if the plug or cable are damaged. The connection cable cannot be replaced. If the cable is damaged, the charger must be replaced immediately (see original spare parts and accessories for order no. of the charger). Do not use the charger if it has been subject to heavy impact, been dropped or damaged in any other way. The charger must be replaced if it is damaged. It cannot be repaired. Do not dismantle the charger and do not try to repair it. To avoid electric shocks make sure no water gets into the connector. Remove the charger plug from the socket before cleaning. Do not short-circuit the equipment. Never insert anything into the battery contacts. Disconnect the charger and store it in a cool, dry place if it is not needed. Corrosion can occur on the terminals and electrical contents if the charger is stored in humid areas. The charger must not be used by persons (including children) with impaired physical or metal abilities or reduced perception, unless they have been instructed on how to use the equipment by a person who is responsible for their safety. Children must be supervised so that that cannot play with the charger. – Plug the battery charger into a 230V socket. – Push the battery (1) into the charger (2) W1 . If the red charge control lamp (3) T4 does not light up, take the battery out and insert it again. Make sure the battery is firmly in the battery charger.
- The red control lamp (3) shows that the battery is being charged normally.
- The green control lamp (4) shows that the battery is fully charged T4 .
- The flashing red control lamp shows that the battery is either too hot or too cold and cannot be charged. Leave the battery connected. Once normal operating temperature has been reached, the charging process begins automatically. See the section “Data sheet for product safety: handling and storage” for the normal operating temperature.
- Flashing red/green control lamps show that the battery cannot be charged and must be replaced. – The battery wakes up from “sleep mode” after about 10 seconds when it is in the connected battery charger. – A completely discharged battery takes approx. 1 hour to be charged completely. Fast charge The fast charge function of the InStart battery makes the following possible:
- 10 seconds charge: wakes the battery up from “sleep mode”
- 10 minutes charge: more than 10 start-up processes
- 60 minutes charge: more than 50 start-up processes with a fully charged battery – The battery remains fully charged if it remains on the charger. – When the green control lamp (4) shows that the battery is fully charged, it can be removed from the charger. – Press the battery status display button to check the available charge (see the section “Battery status display”). – Remove the battery charger plug from the socket if it is not required. – In order to prevent unauthorised use of the mower, particularly by children, remove the ignition key: – when you leave the mower, – when you put the lawn mower away until you need it for mowing again, – before storing the mower for the winter. – Store the battery in a dry, cool and frost-protected room. Battery status display (Illustration U4 ) In order to check the available battery charge, press the battery status display button (6). The display lamps indicate the approximate battery charge remaining:
- four lamps – 78% to 100%
- three lamps – 55% to 77%
- two lamps – 33% to 54%
- one lamp – 10% to 32%
- flashing lamp – less than 10% Filling with oil (Illustration Y1 ) Safety instruction! See table for explanation of symbols page 3 IMPORTANT Avoid damage! Engine is delivered without oil. You must add oil before running the engine. Before starting the engine for the first time, use a funnel to fill motor oil (quantity and quality see technical data) having unscrewed the dipstick in this opening first. – Set the mower on level ground. – Slowly fill oil through the filler neck. Do not overfill. After filling the oil, wait for about one minute and then check the oil level. Insert the dipstick and screw it tight. – Check oil level Remove the dipstick. Use a clean cloth to wipe off the dipstick, then insert it again and screw tightly. Then pull the dipstick out again and read off the oil level. The oil must be at the full mark at the top (arrow). Replenish oil if necessary. The oil level must not be higher than the full mark, however. Insert the dipstick again and tighten. – After initial filling, remove the "NO OIL" sign from the top of the engine. Filling with fuel Safety instruction! See table for explanation of symbols page 3 – Only fill the tank with fresh and clean unleaded standard petrol. Fuel with up to 10% ethanol is acceptable. – Unscrew tank cap. – Fill tank with fuel using a funnel up to max. lower edge of filling nozzle. – Replace tank cap and screw tight. 10 STARTING THE ENGINE (ILLUSTRATION D + P4 ) Safety instruction! See table for explanation of symbols page 3 Only start the engine when you are standing behind the mower. Always place the mower on a level area which is not covered with high grass (if the grass is too high it will block the cutter bar start-up and make starting the mower more difficult). When the engine is started, the machine must not be tilted on end, if necessary it must be tilted by pressing the guide bar down so that the cutting tool is pointing in the direction away from the user, but only as far as absolutely necessary. As long as the mower has not been lowered to the ground again, both your hands must be on the top part of the bar. IMPORTANT The motor only operates when the safety control bracket is pressed against the upper part of the handlebar. As soon as the safety control bracket is released, this returns to its original position under spring force, the motor brake is actuated, and the motor and blade come to stop within three seconds. – Push and hold the safety control bar (1) on the top tube (2) D . – Turn the ignition key (3) clockwise up to the limit stop, for so long until the engine starts running P4 . NOTE To ensure a long service life of the battery and starter, the starting process should never be longer than 5 seconds. Always wait for one minute between actuations. In order to guarantee the full electrical energy for a restart, a waiting time of 60 seconds is recommended. NOTE If the engine does not start and the battery control lamps are flashing, the battery is overheated or the current consumption is too high. All four battery control lamps flash for 10 seconds as a warning. The battery does not have a fuse, but it is reset automatically after 10 seconds. If the battery is too hot (over 60°C), it must be removed and cooled down to ambient temperature. To avoid excessive current consumption during the start-up process, care must be taken that the mower housing is clean and free of grass accumulation and any other objects. NOTE This engine has a ReadyStart
system: This system has a temperature-controlled9 automatic choke. The engine runs with optimum power at maximum speed, which is required for a clean cutting pattern (engine speed = blade speed). 11 SWITCHING OFF THE ENGINE (ILLUSTRATION F + P4 ) – Release the safety control bar (1) F . – Remove the ignition key (3) P4 . 12 EMERGENCY STOPPING Release the safety control lever and the drive switch bar. – The mower will stop. – The blade will stop. – The engine will stop NOTE Before every mowing job, make sure that the safety control bar for the engine brake and the engine drive control bar are working perfectly: – when the safety control bar is released, the engine and cutter bar must come to a standstill within three seconds. – when the engine drive control bar is released, the machine must come to a standstill immediately. If this is not the case, please consult your nearest authorised workshop. 13 MOVEMENT DRIVE Operating the rear wheel drive (Illustration G ) The rear wheel drive is switched on and off by means of the drive control handle (1) on the top guide bar (2) when the motor is running: – Pull and hold the drive control handle = mower moves – Release the drive control handle = mower stops (0-position). The drive control handle must always be pulled firmly up against the top bar. Improper activation will cause wear on the gearbox. The increased resistance of the bar in the starting position is deliberate to make accidental operation more difficult. NOTE The rear wheels click when the mower is pushed forwards. Adjusting the speed (Illustration H ) IMPORTANT The speed may only be adjusted when the engine is running in order to avoid damage! The driving speed is set using the rotary knob mounted on the left. – The knob can be turned in both directions for speed adjustment, so that the required driving speed can be set. The arrow on the knob indicates the driving speed. – Position “Hare” = fast (max. speed) – Position “Tortoise” = slow (min. speed) NOTE Mowing at high speed leads to poor cutting pattern or collection result. Always adapt the speed to the prevailing conditions. For longer grass sections, a slower driving speed should be selected. 14 GRASS COLLECTOR Safety instruction! See table for explanation of symbols page 3 Operation with grass collector WARNING When operating the equipment with a collecting bag, the bag must be completely assembled and in technically perfect condition. IMPORTANT Make sure that the chute (1) R1 is not bent when handling the collector. While mowing, ensure that the collector is emptied in good time. The turbo signal on the collector will indicate when the collector should be emptied. Turbo signal (shows when the grass collector is full) (Illustration J + K ) There is an indicator on the top of the collector that shows whether the collector is empty or full: – The collector indicator inflates if the collector is empty and during the mowing J . – If the collector is full, the indicator collapses; once this happens, stop mowing immediately and empty the collector K . IMPORTANT If the fabric of the grass collector is very dirty the turbo indicator will not inflate – in this case, clean the fabric immediately. The grass collector will only collect grass perfectly if it is permeable to air. IMPORTANT Do not clean the grass collector with hot water! Emptying the grass collector (Illustration L ) – Stop the engine and remove the ignition key. – Lift the ejection flap. – Unhook the filled grass collecting bag by the handle – the ejector flap closes automatically. – Hold the collecting bag firmly by the handle and the recess on the bottom and shake thoroughly. Operation without grass collector WARNING When mowing without grass collector the ejection flap on the mower housing must always be closed (flap down). 15 MOWING Safety instruction! See table for explanation of symbols page 3 Mowing on slopes NOTE The mower can be used on banks and slopes with a gradient of up to 46% (25° angle). Any steeper slopes can lead to engine damage. For safety reasons, however, we urgently recommend you do not exploit this theoretical performance potential. Always make sure you have a firm stance. Manually guided lawnmowers should never be used for slopes with a gradient in excess of 26% (15° angle of slope). Stability may be lost! Checking the oil level Check oil level each time prior to mowing Y1 . Never let the engine to run with too little or too much oil. Irreparable damages could occur. Checking operating safety The lawnmower is equipped with a motor stop device. Before every mowing job, make sure that the motor stop safety control bar is working perfectly. When the control bar is released, the motor and cutter bar must come to a standstill within three seconds. After release, the bar must always return to the position shown in the "component description" diagram. If this is not the case, it must be checked immediately by an authorised workshop. Risk of injury! If the blade run-on time is longer, stop using the equipment and take it to an authorised workshop. Measuring run-on time After the engine has been started, the blade rotates and a wind-like noise can be heard. The run-on time corresponds to the duration of the wind-like noise after the engine has been stopped, it can be measured using a stopwatch. Machine safety and protective devices must not be manipulated or disabled. The perfect function of the motor drive control bar must be checked before every mowing job too. When the motor drive control bar is released, the machine must come to a standstill immediately. If this is not the case, it must be checked immediately by an authorised workshop. Make sure that all protective devices have been attached properly and are not damaged. To avoid risk, check the condition and firm attachment of the blade before every mowing job. The blade attachment screw must always be tightened by an authorised workshop. If the blade screw is too tight or too loose, the blade coupling and cutter bar can become damaged or loose which can lead to serious injuries. A worn or damaged blade must always be replaced. (Refer here to the chapter "Cutter blade care").10 In addition, check the fan, blade coupling and fan housing every 10 operating hours for wear and a tight fit. Also check equipment screws and nuts for a firm fit and tighten if necessary. Make sure the spark plug connector is fitted tightly. Danger: Electric shock. Never remove the spark plug connector when the motor is running. Danger: Electric shock! Disconnect the spark plug connector only when the engine has cooled down. Danger of burns! If the mower mechanism becomes blocked e.g. by colliding with an obstacle, have an authorised workshop check whether any parts of the mower are damaged or deformed. Always have any necessary repairs done by an authorised workshop too. If the machine starts to vibrate unusually heavily or to make unusual noises, please have it checked immediately by an authorised workshop. Time restrictions The time at which lawnmowers may be used varies from region to region. Please ask the corresponding authorities before using your mower. Tips on caring for your lawn Mowing (Illustration M ) WARNING Remove any objects (stones, wood, branches, etc.) from the lawn before each cut; but still watch out for objects lying around during the mowing process. Ask your dealer about lawn care instructions. Information and instructions about mowing can also be found on the manufacturer website. Mulching Your lawn mower can also be equipped with a mulching kit. The respective conversion kit to a mulching system is available as an accessory from professional dealerships (see genuine spare parts and accessories for the conversion kit order no.). The mulching kit also includes tips and information about mulching. You will also find information about mulching on the manufacturer website. WARNING Always have an authorised workshop carry out the conversion of the mower to a mulching system. A wrongly assembled cutting blade coupling or a blade screw that is tightened too tightly or too loosely can allow the cutting blade bars to become loose and cause severe injuries. If the grass should happen to be too high for mulching, the mulching mower can be converted for mowing with a grass collecting bag in no time. Converting the machine to rear ejection (Illustration U2 + S1 ) NOTE As long as the mulching blade system is not converted, this conversion (removal of the mulching plug/hooking the grass collecting bag in place) can be carried out without consulting an authorised workshop. – Stop the engine and remove the ignition key. – Lift the ejection flap. – Remove the mulching plug from the channel U2 . – Hook the grass collecting bag in the bracket provided on the mower housing S1 . The mulching blade system does not have to be converted. The capacity of the collecting bag can be reduced under difficult mowing conditions (e.g. wet grass). For the equipment to be used as a mulching machine again, the mulching plug must be installed again. To do this, remove the grass collecting bag, insert the mulching plug into the ejector channel and close the ejector flap. Clean the ejector channel first. 16 SERVICE INTERVALS IMPORTANT Avoid damage! Under extreme or unusual conditions, shorter servicing intervals than the ones specified below may be necessary. If you establish any problems, please contact an authorised workshop. Carry out routine servicing on the machine in line with the following servicing intervals. Work must be carried out at the following servicing intervals in addition to the maintenance work listed in these operating instructions. Before initial use
- Check the oil level Y1 .
- Wake the battery up and charge it.
- Check all screw connections for a tight fit.
- Check the cutting blade screw and have an authorised workshop tighten it if necessary.
- Check whether the safety control bar for motor stop is working properly.
- Check whether the motor drive control bar is working properly.
- Check that all protective devices have been attached properly and are not damaged. Before every operation
- Check the lawn area and remove any objects.
- Check the area of the boundary wires (if an automatic mower is being used for lawn care).
- Check the oil level Y1 .
- Check the battery charge U4 .
- Check the condition and firm fit of the blade, if necessary have an authorised workshop tighten the blade screw.
- Check whether the safety control bar for motor stop is working properly.
- Check whether the motor drive control bar is working properly.
- Check that all protective devices have been attached properly and are not damaged.
- Check grass collecting equipment for wear or loss of functionality. After every operation
- Check the blade for damage and wear. Every 10 operating hours
- Check all screw connections for a tight fit.
- Check the fan, blade coupling and fan housing regularly for wear and a tight fit. Every 15-20 operating hours or annually
- Lubricate the wheel bearings. Every 25 operating hours or annually
- Clean the air filter paper insert W .
- Clean the spark plug and adjust electrode distance Y . During annual servicing
- Have the air filter paper insert replaced W .
- Have the spark plug replaced Y .
- Clean the gearbox and the area under the belt cover.
- Check the drive throttle cable and adjust it if necessary.
17 CARE AND SERVICING OF YOUR LAWNMOWER
Regular care is the best way to guarantee a long service life and problem-free operation. Insufficient equipment maintenance will lead to safety-related faults! Only use original spare parts because only those guarantee safety and quality! Safety instruction! See table for explanation of symbols page 3 Cleaning (Illustration O ) IMPORTANT During cleaning and maintenance work, do not place the mower on its side, tilt it forwards (spark plug facing upwards) as otherwise start-up difficulties could occur. When tilting the mower upwards make sure the ejection flap does not get damaged. Secure the mower in its raised position! NOTE When tilting the mower upwards, make sure no oil or petrol escapes. Fire hazard! Remove dirt and residual grass directly after mowing. Use a brush or cloth for cleaning. Do not rotate the cutter bar, as otherwise motor oil is pumped into the carburettor/air filter and start-up difficulties can occur. NOTE Do not insert your fingers into the openings in the fan housing and hold the fan. If the cutter bar should be turned during cleaning, there is a risk of fingers being squashed between fan and fan housing. IMPORTANT Never use high-pressure cleaners or a normal water jet to clean the drive area, engine parts (such as ignition system, carburettor etc.), seals and bearing points. Damage or expensive repairs can be the consequence of such action. Storage Always keep the machine in a clean condition in a closed, dry room out of reach of children. Always allow the engine to cool down before you store the machine in a closed room.11 Collapsing the handle (Illustration A1 ) – To save storage space or for transportation, loosen the four wing nuts such that the guide bar can be folded together without resistance in Z-shape above the engine A1 . The locking cams on the bottom bar end must snap out of the holes on the housing. – Do not kink nor squeeze the throttle cables in the process. CAUTION When folding the bar for transport and storage purposes, when loosening the wing nuts and snapping the locking cams from the drilled holes in the housing, it is possible that unintentional upsetting of the bar may occur. In addition, this may result in crushed areas between the top and bottom part of the bar as well as the housing. This may result in a risk of injury! Transporting and securing the equipment – If the equipment has to be carried, do not hold the ejection flap! Hold the carrying handle at the front and at the back (see Figure N ). Please take the weight of the machine into consideration before lifting it (see Technical Data). Lifting large weights can result in health problems. We recommend that two people should always lift or carry the equipment. – Transport the equipment in an upright position. – Park the means of transport on level ground so that the equipment cannot roll away before it is secured. – Remove the collecting bag and secure it separately during transport. – Secure the equipment with approved load-securing devices (e.g. tie-down straps with clamping elements) on or inside the vehicle. Tie-down straps are belt bands made of synthetic fibres. Every tie-down strap is marked with a label. The label contains important details for application. The information on this label must be heeded when using the tie-down strap. – For loaded goods that can roll, we recommend using direct strapping with four lashing straps. Secure the wheels of the equipment in such a way that it does not move during transportation. NOTE Do not tighten the belts too firmly. Fixing the equipment too firmly can cause damage. Maintenance of the blade A sharp blade guarantees optimum cutting performance. Before you start mowing, always check the condition and firm attachment of the cutting blade. The blade attachment screw must always be tightened by an authorised workshop. If the blade screw is too tight or too loose, the blade coupling and cutter bar can become damaged or loose which can lead to serious injuries. A worn or damaged blade must always be replaced. Sharpening and balancing the blade (Illustration Q ) WARNING The sharpening and balancing of the blade should be carried out only by an authorized specialist workshop. An improperly sharpened or unbalanced blade can cause severe vibrations, and damage the lawnmower. The cutting edges of the cutting blade may be grinded only until the respective value (see illustration Q ) or the marking (1) on the cutting blade (ring) has been reached. Attention! Observe the grinding angle of 30°. Your professional workshop can check this value - (grinding limit) for you! WARNING A blade by which the wear limit (marking) has been exceeded can break off and spin away; this can cause severe injuries. Replacing the blade WARNING The cutting blade bar must always be replaced by an authorised workshop. A wrongly assembled cutting blade coupling or a blade screw that is tightened too tightly or too loosely can allow the cutting blade bar to become loose and cause severe injuries. – Only use genuine cutter bars for replacement. Non-equivalent spare parts can damage the machine and are a safety hazard. – Replacement cutting tool must be marked permanently with the name and/or company logo of the manufacturer or supplier and the part number. Servicing the front wheels Lubricate the wheel bearings once a year or every 15-20 operating hours. – Remove the wheel cap cover on both sides. – Use a socket wrench to loosen the hexagon nut, remove the washer, pull the wheels off the wheel axle together with the wheel cap and collar washer. Remove the wheel cap from the wheel. – After the bearings have been lubricated using the roller bearing grease "KAJO- Longlife grease LZR 2", push the wheels back on. First insert the collar washer into the wheel, set the wheel cap in place and press until you hear it click. Set the washer in place, fix using the hexagon nut and tighten to such an extent that the wheels can just about turn easily but without play. Replace the wheel cap covers. (Please see original spare parts and accessories for order no. of roller bearing grease) Servicing the rear wheel drive (Illustration R ) Lubricate the wheel bearings once a year or every 15-20 operating hours. – Remove the wheel cap cover on both sides. – Use a socket wrench to loosen the hexagon nut, remove the washer, pull the drive wheels off the wheel axle together with the wheel cap and collar washer. – Remove the wheel cover, pay attention to the thrust washer. – Remove any soiling from the wheel cover, the free-wheeling pinion on the gear shaft and the gear rim on the inside of the wheel. NOTE Do not remove the free wheel pinion from the gear shaft! – Lubricate the bearings using the roller bearing grease "KAJO-Longlife grease LZR 2". Do not lubricate the free-wheeling pinion and gear rim in the wheel! – Set the wheel cover in place and push the start-up disc onto the wheel axle. When putting the drive wheel in place make sure the pinion and gear rim interlock, turn the wheel on the axle slightly to achieve this if necessary. – If the wheel cap has loosened from the wheel, insert the collar washer into the wheel first as shown in Figure R , set the wheel cap in place and press until you hear it click. Set the washer in place, fix using the hexagon nut and tighten to such an extent that the wheels can just about turn easily but without play. Replace the wheel cap covers. (Please see original spare parts and accessories for order no. of roller bearing grease) Servicing the drive – It is absolutely essential that the Bowden cable runs easily for switching on and off, so that the control drive works perfectly. – The Bowden traction mechanism has been set ready for operation at the works and requires no adjustment. Changing the drive V-belt The drive V-belt must be replaced by a specialist workshop. Recharging the battery (Illustration N2 + W1 + T4 + V1 ) All safety information regarding the handling, storage, safekeeping, transport, disposal of the lithium-ion battery and first-aid measures and measures for combating fires is contained in the "Product safety datasheet" at www.sabo-online.com under Instructions. Information hotline for lithium ion batteries +49 (0) 2261 704-0 – Stop the engine and remove the ignition key. – Release the battery (1) by pressing the button at the side, pull the battery out of the battery compartment on the engine N2 . – Plug the battery charger into a 230V socket. – Push the battery (1) into the charger (2) W1 . If the red charge control lamp (3) T4 does not light up, take the battery out and insert it again. Make sure the battery is firmly in the charger. – A completely discharged battery takes approx. 1 hour to be charged completely. Fast charge The fast charge function of the InStart battery makes the following possible:
- 10 minutes charge: more than 10 start-up processes
- 60 minutes charge: more than 50 start-up processes with a fully charged battery – For more information see the chapter “Before using the equipment for the first time – Charging the battery”. – After the battery (1) has been charged, pull it out of the charger and push it firmly back into the battery compartment (5) on the engine V1 . – First, check the battery compartment on the top of the engine to make sure it is free of objects and clean it with a brush or cloth if necessary. – Remove the battery charger plug from the socket if it is not required.12
18 SERVICING THE ENGINE
Safety instruction! See table for explanation of symbols page 3 WARNING Avoid injury! Engine exhaust fumes contain carbon monoxide and can cause serious illness or death. Do not run an engine in an enclosed area, such as a garage, even with doors and windows open. Move the machine to an outside area before starting the engine. IMPORTANT To clean the engine and for maintenance work, do not place the engine or mower on its side but tilt forwards O (spark plug upwards) because otherwise there may be problems starting the engine. When tipping the mower forwards, make sure that the ejection flap is not damaged. Secure the mower in the raised position! ATTENTION When tilting the mower upwards, ensure that no oil or fuel comes out of the machine. Fire hazard! The regular implementation of the prescribed maintenance and care work are the prerequisite for a permanent and fault-free functionality of the motor and also the basic requirement for any guarantee claims. The motor should be kept clean, particularly on the outside, and the silencer and cylinder area must always be kept free from foreign bodies (e.g. grass residue). The exhaust and motor reach very high temperatures when in use. Flammable foreign bodies such as foliage, grass etc. may catch fire. Perfect cooling can also only ensured when cylinder ribs are always clean. IMPORTANT Never use a pressure cleaner or ordinary water jet to clean the motor. Damages or expensive repairs can be the consequence of such action. Oil change Check the oil level before every use and replenish oil if necessary (see “Check oil level” and “Fill with oil”, illustration Y1 ). An oil change is not necessary. If you wish to change the oil, however, please follow the instructions below. Changing the oil – Before the engine or the equipment is tilted to drain oil, empty the petrol tank and let the engine to run until it stops due to lack of fuel. – Stop the engine and remove the spark plug connector. – Renew the oil as long as the engine is hot. – To change the oil, remove the dipstick from the oil refill neck. – Turn the mower on one side so that the spark plug side is facing upwards and the used oil can drain into a container. Do not drain used oil into the sewage system or soil; dispose of it according to the local regulations. – Position the mower straight and fill brand-name oil into the spout (for quantity and quality, see technical data). Screw the dipstick in and check the oil level (see “Check oil level” and “Fill with oil”, illustration Y1 )! If the oil level is correct, insert the dipstick and tighten it. NOTE For environmental reasons, we recommend that the oil change is performed by an authorised workshop. Cleaning and replacing the air filter (Illustration W ) IMPORTANT Never let the engine start or run whilst the air filter is removed. Loosen the screws (1) on the air filter cover (2) and remove the cover. – Remove the paper filter element (3). – If the paper filter element is slightly dirty, knock the dirt off, if very dirty or damaged, replace it. Do not blast out the paper filter using compressed air. Do not grease it. – Attach the paper filter element to the air filter plate (4). – Set the cover (2) in place and tighten the screws (1) in the air filter plate (4). In the case of unfavourable conditions (heavy dust development), the mower must be cleaned every time it is used, otherwise after 25 operating hours or every year. (Please see original spare parts and accessories for order no. of filter element) Checking the spark plug (Illustration Y ) To check for wear, remove the spark plug connector and unscrew the spark plug. If the electrode is badly worn the spark plug must be replaced as a matter of course. (Order no. see original spare parts list and accessories). Otherwise it is sufficient to clean the spark plug and set the electrode gap to 0.5 mm (for 47-VARIO E) or 0.76 mm (for 43-VARIO E). Screw the spark plug (pay attention to sealing ring) into the engine by hand and tighten using the socket wrench. Press on spark plug connector. Replace the spark plug annually. Correct winter storage of the engine (or when not used for a long period of time) – Empty the petrol tank or allow the engine to run until it stops due to lack of fuel. – Switch off engine and disconnect spark plug cable. – Drain off the oil while the engine is still warm. Fill with fresh oil (for quantity and type, see technical data). – Clean grass and chaff from cylinder and cylinder head fins and around muffler. – Always keep the machine in a clean condition in a closed, dry room out of reach of children. 19 TROUBLESHOOTING Fault Possible cause Remedy Engine does not start
Control handle not turned down. Press the control handle onto the upper part of the bar D . Fuel tank empty. Fill up with clean and fresh fuel. Spark plug connector loose. Push plug connector in place or have it checked by an authorised workshop. Spark plug defective or soiled or electrodes worn out. Replace or clean spark plug, set electrode distance to 0.5 mm (for 47-VARIO E) or 0,76 mm (for 43-VARIO E,) Y . Too much petrol feed to engine (spark plug wet). Have it checked by an authorised workshop. Air filter soiled. Clean or replace the air filter insert W . Battery not charged. Charge battery W1 , X1 . Start-up took longer than 5 seconds or has been repeated too often. If you experience start difficulties, contrary to expectations, the battery must also be charged in between. Engine power decreasing Air filter soiled. Clean or replace the air filter insert W . Spark plug clogged with soot. Have it checked by an authorised workshop. Fuel old or soiled Empty the petrol tank and fill with fresh petrol. Engine runs irregularly Air filter dirty. Clean or replace air filter insert W . Spark plug contaminated with soot. Have it cleaned by an authorized dealer. Mower will not move forward Drive control bracket not pulled. Pull drive switch bar G . Have it checked by an authorized dealer. Drive speed cannot be regulated Have it checked by an authorized dealer Extreme vibration Have it checked by an authorized dealer Cut not clean, lawn turns yellow Cutting blade blunt. Have it sharpened and balanced by an authorised workshop Q . Cutting height too low. Set higher cutting height I . Motor speed too low. Have it checked by an authorized dealer13 Mowing speed too high. Adapt mowing speed, switch motor drive off if necessary. Insufficient overlap between mowing lanes. If grass is long, the mowing lanes may need to overlap further. Lawn matted. A perceptible improvement can be achieved by using a scarifier. Ejector blocked TurboSignal ignored J + K . Empty the collecting bag L . Engine speed too low. Have it checked by an authorized dealer Cutting height too low with grass too high. Set higher cutting height I . Mowing speed too fast. Adapt mowing speed, switch motor drive off if necessary. Grass is damp. Allow the lawn to dry. The mulched grass does not look good: clumps, excessive cut material, coarse cut Cutting blade blunt. Have it sharpened and balanced by an authorised workshop. Mulching rule ignored (cut max. 1/3 of grass height; the grass height to be cut must be less than 10 cm) Set higher cutting height I . Convert mower to rear ejection U2 + S1 and mow lawn with high cutting height first. Driving speed too high. Adapt driving speed, switch motor drive off if necessary. Grass accumulation under the mower blade. Set higher cutting height I . Insufficient overlap between mowing lanes. If grass is long, the mowing lanes may need to overlap further. Grass is damp. Set higher cutting height I . Allow the lawn to dry. In case of faults and defects which have not been listed here, please contact the nearest authorized dealer. Repairs which require specialized knowledge should only be performed by a qualified expert. Your authorized dealer will naturally also be glad to help if you do not wish to perform the maintenance work described here yourself. 20 TECHNICAL DATA Engine 47-VARIO E Engine B&S 4-stroke engine, 775iS Series DOV InStart Engine displacement 161 cm
Engine speed 2800 rpm Rated input 2.7 kW Electrode gap 0.5 mm Fuel Lead-free regular fuel, with max. 10% ethanol Tank contents approx. 1 litres Lubricating oil 4-stroke motor oil,
SAE 30, SAE 5W30, SAE 10W30
Service class SF, SG, SH, SJ or a higher-grade oil Oil quantity 0.6 litres 43-VARIO E Motor B&S 4-stroke motor, 675IS Series InStart Capacity 163 cm
Power of Device 2.6 kW Electrode gap 0.76 mm Fuel Unleaded standard petrol, with max.10% ethanol Tank capacity approx. 0.9 litres Lubricating oil SAE 30, SAE 10W30, SAE 5W30 or similar brand name oil, Minimum quality SF Oil quantity 0.4 – 0.5 litres Battery and charger All models Battery Lithium-ion battery, rechargeable Rated voltage 10.8 V DC Rated capacity 1.45 Ah Rated power 15.7 Wh Optimum performance: 0 to +45 °C Weight 288.4 g Number/type of cells: 3 x ICR 18650HB2 Typical charging time 60 minutes Charger Power supply 100 - 240 V AC, 50/60 Hz AC power input to the mains adapter 0.8 A Voltage input charging station and mower 1.45 V DC Mower 47-VARIO E Housing Die-cast aluminium Cutting width 470 mm Cutting heights Central cutting height adjustment, (15), 25, 30, 40, 45, 55, 60, 70, 80 mm Handlebar height adjustable 3 heights Volume of collecting bag 65 litres Driving speed 2.7 – 4.3 km/h Weight 39.5 kg Length 1625 mm Width 500 mm Height 935 mm Wheels front / rear Ø 180 mm / Ø 200 mm Mount front Cone bearing Mount rear Cone bearing 43-VARIO E Housing Die-cast aluminium Cutting width 430 mm Cutting heights Central, (15), 25, 30, 40, 45, 55, 60, 70, 80 mm Adjustable-height handlebar 3-way Grass collector capacity 65 litres Speed 2.5 – 4.3 km/h Weight 36.5 kg Length 1565 mm Width 500 mm Height 1025 mm Wheels front / rear Ø 180 mm / Ø 200 mm14 Bearing front Cup-and-cone bearing Bearing rear Cup-and-cone bearing Sound power level All models Guaranteed sound power level; measured according to 2000/14/EC
= 96 dB(A) Sound pressure level 47-VARIO E Emission sound pressure level at operator's workplace; measured according to EN ISO 5395-2 Measuring inaccuracy; according to ISO 4871
= 85 dB(A) 3 dB 43-VARIO E Emission sound pressure level at operator's workplace; measured according to EN ISO 5395-2 Measuring inaccuracy; according to ISO 4871
= 83 dB(A) 1,5 dB Vibrations All models Vibrations on the lawnmower’s handlebar; measured according to EN ISO5395-2 Measuring inaccuracy; according EN12096
Motor oil SA24208 Roller bearing grease SAA11300 Spark plug M78543 Air filter insert To be ordered from B&S using the number 792038 (47-VARIO E) To be ordered from B&S using the number 593260 (43-VARIO E) Lithium-ion battery To be ordered from B&S using the number
Battery charger To be ordered from B&S using the number