
45ACCU CLASSIC - Lawn mower SABO - Free user manual and instructions
Find the device manual for free 45ACCU CLASSIC SABO in PDF.
| Product type | Walk-behind lawn mower |
| Brand | SABO |
| Model | 45ACCU CLASSIC |
| Cutting width | 450 mm |
| Cutting heights | 6 positions: central, 25, 40, 55, 70, 80 mm |
| Grass catcher capacity | 60 liters |
| Weight | 23.0 kg |
| Dimensions (L × W × H) | 1380 × 530 × 1040 mm |
| Front wheels / rear wheels | 180 mm / 180 mm |
| Bearing | Tapered roller bearing |
| Motor | 40 V DC motor |
| Motor rotation speed | 2800 min⁻¹ |
| Compatible battery | Lithium-ion 4 Ah, 5 Ah or 6 Ah (models SAU15032, SAU16450, SAU17028, SAU17216, SAU17217, SAU16451, SAU17029) |
| Compatible charger | Fast charger SAU16509 or SAU15033 |
| Housing | Steel |
| Guaranteed sound power level | 94 dB(A) |
| Sound pressure level | 80 dB(A) |
| Vibrations (handlebar) | 2.2 m/s² |
| Operating temperature range | 0 to +45 °C |
| Storage temperature range | -5 to +60 °C |
| Height-adjustable handlebar | 3 levels |
| Mulching | Mulching kit included |
| Maintenance | Cleaning after each use; lubricate wheels every 15-20 hours |
| Safety | Motor stop lever, safety key, removable battery |
| Spare parts | Blades, batteries, chargers, safety key available at authorized dealer |
Frequently Asked Questions - 45ACCU CLASSIC SABO
User questions about 45ACCU CLASSIC SABO
0 question about this device. Answer the ones you know or ask your own.
Ask a new question about this device
Download the instructions for your Lawn mower in PDF format for free! Find your manual 45ACCU CLASSIC - SABO and take your electronic device back in hand. On this page are published all the documents necessary for the use of your device. 45ACCU CLASSIC by SABO.
USER MANUAL 45ACCU CLASSIC SABO
40-ACCU CLASSIC / 45-ACCU CLASSIC
DE
Rasenmäher
BETRIEBSANLEITUNG
FR
Tondeuse à gazon
LIVRET D'ENTRETIEN
EN
Lawn mower
OPERATOR'S MANUAL
NL
Grasmaaier
BEDIENINGSHANDLEIDING
ES
Cortacésped
MANUAL DEL OPERADOR
IT
Tagliaerba
MANUALE DELL'OPERATORE
SABO
SAU22103
A1 | O4 | B1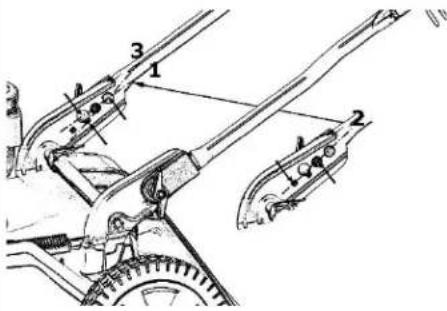 |
R1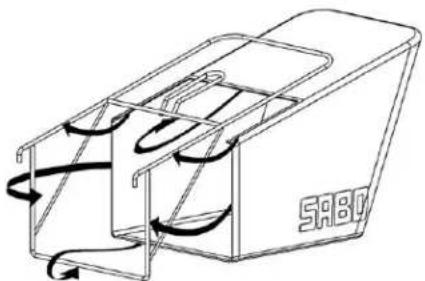 | S1 | I |
K2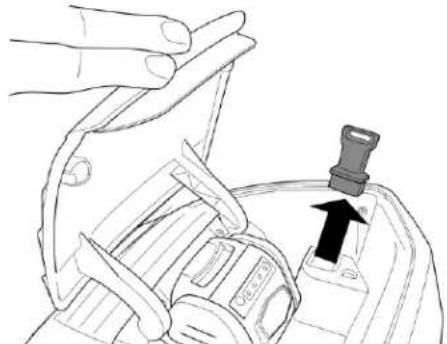 | V1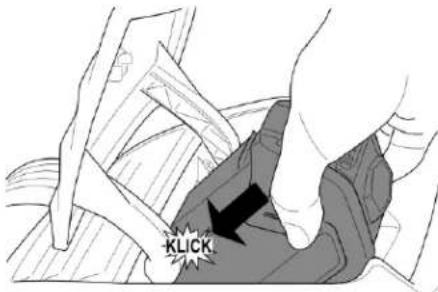 | G2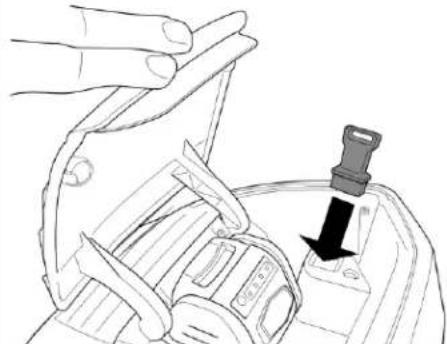 |
N2 | A2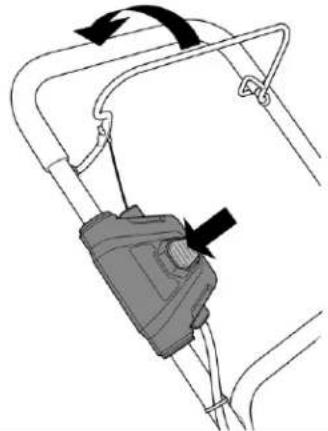 | F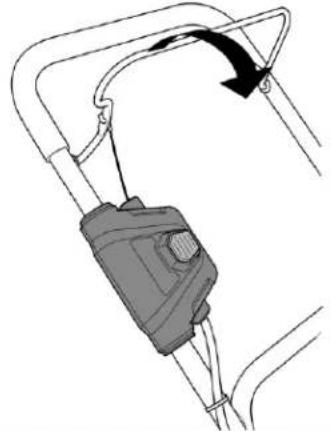 |
L | M | N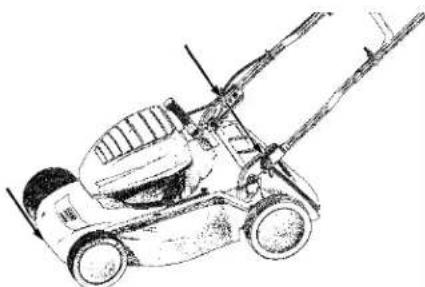 |
N4 | Q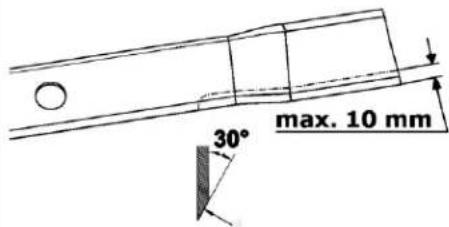 | S |
U5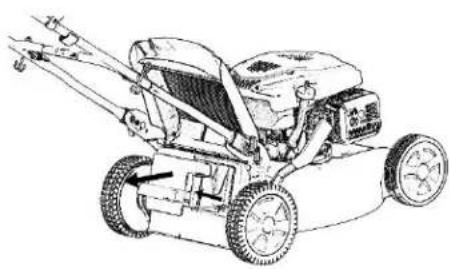 | W1 | U4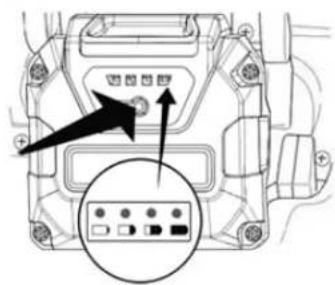 |
| DeutschOriginalbetriebsanleitung |  |
| FrançaisTraduction du mode d'emploi d'origine |  |
| EnglishTranslation of the original instruction |  |
| NederlandsVertaling van de originele gebruiksaanwijzing |  |
| EspañolTraducción de las instrucciones de uso originales |  |
| ItalianoTraduzione delle istruzioni d'uso originali |  |
DE
text_image
Collection of safety and hazard symbols including pictograms, warning signs, and vehicle iconstext_image
Collection of safety and hazard symbols including pictograms, warning signs, and vehicle iconsGeneral power tool safety warnings....2
Lawnmower safety warnings....4
1 Introduction......5
2 Explanation of the rating plate affixed to the machine 5
3 Explanation of the pictograms....5
4 Explanation of the symbols ....5
5 Proper use....6
6 General safety guidelines for the walk-behind sickle lawn mower 6
General safety information....6
Preparatory measures....6
Handling 7
Maintenance and storage....8
7 Description of components....9
8 Preparation....9
Raise the guide bar (figure A1 + O4 + B1)....9
Assembling the grass collecting bag and attaching it to the mower (figure R1 + S1) 9
Adjusting the cutting height (figure 1) 9
Inserting the charged battery (figure K2 + V1 + G2)....9
Removing the battery (figure F + K2 + N2)....10
9 Before initial use ....10
Charge the battery....10
Battery level indicator (figure U4)....10
10 Starting the engine (Figure G2 + D)....10
11 Switching off the engine (figure F + K2)....10
12 Emergency stopping....10
13 Grass collector....10
Operation with grass collecting bag....10
Emptying the grass collecting bag (figure F + K2 + L)....11
Operation without grass collecting bag....11
14 Mowing....11
Using the machine on slopes....11
Checking operating safety....11
Time restrictions....11
Tips on caring for your lawn (figure M) 11
Mulching 11
Converting to mulch mower (figure F + K2 + U5) 11
15 Service intervals....12
16 Care and servicing for your mower....12
Cleaning 12
Storage 12
Collapsing the guide bar (figure A1)....12
Transporting and securing the device (figure N + N4)....12
Servicing the cutter bar 12
Regrinding and balancing of the cutter bar (figure Q)....13
Changing the cutter bar....13
Servicing the wheels (figure S) 13
Customer service....13
17 Troubleshooting....13
18 Technical data....14
Engine....14
Charger....14
Battery 14
Mower 14
Sound power level....14
Sound pressure level....14
Vibrations....14
19 Original spare parts and accessories....14
Declaration of Conformity .... See the back, after the last language
General power tool safety warnings
WARNING Read all safety warnings, instructions, illustrations and specifications provided with this power tool. Failure to follow all instructions listed below may result in electric shock, fire and/or serious injury.
Save all warnings and instructions for future reference.
The term "power tool" in the warnings refers to your mains-operated (corded) power tool or battery-operated (cordless) power tool.
1) Work area safety
a) Keep work area clean and well lit. Cluttered or dark areas invite accidents.
b) Do not operate power tools in explosive atmospheres, such as in the presence of flammable liquids, gases or dust. Power tools create sparks which may ignite the dust or fumes.
c) Keep children and bystanders away while operating a power tool. Distractions can cause you to lose control.
2) Electrical safety
a) Power tool plugs must match the outlet. Never modify the plug in any way. Do not use any adapter plugs with earthed (grounded) power tools. Unmodified plugs and matching outlets will reduce risk of electric shock.
b) Avoid body contact with earthed or grounded surfaces, such as pipes, radiators, ranges and refrigerators. There is an increased risk of electric shock if your body is earthed or grounded.
c) Do not expose power tools to rain or wet conditions. Water entering a power tool will increase the risk of electric shock.
d) Do not abuse the cord. Never use the cord for carrying, pulling or unplugging the power tool. Keep cord away from heat, oil, sharp edges or moving parts. Damaged or entangled cords increase the risk of electric shock.
e) When operating a power tool outdoors, use an extension cord suitable for outdoor use. Use of a cord suitable for outdoor use reduces the risk of electric shock.
f) If operating a power tool in a damp location is unavoidable, use a residual current device (RCD) protected supply. Use of an RCD reduces the risk of electric shock.
3) Personal safety
a) Stay alert, watch what you are doing and use common sense when operating a power tool. Do not use a power tool while you are tired or under the influence of drugs, alcohol or medication. A moment of inattention while operating power tools may result in serious personal injury.
b) Use personal protective equipment. Always wear eye protection. Protective equipment such as a dust mask, non-skid safety shoes, hard hat or hearing protection used for appropriate conditions will reduce personal injuries.
c) Prevent unintentional starting. Ensure the switch is in the off-position before connecting to power source and/or battery pack, picking up or carrying the tool. Carrying power tools with your finger on the switch or energising power tools that have the switch on invites accidents.
d) Remove any adjusting key or wrench before turning the power tool on. A wrench or a key left attached to a rotating part of the power tool may result in personal injury.
e) Do not overreach. Keep proper footing and balance at all times. This enables better control of the power tool in unexpected situations.
f) Dress properly. Do not wear loose clothing or jewellery. Keep your hair and clothing away from moving parts. Loose clothes, jewellery or long hair can be caught in moving parts.
g) If devices are provided for the connection of dust extraction and collection facilities, ensure these are connected and properly used. Use of dust collection can reduce dust-related hazards.
h) Do not let familiarity gained from frequent use of tools allow you to become complacent and ignore tool safety principles. A careless action can cause severe injury within a fraction of a second.
4) Power tool use and care
a) Do not force the power tool. Use the correct power tool for your application. The correct power tool will do the job better and safer at the rate for which it was designed.
b) Do not use the power tool if the switch does not turn it on and off. Any power tool that cannot be controlled with the switch is dangerous and must be repaired.
c) Disconnect the plug from the power source and/or remove the battery pack, if detachable, from the power tool before making any adjustments, changing accessories, or storing power tools. Such preventive safety measures reduce the risk of starting the power tool accidentally.
d) Store idle power tools out of the reach of children and do not allow persons unfamiliar with the power tool or these instructions to operate the power tool. Power tools are dangerous in the hands of untrained users.
e) Maintain power tools and accessories. Check for misalignment or binding of moving parts, breakage of parts and any other condition that may affect the power tool's operation. If damaged, have the power tool repaired before use. Many accidents are caused by poorly maintained power tools.
f) Keep cutting tools sharp and clean. Properly maintained cutting tools with sharp cutting edges are less likely to bind and are easier to control.
g) Use the power tool, accessories and tool bits etc. in accordance with these instructions, taking into account the working conditions and the work to be performed. Use of the power tool for operations different from those intended could result in a hazardous situation.
h) Keep handles and grasping surfaces dry, clean and free from oil and grease. Slippery handles and grasping surfaces do not allow for safe handling and control of the tool in unexpected situations.
5) Battery tool use and care
a) Recharge only with the charger specified by the manufacturer. A charger that is suitable for one type of battery pack may create a risk of fire when used with another battery pack.
b) Use power tools only with specifically designated battery packs. Use of any other battery packs may create a risk of injury and fire.
c) When battery pack is not in use, keep it away from other metal objects, like paper clips, coins, keys, nails, screws or other small metal objects, that can make a connection from one terminal to another. Shorting the battery terminals together may cause burns or a fire.
d) Under abusive conditions, liquid may be ejected from the battery; avoid contact. If contact accidentally occurs, flush with water. If liquid contacts eyes, additionally seek medical help. Liquid ejected from the battery may cause irritation or burns.
e) Do not use a battery pack or tool that is damaged or modified. Damaged or modified batteries may exhibit unpredictable behaviour resulting in fire, explosion or risk of injury.
f) Do not expose a battery pack or tool to fire or excessive temperature. Exposure to fire or temperature above 130 °C (265 °F) may cause explosion.
g) Follow all charging instructions and do not charge the battery pack or tool outside the temperature range specified in the instructions. Charging improperly or at temperatures outside the specified range may damage the battery and increase the risk of fire.
6) Service
a) Have your power tool serviced by a qualified repair person using only identical replacement parts. This will ensure that the safety of the power tool is maintained.
b) Never service damaged battery packs. Service of battery packs should only be performed by the manufacturer or authorized service providers
Lawnmower safety warnings
a) Do not use the lawnmower in bad weather conditions, especially when there is a risk of lightning. This decreases the risk of being struck by lightning.
b) Thoroughly inspect the area for wildlife where the lawnmower is to be used. Wildlife may be injured by the lawnmower during operation.
c) Thoroughly inspect the area where the lawnmower is to be used and remove all stones, sticks, wires, bones, and other foreign objects. Thrown objects can cause personal injury.
d) Before using the lawnmower, always visually inspect to see that the blade and the blade assembly are not worn or damaged. Worn or damaged parts increase the risk of injury.
e) Check the grass catcher frequently for wear or deterioration. A worn or damaged grass catcher may increase the risk of personal injury.
f) Keep guards in place. Guards must be in working order and be properly mounted. A guard that is loose, damaged, or is not functioning correctly may result in personal injury.
g) Keep all cooling air inlets clear of debris. Blocked air inlets and debris may result in overheating or risk of fire.
h) While operating the lawnmower, always wear non-slip and protective footwear. Do not operate the lawnmower when barefoot or wearing open sandals. This reduces the chance of injury to the feet from contact with the moving blade.
i) While operating the lawnmower, always wear long trousers. Exposed skin increases the likelihood of injury from thrown objects.
j) Do not operate the lawnmower in wet grass. Walk, never run. This reduces the risk of slipping and falling which may result in personal injury.
k) Do not operate the lawnmower on excessively steep slopes. This reduces the risk of loss of control, slipping and falling which may result in personal injury.
I) When working on slopes, always be sure of your footing, always work across the face of slopes, never up or down and exercise extreme caution when changing direction. This reduces the risk of loss of control, slipping and falling which may result in personal injury.
m) Use extreme caution when reversing or pulling the lawnmower towards you. Always be aware of your surroundings. This reduces the risk of tripping during operation.
n) Do not touch blades and other hazardous moving parts while they are still in motion. This reduces the risk of injury from moving parts.
o) When clearing jammed material or cleaning the lawnmower, make sure all power switches are off and the battery pack is disconnected. Unexpected operation of the lawnmower may result in serious personal injury.
p) When clearing jammed material or cleaning the lawnmower, make sure all power switches are off and remove the key. Unexpected operation of the lawnmower may result in serious personal injury.
EN
1 INTRODUCTION
Dear garden lover,
Where pride in a trim lawn is coupled with a love of gardening, gardeners really appreciate good gardening equipment. You have made an excellent choice in purchasing your new lawn mower. It combines the power of a major traditional brand with the innovations of modern high-tech. You will feel this when you are working with it and be very pleased with the wonderful result.
Yet before you start work on your lawn, here is some important information that you should always observe.
Before you start your mower for the first time, read these operating instructions through carefully to familiarise yourself with the correct operation and maintenance of the machine and to avoid injury or damage to your lawn mower.
Read and follow the separate operating instructions of the charging device supplied as well, particularly the safety information.
Use the lawn mower carefully. The pictograms on the device draw your attention to the most important precautionary measures.
The safety information in these operating instructions is marked with symbols.
The meaning of the pictograms and symbols is explained in the following chapters.
The terms "left" and "right" always refer to the left and right-hand side of the device seen in the direction of movement.
Your lawn mower will work reliably when the technical instructions are followed exactly. We would like to point out that any damage to the mower caused by operating faults is not covered by warranty / guarantee obligations.
We hope you enjoy cultivating your lawn.
2 EXPLANATION OF THE RATING PLATE AFFIXED TO THE MACHINE

text_image
1 2 3 4 5 LWA dB Product Identification Number * IPX 1 min⁻¹ kW 6 10 9 WBM SABO Maschinenfabrik Gmt Auf dem Höchsten 22 D-51645 Gummersbach 14 13 11 12 8 71 Protection class
2 Production identification number
3 Protection class III symbol
4 Rated speed
5 Model
6 Performance
7 Rated voltage
8 This device does not belong in household waste. Recycle devices, accessories and packaging in an environmentally friendly manner
9 Weight
10 DC voltage symbol
11 CE conformity mark
12 Model year
13 Walk-behind lawn mower
14 Guaranteed sound power level
15 Serial number
These operating instructions apply for the following models:
40-ACCU CLASSIC (SA401023): Cutting width 400 mm
45-ACCU CLASSIC (SA401523): Cutting width 450 mm
Please see the rating plate for the correct model name for your device, as well as the serial number.
The section under a heading in italics and underlined is valid until the next heading marked in this way for the respective model.
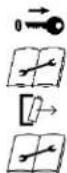
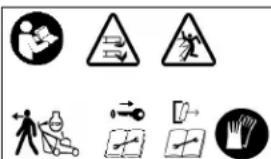
3 EXPLANATION OF THE PICTOGRAMS
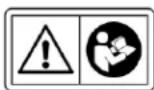
Read and follow the operating instructions and safety information!
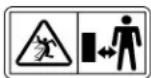
Risk caused by thrown elements when the engine is running – observe the safety distance / Keep all persons outside the danger area!

Keep the power cable away from the cutting tool.

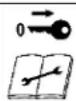
Watch out for sharp blades! Avoid contact with rotating cutter bar! Please make sure that hands and feet do not get under the housing! - Stop the engine and remove the safety key and battery before carrying out cleaning and maintenance work.

Batteries and chargers do not belong in household waste. Hand the battery or charger over to your dealer or take them to a public collection point.

Engine STOP
This device does not belong in household waste. Recycle devices, accessories and packaging in an environmentally friendly manner.
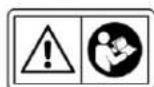
4 EXPLANATION OF THE SYMBOLS
 | WARNINGAlways read and follow the operating instructions and general safety regulations carefully. Keep the operating instructions for reference purposes.Proper use also includes adherence to the operation, maintenance and service conditions prescribed by the manufacturer. |
 | WARNINGKeep your distance / Keep all persons outside the danger area!Contact with the rotating cutter bar can cause severe injuries.Objectsejected at high speed can cause severe injury.You must never mow the lawn if there are other persons nearby, especially children, or animals. |
 | WARNINGElectric shock can lead to serious injuries.The electrical equipment may not be altered.Read and observe the safety information regarding handling of the battery and charger in the separate operating instructions for the charger!Do not spray the device with water. The electrical system may be damaged. |
 | WARNINGElectric shock can lead to serious injuries.Never drive over live wires when the cutting tool is switched on.Before and during the mowing process, check the area for live wires and remove them, if possible.If a live wire is damaged, switch off the device and disconnect the wire from the supply grid. |

WARNING
Watch out for sharp blades! Contact with the rotating cutter bar can cause severe foot injuries.
Only start the engine when standing behind the mower.
Ensure that your feet do not get under the housing.

WARNING
Watch out for sharp blades! Contact with the rotating cutter bar can cause severe hand and foot injuries.
When the engine/blade is running, always observe the safety distance to the machine which is maintained by the guide bar. Ensure that your hands and feet do not get under the housing.

WARNING
Objects ejected at high speed can cause severe injury.
Before mowing areas covered in leaves in particular, remove all stones, sticks, wires, toys and other objects from the lawn.
Never use the equipment with the protective devices damaged or missing.
Missing or damaged safety and protective devices are a safety hazard for both you and other people.
Before initial use, check the fastening of the blade screw; afterwards, check the cutter bar for a tight fit, wear and damage before every mowing. Have an authorised workshop replace worn or damaged blades. Have an authorised workshop tighten the blade screw.
WARNING
If the safety key and battery are not removed when carrying out work on the device, the engine may start accidentally and serious injuries would be the consequence.
Contact with the rotating cutter bar can cause severe hand and foot injuries. Objects ejected at high speed can cause severe injury.

Please always keep in mind that the cutter bar still runs for a short time after you let go of the engine stop safety control bar.
Switch off the engine and wait until the cutting tool has come to a standstill, remove the safety key and battery:
– before maintenance and repair work;
- when the mower needs lifting or tilting e.g. for transportation;
- when driving outside the lawn on paths or streets;
- when transporting the machine to and from the area to be mown;
– before removing or attaching the grass collecting bag;
- before the mulch plug is inserted into or removed from the ejection channel;
- if the machine is left unsupervised;
- before the battery is removed from or inserted into the engine's battery compartment!
For the appropriate cleaning or maintenance tips, consult the operating instructions.
Insufficient device maintenance will lead to safety-related faults.

WARNING
Contact with the rotating cutter bar can cause severe hand and foot injuries. Objects ejected at high speed can cause severe injury.
Switch off the engine and wait until the cutting tool has come to a standstill:
– before the cutting height is set;
– before removing the grass collecting bag!

CAUTION
Contact with the sharp edges of the cutter bar and other sharp edges of the device may cause injuries.
Protective gloves must be worn at all times during maintenance and cleaning work.
5 PROPER USE
- The device is intended solely for mowing grass and lawn surfaces in the course of normal garden and landscaping care ("Proper use"). Any further form of use constitutes improper use; the manufacturer accepts no liability for any resulting damage; the risk is borne solely by the user. Proper use also includes adherence to the operation, maintenance and service conditions prescribed by the manufacturer.
- If used in public areas, parks, sports grounds, on roads and in agricultural and forest areas, special care must be taken.
- The mower must particularly not be used for trimming bushes, hedges and shrubs, for cutting creepers or vegetation on roofs and in balcony boxes, for sucking and/or blowing off pavements.
- The use of any additional equipment and attachments not approved by the manufacturer is prohibited. If such additional equipment and attachments are used, the CE conformity and guarantee are considered null and void. Unauthorised modifications to this lawn mower exclude the manufacturer from liability for any damage resulting from these modifications.
6 GENERAL SAFETY GUIDELINES FOR THE WALK-BEHIND SICKLE LAWN MOWER
General safety information

For your own safety and in order to ensure that the machine functions correctly, please read these operating instructions carefully. Acquaint yourself with the controls and the correct use of the machine. Keep the operating instructions for reference purposes.
- Please remember that the person operating or using the machine bears full responsibility not only for possible risks to other people or their property, but also for accidents which occur whilst using the machine.
• These operating instructions are part of the scope of supply of the machine and must be handed over to the purchaser of the device in the event of resale. - Never allow children or persons under the age of 16 or other persons who are not familiar with the operating instructions to use the machine. Local regulations can determine the minimum age of the person allowed to use the machine.
- Please explain the possible dangers and how to prevent accidents to every person who is supposed to work with the device. This device may only be used, maintained or serviced by persons who are familiar with the device, and who are aware of the possible dangers.
- This device is not meant to be used by persons with restricted physical, sensory or mental capabilities or lacking in experience and/or knowledge, unless they are accompanied by a person responsible for their safety and unless they received instructions from the person on how the device is to be used. This responsible person must decide in advance whether the person with restricted physical, sensory or mental capabilities is suitable for this activity.

You must never mow the lawn if there are other persons nearby, especially children, or animals.
- Please keep your machine in a safe place! Always keep unused devices in a dry, closed room with the safety key removed and without the battery inserted, and keep out of reach of children.
• Machine safety and protective devices must not be manipulated or disabled! - The laying of cables must not be manipulated, e.g. by removing cable clamps or attaching additional cable ties! The cables must lie against the outside of the bar in such a way that they are neither crushed nor overstretched when the bar is folded. A damaged cable may result in a technical defect of the device.
Preparatory measures
- When mowing you must always wear a strong, closed, non-slip pair of shoes or safety shoes and long trousers. Avoid wearing loose clothing or clothing with cords or belts hanging down. Do not mow whilst you are barefooted or wearing sandals. Wear protective goggles to protect your eyes.
- Loud noises can lead to hearing impairments. We recommend wearing hearing protection.
EN

Before and during mowing, check the whole area the device is being used on and remove all stones, sticks, wires, toys and other objects which can be caught and catapulted out.

Before and during the mowing process, check the area for live wires and remove them, if possible.
Never drive over live wires when the cutting tool is switched on. Risk of electric shock!
If a live wire is damaged, switch off the device and disconnect the wire from the supply grid.
- If you also use a mowing robot for lawn care, the following safety information must be heeded with regard to the working area of the mowing robot:
- Before mowing on these areas, always check the range of the boundary wire.
- If the wires are laid in the ground, they must be checked. No wires may be visible, particular attention is advised at the charging station.
- If the boundary wires are laid above ground, they should be routed tight directly on the ground and not lie loose in the grass. The wires must be sufficiently fixed using boundary staples, see the operating manual.
- The boundary staples must not project, if this is the case, push them firmly in place.
- Remove any residual wires before mowing. In the cases described above, there is a risk of the wire being pulled in and wound up by the tool; this can lead to serious injury.
- Low-hanging branches and similar obstacles can injure the operator or interfere with the mowing operation. Cables may snag and be damaged or torn off. A damaged cable may result in a technical defect of the device. Before and during mowing, identify potential obstacles such as low-hanging branches, and trim back or remove those obstacles.

The electrical equipment may not be altered. Read and observe the safety information regarding handling of the battery and charger in the separate operating instructions for the charger!
- Before use, check by visual inspection whether the cutting tool, fastening screws and the entire cutting unit are worn or damaged. In order to avoid unbalance, worn or damaged blades and fastening screws must be replaced by an authorised workshop.
- The condition of the pictograms must be checked every time the device is used. Worn or damaged pictograms must be replaced.
Handling
- The charger supplied may only be used for the batteries belonging to the lawn mower.
The batteries likewise may not be charged with any other charger. You may endanger yourself or damage your device.
Only use the lawn mower with batteries which are approved for it.
Improper use of batteries and the charger can cause electric shocks or fires.
Approved chargers and batteries: see chapter "Original spare parts and accessories".
- The device must not be operated in potentially explosive surroundings.
- Do not mow in bad weather when lightning could strike.
- Do not expose the device to rain or moisture.
- Do not wear radio or music headphones. Safe service and operation requires your full attention.
- Only use the mower during daylight or if the lighting is good. Always push the machine at walking pace.
- Adjust the driving speed to the person and terrain. Slowly increase the speed until you have reached your suitable driving speed.
• Take care when approaching blind corners, shrubs, trees, or other obstacles that may obscure vision. -
Do not move too closely to holes, trenches and banks. The equipment can suddenly topple over when a wheel suddenly gives way over the edge of a trench or a bank or when an edge suddenly yields.
• Take care when mowing under play equipment (e.g. swings). The device may end up in a precarious position. This may result in risk of injury. -
Do not operate the equipment when you are sick, tired or under the influence of alcohol, medicine or drugs.
- Avoid using the device on wet grass, if possible. Otherwise there may be a risk of slipping.
-
Always make sure that you have a firm stance whilst using the scarifier on slopes. Always work at right angles to the slope, never straight up or down. Please be especially careful when you change direction when using the scarifier on a slope.
-
Do not mow excessively steep slopes! Mowing slopes always comes with additional risks. Always make sure you have a firm stance. Walk-behind lawn mowers should never be used for slopes with a gradient in excess of 26% (15° angle of slope). Stability may be lost.
- Please be especially careful when turning the device or pulling it towards yourself.
- If you walk backwards whilst using the machine, you can easily stumble. Avoid walking backwards. Avoid unnatural body positions. Ensure that you have a firm stance and keep your balance at all times.
- Always observe the safety distance to the machine which is maintained by the guide bar.
- In order to avoid the machine slipping when being carried, always hold the machine by the grip devices provided (housing, handlebar ends or transverse bar of the lower guide bar section). Do not grasp the machine by the ejection flap!
- Note the weight of the machine before lifting or carrying it (see "Technical data"). Lifting large weights can result in health problems.
- Never lift or carry the machine when the engine is running.
- Never use the machine with damaged or missing safety and protective devices. Missing or damaged safety and protective devices are a safety hazard for both you and other people.
The safety devices include (see chapter "Description of components"):

– Engine stop safety control bar (1)
The lawn mower is fitted with an engine stop device. During operation and in the event of a hazard, the engine is switched off by releasing the engine stop safety control bar.
The blade must come to a standstill within 3 seconds.
After release, the safety control bar must always return to the position shown in the "Description of components" diagram. If this is not the case, it must be checked immediately by an authorised workshop.
Risk of injury!
If the stopping time of the blade is longer, stop using the device and take it to an authorised workshop.
Measuring the stopping time
After starting the engine, the blade rotates and a wind noise can be heard.
The stopping time corresponds to the duration of the wind noise after the engine has been switched off; it can be measured with a stopwatch.
The function of the safety control bar must never be put out of operation.
It is important to make sure that the safety control bar functions correctly. If the safety control bar is not working properly, have it repaired by an authorised specialist workshop.
- Battery (3) and safety key (4)
This safety device protects against injuries resulting from unintentional starting of the engine.
In order to prevent unauthorised operation of the machine, the safety key and battery must be removed for all work on the machine, before maintenance and repair work, if you intend to leave the machine and during storage.


The protective devices include (see chapter "Description of components"):

– Housing, grass collecting bag, ejection flap (2)
These protective devices protect against injuries from objects that are thrown upwards.
The device must not be operated with a damaged housing or without a properly fitted grass collecting bag or ejection flap on the housing.

- Housing
This protective device protects against injuries through contact with the rotating cutter bar.
The device must not be operated with a damaged housing. Ensure that your hands and feet do not get under the housing.
The protective devices must not be modified.

When you start the machine, make sure that your feet are at a sufficiently safe distance away from the cutting tool.

When the engine is started, the machine must not be tilted on end, if necessary it must be tilted by pressing the guide bar down so that the cutting tool is pointing in the direction away from the user, but only as far as absolutely necessary. As long as the device does not have all 4 wheels on the ground, both of your hands must be on the top part of the bar.
Do not start the engine when people or animals are standing in front of the mower.

Never put your hands or feet near or under revolving parts.
Always make sure that your hands or feet do not get under the housing.

Switch the engine off by releasing the engine stop safety control bar, and make sure that all moving parts have come to a complete standstill and the safety key and battery are removed:
- if you have to leave the machine unsupervised;
– before you inspect, clean or carry out work on the machine;
- when you have to lift or tilt the machine, e.g. for transportation;
- when you need to transport the machine to and from the area to be mown;
- before you remove the battery from or insert it into the engine's battery compartment!
– before you remove or attach the grass collecting bag;
– before the mulch plug is inserted into or removed from the ejection channel;
- when driving off the lawn;
– before unblocking jams or removing blockages in the ejection channel;
- if a foreign body has been encountered;
- if a fault occurs;
- if the machine starts to vibrate strangely.
- If a foreign object has been encountered or if the machine becomes blocked, e.g. by driving onto an obstacle, an authorised workshop must check whether parts of the device have been damaged or deformed. Always have any necessary repairs done by an authorised workshop too.
- If the machine starts to vibrate unusually heavily or to make unusual noises, please have it checked immediately by an authorised workshop.
Heavy vibrations on your hands can damage your health. Please contact an authorised workshop immediately if heavy vibrations occur.

Switch the engine off by releasing the engine stop bar, make sure that all moving parts have come to a complete standstill,
- if you want to adjust the cutting height;
– before you remove the grass collecting bag.
- WARNING
The noise level and the vibration value stated in the operating instructions have been determined according to the standard. These may differ from these values during the actual use of the machine. This depends on the way in which the machine is used.
It is necessary to define safety measures to protect the operating personnel which are based on an estimation of the vibration load during the actual conditions of use. In doing this, all parts of the operating cycle must be taken into account, for instance times in which the machine is switched off or switched on, but running without load.
The use of unbalanced cutting tools, excessive speed of movement, or insufficient maintenance have a significant influence on noise emissions and vibrations. Consequently, it is necessary to take preventive steps to eliminate possible damage due to high levels of noise and stress from vibration.
Maintain the machine well, wear ear protection devices, and take breaks while working.
Adhere to the maintenance work listed in this operating manual and have the device checked and serviced regularly by an authorised workshop.
Maintenance and storage
• Insufficient device maintenance will lead to safety-related faults.
- Ensure that all screws have been tightened securely and that the device is in a safe working condition.

The ejection flap must only be opened and the grass collecting bag or mulch plug removed when the engine is turned off and the cutter bar is at a standstill.

Before you start mowing, always check the grass collecting equipment for wear or loss of functionality.

Before using the machine, always check the condition and firm seating of the blade. The blade fastening screw must always be tightened by an authorised workshop. If the blade screw is tightened excessively or insufficiently, blade fastening and cutter bar may be damaged or get loose, which can lead to serious injuries. A worn or damaged blade must imperatively be replaced.
The replacement, regrinding and balancing of the blade must be carried out by an authorised workshop.
Due to an incorrectly assembled blade fastening, the cutter bar may become loose, which can lead to serious injuries.
An incorrectly ground and unbalanced blade can cause strong vibrations and damage the lawn mower.
- For reasons of safety, always replace worn or damaged parts.
- Do not clean the device under running water or with high-pressure cleaning devices. The electrical system may be damaged.

Protective gloves must be worn at all times during maintenance and cleaning work.
- When handling operating fluids, such as lubricants, suitable protective equipment (e.g. suitable protective gloves) must be worn.
The data sheets of the operating fluids must be observed.

Maintenance and cleaning work may only be carried out on even surfaces with the engine switched off and the safety key and battery removed.
Regular maintenance is essential for safety and top performance.

EN
Always store the device in a clean and well-serviced state in a closed, dry room and inaccessible to children.
Before storing the machine, always remove the battery and the safety key in order to prevent unauthorised operation of the machine.
For reasons of warranty and safety, only genuine spare parts may be used. Non-equivalent spare parts can damage the machine and are a safety hazard.
7 DESCRIPTION OF COMPONENTS
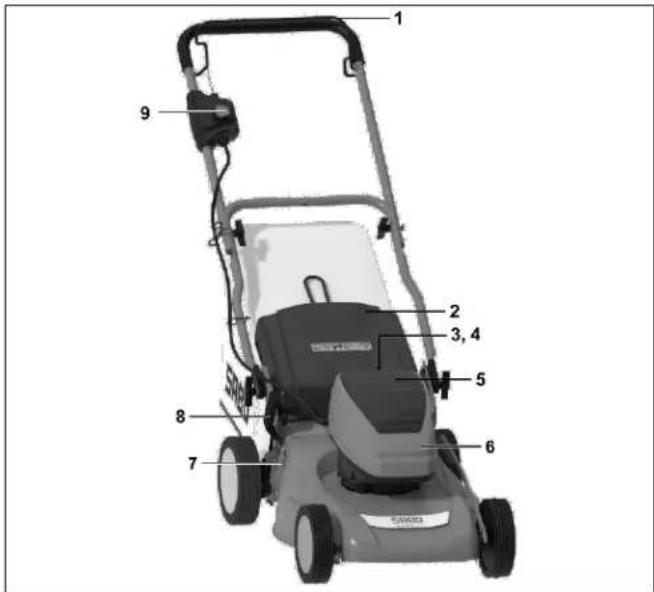
text_image
1 2 3, 4 5 6 7 8 91 Operating clamp for engine (safety control bar)
2 Ejection flap
3 Battery (under the battery cover)
4 Safety key (under the battery cover)
5 Battery cover
6 Engine hood
7 Cutting height notches
8 Adjusting handle for cutting height adjustment
9 Start button (red)
8 PREPARATION
The following parts are included in the packaging for assembly of the mower:
- Mower with preassembled guide bar
• Collector sheet, grass collector frame -
Tool bag with the following contents:
-
Operating instructions with declaration of conformity
– Warranty conditions (depending on model) - Various fixing parts.
• Mulch plug (only 45-ACCU CLASSIC)
In the unlikely event of a missing part, please contact your dealer.
Raise the guide bar (figure A1 + O4 + B1)
IMPORTANT
Make sure that the cables are not pinched, squeezed, twisted or overstretched when the guide bars are folded apart or collapsed! Always run the cables along the outside of the bar connection. A damaged cable may result in a technical defect of the device.
Open out the Z-shaped, folded guide bar by pulling upwards in the following order:
- First, lift up the lower guide bar section A1, push the lower part ends so far apart that the locking cams pointing inwards on both sides lock into the corresponding bores B1.
Three different handlebar heights can be set.
To set a different bar height, the wing nuts must be removed, the screws must be pulled out completely and inserted into the corresponding rectangular holes. The holes and bores for the lowest and highest height adjustment are in each case one level above the holes and bores of the medium height adjustment.
Caution: After the screws have been pulled out, the handlebar can turn over unintentionally.
- Manually tighten the wing nuts on both sides B1.
- Lift the upper guide bar section until upper and lower section of the guide bar are at one level.
(Figure 04)
- When the upper and lower section of the guide bar are at one level, tighten the wing nuts manually.
- Insert the cable into the cable guide and use the cable ties from the tool bag to help you attach it to the upper and lower parts of the guide bar. Lay the cable on the outside of the bar so that the ejection flap can move freely when you raise and close it.
When collapsing the upper part of the bar, ensure that the cable is freely accessible.
CAUTION
When operating the bar height adjustment, the bar may turn over unintentionally when loosening the wing nuts B1 to fasten the lower bar section at the housing and disengaging the locking cams from the bores in the housing. In addition, there may be pinching points between lower bar section and housing. This may result in risk of injury!
Assembling the grass collecting bag and attaching it to the mower (figure R1 + S1)
- Insert the grass collector frame into the collector sheet with the bar to the front. Align the top seam of the collector sheet with the bar.
- Press the retaining profiles onto the frame of the grass collector frame R1.
- Open the ejection flap of the mower upwards.
- Pick up the grass collecting bag by the carrying strap and hang in the grass collecting bag at the top of the mower housing with its two side hooks S1.
- Attach the ejection flap to the collecting bag.
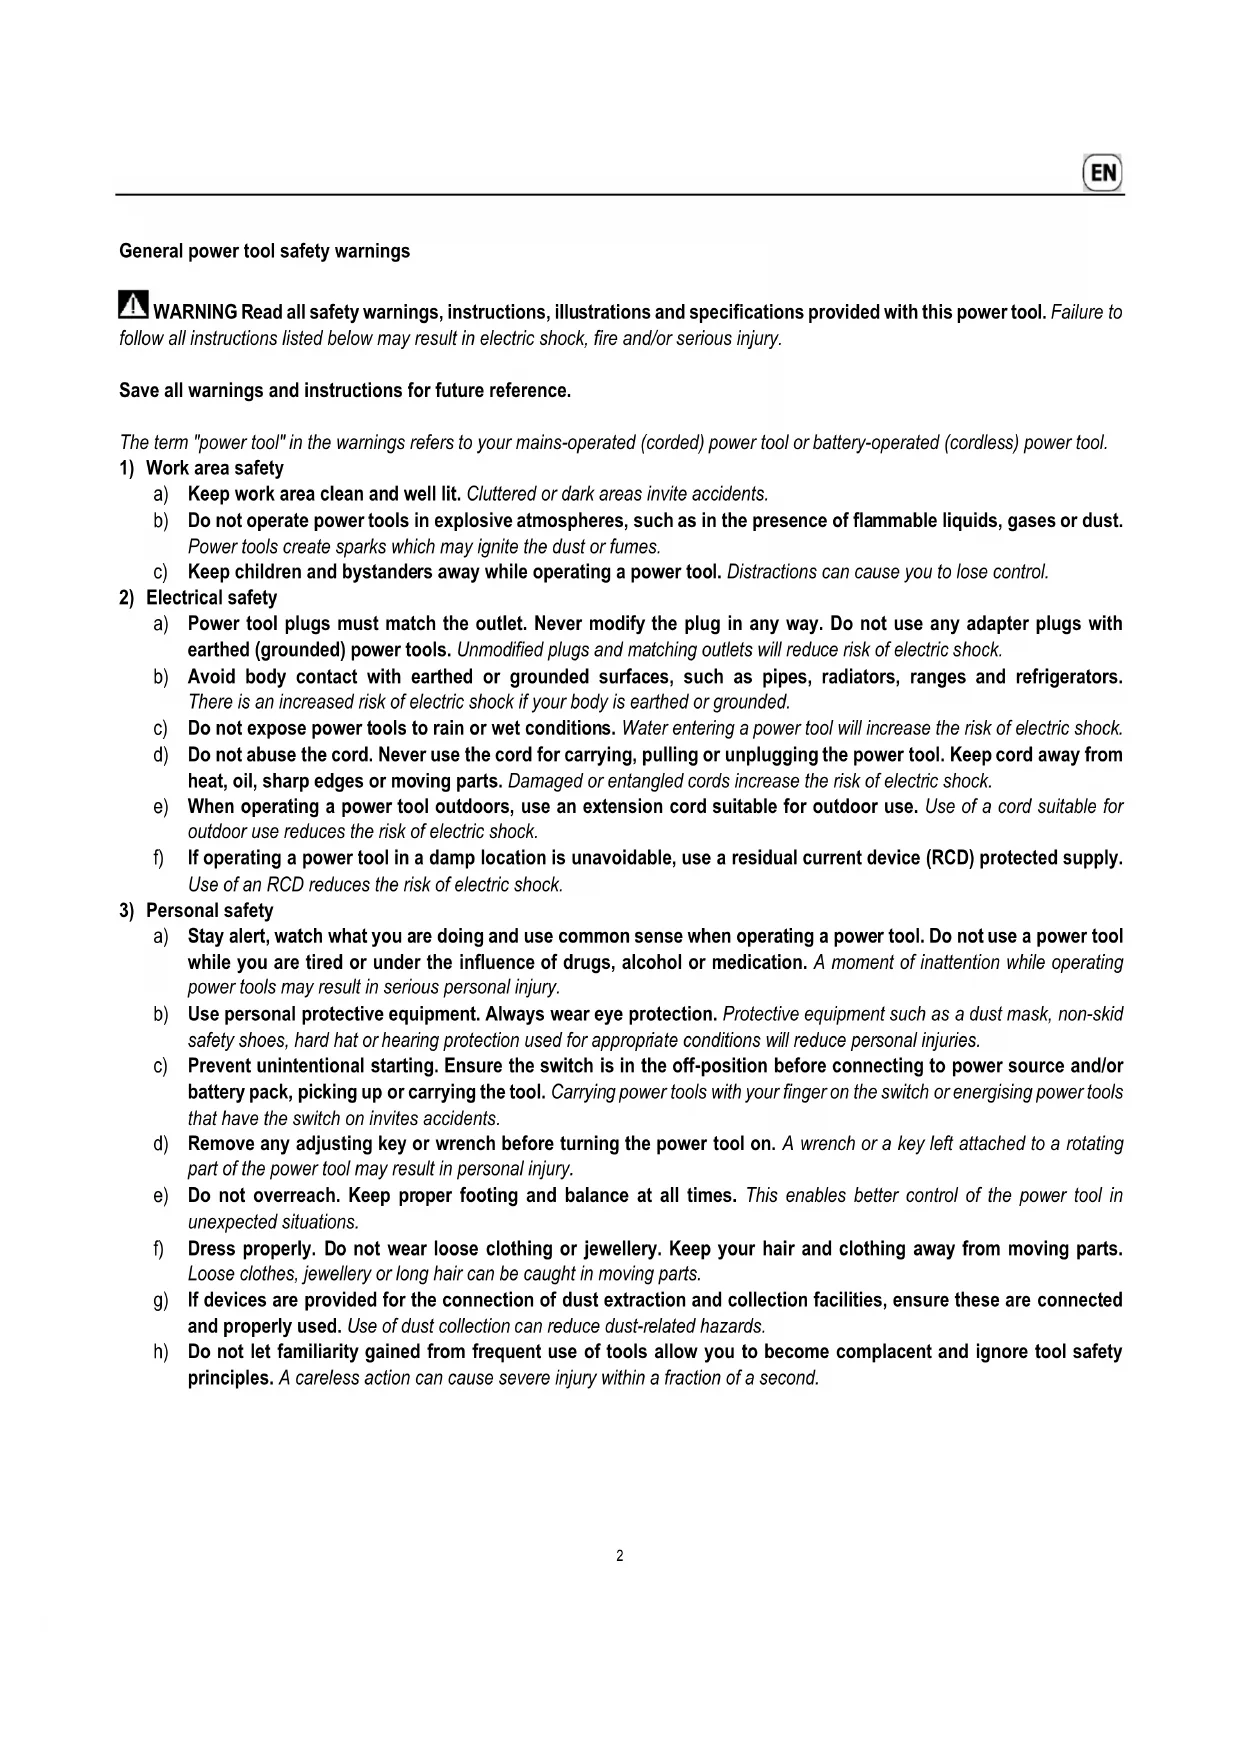
Adjusting the cutting height (figure 1)


Safety information!
For explanation of symbols, see the table on page 2
Your desired cutting height is set with the one-hand adjusting lever (1) on the right side of the mower.
- Bend the lever so far from the housing that the locking cam disengages from the bore and engages again in the desired position after lateral rotation.
IMPORTANT
You should only use your mower at the lowest cutting height on even and flat lawn surfaces! Please note that the lower cutting height settings are only to be used under optimum conditions. If your selected cutting height is too low, the sward may be damaged and even destroyed.
In addition to the cutting height, the driving speed also influences the cutting pattern and the collection result. Adjust the cutting height and the driving speed to the grass height to be cut.
Inserting the charged battery (figure K2 + V1 + G2)
The handling of the charger and battery is described in the separate operating manual for the charger. In particular, read and follow the safety information! Charge the battery fully before initial use!
- Open the battery cover and hold it open.
- Remove the safety key K2.
- Push the battery into the battery compartment until the lock engages V1 Ensure that the lock on the battery moves freely and engages cleanly.
- Insert the safety key if the machine is being used immediately G2.
- Close the battery cover. Ensure that the cover closes automatically. Dirt and grass residue can prevent this and must therefore be removed.
Removing the battery (figure F + K2 + N2)
- Switch off the engine F.
- Open the battery cover and hold it open.
- Remove the safety key K2.
- Press and hold the release button on the front of the battery and remove the battery from the battery compartment N2.
- For easier battery removal, press it into the battery compartment slightly before pulling it out. Keep the release button pressed while doing this. The built-in springs facilitate easier removal.
- Close the battery cover. Ensure that the cover closes automatically. Dirt and grass residue can prevent this and must therefore be removed.
9 BEFORE INITIAL USE

Safety information!
For explanation of symbols, see the table on page 2
Check all screw connections for a tight fit. Tighten the screws, if necessary. You must check the fastening of the cutter bar in particular (see chapter "Maintenance of the cutter bar").
The blade fastening screw must always be tightened by an authorised workshop. If the blade screw is tightened excessively or insufficiently, blade fastening and cutter bar may be damaged or get loose, which can lead to serious injuries.
The lawn mower is fitted with an engine stop device.
Before using the equipment for the first time, make sure that the engine stop safety control bar is working perfectly. When the safety control bar is released, the cutter bar must come to a standstill within 3 seconds.
After release, the safety control bar must always return to the position shown in the "Description of components" diagram.
If this is not the case, it must be checked immediately by an authorised workshop.
Risk of injury!
If the stopping time of the blade is longer, stop using the device and take it to an authorised workshop.
Measuring the stopping time
After starting the engine, the blade rotates and a wind noise can be heard.
The stopping time corresponds to the duration of the wind noise after the engine has been stopped; it can be measured with a stopwatch.
Machine safety and protective devices must not be manipulated or disabled.
Make sure that all protective devices have been attached properly and are not damaged.
Charge the battery

The handling of the charger and battery is described in the separate operating manual for the charger. In particular, read and follow the safety information! Charge the battery fully before initial use!

All safety information concerning the handling, storage, safekeeping, transportation and disposal of the lithium-ion battery, as well as first aid measures and measures for extinguishing fires can be found in the “Product safety data sheet” on www.sabo-online.com with the operating instructions.
Information hotline for lithium-ion batteries
+49 (0) 2261 704-0
Battery level indicator (figure U4)
Press the battery level indicator button on the battery to check the available charge. The indicator lamps light up according to the battery level:
| Lamps | Capacity |
| 4 green lamps | Battery is fully charged |
| 3 green lamps | Battery has 70% charge or more |
| 2 green lamps | Battery has 45% charge or more |
| 1 green lamp | Battery has 10% charge or more and must be charged again soon |
| Lamps are off | Battery has less than 10% charge and must be charged immediately to prevent irreparable damage (total discharge) |
10 STARTING THE ENGINE (FIGURE G2 + D)


Safety information!
For explanation of symbols, see the table on page 2
Only start the engine when standing behind the mower.
Always place the mower on a level area which is not covered with high grass (if the grass is too high it will block the start-up of the cutter bar and make the starting process more difficult). When the engine is started, the machine must not be tilted on end, if necessary it must be tilted by pressing the guide bar down so that the cutting tool is pointing in the direction away from the user, but only as far as absolutely necessary. As long as the device is not on all 4 wheels, both of your hands must be on the top part of the bar.
- Open the battery cover and hold it open.
- Insert the safety key G2.
- Close the battery cover. Ensure that the cover closes automatically. Dirt and grass residue can prevent this and must therefore be removed.
- To switch on the engine, first press and hold the start button D.
- With your other hand, pull the control bar towards the top guide bar. During operation, the control bar must remain held in this position.
- You can now let go of the start button.
11 SWITCHING OFF THE ENGINE (FIGURE F + K2)
- Release the safety control bar F.
- Wait for the cutter bar to stop completely.
- Remove the safety key K2.
12 EMERGENCY STOPPING
Release the safety control bar.
– The blade comes to a standstill.
- The engine will stop.
ATTENTION
Before every mowing job, make sure that the engine stop safety control bar is working perfectly:
- When the safety control bar is released, the blade must come to a standstill within 3 seconds.
If this is not the case, please consult your nearest authorised workshop.
13 GRASS COLLECTOR


Safety information!
For explanation of symbols, see the table on page 2
Operation with grass collecting bag
WARNING
When operating the equipment with a grass collecting bag, the bag must be completely assembled and in technically perfect condition.
When using the machine, ensure that the collecting bag is emptied in good time.
IMPORTANT
The grass collecting bag will only collect grass properly if air can pass through it freely.
IMPORTANT
Do not clean the grass collecting bag with hot water!
Emptying the grass collecting bag (figure F + K2 + L)
- Switch off the engine F.
- Remove the safety key K2.
- Lift the ejection flap.
- Remove the full grass collecting bag from the mower by the carrying strap – the ejection flap closes automatically.
- Shake out of the grass collecting bag thoroughly, holding it by the moulded handle on the bottom L.
Operation without grass collecting bag
WARNING
When mowing without grass collecting bag, the ejection flap on the mower housing must always be closed (flap down).
14 MOWING


Safety information!
For explanation of symbols, see the table on page 2
Using the machine on slopes
ATTENTION
Do not mow excessively steep slopes! Mowing slopes always comes with additional risks. Always work at right angles to the slope, never straight up or down.
Always make sure you have a firm stance. Walk-behind lawn mowers should never be used for slopes with a gradient in excess of 26% (15° angle of slope). Stability may be lost.
Checking operating safety
The lawn mower is fitted with an engine stop device.
Before every mowing job, make sure that the engine stop safety control bar is working perfectly. When the safety control bar is released, the cutter bar must come to a standstill within 3 seconds.
After release, the safety control bar must always return to the position shown in the "Description of components" diagram.
If this is not the case, it must be checked immediately by an authorised workshop.
Risk of injury!
If the stopping time of the blade is longer, stop using the device and take it to an authorised workshop.
Measuring the stopping time
After starting the engine, the blade rotates and a wind noise can be heard.
The stopping time corresponds to the duration of the wind noise after the engine has been stopped; it can be measured with a stopwatch.
Machine safety and protective devices must not be manipulated or disabled.
Make sure that all protective devices have been attached properly and are not damaged.
To avoid any risk, always check the condition and firm seating of the blade before each mowing job. The blade fastening screw must always be tightened by an authorised workshop. If the blade screw is tightened excessively or insufficiently, blade fastening and cutter bar may be damaged or get loose, which can lead to serious injuries. A worn or damaged blade must imperatively be replaced (see chapter "Maintenance of the cutter bar").
Check fan, blade fastening and fan housing for wear and a tight fit every 10 operating hours. Also check device screws and nuts for a firm fit and re-tighten, if necessary.
If the mower becomes blocked e.g. by colliding with an obstacle, have an authorised workshop check whether any parts of the mower are damaged or deformed. Always have any necessary repairs done by an authorised workshop too.
If the machine starts to vibrate unusually heavily or to make unusual noises, please have it checked immediately by an authorised workshop.
Time restrictions
In Germany, the time for the operation of lawn mowers is regulated in the "32nd Ordinance for the Implementation of the Federal Immissions Act (32. BlmSch-V)". In addition, regional restrictions are possible (e.g. to observe the afternoon quiet hours); related information is available from the competent municipal authority.
Tips on caring for your lawn (figure M)
WARNING
Remove all foreign bodies (stones, wood, branches, etc.) from the lawn before any mowing; however, you should still keep an eye out for objects lying around while mowing.
You can get an introduction to lawn care from your dealer on request. Information and instructions for mowing can also be found on the manufacturer's website.
Mulching
40-ACCU CLASSIC
Your lawn mower cannot be equipped with a mulch plug.
45-ACCU CLASSIC
Your lawn mower can be equipped with a mulch plug. The corresponding conversion kit to the mulch system is included upon delivery.
What is mulching?
During mulching, the lawn is cut and the cut stalks are simultaneously repeatedly shredded by the special mulching knife. This mulch knife straightens the stalks of grass and cuts the stalks into very short pieces, which are then evenly distributed over the lawn.
The grass sections can now dry out and rot more quickly, thus promoting humus formation. In this way, the soil is fertilised in a natural manner and also protected from drying out. The collection and disposal of the cut material is no longer necessary. The mulching concept thus substantially supports the ecological cycle.
How to achieve a perfect lawn cut?
When using the mulch mower, the grass height to be cut should not exceed 10 cm, if possible. In one pass, a maximum of 1/3 of the grass height is cut down. If a positive result is not achieved, it may be necessary to mulch two times in succession.
Depending on the type of lawn and the intensity of growth, the lawn should be mown at regular intervals. Especially during strong growth phases, mulching requires more frequent mowing than the traditional collection as otherwise this “one third” rule is difficult to adhere to.
In order to achieve an optimal mulching result, you should reduce the speed of the machine when mulching compared to traditional mowing, to give the grass time to stay longer in the mower and to be thus cut several times.
The best cut pattern and result is achieved on a dry lawn, as wet lawn quickly sticks and clumps due to the short grass sections. These lumps of grass rot and get mouldy and hinder the desired ecological cycle.
If, nevertheless, the lawn must be mowed when it is very damp or wet, the grass sections must be shorter, i.e. the cutting height must be set 1-2 steps higher than for a dry lawn.
You will notice that observing these simple rules, you will get a healthy lawn and the green waste disposal is no longer necessary.
Information regarding mulching can also be found on the manufacturer's website.
And if the grass is too high for mulching, the mulch mower can be converted for mowing with the grass collecting bag with only a few steps.
Converting to mulch mower (figure F + K2 + U5)
45-ACCU CLASSIC
- Switch off the engine F.
- Remove the safety key K2.
– Lift the ejection flap. - Remove the grass collecting bag.
– Clean the ejection channel, if necessary. - Insert the mulch plug into the ejection channel as far as you can U5. Make sure it is fitted tightly.
- Close the ejection flap.
NOTE
The mower can also be used as a rear discharge mower. Conversion of the mulching blade system is not necessary! However, under difficult mowing conditions (e.g. wet grass), the collecting bag filling may be reduced.
The mulch plug must be removed again for the device to be used as a rear discharge mower again. To do this, switch off the engine, remove the safety key, raise the ejection flap, remove the mulch plug from the channel and attach the grass collecting bag to the provided holder at the mower housing.
15 SERVICE INTERVALS
IMPORTANT
Avoid damage! Under extreme or unusual conditions, shorter servicing intervals than the ones specified below may be necessary. If you establish any problems, please contact an authorised workshop.
Carry out routine servicing on the machine in line with the following servicing intervals.
Work must be carried out at the following servicing intervals in addition to the maintenance work listed in these operating instructions.
Before initial use
- Charge the battery.
- Check all screw connections for a tight fit.
- Check the blade screw and have an authorised workshop tighten it, if necessary.
- Check whether the engine stop safety control bar is working properly.
- Check that all protective devices have been attached properly and are not damaged.
Before every operation
- Check the lawn area and remove any objects, particularly live wires.
- Check the area of the boundary wire (if an automatic mower is being used for lawn care).
- Check the battery charge.
- Check the condition and firm fit of the blade; have the blade screw tightened by an authorised workshop, if necessary.
- Check whether the engine stop safety control bar is working properly.
- Check that all protective devices have been attached properly and are not damaged.
- Check grass collecting equipment for wear or loss of functionality.
Every 10 operating hours
- Check all screw connections for a tight fit.
- Check fan, blade fastening and fan housing for wear and a tight fit.
After every operation
- Clean the mower.
- Check the blades for damage and wear.
Every 15-20 operating hours or annually
- Lubricate the wheel bearings.
16 CARE AND SERVICING FOR YOUR MOWER
Regular care is the best way to guarantee a long service life and problem-free operation! Insufficient device maintenance will lead to safety-related faults!
Only use original spare parts because only those guarantee safety and quality!
text_image
Warning symbols and pictograms including safety, hazard, and workplace safety iconsSafety information!
For explanation of symbols, see the table on page 2
Cleaning
Remove all dirt and grass directly after mowing. Place the mower on its side and use a brush or cloth to clean.
ATTENTION
Do not insert your fingers into the fan housing openings and hold the fan. If the cutter bar is turned during cleaning, there is a risk that your fingers will be pinched between the fan and the fan housing!
IMPORTANT
Never spray the mower with water. The electrical system may be damaged.
Storage
Always store the device with the safety key removed and without the battery inserted. Always store the device in a clean and well-serviced state in a closed, dry room and inaccessible to children.
Always allow the device to cool down before storage.
Collapsing the guide bar (figure A1)
IMPORTANT
Make sure that the cables are not pinched, squeezed, twisted or overstretched when the guide bars are folded apart or collapsed! Always run the cables along the outside of the bar connection. A damaged cable may result in a technical defect of the device.
- For space-saving storage or for transport, loosen the four wing nuts until the guide bar can be collapsed in Z form over the engine without resistance A1.
The locking cams at the lower bar end must disengage from the bores in the housing. - Do not kink or squeeze the cable while doing so.
CAUTION
When folding the bar for transport and storage, the bar may fold over unintentionally when loosening the wing nuts and disengaging the locking cams from the bores in the housing. In addition, there may be pinching points between lower and upper bar section and housing. This may result in risk of injury!
Transporting and securing the device (figure N + N4)
- If the device has to be carried, do not hold the ejection flap. Hold it at the front, on the housing, and at the back, on the handlebar connection N.
Note the weight of the machine before lifting or carrying it (see "Technical data"). Lifting large weights can result in health problems.
We recommend that this device should always be lifted or carried by at least two people if other means of help are not available.
When the device is transported on a load area, a loading ramp should be used for loading and unloading. - Transport the device upright on all 4 wheels to avoid damage to the equipment and personal injury.
ATTENTION
Avoid injuries! Be especially careful when loading or unloading the equipment. When a trailer is used, we recommend ensuring that it is equipped with stable sidewalls.
Only the marked points on the transport vehicle may be used to secure the device.
- Park the means of transport on level ground so that the device cannot roll away before it is secured.
– Remove the collecting bag and secure it separately during transport. - Secure the device with approved load-securing devices (e.g. tie-down straps with clamping elements) on or inside the vehicle. Tie-down straps are belt bands made of synthetic fibres. Every tie-down strap is marked with a label. The label contains important details for application. The information on this label must be heeded when using the tie-down strap.
- For loaded goods that can roll, we recommend using direct strapping with four lashing straps. For this purpose, the belts are fastened directly on the fastening points on the device and in the tie-down strapping points on the loading surface and slightly pre-tensioned N4.
ATTENTION
Do not tighten the belts too firmly. Fixing the device too firmly can cause damage.
Servicing the cutter bar
A sharp cutter guarantees perfect cutting performance. Before using the machine, always check the condition and firm seating of the blade. The blade fastening screw must always be tightened by an authorised workshop. If the blade screw is tightened excessively or insufficiently, blade fastening and cutter bar may be damaged or get loose, which can lead to serious injuries. A worn or damaged blade must imperatively be replaced.
Regrinding and balancing of the cutter bar (figure Q)
WARNING
The regrinding and balancing of the cutter bar must be carried out by an authorised workshop. An incorrectly ground and unbalanced blade can cause strong vibrations and damage the lawn mower.
The cutting edges of the cutter bar may only be reground until the marking (1) on the cutter bar (ring) (see figure Q) has been reached. Attention! Observe the grinding angle of 30^ .
Your workshop can check this value (wear limit) for you!
WARNING
A blade in which the wear limit (marking) has been exceeded may break and be thrown away, which can lead to serious injuries.
Changing the cutter bar
WARNING
The replacing of the cutter bar must be carried out by an authorised workshop. Due to an incorrectly assembled blade fastening or an excessively or insufficiently tightened blade screw, the cutter bar may become loose, which can lead to serious injuries.
- For replacement, use only original cutter bars. Non-equivalent spare parts can damage the machine and are a safety hazard.
- Replacement cutter bars must be permanently marked with the name and/or company logo of the manufacturer or supplier and the part number.
Servicing the wheels (figure S)
Lubricate the wheel bearings once a year or every 15-20 operating hours.
- Remove the wheel caps S.
- Using a wrench, loosen the hexagonal nut and remove the pulley and the wheels.
- After the bearings have been lubricated with roller bearing grease "KAJO-Langzeitfett LZR 2", push the wheels back in place, attach the washer, fasten using the hexagonal nut and tighten so that the wheels can turn easily but without play. Reattach the wheel cap.
Customer service
Our customer service is offered by an authorised dealer. You can find a specialised dealership on our homepage at www.sabo-online.com and under the "Service" /
"Search Specialist" tab. If you are unsure, please contact your sales partner.
17 TROUBLESHOOTING
| Faults | Possible causes | Remedy |
| Engine does not start | Safety key not inserted. | Insert the safety key G2 . |
| Battery not charged. | Charge the battery (see the separate operating instructions for the charger). | |
| Battery not functional or cannot be charged. | Replace the battery. | |
| Cutting height set too low (when the grass is too high, this prevents the engine from starting up). | Set a higher cutting height 1 .Tilt the machine when starting. | |
| Too much grass waste in the housing or ejection channel. | Clean grass out of the cutting space / ejection channel, keep the gap between the fan and housing clean (remove the safety key first K2 !). | |
| Have it checked by an authorised workshop. | ||
| An acoustic signal sounds | The battery charge level is below 10%. | Charge the battery (see the separate operating instructions for the charger). |
| Battery not functional or cannot be charged. | Replace the battery. | |
| The acoustic signal sounds even though the battery is charged: technical defect on the mower | Have it checked by an authorised workshop. |
| Engine switches off during mowing | Cutting height too low. | Set a higher cutting height 1. |
| Battery is drained. | Charge the battery (see the separate operating instructions for the charger). | |
| Too much grass waste in the housing or ejection channel. | Clean grass out of the cutting space / ejection channel, keep the gap between the fan and housing clean (remove the safety key first K2 !). | |
| Engine power decreasing | Cutter bar blunt. | Have it reground and balanced by an authorised workshop Q. |
| Battery capacity low. | Charge the battery (see the separate operating instructions for the charger). | |
| Too much grass waste in the housing or ejection channel. | Clean grass out of the cutting space / ejection channel, keep the gap between the fan and housing clean (remove the safety key first K2 !). | |
| Extreme vibration | Have it checked by an authorised workshop. | |
| Poor cutting, lawn turns yellow | Cutter bar blunt. | Have it reground and balanced by an authorised workshop Q. |
| Cutting height too low. | Set a higher cutting height 1. | |
| Excessive mowing speed. | Adapt mowing speed. | |
| Mower paths do not overlap sufficiently. | With high grass, the mowing paths may possibly have to overlap more. | |
| Lawn matted. | A noticeable improvement can be achieved by using a scarifier. | |
| Ejection blocked | Collecting bag full. | Empty the collecting bag L. |
| Cutting height too low and grass too high. | Set a higher cutting height 1. | |
| Excessive mowing speed. | Adapt mowing speed. | |
| Grass is wet. | Let lawn dry. | |
| The mulched grass looks bad: lumps, excessive amounts of cut grass, coarse cut | Cutter bar blunt. | Have it reground and balanced by an authorised workshop. |
| Mulching rule not followed (cut max. 1/3 of grass height; the grass height to be cut must be less than 10 cm). | Set a higher cutting height 1. | |
| Excessive travel speed. | Adapt travel speed. | |
| Grass accumulation under the mower. | Set a higher cutting height 1. | |
| Mower paths do not overlap sufficiently. | With high grass, the mowing paths may possibly have to overlap more. | |
| Grass is wet. | Set a higher cutting height 1. Let lawn dry. |
In case of faults and defects which have not been listed here, please contact the nearest authorised workshop.
Repairs which require specialised knowledge should only be performed by a qualified expert. Your authorised workshop will naturally also be glad to help if you do not wish to perform the maintenance work described here yourself.
18 TECHNICAL DATA
Engine
| Engine | 40 V DC motor |
| Engine speed | 2800 rpm |
Charger
See the separate operating instructions for the charger.
| Permitted temperature range during charging | +7 to +40 °C |
Battery
See the separate operating instructions for the charger.
| Recommended temperature range for storage | +5 to +30 °C |
Mower
40-ACCU CLASSIC
| Housing | Steel |
| Cutting width | 400 mm |
| Cutting heights | Centre, 25, 35, 50, 70, 80 mm |
| Height-adjustable guide bar | 3 times |
| Grass collector capacity | 40 litres |
| Weight | 20.0 kg |
| Length | 1260 mm |
| Width | 440 mm |
| Height | 1040 mm |
| Wheels front / rear | 150 mm / 180 mm |
| Bearing front / rear | Cup-and-cone bearing |
| Permitted temperature range during use | 0 to + 45 °C |
| Permitted temperature range for storage | - 5 to + 60 °C |
| Maximum permitted humidity | 70 %, non-condensing |
45-ACCU CLASSIC
| Housing | Steel |
| Cutting width | 450 mm |
| Cutting heights | Centre, 25, 40, 55, 70, 80 mm |
| Height-adjustable guide bar | 3 times |
| Grass collector capacity | 60 litres |
| Weight | 23.0 kg |
| Length | 1380 mm |
| Width | 530 mm |
| Height | 1040 mm |
| Wheels front / rear | ∅ 180 mm / ∅ 180 mm |
| Bearing front / rear | Cup-and-cone bearing |
| Permitted temperature range during use | 0 to + 45 °C |
| Permitted temperature range for storage | - 5 to + 60 °C |
| Maximum permitted humidity | 70 %, non-condensing |
Sound power level
40-ACCU CLASSIC
| Guaranteed sound power level; measured according to 2000/14/EC | L_w3 = 91 dB(A) |
45-ACCU CLASSIC
| Guaranteed sound power level; measured according to 2000/14/EC | L_wa = 94 dB(A) |
Sound pressure level
40-ACCU CLASSIC
| Emission sound pressure level at operator's workplace, measured according to EN 62841-4-3 | L_pA = 77 dB(A) |
| Measuring inaccuracies; according to ISO 4871 | 3.0 dB |
45-ACCU CLASSIC
| Emission sound pressure level at operator's workplace, measured according to EN 62841-4-3 | L_pA = 80 dB(A) |
| Measuring inaccuracies; according to ISO 4871 | 3.0 dB |
Vibrations
The stated total vibration value has been measured according to a standardised test procedure and can be used to compare the device with another machine. This value can be used for a preliminary estimation of the vibration load.
40-ACCU CLASSIC
| Vibrations at the guide bar; measured according to EN 62841-4-3 Measuring inaccuracies; according EN 12096 | a_HW = 1.4 m/s^2 |
| 0.7 m/s2 |
45-ACCU CLASSIC
| Vibrations at the guide bar; measured according to EN 62841-4-3 | a_HW = 2.2 m/s^2 |
| Measuring inaccuracies; according EN 12096 | 1.1 m/s^2 |
19 ORIGINAL SPARE PARTS AND ACCESSORIES
| Approved lithium-ion batteries | SAU15032, SAU16450, SAU17028(4 Ah, 144 Wh)(Order no. SAA11780)SAU17216 (4 Ah, 144 Wh)(Order no. SAA12800)SAU17217 (5 Ah, 180 Wh)(Order no. SAA12774)SAU16451, SAU17029 (6Ah, 216 Wh)(Order no. SAA12250)All approved lithium-ion batteries are listed in the charger operating instructions |
| Approved battery chargers | Quick charger SAU16509 (Order no. SAA16509)Standard charger SAU15033 (Order no. SAA11781) |
| Safety key | SAA11774 |
| Roller bearing grease | SAA11300 |
| Cutter bar | For safety reasons, the cutter bar must always be replaced by an authorised workshop. This workshop has the respective spare part number for the cutter bar available. |
NL
text_image
Collection of safety symbols including pictograms, warning signs, and various human figures with corresponding icons.text_image
Collection of safety and hazard symbols including pictograms, warning signs, and traffic signs with accompanying icons.text_image
Safety warning symbols including pictograms, triangular warning signs, human figures, and vehicle safety iconsNota di sicurezza!
Name and address of the person in the community authorized to compile the technical construction file:
Name and address of the person in the community authorized to compile the technical construction file: