
Escort 6000 - Hi-fi system PEAVEY - Free user manual and instructions
Find the device manual for free Escort 6000 PEAVEY in PDF.
| Product Type | Amplified Portable Sound System |
| Brand | Peavey |
| Model | Escort 6000 |
| Dimensions (H x W x D) | 36.8 cm x 93.3 cm x 39.4 cm |
| Assembled Weight (including stands) | 22.67 kg |
| Output Power | 300 W RMS per channel (stereo) |
| Frequency Response | 40 Hz - 20 kHz ± 3 dB |
| Distortion | Less than 0.2% THD at full power |
| Signal-to-Noise Ratio | 88 dB (microphone input) |
| Power Supply | 115 V AC 60 Hz or 230 V AC 50/60 Hz |
| Speakers | 2-way: 10" (254 mm) woofer + piezoelectric tweeter |
| Number of Input Channels | 9 channels (5 mic/line + 4 media) |
| Mic/Line Inputs | 7 x XLR combo (XLR + 6.35 mm jack) |
| Multimedia Inputs | Stereo RCA, 3.5 mm jack, USB, Bluetooth |
| Bluetooth | Wireless audio playback (range varies depending on obstacles) |
| Digital Effects | 31 effects (reverb, delay, chorus, enhancer) with optional footswitch |
| Graphic Equalizer | 7 bands (80, 250, 500, 1k, 2k, 4k, 10k Hz) + FLS (Feedback Locating System) |
| Outputs | 2 x speaker (left/right), subwoofer output (100 Hz), monitor output |
| Protection | DDT Limiter (Anti-clipping) |
| Transport | Wheeled case with retractable speaker stands and storage compartments |
| Included Accessories | 2 speaker cables 15', PV microphone (depending on model), power cord |
| Maintenance and Cleaning | Use a dry cloth; do not expose to moisture; unplug before cleaning |
| Safety | Mandatory grounding; do not open; repair by qualified technician |
| Repairability | Spare parts available from authorized Peavey dealers |
Frequently Asked Questions - Escort 6000 PEAVEY
User questions about Escort 6000 PEAVEY
0 question about this device. Answer the ones you know or ask your own.
Ask a new question about this device
Download the instructions for your Hi-fi system in PDF format for free! Find your manual Escort 6000 - PEAVEY and take your electronic device back in hand. On this page are published all the documents necessary for the use of your device. Escort 6000 by PEAVEY.
USER MANUAL Escort 6000 PEAVEY
natural_image
Line drawing of a two-position portable gaming setup with two monitor stands and a central display table (no text or symbols)
Intended to alert the user to the presence of uninsulated "dangerous voltage" within the product's enclosure that may be of sufficient magnitude to constitute a risk of electric shock to persons.
Intended to alert the user of the presence of important operating and maintenance (servicing) instructions in the literature accompanying the product.
CAUTION: Risk of electrical shock — DO NOT OPEN!
CAUTION: To reduce the risk of electric shock, do not remove cover. No user serviceable parts inside. Refer servicing to qualified service personnel.
WARNING: To prevent electrical shock or fire hazard, this apparatus should not be exposed to rain or moisture, and objects filled with liquids, such as vases, should not be placed on this apparatus. Before using this apparatus, read the operating guide for further warnings.

Protective earthing terminal. The apparatus should be connected to a mains socket outlet with a protective earthing connection.

IMPORTANT SAFETY INSTRUCTIONS
WARNING: When using electrical products, basic cautions should always be followed, including the following:
-
Read these instructions.
-
Keep these instructions.
-
Heed all warnings.
-
Follow all instructions.
-
Do not use this apparatus near water.
-
Clean only with a dry cloth.
-
Do not block any of the ventilation openings. Install in accordance with manufacturer's instructions.
-
Do not install near any heat sources such as radiators, heat registers, stoves or other apparatus (including amplifiers) that produce heat.
-
Do not defeat the safety purpose of the polarized or grounding-type plug. A polarized plug has two blades with one wider than the other. A grounding type plug has two blades and a third grounding plug. The wide blade or third prong is provided for your safety. If the provided plug does not fit into your outlet, consult an electrician for replacement of the obsolete outlet.
-
Protect the power cord from being walked on or pinched, particularly at plugs, convenience receptacles, and the point they exit from the apparatus.
-
Only use attachments/accessories provided by the manufacturer.
-
Use only with a cart, stand, tripod, bracket, or table specified by the manufacturer, or sold with the apparatus. When a cart is used, use caution when moving the cart/apparatus combination to avoid injury from tip-over.
-
Unplug this apparatus during lightning storms or when unused for long periods of time.
-
Refer all servicing to qualified service personnel. Servicing is required when the apparatus has been damaged in any way, such as power-supply cord or plug is damaged, liquid has been spilled or objects have fallen into the apparatus, the apparatus has been exposed to rain or moisture, does not operate normally, or has been dropped.
-
Never break off the ground pin. Write for our free booklet "Shock Hazard and Grounding." Connect only to a power supply of the type marked on the unit adjacent to the power supply cord.
-
If this product is to be mounted in an equipment rack, rear support should be provided.
-
Note for UK only: If the colors of the wires in the mains lead of this unit do not correspond with the terminals in your plug, proceed as follows: a) The wire that is colored green and yellow must be connected to the terminal that is marked by the letter E, the earth symbol, colored green or colored green and yellow. b) The wire that is colored blue must be connected to the terminal that is marked with the letter N or the color black. c) The wire that is colored brown must be connected to the terminal that is marked with the letter L or the color red.
-
This electrical apparatus should not be exposed to dripping or splashing and care should be taken not to place objects containing liquids, such as vases, upon the apparatus.
-
The on/off switch in this unit does not break both sides of the primary mains. Hazardous energy can be present inside the chassis when the on/off switch is in the off position. The mains plug or appliance coupler is used as the disconnect device, the disconnect device shall remain readily operable.
-
Exposure to extremely high noise levels may cause a permanent hearing loss. Individuals vary considerably in susceptibility to noise-induced hearing loss, but nearly everyone will lose some hearing if exposed to sufficiently intense noise for a sufficient time. The U.S. Government's Occupational Safety and Health Administration (OSHA) has specified the following permissible noise level exposures:
Duration Per Day In Hours Sound Level dBA, Slow Response
| 8 90 | |
| 6 92 | |
| 4 95 | |
| 3 97 | |
| 2 100 | |
| 1 1/2 102 | |
| 1 105 | |
| 1/2 | 110 |
| 1/4 or less | |
According to OSHA, any exposure in excess of the above permissible limits could result in some hearing loss. Earplugs or protectors to the ear canals or over the ears must be worn when operating this amplification system in order to prevent a permanent hearing loss, if exposure is in excess of the limits as set forth above. To ensure against potentially dangerous exposure to high sound pressure levels, it is recommended that all persons exposed to equipment capable of producing high sound pressure levels such as this amplification system be protected by hearing protectors while this unit is in operation.
Logo referenced in Directive 2002/96/EC Annex
IV(OJ(L)37/38,13.02.03 and defined in EN 50419: 2005
The bar is the symbol for marking of new waste and is applied only to equipment manufactured after 13 August 2005
Correct Disposal of this product. This marking indicates that this product should not be disposed with other house hold wastes throughout the EU. To prevent possible harm to the environment or human health from uncontrolled waste disposal, recycle it responsibly to promote the sustainable reuse of material resources. To return your used device, please use the return and collection systems, or contact the retailer where the product was purchased. They can take this product for environmental safe recycling.

FCC Compliancy Statement
This device complies with Part 15 of the FCC rules. Operation is subject to the following two conditions: (1) this device may not cause harmful interference, and (2) this device must accept any interference received, that may cause undesired operation.
Warning: Changes or modifications to the equipment not approved by Peavey Electronics Corp. can void the user's authority to use the equipment.
Note - This equipment has been tested and found to comply with the limits for a Class B digital device, pursuant to Part 15 of the FCC Rules. These limits are designed to provide reasonable protection against harmful interference in a residential installation. This equipment generates, uses and can radiate radio frequency energy and, if not installed and used in accordance with the instructions, may cause harmful interference to radio communications. However, there is no guarantee that interference will not occur in a particular installation. If this equipment does cause harmful interference to radio or television reception, which can be determined by turning the equipment off and on, the user is encouraged to try and correct the interference by one or more of the following measures.
- Reorient or relocate the receiving antenna.
- Increase the separation between the equipment and receiver.
- Connect the equipment into an outlet on a circuit different from that to which the receiver is connected.
- Consult the dealer or an experienced radio/TV technician for help.
FCC ID: I4S-ESCORT6000
IC: 3642B-ESCORT6000

Peavey Electronics Corporation • 5022 Hartley Peavey Drive • Meridian, MS • 39305 (601) 483-5365 • FAX (601) 486-1278 • www.peavey.com • 80305795 • ©2011
CAN ICES-3 B/NMB/3B
ENGLISH
Escort® 6000
Portable Pro Audio System
Congratulations! You have just purchased the world's finest portable PA system. The Escort's integrated design allows for ease of transport, while its user-friendly controls offer ease of operation, making it the perfect choice for schools, churches, civic organizations as well as DJ's and small musical groups. The Escort features dual two-way speakers driven by a nine-channel, powered mixer, making it ideal for vocal, musical and DJ applications. The mixer includes a media channel with several inputs for multiple playback options and Bluetooth ^ , as well as professional quality features such as a digital effects section, footswitchable effects defeat and a master seven-band graphic EQ with FLS ^ (Feedback Locating System). The carrying case provides additional storage for microphones, cables and whatever optional gear may be required. The Escort's case provides latches for mounting for speakers, multiple handles for various carrying options, and wheels for easy transport. Please read these instructions carefully and enjoy your new Peavey Escort 6000.
Features:
- Convenient package with luggage-style wheels
- Two-way speaker system with 10" woofer and piezoelectric horn
- Nine-channel powered mixer
- USB MP3 playback
- Bluetooth® connectivity for music playback
• High quality digital effects - 7x XLR - 1/4" combination inputs
- Stereo RCA, 3.5mm, and USB media inputs for media playback
- Seven-band graphic EQ with FLS
- Two folding speaker stands
- 2x 15' speaker cables
- Sub-woofer out
• Monitor line level out - Storage compartments for microphones, cables, etc.
• Footswitchable effects defeat
• PV microphone and cable* - Mixer stand*
* Indicates optional features. Available on certain models
THINK SAFETY FIRST!

Much of the setup of the Escort® is similar to the setup of other sound systems, and many aspects require plain common sense. Safety should always be your first concern. Always use grounded outlets and three-wire extension cords. Run sound system cables in a way to prevent the danger of tripping and tape them down if needed. Place the speaker stands and mixer on a solid, level surface. Following these guidelines will help prevent personal injury and equipment damage, ensuring years of trouble-free use.
Setting Up Mixer and Speakers
Place closed unit so speakers are upward. Release latches by lifting up until the latch disengages. Remove the speakers from the case.
NOTE: The latches can be closed after speakers are removed. This is recommended to avoid interference with removal of other components. This will also help avoid damage to the latches. Close the latch by pushing in until it is flush with the side of the case, then push down until it locks.
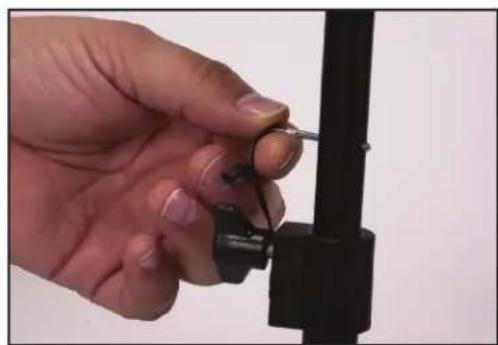
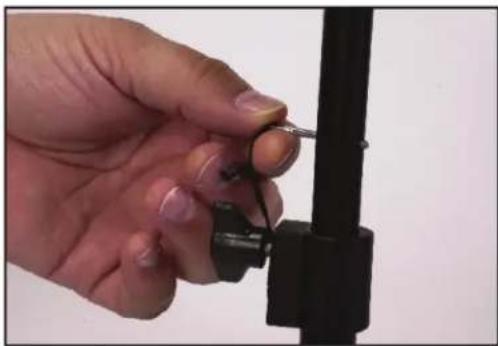
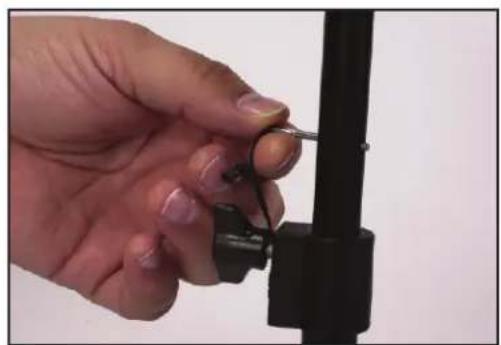
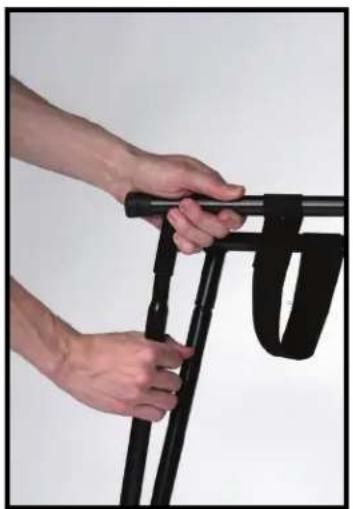
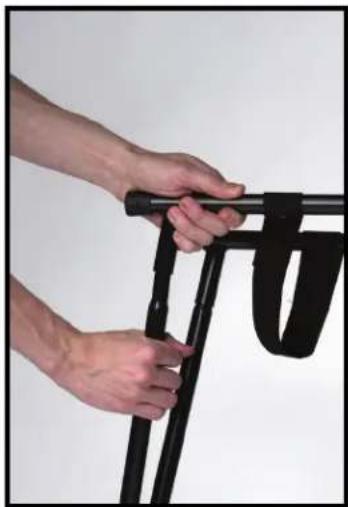
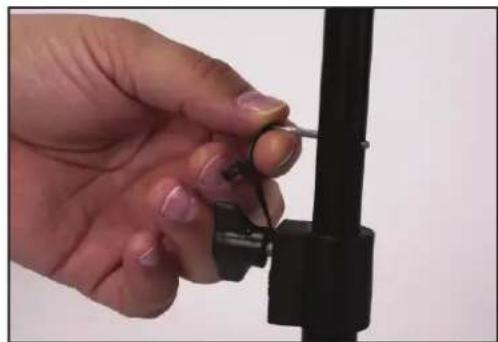
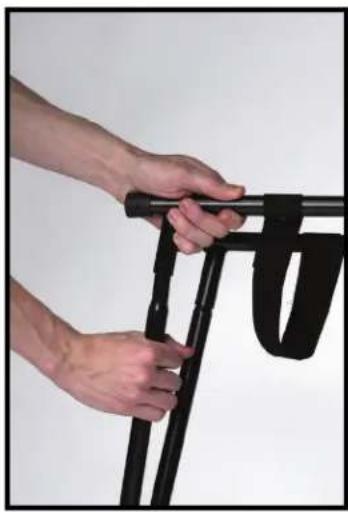
Remove the speaker stands from the case. Be sure the legs on the stand are fully extended to provide a stable base for the speakers and are positioned on a level surface. Tighten the thumbscrew on the base so that it is snug, but do not overtighten (Fig.1). Raise the speaker stands to the desired height, tighten the thumbscrew and install the safety pin as shown (Fig.2).

natural_image
Close-up of a hand adjusting a black tripod-mounted device (no text or symbols visible)Fig. 1
natural_image
Close-up of a hand holding a small metal object with a spring-like tool, mounted on a black mechanical bracket (no text or symbols visible)Fig. 2
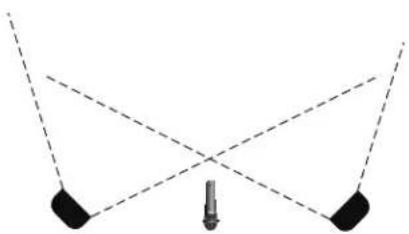
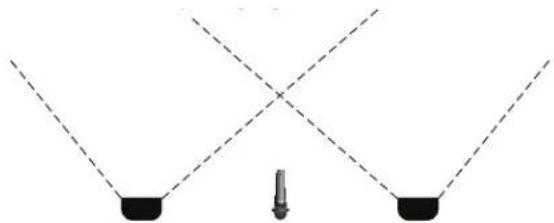
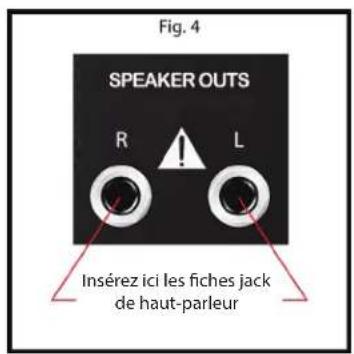
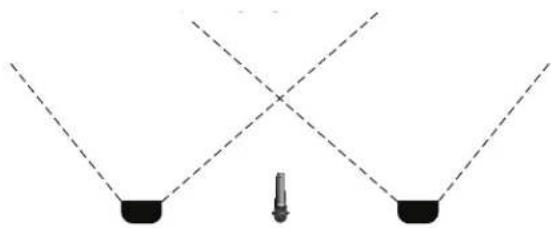
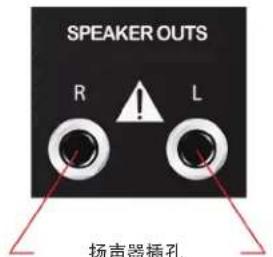
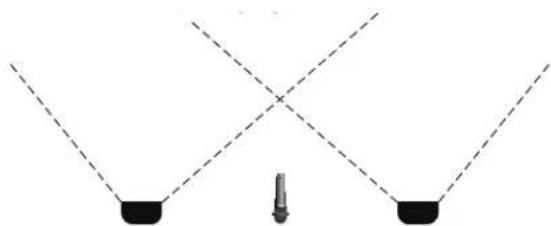
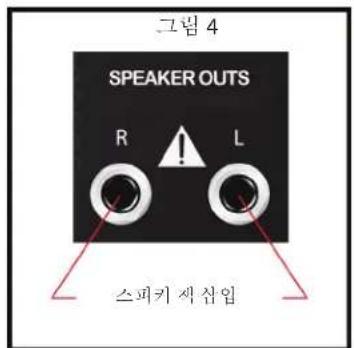
Place speakers on stands and position them so that they will face toward the audience and away from the microphones (Fig.3). Connect speaker cables from the jack on the lower front of the speaker to the speaker outputs on the back of the mixer. Connect the left speaker to the LEFT OUTPUT and the right speaker to the RIGHT OUTPUT (Fig.4).
natural_image
Pure geometric diagram showing two black blocks with dashed lines forming a V-shape (no text or symbols)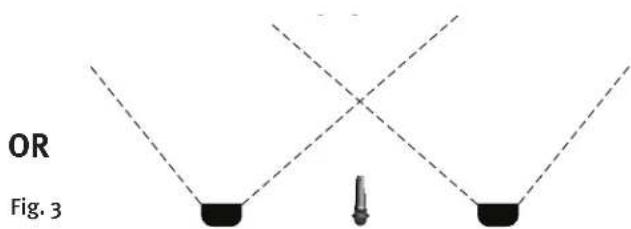
text_image
OR Fig. 3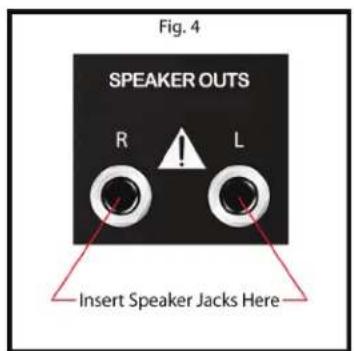
text_image
Fig. 4 SPEAKER OUTS R L Insert Speaker Jacks Here
WARNING! Only connect the included speakers to the mixer. Escort speakers provide optimal load for the powered mixer and using other speakers may result in equipment damage.
Connecting a Powered Sub-Woofer
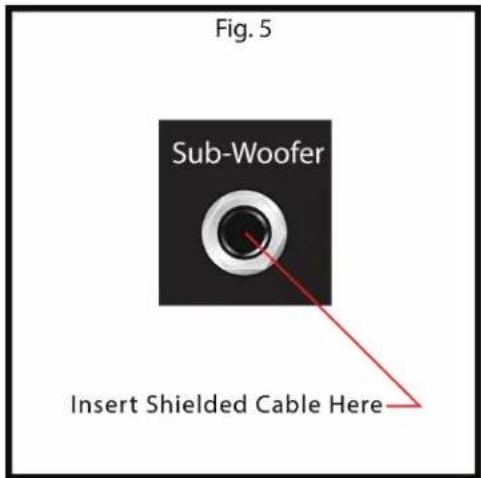
The Escort® 6000 features a Sub-Woofer output that is internally crossed over at 100Hz. This output is line level so it will need to be connected to a POWERED Sub or a Power Amplifier that will then drive your passive Subs. Be sure the power for your Escort and your Sub-Woofer is turned OFF. Insert a 1/4" shielded cable into the Sub-Woofer Output (Fig.5) on the back of the Escort, then insert the other end of the cable into your POWERED Sub-Woofer or power amplifier input.
Connecting a Monitor
The Escort 6000 includes a full-range line level Monitor output. This is to be used when monitors are required for a performance. This output is line level so you will need to use POWERED Monitors or a separate power amplifier to drive passive monitors. Be sure the power to your Escort and your Monitors is turned OFF. Insert a 1/4" shielded cable into the Monitor Output on the back of your Escort (Fig.6), then insert the other end of the cable to the input on your POWERED Monitors or power amplifier. This output can also be sent to another mixer or recording device to record the full-range signal from your performance. The level of the monitor mix can be controlled by the master monitor control (Fig. 6a).
text_image
Fig. 5 Sub-Woofer Insert Shielded Cable Here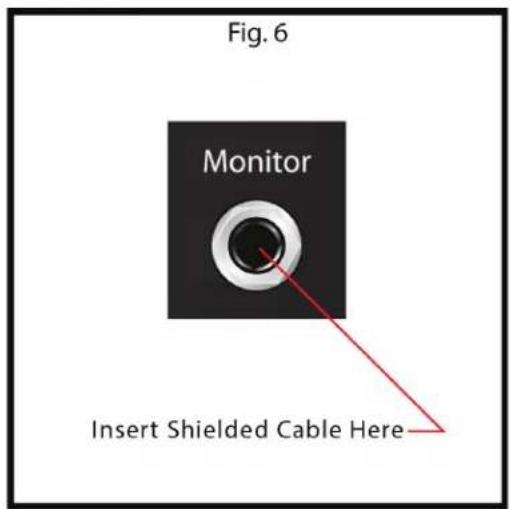
text_image
Fig. 6 Monitor Insert Shielded Cable Here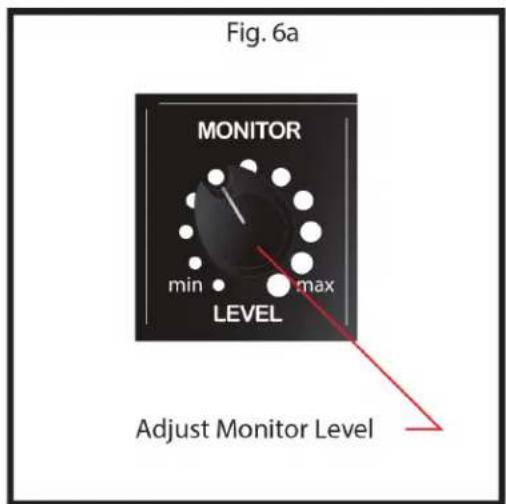
text_image
Fig. 6a MONITOR min max LEVEL Adjust Monitor LevelConnecting Microphone(s) or Line Input(s)
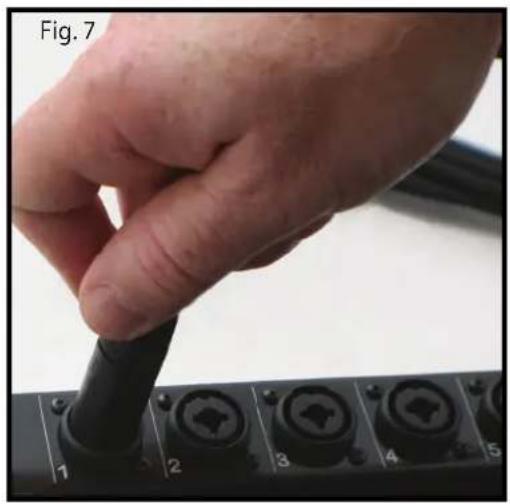
The Escort's powered mixer is designed to work with any good-quality, balanced, dynamic or condenser microphone such as Peavey's PV ^® i series of microphones. Connect the microphone to the XLR (three-pin) input connector as shown (Fig.7). If using multiple microphones, connect them in the order they will be on stage for easy adjustment to each microphone. To connect a line level device such as a keyboard, use a 1/4" instrument cable and insert into the center of the XLR-1/4" combo connector as shown (Fig.8).
natural_image
Close-up of a hand holding a black cable with multiple ports, labeled 'Fig. 7' (no other text or symbols visible)
natural_image
Hand using a screwdriver to adjust or install a terminal panel with numbered buttons (no text or symbols visible)Connecting Media Playback Sources
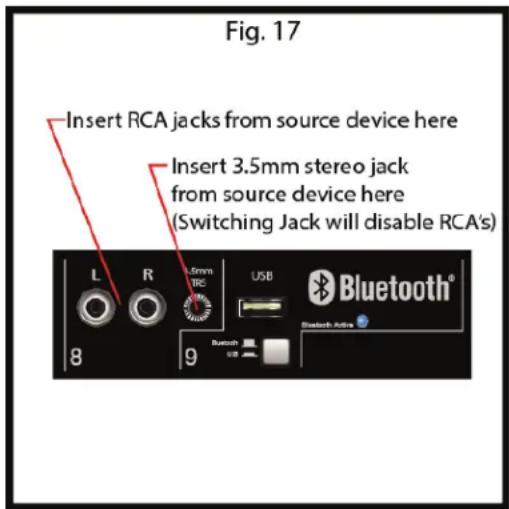
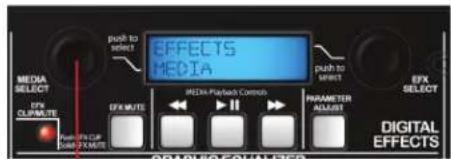
The Escort ^® powered mixer will accept various media playback devices. For connecting a CD player or grounded record player use the CHANNEL 8 RCA Left and Right connections. For connecting an MP3 player or smartphone with media playback use the 3.5mm stereo connector. This will require a stereo 3.5 mm cable (03007820) which can be found at your local Peavey dealer. When using a USB memory stick with MP3 or other audio files stored on it, insert the memory stick into the USB connector on CHANNEL 9, make sure the USB/Bluetooth ^® button is in the USB position, and use the screen and controls in the master section to navigate and play back audio files(Fig.9). Bluetooth connectivity is covered later in the manual under the MEDIA section.
Fig. 9
Insert USB memory device here

text_image
L R 3.5mm TR5 USB Bluetooth® 8 9Press button "in" to activate USB
text_image
EFFECTS MEDIA MEMA & Network Controls PARAMETER ASSETS DIGITAL EFFECTSUse knob to browse media files
Connecting Power
WARNING! Before connecting power make sure the power switch is in the OFF position.
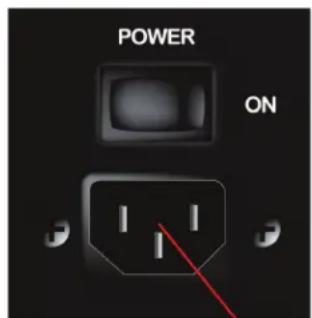
Connect the IEC power cord to the receptacle on the back panel of the unit as shown (Fig.10), and then to a suitable electrical outlet. If an extension cord is required, make sure it is a three-wire cord with an intact ground pin to preserve the safety ground.
NOTE: FOR UK ONLY
As the colours of the wires in the mains lead of this apparatus may not correspond with the coloured markings identifying the terminals in your plug, proceed as follows: (1) The wire that is coloured green and yellow must be connected to the terminal that is marked by the letter E, or by the Earth symbol, or coloured green or green and yellow. (2) The wire that is coloured blue must be connected to the terminal that is

marked with the letter N, or the colour black. (3) The wire that is coloured brown must be connected to the terminal marked with the letter L, or the colour red.
Fig. 10
text_image
POWER ONInsert power cord here-
Basic Operation:
Setting Controls and Turning Unit On
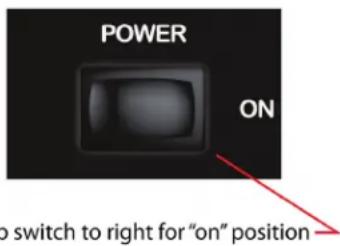
Before turning on power, make sure all speakers, microphones, and other input devices are connected. Set Master section controls to the 12 o'clock position and all other controls all the way down (rotated fully to the left). Turn power on by placing the ON/OFF switch located on the back of the mixer (Fig.11) in the ON position.
Fig. 11
text_image
POWER ON to switch to right for "on" positionBasic Operation:
Adjusting Gain and Volume Controls
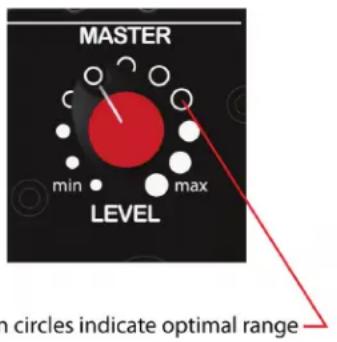
The optimal setting for the powered mixer and included speakers is marked on the MASTER LEVEL control (Fig.12). Adjust the CHANNEL LEVEL control (Fig.13) until the desired volume is achieved. If the desired volume is reached with the CHANNEL LEVEL turned down to one of the first three positions, turn the MASTER LEVEL down so you can turn the CHANNEL LEVEL up. If the desired volume is achieved when the CHANNEL LEVEL is close to max then raise the MASTER LEVEL so you can lower the CHANNEL LEVEL. These are the same as any basic mixer functions.
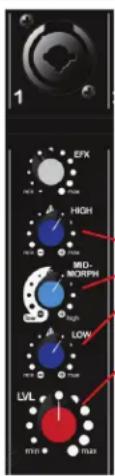
Adjusting Tone Controls
For each active channel adjust the HIGH, MID-MORPH ^® , and LOW controls to achieve desired sound. Use moderation when making these adjustments, as extreme high settings of any of these controls can lead to a distortion of the sound and an increased chance of feedback on microphone inputs.
HIGH
This High EQ shelving type of active tone control varies the treble frequencies (+/- 15dB at 12kHz) and is designed to remove noise or add brilliance to the signal, depending on the quality of the source.
MID-MORPH
Where most mid-range controls work at just one frequency, the Mid-Morph works at two. When turned to the left, it cuts at 250 Hz to reduce frequencies that muddy the sound. When turned to the right, it boosts at 4 kHz to add intelligibility to vocals. Either way, improved vocal or instrument definition can be achieved.
LOW
A shelving type of EQ that varies the bass frequency levels (+/-15dB at 80Hz). Low EQ adds depth to thin-sounding signals or cleans up the muddy ones. As with any EQ, use sparingly. Too much of this EQ can give you a booming bottom end.
Fig. 12
text_image
MASTER min max LEVEL on circles indicate optimal rangeFig. 13
text_image
1 EPK HIGH MID- MORPH LOW LVL 17:21 17:22Tone Controls
Channel Level Control
Effects:
Adjusting Effect Settings
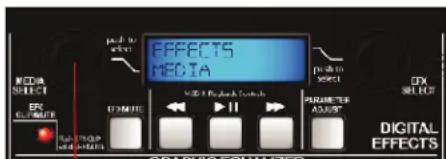
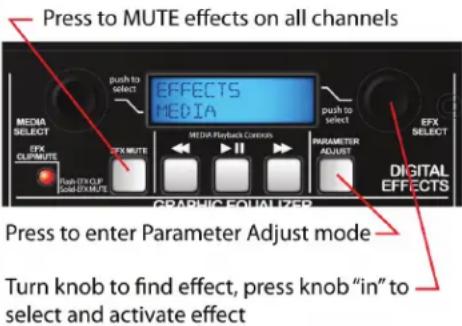
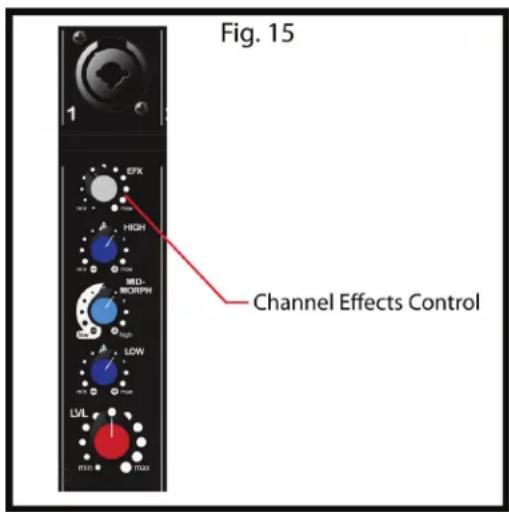
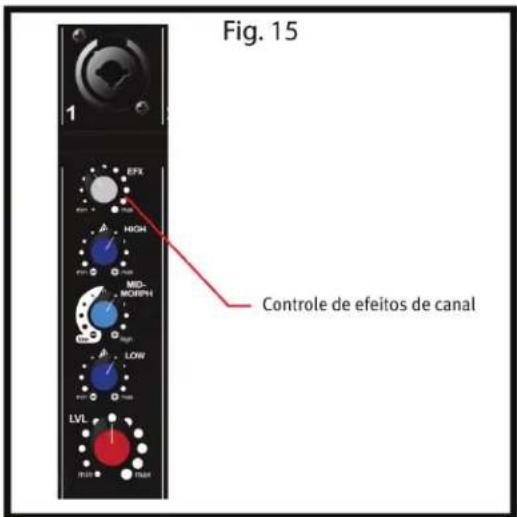
The Escort® has built-in digital effects. These effects can be selected in the MASTER section by turning the EFFECTS SELECT knob left or right until the desired effect is shown on the display (Fig.14). Once the desired effect is displayed on the screen push the knob in to select and activate the effect. To adjust the effect parameter simply press the PARAMETER ADJUST button (Fig.14) the available parameter and its adjustments will be shown on the display. Turn the EFFECTS SELECT knob left or right to adjust the parameter then press the PARAMETER ADJUST button or the EFFECTS SELECT knob to return to the effects select screen. To hear more or less of the effect, on any given channel, turn the CHANNEL EFX knob to the left to hear less of the effect, and to the right to hear more of the effect (Fig.15). The EFX MUTE button in the master section (Fig.14) will mute the effects on all channels. There are no effects on the media channels.
Fig. 14
text_image
Press to MUTE effects on all channels EFFECTS MEDIA push to select MEDIA SELECT EFX CLIP/MUTE EFX MUTE MEDIA Playback Controls PARAMETER ADJUST EFX SELECT DIGITAL EFFECTS PRUSH EXO.P. GOLD EXO.MUTE GRAPHIC EQUALIZER Press to enter Parameter Adjust mode Turn knob to find effect, press knob "in" to select and activate effectEffects:
Footswitchable Effects Defeat
Your new Escort ^® has a footswitchable effects defeat. This allows the user to mute the effects on all channels by use of a single button footswitch such as the Peavey Momentary Single-Button Switch (03050680) which can be purchased at your local Peavey dealer. Insert the 1/4" plug from the footswitch into the EFFECTS DEFEAT jack on the rear of the Escort mixer (Fig.16). Once connected, pressing the footswitch button will toggle the EFX MUTE (Fig.14).
Available Effects and Parameters
ON SCREEN NAME EFFECT AVAILABLE PARAMETER
| 1 REV Plate Br1 | Plate Reverb Bright Time | |
| 2 REV Plate Br2 | Plate Reverb Gentle Low-Pass Time | |
| 3 REV Plate Med | Plate Reverb Medium Low-Pass Time | |
| 4 REV Plate Dk1 | Plate Reverb Hard Low-Pass Time | |
| 5 REV Plate Dk2 | Plate Reverb Dark Time | |
| 6 REV Vocal Hall | Reverb Vocal Time | |
| 7 REV Vocal Big | Hall Reverb Vocal Huge | Time |
| 8 REV Vox Warm | Hall Reverb Vocal Glow Time | |
| 9 REV Strings | Hall Reverb Strings | Time |
| 10 REV Lg Brass | Hall Reverb Brass Hall Time | |
| 11 REV Vox Air | Room Reverb Vocal Air | Time |
| 12 REV Vox Club | Room Reverb Vocal Club Time | |
| 13 REV Snare | Room Reverb Snare Low | Time |
| 14 REV Ac Guitar | Room Reverb Acoustic Guitar | Time |
| 15 REV Sm Brass | Room Reverb Brass | Time |
| 16 ENH Tube | Enhancer Tube Distortion | Brightness |
| 17 ENH Vocal 1 | Vocal Enhancer Vox Brightness | |
| 18 ENH Vocal 2 | Vocal Enhancer Vox Medium | Brightness |
| 19 DLY Double | Delay Double | Time |
| 20 DLY Slap Delay Slapback | Time | |
| 21 DLY BRT 1 | Delay Bright, Few Repeats | Time |
| 22 DLY BRT 2 | Delay Bright, More Repeats | Time |
| 23 DLY BRT 3 | Delay Bright, Most Repeats | Time |
| 24 DLY Dark 1 | Delay Dark, Few Repeats | Time |
| 25 DLY Dark 2 | Delay Dark, More Repeats | Time |
| 26 DLY Dark 3 | Delay Dark, Most Repeats | Time |
| 27 CHO Deep Slow | Chorus High Depth, Slow Rate | Rate |
| 28 CHO Mod Wide | Chorus Moderate Depth, Wide Rate | Rate |
| 29 CHO Shrt Wide | Chorus Short Depth, Wide Rate | Rate |
| 30 CHO Shrt Fast | Chorus Short Depth, Fast Rate | Rate |
| 31 CHO Deep Mod | Chorus High Depth, Moderate Rate | Rate |
text_image
Fig. 15 1 EFX HIGH MID- MORPH LOW LVL Channel Effects Control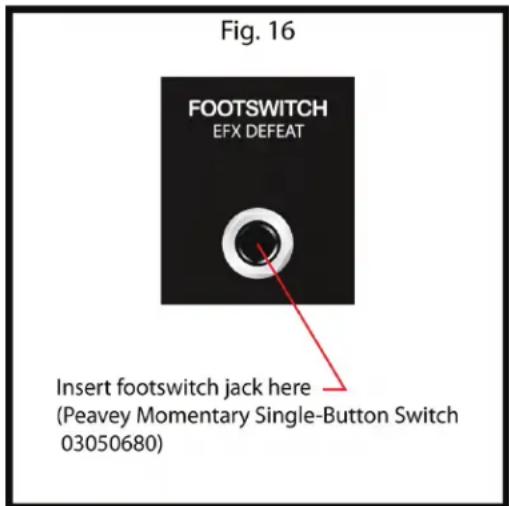
text_image
Fig. 16 FOOTSWITCH EFX DEFEAT Insert footswitch jack here (Peavey Momentary Single-Button Switch 03050680)MEDIA:
Playback from Media Source
Hook up your media source device as mentioned previously. Hook up your media source device as mentioned previously. When using RCA jacks for a CD player, record player, or tape machine make sure the 3.5mm TRS jack is not in use(Fig.17). Use the controls on the source device for play, stop, forward and reverse functions. Adjust channel controls on Escort® mixer for desired sound. For media playback using a MP3 player, smartphone, or other similar device connect using a stereo 3.5mm cable mentioned previously. Use the source device for playback controls. When a device is connected to the 3.5mm jack the RCA jacks are automatically disabled. For MP3 or audio file playback from a USB memory stick make sure the button is in the down position (Fig.18) so the USB plug is active. The currently active digital input (USB or Bluetooth®) will be displayed on the LCD in the Master section. Playback from a Bluetooth media source is covered later in this section.
NOTE: The Escort does not allow playback through multiple media inputs simultaneously.
With your USB device attached, use the MEDIA SELECT knob (Fig.19) to navigate through your audio files. Once the desired file is displayed on the screen press the MEDIA SELECT knob to cue that file. Use the controls on the mixer for play, pause, forward and reverse. If you do not choose to navigate or select a certain file the Escort will play the files in the order they are stored on your USB memory device.
Supported Audio File Types
.WAV
.MP3
.WMA
Bluetooth®
Bluetooth/USB swtich
Selects the audio source for channel 9. In the “down” position, the audio source is the USB slot. The LCD will indicate the slot is ready for a jump drive, and will display “Insert USB drive” (Refer to SETUP section, Connecting Media Playback Sources). In the “up” position, the audio source will be any connected Bluetooth device. The LCD will indicate this by displaying “Bluetooth Input”.
Bluetooth Active LED
The blue “Bluetooth Active” LED indicates the status of the Bluetooth connection. If the LED is off, the Bluetooth module is powered off. If the LED is flashing, the Escort is not paired with any device, but is available for connection. If the LED is lit continuously, that means a Bluetooth enabled device is paired with the Escort.
Bluetooth Operation
To listen to the music via the Bluetooth wireless connection, you must first pair (link) your Escort 6000 with your Bluetooth phone and/or music device.
Turn off any Bluetooth devices previously paired with the Escort 6000.
Turn on the Bluetooth feature on your phone or music device.
Make sure the Escort 6000 is ready for a Bluetooth connection.
The Bluetooth/USB switch must be in the "up" position.
The "Bluetooth Active" LED should be flashing.
The LCD will say, "Bluetooth input".
Place your phone or music device in Bluetooth search mode. The phone or music device will begin searching for the Escort 6000.
Select "ES6000" from the search results on your phone or music device.
Select Ok or Yes to pair your Escort 6000 with your phone or music device.
text_image
Fig. 17 Insert RCA jacks from source device here Insert 3.5mm stereo jack from source device here (Switching Jack will disable RCA's) L R 0.5mm TRC USB Bluetooth® 8 9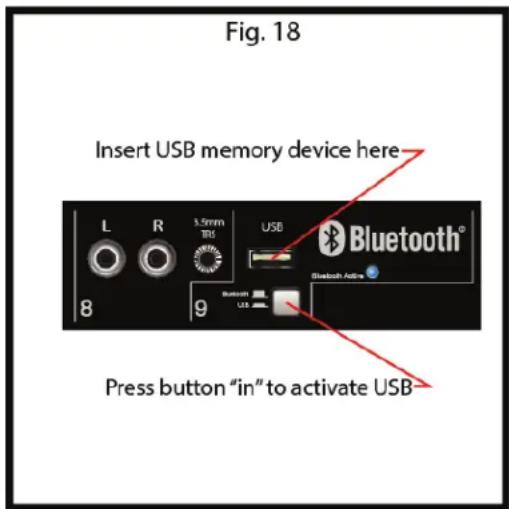
text_image
Fig. 18 Insert USB memory device here L R 3.5mm TRS USB Bluetooth® 8 9 Bluetooth Active Press button "in" to activate USB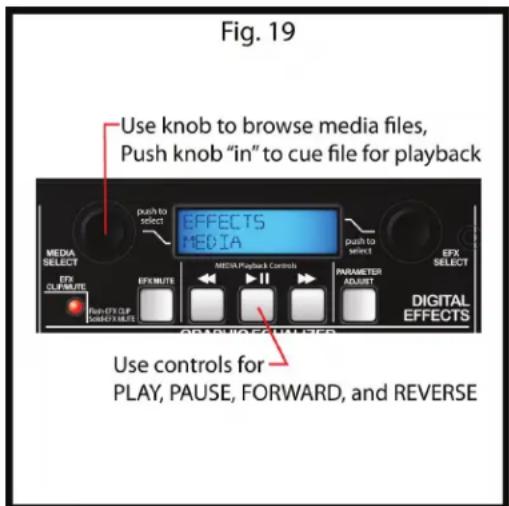
text_image
Fig. 19 Use knob to browse media files, Push knob "in" to cue file for playback EFFECTS MEDIA push to select MEDIA SELECT EFX CLIF/MUTE EFX MUTE MEDIA Playback Controls PARAMETER ADJUST EFX SELECT DIGITAL EFFECTS Use controls for PLAY, PAUSE, FORWARD, and REVERSEWhen your Escort® 6000 successfully pairs and connects with your phone or music device, the Bluetooth® Active LED changes from flashing to steadily lit. You will now be able to play music from your connected music source through your Escort 6000. The level can either be adjusted from the connected source or by the level control in channel 9.
*Wireless range can vary depending on Bluetooth class of source device, and may be subject to interference from obstructions such as walls or other electronic devices.
EQUALIZATION:
Using the Graphic Equalizer
Unlike the HIGH, MID-MORPH, and LOW controls on each channel that adjust only the tone of their own input signals, the seven-band graphic equalizer adjusts the tonal balance of all the signals going through the powered mixer. This graphic equalizer is also a powerful tool to help reduce or eliminate acoustic feedback. This offers the user great flexibility in adjusting the sound, but use moderation in making these adjustments.
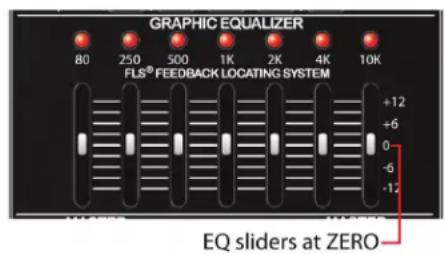
FLS® Feedback Locating System
The FLS (Feedback Locating System) LED indicators are invaluable tools in helping to reduce/eliminate feedback. Acoustic feedback is the loud howl or squealing sound heard through sound systems as the result of sound from the speakers re-entering the microphones. To use the FLS feature, start by setting all graphic EQ sliders (Fig. 20) to o. Then before the audience arrives, increase the MASTER LEVEL and/or CHANNEL LEVEL until feedback occurs. Note which LED illuminates and slightly lower the corresponding slider. This reduces gain at the feedback frequency and can be repeated if necessary to improve gain before feedback. Only adjust the sliders a small amount to avoid adversely affecting sound quality.
Fig. 20
text_image
GRAPHIC EQUALIZER 80 250 500 1K 2K 4K 10K FLS® FEEDBACK LOCATING SYSTEM +12 +6 0 -6 -12 EQ sliders at ZEROGENERAL USE TIPS:
Avoiding Acoustic Feedback
When encountering feedback it is always best to start looking at the placement of the mics and speakers in the system before resorting to equalization (EQ) adjustments. Make sure that the speakers are positioned to direct the sound toward the audience and away from the microphones. Position mics as close to the sound source as reasonable. Moving the mic closer increases the volume of the sound through the system without having to turn up the gain.
Microphone Usage Guidelines
When practical, a single microphone is preferred. Additional microphones pick up more sound from the speakers and each mic must then be turned down to prevent feedback. However, if you have difficulty balancing the level of different individuals with one mic or if you still cannot get sufficient gain, using more mics can offer an advantage. For example, giving several singers their own microphone allows placement of the microphones much closer to each singer. This increases the volume of the sound at the mic and far outweighs any detrimental effect from using multiple mics. It also allows the volume of each mic to be adjusted separately for proper balance.
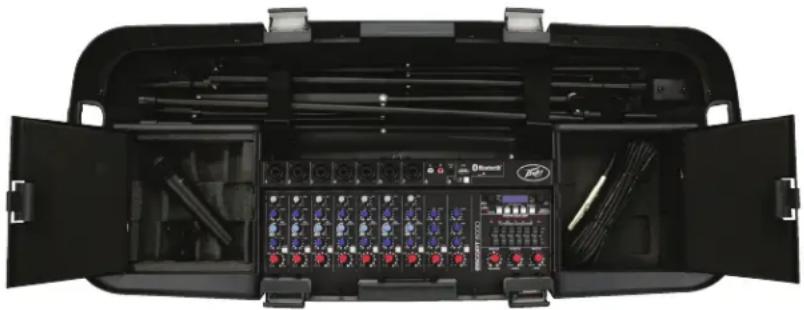
Packing the Escort®
One of the Escort's many benefits is that the entire sound system can be packed inside its easily transportable case (Fig.21). Begin by folding the speaker stands, then secure them into their storage compartment using the two straps. Place the optional microphone(s) in their storage compartment, putting the cables in the other compartment or with the speaker stands. Lay the speakers face down on top of the bottom tray and secure the four latches. The Escort is now ready to be carried or pulled on its built-in, luggage-style wheels.
Fig. 21
natural_image
Interior view of a black multi-compartment portable electronic device with multiple ports and cables (no visible text or labels)OPTIONS:
Optional Accessories (available from local Peavey dealer)
Microphone Stands - Tripod mic stand with boom (00722910)
Additional Microphones and Cables - PVi® 2 mic with cable included (00496360)
Microphone Wind Screens - Black wind screen (00069100)
Additional Speaker Cables in Various Lengths - 25' 16 AWG (00060450)
Additional Speaker Stands in Various Sizes - Black Speaker Stand (00722890)
Audio Cables for CD Player, Record Player, Tape Machine, or MP3 Player/Smartphone Hook-up
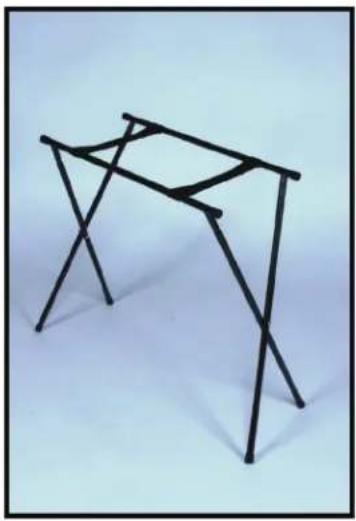
Optional Mixer Stand Assembly (00496340)
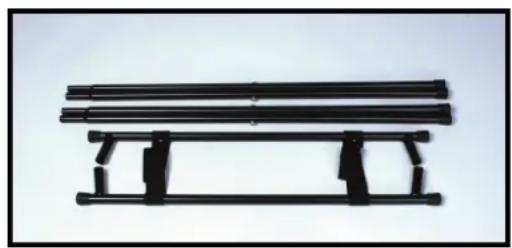
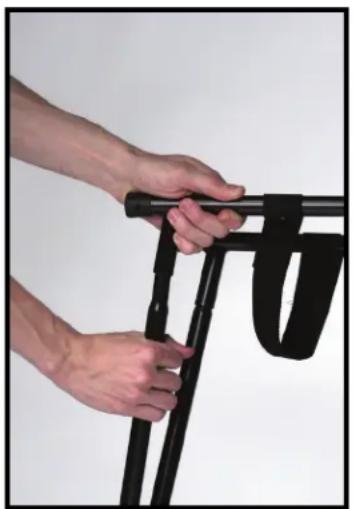
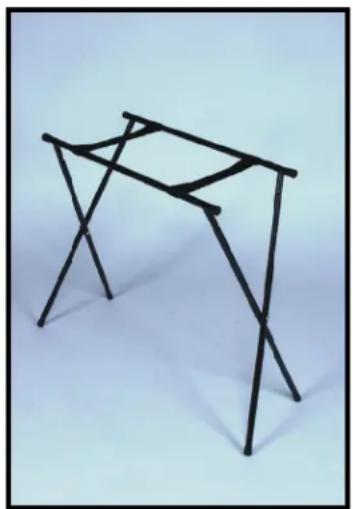
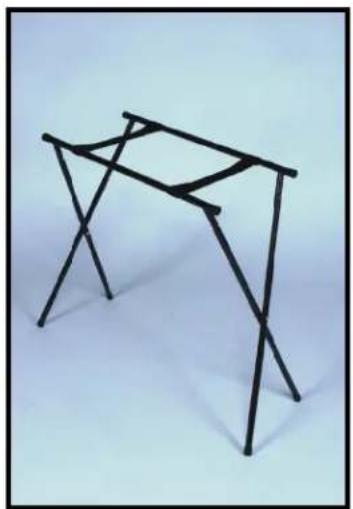
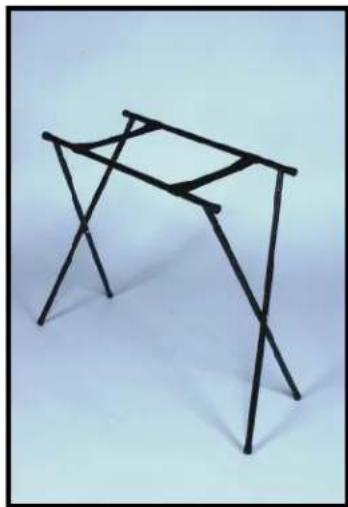
Remove the mixer stand from the case. The mixer stand consists of three parts: two pairs of legs and the stand cross-members (Fig.22). Hold the stand cross-member with the leg sockets together as shown (Fig.23). Fully insert one set of legs into the cross-members (Fig.24). Still holding the cross members together, set the legs on the floor and insert the second pair of legs. If you need to move the stand, carry it folded by holding the legs.

WARNING: For safety, be sure to fully open the mixer stand and place it on a stable, level surface.
Fig. 22
natural_image
Black metal bench with three parallel plates, supported by two supports (no text or symbols visible)Fig. 23
natural_image
Close-up of hands holding a black mechanical device with a strap, against a plain background (no text or symbols visible)Fig. 24

natural_image
Abstract geometric sculpture made of intersecting black lines on a light blue background (no text or symbols)Escort ^® 6000 Troubleshooting Guide
| Problem | Check | Correction |
| No sound (LCD not lit) | Is power switch on?Is line cord connected to live power outlet? | Turn power switch onConnect power cord to live outlet |
| No sound (LCD lit) | Are MASTER and CHANNEL GAIN controls up? | Adjust both MASTER and CHANNEL LEVEL controls upward to desired level. Check speaker connections. Turn mic switch on. Check mic or sound source connection. |
| No Effects | Are the channel EFX controls turned up?Is the master EFX MUTE enabled?Is an effect activated in menu? | Make sure desired effect is selected in Master effect menu. Check the master EFX MUTE. If the LED is illuminated the EFX MUTE is active. Press the EFX MUTE button once to disable. Adjust channel EFX control until audio effect is heard. |
| Files on USB memory device will not play back | Is the file cued for playback?Are the audio files the proper format? | Make sure once MEDIA SELECT knob is rotated to display desired file the knob is then pressed to cue the file. Make sure your audio files are the correct format.See the list of supported audio formats mentioned previously in this manual. |
| Loud howling or squeal from speakers | If it goes away when the CHANNEL or MASTER LEVEL controls are turned down, then it is acoustic feedback. | Reduce microphone gain. Reposition microphone behind or farther from speakers. Observe FLS light above Graphic EQ and reduce level of corresponding slider. |
| Sound is distorted | Is the CHANNEL GAIN at a very high setting? | Reduce LEVEL controls accordingly.Start with CHANNEL LEVEL then adjust MASTER LEVEL accordingly to achieve desired volume with no distortion. |
| No sound (Bluetooth') | Is the “Active” light flashing? | Place the Bluetooth/USB switch in the “Bluetooth” position.Bluetooth enabled device must be “paired” before music can be played through the Escort 6000. Once the device is paired, the Active LED will light continuously. |
Escort® 6000 Specifications:
Output Power: 300 watts RMS (per channel)
Frequency Response: 40 Hz to 20 kHz +/-3 dB
Overload Protection: 10 dB of DDT
" that limits the PA output to prevent clipping that can damage the speakers
Distortion: Less than 0.2% THD @ Max power
Signal/Noise Ratio: 88 dB mic input typical
AC Power: 115 V AC 60 Hz or 230 V AC 50/60 Hz
Weight Assembled: 50 lbs. (22.67 kg) (stands included)
Dimensions: 14.5" H x 36.75" W x 15.5" D (36.8 cm x 93.3 cm x 39.4 cm)
Speakers: Woofer 10" (254 mm) Piezoelectric Horn Tweeter
Phantom Power: 15VDC Available on all XLR Inputs
ESPAÑOL
Escort® 6000
natural_image
Close-up of a hand adjusting a black tripod-mounted device (no text or symbols visible)Fig. 1

natural_image
Close-up of a hand holding a small metal object with a black bracket (no text or symbols visible)Fig. 2
natural_image
Pure geometric diagram with dashed lines and two black shapes, no text or symbols present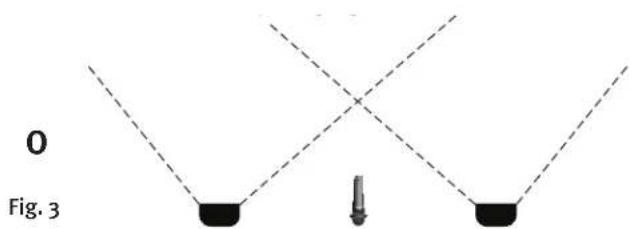
text_image
0 Fig. 3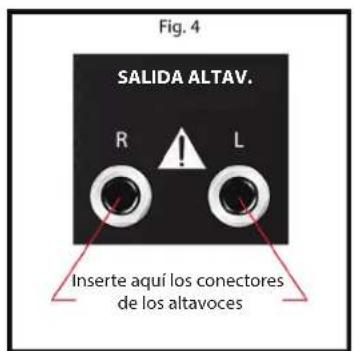
natural_image
Close-up of a hand holding a black cylindrical component, with numbered buttons (1–5) on the leftmost panel (no text or symbols on the device itself)
natural_image
Hand using a screwdriver to adjust or install a black terminal block (no text or symbols visible)LED Bluetooth Active
text_image
Use la perilla para desplazarse por los archivos de medios, pulse la perilla "hacia adentro" para marcar el archivo para su reproducción EFFECTS MEDIA MEDA SELECT EPS CUMINUTE EFX/MUTE MEDA Playback Control EFX/SELECT EFX/MUTE EFX/SELECT EFX/SELECT EFX/SELECT EFX/SELECT EFX/SELECT EFX/SELECT EFX/SELECT EFX/SELECT EFX/SELECT EFX/SELECT EFX/SELECT EFX/SELECT EFX/SELECT EFX/SELECT EFX/SELECT EFX/SELECT EFX/SELECT EFX/SELECT EFX/SELECT EFX/SELECT EFX/Select EFX/Select EFX/Select EFX/Select EFX/Select EFX/Select EFX/Select EFX/Select EFX/Select EFX/Select EFX/Select EFX/Select EFX/Select EFX/Select EFX/Select EFX/Select EFX/Select EFX/Select EFX/Select EFX/Select EFX/ Select EFX/Select EFX/Select EFX/Select EFX/Select EFX/Select EFX/Select EFX/Select EFX/Select EFX/Select EFX/Select EFX/Select EFX/Select EFX/Select EFX/Select EFX/Select EFX/Select EFX/Select EFX/Select EFX/Select EFX/Adjust EFX/Adjust EFX/Adjust EFX/Adjust EFX/Adjust EFX/Adjust EFX/Adjust EFX/Adjust EFX/Adjust EFX/Adjust EFX/Adjust EFX/Adjust EFX/Adjust EFX/Adjust EFX/Adjust EFX/Adjust EFX/Adjust EFX/Adjust EFX/Adjust EFX/Adjust EFX/ adjustnatural_image
Interior view of a black automotive diagnostic tool kit with multiple test equipment and wiring (no visible text or labels)OPCIONES:
natural_image
Black metal bench with three parallel plates, no text or symbols visibleFig. 23

natural_image
Close-up of hands holding a black mechanical device with straps, against a plain background (no text or symbols visible)Fig. 24
natural_image
Abstract geometric sculpture made of intersecting black lines on a light background (no text or symbols)natural_image
Close-up of a hand adjusting a black tripod-mounted component (no text or symbols visible)Fig. 1

natural_image
Close-up of a hand holding a small black object with a metal clip, mounted on a black stand (no text or symbols visible)Fig. 2
natural_image
Pure geometric diagram showing two black objects with dashed lines forming a V-shape (no text or symbols)OU
natural_image
Simple diagram showing two black blocks connected by dashed lines with a central vertical bar (no text or symbols)Fig. 3
natural_image
Close-up of a hand holding a black cylindrical component, with numbered ports (1–5) on the control panel (no text or symbols visible)
natural_image
Hand using a screwdriver to adjust or install a component on a black electronic device (no visible text or symbols)natural_image
Interior view of a black multi-functional portable electronic device with multiple ports and cables (no visible text or labels)OPTIONS :
natural_image
Black metal bench with three parallel plates, supported by support frames (no text or symbols visible)Fig. 23

natural_image
Close-up of hands holding a black mechanical device with a strap, against a plain background (no text or symbols visible)Fig. 24

natural_image
Abstract geometric sculpture made of intersecting black lines on a light background (no text or symbols)natural_image
Close-up of a hand adjusting a black tripod-mounted device (no text or symbols visible)Abb. 1

natural_image
Close-up of a hand holding a small black object with a string, mounted on a black stand (no visible text or symbols)Abb. 2
natural_image
Close-up of a hand holding a black cylindrical component, with numbered buttons (1–7) on the leftmost panel (no readable text or symbols)
natural_image
Hand using a screwdriver to adjust or install a control panel with numbered buttons (1–6), no visible text or symbols on the device itself.natural_image
Interior view of a black automotive diagnostic tool kit with multiple test panels and wiring (no visible text or labels)OPTIONEN:
natural_image
Black metal bench with three parallel plates, supported by two supports (no text or symbols visible)Abb. 23

natural_image
Close-up of hands holding a black mechanical device with a strap (no visible text or symbols)Abb. 24

natural_image
Abstract geometric sculpture made of intersecting black lines on a light background (no text or symbols)(36.8 cm x 93.3 cm x 39.4 cm)
natural_image
Close-up of a hand adjusting a black tripod-mounted camera component (no text or symbols visible)Bild 1

natural_image
Close-up of a hand holding a small metal object with a black bracket (no visible text or symbols)Bild 2
natural_image
Pure geometric diagram with intersecting dashed lines and two black shapes, no text or symbols present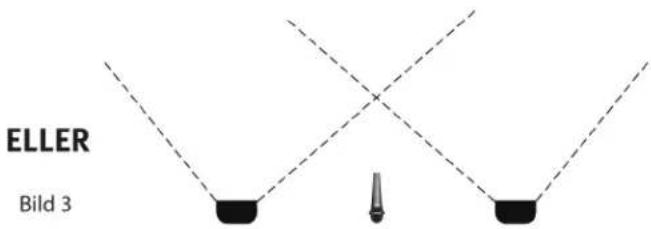
natural_image
Close-up of a hand holding a black cylindrical component, with numbered ports (1–5) on a black panel background (no readable text or symbols)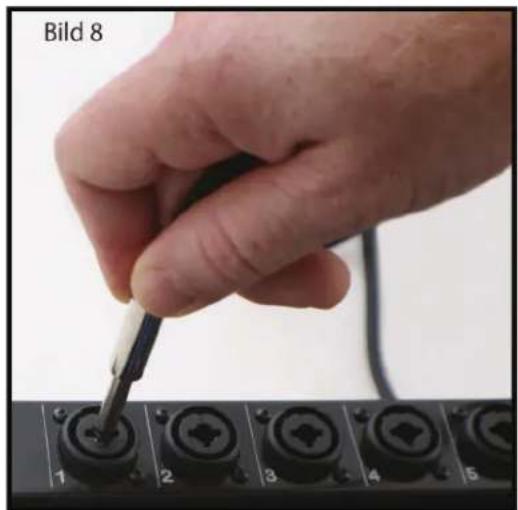
natural_image
Hand using a tool to adjust or install a component labeled 'Bild 8' (no other text or symbols visible)natural_image
Interior view of a black multi-compartment audio testing kit with multiple audio equipment modules and open doors (no visible text or labels)TILLBEHÖR:
natural_image
Black metal bench with two parallel plates, no text or symbols visibleBild 23

natural_image
Close-up of hands installing or adjusting a black mechanical component (no text or symbols visible)Bild 24
natural_image
Simple line drawing of a table structure with no text or symbolsnatural_image
Close-up of a hand adjusting a black tripod-mounted device (no text or symbols visible)Fig. 1

natural_image
Close-up of a hand holding a small black object with a string, mounted on a black stand (no visible text or symbols)Fig. 2
natural_image
Pure geometric diagram with intersecting dashed lines and black shapes, no text or symbols present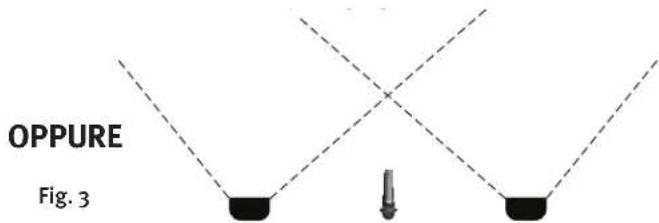
text_image
OPPURE Fig. 3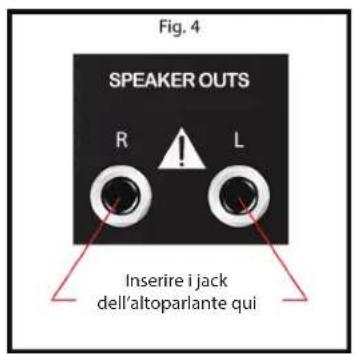
natural_image
Close-up of a hand inserting a black cable into a device panel (no visible text or symbols)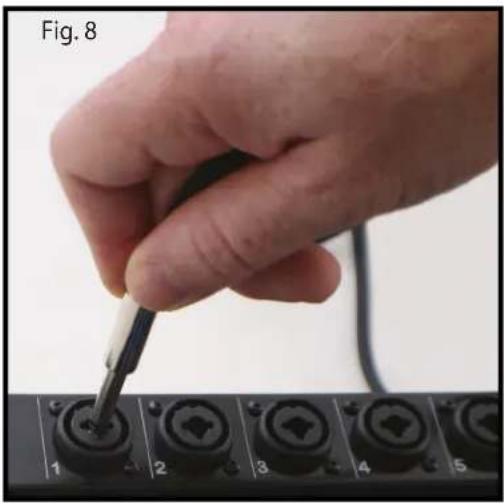
natural_image
Hand using a screwdriver to press a black key on a control panel (no text or symbols visible)Bluetooth Active LED
natural_image
Interior view of a black multi-case medical device with open doors, internal modules, and cable connectors (no visible text or symbols)OPZIONI:
natural_image
Black metal bench with three parallel plates, supported by two supports (no text or symbols visible)Fig. 23

natural_image
Close-up of hands holding a black mechanical device with a strap (no visible text or symbols)Fig. 24

natural_image
Abstract geometric sculpture made of intersecting black lines on a light background (no text or symbols)natural_image
Close-up of a hand adjusting a black tripod-mounted component (no text or symbols visible)Fig. 1
natural_image
Close-up of a hand holding a small metal object with a spring-like tool, mounted on a black stand (no visible text or symbols)Fig. 2
natural_image
Pure geometric diagram with two black shapes and dashed lines forming a symmetrical pattern (no text or symbols)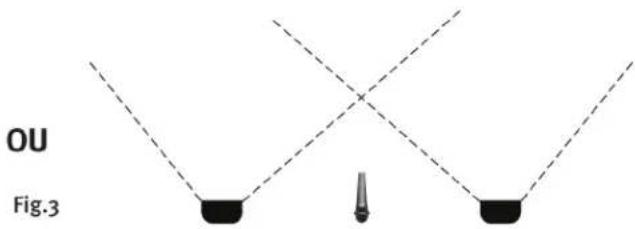
text_image
OU Fig.3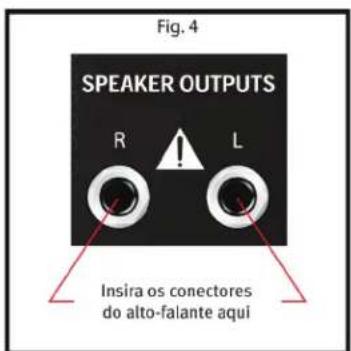
natural_image
Close-up of a hand holding a black cylindrical device with multiple ports, labeled 1 to 5 (no text or symbols on the device itself)
natural_image
Hand using a screwdriver to adjust or install a black component on a control panel (no text or symbols visible)| NOME NO VISOR | EFEITO | PARÂMETRO DISPONÍVEL |
| 1 REV Plate Br1 | Plate Reverb Bright | Tempo |
| 2 REV Plate Br2 | Plate Reverb Gentle Low-Pass | Tempo |
| 3 REV Plate Med | Plate Reverb Medium Low-Pass | Tempo |
| 4 REV Plate Dk1 | Plate Reverb Hard Low-Pass | Tempo |
| 5 REV Plate Dk2 | Plate Reverb Dark | Tempo |
| 6 REV Vocal | Hall Reverb Vocal | Tempo |
| 7 REV Vocal Big | Hall Reverb Vocal Huge | Tempo |
| 8 REV Vox Warm | Hall Reverb Vocal Glow | Tempo |
| 9 REV Strings | Hall Reverb Strings | Tempo |
| 10 REV Lg Brass | Hall Reverb Brass Hall | Tempo |
| 11 REV Vox Air | Room Reverb Vocal Air | Tempo |
| 12 REV Vox Club | Room Reverb Vocal Club | Tempo |
| 13 REV Snare | Room Reverb Snare Low | Tempo |
| 14 REV Ac Guitar | Room Reverb Acoustic Guitar | Tempo |
| 15 REV Sm Brass | Room Reverb Brass | Tempo |
| 16 ENH Tube | Enhancer Tube Distortion | Brilho |
| 17 ENH Vocal 1 | Vocal Enhancer Vox | Brilho |
| 18 ENH Vocal 2 | Vocal Enhancer Vox Medium | Brilho |
| 19 DLY Double | Delay Double | Tempo |
| 20 DLY Slap | Delay Slapback | Tempo |
| 21 DLY BRT 1 | Delay Bright, Few Repeats | Tempo |
| 22 DLY BRT 2 | Delay Bright, More Repeats | Tempo |
| 23 DLY BRT 3 | Delay Bright, Most Repeats | Tempo |
| 24 DLY Dark 1 | Delay Dark, Few Repeats | Tempo |
| 25 DLY Dark 2 | Delay Dark, More Repeats | Tempo |
| 26 DLY Dark 3 | Delay Dark, Most Repeats | Tempo |
| 27 CHO Deep Slow | Chorus High Depth, Slow Rate | Taxa |
| 28 CHO Mod Wide | Chorus Moderate Depth, Wide Rate | Taxa |
| 29 CHO Shrt Wide | Chorus Short Depth, Wide Rate | Taxa |
| 30 CHO Shrt Fast | Chorus Short Depth, Fast Rate | Taxa |
| 31 CHO Deep Mod | Chorus High Depth, Moderate Rate | Taxa |
text_image
Fig. 15 1 EFX HIGH MID-MOIPH LOW LVL Controle de efeitos de canal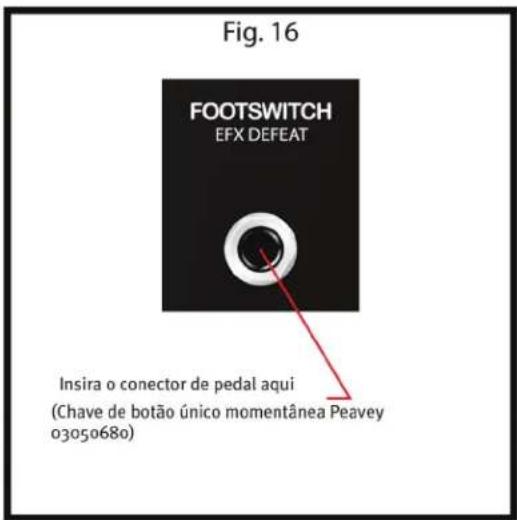
natural_image
Interior view of a black multi-case medical or electrical device with open doors, internal modules, and cable (no visible text or symbols)OPCIONAIS:
natural_image
Black metal bench with two parallel plates, supported by support legs (no text or symbols visible)Fig. 23

natural_image
Close-up of hands installing a black mechanical device with a strap (no text or symbols visible)Fig. 24

natural_image
Abstract geometric sculpture made of intersecting black lines on a light background (no text or symbols)natural_image
Close-up of a hand adjusting a black tripod-mounted camera component (no text or symbols visible)图1
natural_image
Close-up of a hand holding a small metal object with a black bracket (no text or symbols visible)图1
natural_image
Pure geometric diagram with dashed lines and two black shapes, no text or symbols present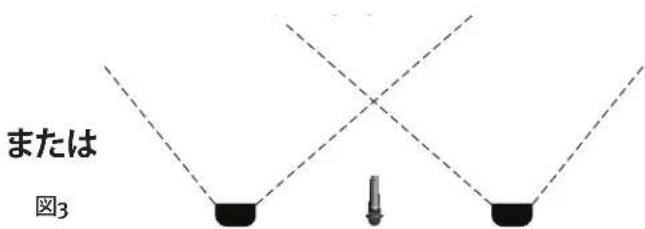
text_image
または 図3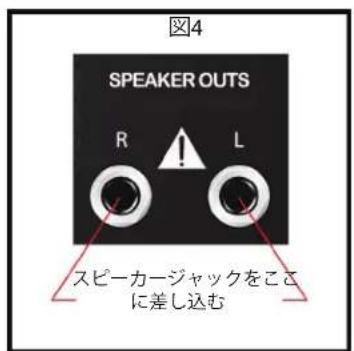
natural_image
Close-up of a hand holding a black cylindrical component, with numbered buttons (1-7) on the left panel, no visible text or symbols on the device itself.
text_image
图8 1 2 3 4 5メディア再生ソースの接続
text_image
L R 3.5mm T16 USB Bluetooth® 8 9 Bluetooth Activeボタンを"イン"にしてUSBを有効化
text_image
MEDIA SELECT EFX CLIMATE push to select! EFFECTS MEDIA EFX MUTE EFX Platform Control PARAMETER ADJUST push to select! EFX SELECT DIGITAL EFFECTS COMPLISSIONALノブでメディアファイルを参照
電源の接続
14 REV Ac Guitar Room Reverb Acoustic Guitar 時間
15 REV Sm Brass Room Reverb Brass 時間
Bluetooth Active LED
natural_image
Interior view of a black automotive testing station with multiple electronic equipment modules and open doors (no visible text or labels)オプション
natural_image
Black metal bench with three parallel plates, supported by support frames (no text or symbols visible)图23
natural_image
Close-up of hands holding a black mechanical device with a handle, against a plain white background (no text or symbols visible)图24
natural_image
Abstract black line drawing of a geometric structure resembling a table or frame (no text or symbols)(36.8 cm x 93.3 cm x 39.4 cm)
14.5" H x 36.75" W x 15.5" D
スピーカー:
ピエゾホーンツイーター
ウーファー 10" (254 mm)
简体中文
Escort® 6000
便携式专业音响系统
natural_image
Close-up of a hand adjusting a black tripod-mounted camera component (no text or symbols visible)图1

natural_image
Close-up of a hand holding a black mechanical component with a spring-like hook (no text or symbols visible)图2
natural_image
Pure geometric diagram with dashed lines and two black shapes, no text or symbols present或
natural_image
Simple diagram showing three black blocks with dashed lines and a central vertical object (no text or symbols)图3
图4
text_image
SPEAKER OUTS R L 扬声器插孔
natural_image
Interior view of a black multi-compartment audio testing unit with multiple audio equipment modules and open doors (no visible text or labels)选配件:
选配附件(可在当地百威经销商处购买)
natural_image
Black metal bench with three parallel plates, supported by support beams (no text or symbols visible)图23
natural_image
Close-up of hands holding a black mechanical device with a curved handle (no text or symbols visible)图24
natural_image
Simple line drawing of a four-legged table structure (no text or symbols)Escort® 6000 故障排除指南
natural_image
Close-up of a hand adjusting a black tripod-mounted camera component (no text or symbols visible)그림 1
natural_image
Close-up of a hand holding a small metal object with a black bracket (no visible text or symbols)그림 1
natural_image
Pure geometric diagram with dashed lines and two black shapes, no text or symbols present또는
natural_image
Pure diagram of three black blocks with dashed lines and a small vertical object at the bottom (no text or symbols)그런 3
natural_image
Interior view of a black automotive testing station with multiple electronic equipment modules and open doors (no visible text or labels)옵션:
natural_image
Black metal bench with three parallel plates, supported by two supports (no text or symbols visible)그림 23
natural_image
Close-up of hands holding a black mechanical device with a handle, against a plain background (no text or symbols visible)그림 24

natural_image
Simple line drawing of a folding table structure (no text or symbols)조립 중량: 50 lbs. (22.67 kg) (stands included)
치수:
(36.8 cm x 93.3 cm x 39.4 cm)
14.5" H x 36.75" W x 15.5" D
natural_image
Abstract black-and-white graphic design resembling stylized figures or a bird, with no readable text or symbols.www.peavey.com
Warranty registration and information for U.S. customers available online at
www.peavey.com/warranty
or use the QR tag below

Features and specifications subject to change without notice.
Peavey Electronics Corporation
5022 Hartley Peavey Drive
Meridian, MS 39305
(601) 483-5365
FAX (601) 486-1278

Logo referenced in Directive 2002/96/EC Annex IV
(OJ(L)37/38,13.02.03 and defined in EN 50419: 2005
The bar is the symbol for marking of new waste and
is applied only to equipment manufactured after 12 August 2005
13 August 2005