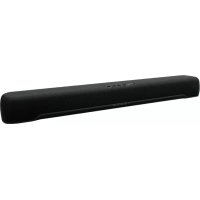
SRC30A - Soundbar YAMAHA - Free user manual and instructions
Find the device manual for free SRC30A YAMAHA in PDF.



User questions about SRC30A YAMAHA
0 question about this device. Answer the ones you know or ask your own.
Ask a new question about this device
Download the instructions for your Soundbar in PDF format for free! Find your manual SRC30A - YAMAHA and take your electronic device back in hand. On this page are published all the documents necessary for the use of your device. SRC30A by YAMAHA.
USER MANUAL SRC30A YAMAHA
Thank you for purchasing this Yamaha product.
This product is a bar-shaped speaker system that can be used by connecting it to a TV. Audio content from a Bluetooth ^® device can also be played through the sound bar.
- Be sure to read this document and the included Safety Brochure to ensure proper and safe use. Keep these documents readily available for future reference.
Safety Brochure
Be sure to read the Safety Brochure first to ensure safe use.

Quick Start Guide (this document)
This document describes the procedure for enjoying the sound of a TV or Bluetooth device and the main functions.
– Confirming contents of product package (p. 4)
– Preparing the remote control (p. 5)
- Installing the product (p. 5)
- Connecting a TV (p. 6)
- Connecting to power (p. 8)
- Playing TV sound through the sound bar (p. 8)
- Adjusting the sound to your preference (p. 9)
- Listening to audio from a Bluetooth® device (p. 10)
- Controlling the sound bar via the smartphone app (p. 10)

User Guide
More detailed information is described.
https://manual.yamaha.com/av/22/src30a/

Confirming contents of product package
This product includes the following main devices and accessories. Take out all items from the box and make sure that all items are present.
■ Main devices

Sound bar (SR-CUC30A)
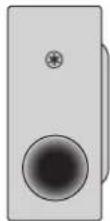
Subwoofer (SR-WSWC30A)
NOTE
- An HDMI cable is not included with this product. Prepare a commercially available one.
■ Accessories
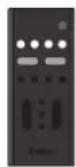
Remote control

Power cords (×2)

AC adaptor
(Model number:
ANAD-420FIOT-B)
Use when mounting the sound bar on a wall.


Spacers (A: ×2, B: ×2 on 1 sheet)

Mounting template
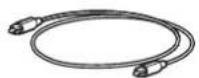
Digital optical audio cable

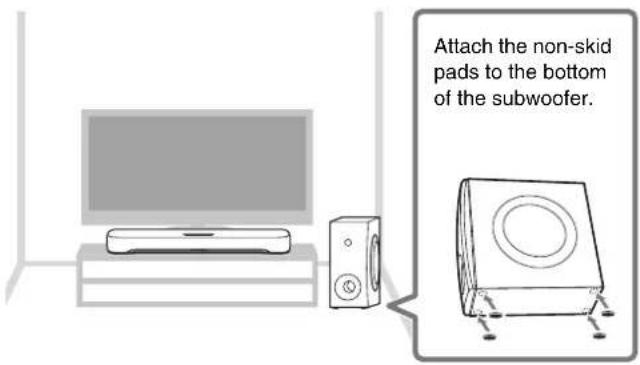
Non-skid pads (4 on 1 sheet)
Attach these to the bottom of the subwoofer.
- Quick Start Guide (this document)
- Safety Brochure
Preparing the remote control
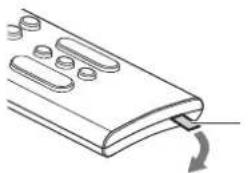
A Lithium battery (CR2025) has already been inserted into the remote control. Pull out the insulation sheet as follows so as to use the remote control.
natural_image
Simple line drawing of a remote control panel with scroll buttons and an arrow indicating rotation (no text or symbols)Battery insulating strip
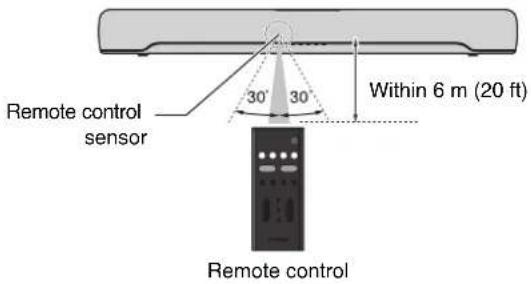
Operating range of the remote control
The remote control can be used to control the functions of this product. When using the remote control, point the remote control at the remote control sensor of the sound bar within the range shown in the following illustration:
Installing the product
Install the sound bar and subwoofer as shown in the following illustration:
NOTE
- The subwoofer can also be used on its side. See the User Guide for details.

User Guide
For the proper installation of the sound bar on a wall, make sure to have it done by a qualified contractor. See the Wall Mounting Installation Guide on our website for the installation method.

Wall Mounting
Installation Guide
Connecting a TV
Connect a TV to the sound bar. Select the connection procedure according to the function to be used. The differences depending on the connection procedure are as follows:
Function and connection procedure
| HDMI Control function ^1) | Jack of TV to connect to | Connection procedure | |
| Digital optical audio cable (included) | - | Digital optical audio output jack  | “Connecting a TV using the digital optical audio cable (included)” (on the right) |
| HDMI cable (commercially available) | √ | HDMI input jack (ARC compatible ^2) ) | “Connecting a TV using an HDMI cable (commercially available)” (on the next page) |
1) The HDMI Control function allows the sound bar to be controlled using the TV's remote control. The following functions can be controlled using the TV's remote control:
- Turn the power on and off
Both the TV and the sound bar turn on/off at the same time.
- Volume adjustment
The sound bar's volume can be adjusted when the TV's audio output is set to the sound bar.
2) When connecting to an HDMI input jack not compatible with ARC, connect with both an HDMI cable and a digital optical audio cable.
NOTE
- The type and quality of the TV audio signal transmitted by either the digital optical audio cable or the HDMI cable is the same.
Connecting a TV using the digital optical audio cable (included)
The TV's audio signal is transmitted to the sound bar when the sound bar is connected to a TV using the included digital optical audio cable. The HDMI Control function that controls the sound bar using a TV's remote control cannot be used.
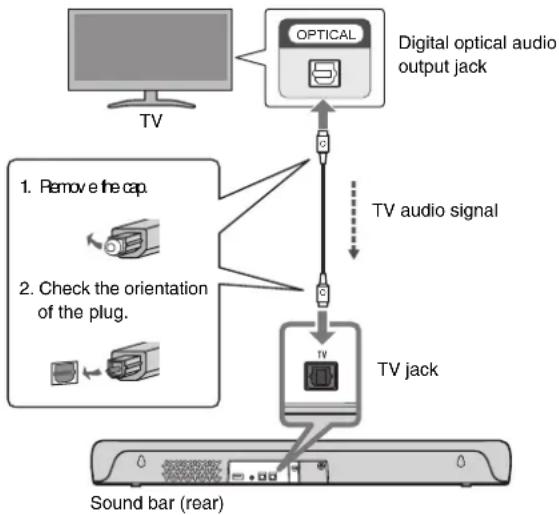
flowchart
graph TD
    A["TV"] --> B["OPTICAL"]
    B --> C["Digital optical audio output jack"]
    C --> D["TV jack"]
    D --> E["Sound bar (rear)"]
    F["1. Remove the cap"] --> D
    G["2. Check the orientation of the plug."] --> D
    H["TV audio signal"] --> D
NOTE
- Connect AV devices (such as BD/DVD players and set top boxes) to the TV's HDMI input jacks.
Connecting a TV using an HDMI cable (commercially available)
Control signals are transmitted from the TV to the sound bar when the sound bar is connected to a TV using an HDMI cable (commercially available). This will enable you to use the HDMI Control function that controls the sound bar using the TV's remote control. If the HDMI cable is connected to the TV's HDMI input jack compatible with Audio Return Channel (labeled as "ARC"), the TV audio signal is also transmitted to the sound bar via the HDMI cable. Therefore, a TV can be connected to the sound bar using a single HDMI cable. When connecting to an HDMI input jack not compatible with ARC, also connect the included digital optical audio cable to transmit the TV audio signal to the sound bar.
Connecting to an ARC-compatible HDMI input jack Connecting to an HDMI input jack not compatible with ARC
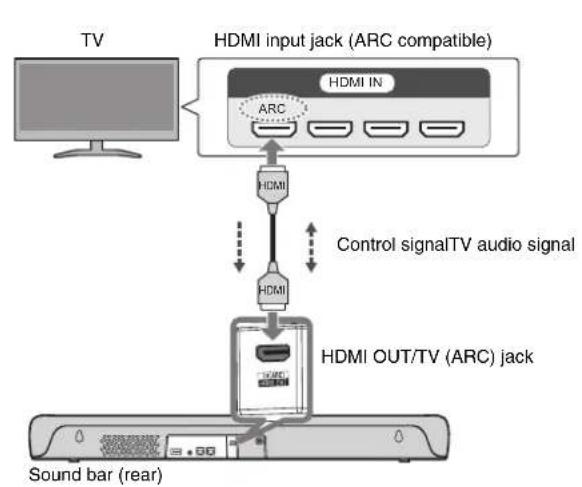
flowchart
graph TD
    A["TV"] --> B["HDMI input jack (ARC compatible)"]
    B --> C["HDMI IN"]
    C --> D["ARC"]
    D --> E["Control signal"]
    E --> F["HDMI"]
    F --> G["HDMI OUT/TV (ARC) jack"]
    G --> H["Sound bar (rear)"]
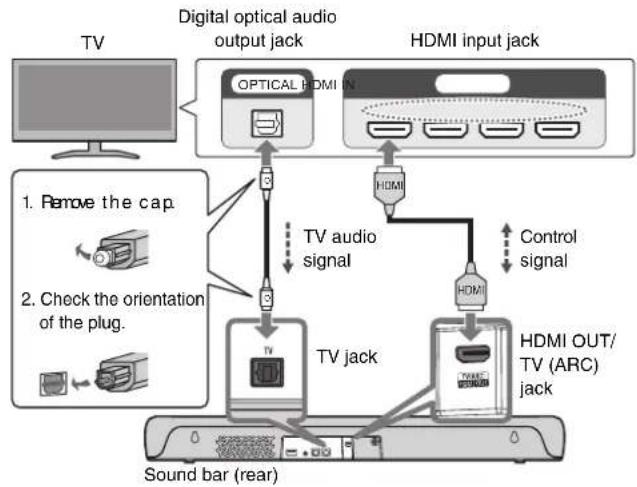
flowchart
graph TD
    A["TV"] --> B["Digital optical audio output jack"]
    B --> C["OPTICAL HDMI IN"]
    C --> D["HDMI"]
    D --> E["Control signal"]
    E --> F["HDMI"]
    F --> G["HDMI OUT/TV (ARC) jack"]
    G --> H["Sound bar (rear)"]
    I["1. Remove the cap"] --> J["3"]
    K["2. Check the orientation of the plug."] --> L["3"]
    M["3"] --> N["TV audio signal"]
    O["4"] --> P["TV jack"]
    Q["5"] --> R[7/8/9/10/11/12/13/14/15/16/17/18/19/20/21/22/23/24/25/26/27/28/29/30/31/32/33/34/35/36/37/38/39/40/41/42/43/44/45/46/47/48/49/50/51/52/53/54/55/56/57/58/59/60/61/62/63/64/65/66/67/68/69/70/71/72/73/74/75/76/77/78/79/80/81/82/83/84/85/86/87/88/89/90/91/92/93/94/95/96/97/98/99
NOTE
- When the sound bar is connected to a TV via an HDMI cable, confirm that the TV's settings are properly configured as follows:
- The TV's HDMI Control function is enabled.
- The TV's audio output is set to ARC (when an ARC-compatible HDMI input jack is connected).
- Connect AV devices (such as BD/DVD players and set top boxes) to the TV's HDMI input jacks.
Connecting to power
After connecting the sound bar to the TV, connect the sound bar and subwoofer to power as follows:
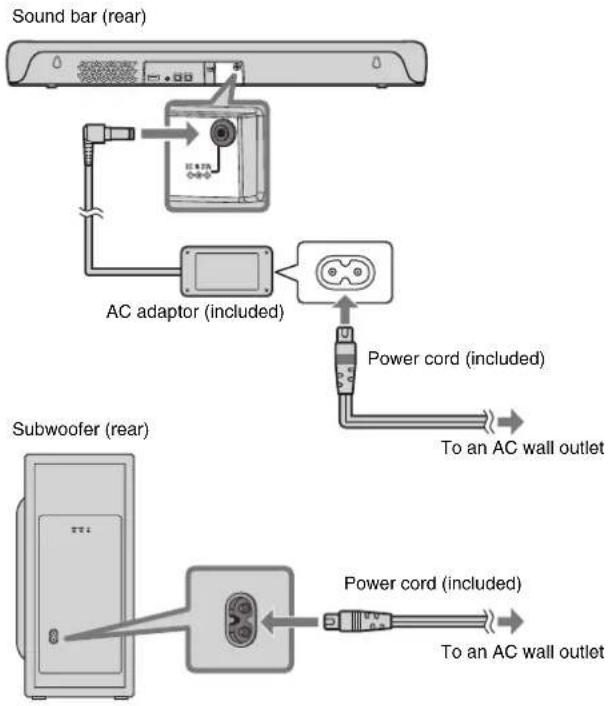
flowchart
graph TD
    A["Sound bar (rear)"] --> B["AC adaptor (included)"]
    B --> C["Power cord (included)"]
    C --> D["To an AC wall outlet"]
    E["Subwoofer (rear)"] --> F["Power cord (included)"]
    F --> G["To an AC wall outlet"]
Playing TV sound through the sound bar
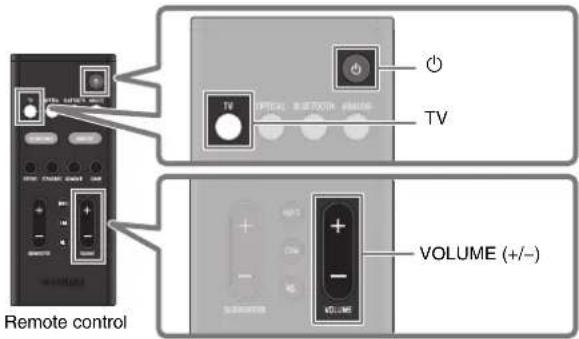
1 Turn on the TV.
When the HDMI Control function of the TV is enabled, the sound bar will also turn on. In this case, go to Step 4.
2 Turn on the sound bar.
Press the ⏻ (power) button on the remote control.
The power of the subwoofer also turns on at the same time.
3 Press TV.
4 Press VOLUME (+/-) to adjust the volume.
Adjusting the sound to your preference
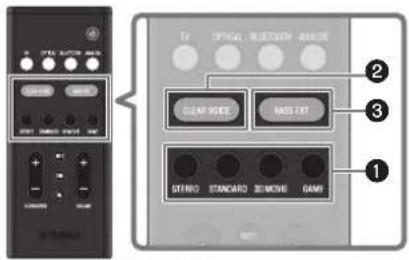
Remote control
① Listening to audio with sound that matches the video or music content (Sound mode)
A sound mode can be selected from among three sound modes that produce surround-sound fields and one sound mode for stereo playback.
STEREO
This sound mode provides stereo playback. It is the sound mode best suited for music playback.
STANDARD
This sound mode provides surround playback that is best suited for TV programs such as sports broadcasts. It emphasizes human voices and makes them easier to hear, while creating a sense of presence.
3D MOVIE
This sound mode provides surround playback that is best suited for movies. It reproduces a three-dimensional sound field and creates a sound space that seems to envelop your body.
GAME
This sound mode provides surround playback that is best suited for video games. Accurate localization of individual sound effects provides a highly immersive gaming experience.
②Playing back human voices clearly (CLEAR VOICE)
The human voices within the audio can be heard more easily when the Clear Voice function is enabled. The function is recommended for playback at a low volume and for movies or dramas that use a lot of background music and sound effects.
Press CLEAR VOICE to enable or disable this function.
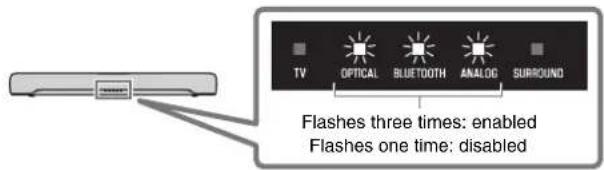
③Enjoying rich bass sound (BASS EXT)
The bass sound is enhanced and becomes richer when the Bass Extension function is enabled.
Press BASS EXT to enable or disable this function.
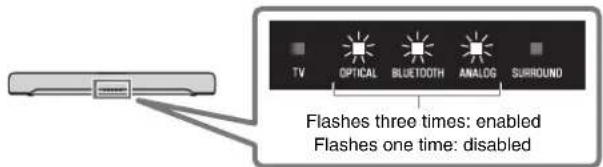
NOTE
The default settings are as follows:
Sound mode: STANDARD
CLEAR VOICE: Disabled
BASS EXT: Enabled
Listening to audio from a Bluetooth® device
Audio content from a Bluetooth device (such as a smartphone) can be played through the sound bar.
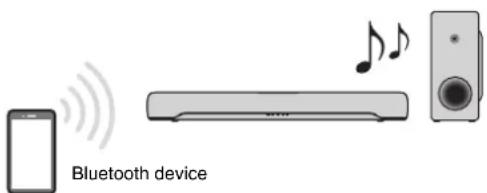
1 Press BLUETOOTH on the remote control to switch the input source to Bluetooth.
2 On the Bluetooth device, enable the Bluetooth function.
A list of Bluetooth devices that can be connected is displayed on the screen of the Bluetooth device.
3 Select your product displayed within the list.
"Yamaha SR-C30A" or "Yamaha AV" is displayed within the list.
4 Play a song on the Bluetooth device.
The sound bar will begin playing audio from the Bluetooth device.
NOTE
- The sound bar can be connected to two Bluetooth devices simultaneously. You will need to stop playback on the one Bluetooth device and then start playback on the other Bluetooth device.
Controlling the sound bar via the smartphone app

By installing the free dedicated app "Sound Bar Remote" on a smartphone, the sound bar can also be controlled from that smartphone. The app allows you to control the sound bar while checking the sound bar settings currently applied, such as sound mode, via the app's screen.
Search for "Sound Bar Remote" on the App Store or Google Play and install it on the smartphone.
For details on the app, see the description of the app on the App Store or Google Play.
NOTE
- To control the sound bar using the app, configure the settings on your smartphone as follows:
- Enable the Bluetooth function.
- For devices using the Android 11 OS or earlier, configure the settings to allow location information to be obtained. The Sound Bar Remote app uses location information from the Android device only to detect the sound bar. The acquired location information will not be used for any other purpose.
- For devices using the Android 12 OS or later, configure the settings to allow the use of nearby devices.
- This sound bar is only compatible with the Sound Bar Remote app. The sound bar cannot be controlled using other apps (such as Sound Bar Controller).
Caisson de basses (SR-WSWC30A)
NOTE
natural_image
Simple line drawing of a remote control panel with scroll buttons and a curved arrow indicating rotation (no text or symbols)Télécommande
Subwoofer (SR-WSWC30A)
■ HINWEIS
natural_image
Simple line drawing of a remote control panel with scroll buttons and a curved arrow indicating rotation (no text or symbols)Batterie-Isolierstreifen
Fernbedienung
Subwoofer (SR-WSWC30A)
OBS!
Subwoofer (SR-WSWC30A)
NOTA
Telecomando
Altavoz de subgraves (SR-WSWC30A)
NOTA
natural_image
Simple line drawing of a remote control panel with scroll buttons and a curved arrow indicating rotation (no text or symbols)
Subwoofer (SR-WSWC30A)
■ OBSERVAÇÃO
natural_image
Simple line drawing of a remote control panel with scroll wheel (no text or symbols)Fita de isolamento de pilha
Snelstartgids (dit document)
Subwoofer (SR-WSWC30A)
■ OPMERKING
natural_image
Line drawing of a remote control panel with scroll arrows indicating rotation (no text or symbols)https://download.yamaha.com/
© 2022 Yamaha Corporation
Published 05/2022
2022年5月 发行
KSOD-A0
VFS3080
G
YAMAHA CORPORATION
10-1 Nakazawa-cho, Naka-ku, Hamamatsu, 430-8650 Japan10-1 Nakazawa-cho, Naka-ku, Hamamatsu, 430-8650 Japan


- Safety Brochure
- Quick Start Guide (this document)
- User Guide
- Confirming contents of product package
- NOTE
- Preparing the remote control
- Operating range of the remote control
- Installing the product
- Connecting a TV
- Connecting a TV using the digital optical audio cable (included)
- Connecting a TV using an HDMI cable (commercially available)
- Connecting to power
- Playing TV sound through the sound bar
- Adjusting the sound to your preference
- ① Listening to audio with sound that matches the video or music content (Sound mode)
- STEREO
- STANDARD
- 3D MOVIE
- GAME
- ②Playing back human voices clearly (CLEAR VOICE)
- ③Enjoying rich bass sound (BASS EXT)
- Listening to audio from a Bluetooth® device
- Controlling the sound bar via the smartphone app
- ■ HINWEIS
- OBS!
- NOTA
- ■ OBSERVAÇÃO
- Snelstartgids (dit document)
- ■ OPMERKING
Brand : YAMAHA
Model : SRC30A
Category : Soundbar