
Swimclear C100SE - Water pump HAYWARD - Free user manual and instructions
Find the device manual for free Swimclear C100SE HAYWARD in PDF.
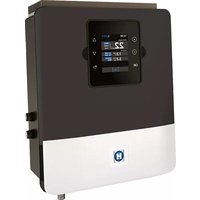
| Product type | Cartridge filter for pool |
| Brand | Hayward |
| Model | Swimclear C100SE |
| Filtration area | 9.3 m² (100 ft²) |
| Nominal flow rate | 20 m³/h (88 GPM) |
| Maximum working pressure | 3.5 bars (50 PSI) |
| Filtration type | Reusable reinforced polyester filter cartridge |
| Connection | Female union connections 63 mm (50 mm optional) |
| Drain plug | 1.5" NPT |
| Manual air relief valve | Yes |
| Pressure gauge | Included |
| Minimum side clearance | 45 cm (18") |
| Minimum top clearance | 30 cm (12") |
| Materials | Corrosion resistant |
| Installation | Above or below waterline |
| Application | Pools and spas, fresh or saltwater |
| Safety | Safety clip on locking ring |
| Maintenance | Hose down, soak in detergent if necessary |
| Winterization | Drain and store indoors |
| Warranty | 2 years (tank 10 years) |
| Spare parts | Use genuine Hayward parts |
Frequently Asked Questions - Swimclear C100SE HAYWARD
User questions about Swimclear C100SE HAYWARD
0 question about this device. Answer the ones you know or ask your own.
Ask a new question about this device
Download the instructions for your Water pump in PDF format for free! Find your manual Swimclear C100SE - HAYWARD and take your electronic device back in hand. On this page are published all the documents necessary for the use of your device. Swimclear C100SE by HAYWARD.
USER MANUAL Swimclear C100SE HAYWARD
natural_image
Abstract geometric logo with stylized letter H inside a circular frame (no text or symbols)HAYWARD®

natural_image
Three identical industrial air purifiers with black fittings and mounting feet, shown from different angles (no visible text or labels)
natural_image
Two line icons: one open with an information symbol, the other closed with an open book (no text or symbols present)GUIDE DE L'UTILISATEUR
OWNER'S MANUAL
MANUAL DEL USUARIO
MANUAL DO UTILIZADOR
ANWENDERHANDBUCH
GEBRUIKERSHANDLEIDING
MANUALE D'USO
natural_image
Abstract geometric logo with stylized letter H inside a circular frame (no text or symbols)HAYWARD®
SWIMCLEAR™ FILTRE À ÉLÉMENTS
GUIDE DE L'UTILISATEUR
CONSERVEZ CE MANUEL POUR UNE CONSULTATION ULTÉRIEURE

natural_image
Abstract geometric logo with stylized letter H inside a circular frame (no text or symbols)HAYWARD®
natural_image
Three identical gray industrial pressure vessel units with labeled ports and a small icon below (no text or symbols on main objects)SWIMCLEAR™
CARTRIDGE FILTERS
OWNER'S MANUAL
SAVE THIS OWNER'S MANUAL

WARNING - Read and follow all instructions in this owner's manual and on the equipment. Failure to follow instructions can cause injury.
WARNING – This document should be given to the owner of the swimming pool and must be kept by the owner in a safe place.
WARNING – This appliance is not intended for use by persons (including children) with reduced physical, sensory or mental capabilities, or lack of experience and knowledge, unless they have been given supervision or instruction concerning use of the appliance by a person responsible for their safety.
WARNING – To reduce risk of injury, do not permit children to use or climb on this product. Closely supervise children at all times.
WARNING – Pool and spa water circulation systems operate under hazardous pressure during start up, normal operation, and possibly after pump shut off. Pressure in system can cause explosive component separation of the upper filter body if safety and operation instructions are not followed. Severe personal injury or death can result.
WARNING – This product should be installed and serviced only by a qualified pool professional.
TO AVOID COMPONENT SEPARATION
- Follow all safety and operation instructions.
- Do not operate water circulation system if a system component is assembled improperly, damaged, missing, or not a genuine Hayward component.
- Before performing maintenance on the water circulation system, verify all system and pump controls are in OFF position and filter manual air relief valve is in the OPEN position.
- Before starting the system pump, verify that all system valves are set in a position to allow water from the filter to return back to the pool.
- Before starting the system pump, the manual air relief valve must be in the OPEN position.
- When starting pump, do not stand over or near filter.
- If water leakage appears in the area of the filter tank clamp, immediately turn off all system circulation pumps and electrical power. Do not return to the filter until all water flow has stopped. Reassemble the clamp system per the instructions in this owner's manual to stop the leak.
- Return to filter to close manual air relief valve only when a steady stream of water (Not air or air and water mix) is discharged from the manual air relief valve.
- Do not change filter control valve position while system pump is running.
WARNING – Pressure testing of the pump and filter system in excess of the 3,5 Bar (50 PSI) can cause explosive separation of the components. Component separation can result in severe personal injury or death.
REGISTRATION
Thank you for choosing Hayward. This manual contains important information regarding the operation and maintenance of your product. Please retain it for reference.
TO REGISTER YOUR PRODUCT IN OUR DATABASE, GO TO:
www.hayward.fr/en/services/register-your-product

For Your Records
Record the following information for your convenience:
1) Purchase Date
2) Complete Name ____
3) Address
4) Zip code
5) Email Address
6) Part number Serial number
7) Pool Dealer
8) Address
9) Zip code ____ Country ____
Note

GENERAL INFORMATION
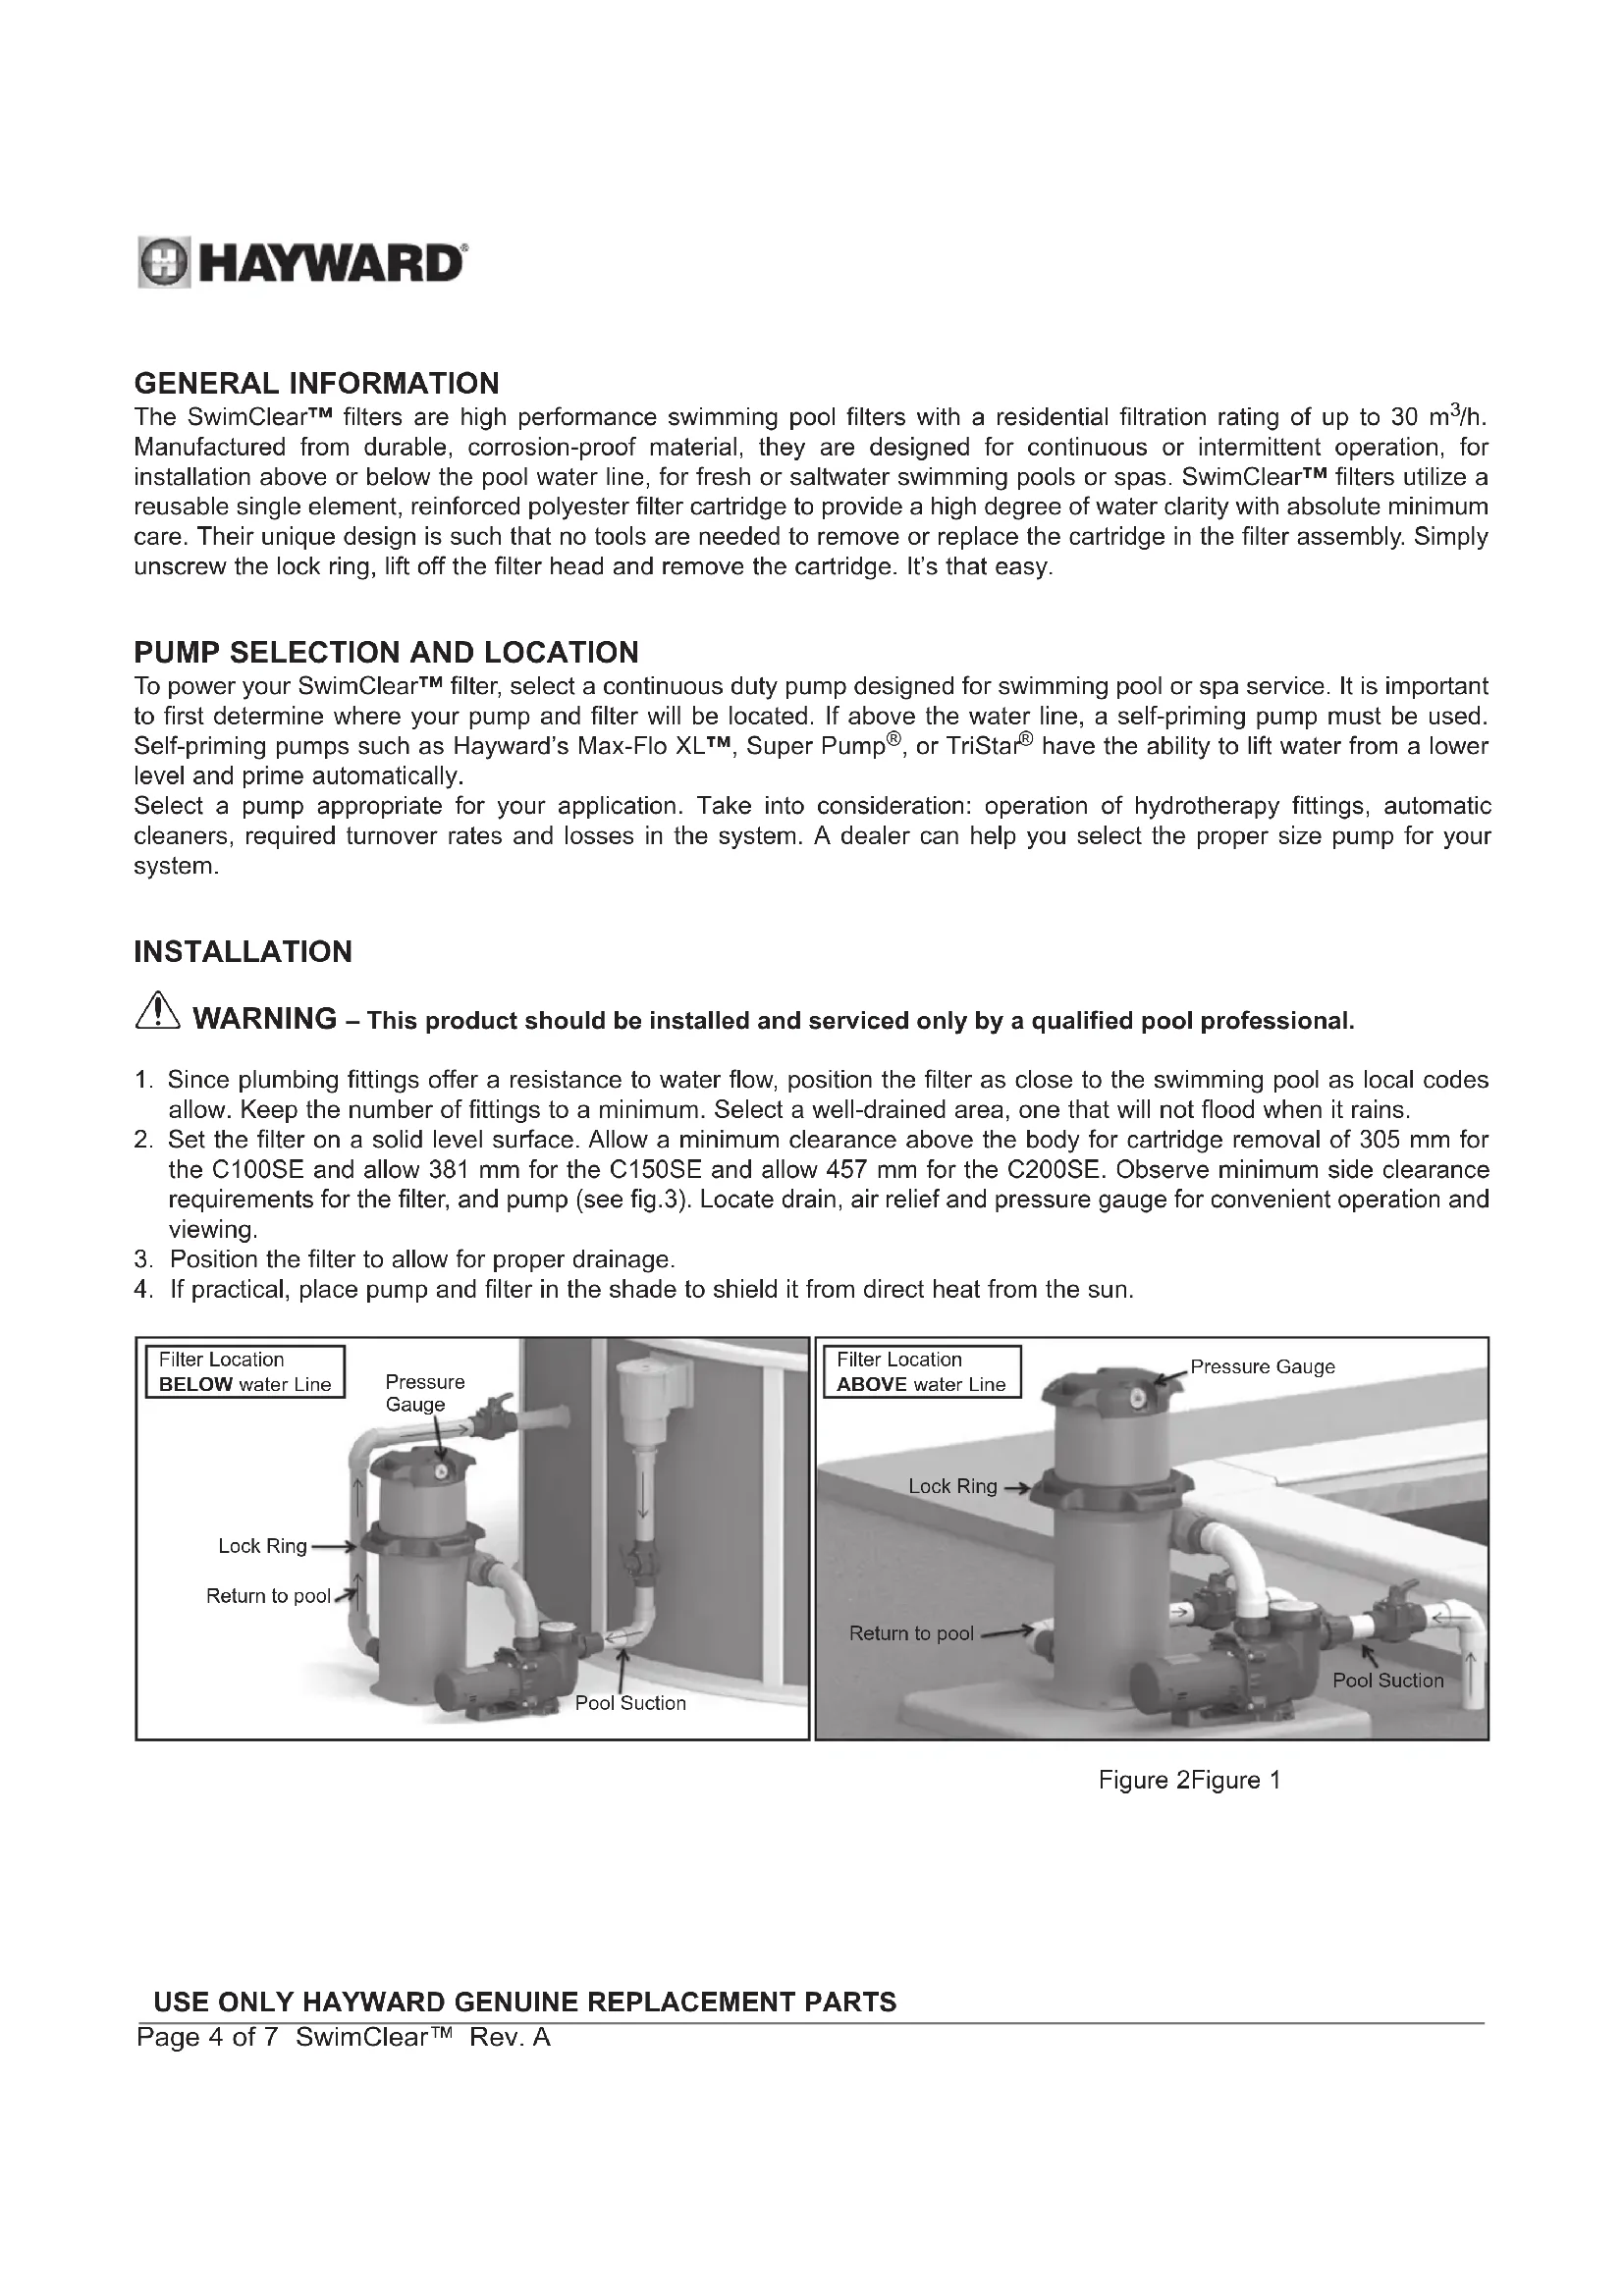
The SwimClear™ filters are high performance swimming pool filters with a residential filtration rating of up to 30m^3/h . Manufactured from durable, corrosion-proof material, they are designed for continuous or intermittent operation, for installation above or below the pool water line, for fresh or saltwater swimming pools or spas. SwimClear™ filters utilize a reusable single element, reinforced polyester filter cartridge to provide a high degree of water clarity with absolute minimum care. Their unique design is such that no tools are needed to remove or replace the cartridge in the filter assembly. Simply unscrew the lock ring, lift off the filter head and remove the cartridge. It's that easy.
PUMP SELECTION AND LOCATION
To power your SwimClear™ filter, select a continuous duty pump designed for swimming pool or spa service. It is important to first determine where your pump and filter will be located. If above the water line, a self-priming pump must be used. Self-priming pumps such as Hayward's Max-Flo XL™, Super Pump®, or TriStar® have the ability to lift water from a lower level and prime automatically.
Select a pump appropriate for your application. Take into consideration: operation of hydrotherapy fittings, automatic cleaners, required turnover rates and losses in the system. A dealer can help you select the proper size pump for your system.
INSTALLATION

WARNING – This product should be installed and serviced only by a qualified pool professional.
- Since plumbing fittings offer a resistance to water flow, position the filter as close to the swimming pool as local codes allow. Keep the number of fittings to a minimum. Select a well-drained area, one that will not flood when it rains.
- Set the filter on a solid level surface. Allow a minimum clearance above the body for cartridge removal of 305 mm for the C100SE and allow 381 mm for the C150SE and allow 457 mm for the C200SE. Observe minimum side clearance requirements for the filter, and pump (see fig.3). Locate drain, air relief and pressure gauge for convenient operation and viewing.
- Position the filter to allow for proper drainage.
- If practical, place pump and filter in the shade to shield it from direct heat from the sun.
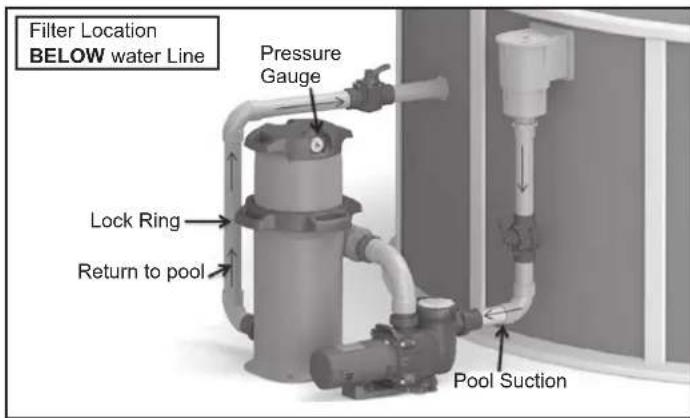
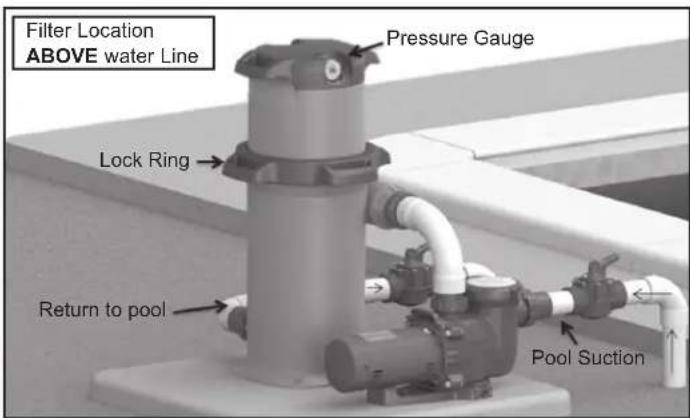
Figure 2 Figure 1
USE ONLY HAYWARD GENUINE REPLACEMENT PARTS
PLUMBING
- The union fittings included with the SwimClear™ are 63 mm union sockets (solvent weld). The 63 mm union fitting is a pipe socket connection. For 50 mm socket fittings order SP2700UNKIT50. Before solvent cementing fitting onto pipe, do not forget to place the union nut on the pipe with the threads facing the filter.
- Refer to fig.1 and 2 for basic suggested piping and valve locations. While systems vary, the main consideration is to provide the desired control of water flow from the pool to the pump and filter, and back to the pool. When the filter is located below water level, provide valves to prevent back flow of water to the filter during cleaning and routine servicing.
- Install face seal, then screw the union nut on to the body to connect the filter to the pump. This connection is the one above the pump discharge
- Install face seal, then screw the union nut on to the body to connect the filter to the return pool plumbing.
- Carefully replace cartridge element into filter body ensuring that the cartridge sits evenly on the collector hub in bottom of filter body.
- Place filter head on filter body (being sure filter head O-ring is in place and clean).
- Tighten lock ring (in clockwise direction) until safety latch fully engages the catch.
- A 1 12 " NPT filter drain plug is furnished with each filter. When making threaded connections to the filter use plastic adapters. Apply three turns of PTFE tape (or use special plastic pipe sealant) to male threads. Screw the fitting into the thread hand tight; then using a strap wrench, tighten one more full turn. Additional tightening is unnecessary and could result in broken or damaged valve body.
- A manual air relief valve is furnished to aid in bleeding off unwanted air when starting the filter.
- Check for joint leaks before operating.
- Refer to pump instruction booklet for pump information.
| Required clearance | ||||
| Side Above | ||||
| Inches Cm | Inches Cm | |||
| C100SE 18 | 45 12 30 | |||
| C150SE 18 | 45 15 38 | |||
| C200SE 18 | 45 18 45 | |||
Figure 3
FILTER MOUNTING
Secure filter to level concrete slab or other rigid surface to meet all local and national codes. Use fasteners appropriate for the material of the surface being fastened to. Use 2 of the 4 available mounting holes (see fig.1) on opposite corners of the filter base to ensure the filter is secure and level.

CAUTION: Be careful not to over tighten the fasteners when mounting the filter. Failure to do so may cause base of the filter to crack at the mounting locations causing the filter to be unstable.
STARTING THE FILTER
Be sure filter drain is closed. Open manual air relief valve and open the suction and return valves (when used).

CAUTION: All suction and discharge valves must be open when starting the system. Failure to do so could see severe personal injury and/or property damage. Be sure lock ring is locked and in latched position.
Stand clear of the filter. Prime and start the pump, following the manufacturer's instructions. Air trapped in the system will automatically vent to the pool and out the manual air relief valve. Close the air relief valve when a steady stream of water (not air or air and water) is being discharged.
USE ONLY HAYWARD GENUINE REPLACEMENT PARTS
FILTERING
Filtration starts as soon as flow is steady through the filter. As the filter cartridge removes dirt from the pool water, the accumulated dirt causes a resistance to flow. As a result, the gauge pressure will increase and flow will decrease. When the indicated pressure increases 7 to 10 psi (0.49 to 0.70 Bar) above the starting pressure, or when flow decreases below the desired filtration rate, clean or replace the filter cartridge.
CLEAN / REPLACE CARTRIDGE
REMOVING CARTRIDGE ELEMENT
- Shut off the pump.
- If filter is located below water level, close valves or block off suction & discharge lines to prevent back flow of water from the pool.
- Remove drain plug and open the manual air relief valve to allow water to drain from filter.
- Depress safety latch and unscrew the lock ring (counterclockwise direction). Carefully lift off filter head with the attached lock ring to gain access to filter cartridge. (Set Head on a flat surface on top of the handle)
- Lift out cartridge and clean or, replace with a clean, spare cartridge. (See Cleaning Cartridge.)
- Clean body O-ring in filter head.
REINSTALLING CARTRIDGE ELEMENT
- Clean any collected debris from the bottom of filter body. Clean the Body O-ring seal area.
- Carefully replace cartridge element into filter body ensuring that the cartridge sits evenly on the collector hub in bottom of filter body.
- Place filter head on filter body (being sure filter head O-ring is in place and clean).
- Tighten lock ring (in clockwise direction) until safety latch fully engages the catch.
- Proceed as in STARTING THE FILTER.
CLEANING CARTRIDGE
The cartridge filter element can be cleaned by washing inside and out with a garden hose. (The cartridge is easier to clean when dry.) After hosing the cartridge, for best results, allow cartridge to dry and carefully brush pleated surface areas to remove fine particles. Do not pressure wash, as it can damage the filter element.
To remove materials such as suntan and body oils from the cartridge pleats, soak the element in a solution of filter element cleaner (various brands available at pool dealer). Follow manufacturer's directions for use and allow an hour for soaking. Hose thoroughly before reinstalling in filter.

CAUTION: Be sure to use a plastic container and take extreme care when handling cleaning agents as they be harmful to eyes, skin and clothing. After cleaning flush with water.
NON-CHLORINE POOLS
Cartridges used in pools or spas that use Baquacil® Sanitizer or other similar non-chlorine based products must be cleaned more frequently than when used in pools that utilize a chlorine system. Consult manufacturer's instructions for frequency, instructions, and chemicals required for cleaning elements in these types of systems. Baquacil® is not compatible with chlorine, bromine, any copper based chemical or non-chlorine shock.
A spare cartridge filter element is an excellent investment. It provides convenience and ensures that your filter will always be ready to operate at peak efficiency.
VACUUMING
Vacuuming can be performed directly into the filter whenever needed. Clean cartridge after vacuuming, if required.
WINTERIZING (Filter)
In areas where sub-freezing temperatures can be expected, the filter should be drained and/or removed from it's operating location and stored indoors. Remove and clean cartridge. Reinstall cartridge in filter tank. Fully tighten lock ring when storing.
USE ONLY HAYWARD GENUINE REPLACEMENT PARTS
SERVICE AND REPAIRS
Consult your local authorized Hayward dealer or service center. No returns may be made directly to the factory without the expressed written authorization of Hayward Pool Europe.
CHEMICAL IDEAL LEVELS
| Combined chlorine 0.2 | ppm Maximum |
| Chlorine (Stabilized) 1.0 | to 3.0 ppm |
| pH 7.2 to 7.6 | |
| Cyanuric Acid (Stabilizer) | 20 to 30 ppm |
| Total Alkalinity 80 to 120 | ppm |
| Calcium Hardness 200 | to 300 ppm |
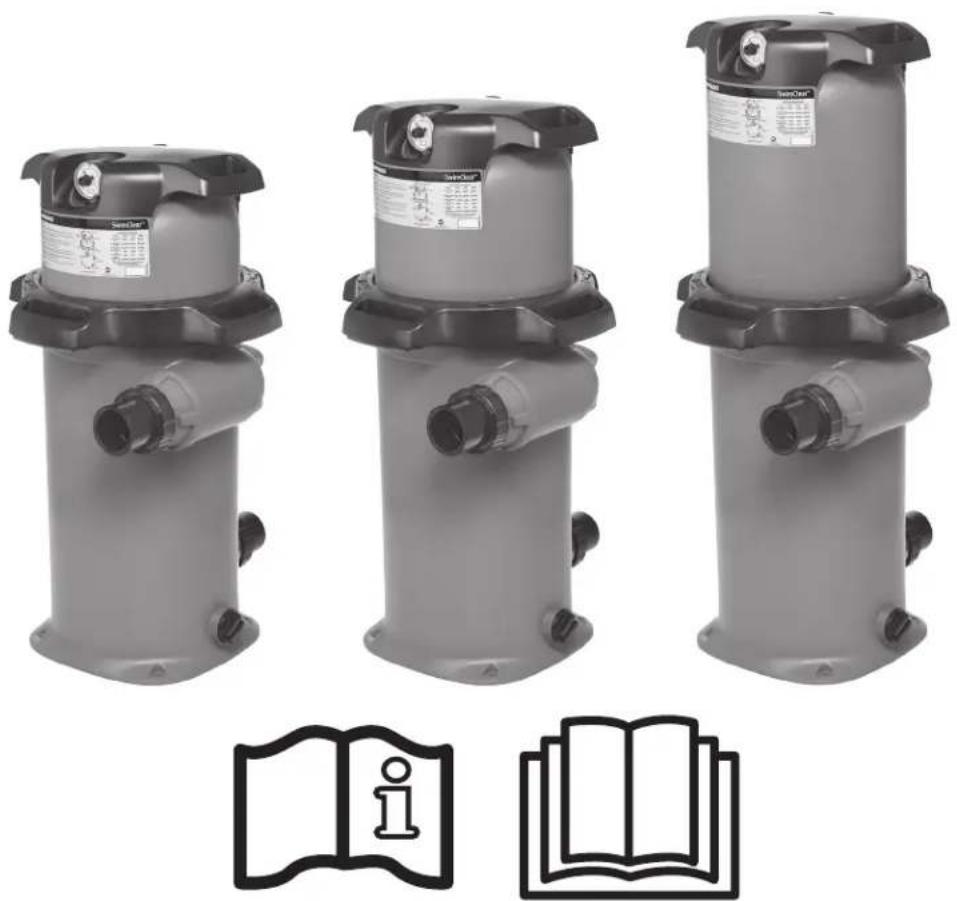
CHARACTERISTICS
| Model Effective filtration rate Design flow rate | ||||
| Ft^2 M^2 GPM M | 3/h | |||
| C100SE | 100 | 9.3 | 88 | 20 |
| C150SE | 150 | 14 | 110 | 25 |
| C200SE | 200 | 18.6 | 130 30 | |
| Maximum working pressure for all models 3.5 Bar (50 PSI) | ||||

natural_image
Abstract geometric logo with stylized letter H inside a circular frame (no text or symbols)HAYWARD®

SWIMCLEAR™ FILTROS DE CARTUCHO
MANUAL DEL USUARIO
CONSERVE ESTE MANUAL DE INSTRUCCIONES

natural_image
Abstract geometric logo with stylized letter H inside a circular frame (no text or symbols)HAYWARD®

natural_image
Three identical gray industrial pressure vessel units with labeled ports and a small icon below (no text or symbols on main objects)SWIMCLEAR™ FILTROS DE CARTUCHO
MANUAL DO UTILIZADOR
GUARDE ESTE MANUAL DE INSTRUÇÕES

www.hayward.fr/en/services/register-your-product
Para seu registo
natural_image
Abstract geometric logo with stylized letter H inside a circular frame (no text or symbols)HAYWARD®

natural_image
Three identical gray industrial pressure vessel units with labeled ports and a small icon below (no text or symbols on main objects)SWIMCLEAR™
PATRONENFILTER
ANWENDERHANDBUCH
BEWAHREN SIE DIESES HANDBUCH ZUM SPÄTEREN NACHSCHLAGEN AUF

www.hayward.fr/en/services/register-your-product

Für Ihre Unterlagen
natural_image
Abstract geometric logo with stylized letter H inside a circular frame (no text or symbols)HAYWARD®

SWIMCLEAR™
FILTER MET FILTERELEMENTEN
GEBRUIKERSHANDLEIDING
BEWAAR DEZE HANDLEIDING

OM UW PRODUCT IN ONZE DATABANK TE REGISTREREN, GAAT U NAAR:
www.hayward.fr/en/services/register-your-product

Voor uw informatie
natural_image
Abstract geometric logo with stylized letter H inside a circular frame (no text or symbols)HAYWARD®

natural_image
Three identical gray industrial pressure vessel units with labeled ports and a small icon below (no text or symbols on main objects)SWIMCLEAR™
FILTRI A CARTUCCIA
MANUALE D'USO
CONSERVARE IL PRESENTE MANUALE PER FUTURA CONSULTAZIONE

www.hayward.fr/en/services/register-your-product

Dati da conservare
natural_image
Abstract geometric logo with stylized letter H inside a circular frame (no text or symbols)HAYWARD®

natural_image
Three identical gray industrial pressure vessel units with labeled ports and a small icon below (no text or symbols on main objects)SWIMCLEAR™ ПАТРОННЫЕ ФИЛЬТРЫ
www.hayward.fr/en/services/register-your-product

Для записей
| N° Ref | |
| 1 ECX271261 | |
| 2 CCX1000L | |
| 3 CXRLV1001 | |
| 4 CXGAR1001P | AK2 |
| 5 CCX1000N | |
| 6a CX100B | |
| 6b CX150B | |
| 6c CX200B | |
| 7 CXLRL1001 | |
| 8 CXFHR1001 | |
| 9 CXSLS1001 | |
| 10a CX100XRE | |
| 10b CX150XRE | |
| 10c CX200XRE | |
| 11 CXFBA1001 | |
| 12a CXFDA100 | |
| 12b CXFDA150 | |
| 12c CXFDA200 | |
| 13 SP1022CBLK | |
| 14 SP3200UNK | T63 |
| 14' SP2700UNK | IT50 |
GARANTIE LIMITÉE
All HAYWARD products are covered for manufacturing defects or material defects for a warranty period of 2 years as of date of purchases. Any warranty claim should be accompanied by evidence of purchase, indicating date of purchase. We would therefore advise you to keep your invoice.
The HAYWARD warranty is limited to repair or replacement, as chosen by HAYWARD, of the faulty products, provided that they have been subjected to normal use, in compliance with the guidelines given in their user guides, provided that the products have not been altered in any way, and provided that they have been used exclusively with HAYWARD parts and components. The warranty does not cover damage due to frost and to chemicals. Any other costs (transport, labour, etc.) are excluded from the warranty.
HAYWARD may not be held liable for any direct or indirect damage resulting from incorrect installation, incorrect connection, or incorrect operation of a product.
In order to claim on a warranty and in order to request repair or replacement of an article, please ask your dealer.
No equipment returned to our factory will be accepted without our prior written approval.
Wearing parts are not covered by the warranty.
Product with warranty extension: Tank 10 years.
GARANTÍA LIMITADA
BESCHRÄNKTE GARANTIE
- HAYWARD®
- SWIMCLEAR™ FILTRE À ÉLÉMENTS
- REGISTRATION
- TO REGISTER YOUR PRODUCT IN OUR DATABASE, GO TO:
- For Your Records
- Note
- GENERAL INFORMATION
- PUMP SELECTION AND LOCATION
- INSTALLATION
- USE ONLY HAYWARD GENUINE REPLACEMENT PARTS
- PLUMBING
- FILTER MOUNTING
- STARTING THE FILTER
- FILTERING
- CLEAN / REPLACE CARTRIDGE
- REMOVING CARTRIDGE ELEMENT
- REINSTALLING CARTRIDGE ELEMENT
- CLEANING CARTRIDGE
- NON-CHLORINE POOLS
- VACUUMING
- WINTERIZING (Filter)
- SERVICE AND REPAIRS
- SWIMCLEAR™ FILTROS DE CARTUCHO
- Para seu registo
- Für Ihre Unterlagen
- SWIMCLEAR™
- FILTER MET FILTERELEMENTEN
- OM UW PRODUCT IN ONZE DATABANK TE REGISTREREN, GAAT U NAAR:
- Voor uw informatie
- Dati da conservare
- SWIMCLEAR™ ПАТРОННЫЕ ФИЛЬТРЫ
- Для записей
- GARANTIE LIMITÉE
- GARANTÍA LIMITADA
- BESCHRÄNKTE GARANTIE
Brand : HAYWARD
Model : Swimclear C100SE
Category : Water pump