Ceety - Bike Puky - Free user manual and instructions
Find the device manual for free Ceety Puky in PDF.
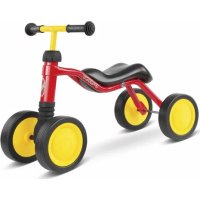
| Product type | Tricycle for children (models Ceety, Ceety Air, Ceety Comfort) |
| Recommended age | Ceety and Ceety Air: from 2 years; Ceety Comfort: from 1.5 years |
| Maximum load capacity | 25 kg |
| Frame material | Steel (not specified, reasonable estimate) |
| Wheels | Pneumatic (Ceety Air: air tires; others: solid or air tires depending on model) |
| Usage modes | Stroller mode (freewheel activated) and tricycle mode (child pedaling) |
| Braking system | Rear brake (on Ceety Comfort) |
| Freewheel | Activatable/deactivatable by locking ring |
| Steering lock | Adjustable by rotary handle (180°) |
| Parental control bar | Included, height adjustable |
| Safety belt | 3-point system (on Ceety Comfort, removable) |
| Included accessories | Dump truck, footrest (Ceety Comfort), shopping bag, accessory bag, canopy (depending on model) |
| Handlebar height adjustment | Yes, by clamping screw |
| Seat height adjustment | Yes, continuous |
| Maintenance | Check screws, tire pressure; clean with soapy solution and soft cloth; do not use high-pressure cleaner |
| Wear parts | Wheels, pedal crank, brake covers, grips |
| Warranty | 5 years on frame, fork, and handlebar (subject to registration within 4 weeks) |
| Brand | Puky |
| Country of origin | Germany |
Frequently Asked Questions - Ceety Puky
User questions about Ceety Puky
0 question about this device. Answer the ones you know or ask your own.
Ask a new question about this device
Download the instructions for your Bike in PDF format for free! Find your manual Ceety - Puky and take your electronic device back in hand. On this page are published all the documents necessary for the use of your device. Ceety by Puky.
USER MANUAL Ceety Puky
natural_image
Silhouette of a child riding a tricycle with a long rod (no text or symbols)text_image
Technical diagram of a multi-step bicycle steering system with numbered components and labeled partsMONTAGEANLEITUNG CEETY | CEETY AIR | CEETY COMFORT
natural_image
Three types of wrenches shown in grayscale, no text or symbols present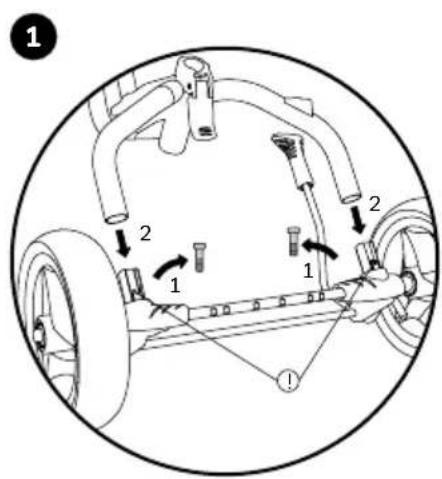
text_image
1 2 1 1 2 1natural_image
Diagram of a mechanical device with a rotating wheel and lever, enclosed in a circle (no text or symbols)natural_image
Simple line drawing of a mop handle and bucket with an arrow indicating rotation (no text or symbols)• 2 Maulschlüssel 10 mm
natural_image
Diagram of a mechanical component with directional arrows indicating movement or force (no text or symbols present)Congratulations on the purchase of this PUKY vehicle. You have acquired a quality product, which is certain to bring you great joy.
Please read the manual carefully before commissioning the vehicle and keep it for future reference! Please read the manual carefully prior to use and keep it in a secure place. Failure to observe the information contained in this manual may impair the safety of your child. If you have any questions or problems, please contact your dealer or contact us online at www.puky.de
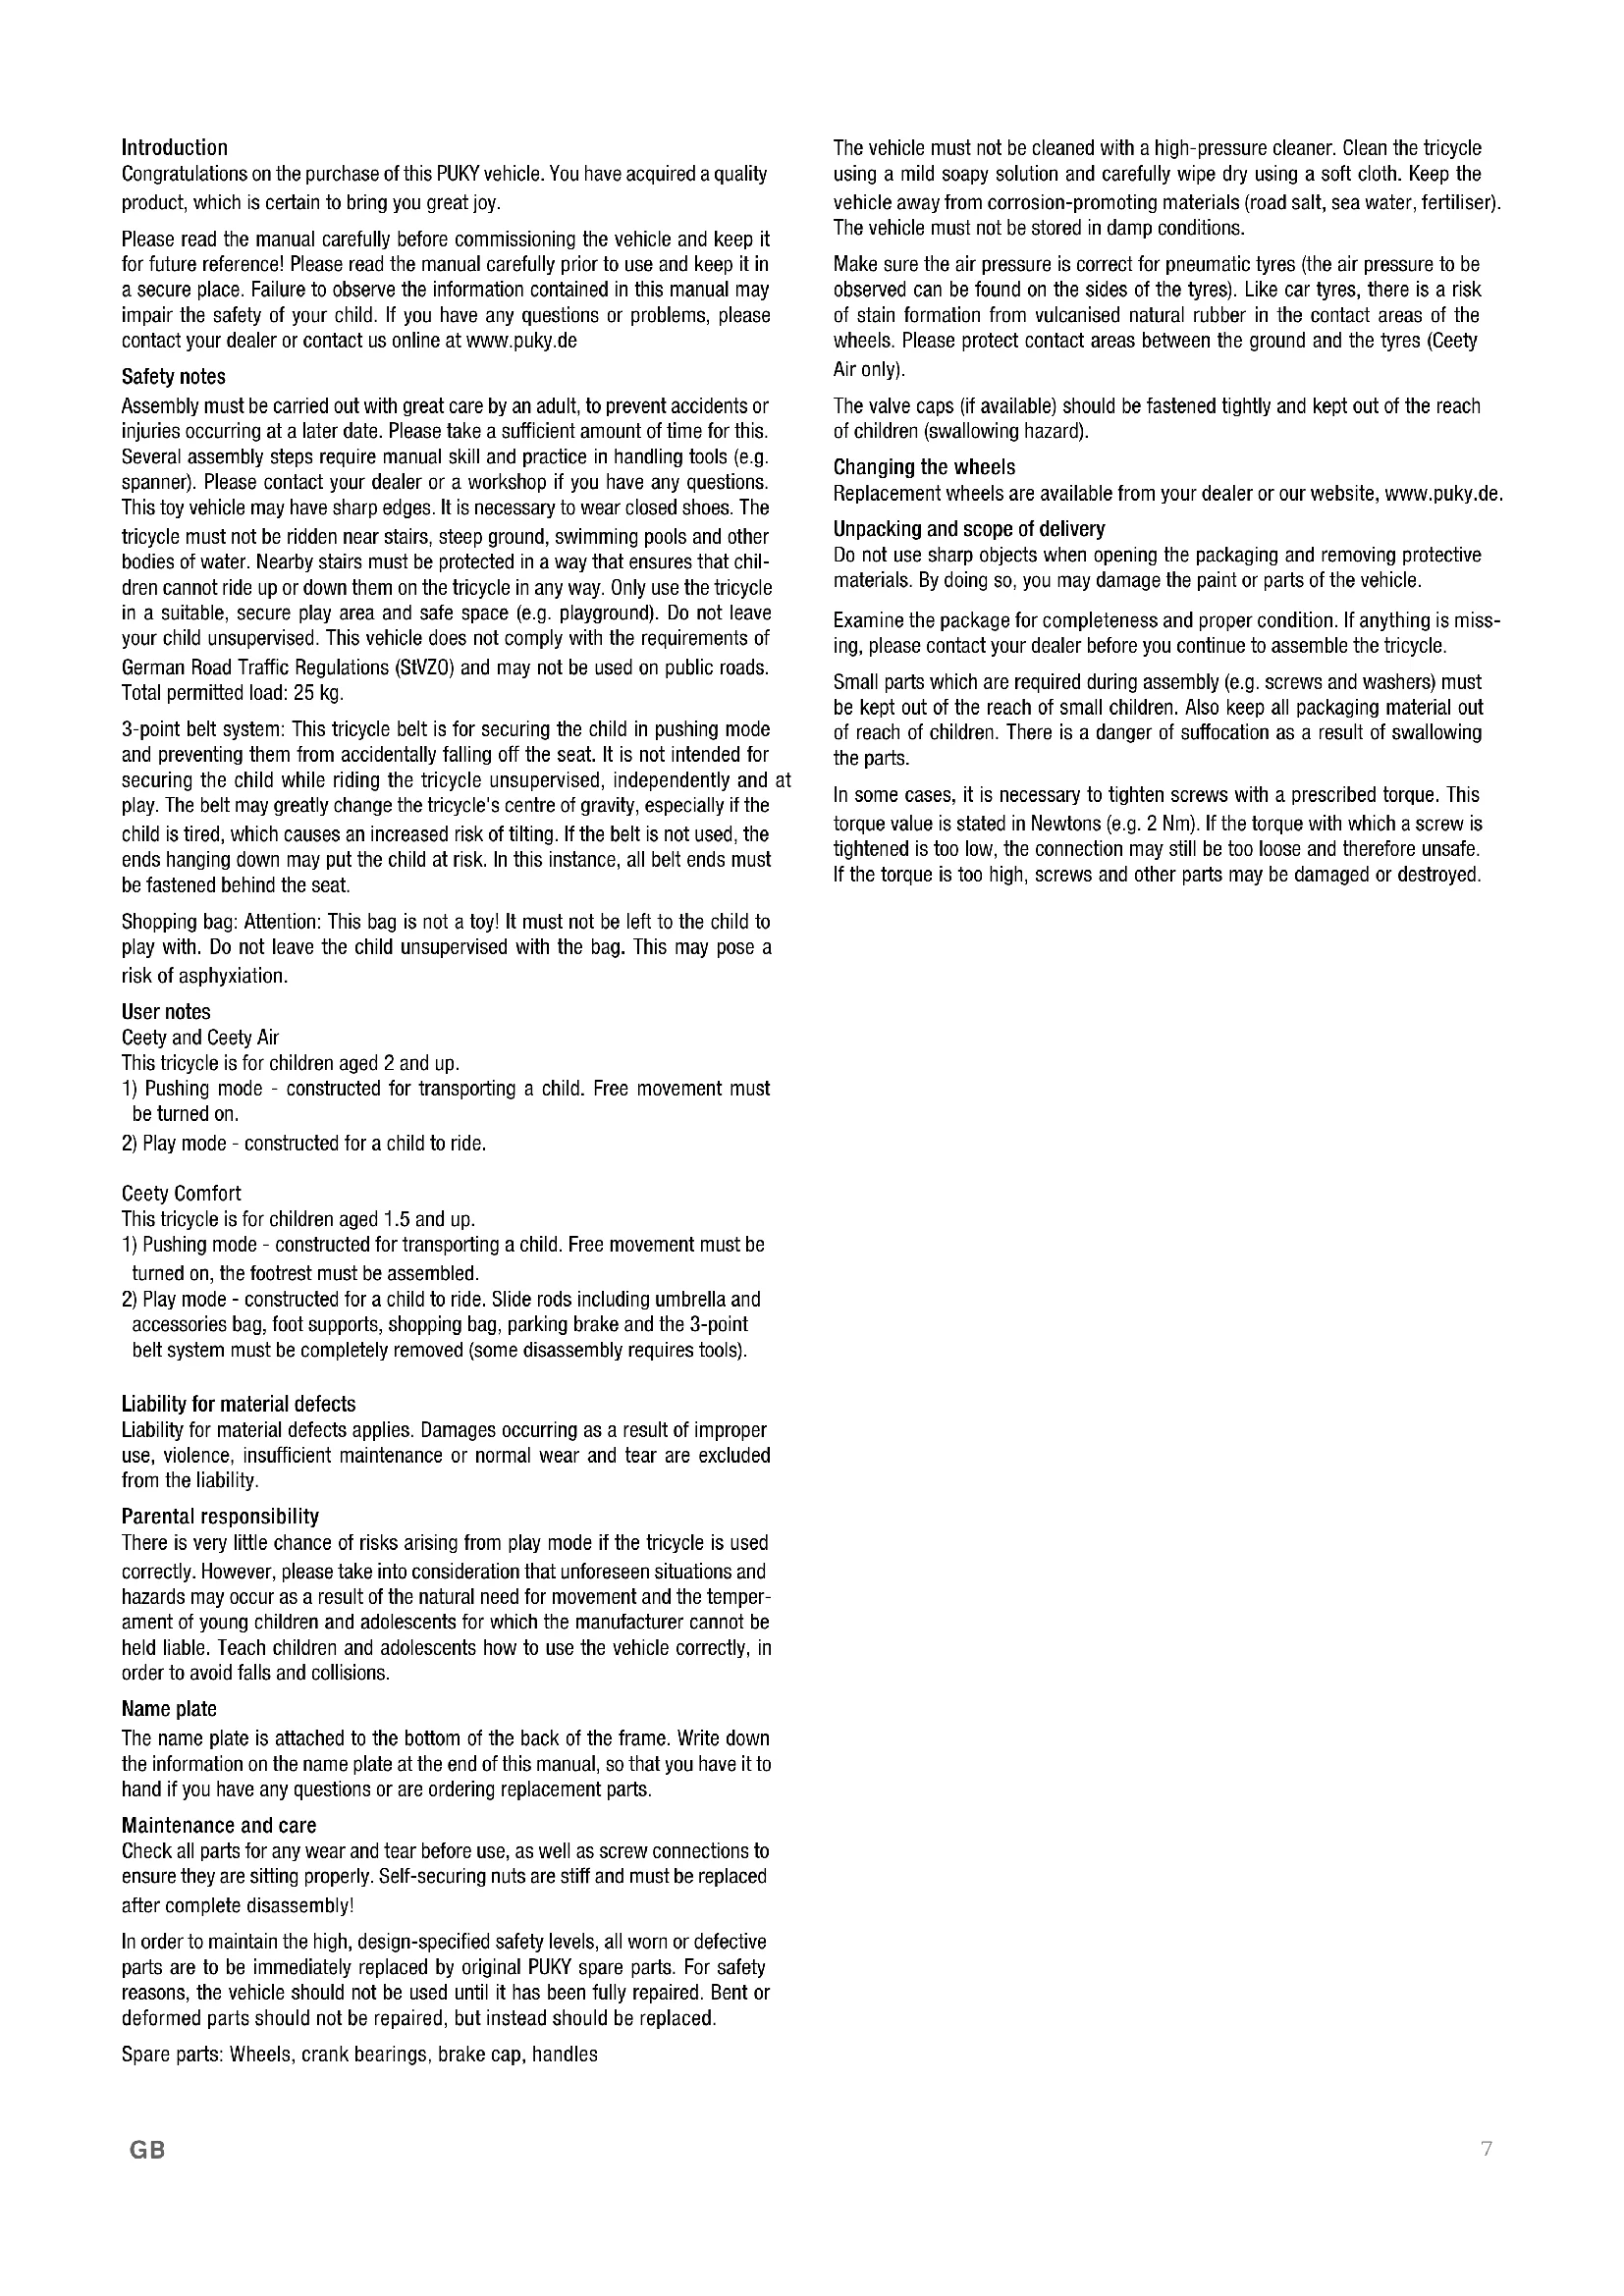
Safety notes
Assembly must be carried out with great care by an adult, to prevent accidents or injuries occurring at a later date. Please take a sufficient amount of time for this. Several assembly steps require manual skill and practice in handling tools (e.g. spanner). Please contact your dealer or a workshop if you have any questions. This toy vehicle may have sharp edges. It is necessary to wear closed shoes. The tricycle must not be ridden near stairs, steep ground, swimming pools and other bodies of water. Nearby stairs must be protected in a way that ensures that children cannot ride up or down them on the tricycle in any way. Only use the tricycle in a suitable, secure play area and safe space (e.g. playground). Do not leave your child unsupervised. This vehicle does not comply with the requirements of German Road Traffic Regulations (StVZO) and may not be used on public roads. Total permitted load: 25 kg.
3-point belt system: This tricycle belt is for securing the child in pushing mode and preventing them from accidentally falling off the seat. It is not intended for securing the child while riding the tricycle unsupervised, independently and at play. The belt may greatly change the tricycle's centre of gravity, especially if the child is tired, which causes an increased risk of tilting. If the belt is not used, the ends hanging down may put the child at risk. In this instance, all belt ends must be fastened behind the seat.
Shopping bag: Attention: This bag is not a toy! It must not be left to the child to play with. Do not leave the child unsupervised with the bag. This may pose a risk of asphyxiation.
User notes
Ceety and Ceety Air
This tricycle is for children aged 2 and up.
1) Pushing mode - constructed for transporting a child. Free movement must be turned on.
2) Play mode - constructed for a child to ride.
Ceety Comfort
This tricycle is for children aged 1.5 and up.
1) Pushing mode - constructed for transporting a child. Free movement must be turned on, the footrest must be assembled.
2) Play mode - constructed for a child to ride. Slide rods including umbrella and accessories bag, foot supports, shopping bag, parking brake and the 3-point belt system must be completely removed (some disassembly requires tools).
Liability for material defects
Liability for material defects applies. Damages occurring as a result of improper use, violence, insufficient maintenance or normal wear and tear are excluded from the liability.
Parental responsibility
There is very little chance of risks arising from play mode if the tricycle is used correctly. However, please take into consideration that unforeseen situations and hazards may occur as a result of the natural need for movement and the temperament of young children and adolescents for which the manufacturer cannot be held liable. Teach children and adolescents how to use the vehicle correctly, in order to avoid falls and collisions.
Name plate
The name plate is attached to the bottom of the back of the frame. Write down the information on the name plate at the end of this manual, so that you have it to hand if you have any questions or are ordering replacement parts.
Maintenance and care
Check all parts for any wear and tear before use, as well as screw connections to ensure they are sitting properly. Self-securing nuts are stiff and must be replaced after complete disassembly!
In order to maintain the high, design-specified safety levels, all worn or defective parts are to be immediately replaced by original PUKY spare parts. For safety reasons, the vehicle should not be used until it has been fully repaired. Bent or deformed parts should not be repaired, but instead should be replaced.
Spare parts: Wheels, crank bearings, brake cap, handles
The vehicle must not be cleaned with a high-pressure cleaner. Clean the tricycle using a mild soapy solution and carefully wipe dry using a soft cloth. Keep the vehicle away from corrosion-promoting materials (road salt, sea water, fertiliser). The vehicle must not be stored in damp conditions.
Make sure the air pressure is correct for pneumatic tyres (the air pressure to be observed can be found on the sides of the tyres). Like car tyres, there is a risk of stain formation from vulcanised natural rubber in the contact areas of the wheels. Please protect contact areas between the ground and the tyres (Ceety Air only).
The valve caps (if available) should be fastened tightly and kept out of the reach of children (swallowing hazard).
Changing the wheels
Replacement wheels are available from your dealer or our website, www.puky.de.
Unpacking and scope of delivery
Do not use sharp objects when opening the packaging and removing protective materials. By doing so, you may damage the paint or parts of the vehicle.
Examine the package for completeness and proper condition. If anything is missing, please contact your dealer before you continue to assemble the tricycle.
Small parts which are required during assembly (e.g. screws and washers) must be kept out of the reach of small children. Also keep all packaging material out of reach of children. There is a danger of suffocation as a result of swallowing the parts.
In some cases, it is necessary to tighten screws with a prescribed torque. This torque value is stated in Newtons (e.g. 2 Nm). If the torque with which a screw is tightened is too low, the connection may still be too loose and therefore unsafe. If the torque is too high, screws and other parts may be damaged or destroyed.
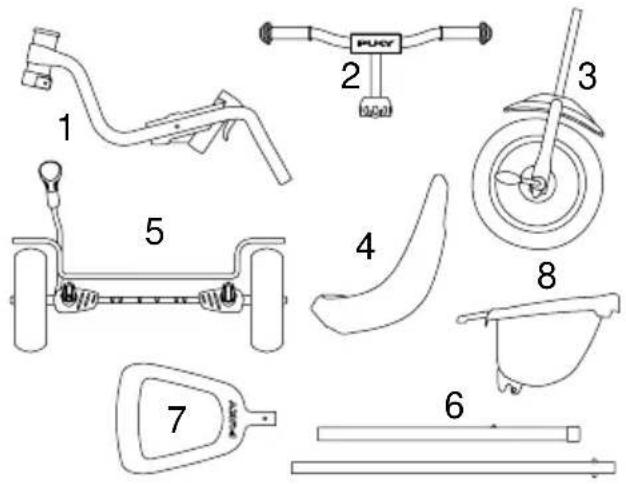
CEETY | CEETY AIR SCOPE OF DELIVERY
1 Frame
2 Steering wheel
3 Fork, including front wheel and foot pedal
4 Seat, including screw connection
5 Back axle with wheels
6 Guide pole pipe
7 Guide pole handle
8 Tipper
text_image
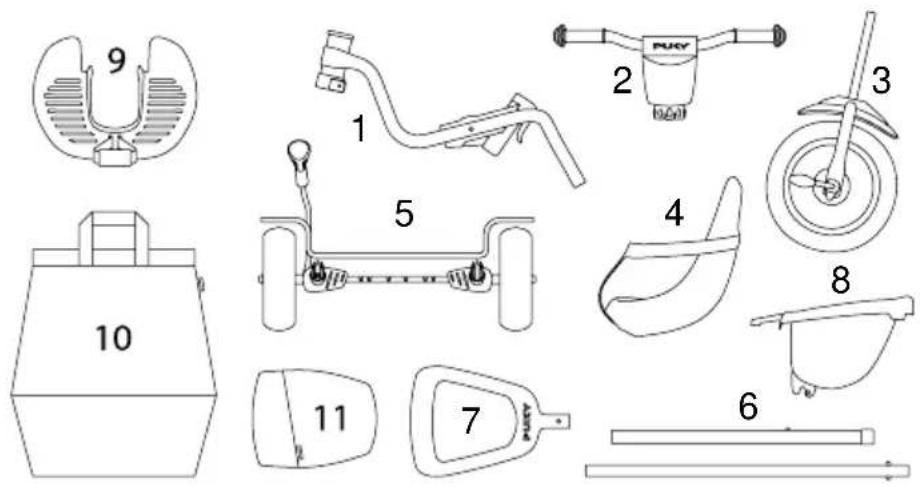
1 2 3 4 5 6 7 8 PUCYCEETY COMFORT SCOPE OF DELIVERY
1 Frame
2 Steering wheel including crash pad with bag
3 Fork, including front wheel and foot pedal
4 Seat, including screw connection and
3-point belt system
5 Back axle with wheels
6 Guide pole pipe
7 Guide pole handle
8 Tipper
9 Foot rest
10 Shopping bag
11 Accessories bag
text_image
Technical diagram showing 10 labeled mechanical components with numbered parts and cross-sectional viewsCEETY | CEETY AIR | CEETY COMFORT INSTALLATION MANUAL
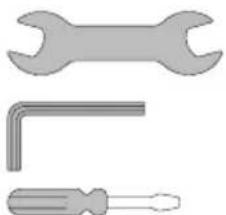
The following tools are required for installation of the Ceety and Ceety Air
- Open-jawed spanner 10 mm
- Allen key 5 mm
- Slotted head screwdriver
natural_image
Three types of wrenches and screwdrivers, no text or symbols present
text_image
1 2 1 1 2 1Undo screws and insert rear axles into frame. Align square nuts to the rear (!).
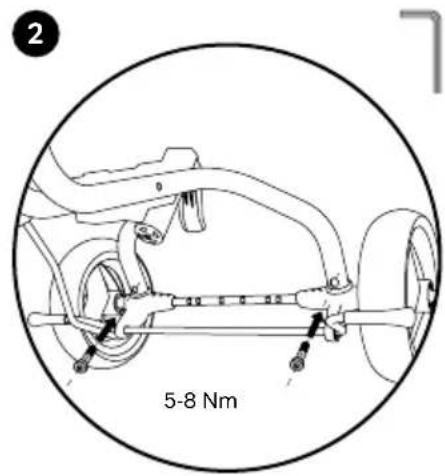
text_image
2 5-8 NmInsert screws and tighten.
2a
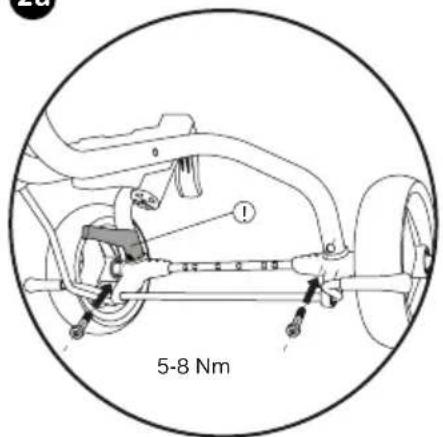
text_image
5-8 NmOnly on Ceety Comfort model: guide left screw through the parking brake (!) opening and tighten.
3
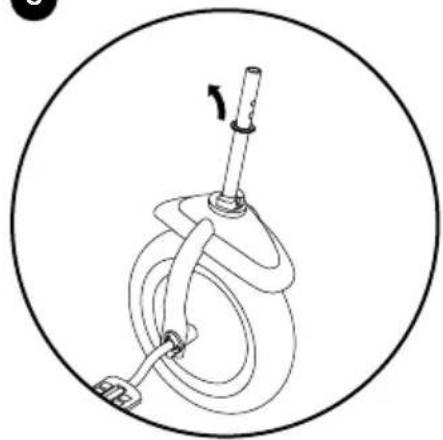
natural_image
Simple line drawing of a mechanical device with a circular frame and a central shaft, no text or symbols present.Remove transport lock (cardboard, rubber band) and take off the washer.
4
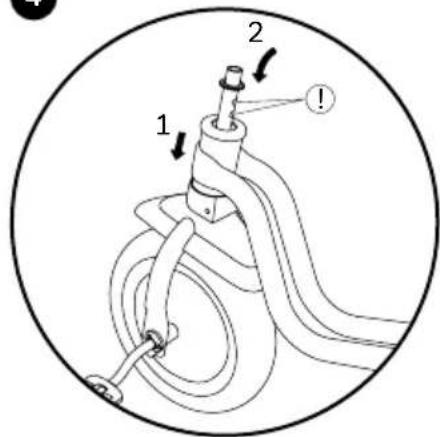
text_image
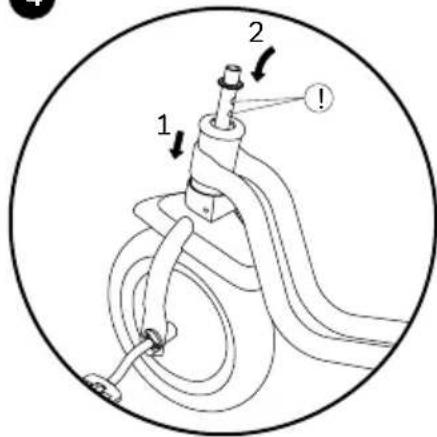
Technical diagram of a mechanical device with labeled parts and directional arrows indicating motion or assembly.Slide the steering tube onto the fork shaft, until it reaches the stop.. Replace the washer again. Align the lug on the handlebar to the rear (!).
5
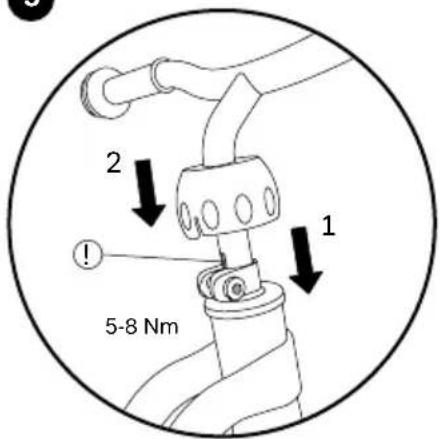
text_image
2 1 5-8 NmSlide the handlebar all the way onto the fork shaft, and tighten the screw. Firmly press down on the spherical cap until it snaps into position. Align the slot in the handlebar with the rear (!).
6
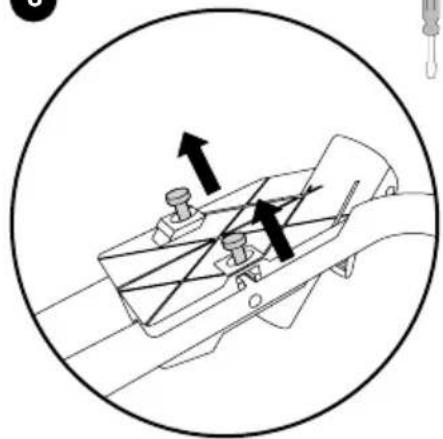
natural_image
Technical diagram of a mechanical assembly with directional arrows indicating movement or force (no text or symbols present)Unscrew screws from the seat retainer.
7
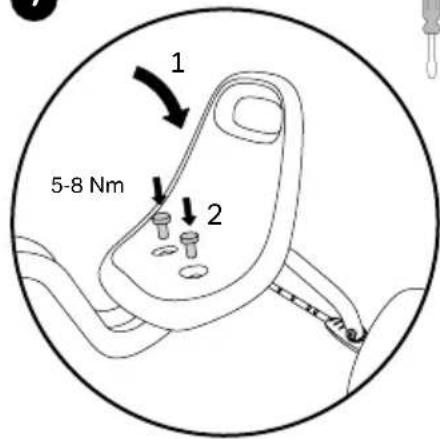
text_image
1 5-8 Nm 2Mount seat and screw into position.
8
text_image
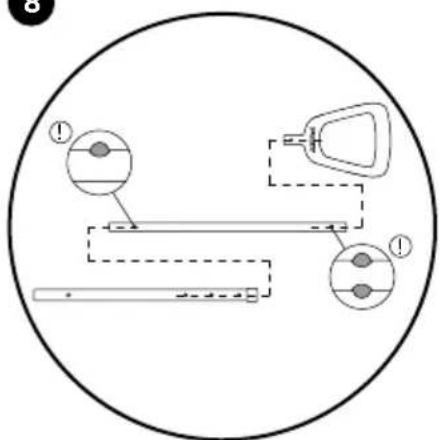
Diagram showing a mechanical or electrical component with labeled parts and dashed lines indicating connections or paths.Fit the push rods and handle together.
●
text_image
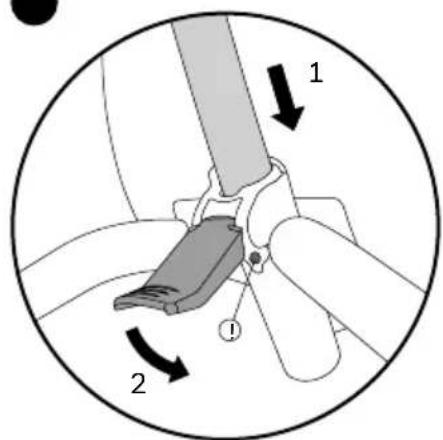
Diagram illustrating a mechanical assembly with labeled parts and directional arrows indicating motion or force.Insert the push road into the seat retainer and lock into place. Ensure that the locking mechanism (spring) locks in correctly (!).
10
text_image
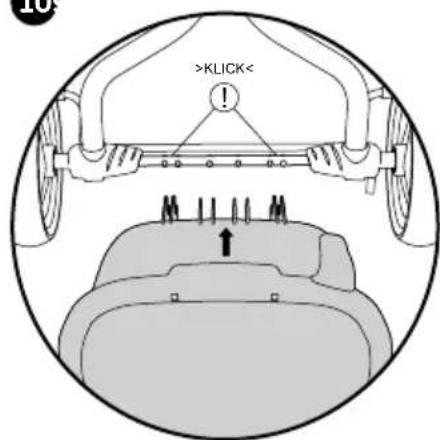
>KLICK< !Position the recess on the rear axle until it locks into place.
DETAILED INSTALLATION MANUAL FOR CEETY COMFORT
text_image
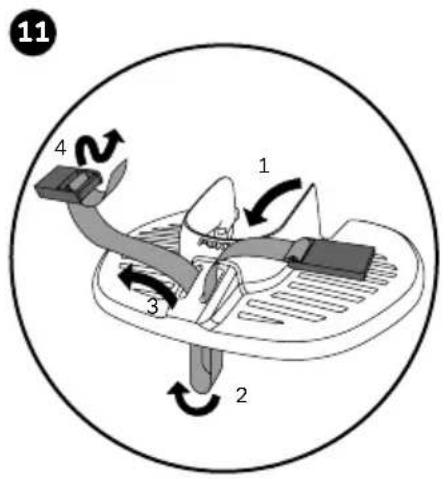
11 4 1 3 2Pull the enclosed belt through the footrest, then through the belt bar.
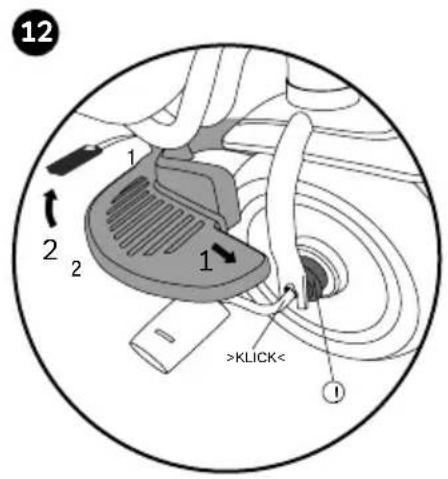
text_image
12 1 2 2 1 >KLICK< ①Position the footrest on the crank and attach the belt to the frame. If using the footrest, the freewheel must be enabled - pull the lock ring away from the rim (!).
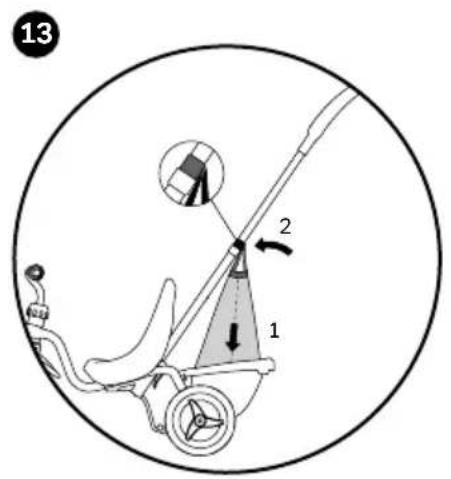
text_image
13 2 1Place the shopping bag in the recess and loop up the bag handles to the hook strap (push bar).

text_image
14 POTYAttach the accessories bag to the handle with Velcro.
OPERATION OF CEETY | CEETY AIR | CEETY COMFORT
The following tools are required for installation of the Ceety and Ceety Air
• 2 open-jawed spanners 10 mm

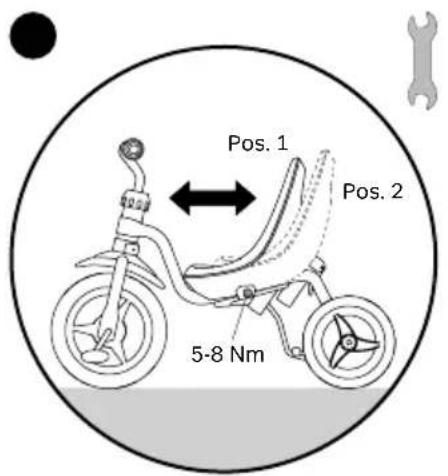
The seat position can be adjusted into myriad positions by loosening the screw somewhat. Afterwards, tighten the screw sufficiently.
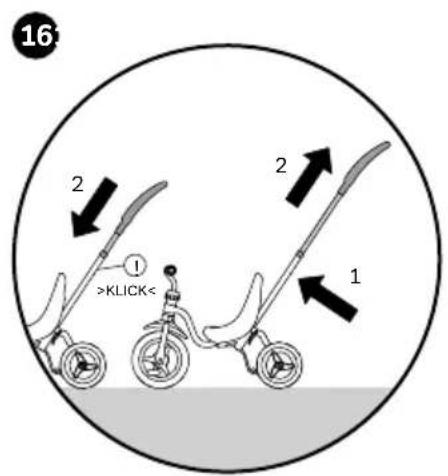
text_image
16 2 2 1 >KLICKSet the level of the push rod by pressing the locking mechanism (spring). Ensure that the locking mechanism (spring) locks in correctly once again.
text_image
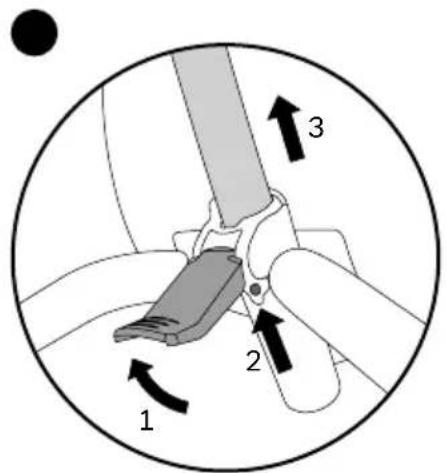
1 2 3Remove push rod: Release the safety lever, press the locking mechanism (spring) and pull out the rod.
text_image
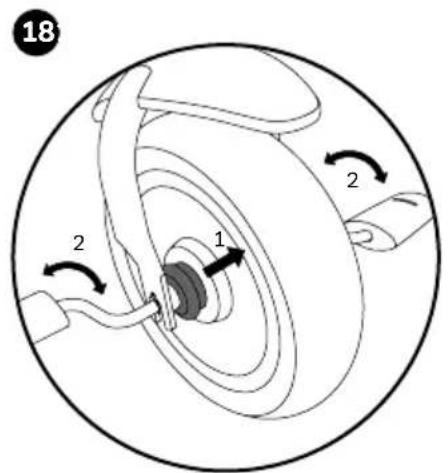
18 2 1 2Deactivate the freewheel so that the child can step on it too: to do so, push the locking ring against the rim until it locks. Turn crank slightly, as it makes locking in easier.
text_image
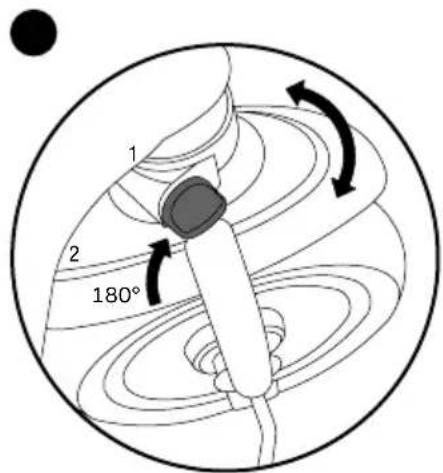
1 2 180°Turn rotary knob 180° so that handlebar locking is activated or deactivated.
DISMANTLING & ASSEMBLY OF THE 3-POINT BELT SYSTEM
To assemble (A) or dismantle (B) the 3-point belt system, you require the following tool (not included in the scope of delivery)
- Screwdriver (crosstip)
natural_image
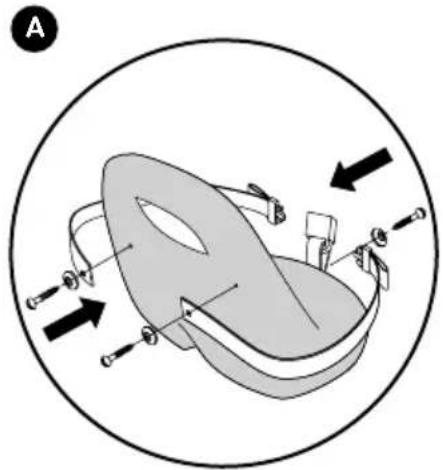
Diagram of a mechanical component inside a circular frame, showing internal parts and directional arrows (no text or symbols)Lock the pierced ends of the belt to the tricycle seat using the screws in the size provided. Caution! Only tighten the screws until they are hand-tight otherwise the plastic parts may be damaged.
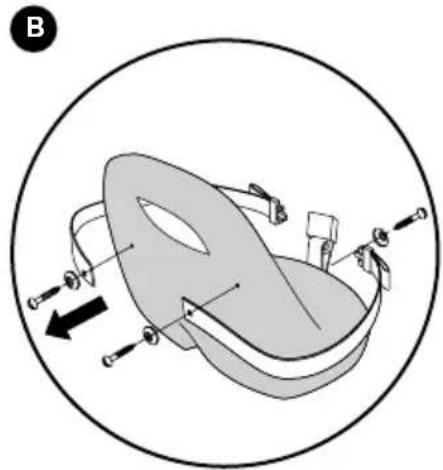
natural_image
Mechanical component diagram showing a circular frame with attached parts and directional arrows (no text or symbols)Remove the belt by loosening the screws.
Inleiding
text_image
Technical diagram of a scooter component with numbered parts and labeled partsMONTAGE -INSTRUCTIES CEETY | CEETY AIR | CEETY COMFORT
natural_image
Three types of wrenches shown in grayscale, no text or symbols present
text_image
1 2 1 1 2 1natural_image
Simple line drawing of a mechanical device with a circular frame and a central shaft (no text or symbols)natural_image
Simple line drawing of a mop handle and bucket with an arrow indicating rotation (no text or symbols)natural_image
Diagram of a mechanical component with arrows indicating assembly or movement, enclosed in a circle (no text or symbols)natural_image
Diagram of a mechanical component with directional arrows indicating movement or force (no text or symbols present)text_image
Technical diagram of a multi-step electric scooter assembly with numbered components and labeled partsINSTRUCTIONS DE MONTAGE CEETY | CEETY AIR | CEETY COMFORT
natural_image
Three types of wrenches shown in grayscale, no text or symbols present
text_image
1 2 1 1 2 1natural_image
Simple line drawing of a mechanical device with a circular frame and a central shaft (no text or symbols)natural_image
Technical diagram of a mechanical clamp or bracket with directional arrows indicating movement (no text or symbols present)text_image
Diagram showing a mechanical or electrical component with labeled parts and dashed lines indicating connections or paths.text_image
Diagram of a mechanical device with labeled parts and directional arrows indicating motion or force directions.natural_image
Illustration of a hand tool lifting a container with a circular frame (no text or symbols)natural_image
Diagram of a car seat assembly with arrows indicating parts, enclosed in a circle (no text or labels)natural_image
Mechanical component diagram showing a circular frame with attached parts and directional arrows (no text or symbols)Retirer la sangle en desserrant les vis.
Indledning
text_image
Technical diagram of a multi-step automotive component assembly with numbered parts and labeled partsMONTERNINGSVEJLED- NING CEETY | CEETY AIR | CEETY COMFORT
natural_image
Three types of wrenches shown in grayscale: standard, angled, and flat (no text or symbols)
text_image
1 2 1 1 2 1natural_image
Simple line drawing of a mechanical device with a rotating shaft and base, enclosed in a circle (no text or symbols)Fjern transportsikringen (pap, gummibånd) og tag underlagsskiven af.
4
text_image
Diagram of a mechanical device with labeled parts and directional arrows indicating motion or assembly.text_image
Diagram showing a mechanical or electrical component with labeled parts and dashed lines indicating connections or paths.text_image
Diagram of a mechanical device with labeled parts and directional arrows indicating motion or force directions.natural_image
Illustration of a hand holding a mallet with a bag, showing a change in the air between them (no text or symbols)natural_image
Diagram of a mechanical component inside a circular frame, showing directional arrows and labeled parts (no text or symbols present)text_image
Technical diagram of a multi-step bicycle steering system with numbered components and labeled partsISTRUZIONI DI MON- TAGGIO CEETY | CEETY AIR | CEETY COMFORT
natural_image
Three types of wrenches and screwdrivers, no text or symbols present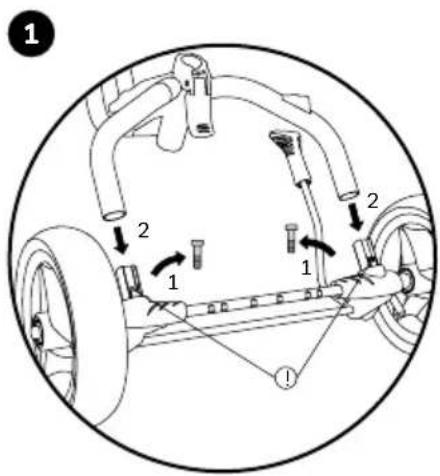
text_image
1 2 1 1 2 1natural_image
Simple line drawing of a mechanical device with a circular frame (no text or symbols)natural_image
Technical diagram of a mechanical component with directional arrows indicating movement or force (no text or symbols present)text_image
Diagram showing a mechanical or electrical component with labeled parts and dashed lines indicating connections or paths.text_image
Diagram of a mechanical device with labeled parts and directional arrows indicating motion or assembly.natural_image
Technical diagram of a mechanical component inside a circular frame, showing internal parts and directional arrows (no text or labels)text_image
Technical diagram of a bicycle steering wheel with numbered components and labeled partsINSTRUKCJA MONTAŻU CEETY | CEETY AIR | CEETY COMFORT
natural_image
Three types of wrenches shown in grayscale: standard, angled, and flat (no text or symbols)
text_image
1 2 1 1 2 1natural_image
Simple line drawing of a mechanical device with a circular frame (no text or symbols)natural_image
Technical diagram of a mechanical component with directional arrows indicating movement or force (no text or symbols present)text_image
Diagram showing a mechanical or electrical component with labeled parts and internal features, including a handle and two circular insets.text_image
Diagram of a mechanical belt drive mechanism showing two directional arrows labeled 1 and 2 indicating rotation or movement.text_image
12 1 2 2 1 >K L I C Knatural_image
Illustration of a hand holding a mallet with a container, enclosed in a circle (no text or symbols)natural_image
Diagram of a mechanical component inside a circular frame, showing adjustment arrows and no readable text or symbols.natural_image
Diagram of a mechanical component inside a circular frame, showing internal parts and directional arrows (no text or symbols)text_image
Technical diagram of a scooter component with numbered parts and labeled partsNÁVOD NA MONTÁŽ VÝROBKŮ CEETY | CEETY AIR | CEETY COMFORT
natural_image
Three types of wrenches shown in grayscale, no text or symbols present
text_image
1 2 1 1 2 1natural_image
Simple line drawing of a mechanical device with a circular frame and a central shaft (no text or symbols)natural_image
Diagram of a mechanical clamp or bracket with directional arrows indicating movement (no text or symbols)text_image
Diagram showing a mechanical or electrical component with labeled parts and dashed lines indicating connections or paths.text_image
Diagram showing a mechanical assembly with labeled parts and directional arrows indicating motion or force directions.natural_image
Diagram of a mechanical component inside a circular frame, showing directional arrows and no readable text or symbols.natural_image
Technical diagram of a mechanical component inside a circular frame, showing internal parts and directional arrows (no text or symbols)text_image
Technical diagram of a scooter component with numbered parts and labeled partsINSTRUCCIONES DE MONTAJE CEETY | CEETY AIR | CEETY COMFORT
natural_image
Three types of wrenches shown in grayscale, no text or symbols present
text_image
1 2 1 1 2 1natural_image
Mechanical diagram showing a rotating wheel with a shaft and connecting rod, enclosed in a circle (no text or symbols)text_image
Diagram of a mechanical device with labeled parts and directional arrows indicating motion or assembly.natural_image
Technical diagram of a mechanical clamp or bracket with directional arrows indicating movement (no text or symbols)text_image
Diagram showing a mechanical or electrical setup with labeled components and directional arrows, including numbered annotations.text_image
Diagram illustrating a mechanical assembly with labeled parts and directional arrows indicating motion or force.natural_image
Simple line drawing of a mop handle and bucket with an arrow indicating rotation (no text or symbols)natural_image
Diagram of a mechanical component with directional arrows indicating movement or force (no text or symbols present)text_image
Technical diagram of a multi-step automotive component assembly with numbered parts and labeled partsИНСТРУКЦИЯ ПО МОНТАЖУ СЕETY | CEETY AIR | CEETY COMFORT
natural_image
Three types of wrenches and screwdrivers, no text or symbols present
text_image
1 2 1 1 2 1natural_image
Simple line drawing of a mechanical device with a rotating shaft and rope, enclosed in a circle (no text or symbols)text_image
Technical diagram of a mechanical component with numbered parts and directional arrows indicating motion or assembly.natural_image
Technical diagram of a mechanical component with directional arrows indicating movement or force (no text or symbols)text_image
Diagram showing a mechanical or electrical component with labeled parts and dashed lines indicating connections or paths.text_image
Diagram showing a mechanical assembly with labeled parts and directional arrows indicating motion or force directions.natural_image
Diagram of a car seat assembly with arrows indicating parts, enclosed in a circle (no text or labels)natural_image
Mechanical component diagram showing a circular frame with attached parts and directional arrows (no text or symbols)From September 01, 2016 (date of purchase), PUKY is offering a 5-year guarantee for all vehicles on frames, forks and handlebars. The guarantee is transferable and can also be claimed in case of preparation and material errors by second or third-hand customers. In order to activate the guarantee for the first time, (online) registration by the purchaser is required within 4 weeks after purchase of the vehicle. You can obtain further information under: www.puky.de
NL
The type label is located underneath the frame. Please complete the information from the type label so that you have all the information you need in the event of any questions or when ordering spare parts.
NL
natural_image
Silhouette of a motorcycle with a long rod and arrow indicating motion (no text or symbols)PUKY GmbH & Co. KG
Fortunastrasse 11
D-42489 Wuelfrath
S.No:
P. No: