moto - Bike Puky - Free user manual and instructions
Find the device manual for free moto Puky in PDF.
User questions about moto Puky
0 question about this device. Answer the ones you know or ask your own.
Ask a new question about this device
Download the instructions for your Bike in PDF format for free! Find your manual moto - Puky and take your electronic device back in hand. On this page are published all the documents necessary for the use of your device. moto by Puky.
USER MANUAL moto Puky
Congratulations on the purchase of this PUKY vehicle. You have acquired a quality product, which is certain to bring you great joy.
This manual contains information on the safe use of your vehicle and its care. Please read the manual carefully prior to use and keep it in a secure place for future reference. Failure to observe the information contained in this manual may impair the safety of your child. Should you have any questions, please contact your dealer or contact us via our website: www.puky.net.
Parents' responsibility
Risks during play are, for the most part, excluded when used in accordance with the intended purpose. However, please take into consideration that unforeseen situations and hazards may occur as a result of the natural need for movement and the temperament of young children and adolescents for which the manufacturer cannot be held liable.
Teach children and teenagers how to use the vehicle correctly, in order to avoid falls and collisions. The vehicle does not have any brakes.
Supervise children, and make them aware of any potential hazards.
Suitability
The vehicle must only be used in a suitable, safe play area, in a sheltered environment. It should only be used on even, barrier-free surfaces! This vehicle does not comply with the requirements of German Road Traffic Regulations (StVZ0) and may not be used on public roads. The permitted total load is a maximum of 20 kg. This toy vehicle may have sharp edges.
Attention: Not to be used by children over 36 months (insufficient stability).
Attention: Protective equipment required. Not for use in road traffic.
Attention
Small parts which are required during assembly (e.g. screws and washers) must be kept out of the reach of small children. There is a danger of suffocation as a result of swallowing the parts. Also keep all packaging material out of reach of children.
The bike must be assembled with great caution and by an adult to avoid any potential subsequent accidents or injuries. Please take a sufficient amount of time to assemble the bike. Several assembly steps require manual skill and practice in handling tools (e.g. spanner). Please contact your dealer or a workshop if you have any questions.
In some cases, it is necessary to tighten screws with a prescribed torque. This torque value is stated in Newtons (e.g. 2 Nm). If the torque with which a screw is tightened is too low, the connection may still be too loose and therefore unsafe. If the torque is too high, screws and other parts may be damaged or destroyed.
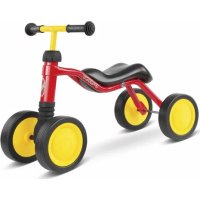
PUKYMOTO concept
PUKYMOTO is an ergonomically-designed children's vehicle which closes the gap between a four-wheel ride-on vehicle and a two-wheel balance bike. It permits children who can already walk well to ride more dynamically and sportily than on a classic ride-on car, and yet offers more anti-tip stability (2-wheel rear axle) than a balance bike.
Usage
It is necessary to wear closed shoes. The vehicle must not be driven in the vicinity of stairs, slopes, steep terrain, swimming pools, or other bodies of water. Stairs in the vicinity must be secured to prevent children from riding up or down them on the vehicle.
The legal liability for material defects applies. Damages caused by inappropriate use, the effects of force, insufficient maintenance or due to normal wear and tear are excluded from the liability of material defects.
CE mark
This product complies with the European Toy Safety Directive 2009/48/EC and therefore bears the CE mark.
Type label
The type label is attached to the underside of the frame. Please record the information on the identification plate in the cycle passport at the end of this manual so that you have all the information you need in the event of any questions or when ordering spare parts.
Maintenance and care
Examine the vehicle at regular intervals for any wear, and to check that the screws are still properly tightened. Self-tightening nuts are hard to loosen and must be replaced after complete disassembly!
In order to maintain the high, design-specified safety levels, all worn or defective parts are to be immediately replaced by original PUKY spare parts. For safety reasons, the vehicle should not be used until it has been fully repaired. Bent or deformed parts should not be repaired but instead should be replaced.
Spare parts: Wheels, handlebar grips
The vehicle must not be cleaned with a high-pressure cleaner. Clean the tricycle using a mild soapy solution and carefully wipe dry using a soft cloth. Keep the vehicle away from corrosion-promoting materials (road salt, sea water, fertiliser). The vehicle must not be stored in damp conditions.
Unpacking and scope of delivery
Do not use any sharp objects when opening the packaging and removing protective material. By doing so, you may damage the paint or parts of the vehicle.
- Remove all parts from the packaging.
- Remove the protective material. Keep all packaging material out of reach of children – there is a risk of suffocation.
- Examine the package for completeness and proper condition. If anything is missing, please contact your dealer before you start to assemble the vehicle.
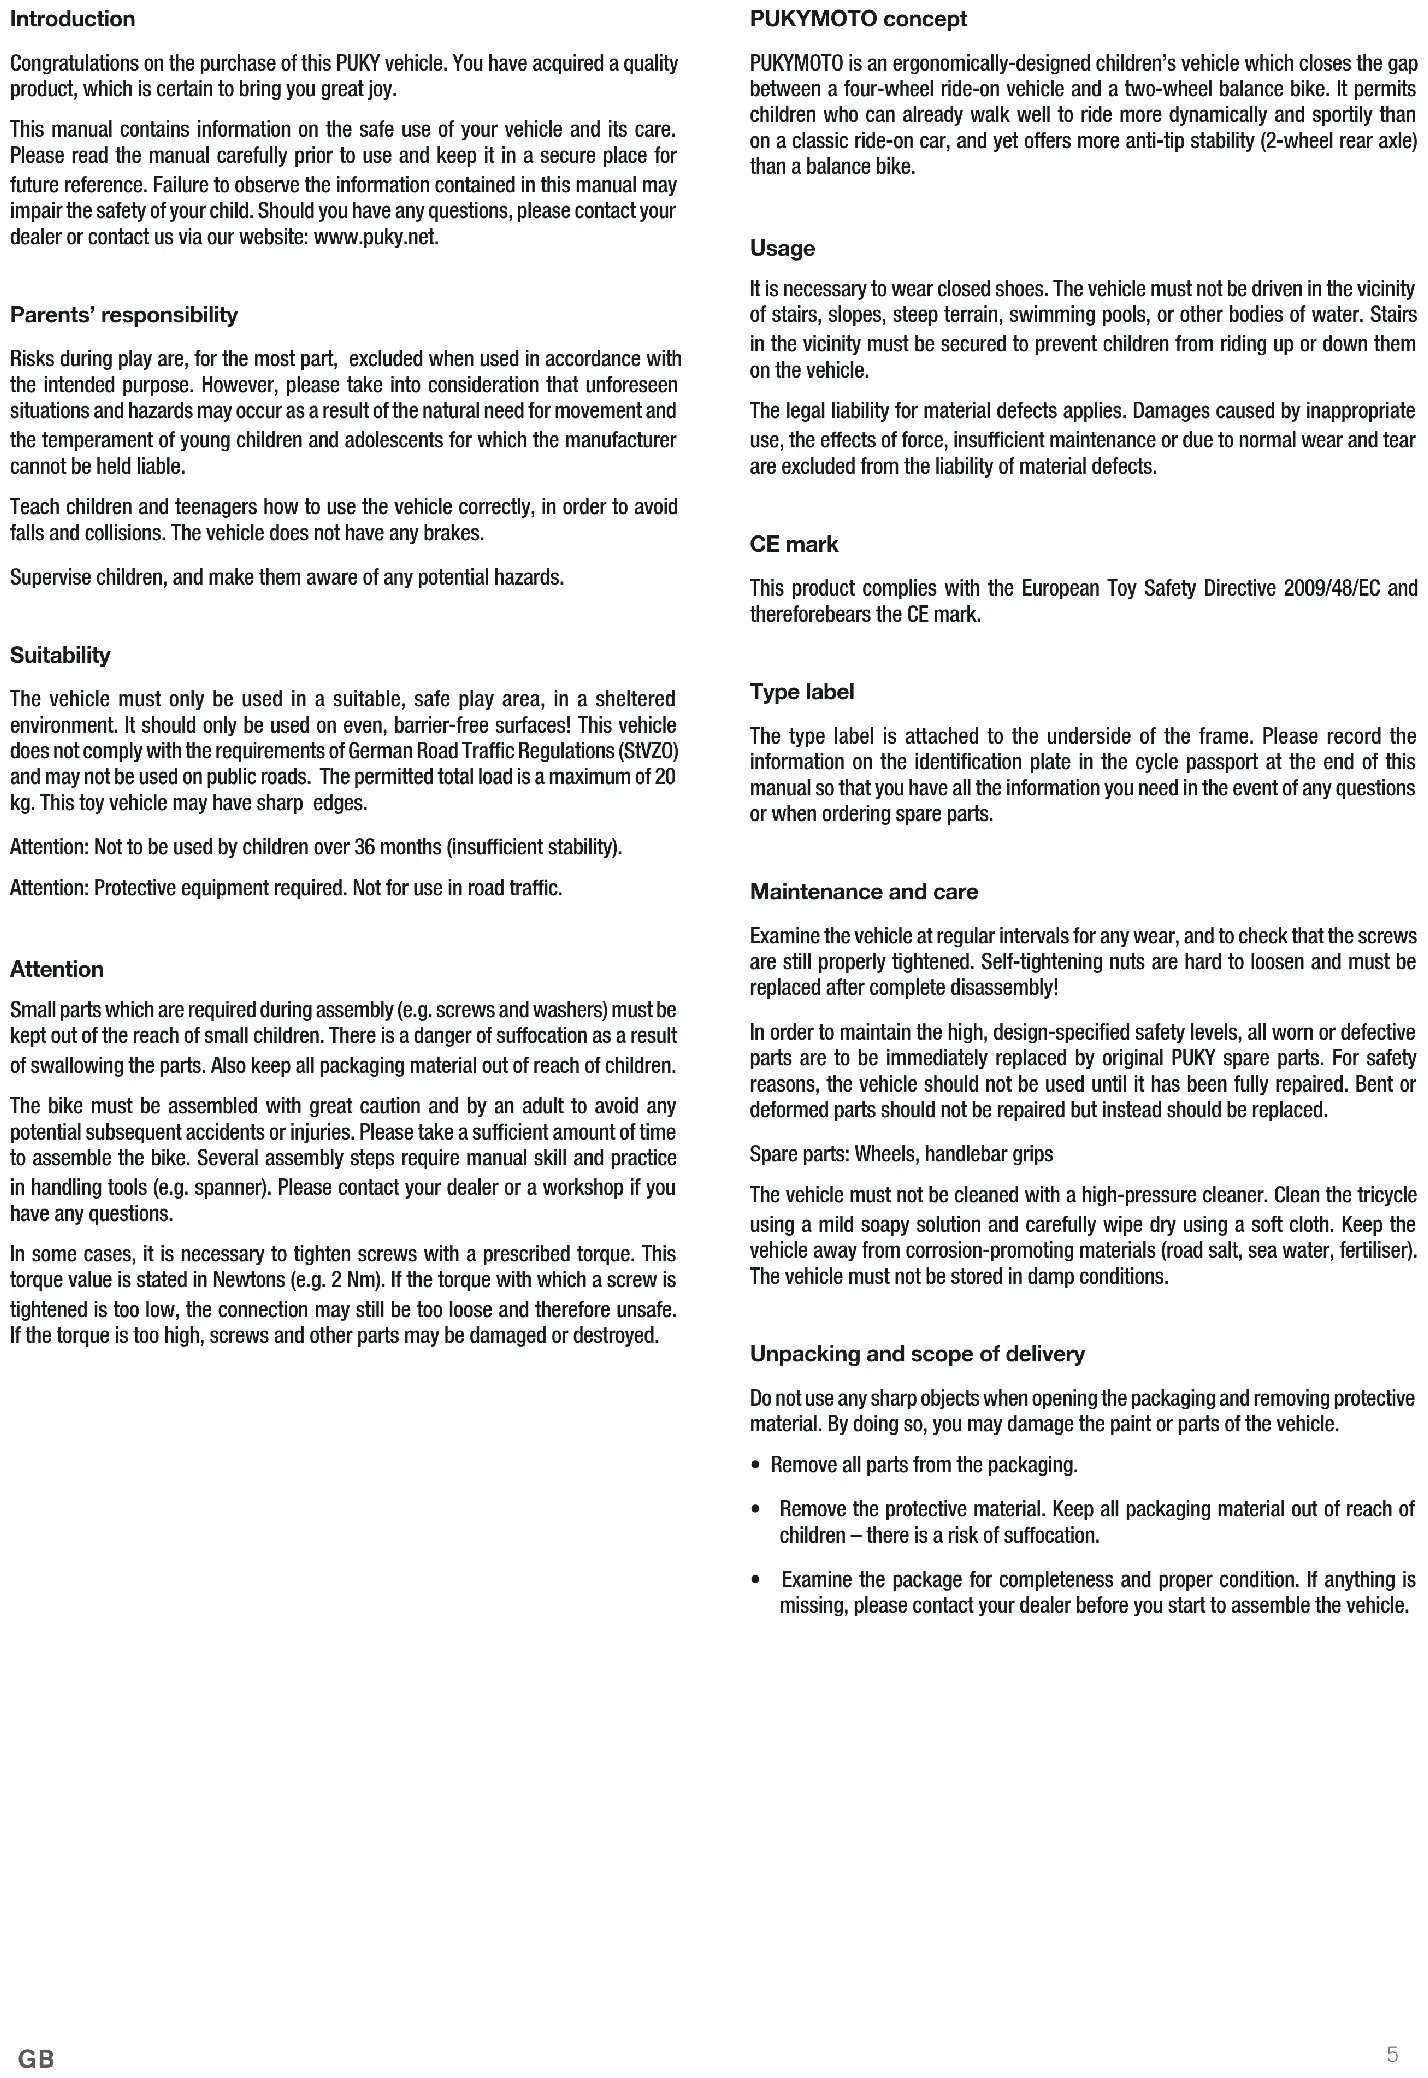
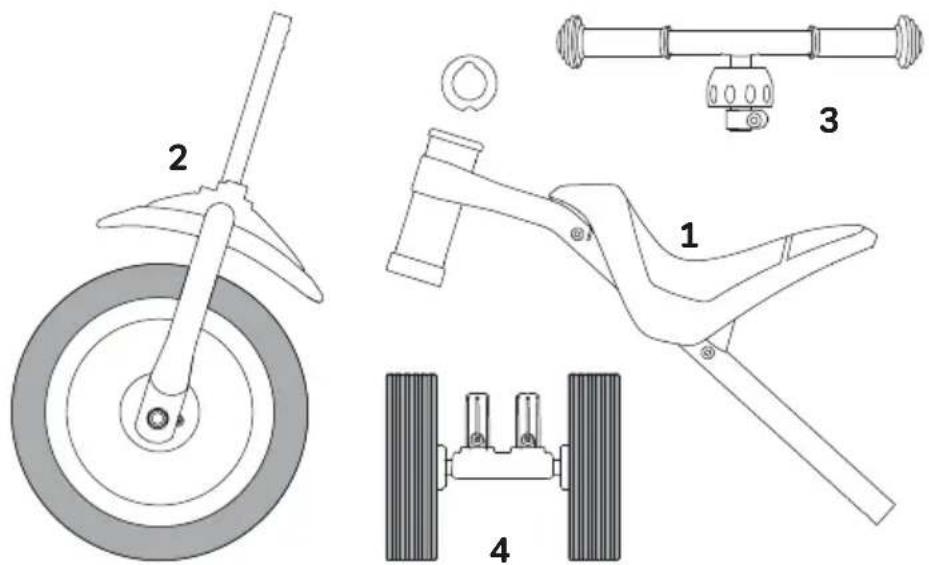
SCOPE OF DELIVERY PUKYMOTO
- Frame incl. seat
- Fork incl. front wheel
- Handlebar
- Rear axle with wheels
INSTALLATION MANUAL
You will need the following tools for assembly: (The tools are not part of the scope of delivery)
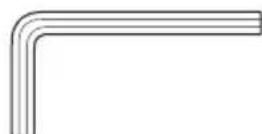
- Allen key 5 mm
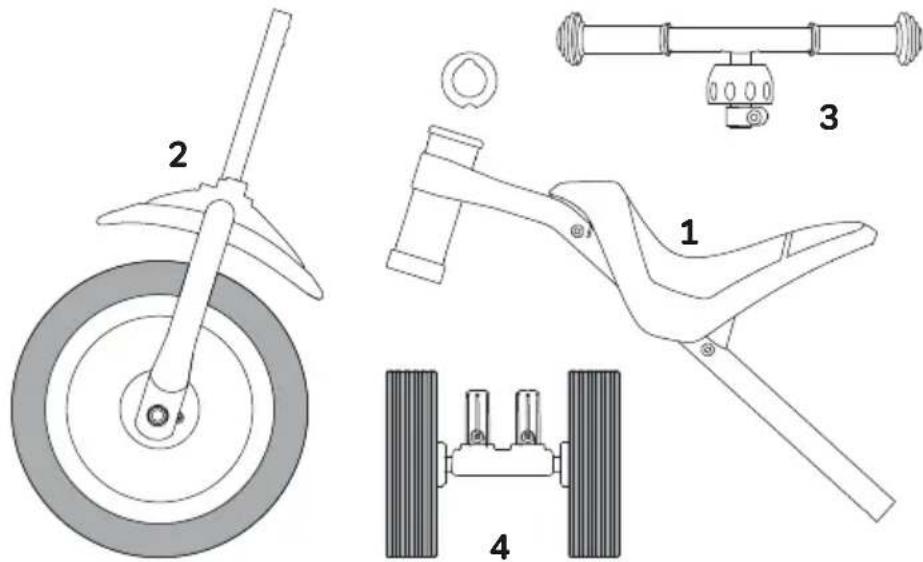
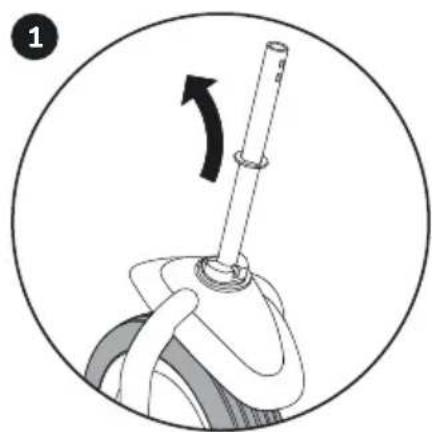
Remove transport restraint (paperboard, rubber band) and take off the washer.
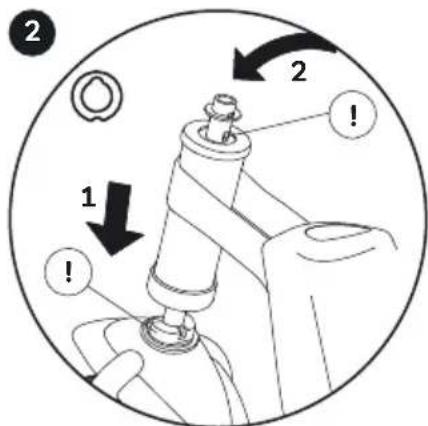
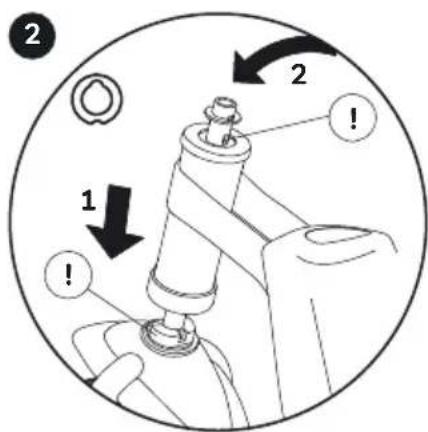
Slide the steering tube onto the fork shaft, until it reaches the stop. Make sure that the steering head is aligned correctly (!) Add the washer. Align the ribs on the fork shaft to face backwards (!).
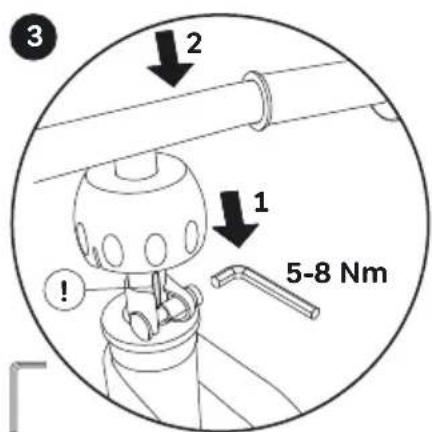
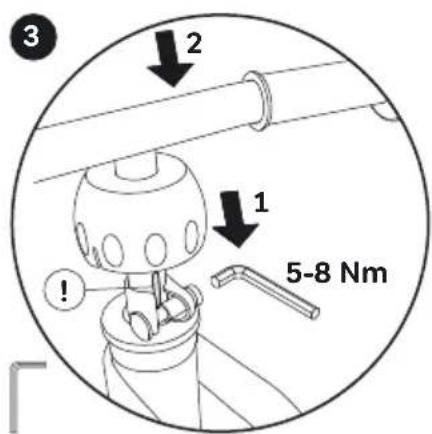
Slide the handlebar all the way onto the fork shaft, and tighten the screw. Align the slot in the handlebar with the rear (!) Firmly press down on the spherical cap until it snaps into position.

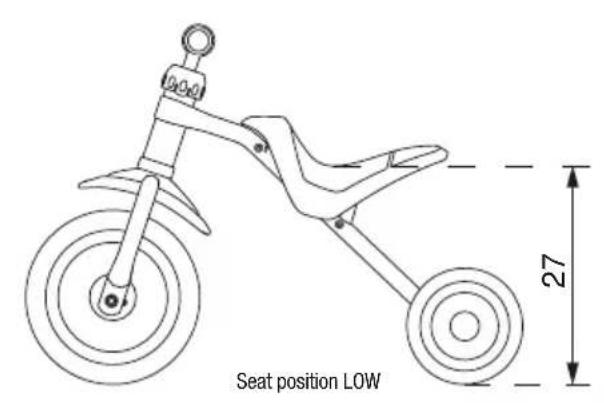
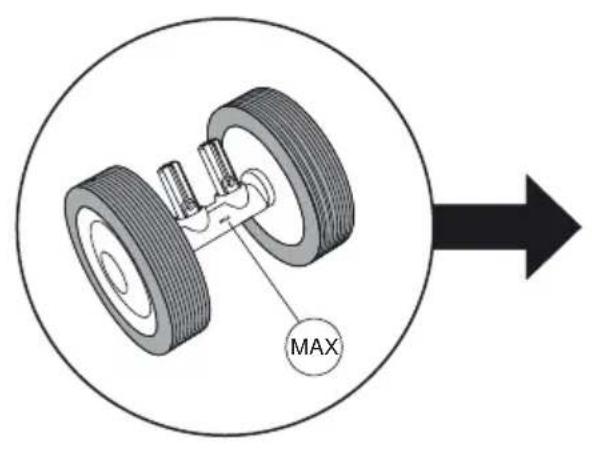
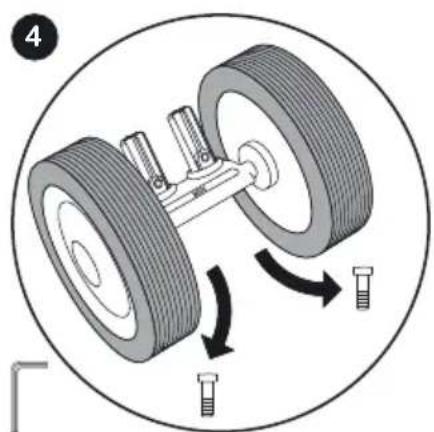
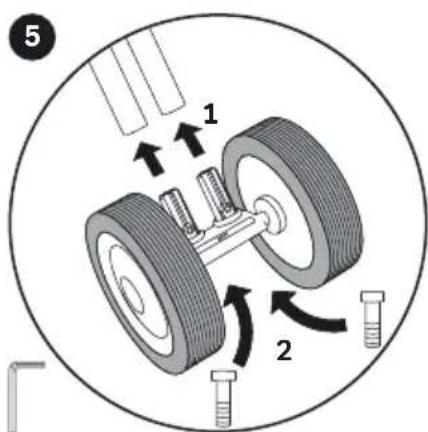
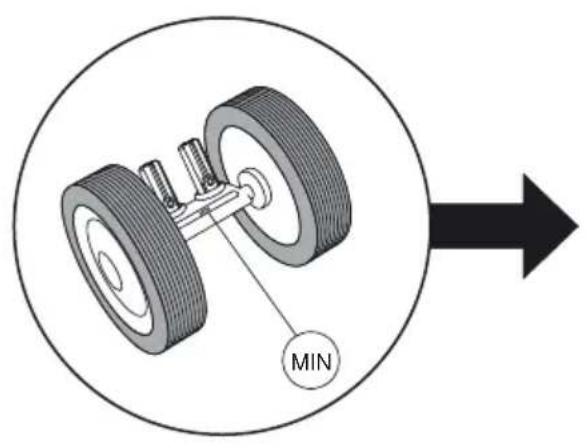
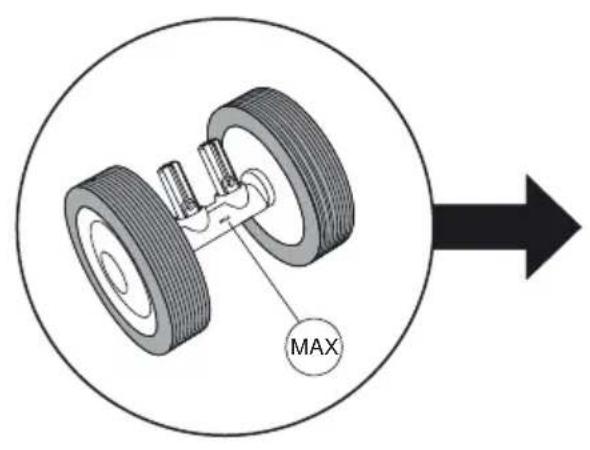
Unscrew screws from rear axle. Insert the rear axle into the frame in

the desired position - seat height min.
(27 cm) or seat height max. (29 cm).
Insert screws and tighten with tool (spanner).
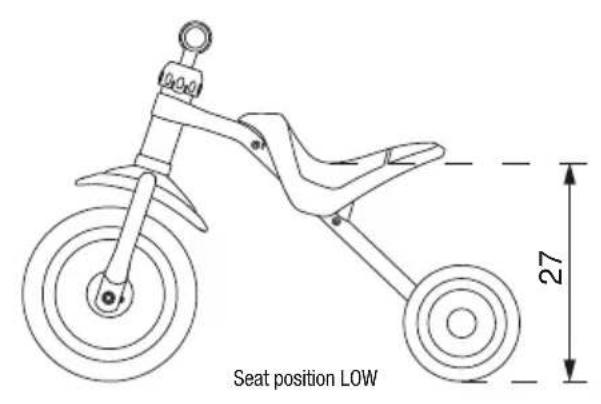
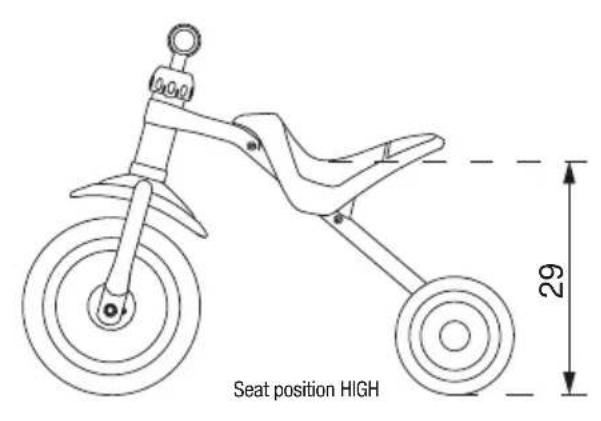
OPERATION
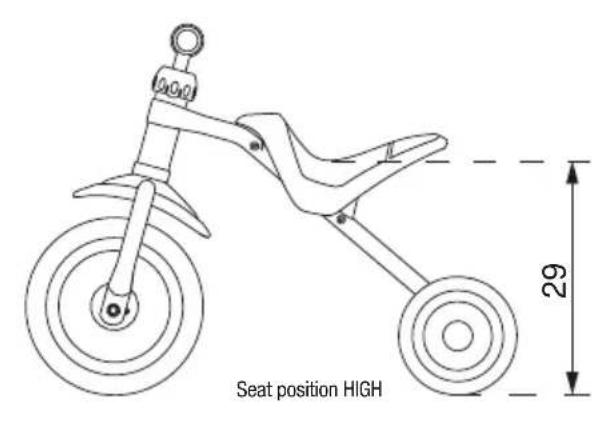
Adjust the seat height by turning the rear axle - Seat height Min (27cm) or seat height Max (29 cm).

Inleiding
He octabJIaIe Ix 6e3 npncMOtpa N o6paTne Ix BHHMaHHe Ha BO3MoXHbIe onaCHOCTN.
Ha3HaueHne
TpaHcnpTHoe cpeCTBO pa3pewaeTc HcNoIb3oBaTb TOnbK B NoXOauee 3auuueHHouIrpoBo 30He N B 6e3onachom NomeueHN. NcNoIb3oBaTb ToBko Ha Cbo6oHou POBHO NOBepxHocT! DaHHO TpaHCnoptHO cpeCTBO He COOTBetCTByET PpaBnAM donycka TpaHCnoptHBx cpeCTB K DmXeHNO, NO3ToMy ERO HeB3A nCIOb3oBaTb DnA DmXeHnno No doporam. Han6oIbuaa DOnyctIma8 O6uaa Harpy3ka coCTabNt 20 Kr. KpOMKn IrpyueHoro TpaHCnoptHOro cpeCTBa MOrYT 6blb OctPbIM.
BHHAMHHe. NcnoJIb3OBAHHe DeTbMn CTapIe 3-X Iet He dOnyCKaETcR (HeIOCTaTOHAR yCTOHNBOCTb).
BHHaHHe. Tpe6yETc3aUHTHOe CHAPXeHHe. He nIeNIOJIb3OBAHnB DopoXHom dINKHeHc.MakCmym
BHMaHne
HeDoryckaIte nonaHnre Heo6xumbIX nmoHTaxa MeKnx Detanei (HaNPmep, BHTOB u wai6) B pyKn manehblkX detei. OHN MOrY nporntmb 3Tn Detanu 3aoxybrc. DePknTe IIO60y naKobOchbl matepnaBdnn OT detei.
MOHTAXdoJIKeH BbIINHbB3Pocnbl YeIOBek,JeCTBya OChEB BHIMATEJbHO, YTO6bI NCKIIOnTHpNCNcIeDyIOUHX HecCACTbIX CNYaB IN TpaBM.OTBeJITHe MoTAXdoCTaTOHoe KOIuYeCTBO BpeMeHN. HeKOTOpBE MOHTAXHbIE paBoTb Tpebyot ONpeDEeHHbX npAKTNUeCKNX HABIKOB INoTBa OpbauEHN CpyHbIMN IHCTpyMeHTAMN (HaNPIMep, CraeYbHM KInOUM).Ecln Bbl yCbCTByeTe Ce6B HeIOCTaTOHOb YEpeHNO, ObpaNTecb K PermoHbHOMy Dmnepy INB MaCTepckyo.
B HeKOTOpbIX MecTx Tpe6yEtC3aTgNBAtb BnHTbI ONpeJeHbbIM MOMeHTOM 3aTAAKKN. MOMENT 3aTAAKKN yka3bBaetcB HbIoTOH-METpax (HanpIMep, 2HM). Ecnn 3aTAYb BnHT C MehBIm YcUNMe, COeINHeHne MOKeT OKa3aTbcra CmIKOM cna6bIM n HeHaJeXhbIM. CmIKOM 6oJIbwoe ycInne MOKeT npIBcTeN K NOBpeXJdeHNIO pa3pyuEHHIO BnHTOB INpyrNX Detanei.
Moden PUKYMOTO
PUKYMOTO -3TO 3PROHUMHHOE DetCKOE TPAHCNOPTHOE CpeCTBO, KOTOPOE coeHNHET 3a3Op MEXy YeTbIPEXKONECHBM TPAHCNOPTHBM CpeCTBOM IN DByXKONECHBM TPAHCNOPTHBM CpeCTBOM. 3TO N03BOJARET DETRM, KOTOPBLE yKe 6eOtonachbl, ynpaBnTB 6olee DNHAMMHNOH IN CNOPTNBHO E3DoH, YEM C TpaDNUOHbIM YeTbIPEXKONECHBM TPAHCNOPTHBM CpeCTBOM. KpOME TORO, OH OBeCneuBaET 6oIbSyIO CTabINbHOCTb (2-KONECHA 3aDHRA OCB), YEM ABTomO6NJb CDbymKonecAm
Yka3aHnno 3Kcnnyataun
Heo6xmoHocntb3akpyIoo6yB.3anpeaaetcKaatabcHaMaunHKe prdcm cNeCTnUAM,ObpbIBNCTbIMu yAcTkAMn,6accenHAMn IpyrHMn BDOeMaMn. HaxoJusce noBm3OCTn neCTnUb CneJeYer OpaNTb TAK,TO6blTeH He MOrJIn nOHNMaTbCnCyckTaBCNo HMMaunHKe.
IepyCMOTpeHHa 3aKHOaTeBCTBOM OTBcTBeHHOCb Ipoabua 3a deEeKtby N3dEmna. OTBcTBeHHocb Ipoabua He pacnpoctpanreTcHa NOBpeXdHn, Bb3BaHbIe HeAhnEkaue HarpY30K, CINOBbIM BO3deNCTBnEM, HEOCTaTOhBM TEXOcnykBaHem INI ECTeBEHHbIM 3HOCOM.
MapKIpOBka CE
Maunnka cooTBeCTbBye Tpe6oBaHmEbponeckOu DpuKeKtBbl 2009/48/EG o 6e3onachochtn rpyuek n Nmeet Mapkpobky 3hakom CE.
ΦnMpMeHHa Ta6nUka
ΦπμmEHnA TaBnUkApKpEnIeHa Bn3y Ha pame. BnWnte yKaaHnHle Ha ΦπμmEHnO TaBnUkHe DaHbE B nacnpT TpaHCnptHO CpeCTBa B KOHc DeHHORO pyKOBOCTBA NO 3KcnIyatauM, YTO6bIMETb NpD pyKo Heo6XoMbIe CBedeHnHA CNYaB03HNKHOBEHn BONPCOB Wn 3aKa3a 3aNacteI.
Texo6nykuaBaanu yxoad
Ipeed 3KcNpyatauue nCneyet npOBepTb BCE deTann Ha HauuHne CNEOB uHcOca, a BHTOBble coeMHHeHnHa IpoUHOCTb NocAaKn. CamoCTONOPaUeCeR raKn MMeOT Tyryo pe36by n oocle noJHoro demOHtaka noJdEkaT 3ameHe!
Ira coxpaHnnapeDycmptpHHo KOHCTpyKneBbICOKO yPOBHa 6e30NaCHcTn
13HOeHHbIe IIN HeCNpabHbIe DeTaN Heo6XoIMo Cpa3y Xe 3aMeHrTa
OprrnHaJIbHbIMN 3aNAChbIMN YactmN pPUMbI PUKY. Nc 0o6paKeHN 6e30NaCHcTn
He cJeTy nCOnJb30BaTb TpaHCnOpTHoe CpeCTBO 0 DaBePHeHnpeMOHTA.
TOrHytble dTeaJI NcJeTy HE BbIPnPMJIb, a cpa3y Xe 3aMeHrTa.
БыICTPOM3HaWIMBaHOUmecSdTeTAM:KoJIeCa,HaKJIaJKn pyKoYrTOK
IINYIHCKMIAMHHKNHe pAs3peHaaTcNcNOb3OBaTB BbICOKHOANOPbIO OCHNTeB. MaunHKy CnEeyET NCTNBcA6bIMMbIBHBIMpACTBOPOM,a3atEM TuaTeNbHO npOHTpaTB MKarKo cAnPefTKo.He CnEeyET DOnyckaTB KOHTaTaMaunHKC mATEpHaanAMn,CNOC6CTByHoUmmOcbpOBAHNIO Kopp03n(ColbIO nOncbIKN yMl, MOpCKo Co1bO,yO6peHnA.MaunHKy He pAspeHaetcXpaHntBo BIAJHX NOMeUeHIX.
PacnakOBka N KOMNJIeKT NOCTaBKn
He nIOnb3yIne DnBCKpbTnN yNaKOBKn ydaJIeHn 3aunTHOro Maepnna OcTpbIe npEmdTebl. OH MoryT cepBe3HO nobpeDnT b NaKOKpacoHoe NOKpbITne nn DetanMauHHKn.
-
13BNEKHTE BCE dETaJIH n3 ynaKOBKn.
CHIMMTE 3aunTHbMaTePnAn. DepKNTe IIO6oynakOBOHyMaTePnAn nOdaJIbe OT detE: onaCHOCTb ydyIbIy
PpOBepbTe KOMTNEKTHOCb NocTABn HnAHIyue NOBpeHn, NOnyehHBix npn TpaHcnpTPOBKe. B CNYae OTCYCTBnA kKn-Im6 DeTanei ObpaNTeCb K pRHOHaBHomMy dInepy, npExe Yem npoDJIkNtB paOToY. -
Pama BKJIOHAY CeJIO
- BvIIka BKn.IpepeHne Koneco
3.Pynb.
4.3aH8OcBcKoJeCAMn
TopoBbI WecTnRpaHbI raeHbI KInOu 5 MM

YdaJIbT 3aunTHyIO CnCTeMy TpaHcNoPTnOBKn (KapTOH,pe3INHOBA JIHTA)NCHrTB IaM6y.
Hadeb pyeBcTepKHe Ype3 rOIOBHyTOpy6y,doynopa.CobIaTaB npabInbHoe pacnoJoxKeHne nouunnHka pyeBO- ro Bana (!)BCTaBtNb noKnadHyu wAby.BoepHyb HocNKpyeBcTpy6knHasd (!).
BCTaBnTb pyNBpyNEBOI CTepKeHb Do ynpora npoHO 3akpyTNb BHT.OTBepCTne B pyne DOJXKHO 6bITbOpENTHPOBAHO Ha3ad (!) HAdaBnTb HaHaUKy BHN3 Do 3aueKNBaHnR.
BbIepyTb 60JbIc 3aDHeN oCn. BCTaBtB b pamy 3aDHIIO ocB JKeJeMaOM NOJIOKeHm
- BbICota CnEHeB MHH. (27 CM) NIN BbICOTA CnEHeB MaKc. (29 CM). BCTaBtB 60NTbI 3aTAYbC NOMOULIO INHCTpyMeHTA (MMycoBOr KIOUa).
GARANTIE/WARRANTY/GARANTIE/GARANTIE/ GARANTI/GARANZIA/GWARANCJA/ZÁRUKA/
DE
From September 01, 2016 (date of purchase), PUKY is offering a 5-year guarantee for all vehicles on frames, forks and handlebars. The guarantee is transferable and can also be claimed in case of preparation and material errors by second or third-hand customers. In order to activate the guarantee for the first time, (online) registration by the purchaser is required within 4 weeks after purchase of the vehicle. You can obtain further information under: www.puky.de
NL
Please complete the identification plate on the cycle passport page.
The PUKY identification plate is fitted to the vehicles as shown in the drawings below and must be noted down for ordering replacement parts from your dealer.
D-42489 Wulfrath, Germany