
TM502XX - TV wall mount Vonroc - Free user manual and instructions
Find the device manual for free TM502XX Vonroc in PDF.
| Product type | Wall mount for TV |
| Brand | Vonroc |
| Model | TM502XX |
| Dimensions (W x H) | 495 x 435 mm |
| Wall clearance | 34 mm |
| Mount weight | 1.5 kg |
| Maximum screen weight | 50 kg |
| Compatible screen diagonal | 37" to 75" |
| Compatible VESA standards | 400x400, 400x300, 400x200, 300x300, 300x200, 200x200 |
| Material | Steel |
| Finish | Black |
| Tilt | Yes, adjustable (forward) |
| Wall mounting | On drywall with wood studs or masonry (brick, concrete) |
| Unlocking system | Unlocking cords |
| Spirit level included | Yes |
| Included accessories | Wall plate, support arms, hardware, Allen key, spirit level |
| Safety | Respect max weight, install on solid wall, use appropriate anchors |
| Maintenance | Clean with a soft dry cloth |
| Warranty | Statutory against manufacturing defects (see manual) |
| Repairability | Spare parts not specified; contact customer service |
Frequently Asked Questions - TM502XX Vonroc
User questions about TM502XX Vonroc
0 question about this device. Answer the ones you know or ask your own.
Ask a new question about this device
Download the instructions for your TV wall mount in PDF format for free! Find your manual TM502XX - Vonroc and take your electronic device back in hand. On this page are published all the documents necessary for the use of your device. TM502XX by Vonroc.
USER MANUAL TM502XX Vonroc
TV WALL MOUNT TM502XX

natural_image
Pure electrical circuit lines without any symbolsEN Original Instructions 05
text_image
495mm 50mm - 445mm 0° -8° 150mm 35mm - 410 mm 435mmB
text_image
Technical diagram showing labeled components of a mechanical assembly, including panel, bracket, and housing parts.C
text_image
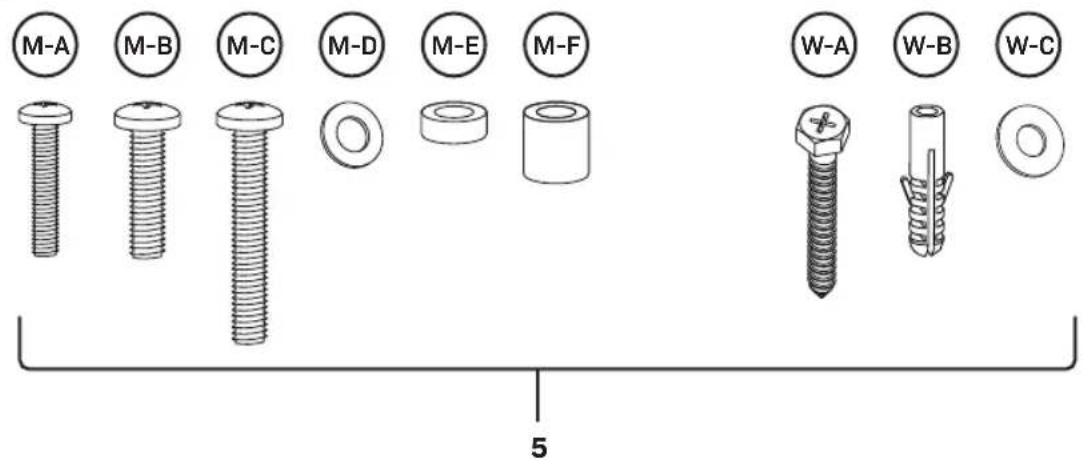
M-A M-B M-C M-D M-E M-F W-A W-B W-C 5D

text_image
1 4 W-C W-A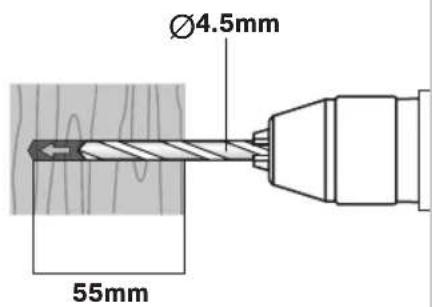
text_image
Ø4.5mm 55mmE
text_image
1 4 W-B W-C W-A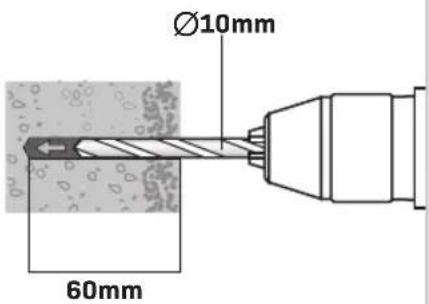
text_image
Ø10mm 60mm
text_image
F 2 2 M-A-M-B M-D M-A-M-B M-D M-F M-AM-B M-DM-OM-DM-D M-C M-F M-CM-C M-E M-F M-F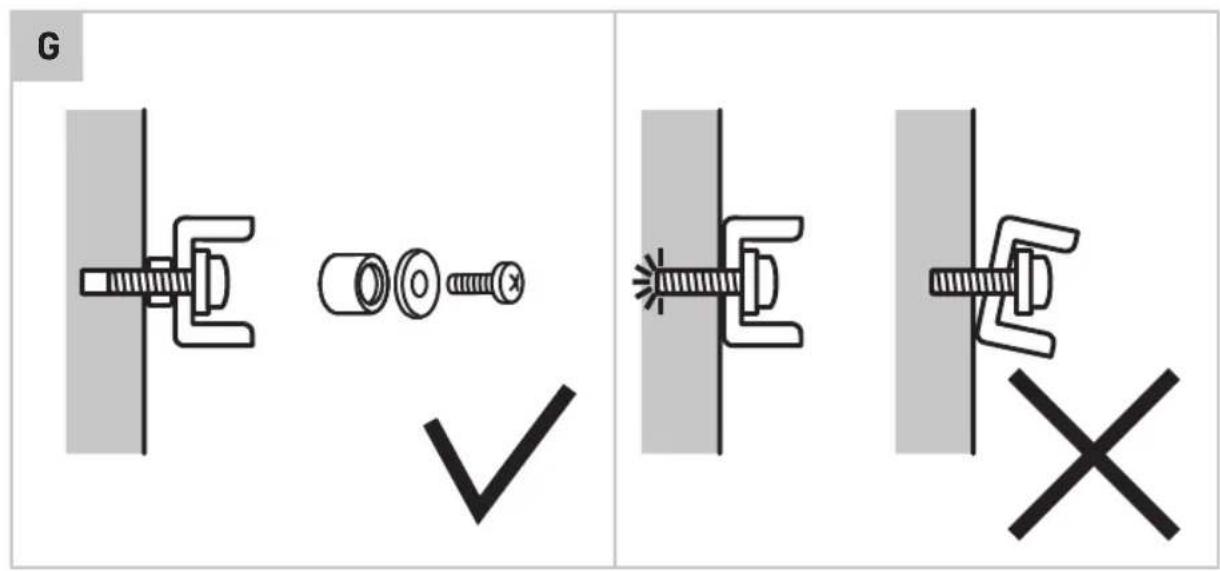
text_image
G ✓ ✓ ×
text_image
H1.SAFETYINSTRUCTIONS
Read the enclosed safety warnings, the additional safety warnings and the instructions. Failure to follow the safety warnings and the instructions may result in electric shock, fire and/or serious injury. Save the safety warnings and the instructions for future reference.
The following symbols are used in the user manual or on the product:

Read the user manual.

Denotes risk of personal injury, loss of life or damage to the tool in case of non-observance of the instructions in this manual.

Not intended for use by children.
SAFETY WARNINGS
Please read these instructions carefully and thoroughly before using this product and keep them for future reference. It is important that you understand how to use this product correctly, so please take the time to familiarize yourself with the requirements as outlined in these instructions.
- If you are in any doubt about using this product, it is strongly recommended to employ the services of a suitably qualified expert.
- Please consult the manual for your TV and ensure that the weight and size of the TV is within the limits specified for this product
- Note that not all of the supplied mounting accessories provided may be required for the installation of your specific TV.
-
The mounting accessories provided are exclusively intended for installation onto strong supporting structures such as solid brick, solid concrete or solid wood columns.
-
PRODUCT INFORMATION
| Model no. TM502XX | |
| Dimensions 495 x 435mm | |
| Wall clearance 34mm | |
| Weight 1,5kg | |
| Max. supported screen weight 50kg | |
| Supported screen diagonal 37" to 75" | |
| Supported VESA patterns 400 x 400 | 400 x 300 |
| 400 x 200 | |
| 300 x 300 | |
| 300 x 200 | |
| 200 x 200 | |
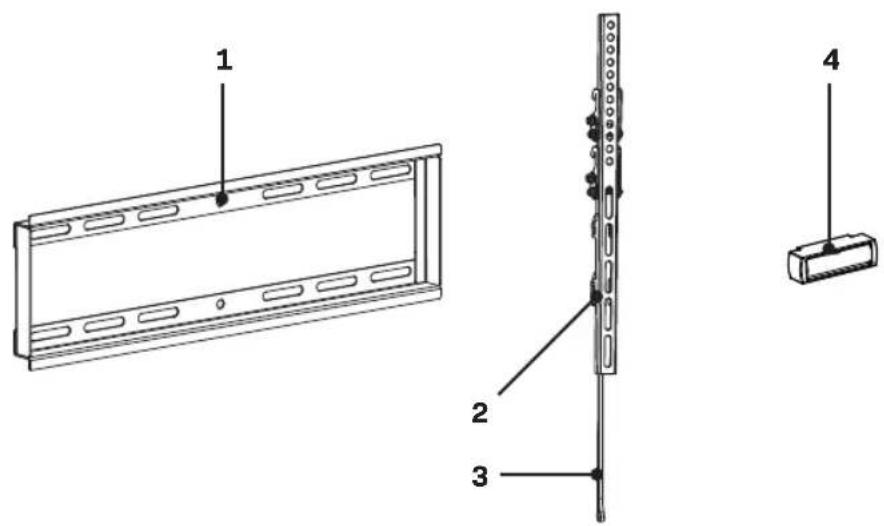
DESCRIPTION
- Wallplate
- TV support arm
- Unlockingcord
4.Spriritlevel - Hardwarekit
3.INSTALLATION
Before installation

Ensure that your TV is compatible with this wall mount before proceeding the installation.

Ensure that the supporting wall is capable of sustaining the combined weight of this wall mount and the TV.
Attach Wall Plate to Wall
Choose option A or B depending on your wall construction.
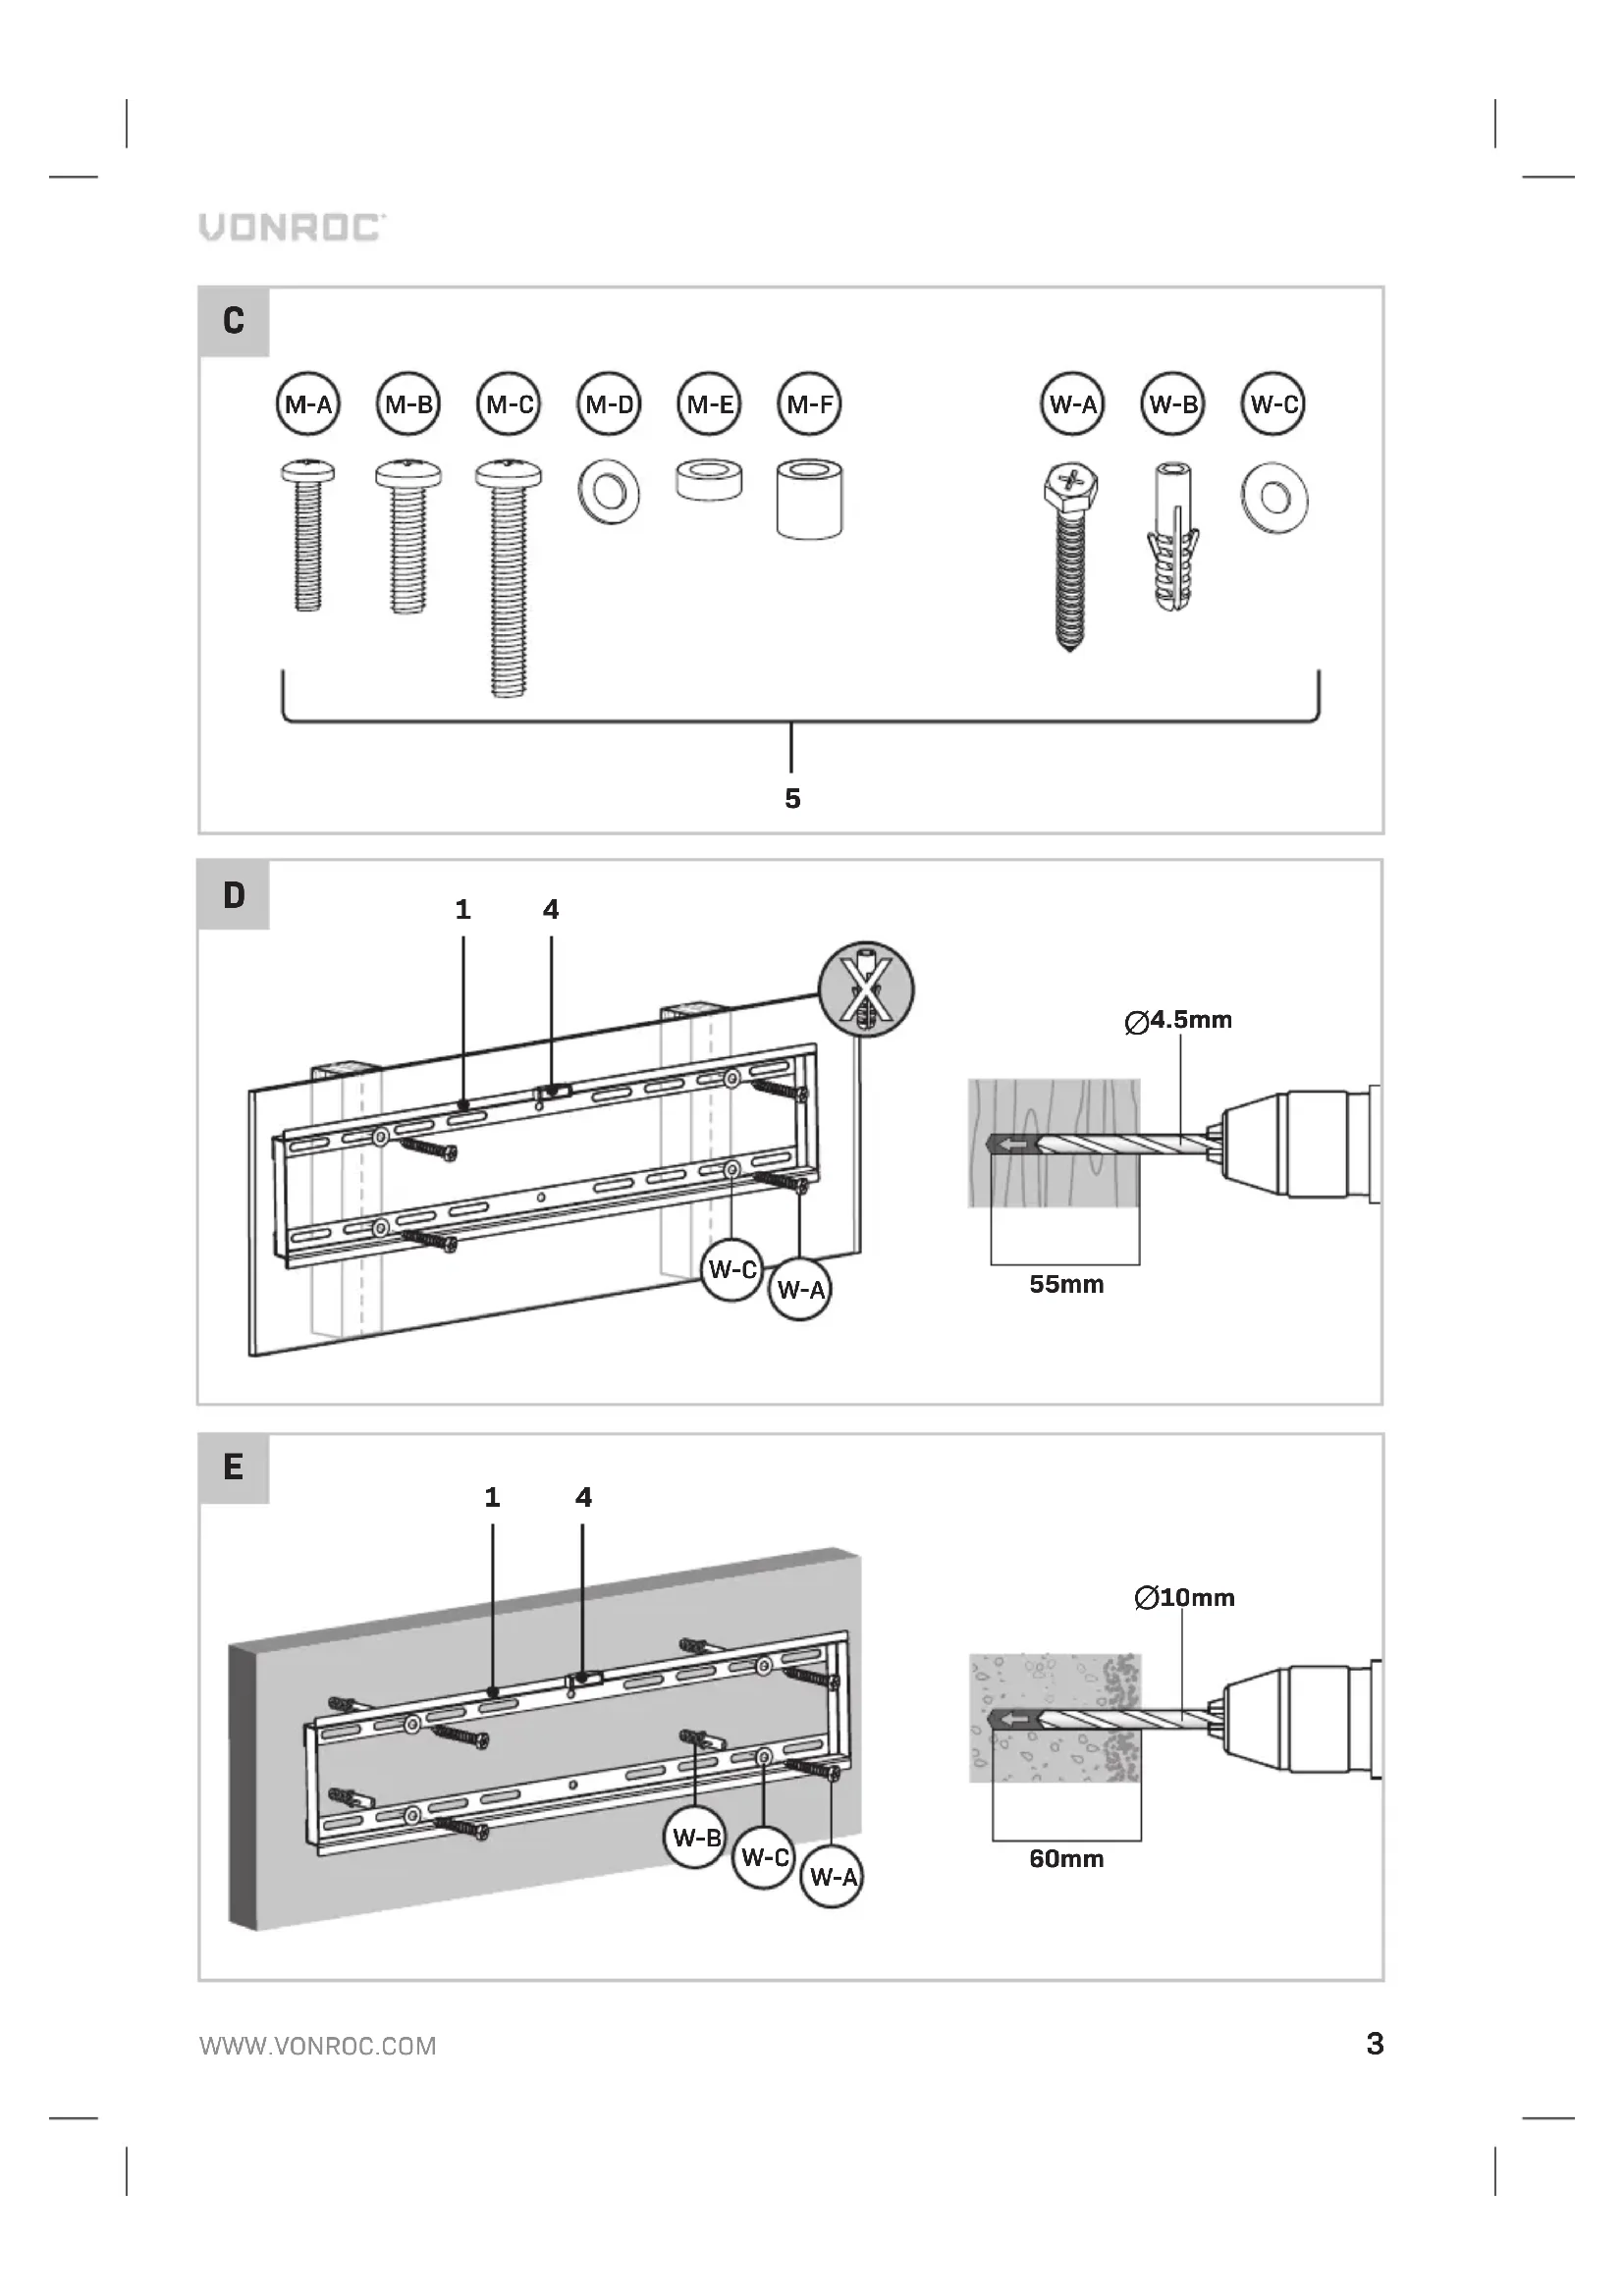
Option A: Installing in drywall with timber supports (Figure D)

If you are installing this TV wall mount using this method, you must spread the wall plate across 2 wall studs. Do not attach the wall plate to a single wall stud in the center of the wall plate.
- Locate the center of two adjacent timber studs using a stud finder.

You must use the center of the stud to avoid cracking or splitting the timber during installation.
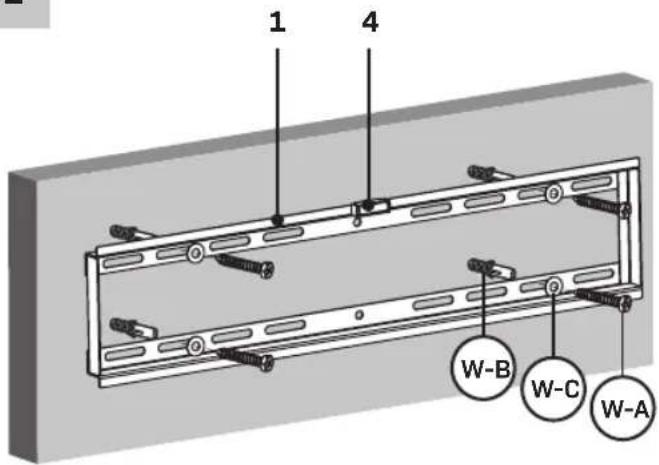
- Mark a minimum of four mounting holes over the stud centers using the wall plate as a guide. Position two holes at either end of the wall plate (1). Use the provided spirit level (4) to ensure the wall plate (1) is level.
- Pre-drill the holes to a minimum depth of 55mm using a 4.5mm drill bit. If installing in hardwood, a slightly larger diameter and deeper hole may be required.
- Place the washers (W-C) onto the lag bolts (W-A). Attach the wall plate (1) to the wall using the lag bolts (W-A).
Option B: Installing in masonry (Figure E)

Ensure there is a minimum of 35mm of actual concrete/brick thickness in the location of each hole.

Drill into solid concrete/bricks only. Do not drill into mortar joints.
- Mark a minimum of four mounting holes using the wall plate (1) as a guide. Position two holes at either end of the wall plate (1). Use the provided spirit level (4) to ensure the wall plate (1) is level.
- Drill the holes to a minimum depth of 60mm using a 10mm masonry drill bit. Clean out the holes after drilling.
- Fully insert a concrete anchor (W-B) into each hole. Tap the anchor in using a hammer if required.
- Place the washers (W-C) onto the lag bolts (W-A). Attach the wall plate (1) to the wall using the lag bolts (W-A).
Attach Mounting Arms to TV (Figure F)
- Using a second person for assistance, lay your TV face down on something soft so as not to scratch the TV screen. Check the back of your TV to find the appropriate mounting pattern.

Do not place the TV face down onto a table smaller than the TV itself, as doing so may crack or damage the TV screen.
- Sort through the provided bolts (M-A, M-B, M-C) until you find the correct size that fits into the mounting holes on the back of your TV. Test if the bolts can be tightened by hand for at least three full turns. Do not yet fully tighten the bolts.

If you feel resistance while turning the bolt you must stop immediately and select a shorter bolt. Forcing in an oversized bolt may cause damage to your TV (see figure G)
- Remove the bolts from the TV once you have selected the correct bolt size.

Refer to your local hardware supplier for the correct bolts and washers if none of the supplied bolts will fit your TV.
- Gently place the mounting arms (2) on the back of the TV. If the back of your TV is curved or recessed you may need to use one or more of the supplied spacers (M-E or M-F). When using a spacer you may also need to use a longer bolt. Keep in mind that the bolt must always be able to turn at least three full turns (see figure G).
- Place the washers (M-D) onto the previously selected bolts. Attach the mounting arms (2) to the TV using the bolts. Do not over tighten the bolts, as doing so may cause damage to your TV.
Attach TV to wall (Figure H)
- Using a second person for assistance, carefully lift the TV and hook the arms (2) over the top of the wall plate (1). Note that there are two height options on the mounting arms (2) to choose from.
- Gently pull down on the unlocking cords (3) on the mounting arms (2) to open the locks into the ready position.
- Slowly lower the bottom of the TV until the bottom of the mounting arm (2) locks into the bottom of the wall plate (1). Release the unloc-
king cords (3) to secure the TV onto the wall plate (1).
- To tilt the TV forwards, slightly loosen the bolts (6) on the side of the mounting arms (2). Adjust the TV to your preferred position and secure in place by re-tightening the bolts (6).
- To remove the TV from the wall plate, gently pull the unlocking cords (3) to release the mounting arms (2). Using a second person for assistance, pull the bottom of the TV slightly forwards and then lift the TV up from the wall plate (1).
WARRANTY
VONROC products are developed to the highest quality standards and are guaranteed free of defects in both materials and workmanship for the period lawfully stipulated starting from the date of original purchase. Should the product develop any failure during this period due to defective material and/or workmanship then contact VONROC directly.
The following circumstances are excluded from this guarantee:
- Repairs and or alterations have been made or attempted to the machine by unauthorized service centers;
- Normal wear and tear;
- The tool has been abused, misused or improperly maintained;
- Non-original spare parts have been used.
This constitutes the sole warranty made by company either expressed or implied. There are no other warranties expressed or implied which extend beyond the face hereof, herein, including the implied warranties of merchantability and fitness for a particular purpose. In no event shall VONROC be liable for any incidental or consequential damages. The dealers remedies shall be limited to repair or replacement of nonconforming units or parts.
The product and the user manual are subject to change. Specifications can be changed without further notice.