
POWX1706 - Compressor PowerPlus - Free user manual and instructions
Find the device manual for free POWX1706 PowerPlus in PDF.
| Brand | PowerPlus |
| Model | POWX1706 |
| Product type | Oil-free air compressor |
| Rated power | 1100 W (1.5 CH) |
| Rated voltage | 220-240 V ~ 50 Hz |
| Rated pressure | 8 bar |
| Air flow (capacity) | 180 l/min |
| Rotation speed | 3750 min⁻¹ |
| Protection class | II (double insulation) |
| Protection rating | IP20 |
| Sound pressure level (LpA) | 84 dB(A) |
| Sound power level (LwA) | 96 dB(A) |
| Motor type | Oil-free |
| Duty cycle | S3-15 (1.5 min operation / 8.5 min rest) |
| Included accessories | Air blow gun with pressure gauge, air hose with quick coupling, balloon needle, valve connector, universal connector, rubber tip, deflation valve connector, screw-on valve connector, additional connector, nozzle adapter, extension nozzle |
| Weight | Approximately 12 kg (estimated) |
| Dimensions (L x W x H) | Approximately 40 x 30 x 35 cm (estimated) |
| Intended use | Inflating tires, balloons, air mattresses; operating pneumatic tools; blow cleaning; spraying (aqueous detergents) |
| Maintenance | Clean ventilation openings, check hoses and fittings regularly, drain tank after use |
| Warranty | 36 months |
Frequently Asked Questions - POWX1706 PowerPlus
User questions about POWX1706 PowerPlus
0 question about this device. Answer the ones you know or ask your own.
Ask a new question about this device
Download the instructions for your Compressor in PDF format for free! Find your manual POWX1706 - PowerPlus and take your electronic device back in hand. On this page are published all the documents necessary for the use of your device. POWX1706 by PowerPlus.
USER MANUAL POWX1706 PowerPlus
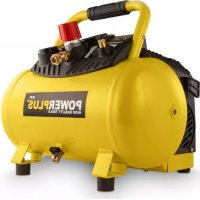
natural_image
Yellow POWERPLUS power plant tool with coiled spring, air pressure gauge, and various connectors (no visible text or symbols)
NL NEDERLANDS VERTAALDE VERSIE VAN DE ORIGINELE HANDLEIDING
FR FRANÇAIS TRADUCTION DU MODE D'EMPLOI D'ORIGINE
EN ENGLISH ORIGINAL INSTRUCTION MANUAL
1 BESCHRIJVING (FIG. A)....3
2 INHOUD VAN DE VERPAKKING....3
3 TOELICHTING VAN DE SYMBOLEN 3
4 ALGEMENE VEILIGHEIDSVOORSCHRIFTEN ....4
4.1 Werkplaats....4
4.2 Elektrische veiligheid ....4
9 PROBLEEMOPLOSSING....11
10 GARANTIE 11
11 MILIEU....12
COMPRESSOR 1100 W ZONDER OLIE + 11 ACCESSOIRES POWX1706

1 BESCHRIJVING (FIG. A)
28/03/2022, Lier - Belgium
1 DESCRIPTION (FIG. A) 3
2 LISTE DES PIÈCES CONTENUES DANS L'EMBALLAGE....3
3 PICTOGRAMMES 4
4 CONSIGNES DE SÉCURITÉ GÉNÉRALES .... 4
Notified Body TÜV SÜD
28/03/2022, Lier - Belgium
1 DESCRIPTION (FIG. A) 3
2 PACKAGE CONTENT LIST....3
3 SYMBOLS 4
4 GENERAL POWER TOOL SAFETY WARNINGS ....4
4.1 Work area 4
4.2 Electrical safety....4
4.3 Personal safety 5
4.4 Power tool use and care....5
4.5 Service....5
5 SPECIFIC SAFETY WARNINGS....6
5.1 Do's....6
5.2 Don'ts 7
6 OPERATION....8
6.1 Switching on and off....8
6.1.1 Switching the appliance on....8
6.1.2 Switching the appliance off....8
6.2 Compressed air hose with quick coupler (5)....8
6.2.1 Connecting: 8
6.2.2 Cutting: 8
6.3 Inflation....8
6.3.1 Using the adapter....8
6.3.2 Using the valve adapter (13) 9
6.3.3 Using the ball needle (12)/ universal adapter (11)....10
6.3.4 Using the adapter set....10
6.3.5 Using with the extension nozzle (19)....10
7 TECHNICAL DATA 10
8 NOISE....10
9 TROUBLESHOOTING 11
10 WARRANTY....11
11 ENVIRONMENT 12
COMPRESSOR 1100 W + 11 PCS - NO OIL POWX1706

WARNING! Read this manual and general safety instructions carefully before using the appliance, for your own safety. Your power tool should only be passed on together with these instructions.
1 DESCRIPTION (FIG. A)
- ON / OFF switch
- Carrying handle
- Accessory compartment
- Mains plug
- Compressed air hose with quick coupler
- Manometer with gun
- Release valve
- Compressed air connector
- Hose with lever quick coupler
-
Trigger
-
Universal adapter
- Ball needle
- Valve adapter
- Rubber head
- Deflating valve adapter
- Screw-on valve adapter
- Addition adapter
- Nozzle adapter for the nozzle set
- Extension nozzle
- Quick-connector air outlet
- Remove all packing materials.
- Remove remaining packaging and transit supports (if existing).
- Check the completeness of the packing content.
- Check the appliance, the power cord, the power plug and all accessories for transportation damages.
- Keep the packaging materials as far as possible till the end of the warranty period. Dispose it into your local waste disposal system afterwards.
WARNING: Packing materials are no toys! Children must not play with plastic bags! Danger of suffocation!
1 compressor
1 compressed air gun (with manometer)
1 ball needle
1 valve adapter
1 universal adapter
1 rubber head
1 deflating valve adapter
1 screw-on valve adapter
1 addition adapter
1 nozzle adapter for the nozzle set
1 extension nozzle
1 manual

When parts are missing or damaged, please contact your dealer.
3 SYMBOLS
In this manual and/or on the machine the following symbols are used:
 | Before use, read the handbook carefully. |  | Warning, hot surfaces! | ||
 | Wear noise protection. |  | Danger - automatic control (closed loop). | ||
 | Dangerous voltage! |  | Only for indoor use! | ||
 | Do not start. |  | Class II - The machine is double insulated; Earthing wire is therefore not necessary. | ||
 | Wear eye protection |  | Wear gloves |
4 GENERAL POWER TOOL SAFETY WARNINGS
Read all safety warnings and all instructions. Failure to follow all warnings and instructions may result in electric shock, fire and/or serious injury. Save all warnings and instructions for future reference. The term "power tool" in the warnings refers to your mains operated (corded) power tool or battery operated (cordless) power tool.
4.1 Work area
- Keep work area clean and well lit. Cluttered and dark areas invite accidents.
- Do not operate power tools in explosive atmospheres, such as in the presence of flammable liquids, gases or dust. Power tools create sparks which may ignite the dust or fumes.
- Keep children and bystanders away while operating a power tool. Distractions can cause you to lose control.
4.2 Electrical safety

Always check that the power supply corresponds to the voltage on the rating plate.
- Power tool plugs must match the outlet. Never modify the plug in any way. Do not use any adapter plugs with earthed (grounded) power tools. Unmodified plugs and matching outlets will reduce risk of electric shock.
- Avoid body contact with earthed or grounded surfaces such as pipes, radiators, ranges and refrigerators. There is an increased risk of electric shock if your body is earthed or grounded.
- Do not expose power tools to rain or wet conditions. Water entering a power tool will increase the risk of electric shock.
- Do not abuse the cord. Never use the cord for carrying, pulling or unplugging the power tool. Keep cord away from heat, oil, sharp edges or moving parts. Damaged or entangled cords increase the risk of electric shock.
- When operating a power tool outdoors, use an extension cord suitable for outdoor use. Use of a cord suitable for outdoor use reduces the risk of electric shock.
- If operating a power tool in a damp location is unavoidable, use a residual current device (RCD) protected supply. Use of an RCD reduces the risk of electric shock.
4.3 Personal safety
- Stay alert, watch what you are doing and use common sense when operating a power tool. Do not use a power tool while you are tired or under the influence of drugs, alcohol or medication. A moment of inattention while operating power tools may result in serious personal injury.
- Use safety equipment. Always wear eye protection. Safety equipment such as dust mask, non-skid safety shoes, hard hat, or hearing protection used whenever conditions require will reduce personal injuries.
- Avoid accidental starting. Ensure the switch is in the off position before plugging in. Carrying power tools with your finger on the switch or plugging in power tools that have the switch on invites accidents.
- Remove any adjusting key or wrench before turning the power tool on. A wrench or a key left attached to a rotating part of the power tool may result in personal injury.
- Do not overreach. Keep proper footing and balance at all times. This enables better control of the power tool in unexpected situations.
- Dress properly. Do not wear loose clothing or jewellery. Keep your hair, clothing and gloves away from moving parts. Loose clothes, jewellery or long hair can be caught in moving parts.
- If devices are provided for the connection of dust extraction and collection facilities, ensure these are connected and properly used. Use of these devices can reduce dust related hazards.
4.4 Power tool use and care
- Do not force the power tool. Use the correct power tool for your application. The correct power tool will do the job better and safer at the rate for which it was designed.
- Do not use the power tool if the switch does not turn it on and off. Any power tool that cannot be controlled with the switch is dangerous and must be repaired.
- Disconnect the plug from the power source before making any adjustments, changing accessories, or storing power tools. Such preventive safety measures reduce the risk of starting the power tool accidentally.
- Store idle power tools out of the reach of children and do not allow persons unfamiliar with the power tool or these instructions to operate the power tool. Power tools are dangerous in the hands of untrained users.
- Maintain power tools. Check for misalignment or sticking of moving parts, breakage of parts and any other condition that may affect the power tool's operation. If damaged, have the power tool repaired before use. Many accidents are caused by poorly maintained power tools.
- Keep cutting tools sharp and clean. Properly maintained cutting tools with sharp cutting edges are less likely to stick and are easier to control.
- Use the power tool, accessories and tool bits etc., in accordance with these instructions and in the manner intended for the particular type of power tool, taking into account the working conditions and the work to be performed. Use of the power tool for operations different from intended could lead to a hazardous situation.
4.5 Service
- Have your power tool serviced by a qualified repair person using only identical replacement parts. This will ensure that the safety of the power tool is maintained.
5 SPECIFIC SAFETY WARNINGS

This symbol indicates warnings to be read before using the product so as to prevent injury to the user.

Compressed air is a potentially dangerous form of energy; always take great care when using the compressor and its accessories.

Warning: the compressor may restart when power is restored following a blackout.
- The compressor and hoses can get very hot during operation. Touching them can cause burns.
- The gases or vapours sucked in by the compressor intake must be kept free of admixtures that could lead to fires or explosions inside the compressor.
- When removing the hose coupling, always hold the hose coupling firmly to avoid injury caused by the hose flying off.
- When working with the blow-out gun, wear goggles. Foreign bodies and blown out particles can easily cause injuries.
- Do not direct the blow-out gun at people or use it to clean clothing you are wearing.
- Check all connections and supply lines. All maintenance units, couplings and hoses must correspond to the appliance parameters in terms of pressure and air flow. Excessively low pressure will adversely affect the function of the appliance; excessively high pressure can cause property damage and personal injury. Protect the hoses against kinking, constriction, solvents and sharp edges.
- Ensure that the hose clamps are always tight. Loose or damaged hose clamps can allow air to escape in an uncontrolled manner.
- Replace a damaged hose immediately. A faulty supply line can cause a compressed-air hose to thrash about and cause personal injury.
- Do not breath in the exhaust air directly.
- The hose must be designed for at least 150% of the maximum pressure generated in the system.
- The tool and the supply hose must be fitted with a hose coupling that allows the pressure of the coupling hose to be dispersed completely during disconnection.
- Warning! An undersized compressed air system will reduce the efficiency of your appliance.
- Avoid getting exhaust air in your eyes. The exhaust air from the appliance may contain water, oil, metal particles or impurities from the compressor. This can cause damage to health.

Take care when putting down the appliance! Always put the appliance down so it does not lie on the ON/OFF switch. Under certain circumstances, this could cause an accidental activation of the appliance which, in turn, could lead to hazards.
5.1 Do's
- The compressor must be used in a suitable environment (well ventilated with an ambient temperature of between +5 °C and +40 °C) and never in places with dust, acids, vapours, explosive or flammable gases.
- Keep the work area free. When operating, the compressor must be placed on a stable surface.
- Safety goggles should be worn when using the compressor in order to protect the eyes against any foreign bodies lifted by the jet of air.
■ If possible, when using air-powered accessories, wear safety clothing.
■ Always maintain a safety distance of at least 2 meters between the compressor and the work area.
- Check for correspondence between the compressor plate data with the actual specifications of the electrical system. A variation of ± 10% with respect of the rated value is allowed
- Insert the plug of the electrical cable in a socket of suitable shape, voltage and frequency complying with current regulations.
- Use extension cables with a maximum length of 5 meters and with a cable cross-section of not less than 1.5 mm^2 . Use of extension cables of different length and cross-section and also of adapters and multiple sockets should be avoided.
■ Always use the handle to move the compressor.
- When using compressed air, you must know and comply with the safety precautions to be adopted for each type of application (inflation, air powered tools, painting, washing with water-based detergents only, clinching, etc.).
- To avoid overheating of the electric motor, this compressor is designed for intermittent duty operation as indicated on the technical data plate (for example, S3-15 means 1.5 minutes On, 8.5 minutes OFF). In case of overheating, the thermal cut-out of the motor is released, automatically cutting off the power when the temperature is too high due to excess current take-off. The motor restarts automatically when normal temperature conditions are restored.
5.2 Don'ts
■ Never direct the jet of air towards persons, animals or your body.
- Never let the compressor come into contact with water or other liquids and never direct the jet of liquids sprayed by tools connected to the compressor towards the compressor: as the appliance is live, this could cause electrocution or short-circuits.
■ Never use the appliance with bare feet or wet hands or feet.
- Never yank the power cable to disconnect the plug from the power outlet or to move the compressor.
■ Never leave the appliance exposed to adverse weather conditions (rain, sun, fog, snow).
- If this compressor is used outdoors, always remember to stow it after use in a covered or closed place
■ Never use the compressor outdoors in rain or bad weather.
- Never allow inexpert persons to use the compressor without suitable surveillance. Keep animals at a distance from the work area.
- This appliance is not intended for use by persons (including children) with reduced physical, sensory or mental capabilities, or lack of experience and knowledge, unless they have been given supervision or instruction concerning the use of the appliance by a person responsible for their safety.
■ Children should be supervised to ensure that they do not play with the appliance.
- The compressed air produced by the compressor cannot not be used for pharmaceutical, food or medical purposes or to fill the air bottles of scuba divers.
- Do not place flammable or nylon/fabric objects close to and/or on the compressor.
- Do not cover the air inlets on the compressor.
- Do not open or tamper with any part of the compressor. Contact an authorized service centre
6 OPERATION

NOTE! The appliance vibrates during operation. Therefore, always put it down during operation.
Remove the required accessories from the accessory compartment (3).
6.1 Switching on and off
6.1.1 Switching the appliance on
Move the ON/OFF switch (1) into the position "I" to switch the appliance on.
6.1.2 Switching the appliance off
Move the ON/OFF switch (1) into the position "O" to switch the appliance off.

Caution! This appliance is not designed for continuous operation. To prevent the motor from overheating, the appliance may only be used as follows: within a period of 10 minutes the appliance may only be operated at the rated power input for 15% of the period, in other words, 1.5 minutes. During the rest of the time period (cooling phase 8.5 minutes), the appliance cools down again.
6.2 Compressed air hose with quick coupler (5)
6.2.1 Connecting:
Push the compressed air connector (9) into the quick coupler of the compressed air hose (5), the sleeve automatically springs forwards.
6.2.2 Cutting:
Pull back the sleeve on the quick coupler of the compressed air hose (5) and remove the compressed air connector (8).

Caution! When disconnecting the quick coupler of the compressed air hose (5), hold the coupler firmly to prevent injuries caused by the hose flying off.
6.3 Inflation
6.3.1 Using the adapter

Schrader valve, tire valve
Area of use:
This application allows for a simple and accurate inflation of tires. The manometer (6) is used to check the tire pressure. Thanks to the integrated release valve (7) it is possible to reduce the tire pressure if it is too high.

ATTENTION! Please note, the manometer (6) is not calibrated! After inflation, always check the tire pressure immediately, for example, at a petrol station.

Not suitable for inflating automotive tires
Ensure that the ON/OFF switch (1) is set to "O".
- Press the lever quick coupler (9) downwards to attach it.
- Place the lever quick coupler (9) onto the valve and then release the lever.
- Insert the mains plug (4) of the compressor into a mains power socket.
- Switch the ON/OFF switch (1) to "I".
- Read the air pressure from the manometer (6).
- Switch the ON/OFF switchto (1) "O" as soon as the correct or permissible air pressure has been reached.
- Press down the lever quick coupler (9) and pull it off the valve.
- Remove the mains plug (4) from the mains power socket.
6.3.2 Using the valve adapter (13)

natural_image
Technical line drawing of two mechanical components with threaded ends (no text or symbols)Sclaverand valve, race valve
Dunlop valve, bicycle valve
Area of use:
The valve adapter (13) facilitates easy inflation of bicycle tires.
- Use the valve adapter (13) to pump to the valves shown above.
- Connect the valve adapter (13) into the lever quick coupler (9) and then release it.
- Start by pressing the valve adapter (13) onto the valve.
- Inflate as described above.
6.3.3 Using the ball needle (12)/ universal adapter (11)
Area of use:
The ball needle (12) can be used to inflate various balls. The universal adapter (11) can be used to inflate air mattresses or similar.
- Press the lever quick coupler (9) downwards to attach it.
- Insert the ball needle (12) or the universal adapter (11) into the lever quick coupler (9) and then release it.
- Inflate as described above.

NOTE! To avoid damage to the valve, you should moisten the ball needle (14) before insertion.
6.3.4 Using the adapter set
The adapter set allows the tyre filling device to be used for the following additional applications:
■ Inflating pools, air mattresses or dinghies using the additional adapter (17).
- Inflating items with screw valves (e.g. dinghies) using the screw-on valve adapter (16).
- Deflating large-volume items. Use the deflating valve adapter (15) for this purpose.
- The two tapered universal adapters (14/11) can also be used to inflate air mattresses.
6.3.5 Using with the extension nozzle (19)
The extension nozzle (19) is used for cleaning/blowing out of concealed spaces or hard-to-reach areas, as well as for the cleaning of contaminated equipment. The infinitely variable trigger (10) allows an exact dosage of the compressed air.
If you want to use the extension nozzle (19), you must first unscrew the hose with the lever quick coupler (9) from the gun with the manometer (6).
- Now screw on the extension nozzle into the gun with the manometer.
7 TECHNICAL DATA
| Rated voltage | 220-240 V |
| Rated frequency | 50 Hz |
| Rated power | 1100 W – 1.5 HP |
| Rotation speed | 3750 min-1 |
| Rated pressure | 8 bar |
| Air debit (capacity) | 180 l/min |
| Protection class | II |
| Degree of protection | IP20 |
8 NOISE
Noise emission values measured according to relevant standard. (K=3)
| Acoustic pressure level LpA | 84 dB(A) |
| Acoustic power level LwA | 96 dB(A) |

ATTENTION! Wear hearing protection when sound pressure is over 85 dB(A).
9 TROUBLESHOOTING
| Fault | Solution |
| Appliance does not run | Check your power supply. Check that all cables, fuses and the mains socket are in working order. |
| Do not use excessively long extension cables. | |
| Do not use the appliance at temperatures below +5 degrees. | |
| Avoid overheating the motor. Allow the motor to cool down. | |
| Working pressure too low | Check the seals and the non-return valve. Replace these if necessary. |
| Tools do not work | Check the hoses, quick coupler and the tools. Replace these if necessary. |
10 WARRANTY
- This product is warranted for a 36-month period effective from the date of purchase by the first user.
- This warranty covers all material or production flaws excluding : batteries, chargers, defective parts subject to normal wear & tear such as bearings, brushes, cables, and plugs, or accessories such as drills, drill bits, saw blades, etc. ; damage or defects resulting from maltreatment, accidents or alterations; nor the cost of transportation.
- Damage and/or defects resulting from inappropriate use also do not fall under the warranty provisions.
■ We also disclaim all liability for any bodily injury resulting from inappropriate use of the tool. - Repairs may only be carried out by an authorised customer service centre for Powerplus tools.
- You can always obtain more information at the number 00 32 3 292 92 90.
- Any transportation costs shall always be borne by the customer, unless agreed otherwise in writing.
- At the same time, no claim can be made on the warranty if the damage of the device is the result of negligent maintenance or overload.
- Definitely excluded from the warranty is damage resulting from fluid permeation, excessive dust penetration, intentional damage (on purpose or by gross carelessness), inappropriate usage (use for purposes for which the device is not suitable), incompetent usage (e.g. not following the instructions given in the manual), inexpert assembly, lightning strike, erroneous net voltage. This list is not exhaustive.
- Acceptance of claims under warranty can never lead to the prolongation of the warranty period nor commencement of a new warranty period in case of a device replacement.
- Devices or parts which are replaced under the warranty therefore remain the property of Varo NV.
- We reserve the right to reject a claim whenever the purchase cannot be verified or when it is clear that the product has not been properly maintained. (Clean ventilation slots, carbon brushes serviced regularly, etc.).
- Your purchase receipt must be kept as proof of date of purchase.
- Your appliance must be returned undismantled to your dealer in an acceptably clean state, (in its original blow-moulded case if applicable to the unit), accompanied by proof of purchase.
11 ENVIRONMENT
Should your appliance need replacement after extended use, do not discard it with the household rubbish but dispose of it in an environmentally safe way. Waste produced by electrical machine items should not be handled like normal household rubbish. Please recycle where recycle facilities exist. Check with your Local Authority or retailer for recycling advice.
12 DECLARATION OF CONFORMITY


VARO N.V. - Vic. Van Rompuy N.V... Joseph Van Instraat 9 - BE2500 Lier - BELGIUM, declares that,
Product: Compressor 1100 W + 11 pcs – no oil – 1.5 HP
Trade mark: POWERplus
Model: POWX1706
is in conformity with the essential requirements and other relevant provisions of the applicable European Directives, based on the application of European harmonized standards. Any unauthorized modification of the apparatus voids this declaration.
European Directives (including, if applicable, their amendments up to the date of signature):
2011/65/EU
2006/42/EC
2014/30/EU
2000/14/EC Annex VI LwA
Measured 96 dB(A)
Guaranteed 97 dB(A)
Notified Body TÜV SÜD
European harmonized standards (including, if applicable, their amendments up to the date of signature):
EN1012-1:2010
EN62841-1:2015
EN IEC55014-1:2021
EN IEC55014-2:2021
EN IEC61000-3-2:2019
EN61000-3-3:2013
Keeper of the Technical Documentation: Philippe Vankerkhove, VARO – Vic. Van Rompuy N.V.
The undersigned acts on behalf of the company CEO,
Mertens Ludo
Ludo Mertens
Regulatory Affairs – Compliance Manager
28/03/2022, Lier - Belgium
Notified Body TÜV SÜD
Notified Body TÜV SÜD
28/03/2022, Lier - Belgium
Notified Body TÜV SÜD
Notified Body TÜV SÜD
Regulatory Affairs – Compliance Manager
28/03/2022, Lier - Belgium
Not suitable for inflating automotive tires.
Notified Body TÜV SÜD
28/03/2022, Lier - Belgium
1 BESKRIVELSE (FIG. A) 3
2 PAKKENS INNHOLD 3
3 SYMBOLFORKLARING ....4
4 GENERELLE SIKKERHETSADVARSLER .... 4
5 SIKKERHETSREGLER....6
Notified Body TÜV SÜD
Regulatory Affairs – Compliance Manager
28/03/2022, Lier - Belgium
1 BESKRIVELSE (FIG. A) 3
2 MEDF∅LGENDE INDHOLD 3
3 SYMBOLER....4
4 ALMINDELIGE SIKKERHEDSANVISNINGER FOR EL-VÆRKT∅J 4
Notified Body TÜV SÜD
28/03/2022, Lier - Belgium
1 BESKRIVNING (FIG. A) 3
2 FÖRPACKNINGSINNEHÅLL 3
3 SYMBOLER....4
4 ALLMÄNNA SÄKERHETSANVISNINGAR FÖR ELEKTRISKA VERKTYG....4
6.2.2 Losskoppling....8
6.3 Uppumpning....8
6.3.1 Med adapter....8
6.3.2 Med ventiladapter (13) 9
6.3.3 Med bollnål (12) / universaladapter (11)....9
6.3.4 Med adaptersats....10
2 FÖRPACKNINGSINNEHÅLL
natural_image
Technical line drawing of two mechanical components with threaded ends and a connector (no text or symbols)Med Schraderventil, racerventil
Notified Body TÜV SÜD
28/03/2022, Lier - Belgium
1 LAITTEEN OSAT (KUVA A) 3
2 PAKKAUKSEN SISÄLTÖ....3
3 SYMBOLIT 4
4 YLEISET TURVALLISUUSOHJEET....4
7 TEKNISET TIEDOT....10
8 MELU....10
9 VIANETSINTÄ....10
10 TAKUU 11
11 LAITTEEN KÄYTÖSTÄ POISTAMINEN 11
KOMPRESSORI 1100 W (ÖLJYTÖN) + 10 LISÄTARVIKKEET POWX1706

Notified Body TÜV SÜD
28/03/2022, Lier - Belgium
Notified Body TÜV SÜD
28/03/2022, Lier - Belgium
1 OPIS (SL. A)....3
2 POPIS SADRŽAJA PAKETA 3
3 SIMBOLI 4
4 OPĆA UPOZORENJA O SIGURNOSTI RUKOVANJA ELEKTRIČNIM ALATIMA 4
4.1 Radno mjesto....4
4.2 Električna sigurnost....4
natural_image
Technical illustration of a mechanical component with threaded shaft and flange (no text or symbols)Sclaverand ventil, presta ventil (za utrke)
Dunlop ventil, ventil za bicikle
Područje uporabe:
Adapter ventila (13) omogućava jednostavno pumpanje guma na biciklima.
- Koristite adapter ventila (13) za pumpanje gore prikazanih ventila.
- Priključite adapter ventila (13) u ručicu brze spojnice (9) i zatim je otpustite.
■ Započnite pritiskanjem adaptera ventila (13) na ventil.
■ Napumpajte kako je opisano gore.
6.3.3 uporaba igličastog kugličnog ventila (12) / univerzalnog adaptera (11)
Područje primjene:
Igličasti ventil za lopte (12) može se koristiti za napuhavanje različitih lopti. Univerzalni adapter (11) može se koristiti za napuhavanje zračnih madraca i slične opreme.
- Pritisnite prema dolje ručicu brze spojnice (9) kako biste je priključili.
- Umetnite igličasti ventil za lopte (12) ili jedan od univerzalnih adaptera (11) u ručicu brze spojnice (9) i zatim je otpustite.
■ Napumpajte kako je opisano gore.
6.3.4 Korištenje kompleta adaptera
Notified Body TÜV SÜD
28/03/2022, Lier - Belgium
1 OPIS (SL. A) 3
2 SPISAK SADRŽAJA PAKOVANJA .... 3
3 SIMBOLI 4
4 OPŠTA BEZBEDNOSNA UPUTSTVA ZA ELEKTRIČNE ALATE .4
4.1 Radna oblast 4
natural_image
Technical line drawing of two mechanical components (no text or symbols)Francuski (presta) ventil
Biciklistički (danlop) ventil
Oblast primene:
Adapter za ventile (13) omogućava lako naduvavanje guma za bicikle.
- Upotrebite adapter za ventile (13) da biste pumpali kroz prethodno prikazane ventile.
- Spojite adapter za ventile (13) sa brzom spojnicom sa ručicom (9) a zatim je otpustite.
- Počnite tako što ćete adapter za ventile (13) pritisnuti uz ventil.
- Napumpajte na prethodno opisani način.
6.3.3 Upotreba igle za lopte (12) / univerzalnog adaptera (11)
Oblast primene:
Igla za lopte (12) se može koristiti za naduvavanje raznih lopti. Univerzalni adapter (11) se može koristiti za naduvavanje dušeka na naduvavanje i slično.
- Pritisnite ručicu brze spojnice (9) na dole da biste je pričvrstili.
- Umetnite iglu za lopte (12) ili jedan od univerzalnih adaptera (11) u brzu spojnicu sa ručicom (9) i zatim je otpustite.
- Napumpajte na prethodno opisani način.

Notified Body TÜV SÜD
Evropski harmonizovani standardi (uključujući, ukoliko je to primenljivo, njihove dopune do dana potpisivanja):
EN1012-1:2010
EN62841-1:2015
EN IEC55014-1:2021
EN IEC55014-2:2021
EN IEC61000-3-2:2019
EN61000-3-3:2013
Čuvar tehničke dokumentacije: Philippe Vankerkhove, VARO – Vic. Van Rompuy N.V.
Dole potpisani zastupa upravu preduzeća,
Mentens Ludo
Ludo Mertens
Menadžer za sertifikaciju
28/03/2022, Lier - Belgium
1 POPIS (OBR. A)....3
2 SEZNAM OBSAHU BALENÍ....3
3 SYMBOLY 4
4 OBECNÁ BEZPEČNOSTNÍ UPOZORNĚNÍ PRO ELEKTRICKÉ NÁSTROJE ...... 4
natural_image
Technical line drawing of a mechanical component with threaded ends and flanges (no text or symbols)28/03/2022, Lier - Belgium
1 POPIS (OBR. A) 3
2 OBSAH BALENIA....3
3 SYMBOLY 4
4 VŠEOBECNÉ BEZPEČNOSTNÉ VAROVANIA PRE ELEKTRICKÉ NÁRADIE....4
4.1 Pracovná plocha....4
natural_image
Technical line drawing of two mechanical components with threaded ends (no text or symbols)Notified Body TÜV SÜD
28/03/2022, Lier - Belgium
1 DESCRIERE (FIG. A)....3
2 CONTINUTUL PACHETULUI 3
3 SIMBOLURI....3
4 AVERTISMENTE GENERALE DE SIGURANTĂ PRIVIND APARATELE ELECTRICE ....4
4.1 Zona de lucru 4
natural_image
Technical line drawing of two mechanical components with threaded ends and a central protrusion (no text or symbols)28/03/2022, Lier - Belgium
28/03/2022, Lier - Belgium
1 LEÍRÁS (A. ÁBRA) 3
2 CSOMAGOLÁS TARTALMA....3
3 JELZÉSEK 4
4 ÁLTALÁNOS BIZTONSÁGI SZABÁLYOK....4
Notified Body TÜV SÜD
28/03/2022, Lier - Belgium
1 ОПИСАНИЕ (РИС. А) 3
natural_image
Technical line drawing of a mechanical component with threaded ends and a cylindrical shaft (no text or symbols)Notified Body TÜV SÜD
28/03/2022, Lier - Belgium
1 ОПИСАНИЕ (ФИГ. А) 3
2 СПИСЪК НА СЪДЪРЖАНИЕТО НА ОПАКОВКАТА....3
3 СИМВОЛИ ....4
4 ОБЩИ ПРЕДУПРЕЖДЕНИЯ ЗА БЕЗОПАСНОСТ ПРИ ИЗПОЛЗВАНЕ НА ЕЛЕКТРОИНСТРУМЕНТИ......4
4.1 Работна зона....4
natural_image
Technical line drawing of a mechanical component with threaded ends and a flanged base (no text or symbols)Notified Body TÜV SÜD
natural_image
Yellow portable air purifier with coiled hose, pressure gauge, and various tubing (no visible text or symbols)varo
WWW.VARO.COM
DESIGNED AND MARKETED BY VARO
©copyright by varo
VARO - VIC. VAN ROMPUY nv
JOSEPH VAN INSTRAAT 9 - 2500 LIER - BELGIUM
- COMPRESSOR 1100 W ZONDER OLIE + 11 ACCESSOIRES POWX1706
- BESCHRIJVING (FIG. A)
- COMPRESSOR 1100 W + 11 PCS - NO OIL POWX1706
- DESCRIPTION (FIG. A)
- SYMBOLS
- GENERAL POWER TOOL SAFETY WARNINGS
- Work area
- Electrical safety
- Personal safety
- Power tool use and care
- Service
- SPECIFIC SAFETY WARNINGS
- Do's
- Don'ts
- OPERATION
- Switching on and off
- Compressed air hose with quick coupler (5)
- Inflation
- Not suitable for inflating automotive tires
- Using the valve adapter (13)
- Area of use:
- Using the ball needle (12)/ universal adapter (11)
- NOTE! To avoid damage to the valve, you should moisten the ball needle (14) before insertion.
- Using the adapter set
- Using with the extension nozzle (19)
- NOISE
- ATTENTION! Wear hearing protection when sound pressure is over 85 dB(A).
- WARRANTY
- ENVIRONMENT
- DECLARATION OF CONFORMITY
- FÖRPACKNINGSINNEHÅLL
- KOMPRESSORI 1100 W (ÖLJYTÖN) + 10 LISÄTARVIKKEET POWX1706
- Područje uporabe:
- uporaba igličastog kugličnog ventila (12) / univerzalnog adaptera (11)
- Područje primjene:
- Korištenje kompleta adaptera
- Oblast primene:
- Upotreba igle za lopte (12) / univerzalnog adaptera (11)
Brand : PowerPlus
Model : POWX1706
Category : Compressor