TD 102 A - Turntable THORENS - Free user manual and instructions
Find the device manual for free TD 102 A THORENS in PDF.
| Product Type | Belt-drive turntable |
| Brand | Thorens |
| Model | TD 102 A |
| Dimensions (W x H x D) | 420 x 138.6 x 355 mm |
| Weight | Approximately 4.8 kg (including dust cover) |
| Power supply | 100-240 V AC, 50/60 Hz (power adapter included) |
| Power consumption | Less than 0.5 W in standby |
| Playback speeds | 33 1/3 and 45 RPM |
| Speed variation | ± 2% |
| Wow and flutter | 0.2% |
| Signal-to-noise ratio | 67 dB or more (A-weighted, LPF 20 kHz) |
| Turntable platter | Aluminum, diameter 300 mm |
| Tone arm | Carbon fiber tube, statically balanced, effective length 214.5 mm |
| Tracking force | 2 g (adjustable via counterweight) |
| Cartridge | Audio-Technica AT-VM95E (VM stereo dual magnet) |
| Output voltage | 4.0 mV ± 3 dB |
| Audio outputs | Analog RCA connectors with selectable PHONO EQ |
| Main functions | Auto start, auto stop, size/speed selection, lift lever, dust cover, standby button |
| Maintenance and cleaning | Clean the body and dust cover with a soft cloth slightly dampened with a diluted neutral cleaning product. Use a suitable product for the stylus and records. |
| Safety | Do not place on a heat source, avoid vibrations, do not move while in operation, check the power supply voltage, leave ventilation space. |
| Included accessories | 45 RPM adapter, audio cable, power supply, rubber mat, dust cover |
Frequently Asked Questions - TD 102 A THORENS
User questions about TD 102 A THORENS
0 question about this device. Answer the ones you know or ask your own.
Ask a new question about this device
Download the instructions for your Turntable in PDF format for free! Find your manual TD 102 A - THORENS and take your electronic device back in hand. On this page are published all the documents necessary for the use of your device. TD 102 A by THORENS.
USER MANUAL TD 102 A THORENS
PYKOBODCTBO NOLBJ3OBATEJI
使用手册
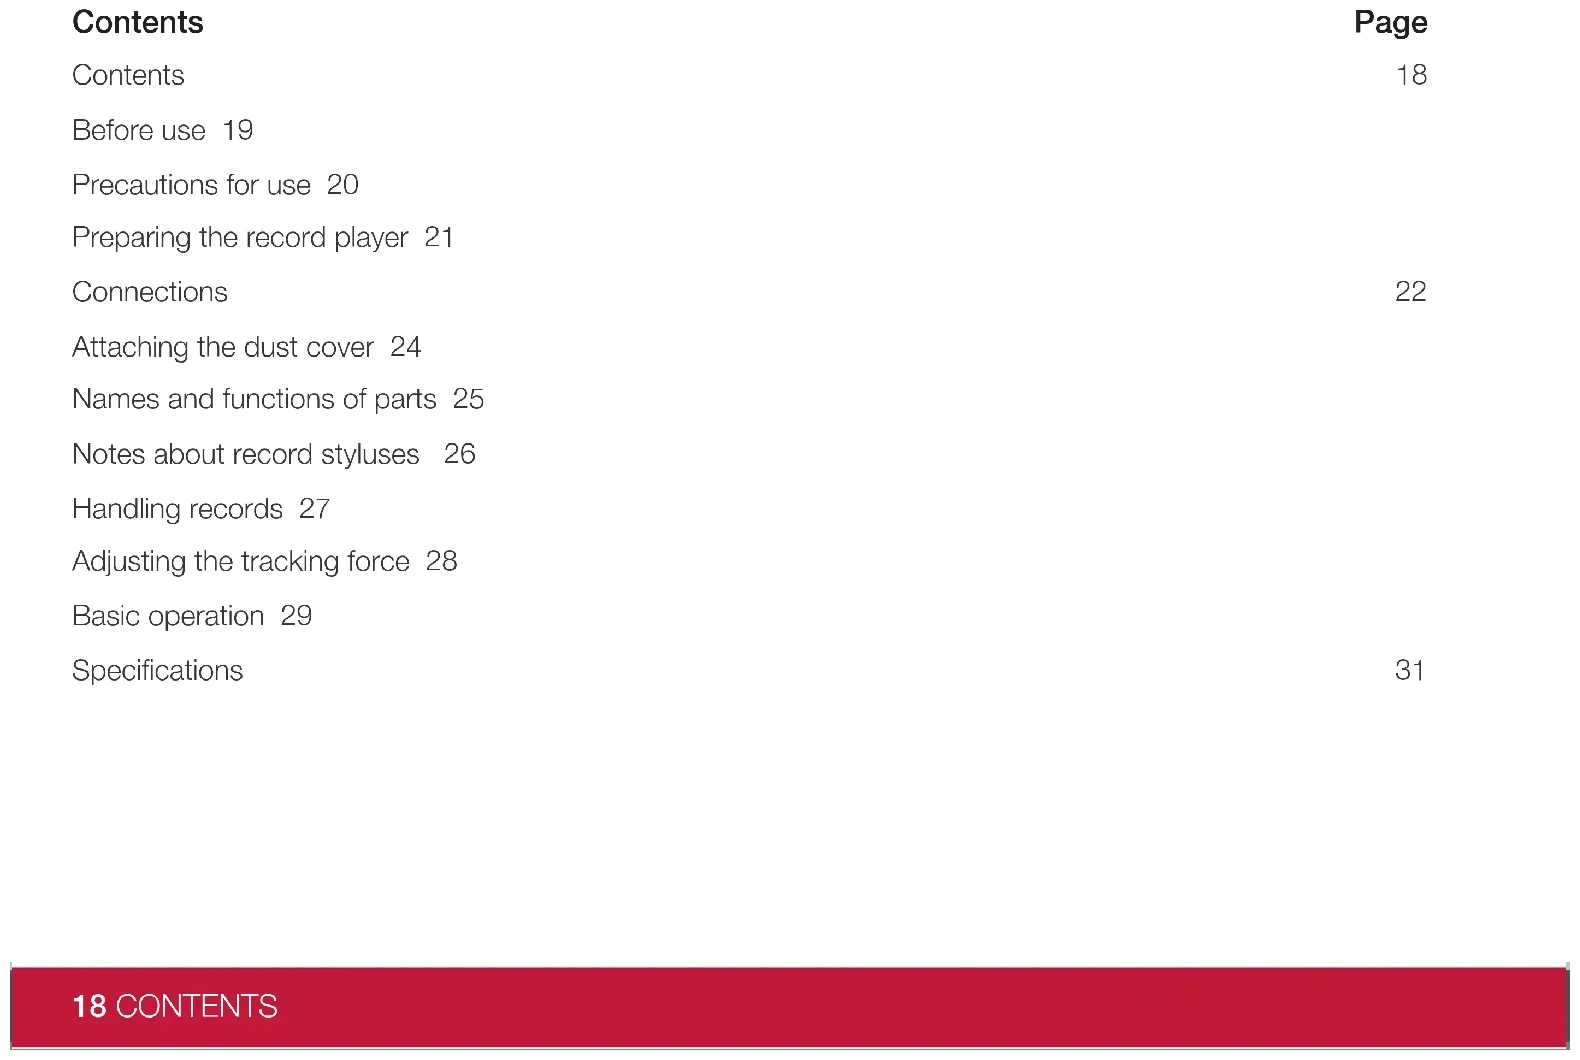
Contents
Page
Contents
18
Before use 19
Precautions for use 20
Preparing the record player 21
Connections
22
Attaching the dust cover 24
Names and functions of parts 25
Notes about record styluses 26
Handling records 27
Adjusting the tracking force 28
Basic operation 29
Specifications
31
Before use
Thank you for choosing THORENS.
Read this manual carefully to get the best performance from this unit.
Precautions for use
Do not place anything on the dust cover. Objects on the cover might cause noise due to vibrations or fall off, especially during playing.
Do not place the unit on an amplifier or any other device that generates heat. Doing so could cause discoloration, deformation or malfunction.
Also avoid locations that are subject to vibrations or exposed to excessive dust, cold or moisture.
As the unit could become warm during operation, always leave sufficient space around it for ventilation. When installing this unit, leave a little space between it and other devices and walls to allow good heat dissipation.
Do not move the unit during playing, the record rotates. Do not lift or move the unit during playing. Doing so may damage the record, the stylus, the cartridge or the unit.
Always remove the record before relocating or moving this unit. Moving the unit with a record on the platter could damage the record, the stylus and the cartridge or could cause a malfunction.
The voltage supplied to the unit should match the voltage as printed on the rear panel. If you are in any doubt regarding this matter, consult an electrician.
Maintenance
Wipe off any dirt on the cabinet and dust cover surfaces using a soft cloth that has been slightly dampened with a diluted neutral cleanser.
Preparing the record player
Place the unit on a flat surface.
The heights of this unit's feet cannot be adjusted, so place it on a level surface.
Place the rubber mat on the turntable platter.
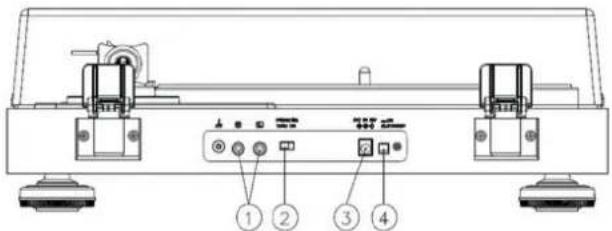
Connections
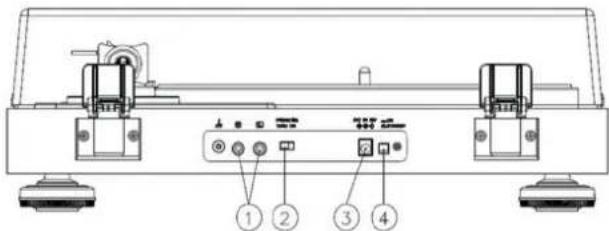
01. Analog audio output connectors (L/R)
These output analog audio signals.
The PHONO EQ switch setting changes the type of output signal.
Use the included audio cable (or commercially-available ones) to connect other equipment to the output connectors of this unit.
02. PHONO EQ (audio output setting) switch ON
Signals that have been amplified by the built-in equalizer amp are output from the analog audio output connectors (L/R).
THRU
The VM cartridge signal is output directly through the analog audio output connectors (L/R). Use this when connecting to equipment that has PHONO inputs. When shipped new from the factory, this is set to ON.
ATTENTION
When set to ON, if connected to the PHONO inputs of an amplifier, for example, the output from speakers and headphones will be very loud, which could damage equipment or harm hearing.
22 CONNECTIONS
3. DC input connector
After completing all other connections, connect the included AC adapter to this connector.
Confirm that the power plug of the AC adapter is plugged into a power outlet.
Do not use any AC adapter other than the one included.
The included AC adapter has plugs that can be changed. Attach the plug that suits the region where it is being used.
4. STANDBY/ON button
Press the STANDBY
Attaching the dust cover
Insert the hinges completely into the hinge holders at the left and right ends of the back of the main unit. Align the tops of the hinges with the dust cover hinge holders and insert them.
Removing the dust cover
Hold both edges of the dust cover and lift it slowly to remove it along with the hinges from the unit. Then, remove the hinges from the dust cover.
Opening and closing the dust cover
Opening
Hold the front edge of the dust cover and gently lift it open completely until it stops. The dust cover will stay open in this position.
Closing
Gently lower the dust cover until it is closed.
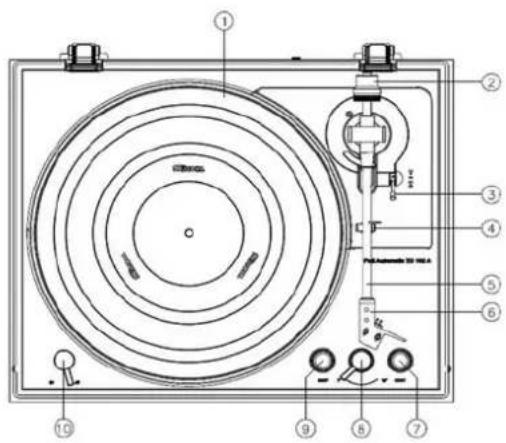
Names and functions of parts
- Platter
Place records centered on the platter.
- Counterweight
To properly balance the tonearm (Not an adjustable)
- Tonearm lifter lever
Use this lever to lower and raise the tonearm.
- Tonearm holder
To lock the tone arm in place when not in use.
- Tonearm
Main body of Tonearm
- Headshell
To provide needle protection
- START button
This starts record playback.
- Record size selection lever
Select the size of the record to be played.
- STOP button
This stops record playback
- 33/44 RPM switch
Select 33 or 45 rpm for playing a vinyl
Notes about record styluses
If the stylus becomes bent (damaged), it will no longer be able to accurately trace the groove. Since a bent stylus could also damage records and cause malfunction, handle styluses carefully.
Always use a commercially-available stylus cleaner to clean a stylus. Use of anything other than a stylus cleaner could damage the stylus.
ATTENTION
Be aware that bent styluses, for example, that result from insufficient customer caution or an outside cause are not covered by the warranty.
Handling records
Holding records
When holding a record or removing it from its sleeve, avoid touching the grooves by holding the record by its label and edge with one hand or by holding it by its edge with both hands.
Cleaning
Fingerprints and dust on a record can cause noise and the sound to skip, as well as damage the record itself and the stylus. Use a commercially-available record cleaner to clean records. Do not use thinner or anything other than a record cleaner. Such chemicals could harm the surface of the record.
When using a record cleaner, wipe the surface of the record in a circular motion, following the grooves.
Precautions for use
Do not leave records in places that are exposed to direct sunlight or are very hot or very humid. Leaving a record in such a condition for a long time could result in warping, mold growth or other damage.
Do not stack multiple records or place heavy objects on top of them. Do not leave records at an angle for long amounts of time, either. Doing so could result in warping or other damage.
Do not allow hard objects to directly touch the audio grooves. Doing so could cause scratches.
After you finish playing a record, always put it back into its sleeve for storage. Leaving a record unprotected could result in warping or scratching.
Do not use cracked records.
Adjusting the tracking force
- Screw the counterweight (2) on the back of the arm.
- Lower the lift lever (3) forwards so that the tonearm lowers.
- Remove the needle guard, release the lock of the tonearm and move it between the support (4) and platter so that it can swing freely up and down. (Caution: the needle must not hit anywhere).
- Turn the counterweight at the end of the tonearm until the tonearm floats freely and automatically in a central position returns. When the arm floats up, turn the weight counterclockwise, it floats down turn the weight in the other direction. The arm is thus balanced.
- Guide the tonearm back into the holder and lock it.
- Turn the ring with the scale on the counterweight to „0“ without turning the counterweight yourself.
- The scale refers to the weight in grams. With the included AT VM 95E pickup system, turn the entire counterweight counterclockwise to a value of 2^4 grams
Basic operation
Playing records
Remove the protective cap from the cartridge stylus before using the turntable.
- Press the STANDBY/ON button on the back of the unit to turn it on.
- Open the dust cover slowly. Be careful not to pinch your hand, for example, when opening and closing the dust cover.
- Place a record on the platter. When playing a 45 RPM large-hole single record, use the included adapter.
- Turn the record size selection lever to select the record size.
- Select the rotation speed indicated on the record. The rotation speed can be set to 33 RPM or 45 RPM.
- Press the START button to start playback. The platter begins to turn, the tonearm moves to the outer edge of the record, the stylus lowers to the record, and playback begins. This playback operation cannot be stopped in the middle. Do not place anything on top of the dust cover.
ATTENTION
During playback, do not touch the tonearm or the record. Doing so could damage the stylus tip and cause scratches on the record.
Do not forcibly stop platter rotation during playback. Since this product is not a turntable designed for DJs (direct drive), doing something like this could cause malfunction.
During record playback, feedback could occur if the volume is too loud. If this happens, lower the volume of the amplifier.
When playback finishes
When the tonearm reaches the lead-out groove of the record, it will automatically rise and return to the tonearm holder, and the platter will stop turning.
Starting playback from a track in the middle of the record
-
Use the tonearm lifter lever to raise the tonearm.
-
Move the tonearm so the cartridge stylus is at the track to be played back.
When the tonearm is moved above the record, the platter will start turning.
- Use the tonearm lifter lever to lower the tonearm.
The tonearm lowers slowly until the stylus touches the record and playback begins.
Stopping playback in the middle
Press the STOP button during playback to make the tonearm rise and return to the tonearm holder. This also stops the platter turning.
Basic operation
Turntable section
Drive System Belt Drive
Motor DC Motor
Speed 33 1/3 RPM, 45 RPM
Rotation Speed Variation ±2%
Wow and Flutter 0.2%
Signal-to-Noise Ratio 67dB or higher (A-weighted, 20kHz LPF)
60dB or higher (unweighted, 20kHz LPF)
Platter Aluminum Die-cast
Diameter of Platter 300mm
Tonearm section Carbon tube
Type Balance
Effective Arm Length 214.5mm
Tracking force 2g
Overhang
19.5mm
Cartridge section
Type VM type (Audio-Technica AT-VM95E)
Output Voltage
4.0mv ±3db
Tracking force 2.0g± 0.5g
Cartridge Weight
6.1g ±0.2g
Power
AC 100 to 240V, 50/60Hz
Power Consumption
Less than 0.5W at Standby
Overall Dimensions (dust cover included) (W× D× H)
420 × 138.6 × 355 mm
Weight (dust cover included)
Approx. 4,8 kg
TD 102 A
Takke n36eRaTe pa3MeIaTaYcTpoIcTBo B MeCTax, NOBepKeHHbIX BO3JeIcTBIO BV6paCIN, XOJIOna IJIIN BnAri, IN He yCTaHaBJIInBaIte npONrPbIBaTeJI B MecTAX CINbHO 3aNbJNEHOCHTN.
Tak kaB BO Bpempa60bI yCTpoNCTBO MOKeH HArpeBaTbCRA, BcERda OCTaBnTe BOKpyr Hero DoctatoUHO MeCTa DnBHeNTnAu. PnY UcTaHOBe IpnIrpBbAteJr OCTaBtE He6OJIbUoe IpocTpHaCTBO MeKdy Hm IN dpyHM N yCTpoNCTBaMn, a TaKKe YCTaHOBIne YCTpoNCTBO Ha ydaJIeHmN OT CTeH, YTO6bl ObecneHTb XopoWn OTBOd TeIIa.
He nepemeeaTe npOnrpBbATEb BO Bpem BOCnpON3BeDeHn IIN BO Bpem BpaueHn BNHNIOBOI pAnCTnKn. He noDnHMaTe n He nepemeeaTe yCTpoNcTBO BO Bpem BOCnpON3BeDeHn. 3TO MOKET npNBecTN K NOBpeXdEHNO PnactNHKn, INbl, KapTpndka NII CamOro npOnrpBbATEJIa.
Bcerda chImaIte pIaCTnHKy neped nepemeeHem yctpoiCTBa.IpeMeueHne npOnrpbIbaTeJb BmecTe C pIaCTnKo, yCTaHOBLeHHoHa BpaUaIOUeMcra INCKe MOKe TnpINBeCTN K NOBpeKDeHHIO IIaCTnHKn, CTNJLyca NN KapTpNDka, INN MoKeT NocLjXkNTb PnUHHO Bo3NHKHOBeHnA DpyRo HEnCpabHOCTn.
HaipjxHHe, nOdaBaemoe Ha yCTpOJCTBO, IOJIHXHO COOTBeTCTBOBaTb HapjxHHeIO, yKa3aHHOMy Ha 3aHHe nnHeI. Ecn y BAC eCTb KaKHe-Jn6o COMHeHnro NO 3TOMy BONPOcy, npOKOHcYbTIpyuTEcb C npOdaUc0m.
YxoI n o6cnyxnbHne
BbITpnte rpr3b c nobepxHocTn KOpnyca n nbJIe3aUHTHO KnKbIJKM MAnKo TKaHbIO, CJIeRka yBlaXHeHHo pa36abJIeHHbIM HeITpaJIbHbIM MOIOUcIM CpeICTBOM.
IoproTOBka npoIrpbIbATEJI BUNHIOBbIX NlaCTnHOK K pa6OTe
PomeCTnTe yCtpoNCTBO Ha pOBHyIO NOBepXHOCTb.
BbICota HOxek ycTpoiCTBa He peRyIINpyeTc, N03TOMy NOMECTNTE npONrpbIbAteJIb Ha pOBHyIO rOpN3OHTaJIbHyIO NOBepXHocTb.
IomeCTnTe pe3INHObBIOKOBpIK Ha ONOpHbI INCK.
PoiKJIIOUeHnIa
01.AHaIorOBbIe ayIOOBbIXOaBI (J/II)
Ha daHbIe BbIXObl NOaIOTc aHaIIOBbIe ayDnO cnHaJIbI.
Pn nmoi nepeknouaTEJ PHONO EQ (pOHO KOppeKTop) MoXHO N3MeHrTb TIN BbIXoHOrO CnHa-
Дяпдкюченя дуго ообopyдовоня K bixoHbIM pa3bEmam daHHORO yCTPOIcTBa NCNoJIb3yIte npnilaraemB KOMnIeKtauyn aydno Kaeb. EcIn aydno KaebB KOMnIeKTe K npOnIrpBaTeJIIO nla-CTINOK He npnilaraetc, erO MOxHO pIno6peCTN DOONIHHTeJIbHO B MaRa3nHe.
02.YctaHObKa PHONO EQ (HacTpoiKa ayDIOBbIXoJa) B noJoxKeHe BKJI.
CunhaIbI, ycnHeHbIe BCTPOeHHbIM ycJInTeIeM fOHOKOppeKTopa, BBIOaTcR Hepe3 aHaIoroBbIe BblXoHbIe ayNo pa3bEmI (JeBbI/IIpaBbI).
TPAH3NTHbI BbIXOJ
CnHaI c KapTpndka 3ByKoCHImaTeJI BbIOJNTcH HenocpeIcTBeHHO uepe3 aHaIOrOBbIe BbIXoHbIe ayDIO pa3bEmbl (II/II). IVcnoJIb3yIte erO npi NpIKNoHeHm K obOpUdoBaHIO, ImeIoUeMy BxOdbI PHONO. Ha 3aBOBe OH yCTaHOBJIeH B NOLOKeHne ON (BKJI.).
52 NOДКЛЮЧЕНЯ
BHIMAHNE
Korda nepeeklouateb yctaHOBJEN B NOLOXKeHne ON, HApnimep, npi NODKIOUeHHN K BXoam ycNJITeJI PHONO, 3Byk, Bocnpon3BOIMbI IN3 KOLOHOK IN 3ByK, BOCnpON3BOIMbI Yepe3 HayuHNKIN 6yJeT OeHb rPOMKIM, a 3TO, B CBOIO OOpeB, MOKeT BbIBcTNI 3 CTPOJOBaHHe INI NOBpeNTb CnyX.
03. BxOHN pa3bEM NOCTOHHORO TOKa
IocJIe 3aBepseHnBCEX OCTaJIbHbIX NOJKNIOUHeHn NODKJIIOUHTe K 3TOMy pa3beMy BXOJaU B KOM- nKeT aanTepepeMeHHoro Toka.
Y6eIITecb, yTO BnJIka ceTeBOrO aanTepa nOKIOHHeHa K po3eTke.
He nCnoIb3yIte HnKaKne aIaITepeBb IepemEHHO TOKa, KpOME BXOJaUeRO B KOMJIeKT NOCTaBKn.
BxOJI B KOMNIEKT NOCTABKn CeTeBOA aanTep IMeET BNJK, KOtOpbIE MOXHO MeHrTb. IOnKJIIOHTe BUNKy, COOTBeTCTByIOUyIO peHNOHy, B KOTOpOM OH NcNoJIb3YeTCra.
04. Khonka STANDBY/ON
Haxmte KlaBnuy STANDBY
PpIKpeIeHne nbIe3aIHTHO KpbIiKn
IoiHocTbIO BCTaBbTe peTJIIN B neTneBbIE depeXaTeJIIN Ha JeBOI IN paBOI CTOpOHax 3aJHei CTeHKn OCHOBHORO yCTPOINCTBa.
CoBMeCTIe BepxHHe uactn nTeJIb C npeXaTeJIaMn NblIe3aUHTbIX KpbILueK IN BCTaBtB INBHyTpB.
CHaTne nblne3auTHoN KpbIuKn
Bo3bMITE nbIe3aUHTHyO KpbIuKy IByMa pyKaMn, N MeJIeHHO NOHIMaTe ee, YTO6bI CHaTb BMeCTe C nETJAMN yCTpOInCTBa. 3aTeM cHIMITE neTIN C nbIe3aUHTHO KpbIuKN.
OTKpbBaHne 3aKpbBaHne PbIe3aunTHoN KpbIuIKN
OTkpbIBaHne
Bo3bMntecb 3a nepenHn Kpa nIe3aHTHO KnblkN IOctOpOxHo npInoHmmtte ee do ynpa. B 3tOM NOLOXHeHH Nblne3aHTHaK pBlkA ocTaHETcB OTKpbITOM NOLOXHeHH.
3aKpbiBaem KpbIiKy
AkkpaTHO onyCTIe nbIe3aunTHyo KpbIuKy, noka OHa He 3aKpoETcra.
Ha3BaHnI nФункUm YacTei
- Dnck
YcTaHaBnBaIte PJIaCTINHKn IOn LcHTpy DnCKa.
- PpOToNBoBec
PpabnIbHO c6aJIaHcnpyIte ToHaPM
- Pukka MkkpOtnTa ToHapMa
Icnoj3ynte 3OTpykU, yTO6bI ONyCTNTb I NOHrTb TOHaPm.
4.ДерхаTeьToHapMa
ДлгфнкалгпToHapMaHaMeCTe,KordaOHHeИсноь3уETc.
- ToHapM
OCHOBHOI KOpNyc ToHapMa
- DepxkataeB 3ByKOCHMaTeTn
IaHTbI FONOBKN 3BYKCHMAteTn
- Khonka START
PpeHa3HaueHa dIy Haaya BocnpOn3BedeHnY.
- RykoTka perylnpoBkn pa3mepa 3annc
Bb6epTe pa3MeP 3aHcN dIy BocnpOn3BeDeneHn.
- Khonka CTON
Icnojbl3yeTcJnOCTaHOBKnBOCpOn3BeJeHne 3aNNCN
- NpeeknouaTeNb ckopocTu 33/44 o6/MnH
BbIbepe cKOpoc7b 33 nnn 45 06/MnH nn BpaueHnnaCTNHKn.

PpimMeaHnO rONOBKe 3ByKOCHImaTeJI nI npOnrpbBaHnB BuHNIObBix DnCKOB
Ecnn nIgna corHyTa (noBpeXdeHa), Oha 6oJIbIe He CMOKeT ToH0 OTCJeXnBaTb KaHaBky. NocKoJbKy corHyTaj nIgna MoKeT TaKke NoBpeIITb 3aIncn I npInBeCTn K HeppaBnIbHO npOte, o6paauTeCb c rOJOBkAmN octOpoxHo.
Iy OunchKn Irgbl Bcerda NcnoJb3ynte NmeOuicnB npodaXe OunchTeNb dny Irgn. NcnoJb30BaHne dpuynx CpeDCTB, KpOME OunchTeTEnJa Irgn, MoKET NOBpeDNTb Irgny.
BHIMAHNE
ImeTe B BVny, yTo Ha n3OrHyTbie ngbli, Hapnimep, nobpeKdHbIe BCJeCTBHe HeIOCTaTOHoi OCToPoxHOCTN CO CTOpOHbI BnaJelbca INI NOCTOpOHHe npuHbI, rapaHTnHa pacnpocTpaHareTCra.
06paueHne c 3aanncA M
XpaenHe 3anncen
Jepka nlaCTnHKy INI BbIHMaJ ee IN3 KOHBePta, IN36eAaTe npKacatbcra K KaHaBkam, JepKNTe pNaCTNHky 3a cepenHy n 3a Kpaon Ondno pyKoN nn depKNTe ee 3a Kpaon oBeMN pyKaMn.
OuNTka
OTneaTkn naiIbueB nIbIb Ha nIpaTnHke MoryT Bbi3BaTb IyM nIpoNcKn 3Byka, a TaKKe NOBpeDntb camy PnactnHKu nIgny. Dna OunCTKn PnactnHok nCnoJIb3yIte ImeOuIeCeB nPodaJke OUnCTnTei. He nCnoJIb- 3yIte paCTBopNTeIN INI npYrHe YnCTraUne CpeDCTBa. TaKne XIMNKaTb MOryT NOBpeDntb NOBepXHOCTb PnactnHKn.
Pn INCNOJIb3OBAHIN BaKyyMHOJ MOIKN OUYIaJIte NOBepxHOCTb PJIaCTIHKN KpyROBbIMN DBHXeHNA, CJeDyA 3a KaHaBkAmN.
Mepbi npedoctoopoxhoctn pni nCnoB3ObaHm PnaactnHOK
He octabnIte nactnHb IN MeCTax, NOBepXeHHbIX BO3deNCTBIO npAmbIX cONHehbx Lyuei ININ B Oyehb XapKnx INI ONeH bLnAkhbIX MeCTax. EcIn OCTaBnTb nactnKHy B TaKOM MecTe Ha DOJIroe Bpemr, 3TO MOKeT npNBecTI K DeOpMaun, Obpa3OBAHIO PIIeCEHN INI DpyIM NOBpeKDeHm NlactnHOK.
He cKlaIbIaIe HeCKOJIbKO IJaCTHOK I He KlaIITe IOBepx HIX TAgKeJIbIe IpEIMTeI. TaKke He OCTaBJIaI-Te IJaCTHKNIOyILOM B HaKIOHOM INoLOXeHN B TeueHne DInTEJbHOrO BpEmH. 3TO MOKET npINBeCTN K DeOpMaUIN IIN dpyIM NOBpeXdEHnM.
He no3B0JIyTe TBepdIIM npeDMeTAM HeNOCpeIcTBeHHo KaCaTbCra 3ByKObbIX KaHaBOK. To MoKet npINBeCTN K NOBJIeHHIO capaHn.
No OKOHaHn npOnrpbBaHn pJIacTHKn BceRda KlaIInTe ee o6paTHo B KOHbepT Iy xpaHeHn. EcIn octaBnTb pJIaCTNHKy He3aUuIeHHo, OHa MOKeT JeΦopMnpObaTbCra NIN NOapanaTbcra.
He nCnoJIb3yIte TpeChyBUnne INaCTnHKn.
PerynpoBka npNXMHOc nJIbI
- PnKpyTne npOTnbOBec (2) K 3aJHe yactn pbIyara.
- Onyctnte noDbemhbipbivar (3) Bnpeid, yTo6bl ToHapm onyctncra.
- CHIMITE 3aunTHbI KOxUx nJIbl, OCBO6OHTe fHKCaTOp TOHApMa I nepemecTne ero Mexky onopoi (4) n POnHoc TaK, YTO6bl OH MOR CBO6OJHO Kauatbcra BBepx u BHN3. (BHMaHHe: nRa He doJXHa HnKyda nonadTa).
- Поворачиваite npOTиBOBec Ha KOHcTe ToHApMa Do Tex nop, nOKa ToHapM He 6ydet CBO6OHDNo nepeMeueTbCRA ABTOMaTHUeCKN B U cHTpaIbHOM NOLoxEHN. BO3BpauaetcR. Korda pyKa BCnIbIBaET, NOBepHnte rnpIO npOTuYacOBoI CTpeKN, OHa PJIaBaET BHN3 NOBepHnte rnpIO B dpyrom HAnpaBJIeHN. TAKIM O6pa3OM, pyKa ypaBHOBeWeHa.
- BctabbTe ToHapm 6oPaTHO B OnOpy n 3aФNKcUpyIte erO.
- Повернite Кльculo сшкалов на потивобе на «0», не постору.TelbHo.
-
- BecbI yka3aHb I rpaMMax. C BkJIIOeHHo CNCTeMoI NO6Opa AT VM 95E, noBepHnTe Becb npOTNBOBec npOTNB YacBOB CTpeKN Ha 3HaueHne «2» rpaMma
OCHOBHbIe onepaun
Bocnpoun3BeJeHne 3aIncen
IpeenicnojB3OBAHnem npOnrPbIBaTeJI CHIMMITE 3aUHTbI KOJIpaOK C INJIbI KapTpndka.
- Haxmnte KhoNky STANDBY/ON Ha 3aHne nHaEn yctpoiCTBa, YTO6bI BKnHouHTb yctpoiCTBO.
- MeДлЕнHo OTKpoITe nbIe3aUHTHy KoBbIuKy.
Будte OCTOPOKHbI, Истаитесь He 3aLcEMITb pyKy, HanpIMep, npN OTKpbITIN I 3aKpbITIN nbIe3a-
- IomeCTIte pJIacTHNKy Ha dNCK.
Pn BOCpON3BeHn OJHOI pactHKn Ha 45 o6/MnH C 6OJIbUIM OTBepCTneM IcNoJIb3yIte BXoJa- uN B KOMJIeKT aanTep. - NObepHnTe pbIaXok BbIbopa pa3mepa 3aIncn.
- BbIbepnte ckopocTb BpaueHnry, yKa3aHHyO Ha nlaactnHke.
CKopoocbBpaUeHmMOxHO yCTaHOuNTb Ha 33 nnn 45 06/MnH.
- Haxmte KhoNky START, uTo6bHaayaTb BocnpOn3BeDeHne.
ДИСК НИHAET ВРАЦТСА, TOHAPM ИЕРЕМЕЦАЕТСА K BHESHEMY KpaIO ПЛACTINHKN, 3BYKOCHMATEJIb ONYCKAETCSKIIaCTINHKE, И НAHINAETCS BOCPON3BeDEHNE. ДанHyО ONEPAUIB BOCPON3BeDEHNY HEBO3MOXHO OCTaHOBNTB, He DOxJaBUNCb OKOHaHNY BOCPON3BeDEHNY.
He KnaIte HnYeRo NOBepx NbIe3aUHTHOKpbIuKn.
BHIMAHNE
Bo BpemBocpon3BeHnHe npKacTecb K ToHapMy IINI pAACTHKe. 3TO MOKe TIOBpeNTb INJy INPnBcTeN K NOABLeHnIO capaNH Ha pAACTHKe.
He octaHabnBaIte BpaueHne DnCKa BO BpemB Bocnpo3BeHn. Pockoly DaHHoe yCTpoiCTBO He ABJareTc npOnrpbIbATEJIeM, npeHa3HaueHHbIM dIy DN-IXeEB (C npRmbIM npuBOOM), BblONHeHne NDO6hIX DeiCTBn MoKet npNBecTI K c6Oam B pa6ote.
Bo BpemBocnpOn3BeDHeHn 3aInc MoKeT Bo3HnKHyTb O6paTHa CBa3b,ecnI rPOMKOCTb 6yDet CInuKOM Bicokoi. Ecn 3TO npOn3OJeT, yMeHbUHTe rPOMKOCTb ycNJITeJIa.
No OKOHaHn BocnpOn3BeJeHn
Korda ToHapM DoCTnraeT KaHaBKn BbIbera Ha NpIaCTnHKe, OH aBTOMaTHueCKN NOHIMaETcN BO3BpaUaTeC K DePkaTeJIIO ToHapMa, a NpIaCTnHka NepeCTaET BpaUaTbcr.
Haayao Bocpon3BedeHnCdoPckn B cepenHe nactnKn
01.CnOMOuHpbUHaTaTOHaPMaNoHNMITE TOHaPm.
- Iepemecnte ToHapm TaKIM o6pa3OM, UTo6bI nrga KapTpndka Okazanacb Ha Iopoxke IJRA BOCPON3-
Korda ToHapm nepemelaaetcna nlaactnHKo, dNCK hauHaet Bpaatbcra.
03.ИспоьзуйТе рыагToHApMaДЯOnySCaHnToHApMa.
ToHapm ONyCKaETcMa MeJHeHO, NOKa INJa He KOCHTc PJIaCTINHKn I He NaHETc BOCIPON3BedeHne.
OctaHOBKa BOCPon3BedeHnNocepeDInHe
HaKMMTE KHOIky STOP BO BpemB OBCPon3BeHnry, YTO6bI TOHAPM NOHJNCN BepHyJcB ToHApMa. TaKoe DeiCTBne TaXke npuBeTe K OCTaHOBKe BpaUeHn DaCKa.
NoBOPoTHbI DnCK
CnTeMa npBOba PemehHO npBOD
MotopBnuratelb noctoHHoro Toka
Motop 33 1/3 o6/MNH, 45 o6/MNH
TeToHaZnI nNCKaXeHn0.2%
OTHoHHe cHn-7m 67 nBn BbIe (A-B3BeWeHHa, 20 KLPF) 60 nBn BbIe (HepeperpyKeHHb, 20 KLPF)
DnCK AIIOMMHNEBbI JINTOJ
DnameTp Dncka 300MM
Cekzra Tohapa YrlepoHa Tpy6ka
TnCTaTnueckn-c6aJIaHcnpoBaHHbI,IpraMoN
3ΦΦeKTHBnaДnHaHapBaJIOuei 214.5MM
PnKMMHcNJa 2rp
HabicaHne 19,5MM
Cekunkaptpnka
Tun Tun VM (Audio-Technica AT-VM95E)
HanpexHeHa BixOe 4.0MB±3n6
Даьленистунуca 2.0р ±0.5р
Bec Kaptpnka 6.1rp ±0.2rp
MoHocTb AC or 100 do 240 B, 50/60
Iotpe6JIeMaMoHocTb MeHee 0,5 B vpeKmme OxuHaHn.
T6apuTHbIe pa3Mepbl (B KOMnJIeKr BXoJNT 420x138.6x355MM nJIe3aunTHa KpbIka) (Lx x F x B)
Bec (B KOMNNEKT BXOJNT nbIe3aunTHa KpbIuKa) PpIMepHo 4,8 Kr
TD 102 A
BEDIENUNGSANLEITUNG
USERGUIDE
MANUEL D'UTILISATION
PYKOBODCTBOIOJb3OBATEJIa
使用手册