TD 403 DD - Turntable THORENS - Free user manual and instructions
Find the device manual for free TD 403 DD THORENS in PDF.
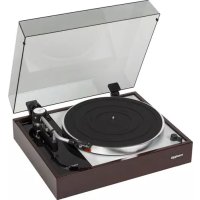
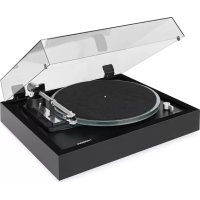
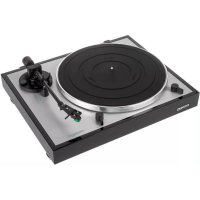
| Product Type | Direct Drive Turntable |
| Brand | Thorens |
| Model | TD 403 DD |
| Dimensions (W x D x H) | 420 x 355 x 139 mm |
| Weight | 9.7 kg |
| Power Supply | 100-240 V, 50/60 Hz, external power adapter, max consumption 36 W |
| Drive Mechanism | Direct Drive (DC motor) |
| Playback Speeds | 33 1/3 and 45 rpm |
| Tonearm | TP150, effective length 9" (232.8 mm), two-part adjustable counterweight, anti-skating by counterweight with thread guided by ruby bearing |
| Cartridge | Ortofon 2M Blue, MM, nude elliptical stylus, tracking force 1.8 g ± 0.2 g, weight 7.2 g |
| Audio Output | RCA/Cinch (gold-plated), supplied cable, for MM phono input |
| Platter | Die-cast aluminum, diameter 12" (300 mm) |
| Dust Cover | Supplied with hinges, removable |
| Maintenance and Cleaning | Clean the casing and dust cover with a soft cloth slightly moistened with a neutral product diluted in water. Clean the records with an antistatic brush. Check the stylus after approximately 500 hours of operation. |
| Safety | Do not place objects on the dust cover. Avoid heat sources and vibrations. Leave ventilation space. Do not move the device while in operation. Disconnect the power supply if not in use for extended periods. |
| Spare Parts and Repairability | Interchangeable headshell (SME standard), replaceable stylus, removable counterweight, expert adjustments (VTA, azimuth) possible by user |
| General Information | Manual available in several languages (FR, DE, EN, RU, ZH, etc.). 84-page manual. Warranty and after-sales service: contact the dealer. |
Frequently Asked Questions - TD 403 DD THORENS
User questions about TD 403 DD THORENS
0 question about this device. Answer the ones you know or ask your own.
Ask a new question about this device
Download the instructions for your Turntable in PDF format for free! Find your manual TD 403 DD - THORENS and take your electronic device back in hand. On this page are published all the documents necessary for the use of your device. TD 403 DD by THORENS.
USER MANUAL TD 403 DD THORENS
natural_image
Hand holding a black plastic clip attached to a white tray (no text or symbols visible)natural_image
Close-up of a mechanical device component with a metallic handle and labeled ports (no readable text or symbols)STROMVERSORGUNG
Weiss = Signal links
Blau = Masse links
natural_image
Close-up of two black mechanical flanges with bolt holes and three small screws, displayed on a white surface (no text or symbols visible)natural_image
Close-up of a mechanical component with three circular ports and two metal rods (no visible text or symbols)natural_image
Close-up of a mechanical optical instrument with a black cylindrical component and metallic base (no visible text or symbols)Precautions for use 23
Top view 24
Rear view 25
First steps 26
Maintenance
30
Expert settings 31
Specs
35
Before use
Thank you for choosing THORENS.
Read this manual carefully to get the best performance from this unit.
Precautions for use
Do not place anything on the dust cover. Objects on the cover might cause noise due to vibrations or fall off, especially during playing.
Do not place the unit on an amplifier or any other device that generates heat. Doing so could cause discoloration, deformation or malfunction.
Also avoid locations that are subject to vibrations or exposed to excessive dust, cold or moisture.
As the unit could become warm during operation, always leave sufficient space around it for ventilation. When installing this unit, leave a little space between it and other devices and walls to allow good heat dissipation.
Do not move the unit during playing, the record rotates. Do not lift or move the unit during playing. Doing so may damage the record, the stylus, the cartridge or the unit.
Always remove the record before relocating or moving this unit. Moving the unit with a record on the platter could damage the record, the stylus and the cartridge or could cause a malfunction.
The voltage supplied to the unit should match the voltage as printed on the rear panel. If you are in any doubt regarding this matter, consult an electrician.
Maintenance
Wipe off any dirt on the cabinet and dust cover surfaces using a soft cloth that has been slightly dampened with a diluted neutral cleanser.
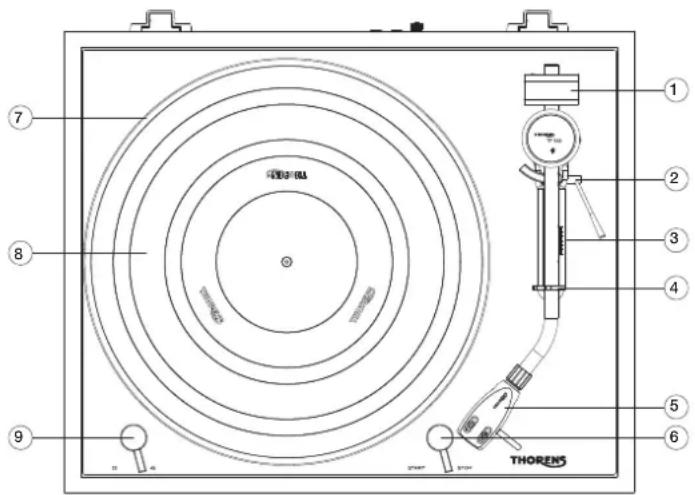
TOP VIEW
1. 1. tonearm counterweight
The counterweight at the back of the tonearm is used to balance the arm and to adjust the correct tracking force of the cartridge used.
2. anti-skating adjustment
Here you can adjust the anti-skating.
3. tone arm lift lever
The lift lever is used to lower the tone arm onto the record and raise it again.
4. tonearm support with lock
The tone arm can be locked in the support.
5. Exchangeable headshell
To accommodate a pick-up system with half-inch mounting. The headshell can be exchanged for any other headshell with standard SME mounting.
6. START/STOP switch
„START“ switches the motor on and the platter starts to rotate. „STOP“ stops playback.
7. platter made of die-cast aluminium.
8. rubber platter mat
For holding the record.
9. 9. speed switch
Switches between 33.3 and 45 rpm.
text_image
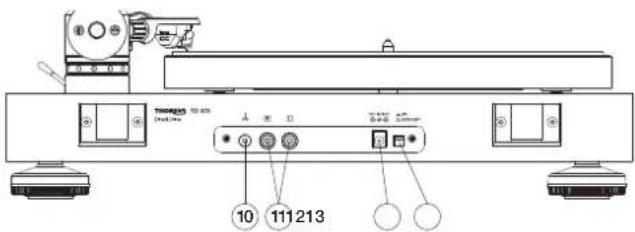
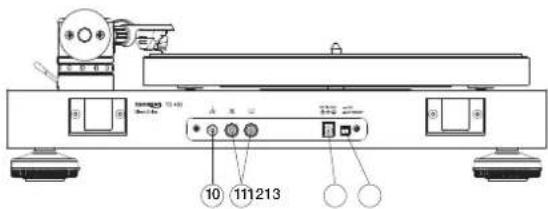
THORENS 1 2 3 4 5 6 7 8 9REAR VIEW
text_image
Theropos 10-235 Control Unit 10 111 21310. Earth screw (ground)
Connects to the amplifier's ground screw with a separate conductor to prevent hum interference.
11. RCA (Cinch) jacks
Connection for the signal cable to the amplifier. Pay attention to the colour coding: red = right channel, white = left channel.
12. Power connection
The power cable from the supplied mains adapter is plugged in here.
13. Main switch
This switches the unit on and off. During operation, the switch must be in the „On“ position.
FIRST STEPS
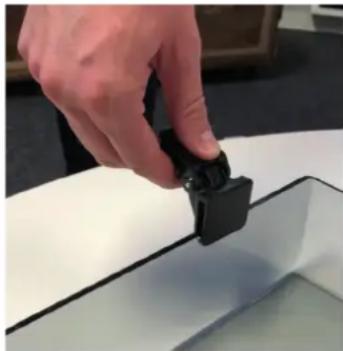
INSTALLING THE DUST COVER
- Unpack the two hinges and the dust cover. Please take care not to scratch the bonnet.
- Note that the hinges have a clip side and a tab side.
- Press the two clips into the designated places on the back of the dust cover until they click into place.
- Now push the dust cover with the hinges into the slots provided on the back of the TD403.
natural_image
Hand holding a black plastic clip attached to a white rectangular object (no text or symbols visible)INSTALLATION AND ADJUSTMENT
After unpacking, the unit is ready to play in just a few steps.
- Place the turntable on a stable surface so that it is not slippery and stands straight.
- Carefully place the platter on the axle. The platter is driven directly, so no further step is necessary to install the platter. Now turn the platter a few times by hand and make sure that it runs smoothly and without noise.
- Place the supplied rubber mat on the plate with the grooved side on top.
- Place the pre-installed headshell in the front of the tonearm and fix it in place by turning the cap nut. The small guide pin points straight up.
- Screw the counterweight onto the end of the tonearm.
- Slide the anti-skating adjustment weight in the arm base to the zero position.
- Fold the lift lever forward so that the lift bench is lowered.
- Remove the needle guard on the pick-up and loosen the pick-up arm lock.
- Carefully move the tone arm towards the turntable with the finger lever so that it can swing freely up and down. Make sure that the needle does not touch the platter or the chassis.
- Turn the counterweight until the tone arm floats freely and swings back into a straight line by itself. If the arm is up, turn the counterweight slightly counterclockwise, if it is down, turn it in the opposite direction until it is balanced.
- Put the tone arm back on the support and fix it.
-
On the counterweight there is a ring with a scale for the tracking force in Pond, which can be moved independently of the weight. Now turn this ring alone, without turning the whole weight, until the „0“ at the top is opposite the mark on the bearing block of the tone arm.
-
To set the desired tracking force, now turn the counterweight as a whole until the corresponding number is opposite the mark. The supplied Ortofon 2M Blue cartridge requires between 1.6 and 2 pounds of tracking force. It is recommended to orientate yourself towards the upper end of these values.
- Then move the weight for the anti-skating in the slot between the tonearm base at the back and the arm support at the front to the same value. On the scale, the long lines indicate an increase of 0.5 when viewed from behind. To adjust the value, it is best to use a small screwdriver or the pin supplied for tone arm height adjustment.
Important: the basic position at the base of the arm specifies the value 0.5, i.e. the other values are based on this.
This completes all adjustments to the tonearm. The description of the steps for adjusting the height of the tone arm (VTA) and for adjusting the azimuth can be found later in this document under EXPERT SETTINGS.

natural_image
Close-up of a mechanical device component with a metallic handle and control buttons (no visible text or symbols)POWER SUPPLY
Connect the external power supply to the socket on the back of the unit and then to a power outlet. Switch the main switch next to the socket on the back to the „on“ position.
CONNECTING TO THE AMPLIFIER
There are two RCA sockets on the rear panel for connecting the TD403 to an amplifier. Connect these sockets to the phono input of the amplifier using the cable supplied. The coding red means right channel and white or black means left channel.
IMPORTANT: the Ortofon 2M Blue cartridge preinstalled at the factory requires a phono MM input. A high level input (designation CD, AUX, TUNER or similar) is not suitable for record playback with the TD403.
RECORD REPRODUCTION
- Place a record on the platter and select the appropriate playback speed (33.3 or 45 rpm) at the front of the lever on the left. For small 45 singles you need the single puck supplied.
- Unlock the tone arm and make sure the lift is up.
- Start the platter with the lever on the front right.
- Move the tone arm over the record with your hand so that the needle hovers over the desired spot and lower it with the lift.
- Playback begins.
- When playback is finished, raise the arm with the lift and move it back to the support. Stop switches off the motor. If necessary, put on the needle guard of the pick-up system.
- When not in use for a longer period of time, switch off the power supply at the back with the switch.
Maintenance
REPLACING THE STYLUS
The following refers to the supplied Ortofon 2M Blue cartridge and the other models from the 2M series.
- Put on the needle guard, loosen the headshell cap nut and pull it off the tonearm tube.
- Remove the needle guard again and pull the needle carrier off towards the front.
- Slide the new needle carrier onto the system body.
- Put on the needle guard again and fix the headshell to the tonearm again.
- It is not necessary to change the settings on the tone arm if it is a replacement needle of the same type.
The needle should be checked after approx. 500 hours of operation and replaced if necessary.
If you are unsure about this, leave the replacement of the pick-up to your dealer or another competent person.
IMPORTANT RECOMMENDATION
Clean your valuable records regularly with a commercially available antistatic brush or use a record washing machine. Make sure that the diamond is clean. To do this, it is best to use the small brush supplied, which you can carefully brush over the diamond from the back to the front.
TRANSPORTING THE TURNTABLE
It is best to use the original packaging of the unit for transport.
Put on the needle guard and lock the tone arm in its support. For longer transport or for shipping, loosen headshell and pull it off. Then remove the rear counterweight and set the anti-skating value to zero. Then remove the turntable and stow it on the bottom of the box.
Lift the dust cover off its hinges and pack it securely.
EXPERT SETTINGS
REPLACING THE CARTRIDGE
To replace the complete cartridge with another model, please follow the steps below.
- Put on the needle guard, unscrew the headshell and pull it off the tone arm tube.
- pull off the four coloured cables from the pins on the cartridge and unscrew it.
- Screw the new pick-up into the headshell and connect the cables. Do not tighten the screws yet.
- Move the pick-up in the headshell until the overhang and zero crossings fit. You will need an adjustment template for this.
- Tighten the screws.
Wiring diagram of the coloured cables:
$$ \text { Red } = \text { signal right } $$
$$ \text { Green } = \text { ground right } $$
$$ \text { White } = \text { signal left } $$
$$ \text { Blue } = \text { ground left } $$
If you replace the complete catridge, the tone arm must be readjusted as described above.
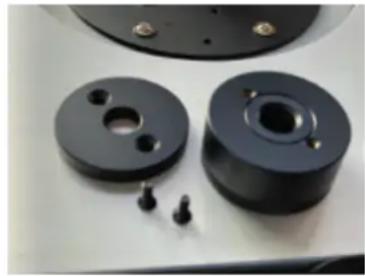
CARTRIDGES WITH DIFFERENT INHERENT WEIGHTS
The counterweight of the TP150 tonearm is made of two parts in order to balance cartridges with different weights. The two parts are connected with two screws that can be easily loosened. However, it is advisable to adjust the weight so that it is as close as possible to the bearing of the tone arm in order to minimise
natural_image
Close-up of two black mechanical flanges with bolt holes and small pins, no visible text or symbolsthe leverage effect on the arm. Therefore, always check first whether the arm can be balanced with the two weights connected. If this is not possible, unscrew the rear part of the weight.
If both weights are in combination, pickups up to approx. 30 g own weight can be balanced.
ADJUSTMENT OF THE AZIMUTH
The azimuth is the correct vertical angle of the diamond needle into the grooves of the record, i.e. seen from the front, the diamond must be exactly perpendicular to the record. The easiest way to check this is to use a mirror onto which the pick-up head is lowered. The pick-up system and the image must form a line without any kinks.
Alternatively, it is advisable to use a transparent stencil with a line grid, through which a slanted position of headshell and pick-up becomes directly visible. You may also be able to use a commercially available set square for this purpose.
To correct a possible deviation from the correct position, the tone arm can be turned.
To do this, loosen the cover of the arm base with a small flat-blade screwdriver and then slightly loosen the cross-head screw (1) located centrally underneath.
32 EXPERT SETTINGS
CAUTION: please only loosen slightly, never unscrew!
After loosening the screw, the arm tube can be turned a few degrees in both directions. When doing so, always check the current position with a mirror or template.
Make sure never to move the arm lengthwise, but only sideways.
text_image
THORENS TP 150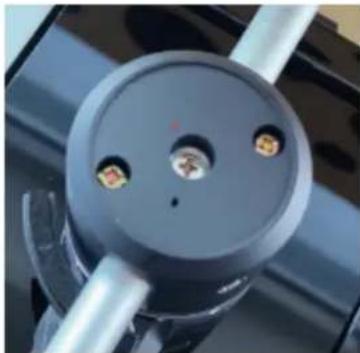
natural_image
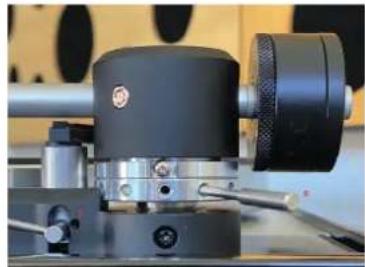
Close-up of a mechanical component with three circular ports and metal rods (no visible text or symbols)ADJUSTMENT OF THE TONE ARM HEIGHT
Replacing a pick-up may require a correction of the arm height. As a rule of thumb, when playing a record from the side, the arm should be parallel to the surface of the record. If this is not the case, because the new cartridge is either higher or lower, the arm height must be adjusted accordingly.
natural_image
Close-up of a mechanical optical instrument with a black cylindrical component and metallic handle (no visible text or symbols)A normal Phillips screwdriver (Ph2) and the metal pin supplied are needed for this. For checking purposes, a triangle or a transparent template with parallel lines printed on it are suitable.
First, carefully loosen the screw (1) a little. Then use the pin (2) to turn the ring in the necessary direction until the tone arm has reached the desired height. Then tighten the screw (1) again.
In some cases, the lift may also need to be adjusted afterwards because the arm sits on the lift bench even when it is lowered or cannot be raised far enough. After loosening the screw (3), the lift height can be adjusted.
Specs
Turntable
Drive Direct
Motor DC Motor
Speeds 33 1/3 and 45 rpm
Deviation from set speed +/- 0.33%
Wow & flutter 0.15%
Signal-to-Noise Ratio 67dB (A-weighted, 20kHz LPF)
60dB (unweighted, 20kHz LPF)
Platter Aluminum Die-cast
Diameter of Platter 12", 300mm
Tone arm
Type Static Balance, J-shaped
Effective Length 9" / 232.8 mm
Effective Mass 15 g
Cartridge weight Up to 30 g
Overhang 17.8 mm
Anti-skating Adjustment Counterweight guided with thread through ruby bearing
Cartridge
Type Ortofon 2M Blue, MM
Stylus Construction Elliptical, nude
Frequency Response 20Hz - 25kHz
Channel Separation >25dB / 1kHz
Channel Balance 1.5dB / 1kHz
Specs
| Vertical Tracking Angle 20° |
| Supported Load Impedance 47k Ohm |
| Output Voltage 5.5mV (1kHz, 3.54cm/sec.) |
| Tracking Force 1.8g +/- 0.2g |
| Cartridge Weight 7.2g |
| Headshell Weight 13.5g (including Screws, Nuts and Wires) |
Analog Output
| Connector RCA/Cinch (Gold-plated) |
| Power AC 100 - 240V, 50/60Hz |
| Power Consumption 36W max |
| Overall Dimensions (W x D x H) 420 x 355x 139mm |
| Weight 9.7 kgs |
TD 403 DD
BEDIENUNGSANLEITUNG
USER GUIDE
MANUEL D'UTILISATION
text_image
① ② ③ ④ ⑤ ⑥ ⑦ ⑧ ⑨ THORENSFACE ARRIÈRE
text_image
10 11121311. Prises RCA (Cinch)
natural_image
Hand holding a black plastic clip attached to a white rectangular object (no text or symbols visible)natural_image
Close-up of a mechanical component with a metallic cylindrical part and a small circular mark on the side (no visible text or symbols)ALIMENTATION EN COURANT ÉLECTRIQUE
natural_image
Close-up of two black mechanical flange components with bolt holes and three small screws, placed on a white surface (no text or symbols visible)natural_image
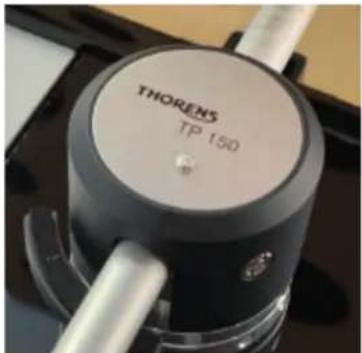
Close-up of a black mechanical component labeled 'THORENS TP 150' with two metallic rods extending outward (no additional text or symbols visible)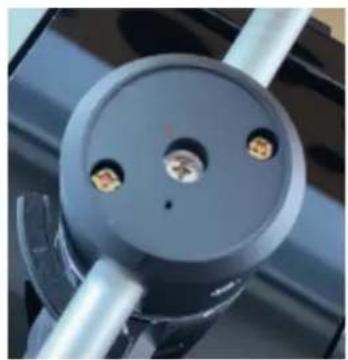
natural_image
Close-up of a mechanical component with two circular ports and metal rods (no visible text or symbols)RÉGLAGE DE LA HAUTEUR DU BRAS DE RÉGLAGE DU SON
natural_image
Close-up of a mechanical optical instrument with a black cylindrical component and metallic shaft (no visible text or symbols)Masse effective 15 g
Poids du balayeur
Surplomb 17,8 mm
text_image
① ② ③ ④ ⑤ ⑥ ⑦ ⑧ ⑨ THORENSОБРАТНАЯ СТОРОНА

text_image
10 111213natural_image
Hand holding a black plastic clip attached to a white rectangular object (no text or symbols visible)natural_image
Close-up of a mechanical component with a metallic cylindrical part and a small red bolt, no visible text or symbols.63 ПЕРВЫЕ ШАГИ
РАЗЪЕМ НА УСИЛИТЕЛЕ
natural_image
Close-up of two black mechanical flanges with bolt holes and three small screws, displayed on a white surface (no text or symbols visible)natural_image
Close-up of a mechanical component with three circular ports and metal rods (no visible text or symbols)natural_image
Close-up of a mechanical optical instrument with a black cylindrical component and a textured grip (no visible text or symbols)natural_image
Hand holding a black plastic clip attached to a white tray (no text or symbols visible)安装和调整
打开包装后,只需几步即可开始播放。