TD202 - Turntable THORENS - Free user manual and instructions
Find the device manual for free TD202 THORENS in PDF.
| Product type | Belt-drive turntable |
| Brand | Thorens |
| Model | TD202 |
| Speed settings | 33 1/3 rpm and 45 rpm |
| Motor | DC motor |
| Speed variation | ±2% |
| Wow and flutter | 0.2% |
| Signal-to-noise ratio | 67 dB or more (weighted, 20 kHz LPF) |
| Platter | Aluminum, diameter 300 mm (12") |
| Tonearm | Aluminum tube, static balance, effective length 223.6 mm (8.8") |
| Stylus pressure | 0 to 4 g (adjustable) |
| Acceptable cartridge weight | 3.5 to 6.0 g |
| Pre-installed cartridge | Stylus pressure 2.0 g ±0.5 g, weight 5.7 g ±0.5 g |
| Frequency response | 20 Hz to 20 kHz |
| Channel separation | > 18 dB |
| Vertical tracking angle | 20 degrees |
| Output impedance | 47 kΩ |
| Output voltage | 2.5 mV (1 kHz, 3.54 cm/s) |
| Outputs | Gold-plated RCA, USB (for PC connection), built-in phono preamp (switchable) |
| Power supply | External AC adapter 100-240 V, 50/60 Hz |
| Power consumption | 1.5 W (standby < 0.5 W) |
| Stylus maintenance | Regular cleaning with soft brush and alcohol, replacement every 250 hours approx. |
| Transport | Remove the belt from the pulley, remove the platter, lock the tonearm |
Frequently Asked Questions - TD202 THORENS
User questions about TD202 THORENS
0 question about this device. Answer the ones you know or ask your own.
Ask a new question about this device
Download the instructions for your Turntable in PDF format for free! Find your manual TD202 - THORENS and take your electronic device back in hand. On this page are published all the documents necessary for the use of your device. TD202 by THORENS.
USER MANUAL TD202 THORENS
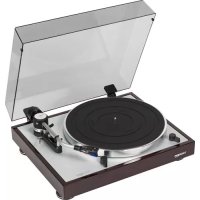
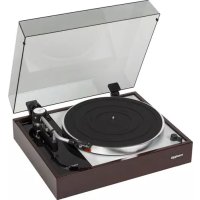
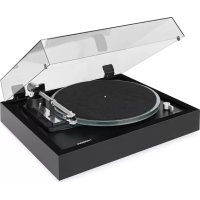
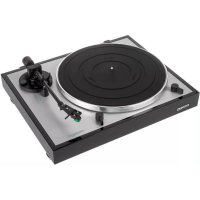
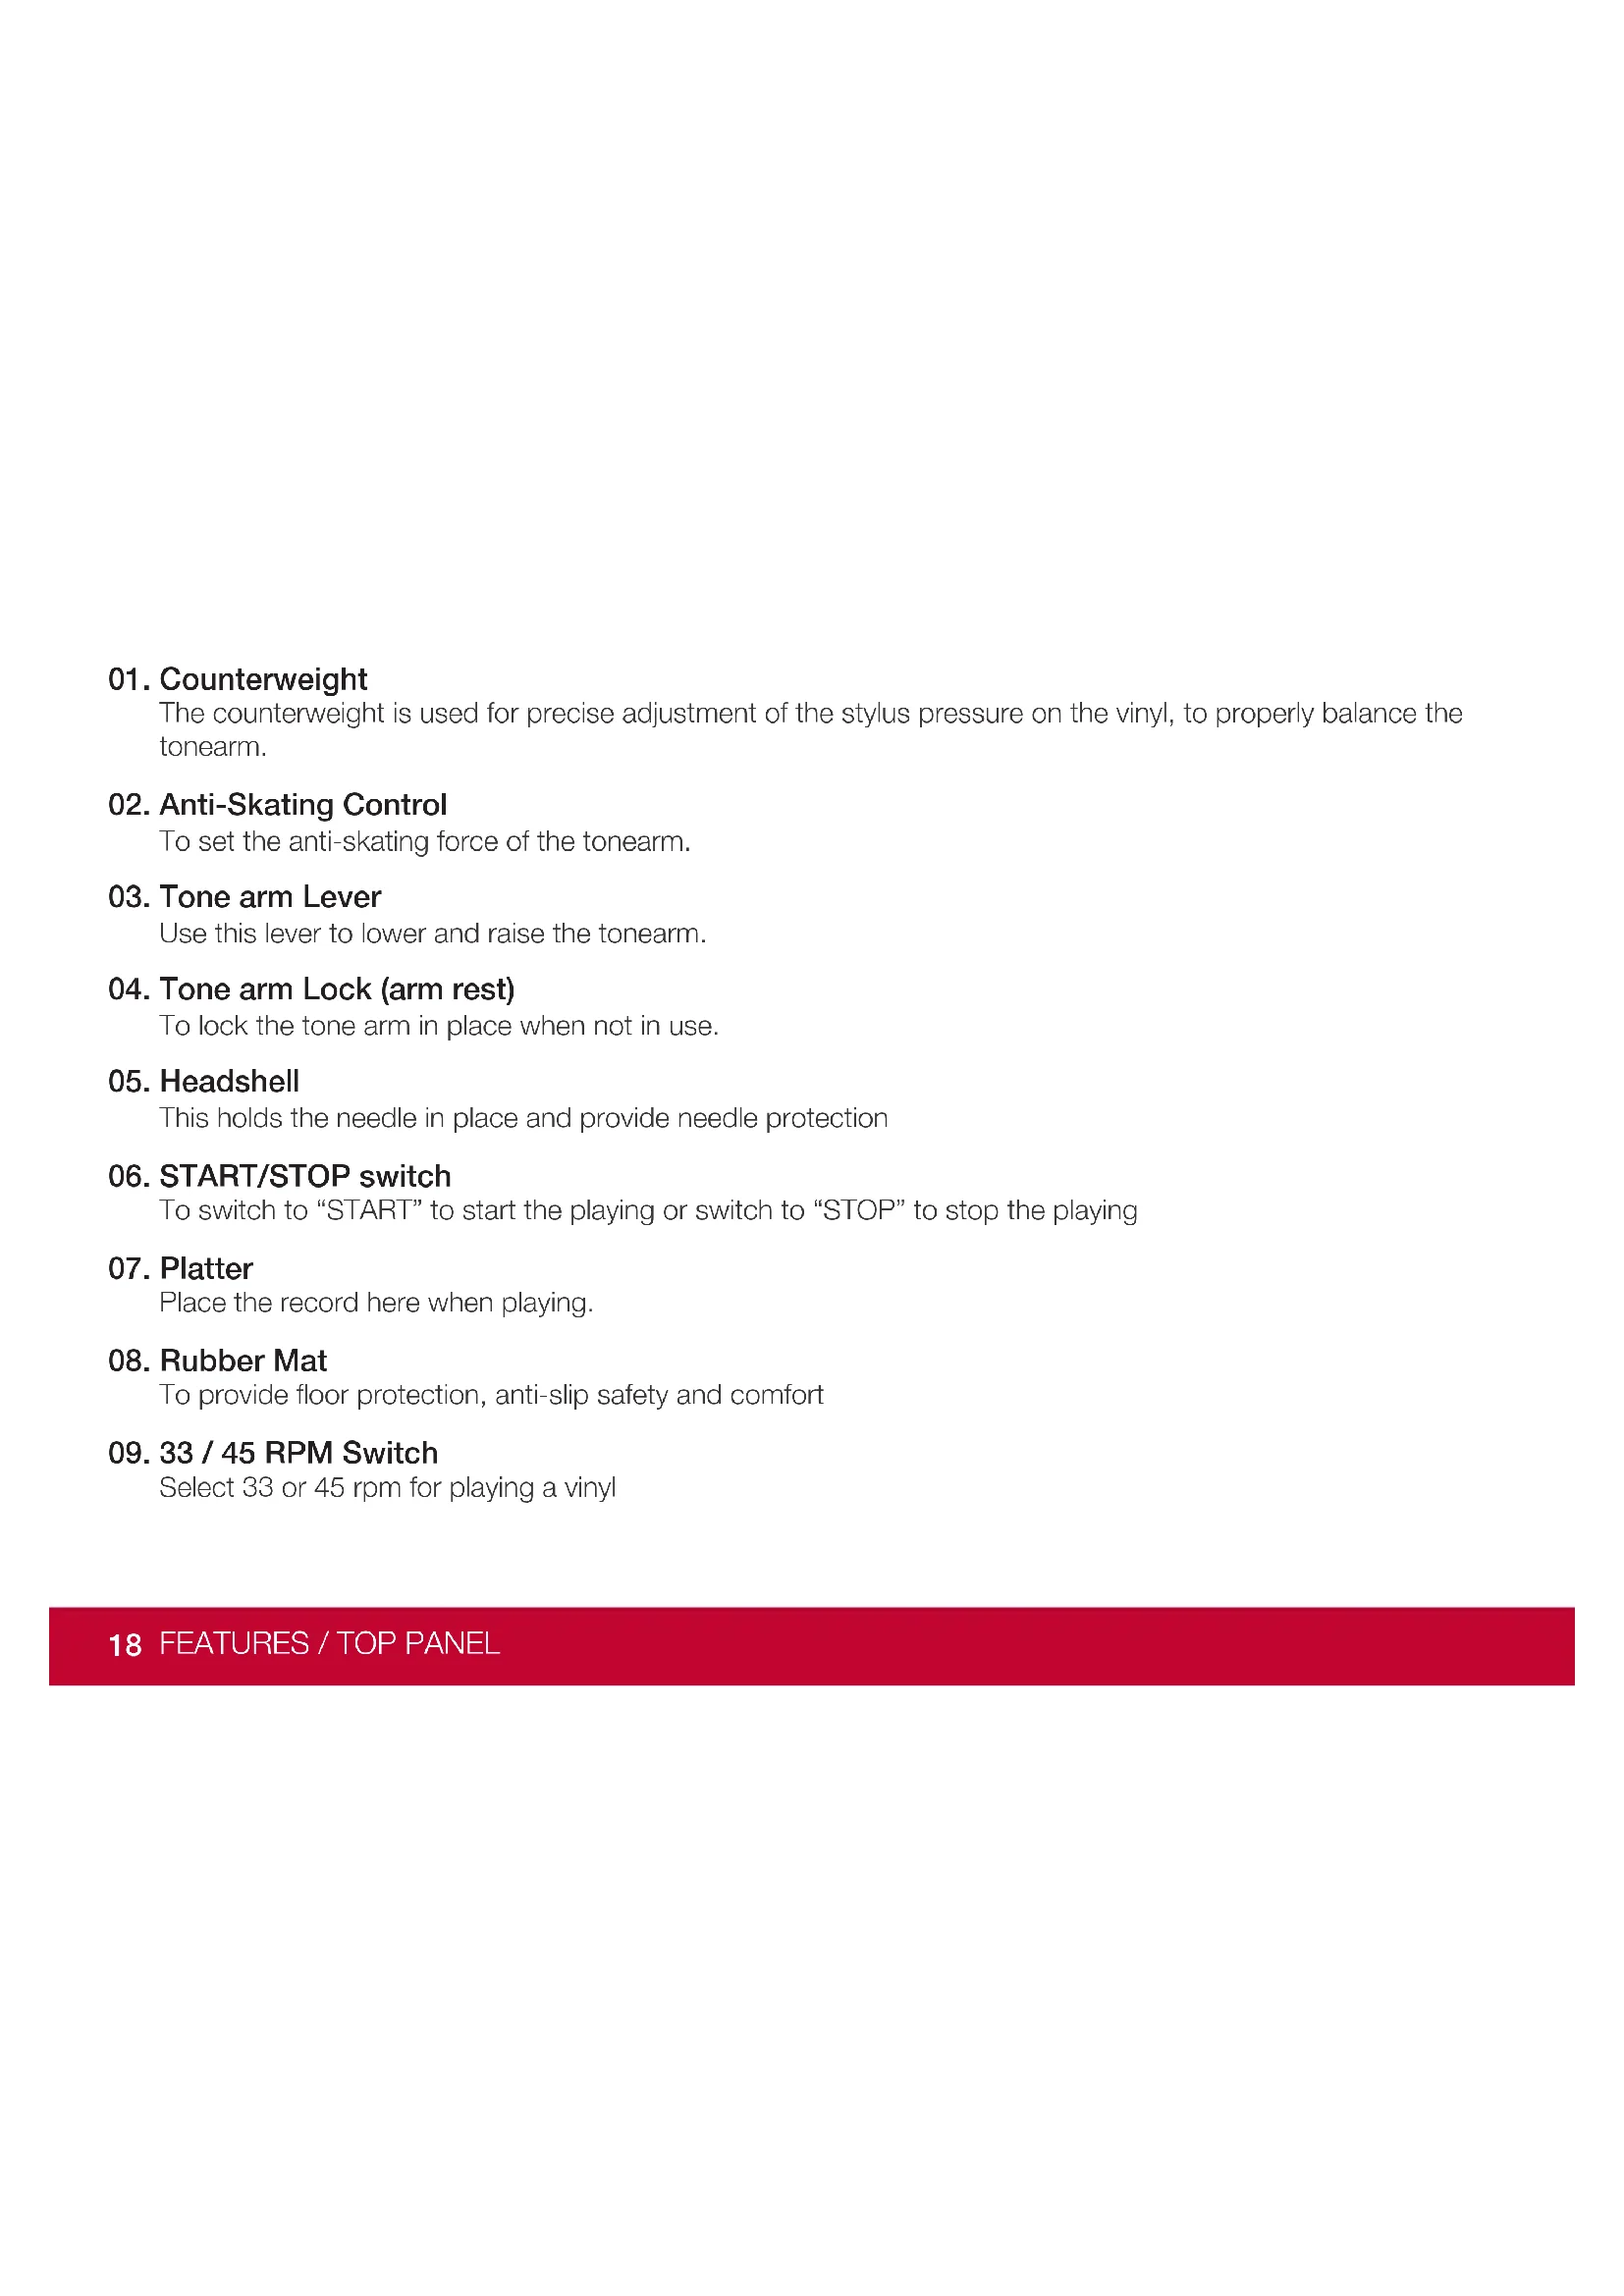
The counterweight is used for precise adjustment of the stylus pressure on the vinyl, to properly balance the tonearm.
02. Anti-Skating Control
To set the anti-skating force of the tonearm.
03. Tone arm Lever
Use this lever to lower and raise the tonearm.
04. Tone arm Lock (arm rest)
To lock the tone arm in place when not in use.
05. Headshell
This holds the needle in place and provide needle protection
06. START/STOP switch
To switch to "START" to start the playing or switch to "STOP" to stop the playing
07. Platter
Place the record here when playing.
08. Rubber Mat
To provide floor protection, anti-slip safety and comfort
09. 33 / 45 RPM Switch
Select 33 or 45 rpm for playing a vinyl
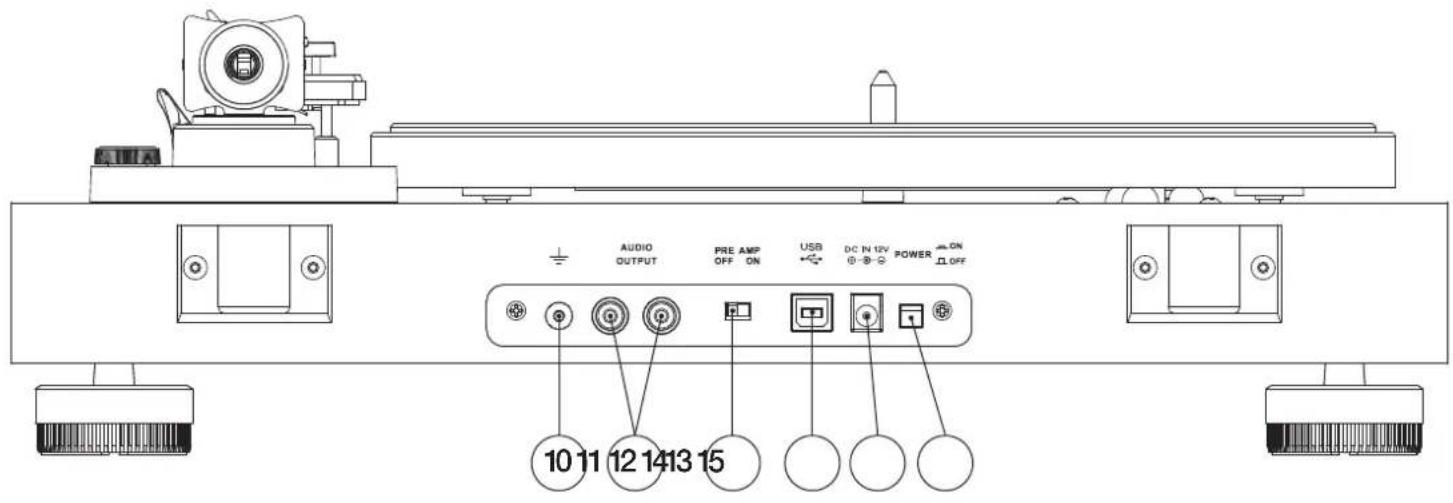
10. Grounding terminal
A direct electrical connection to the earth
11. RCA JACKS selector
Plug in the RCA cable, and connect the cable to the audio amplifier
12. Pre Amp ON/OFF selector
ON: Connect the RCA cable to the LINE-IN terminal of the amplifier.
OFF: to stop the LINE-IN terminal of the amplifier.
13. USB Port
Use the USB cable to connect from your turntable to your computer.
14. Power Supply Jack
To connect the power cable for power supply
15. Power Switch
To turn the unit On/Off
DUST COVER INSTALLATION
- Unwrap the two hinges and the dustcover.
- Note that the hinges have a clamp side and a tab side.
- Note that the dustcover has two spots on its rear edge shaped to accept the clamps.
- Carefully push the clamps onto the dustcover in these locations
- Now snap the two clamps into the areas indicated at the back of the turntable to accept them.
MOUNT AND ADJUST
- Place the aluminum turntable platter over the center spindle. Place your fingers through one of the access holes and grab the rubber belt and stretch it over the motor pulley. Be sure the belt is not twisted.
Spin the platter a few times to be sure the belt runs smoothly. Now place the rubber platter mat on top of the platter so the ribbed sections point upward - Insert the headshell into the tone arm and fix it by turning the collar.
- Insert the counterweight on the end of the tone arm, rotating it until it threads into place.
- Rotate the antiskating knob counterclockwise until it is set to "0". Make sure the gauge is pointing in your direction
- Place the lever for the tone arm lift in the front position so that the lift bank lowers.
- Open the tone arm lock. Seize the handle of the tone arm and move it just outside the edge of the platter so that it can float up and down. Remove the protective cap from the stylus. (Be careful not to hit the stylus against anything.)
- Turn the counterweight until the tone arm floats level. If the tone arm moves up: Turn the counterweight counter-clockwise. If the tone arm moves down: Turn the counterweight clockwise
- Put the tone arm back onto the arm rest and lock it.
-
The counterweight has a rotary ring with a scale. Without turning the counterweight, only turn the ring until the zero "0" aligns with the indicator line.
-
The scale indicates the stylus pressure in grams. The pressure of the cartridge supplied with this turntable is 2.0g, turn the entire counterweight counter-clockwise to "2" and the anti-skating to "2". If a different cartridge is used, adjust the stylus pressure and the antiskating indicated to the corresponding specifications.
MAINS CONNECTION
An external switching power adaptor is supplied with this turntable.
There are the RCA jacks on the rear panel of the turntable. You can use it to connect to your amplifier. You also could switch the selector to "ON" or "OFF", and connect the RCA plug to the "LINE" input of your amplifier.
- Place the record on the turntable. If it is a 45 rpm, you need to place the adaptor on the record spindle.
- Choose the playing speed.
- Release the pick-up arm clip.
- Place the cartridge vertically over the first track of the record the turntable starts turning.
- Lower the cue lever to place the stylus in the groove
- When playback is complete, push the cue lever to lift the tone arm and move it back to the arm rest.
- If you want to pause the playback, switch the knob to "off", and switch it to 33 or 45 to continue the playback.
- After finish the playback, please switch off the power to save energy.
TO REPLACE THE STYLUS
- Put the rest clip on the pick-up arm.
- Remove the protective cap from the stylus.
- Pull the stylus to the lower front and remove it.
- Put in the new stylus following the reverse procedure.
- Replace the protective cap on the stylus.
TO REMOVE THE CARTRIDGE
- Put the rest clip on the pick-up arm.
- Remove the stylus to prevent damage.
- Remove the two cartridge fixing screws.
- Disconnect the four link wires at the back of the cartridge.
TO INSTALL NEW CARTRIDGE
- Connect the four link wires.
- Take care of the receptacle's colors.
• Install the cartridge in the head shell.
• Install the two cartridge fixing screws. - Re-install the stylus.
- Replace the protective cap on the stylus.
IMPORTANT RECOMMENDATIONS
We advise you to clean your records using a rag impregnate with an antistatic product for maximum enjoyment of your records and also to make them last.
We would also point out that for the same reason your stylus should be replaced periodically (approximately every 250 hours). Dust the stylus from time to time using a very soft brush dipped in alcohol (brushing from back to front of the cartridge).
WHEN TRANSPORTING YOUR RECORD PLAYER DO NOT FORGET TO:
Replace the protective cap on the stylus. Disconnect the drive belt by stretching it over the motor pulley, and allow it to wrap back around the inner drive area and then remove the platter by pulling it straight up off the spindle. Put the rest clip into the pick-up arm.
Turntable section
Drive System Belt Drive
Motor DC Motor
Speed 33 1/3 RPM, 45 RPM
Rotation Speed Variation + / - 2%
Wow and Flutter 0.2%
Signal-to-Noise Ratio
67dB or higher (A-weighted, 20kHz LPF)
60dB or higher (unweighted, 20kHz LPF)
Platter Aluminum Die-cast
Diameter of Platter 12", 300mm
Tonearm section Alumi tube
Type Static Balance, Straight
Effective Arm Length 8.8", 223.6mm
Stylus Pressure Range 0 to 4g
Supported Cartridge Weight 3.5 bis 6.0g
Overhang 18.6mm
Anti-skating Adjustment Supported
Cartridge section
Type MM type (Audio-Technica AT-95E)
Stylus Construction Bonded Diamond
Frequency Response 20Hz to 20kHz
Channel Separation >18dB
Channel Balance 2.5dB
Vertical Tracking Angle 20 degrees
Supported Load Impedance 47k ohms
Output Voltage 2.5mV (1kHz, 3.54cm/sec.)
Stylus Pressure 2.0g +/-0.5g
Cartridge Weight 5.7g +/-0.5g
Head-shell Weight 11g (including Screws, Nuts and Wires)
Analog Output
Connector RCA Pin jack (Gold-plated)
Power AC 100 to 240V, 50/60Hz
Power Consumption 1.5W (less than 0.5W at Standby)
Overall Dimensions (W x D x H) 420 x 355x 141mm
Weight Approx. 3.9 kg

bar
| Period | Value | |---|---| | 2018Q1 | 0 | | 2018Q2 | 0 | | 2018Q3 | 0 | | 2018Q4 | 0 | | 2019Q1 | 0 | | 2019Q2 | 0 | | 2019Q3 | 0 | | 2019Q4 | 0 | | 2020Q1 | 0 | | 2020Q2 | 0 | | 2020Q3 | 0 | | 2020Q4 | 0 | | 2021Q1 | 0 | | 2021Q2 | 0 | | 2021Q3 | 0 | | 2021Q4 | 0 | | 2022Q1 | 0 | | 2022Q2 | 0 | | 2022Q3 | 0 | | 2022Q4 | 0 | | 2023Q1 | 0 | | 2023Q2 | 0 | | 2023Q3 | 0 | | 2023Q4 | 0 | | 2024Q1 | 0 | | 2024Q2 | 0 | | 2024Q3 | 0 | | 2024Q4 | 0 | | 2025Q1 | 0 | | 2025Q2 | 0 | | 2025Q3 | 0 | | 2025Q4 | 0 | | 2026Q1 | 0 | | 2026Q2 | 0 | | 2026Q3 | 0 | | 2026Q4 | 0 | | 2027Q1 | 0 | | 2027Q2 | 0 | | 2027Q3 | 0 | | 2027Q4 | 0 | | 2028Q1 | 0 | | 2028Q2 | 0 | | 2028Q3 | 0 | | 2028Q4 | 0 | | 2029Q1 | 0 | | 2029Q2 | 0 | | 2029Q3 | 0 | | 2029Q4 | 0 | | 2030Q1 | 0 | | 2030Q2 | 0 | | 2030Q3 | 0 | | 2030Q4 | 0 | | 2031Q1 | 0 | | 2031Q2 | 0 | | 2031Q3 | 0 | | 2031Q4 | 0 | | 2032Q1 | 0 | | 2032Q2 | 0 | | 2032Q3 | 0 | | 2032Q4 | 0 | | 2033Q1 | 0 | | 2033Q2 | 0 | | 2033Q3 | 0 | | 2033Q4 | 0 | | 2034Q1 | 0 | | 2034Q2 | 0 | | 2034Q3 | 0 | | 2034Q4 | 0 | | 2035Q1 | 0 | | 2035Q2 | 0 | | 2035Q3 | 0 | | 2035Q4 | 0 | | 2036Q1 | 0 | | 2036Q2 | 0 | | 2036Q3 | 0 | | 2036Q4 | 0 | | 2037Q1 | 0 | | 2037Q2 | 0 | | 2037Q3 | 0 | | 2037Q4 | 0 | | 2038Q1 | 0 | | 2038Q2 | 0 | | 2038Q3 | 0 | | 2038Q4 | 0 | | 2039Q1 | 0 | | 2039Q2 | 0 | | 2039Q3 | 0 | | 2039Q4 | 0 | | 2040Q1 | 0 | | 2040Q2 | 0 | | 2040Q3 | 0 | | 2040Q4 | 0 | | Note: The values in the 'Year' column are estimated based on the provided code. The 'Year' values are not explicitly labeled in the image. The 'Year' values are estimated based on the 'Year' values.TD202
BEDIENUNGSANLEITUNG
USER GUIDE
MANUEL D'UTILISATION
Ajustement Anti-skating Permis
Section Cellule
Type MM type (Audio-Technica AT95E)
Dimensions (I x H x P) 420 x 355x 141mm
Poids Approx. 3.9 kg

bar
| Quarter | Value | |---|---| | Q1 | 43PYK | | Q2 | 43PYK | | Q3 | 43PYK | | Q4 | 43PYK |TD202
BEDIENUNGSANLEITUNG
USER GUIDE
MANUEL D'UTILISATION
输出电压 2.5mV (1kHz, 3.54cm/sec.)
针压 2.0g + / - 0.5g
唱头重量 5.7g +/-0.5g
唱头盖重量 11g (including Screws, Nuts and Wires)
Analog 输出部分
连接器 RCA Pin jack (Gold-plated)
电源 AC 100 to 240V, 50/60Hz
功耗 1.5W (less than 0.5W at Standby)
整机尺寸 (W x D x H) 420 x 355x 141mm
重量 Approx. 3.9 kg
温度 本产品最高使用温度为50℃
Thorens GmbH