Bep BP200Z - Vacuum Cleaner Zoef Robot - Free user manual and instructions
Find the device manual for free Bep BP200Z Zoef Robot in PDF.
User questions about Bep BP200Z Zoef Robot
0 question about this device. Answer the ones you know or ask your own.
Ask a new question about this device
Download the instructions for your Vacuum Cleaner in PDF format for free! Find your manual Bep BP200Z - Zoef Robot and take your electronic device back in hand. On this page are published all the documents necessary for the use of your device. Bep BP200Z by Zoef Robot.
USER MANUAL Bep BP200Z Zoef Robot
text_image
ZOEF ROBOTROBOTSTOFZUIGER
Bep
BP200Z
GEBRUIKSAANWIJZING
Inhoudsopgave
natural_image
Icon set showing a person reading a book and an icon with an exclamation mark (no text or symbols)natural_image
Simple line drawing of a toaster connected to a power outlet, with an inset showing the device's internal components (no text or symbols)
text_image
3ft/1m 3ft/2m 6ft/2m √1mnatural_image
Illustration of hands connecting a wall-mounted electrical socket to a plug, with cable being inserted (no text or symbols)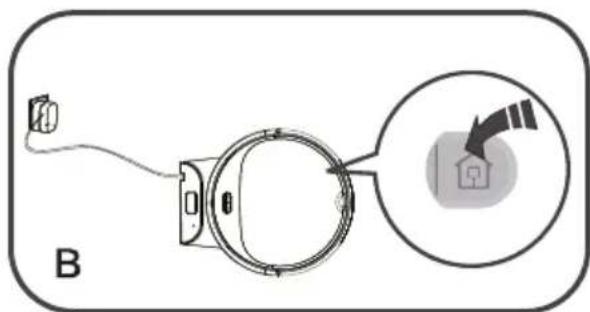
text_image
Btext_image
Diagram showing a spiral and circular object with dimension arrows, labeled with number 1
natural_image
Pure geometric diagram showing a square with internal spiral arrows and dimension lines, no text or symbols present.
natural_image
Illustration of a robotic device with sensor waves and directional arrows, no text or symbols presentnatural_image
Illustration of hands using a tool to adjust or install a component on a base (no text or symbols visible)natural_image
Simple line drawing of a device with a cloud above a component, labeled 'A' (no text or symbols on the diagram itself)
natural_image
Diagram of a robotic car interior with a mechanical component and a curved top part (no text or symbols)natural_image
Line drawing of a compass with an open blade and a rectangular base (no text or symbols)
natural_image
Line drawing of a mechanical device with a central component and a pen-like tool, enclosed in a rounded square frame (no text or symbols)natural_image
Illustration of a hand holding a circular object next to a device with a pen, both without any text or symbols.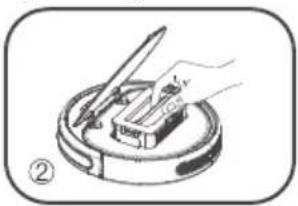
natural_image
Illustration of a hand using a tool to press or install a component on a circular base (no text or symbols)
natural_image
Illustration of an open toolbox with internal compartments, no text or symbols present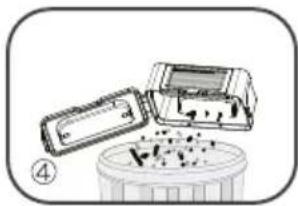
natural_image
Illustration of a device with a lid and a container with contents, no visible text or symbols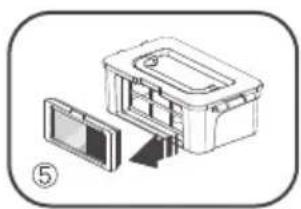
natural_image
Diagram of a device with an open lid and internal components, no text or symbols present
natural_image
Illustration of a mechanical device with a faucet, open box, and partially assembled parts (no text or symbols)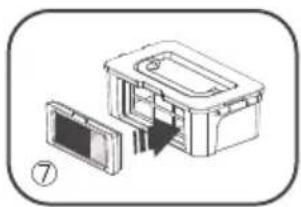
natural_image
Diagram of a device with an open lid and a rectangular housing, no text or symbols presentnatural_image
Technical diagram of a mechanical assembly with two views: top shows internal components, bottom shows a close-up view (no text or labels)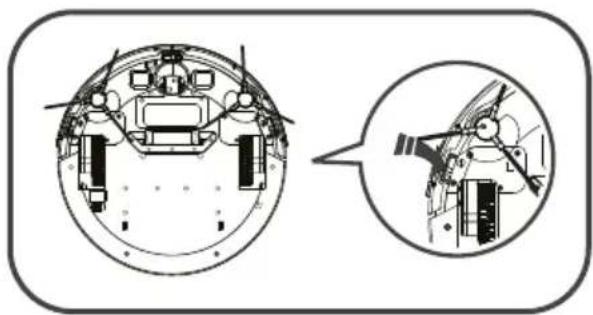
natural_image
Technical diagram of a mechanical assembly with cross-sectional and side views (no text or labels)√
5 Problemen oplossen
1 Safety Description
2 Product Composition
5 Product Operation
9 Product maintenance
10 Common abnormalities
1 Safety Description
Please read the following safety descriptions and follow all these safety prevention. measures before using the product.
natural_image
Icon set showing a person reading and an icon with an exclamation mark, next to an open book (no text or symbols)Please read the Manual carefully.
Please keep the Manual appropriately.
Any operation not conforming to the Manual may cause the product to be damaged.
!
- Only technicians authorized by us can disassemble the product and users are not recommended to disassemble it by themselves.
- This product can only use exclusive power adapters and other adapters may cause damage.
- Please don't touch electric wires, sockets or power adapters when hands are moist.
- Please don't let cloth curtains or any body parts rolled to moving parts of the product.
- Please don't put the product near to cigarette ends, lighters or other open fires.
- Please don't bend electric wires excessively or put heavy or sharp objects on the machine.
- The product is for indoor use only. Please don't use it outdoors.
- Please don't sit on the product.
- Please don't use the product in moist environments like bathrooms.
- Before using the product, please move all fragile objects (such as glass cups, lighting fixtures, etc.) and other objects which are likely to entangle the side brushes and suction channel (such as electric wires, paper scraps and curtains) on the ground.
- Please don't put the product where it is easy to fall off (such as tables and chairs).
- Please turn off the power switch at the bottom of the machine when the product is not used for a long time.
- Carefully check whether the power adapter has been connected well with the socket before using.
- To prevent stumbling, other members in the room should be informed when the product is operating.
- The product may not cross a step which is over 15mm high.
- Service temperature of the product ranges from 0^ C to 40^ C and it should not be used under high temperature.
- The battery must be removed from the appliance before it is scrapped.
- The appliance must be disconnected from the supply mains when removing the battery.
- If the machine has no reaction when it is started, please check whether the switch at the bottom of the machine has been turned on; if there is still no response, it is necessary to move the machine manually to the home base, and try starting it again after it is fully charged.
② Product Composition
2.1 Part Name

text_image
Dust bin/Water Tank Surface case Middle cover Control buttons Bumper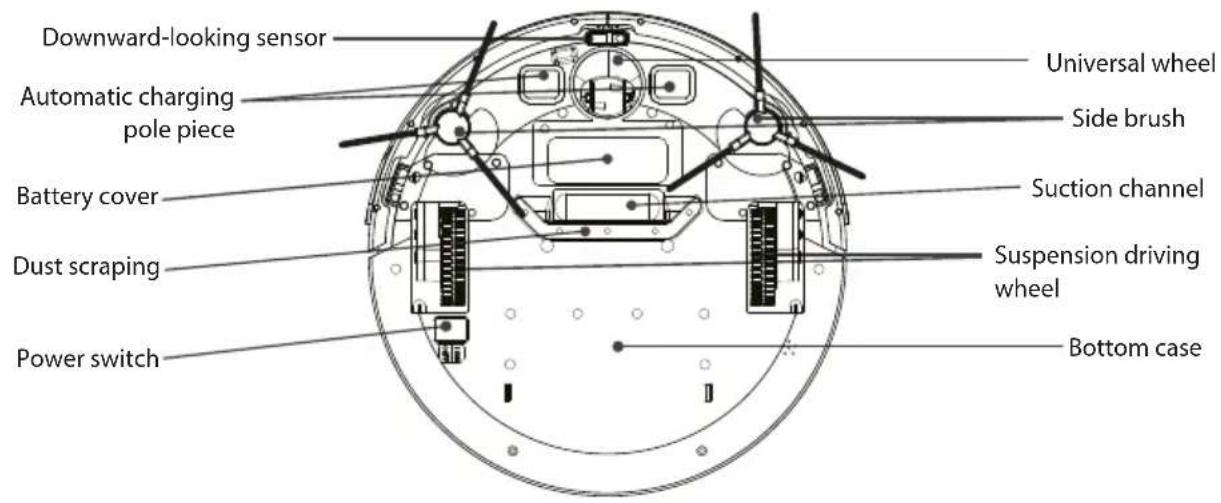
text_image
Downward-looking sensor Automatic charging pole piece Battery cover Dust scraping Power switch Universal wheel Side brush Suction channel Suspension driving wheel Bottom case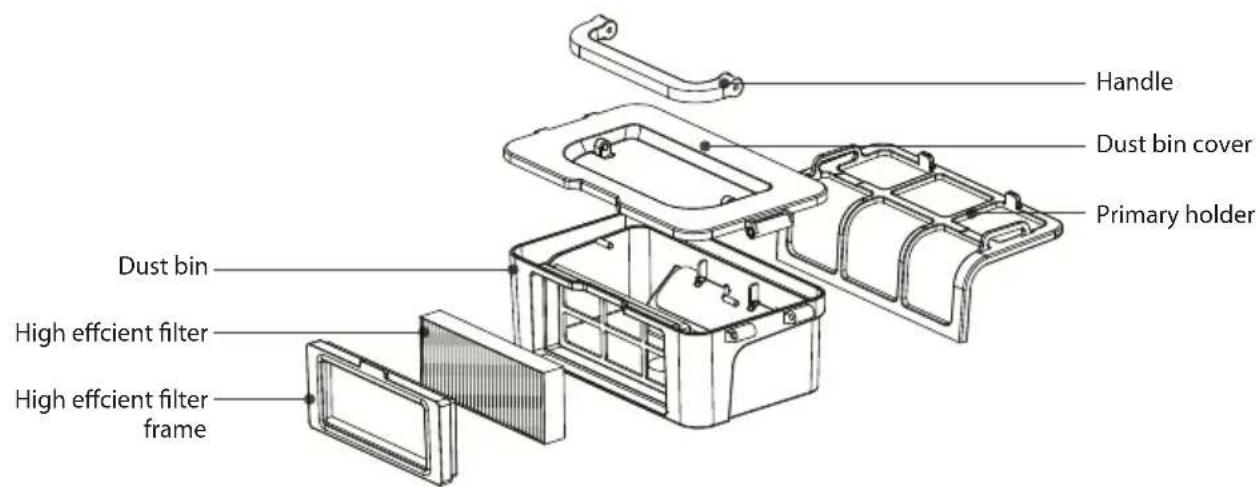
text_image
Handle Dust bin cover Primary holder Dust bin High efficient filter High efficient filter frame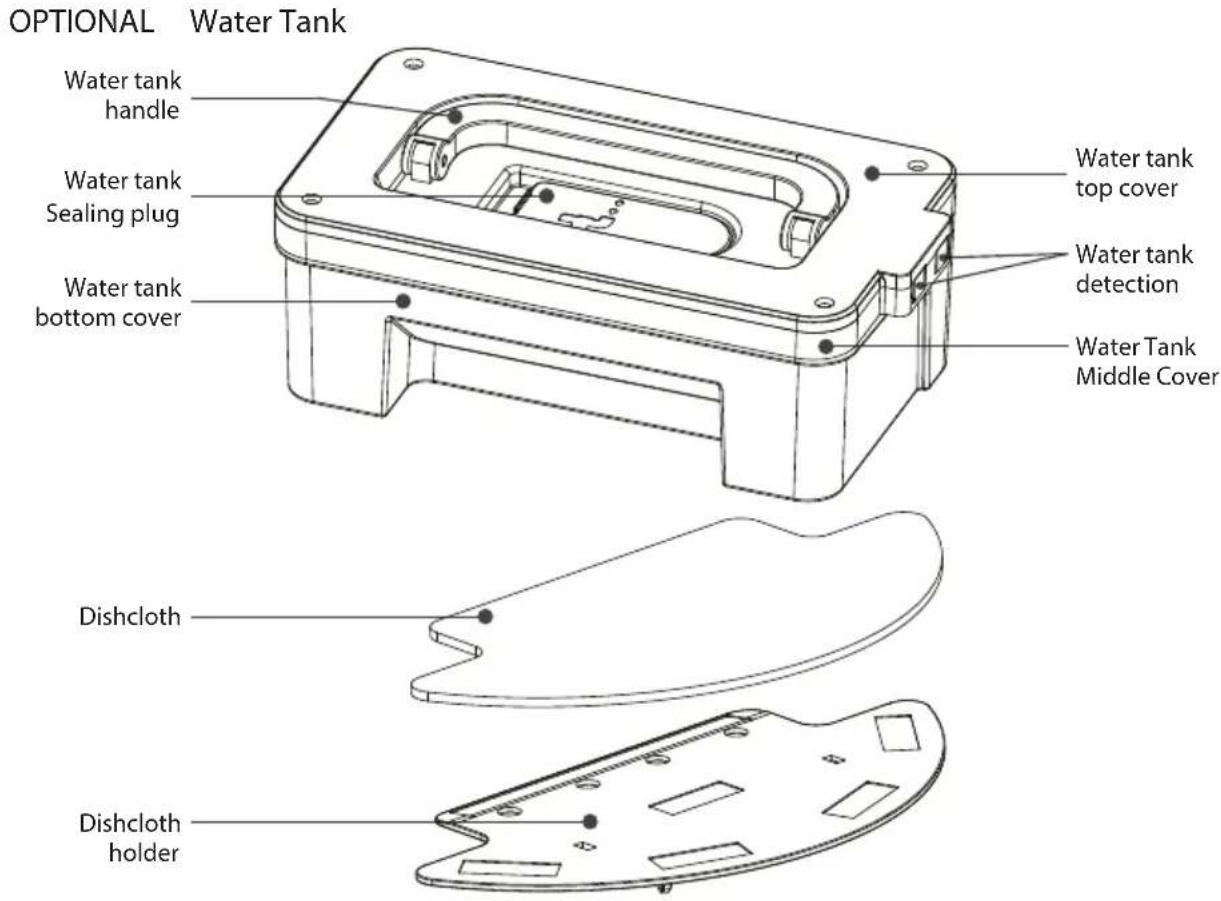
text_image
OPTIONAL Water Tank Water tank handle Water tank Sealing plug Water tank bottom cover Water tank top cover Water tank detection Water Tank Middle Cover Dishcloth Dishcloth holder2.2 Display of charging base and button in the machine Charging Base
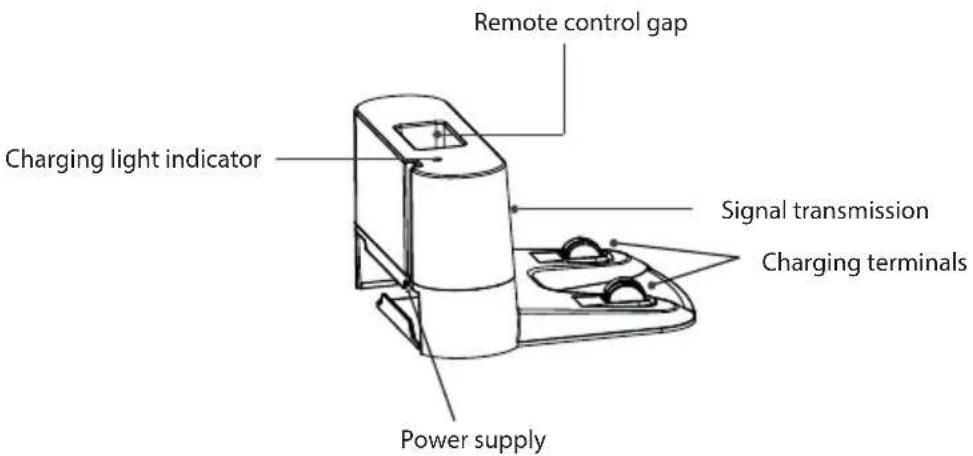
text_image
Remote control gap Charging light indicator Signal transmission Charging terminals Power supply| Button displayMachine status | |
| Charging | Green light breathes |
| Charging finished | Green light normally on |
| Standby mode | Green light normally on |
| At Failure | Red light normally on / flashing |
| Low battery | Orange light normally on |
| Cleaning | Green light normally on |
| Dormancy status | Light not on |
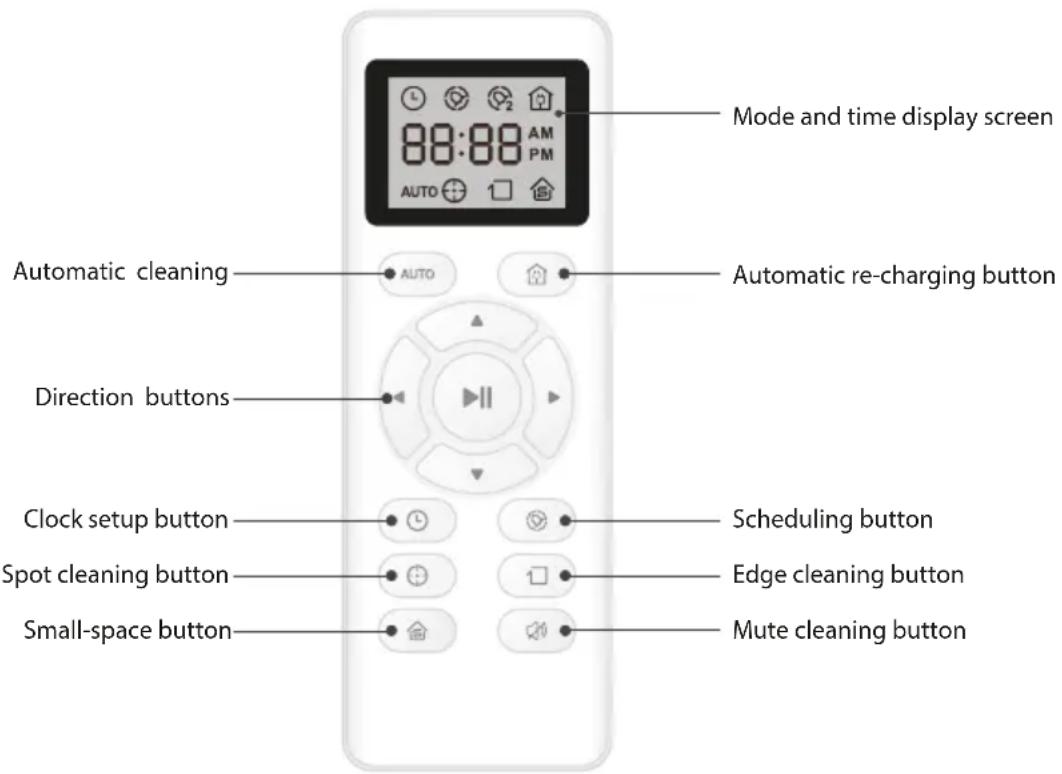
2.3 Remote Control
Detailed operation instructions
text_image
Mode and time display screen 88:88 AM PM AUTO Automatic cleaning AUTO Automatic re-charging button Direction buttons Clock setup button Scheduling button Spot cleaning button Edge cleaning button Small-space button Mute cleaning button
√ Please set two AAA batteries before using.
If the remote control won't be used for a long time, please take the batteries out.
√ The remote control should be aligned with the signal receptor of machine during operation and the effective range is within 5 meters.
3 Product Operation
3.1 Quick start guide
normally on. Put the home base along a wall, and remove all barriers respectively 1m on the left and right and 2m in front of it, as shown below.
natural_image
Diagram of a battery connected to a power outlet, with an inset showing a device inside (no text or symbols)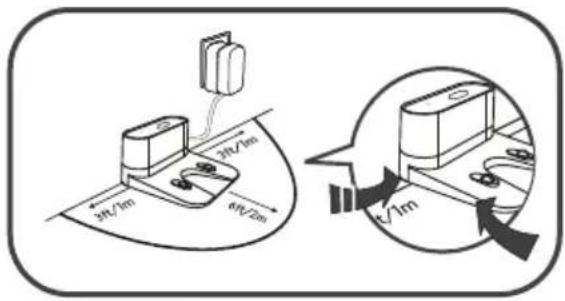
text_image
3ft/1m 3ft/2m 6ft/2m t/1mnormally on.
(If you don't operate the machine within 10 minutes, the machine will enter dormancy mode).
!
√ Please make sure that the power switch has been turned on. Otherwise, the machine will be unable to operate and be charged.
If the machine is red and give alarm sound when being charged. It indicates that the bottom power of machine has not been turned on, thus the machine cannot be normally charged.
√ Please make sure that the power switch is in open state before charging. Otherwise, the machine will be unable to be effectively charged.
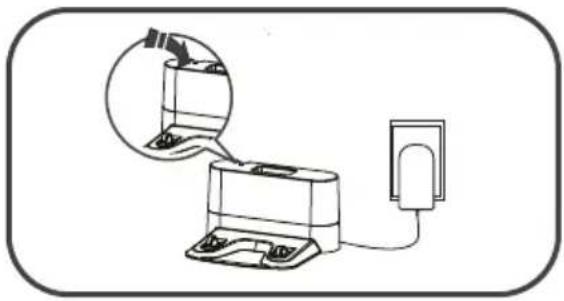
A. Plug the power adapter in the home base and connect the other side with power supply, as shown in Fig: A.
B. Under standby or cleaning status, press automatic re-charging button on the remote control to make the machine go back to the home base for charging, as shown in Fig: B.
C. Under standby or cleaning mode, press the go home button in the machine to enter the go home mode.

natural_image
Illustration of hands connecting a wall-mounted electrical socket to a plug, with cable being inserted (no text or symbols)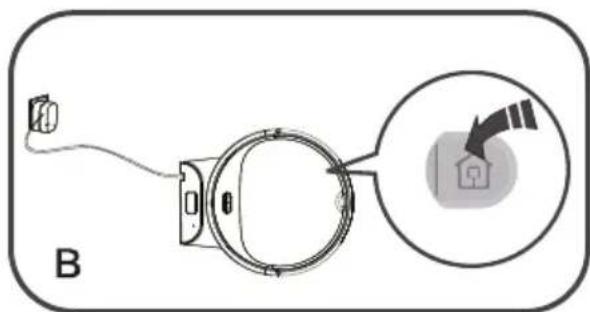
text_image
BTo better prolong life of the battery:
A. The first three times the new battery charge is more than 24 hours.
B. When the machine is normally used, please store the battery on home base and ensure that the home base is connected to power.
C. If the machine won't be used for a long time, please fully charge the machine, turn off the power switch, take the battery out and store it in ventilated and dry places.
When the battery power is too low, the machine can automatically seek home base for charging.
3.2 Power on/standby/dormancy/power off
A. Make sure that the power switch at the bottom of the machine is turned on.
B. Press the ⏻ button in the machine or the AUTO button in the remote control to make the machine work.
A. Press the ⏻ button in the machine to enter this mode when the machine at cleaning mode.
B. Press the ⏻ button in the machine to enter this mode when the machine at standby mode.
A. Long press ⏻ button of machine for 3s.
B. The machine can automatically enter this mode when there is no operation within 10 minutes.
A. Open the power switch at the bottom to O status (O is used for "turn off"; I is used for "turn on"; scheduling state of product is O).
3.3 Scheduling cleaning
A. Press the ⏻ button on the remote control to set the real clock time and press direction buttons to set the specific time.
B. Press the ▶ button to save the setup.
A. Aim the remote control at the machine and press the button to enter scheduling mode.
B. Press the direction of the remote control to set specific cleaning time.
C. Aim the remote control at the machine and press the ▶ button to save time, at this time, the scheduling is successful when the machine makes a prompt tone.
Aim the remote control at the machine and long press the button to cancel the function the scheduling is successfully canceled when the machine rings two times.
√
When setting the scheduling time, point the remote control to the machine, press 🔒 button on the remote control, and there will be a prompt tone to confirm that the receipt is successful. If there is no prompt tone, the setting is invalid.
√ Once the scheduling works, the machine will start to work at the scheduling time. If the power switch at the bottom of the machine is turned off, the scheduling will be reset, you will need to set the scheduling again.
If batteries of the remote control are replaced, please re-set the scheduling time and clock time.
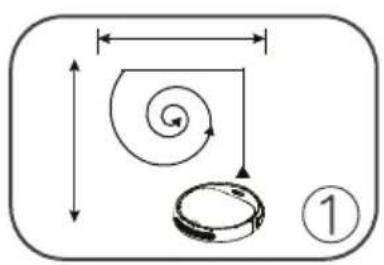
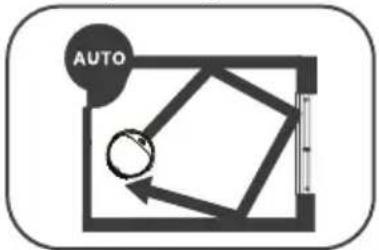
3.4 Cleaning Mode
A. Press ☐ on machine and the AUTOutton on remote control to make the machine enter this mode under standby mode.
B. Press ☐ on machine and the button on remote control to make the machine enter standby mode under this mode.
√ Tips: the machine can automatically clean room in this mode and adjust cleaner path according to various ground environment.
A. Press the ⏻ button on remote control to make the machine enter this mode under standby mode.
B. Press ⏻ on machine and the ▶ button on remote control to make the machine enter standby mode under this mode.
A. Press the □ button on remote control to make the machine enter this mode under standby mode.
B. Press ⏻ button on machine and the ▶ button on remote control to make the machine enter standby mode under this mode.
√ Tips: The machine will automatically enter edge cleaning mode after detecting the edge of objects.
text_image
Diagram showing a spiral and circular object with dimension arrows, labeled with number 1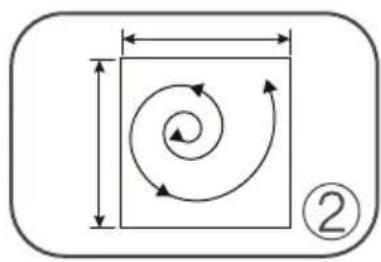
natural_image
Pure geometric diagram showing a square with internal spiral arrows and dimension lines, no text or symbols present.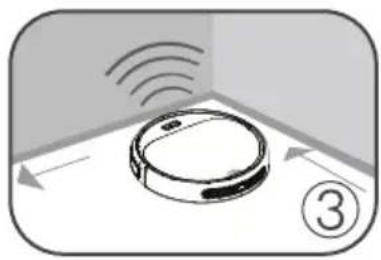
natural_image
Diagram of a robotic device with sensor waves and directional arrows, no text or symbols presentA. Press the ⏻ button on remote control the ⏻ button on machineto make the machine enter this mode under standby mode.
B. Press the ▶ button on remote control or the ⏻ button on machine to make the machine enter standby mode under this mode.
A. Press the 🏠 button on remote control to make the machine enter this mode under standby mode.
B. Press ⏻ on machine and the ▶ button on remote control to make the machine enter standby mode under this mode.
√ Tips: This mode is suitable for short time cleaning of single and small rooms.
3.5 Use of Wet dishcloth
This product is equipped with a wet dishcloth component, if you need mop the floor after Finished cleaning, you can replace dust bin with Wet dishcloth component. Please refer to the maintenance section in this manual for cleaning up.

√ Please do not use the wet dishcloth component on the carpet. Please fold the edge of the carpet to avoid Dirty carpet.
√ Please pay attention to adding water or Cleaning up in time and remove the water tank when adding water.
√ Please moving the wet dishcloth component when changing.
Open the cover and inject the water into the water tank.

natural_image
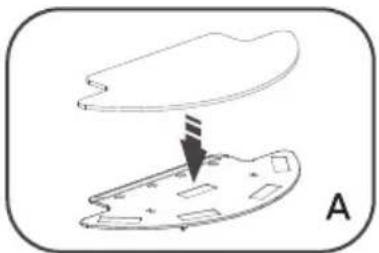
Illustration of hands using a tool to adjust or install a component on a base (no text or symbols visible)A. Past wet dishcloth on holder, as shown in Fig: A
B. Install holder with wet dishcloth to bottom case, as shown in Fig: B
natural_image
Diagram showing a cloud above an irregularly shaped object with a downward arrow, labeled 'A' (no text or symbols on the diagram itself)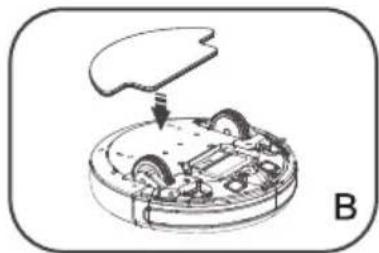
natural_image
Diagram of a robotic device with a handle and internal components, labeled B (no text or symbols on the diagram itself)Replace dust bin with Wet dishcloth component.
natural_image
Line drawing of a compass and a small building on a circular base (no text or symbols)
natural_image
Line drawing of a compass and inkwell on a circular base (no text or symbols)To start any cleaning mode on demand, and then the machine starts mopping the floor.
flowchart
graph TD
    A["Auto"] --> B["Directional Path"]
    B --> C["Next Step"]
    style A fill:#f9f,stroke:#333
    style C fill:#ccf,stroke:#333
4 Product maintenance
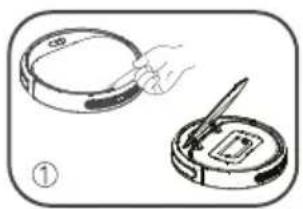
4.1 Cleaning of side brush
Please clean the side brush when it becomes dirty; if the side brush is damaged, please replace it.
4.2 Cleaning of dust bin and filters
Please promptly clean the dust bin and filters after use, as shown below:
!
√ Please check whether there are foreign matters in the suction channel and clean it after taking out the dust bin box.
√ HEPA filter is recommended to be washed with water after it has been used for 15-30 days.
√ Please put the cleaned primary and HEPA filters in ventilated and shady places for drying before using.
√ Primary and HEPA filters are all replaceable accessories.
natural_image
Illustration of a hand using a tool to clean a circular object, with no visible text or symbols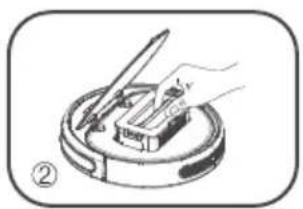
natural_image
Illustration of a hand using a tool to press or install a component on a circular base (no text or symbols)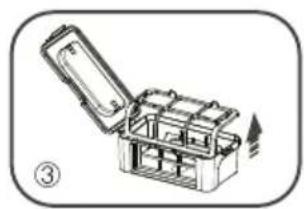
natural_image
Illustration of an open toolbox with internal compartments, no text or symbols present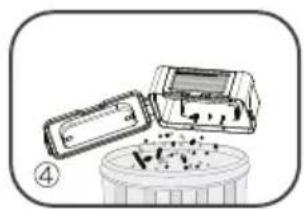
natural_image
Illustration of a battery cell with an open lid and internal components, no text or symbols present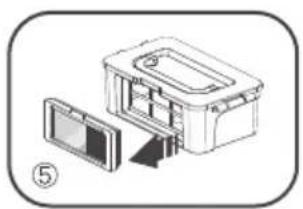
natural_image
Diagram of a device with an open lid and a rectangular housing, no text or symbols present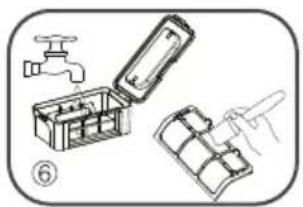
natural_image
Illustration of a mechanical device with a faucet, open box, and folded panel (no text or symbols)
natural_image
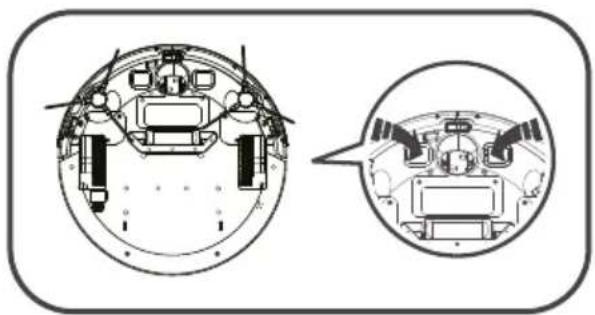
Diagram of a device interior showing a box, panel, and door assembly (no text or labels)4.3 Cleaning of sensors and butting charging pole pieces
Lightly wipe the sensors and butting charging pole pieces with dry cleaning tools or soft cloths,
natural_image
Technical diagram of a spacecraft's internal components, showing top and side views (no text or labels)
natural_image
Technical diagram of a mechanical assembly with two views: top shows internal components, bottom shows exploded view (no text or labels)√
5 Common abnormalities
5.1 Warning code
Any abnormalities occurring during operation should be identified by prompt tone in the machine. The position of abnormality can be found according to the number of "beep" after the indicator light on the main engine becomes red and flashes. Relevant details are listed below:
| Prompt tone | Abnormality reasons Solutions | |
| • | No dust bin or water tank | Please put dust bin or water tank in the machine |
| • • | The collision plate is abnormal | Check if the collision plate is stuck with foreign matters |
| • • • | The cliff sensors are abnormal | The cliff sensors are dirty, please clean them up |
| • • • • | Other abnormalities | Voltage is too low and artificial assistance is needed or the power switch is off while charging |
The position of abnormality can be found according to the number of "beep" after the indicator light on the main engine becomes red and flashes. Relevant details are listed below:
| Prompt tone | Abnormality reasons Solutions | |
| • | The driving wheel is abnormal | Rotate the wheel and check if it gets stuck |
| • • | The side brushes are abnormal | Check if the side brushes get stuck or entangled; please clean the side brushes |
| • • • | The fan is abnormal | Clear the rubbish in the dust bin and clean the rubbish channel |

operation:
- Turn on the power switch at the bottom of the machine and restart;
- If restarting fails to solve the problem, please send the machine to after-sales center for maintenance;

text_image
ZOEF ROBOTRoboterstaubsauger
Bep
BP200Z
GEBRAUCHSANWEISUNG
Inhaltsangabe
text_image
Icon set showing a person reading and an exclamation mark, alongside an open book with an exclamation mark.natural_image
Simple line drawing of a toaster connected to a power outlet, with an inset showing the device's internal components (no text or symbols)
text_image
3ft/1m 3ft/2m 6ft/2m t/1mnatural_image
Illustration of hands connecting a power outlet to a terminal block, with cable being inserted (no text or symbols)
text_image
Btext_image
Diagram showing a spiral and circular object with dimension arrows, labeled with number 1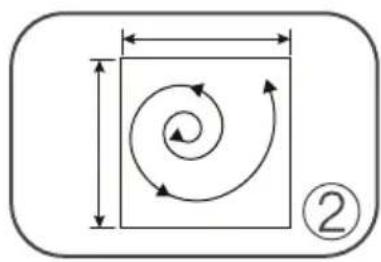
natural_image
Diagram showing a square with an arrow indicating rotational motion, enclosed in a rounded rectangle with dimension lines (no text or symbols)
natural_image
Diagram of a robotic device positioned at the bottom of a corner, with no visible text or symbols.natural_image
Illustration of hands using a tool to adjust or install a component (no text or symbols visible)natural_image
Diagram showing a device with a cloud above a component, labeled 'A' (no text or symbols on the diagram itself)
natural_image
Diagram of a mechanical device with internal components and a downward arrow, labeled B (no text or symbols present)natural_image
Illustration of a compass and inkwell on a circular base (no text or symbols)
natural_image
Illustration of a quill pen resting on a circular base with a small object inside (no text or symbols)natural_image
Illustration of a hand holding a circular object next to a circular device with a pen inserted (no text or symbols)
natural_image
Illustration of a hand using a tool to press or install a component on a circular base (no text or symbols)
natural_image
Illustration of an open toolbox with internal compartments and a handle, no text or symbols present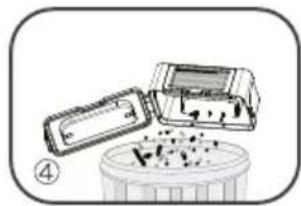
natural_image
Illustration of a device with a lid and a container filled with granular material (no text or symbols)
natural_image
Diagram of a device with an open lid and internal components, no text or symbols present
natural_image
Illustration of a mechanical assembly with a faucet, open toolbox, and partially assembled parts (no text or symbols)
natural_image
Diagram of a device with an open lid and internal components, no text or symbols presentnatural_image
Technical diagram of a mechanical assembly with two views: top shows internal components, bottom shows interior components (no text or labels)
natural_image
Technical diagram of a mechanical assembly with cross-sectional and side views (no text or labels)
5 Fehlerbehebung
5.1 Warnsignale
natural_image
Icon set showing a person reading a book and an icon with an exclamation mark (no text or symbols)natural_image
Simple line drawing of a toaster connected to a power outlet, with an inset showing the device's internal components (no text or symbols)
text_image
3ft/1m 3ft/2m 6ft/2m √1mnatural_image
Illustration of hands connecting a power outlet to a terminal block, with cable being inserted (no text or symbols)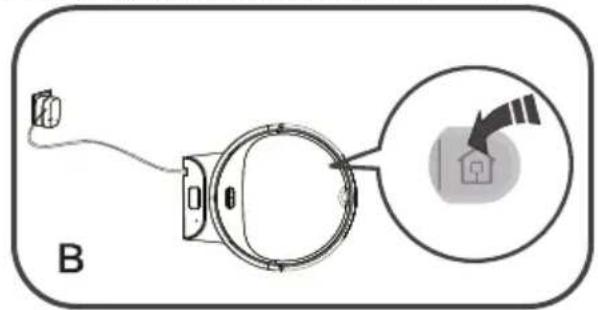
text_image
Btext_image
Diagram showing a spiral and circular object with dimension arrows, labeled with number 1
natural_image
Diagram showing a square with an arrow indicating rotational motion, enclosed in a rounded rectangle with dimension lines (no text or symbols)
natural_image
Illustration of a robotic device with sensor waves and directional arrows, no text or symbols presentnatural_image
Illustration of hands using a tool to adjust or install a component (no text or symbols visible)natural_image
Diagram showing a device with a cloud above a component, labeled 'A' (no text or symbols on the diagram itself)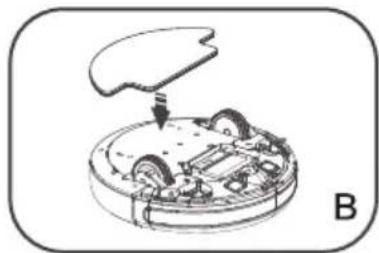
natural_image
Diagram of a mechanical device with internal components and a labeled section B (no text or symbols present)natural_image
Illustration of a compass and inkwell on a circular base (no text or symbols)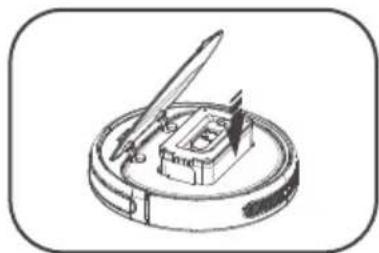
natural_image
Illustration of a quill pen resting on a circular base with a small object inside (no text or symbols)natural_image
Illustration of a hand holding a circular object next to a circular device with a pen inserted (no text or symbols)
natural_image
Illustration of a hand using a tool to press or install a component on a circular base (no text or symbols)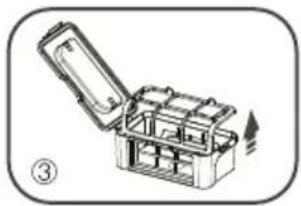
natural_image
Illustration of an open toolbox with internal compartments and a handle, no text or symbols present
natural_image
Illustration of a device with a lid and a container filled with granular material (no text or symbols)
natural_image
Diagram of a device with an open lid and internal components, no text or symbols present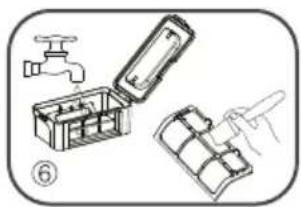
natural_image
Illustration of a mechanical assembly with a faucet, open toolbox, and partially assembled parts (no text or symbols)
natural_image
Diagram of a device with an open lid and internal components, no text or symbols presentnatural_image
Technical diagram of a mechanical assembly with two views: top shows internal components, bottom shows interior components (no text or labels)
natural_image
Technical diagram of a mechanical assembly with cross-sectional and side views (no text or labels)