Harm MR40Z - Lawn mower Zoef Robot - Free user manual and instructions
Find the device manual for free Harm MR40Z Zoef Robot in PDF.

| Product type | Robotic lawn mower |
| Brand | Zoef Robot |
| Model | Harm MR40Z |
| Battery voltage | 28 V |
| Battery capacity | 4 Ah (Lithium) |
| Adapter power supply | 100-240 V AC |
| Cutting width | 24 cm |
| Adjustable cutting height | Yes (by knob, approx. 20-60 mm) |
| Cutting type | Mulching (3 blades) |
| Max mowing area | 1000 m² |
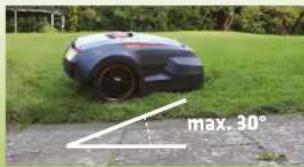
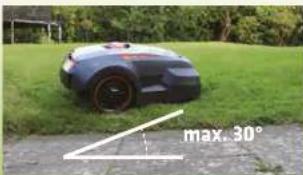
| Max slope | 30° |
| Moving speed | 0.5 m/s |
| Noise level | 65 dB(A) |
| Built-in sensors | Obstacle, rain, lift, tilt |
| Automatic return to charging station | Yes |
| Programming | Mowing cycle every 2 days |
| Anti-theft protection | Removable safety key |
| Perimeter wire length | 100 m |
| Recommended maintenance | Regular cleaning, blade inspection |
Frequently Asked Questions - Harm MR40Z Zoef Robot
User questions about Harm MR40Z Zoef Robot
0 question about this device. Answer the ones you know or ask your own.
Ask a new question about this device
Download the instructions for your Lawn mower in PDF format for free! Find your manual Harm MR40Z - Zoef Robot and take your electronic device back in hand. On this page are published all the documents necessary for the use of your device. Harm MR40Z by Zoef Robot.
USER MANUAL Harm MR40Z Zoef Robot
Guaranteed sound power level 65 dB(A).
WEGGOOEN
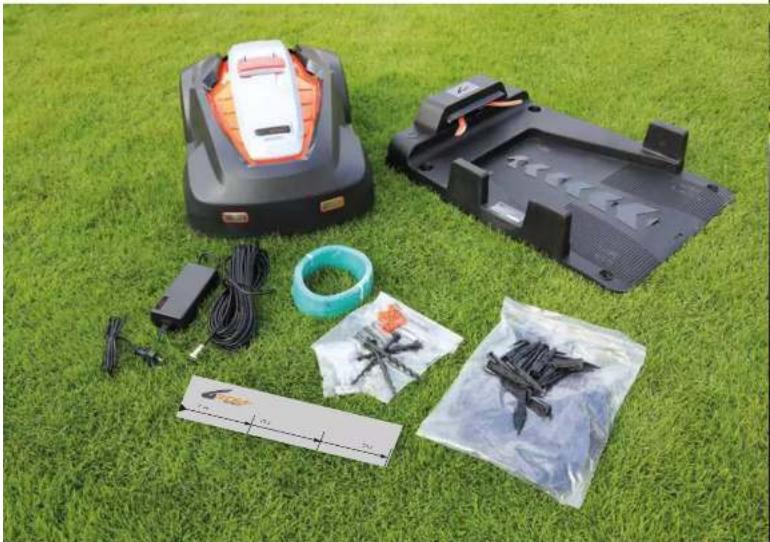
- Docking station
- Robot mower
3.2 security keys - 3 extra sets of blades including bolts
5.1 power adaptor
6.4 security pegs for docking station - 100 pegs for wiring
8.100 m wire
9.2 scale cartons - 4 wire joints
- Manual
Introduction and safety. 4
Safety instructions 5
Planning 6-7
Installation. 8
Charging and Testing. 9
Setting and start. 10-11
Sensors 12
Maintenance and Winter Storage. 13
Trouble Shooting. 14-15
Technical Specifications 16
Certification. 16
Warranty. 16

MANUAL·MR40Z

MANUAL·MR40Z
Introduction and safety
Introduction
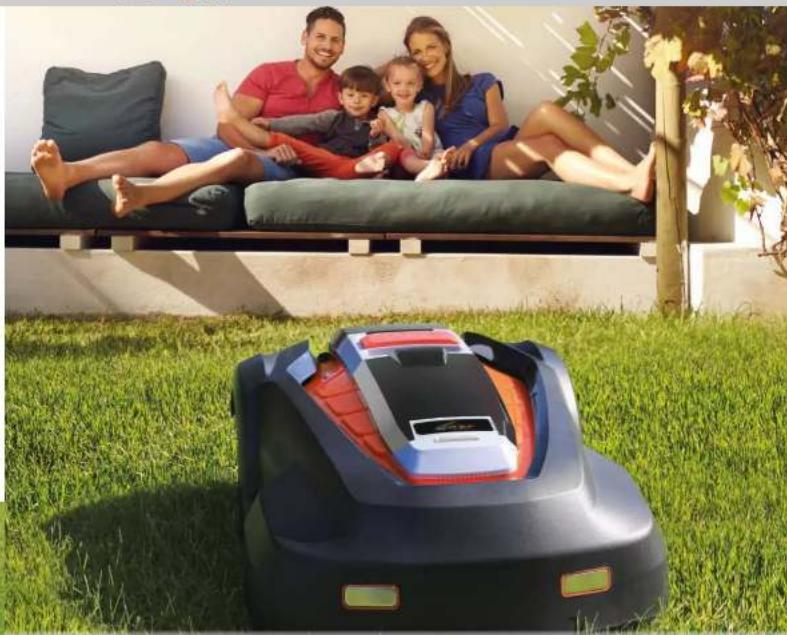
Congratulations on your choice for a Zoef Robot with exceptional
high-quality product. This battery powered mower using a micro computer, timer
and sensors to achieve autonomous and unattended operation within a defined garden area.
Mainly intended for household lawn mowing and maintenance.
To get the best results from your Harm robot mower requires knowlegde of
its function. This operator's manual contains important information about
the mower, how it should be installed and how to use it... If any doubt, you can seek for further information on our website: www.zoeefrobot.nl
Symbols on MR40Z
These symbols can be found on the lawn mower. Study them carefully so
that you understand their significance.

Read through the Operator's Manual carefully and understand the content before using your robot

The warnings and safety precautions in this Onderstors Manual must be carefully followed if the mover is to be used safely and efficiently.

Harm can only start when the anti-theft KEYIs correctly plugged in.
inspection and maintenance must be carried out with power switch turned to OFF.

Objects may be thrown from mower while operating, keep a safe distance from the machine when operating, take caution.
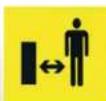
Keep children, pots and bystanders away from motor when operating.
Keep your hands and feet away from the rotating blades.
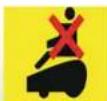
Dor not ride on harm
Safety instructions
Read the Operator's Manual carefully before use. Keep it well for future reference.
Training
a. Read the instructions carefully Be familiar with the controls and the proper use of the machine.
b. Never allow people unfamiliar with these instructions or children to use the machine. Local regulations may restrict the age of the operator.
c. The operator or user is responsible for accidents or hazards occurring to other people or their property.
Preparation
a. The charging adapter is designated for indoor use only. Please always keep it clean, ventilated and away from moisture.
b. Ensure the correct installation of the boundary wiring as instructed.
c. Inspect regularly the area where the machine is to be used and remove all stones, sticks, wires, bones and other foreign objects.
d. Check regularly that the blades, blade bolts and cutter assembly are not worn or damaged. Replace worn or damaged blades and bolts in sets to maintain correct balance.
Operation
a. Do not put hands or feet near or under rotating parts.
b. Never pick up or carry a machine while the motor is running.
c. Turn off the power button (0):
NB: Do not leave the machine to operate unattended if you know that there are pets, children or people in the vicinity.
Maintenance and storage
a. It is strictly prohibited to flush water at the bottom of the robot. The bottom shall be cleaned with a brush/ cloth
b. Keep all nuts, bolts and screws tight to be sure, the machine is in safe working conditions
c. Replace worn or damaged parts for safety
d. Ensure that only authorized parts are used when replacing knives and bolts.
e. Ensure that batteries are only charged using the correct charger/adapter for recommended by the manufacturer. Incorrect use may result in electric shock, overheating or leakage of corrosive liquid from the battery.
f. In the event of leakage of electrolyte, flush with water or neutralizing agent and seek medical help if it comes into contact with the eyes, etc.
g. Servicing of the machine should be according to manufacturer's instructions
See also page 13: Maintenance and Winter Storage.

MANUAL·MR40Z
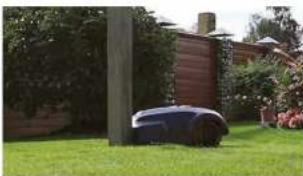
Planning
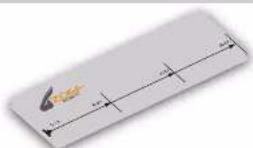
Sketch of the working area:
In order to make the robot mov within the desired area - and only that area - you need to mark the area by means of boundary wriling
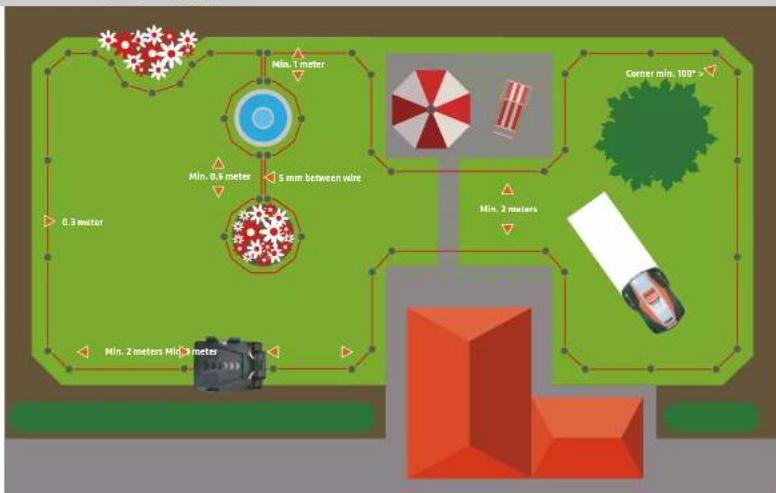
Before you start, it is important to make a sketch of the robot's working area and the "obstacles" it should walk around, which, therefore, should also be marked with boundary wire. The boundary wire should be laid so that there will never be more than maximum 15 meters from the robot mower to the boundary wire.
In case your neighbour also has a robot mover it is important that you install your boundary wire and docking station minimum 2 meters from your neighbour's boundary wire. In case the distance between your and your neighbour's boundary wire is less than 2 meters, please contact your zoof Robot service centre for further advice
To avoid future problems, you should follow your sketch carefully to lay the boundary wire correctly.
Positioning of the docking station:
Start by placing the docking station on your sketch within a reasonable distance to your outdoor switch as the power cable of the docking station is 10m
The docking station must be placed on a solid, flat surface.
Avoid planning the docking station:
mower may be damaged by puddles.
Note: It is important that the adaptor and the electrical plug are always kept dry!
You must allow 2 m free space without obstacles in front of the docking station to ensure that the machine can return to the station without problems. A free space of 1 m is required before the docking station.
Rules for laying the boundary wire:
without breaks or crossings. 100 m cable is included.
100 pogs are included
mimum 100 (please see drawing).
derlin of the lawn. 10~cm is required if the adjacent surface is in the same level (f inst, tilcs). 20~cm in case of a firm edge and 10~cm in case of a soft edge, f inst. towards bushes and other vegetation where the robot mowver may get stuck.
boundary wire if you do not want your robot to move within this area. The ingoing and outgoing cable must be maximum 5 mm from each other.


MANUAL·MR40Z
move them. If, however, the stone has a sloping surface, which the robot may accidentally climb, you should move or completely remove the stone from the working area.
to protect the trees. If there are no visible roots no boundary wire is necessary.
the bronchus so that they do not hinder the free running of the mower. At the same time these branches may cause the activation of the rain sensor if rain drops from the branches hit the machine. In that case, the machine will return to the dock station even in dry weather.
if you will avoid it, you only need 10 cm between the boundary wire and the driveway. If, however, your driveway is covered with gravel or similar the robot mower cannot pass over it. In this case you need a distance of 30 cm between the boundary wire and the driveway.
If the surface gets steeper the robot has a sensor that will make it stop. If the surface is sloping downwards more than 25^ towards the boundary wire, the robot may slide out of the working area in case of wet grass. Therefore, we recommend that the
boundary wire is laid up to 40cm from the borderline in such sloping terrain.

MANUAL·MR40Z

MANUAL·MR40Z
Installation
Prepare the materials:
Prepare the lawn:
The grass should not be higher than 60 mm when pegging the boundary wire. If it is higher, it is recommended to mow the lawn with an ordinary lawn mower first. Then the wire can be laid as close as possible to the ground, which will prevent the robot mower from cutting the cable and people from stumbling over it. After a short while, the cable will disappear into the turf.
Lay the boundary wire:
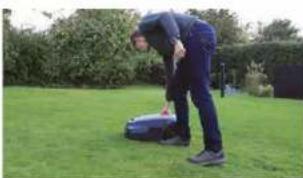
Place the robot's docking station as indicated on your sketch (sidewise) and insert the start peg. Take care that you reserve 0.5 m extra cable to be used for the final installation of the docking station.
Lay your wiring loosely round the working area in the garden according to your sketch. Then you can easily adjust it as you proceed.
Now you can start inserting the pegs. Use your scale cartons to keep the desired distance to the edge (10 - 30 cm depending on the nature of the edge as described under 'Planning'). The distance between the pegs must be max 1 m. We recommend that the pegs are placed closer to each other in the corners, which shall always be more than 100".
If there are areas in your lawn where you do not want your robot to know, you encircle the area with boundary wire as indicated on page 7.
Note: max. 5 mm between in- and outgoing boundary wires (see drawing page 7).
Insert you final peg when you are back at the docking station
In case the included 100 m wire is not sufficient, you can buy more wire. Use the included wire joints for assembly. You do not need to strip the wire ends for the assembly.
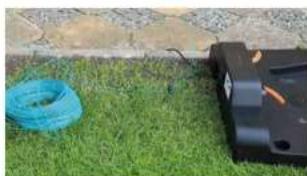
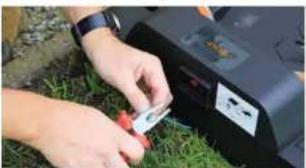
Connect the boundary wire to the docking station:
Cut the end of the wire to a length appropriate to reach the clamps (too much extra wire may cause signal problems). Strip the two ends of the wire.
When you connect the wire to the docking station there is an IN-wire and an DUT-wire as indicated. The IN-wire is threaded through the wreholder under the docking station and must be connected to the red clamp on the left side of wreholder, whereas the DUT-wire must be connected to the black clamp above the wreholder.
You can now fix the docking station to the ground by screwing the 4 safety plugs from the box into the ground.


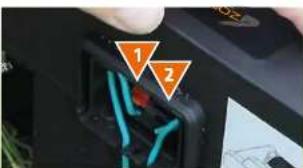
- IN (red) from under the docking station (end of wire).
- OUT (block) to the law (start of wire)
After connecting IN and OUT wire, put the protecting cover on.
Charging and Testing
Charging the robot mower:
First:
Place the robot mover in the docking station for charging, even if the robot has been pre-charged at the factory.
Testing the charging adapter:
supply, the LED indicator on the adapter shows a constant green light. When the machine is charging, the LED indicator turns into a constant red light until the robot is fully charged.
Note: Sometimes the LED on the robot shows fully charged (constant green light) while the LED indicator on the charging adapter still shows a constant red light. This is normal.
ken because of water intrusion
Testing the docking station:
outlet and the LED indicator on the clocking station is turned on. Turn on the power Power button and the LED indicator flashes green every 0.5 second (factor).
When the robot is fully charged, the indicator shows a constant green light (1).
Note: the robot LED indicator still keeps flashing after a long-time charging (more than 3 hours), generally there is a
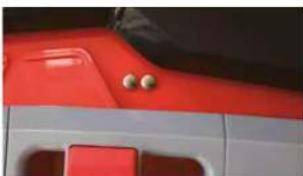
poor charging contact. It's time to clean charging tentacles and the 2 copper sheets of the robot. We suggest you clean these charging parts regularly with steel wool or fine emery paper.
beeping. After 30 seconds, the buzzer stops beeping, but the LED indicator still flashes green. This is a way of tracking if there is a break on the boundary wire.
and the LED indicator now shows a constant green light again (2).
Important: The adapter must always be stored in a dry place.
The "I" arrow on docking the docking station points towards the working area.

MANUAL·MR40Z

MANUAL·MR40Z
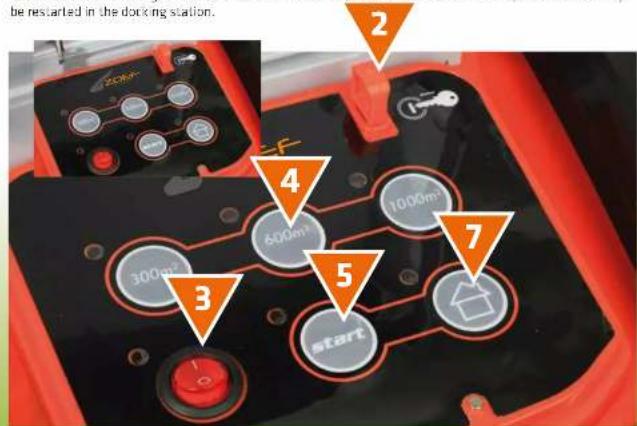
Setting and start
Please remove all foreign objects like: roots, stones, branches, toys etc. from the lawn.
Setting:
After installation and charging, you are now ready to do the setting
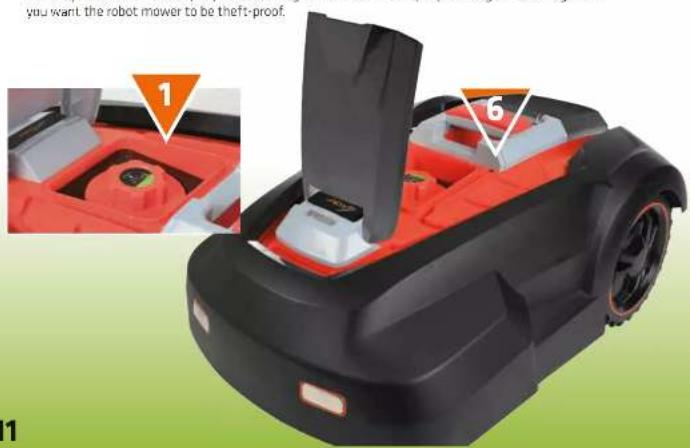
1. Adjust the cutting height by turning the dial (1)
Notice the numbers on dial and stop at your desired height.
2. Insert the security key (2).
Notice the shape of the security key and make sure you insert it correctly.
Note: without the key, all buttons on control panel are inoperable except the power switch. So any
time you want to manually operate the panel don't forget to insert the security key.
3. Press the power switch on "I" to turn on the robot (3)
Before going further, it's better to wait 1-9 seconds so that all electronic parts have been powered up.
4. Choose size of your lawn (4)
300 m 24h running time, every 2 days, charging time included.
600 m 8h running time, every 2 days, charging time included.
1000 m 12h running time, every 2 days, charging time included.
5. Press Start (5)
The timer counts from the moment you press the START button, then cutting will repeat in 48h intervals.
which means the robot will go out cutting at the same moment every other day (every 2 days).
You may remove the security key after starting to avoid that other people change the setting, and if
Start
The robot is now ready to move.
Note! If the grass is higher than 50mm we recommend that you first move it with a traditional lawn mower - or with the robot mower set in its highest cutting position.
Automatic mowing:
After choosing the size of your lawn as indicated above, you press the START button. The robot mowers will start by cutting alongside the boundary wire. The second time the robot leaves the docking station, it will move randomly in straight lines until there is 20% left of the battery, where after it returns to the docking station for recharging. After 1 hour's recharging, the robot continues cutting periodically until it has worked the total number of hours corresponding to the chosen size of lawn. Then it returns to the docking station.
Other buttons:
STOP-button (6):
You ran stop the robot motor at any time by pressing the emergency STOP button.
Note: Emergency STOP button will not interrupt your Initial setting.
Restart on the lawn after pressing STOP button must take place in maximum 2 meters distance from boundary wire with security key inserted.
HOME-button (7):
While cutting, you may activate the "HOME" button and the robot mower will return to the docking station.
NB:The HOME button will not interrupt your initial setting.
START/RESTART-button:
Restart must take place with security key inserted at a max. 2 meters distance to boundary wire.
Choose the Same Area button as your initial setting and then press the START button. Once you restart the robot motor inside the docking station, a new time cycle will begin.
NB: In case there is no light on the indicator of the power, the machine has run out of power and can only
be restarted in the docking station.

MANUAL·MR40Z

MANUAL·MR40Z
Sensors
Obstacle/contact sensor:
When the robot moves meets an obstacle, it will reverse and change direction to avoid the obstacle. If it does not find a new way within 3 seconds, the cutting motor stops. If it does not find a new way within 10 seconds, the robot will shut down and it will require a manual restart to get it running again.
Rain sensor:
In case of heavy rain, the robot will automatically return to the docking station and restart cutting when the next working cycle begins. Raindrops from overhanging branches may activate the rain sensor, in which case the robot will return to the docking station.
Lift sensor:
This sensor is placed close to the wheels and measures the gravity of the wheels.
If the robot is filled manually or if both wheels are run into a hole, the robot will shut down and must be restarted manually. Restart on the lawn can only take place if you move the machine so that it has a maximum distance of 2 meters to the boundary wire and press "Same Area" button and "START". The working cycle will not be changed.
Tilt sensor:
A 6 axle sensor is integrated in the robot mover to measure the tilt angle in all directions. If the tilt angle exceeds 30o, the cutting motor will stop immediately, but continue driving. If the angle decreases within 10 seconds, the cutting motor will restart automatically. If, however, the angle does not decrease within 10 seconds, the mover will shut down and will need a manual restart.
Restart on the lawn can only take place if you move the machine so that it has a maximum distance of 2 meters to the boundary wire and press "Same Area" button and "START". The working cycle will not be changed.
Maintenance and Winter Storage
Ordinary cleaning:
You prolong the life of your robot movement if you currently keep it clean.
Top cover
Lift the top cover and clean it for grass and dirt using a soft brush. You can wipe it with a wet cloth (do not rinse with water due to the electronics).
Bottom
Clean also the bottom using a soft brush. Particularly, ensure that blades, blade holder and front wheels can rotate freely. Note: Remember to turn off the power switch before cleaning! If the robot motor often runs in wet grass, it is important to ensure that the blades are cleaned for grass so that they can rotate.
Docking station
You shall also clean the docking station frequently by removing dirt and grass from the base plate
Switches
Clean the switches on the robot motor and the docking station with fine emery paper or s steel wool a couple of times during the season. Clean the two charging tentacles of station.
It is important to make sure that all bolts, screws and nuts are fastened correctly at all times to give the robot mover the best possible working conditions.
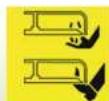
Replacement of spare parts:
Blades:
The blades have 2 sharp cut edges. Therefore, they are reversible if they have become unsharp on one edge if both edges are unsharp, the blades can easily be replaced using a screwdriver.
Note: Remember to turn off the power switch before you start.
When you have taken out the screw, It is important to remove grass and other dirt from the blade holder. Then you can insert the new blade. Screw the blade screw firmly in. Check that the blades are rotating.
Note: It is important that all 3 blades are reversed or replaced at one time.
Battery:
Gerealy the battery life is 5 years, depending on the workload and mani nance of the robot mower. You can easily replace the battery by unfastening the 4 screws in the battery compartment cover and replacing the old battery with a new one.
Note: Always use original/authorized spare parts!
Winter storage:
Before winter storage we recommend that you charge your robot mower in the docking station.
During the winter, we recommend that you take your robot mower and charging station inside and store it in a dry and preferably frost free room. Turn off the power switch (0) to protect the battery. It is a good idea to charge the battery a couple of times during the winter to ensure good performance. You can either do it by taking your docking station inside too or by putting your robot mower in to the docking station outside and take it back inside after charging.
If there is any risk of frost in the room, where you store your robot mower, you can take out the battery and keep it in a warm and dry place.

MANUAL·MR40Z

MANUAL·MR40Z
Trouble Shooting
As a Quick Guide if the robot mowder does not work properly, you may follow the below steps of trouble shooting to solve the problem. If the fault persists or in case of similar problems contact your dealer.
| Stage Symptom Possible Cause Action | ||
| Preparation | The robot mowver does not start running | The security key may not be inserted. Wrong installation of the docking station. Wrong connection of the boundary wire. |
| The robot mowver's initial drive along the boundary wire does not follow its track or revolts in some sections of the path. | The detection function of the boundary wire does not work properly, perhaps due to some foreign interference signal in the area. like first an underground power system, high power electrical equipment or similar. The nearest boundary wire of your neighbor is not far minimum 2 m from yours. | |
| Fails to contact him/ her when returning to the docking station | The docking station is installed on an uneven surface | |
| Initial Use | The robot mowver stops with the LED indicator flashing RED. | Step 1: Examine the parking location. In case of a slope larger than 30° the tilting sensor is activated. |
| Step 2: The robot mowver cannot detect the signal from the boundary wire. | ||
| Step 3: The sill sensor is activated. The front wheels may be trapped in a pit and left suspending in the air. The front wheels might be stuck and cannot rotate and slide smoothly. | ||
| The robot mowver stops with the LED indicator flashing green | Somebody else has tried to restart the robot mowver, but that failed due to lack of knowledge. | |
| The roost mowver stops and the LED indicator does not turn. | The battery is exhausted. | |
| Stage Symptom Possible Cause | Action | |
| Regular operation | The robot moves runs outside the boundary wire and stops close to it. | Wheels, especially the rear drive wheels may have a poor grip if covered with mud and other debris. In case of bad turning conditions, slopes or wet grass near the boundary wire, the robot motor may tend to slip across the boundary wire while turning direction. The detection function of the boundary wire does not work properly. |
| The blades have become unsharp and the cutting system is unbalanced. The blade disc was damaged hitting a hard object. The nuts for fastening the blade disc have loosened. | ||
| The regular time of working after each charging has become shorter. | Dirty charging tentacles of docking station. Dirty charging copper eyes of robot motor. Battery capacity is reduced after repeatedly charging and discharging. | |
| The robot moves does not start routinely after previous activation of rain sensor. | The rain sensor remains activated. | |
Note:
Any; no you wish to restart the robot mover you must move it near to the boundary wire; max. 2 meters distance. Once you have turned off the power, you must place the robot in the docking station for manual restart.
Technical Specifications
ROBOT LAWN MOWER MODEL HARM MR40Z
| Lithium battery voltage: | 28V |
| Lithium battery capacity: | 4Ah |
| Motor type: | Brushless motor |
| Blade speed: | 2900rpm |
| Cutter type: | 3 blades (mulching) |
| Cutting width: | 24cm |
| Mowing mode: | Random straight line |
| Suitable lawn area: | Up to 1000m² |
| Maximum climb angle: | 30° |
| Maximum walking speed: | 0.5m/s |
| Standard wire length: | 100m |
| Quantity of pegs: | 100pcs |
| Noise level: | 65dB(A) |
Certification
EN 50636-2-107:2015 (Product safety),
EN 61558-1:2005+A1:2009/EN 61558-2-16:2009+A1:2013 (Power Supply safety),
EN 55014-1:2006+A2:2011 (EMC Emissions), EN 55014-2:1997+A2:2008 (EMC Immunity).
Guaranteed sound power level 65 dB(A).
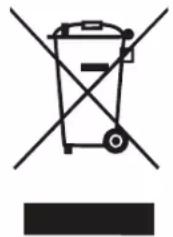
Disposal of waste
Do not dispose of this product together with general household waste.
Deliver it to a recycling station in order that the recyclable parts may be used for recycling and the
Non-recyclable parts may be disposed of in an environmentally proper way.
General Warranty Condition
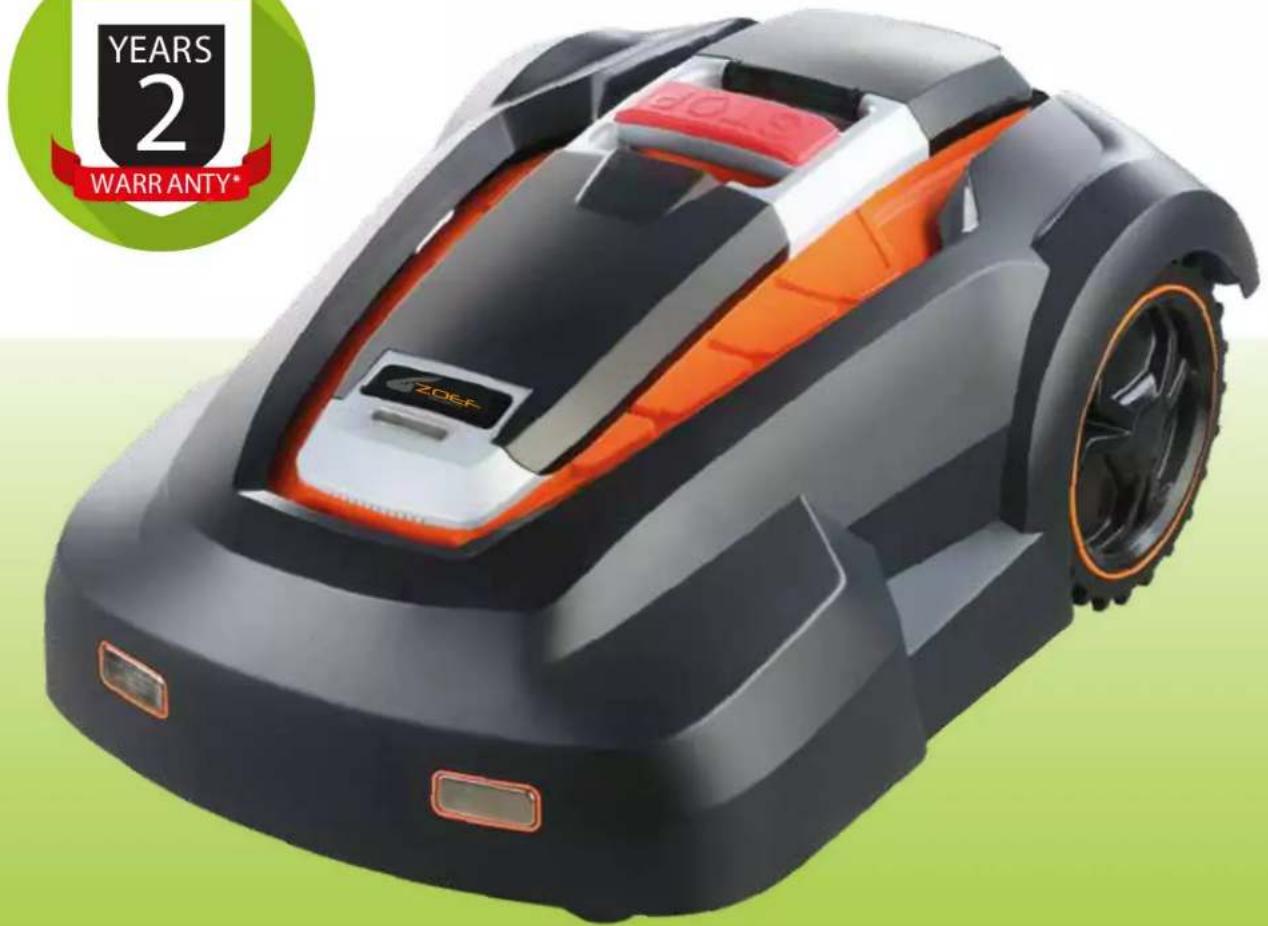
You have 2 Years general warranty on the Zoef Robot robot mowers.
The warranty period starts when purchasing the product.
The warranty covers defective materials or improper workmanship on the product.
Only the batteries we offer 5 month warranty.
Within the warranty period, Zoef Robot is obligated to replace the defective parts that have been submitted to an autorized Zoef Robot service workshop/dealer.
Zoef Robot furthermore, covers labou cost within the warranty period.
For all warranties, user must inform of model and series number.
The warranty does NOT include costs of transportation or cleaning of machine. Further, the warranty does not cover damages caused by natural wear, improper treatment or lack of maintenance. Finally, the warranty does not apply in case of unauthorized spare parts.

ROBOTER-MAHER
GEBRAUCHSANWEISUNG
HARM
MR40Z

Deutsch
INHALT SCHACHTEL
5.DUCKEN SIE AUF START (S)
Guaranteed sound power level 65 dB(A).
ENTSORGEN
REEMPLACEMENT DES PIEÇES
Couteaux
Guaranteed sound power level 65 dB(A).