SL1255 - Milling machine CARAT - Free user manual and instructions
Find the device manual for free SL1255 CARAT in PDF.

| Product Type | Grooving Machine (Slot Milling Machine) |
| Brand | Carat |
| Model | SL1255 |
| Power Supply | 1800 W |
| Voltage | See nameplate (230 V typical) |
| Frequency | 50 Hz |
| No-load Speed | 9000 min⁻¹ |
| Max Disc Diameter | 125 mm |
| Mounting Diameter | 22.23 mm (7/8") |
| Max Cutting Depth | 40 mm |
| Max Groove Width | 35 mm |
| Dimensions (L x W x H) | 365 mm x 151 mm x 247 mm |
| Weight (without cable or disc) | 4.7 kg |
| Compatible Discs | Specific diamond blades for grooving |
| Included Accessories | Set of spacers (15, 10, 6 mm), side handle |
| Dust extraction connection | Yes, dust port on guard |
| Safety Features | Overload protection, thermal protection, load indicator |
| Depth Adjustment | Continuous adjustment knob |
| Carbon Brushes | Accessible and replaceable, change at 6 mm wear |
| Sound Level | Sound pressure 95.5 dB(A), sound power 106.5 dB(A) |
| Vibration Level | 2.8 m/s² (uncertainty K=1.5 m/s²) |
| Compatible Materials | Stone, concrete, masonry (dry cutting) |
Frequently Asked Questions - SL1255 CARAT
User questions about SL1255 CARAT
0 question about this device. Answer the ones you know or ask your own.
Ask a new question about this device
Download the instructions for your Milling machine in PDF format for free! Find your manual SL1255 - CARAT and take your electronic device back in hand. On this page are published all the documents necessary for the use of your device. SL1255 by CARAT.
USER MANUAL SL1255 CARAT
natural_image
Carat blade tool with mesh effect, no visible text or symbols on the device itselfSL-1255
| Nederlands 2 |
| Français 16 |
| English 29 |
| Deutsch 41 |
| Dansk 55 |
| Svenska 68 |
| Norsk 81 |
SPECIFICATIES
Director: C.J. van Beek

01-11-2020
CARAT
Director: C.J. van Beek
01-11-2020
CARAT
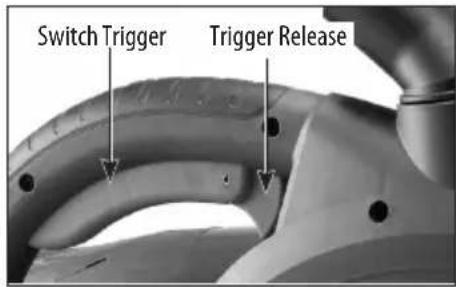
- Main Handle
- Switch Trigger
- Trigger Release
- Dust Port
- Side Handle
- Depth Adjuster
- Wheel
- Base
-
Limit Pin
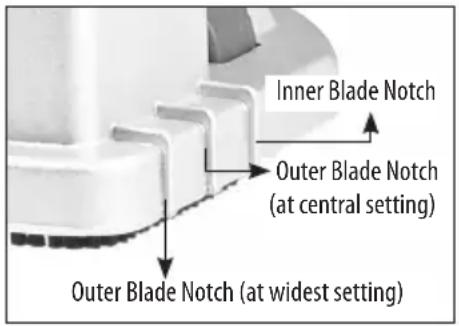
-
Sighting Notches
- Power Supply Cord
- Load Warning Light
- Brush Cap
- Motor
- Tool-Free Arbor Screw
- Tab
GENERAL SAFETY INSTRUCTIONS

WARNING! Read all safety warnings and all instructions. Failure to follow the warnings and instructions may result in electric shock, fire and/or serious injury.
Save all warnings and instructions for future reference. The term "power tool" in the warnings refers to your mains operated (corded) power tool or battery-operated (cordless) power tool.
1) WORK AREA SAFETY
a. Keep work area clean and well lit. Cluttered or dark areas invite accidents.
b. Do not operate power tools in explosive atmospheres, such as in the presence of flammable liquids, gases or dust. Power tools create sparks which may ignite the dust or fumes.
c. Keep children and bystanders away while operating a power tool. Distractions can cause you to lose control.
2) ELECTRICAL SAFETY
a. Power tool plugs must match the outlet. Never modify the plug in any way. Do not use any adapter plugs with earthed (grounded) power tools.
Unmodified plugs and matching outlets will reduce risk of electric shock.
b. Avoid body contact with earthed or grounded surfaces such as pipes, radiators, ranges and refrigerators. There is an increased risk of electric shock if your body is earthed or grounded.
c. Do not expose power tools to rain or wet conditions. Water entering a power tool will increase the risk of electric shock.
d. Do not abuse the cord. Never use the cord for carrying, pulling or unplugging the power tool. Keep cord away from heat, oil, sharp edges or moving parts. Damaged or entangled cords increase the risk of electric shock.
e. When operating a power tool outdoors, use an extension cord suitable for outdoor use. Use of a cord suitable for outdoor use reduces the risk of electric shock.
f. If operating a power tool in a damp location is unavoidable, use an earth leakage circuit breaker. Use of an earth leakage circuit breaker reduces the risk of electric shock.
3) PERSONAL SAFETY
a. a) Stay alert, watch what you are doing and use common sense when operating a power tool. Do not use a power tool while you are tired or under the influence of drugs, alcohol or medication. A moment of inattention while operating power tools may result in serious personal injury.
b. Use personal protective equipment. Always wear eye protection. Protective equipment such as dust mask, non-skid safety shoes, hard hat, or hearing protection used for appropriate conditions will reduce personal injuries.
c. Prevent unintentional starting. Ensure the switch is in the off-position before connecting to power source and/or battery pack, picking up or carrying the tool. Carrying power tools with your finger on the switch or energising power tools that have the switch on invites accidents.
d. Remove any adjusting key or wrench before turning the power tool on. A wrench or a key left
attached to a rotating part of the power tool may result in personal injury.
e. Do not overreach. Keep proper footing and balance at all times. This enables better control of the power tool in unexpected situations.
f. Dress properly. Do not wear loose clothing or jewelry. Keep your hair, clothing and gloves away from moving parts. Loose clothes, jewelry or long hair can be caught in moving parts.
g. If devices are provided for the connection of dust extraction and collection facilities, ensure these are connected and properly used. Use of dust collection can reduce dust-related hazards.
4) POWER TOOL USE AND CARE
a. Do not force the power tool. Use the correct power tool for your application. The correct power tool will do the job better and safer at the rate for which it was designed.
b. Do not use the power tool if the switch does not turn it on and off. Any power tool that cannot be controlled with the switch is dangerous and must be repaired.
c. Disconnect the plug from the power source and/or the battery pack from the power tool before making any adjustments, changing accessories, or storing power tools. Such preventive safety measures reduce the risk of starting the power tool accidentally.
d. Store idle power tools out of the reach of children and do not allow persons unfamiliar with the power tool or these instructions to operate the power tool. Power tools are dangerous in the hands of untrained users.
e. Maintain power tools. Check for misalignment or binding of moving parts, breakage of parts and any other condition that may affect the power tool's operation. If damaged, have the power tool repaired before use. Many accidents are caused by poorly maintained power tools.
f. Keep cutting tools sharp and clean. Properly maintained cutting tools with sharp cutting edges are less likely to bind and are easier to control.
g. Use the power tool, accessories and tool bits etc., in accordance with these instructions, taking into account the working conditions and the work to be performed. Use of the power tool for operations different from those intended could result in a hazardous situation.
CUT-OFF MACHINE SAFETY WARNINGS
. The guard provided with the tool must be securely attached to the power tool and positioned for maximum safety, so the least amount of wheel is exposed towards the operator. Position yourself and bystanders away from the plane of the rotating wheel. The guard helps to protect operator from broken wheel fragments and accidental contact with wheel.
Use only diamond cut-off wheels for your power tool. Just because an accessory can be attached to your power tool, it does not assure safe operation.
. The rated speed of the accessory must be at least equal to the maximum speed marked on the power tool. Accessories running faster than their rated speed can break and fly apart.
. Wheels must be used only for recommended applications. For example: do not grind with the side of cut-off wheel. Abrasive cut-off wheels are intended for peripheral grinding, side forces applied to these wheels may cause them to shatter.
. Always use undamaged wheel flanges that are of correct diameter for your selected wheel. Proper wheel flanges support the wheel thus reducing the possibility of wheel breakage.
. The outside diameter and the thickness of your accessory must be within the capacity rating of
—GB—
your power tool. Incorrectly sized accessories cannot be adequately guarded or controlled.
The arbour size of wheels and flanges must properly fit the spindle of the power tool. Wheels and flanges with arbour holes that do not match the mounting hardware of the power tool will run out of balance, vibrate excessively and may cause loss of control.
. Do not use damaged wheels. Before each use, inspect the wheels for chips and cracks. If power tool or wheel is dropped, inspect for damage or install an undamaged wheel. After inspecting and installing the wheel, position yourself and bystanders away from the plane of the rotating wheel and run the power tool at maximum no load speed for one minute. Damaged wheels will normally break apart during this test time.
. Wear personal protective equipment. Depending on application, use face shield, safety goggles or safety glasses. As appropriate, wear dust mask, hearing protectors, gloves and shop apron capable of stopping small abrasive or workpiece fragments. The eye protection must be capable of stopping flying debris generated by various operations. The dust mask or respirator must be capable of filtrating particles generated by your operation. Prolonged exposure to high intensity noise may cause hearing loss.
- Keep bystanders a safe distance away from work area. Anyone entering the work area must wear personal protective equipment. Fragments of workpiece or of a broken wheel may fly away and cause injury beyond immediate area of operation.
. Hold the power tool by insulated gripping surfaces only, when performing an operation where the cutting accessory may contact hidden wiring or its own cord. Cutting accessory contacting a "live" wire may make exposed metal parts of the power tool "live" and could give the operator an electric shock.
- Position the cord clear of the spinning accessory. If you lose control, the cord may be cut or snagged and your hand or arm may be pulled into the spinning wheel.
. Never lay the power tool down until the accessory has come to a complete stop. The spinning wheel may grab the surface and pull the power tool out of your control.
Do not run the power tool while carrying it at your side. Accidental contact with the spinning accessory could snag your clothing, pulling the accessory into your body.
Regularly clean the power tool's air vents. The motor's fan will draw the dust inside the housing and excessive accumulation of powdered metal may cause electrical hazards.
. Do not operate the power tool near flammable materials. Sparks could ignite these materials.
Do not use accessories that require liquid coolants. Using water or other liquid coolants may result in electrocution or shock.
KICKBACK AND RELATED WARNINGS
Kickback is a sudden reaction to a pinched or snagged rotating wheel. Pinching or snagging causes rapid stalling of the rotating wheel which in turn causes the uncontrolled power tool to be forced in the direction opposite of the wheel's rotation at the point of the binding. For example, if an abrasive wheel is snagged or pinched by the workpiece, the edge of the wheel that is entering into the pinch point can dig into the surface of the material causing the wheel to climb out or kick out. The wheel may either jump toward or away from the operator, depending on direction of the wheel's movement at the point of pinching. Abrasive wheels may also break under these conditions.
Kickback is the result of power tool misuse and/or incorrect operating procedures or conditions and can be avoided by taking proper precautions as given below.
-GB-
. Maintain a firm grip on the power tool and position your body and arm to allow you to resist kickback forces. Always use auxiliary handle, if provided, for maximum control over kickback or torque reaction during start-up. The operator can control torque reactions or kickback forces, if proper precautions are taken.
. Never place your hand near the rotating accessory. Accessory may kickback over your hand.
Do not position your body in line with the rotating wheel. Kickback will propel the tool in direction opposite to the wheel's movement at the point of snagging.
. Use special care when working corners, sharp edges etc. Avoid bouncing and snagging the accessory. Corners, sharp edges or bouncing have a tendency to snag the rotating accessory and cause loss of control or kickback.
. Do not attach a saw chain, woodcarving blade, segmented diamond wheel with a peripheral gap greater than 10 mm or toothed saw blade. Such blades create frequent kickback and loss of control.
. Do not "jam" the wheel or apply excessive pressure. Do not attempt to make an excessive depth of cut. Overstressing the wheel increases the loading and susceptibility to twisting or binding of the wheel in the cut and the possibility of kickback or wheel breakage.
. When wheel is binding or when interrupting a cut for any reason, switch off the power tool and hold the power tool motionless until the wheel comes to a complete stop. Never attempt to remove the wheel from the cut while the wheel is in motion otherwise kickback may occur. Investigate and take corrective action to eliminate the cause of wheel binding.
. Do not restart the cutting operation in the workpiece. Let the wheel reach full speed and carefully re-enter the cut. The wheel may bind, walk up or kickback if the power tool is restarted in the workpiece.
. Support panels or any oversized workpiece to minimize the risk of wheel pinching and kickback.
Large workpieces tend to sag under their own weight. Supports must be placed under the workpiece near the line of cut and near the edge of the workpiece on both sides of the wheel.
Use extra caution when making a "pocket cut" into existing walls or other blind areas. The protruding wheel may cut gas or water pipes, electrical wiring or objects that can cause kickback.
5) SERVICE
Have your power tool serviced by a qualified repair person using only identical replacement parts. This will ensure that the safety of the power tool is maintained.
Symbols used in this manual
V.....volts
A.....amperes
Hz.....hertz
W.....watt
\~......alternating current
n_0 ......no load speed
min ^-1 ......revolutions or reciprocation per minute

......warning of general danger
....class II tool

.....read these instructions

.....always wear eye protection

.....always wear a dust mask.

.....always wear hearing protection
—GB—

.....wear safety-approved hard hat

.....Keep hands clear – pinching hazard.

DANGER! Keep hands away from cutting area and the blade.

rotating parts - entanglement hazard. Keep hands, loose clothing and long hair away from moving parts
do not dispose of electric tools, accessories and packaging together with household waste material
SPECIFIC SAFETY RULES
-
Keep hands away from cutting area and blade at all times! Keep your second hand on an auxiliary handle. If both hands are holding the saw, they cannot be cut by the blade.
-
Do not reach underneath the work.
-
Hold tool by insulated gripping surfaces when performing an operation where the cutting tools may contact hidden wiring or its own cord. Contact with a "live" wire will make exposed metal parts of the tool "live" and shock the operator.
-
Always use blades with correct size and shape arbor holes. Blades that do not match the mounting hardware of the saw will run eccentrically, causing loss of control.
-
Never use damaged or incorrect arbor flanges or bolts. The arbor flanges and bolt were specially designed for your saw, for best performance and safety of operation.
-
Maintain a firm grip on the saw and position your body and arm in a way that allows you to resist KICKBACK forces. KICKBACK forces can be controlled by the operator, if proper precautions are taken.
-
Do not use a dull or damaged blade.
-
Use only recommended blades, rated at the machine's maximum rated RPM or higher with correct arbor hole.
-
Tighten blade retaining bolt and all clamps before operating.
-
Check the inside surfaces of the arbor flanges as well as the sides of the blade for freedom from any foreign matter.
-
Check the blade for cracks or other damage before operation. Replace cracked or damaged blade immediately. Carry out a test run without load for at least 30 seconds before use.
-
Never start the tool with the workpiece against the blade.
-
Allow the motor to achieve full speed before cutting.
-
Important: After completing the cut, release power switch and wait for coasting blade to stop completely before putting the saw down
-
Never operate the tool in an area with flammable solids, liquids, or gases. Sparks from the commutator/carbon brushes could cause a fire or explosion.
-
There are certain applications for which this tool was designed. The manufacturer strongly recommends that this tool NOT be modified and/or used for any application other than for which it was designed. If you have any questions relative to its application DO NOT use the tool until you have written the manufacturer and have been advised.
-
Only use the machine for dry cutting in stone, concrete or masonry.
-GB-
- Use the auxiliary handles supplied with the tool. Loss of control can cause personal injury.
- Use a residual current device (PRCD) (not included) to protect from current surges.
- Keep power supply cord clear from the working range of the machine. Always lead the cable away behind you.
- Immediately switch off the machine if unusual vibrations or if other malfunctions occur. Check the machine in order to find out the cause.
- Only use and store diamond blades according to the Manufacturer's instructions.
- Pay attention to the dimensions of the blades. The diameter of the center bore must engage the arbor without play. If not use any necessary reduction pieces or adapters (supplied with the blade) to ensure a proper fit.
- Take care to avoid hidden electric lines, gas and water pipes. Check your working area, e.g. with a metal detector before commencing work.
- The dust that arises when working with this tool can be harmful to health. Use a dust absorption system and wear a suitable dust protection mask and remove deposited dust with a vacuum cleaner.
ELECTRICAL CONNECTION
The network voltage must conform to the voltage indicated on the tool name plate. Under no circumstances should the tool be used when the power supply cable is damaged. A damaged cable must be replaced immediately by an authorized Customer Service Center. Do not try to repair the damaged cable yourself. The use of damaged power cables can lead to an electric shock.
INTRODUCTION
This saw is designed exclusively for the creation of masonry grooves (parallel double cuts in concrete, masonry and stone) for the purpose of placing water, electric or gas conduits. The machine is designed to use a pair of parallel diamond blades (not included). This machine should not be used for cutting other materials. The machine should not be converted or modified, e.g. for any other form of use, other than as specified in these operating instructions. The user shall be liable for damages and accidents due to incorrect use.
UNPACKING
Carefully remove the tool and all loose items from the container. Retain all packing materials until after you have inspected and satisfactorily operated the machine.
NOTE: Appropriate dry diamond blades (not included) must be mounted to the machine before operating.
PERMITTED TYPES OF BLADE
Only use diamond segmented blades with a maximum peripheral gap between segments of 10 mm and with a negative rake angle, Maximum blade diameter of 125mm and a minimum blade core thickness of 1.5mm.
Bonded reinforced abrasive blades are not permitted with this machine.
CARTON CONTENTS
- Wall Chaser Machine
- Spacers Set: 15mm, 10mm, 6mm
- Side Handle
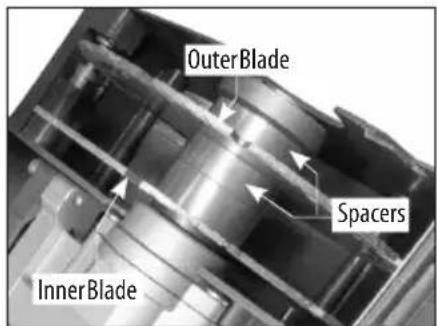
INSTALLING THE DIAMOND BLADES AND ADJUSTING THE GROOVE WIDTH
INSTALLING THE BLADES
NOTE: If the Tool-Free Arbor Screw cannot be removed because the arbor just turns together with the screw (freewheeling), hold the rim of the Tool-Free Arbor Screw while loosening. This will allow it to be loosened.
- Unplug the machine and push the limit pin to release the base and allow it swing down and out of the way.
- Place the inner blade in position directly on the arbor making sure the direction of rotation arrow of the blade and the arrow on the machine are in the same direction.
- Place as many spacers as necessary to achieve the desired groove width. They are in sizes 15, 10, and 6 mm.
- Place the outer blade in position.
- Place all of the remaining spacers from the spacer set on top of the outer blade (so that the arbor may be tightened).
- Place the tool-free arbor screw in position.
- Flip up the tab on the arbor screw and screw it in tightly. It may be helpful to wear gloves and grab the blade to immobilize it while tightening the arbor screw. Once tight, flip the tab back down.
- When closing the base, ensure that the spring is properly positioned in its socket in the base, then press the limit pin to allow the base to close.
NOTE: Use blades that have an arbor bore which can fit, and that are rated for the machine's maximum rated speed or higher.

REMOVING THE BLADE
Removal is the opposite of installing the blade.
TO ADJUST THE DEPTH OF CUT
Turn the depth adjustor wheel to the desired depth of cut. Note that the actual depth of cut will decrease slightly as the diamond blades wear.

CAUTION: For deep cuts in hard materials, it is recommended to pre-cut about 20mm before performing the final full depth cut. This will be faster, more efficient and less stressful to the motor.
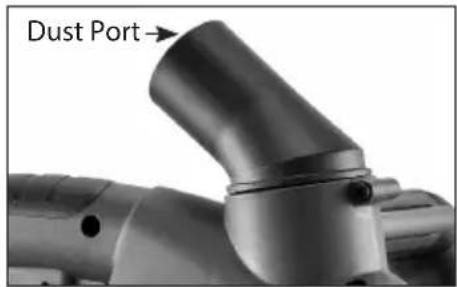
There is a vacuum port provided on the blade cover to collect dust when operating. Always make use of it. Simply attach the vacuum cleaner hose to the vacuum port.
STARTING AND STOPPING TOOL
To switch on:
This machine has a lock-off type switch. First press the trigger release, then squeeze the trigger switch to switch on. For safety reasons, the switch is not possible to lock on.
To switch off:
Release the trigger switch to stop the machine. After the machine has been switched off, the blade will still rotate for a time, take care that parts of your body do not come into contact with the blade while it is still rotating.
LOAD WARNING, OVERLOAD PROTECTION AND OVERHEAT PROTECTION
Load Warning Light:
Whenever the unit is plugged in, the light will be lit solid green.
When the load on the motor is in the maximum range, the light will flash red.
When the motor is overloaded or overheated, the light will be lit solid red.
Load Warning Function:
When maximum load is exceeded, the load warning function will operate, causing the motor to pulsate. When this happens, the operator should decrease the force on the tool, and it will return to normal operation automatically. If the load is not decreased, the motor will shut down and the load warning light will be lit solid red. In this case, the motor must be restarted by turning the switch OFF and then back ON.
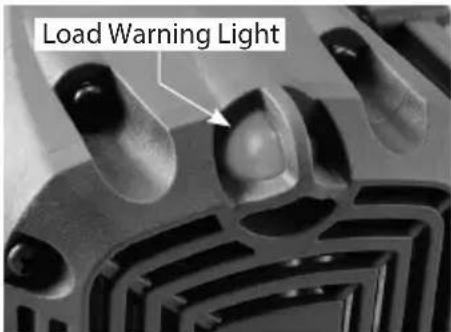
Overheat Thermal Protection:
If the temperature of the motor gets too high, the thermal protection will shut the motor down and the load warning light will be lit solid red. The motor must be restarted by turning the switch OFF and then back ON. When this happens, do not immediately put a load on the motor after restarting. Always run the machine at no load for a few minutes to return to a normal operating temperature before continuing.
CAUTION: The motor will be damaged if it is repeatedly overloaded or overheated. Always cool the motor by running at no load for a few minutes whenever it stops from either overheat or overload.
HOW TO USE THE TOOL
Effective control of this powerful saw requires two-handed operation for maximum protection. Hold the saw firmly WITH BOTH HANDS to prevent loss of control which could cause personal injury.
SIGHTING NOTCHES
The sighting notches at the front of the machine show the operator the line of cut. The innermost notch indicates the line of the inner blade. Use the inner notch as a reference point as it will not change with different channel width settings. The outermost notch shows the line of the outer blade at widest setting. The central notch shows the outer line of a medium channel width (using the 15 mm spacer).
OPERATION
- Adjust the groove width as desired.
- Adjust the depth of cut.
- Mark the intended cutting line.
-
Place the machine in position on the workpiece.
-
While it is still raised and the blades are not yet in contact with the workpiece, squeeze the trigger and allow the machine to reach full speed.
-
Holding firmly with both hands, slowly lower the blades into the cut, continuing until the depth stop is reached. Start at the top of the wall and pull the machine downwards. Take care that the base remains firmly on the workpiece.
CAUTION: Take care not to cut in a curved line. This will likely shatter the diamond blades causing a severe hazard.
- When the cut is finished, raise the machine to the top of its stroke and allow the coasting blade to come to a full stop before setting down.
Do not force the cut. Let the saw do the cutting at the rate of speed permitted by the type of cut and workpiece.
SHARPENING DULL DIAMOND BLADES
If a lot of sparks are seen while cutting, this is a sign that the blade is becoming dull. To create better diamond exposure (sharpen), make several cuts in a special sharpening stone for diamond blades or alternately use calcareous sandstone.
MAINTENANCE
Every 50 hours of operation blow compressed air through the motor while running at no load to clean out
accumulated dust. (If operating in especially dusty conditions, perform this operation more often.)
KEEP TOOL CLEAN
All plastic parts should be cleaned with a soft damp cloth. NEVER use solvents to clean plastic parts. They could possibly dissolve or otherwise damage the material. Wear safety glasses while using compressed air.
THE CARBON BRUSHES
The carbon brushes are a normal wearing part and must be replaced when they reach their wear limit.
Replace the brushes if they are worn to 6mm or less.
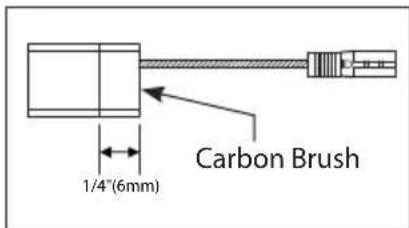
To replace:
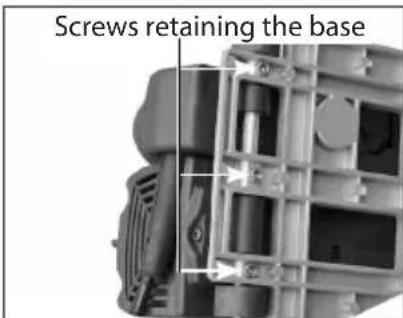
Unplug the machine, press the limit pin to open the base, and remove the screw to release each brush cap. To make changing the bottom brush easier, one may remove the 3 screws to temporarily remove the base.
Pull back on the carbon brush springs to release the tension. Unscrew the screw holding the carbon brush lead. Then pull out the brush. Repeat for the other side. To reassemble reverse the procedure.
NOTE: To reinstall the same brushes, first make sure the brushes go back in the way they came out. Otherwise a break-in period will occur that will reduce motor performance and increase brush wear.
Caution: Always replace the brushes as a pair.
If the replacement of the power supply cord is necessary, this has to be done by the manufacturer or their agent in order to avoid a safety hazard.
WARNING: All repairs must be entrusted to an authorized service center. Incorrectly performed repairs could lead to injury or death.
Noise/vibration information
Measured in accordance with EN 60745-1
Model no.: SL-1255
Noise level: Sound pressure level( L_pA ): 95.5 dB(A) Sound power level( L_wA ): 106.5 dB(A) K=3 dB
Vibration level: a_h = 2.8 m/s^2 K = 1.5 m/ s^2
The vibration emission level has been measured in accordance with a standardised test given in EN 60745; it may be used to compare one tool with another and as a preliminary assessment of exposure to vibration when using the tool for the applications mentioned
- using the tool for different applications, or with different or poorly maintained accessories, may significantly increase the exposure level
- the times when the tool is switched off or when it is running but not actually doing the job, may significantly reduce the exposure level
protect yourself against the effects of vibration by maintaining the tool and its accessories, keeping your hands warm, and organizing your work patterns
CE Declaration of Conformity
•We declare under our sole responsibility that this product is in conformity with the following standards or standardized documents: EN 60745-1: 2009 + A11: 2010 & EN 60745-2-22: 2011 + A11: 2013, EN 61000, EN 55014 in accordance with the regulations 2014/30/EU, 2006/42/EC, 2011/65/EU
•Technical file at: CARAT Nederland B.V.
Nikkelstraat 18, 4823 AB Breda, The Netherlands
Director: C.J. van Beek

01-11-2020
CARAT
Director: C.J. van Beek

01-11-2020
CARAT
ST∅VSAMLING MED VAKUUM
Director: C.J. van Beek

01-11-2020
CARAT
CARAT Nederland B.V. Nikkelstraat 18, 4823 AB Breda, The Netherlands
SPECIFICATIONER
Stänga av:
Director: C.J. van Beek
01-11-2020
CARAT
1) SIKKERHET PÅ ARBEIDSOMRÅDET
JUSTERING AV SKJÆRETS DYBDE
ST∅VSUGING AV ST∅V
Director: C.J. van Beek

01-11-2020
CARAT
natural_image
Abstract wave pattern with flowing white lines on a gray background (no text or symbols)CARAT
www.carat-tools.eu | www.carat-tools.com
www.carat-tools.be | www.carat-tools.nl | www.carat-tools.dk