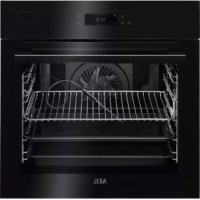
BSE778380B - Electric oven AEG - Free user manual and instructions
Find the device manual for free BSE778380B AEG in PDF.



| Product type | Built-in electric oven |
| Brand | AEG |
| Model | BSE778380B |
| Capacity | 72 L |
| Appliance dimensions (H x W x D) | 594 x 595 x 569 mm |
| Built-in dimensions (H x W x D) | 590 x 560 x 550 mm (min.) |
| Weight | 34.0 kg |
| Power supply | Electric, 230 V, cable 1.5 m |
| Energy efficiency class | A+ |
| Energy consumption (conventional) | 0.93 kWh/cycle |
| Energy consumption (fan-forced) | 0.69 kWh/cycle |
| Energy efficiency index | 81.2 |
| Main functions | Top/Bottom heat, Fan-forced, Turbo grill, Grill, Fan-forced with moisture, Steam cooking, Assisted cooking, Food probe, Pyrolytic cleaning |
| Additional functions | Fast preheat, Automatic shut-off, Keep warm, Defrost, Sterilization, Dehydrate |
| Cleaning | Pyrolytic cleaning (3 modes), Cleaning reminder |
| Included accessories | Wire rack, Baking tray, Roasting dish, Food probe, Telescopic runners (optional) |
| Safety | Child safety, Key lock, Automatic shut-off, Cooling fan |
| Connectivity | Wi-Fi 2.4 GHz, My AEG Kitchen app, Remote control |
| Lighting | Halogen bulb, energy efficiency class G |
| Repairability | Original spare parts available, authorized after-sales service |
Frequently Asked Questions - BSE778380B AEG
User questions about BSE778380B AEG
0 question about this device. Answer the ones you know or ask your own.
Ask a new question about this device
Download the instructions for your Electric oven in PDF format for free! Find your manual BSE778380B - AEG and take your electronic device back in hand. On this page are published all the documents necessary for the use of your device. BSE778380B by AEG.
USER MANUAL BSE778380B AEG
natural_image
Simple line drawing of a kitchen oven (no text or symbols)How to install your AEG/Electrolux Oven - Column installation
natural_image
Technical illustration of a door opening with an inset close-up showing mechanical components (no text or symbols)4. PËRSHKRIM I PRODUKTIT
natural_image
Technical line drawing of a metal frame structure with two magnified views showing internal details (no text or symbols)natural_image
Line drawing of a curved architectural or mechanical component with railings, no text or symbols present9.2 Sensori i ushqimit
natural_image
Line drawing of a fish being lifted by a rack-mounted device, showing structural components and airflow direction (no text or symbols)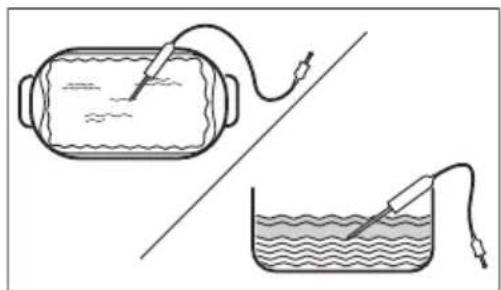
natural_image
Illustration of a cylindrical device connected to a wire with a probe, and a beaker with a probe inserted into liquid (no text or symbols)natural_image
Line drawing of a cooking pot with two handles (no text or symbols)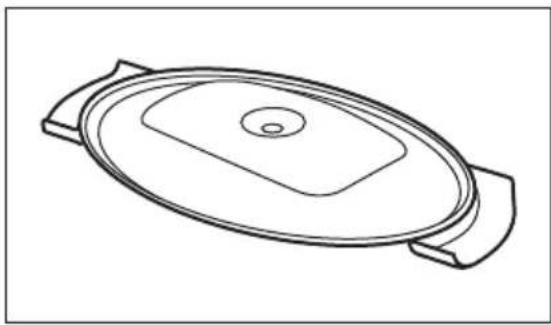
natural_image
Line drawing of a lid with a square opening and two side handles (no text or symbols)natural_image
Line drawing of an oval-shaped metal tray with two handles and a perforated interior (no text or symbols)natural_image
Simple line drawing of an oval-shaped object with no text or symbolsTavë pice
natural_image
Simple line drawing of a circular sieve or pan with a handle (no text or symbols)Tavë gatimi
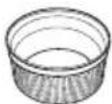
Tasa qeramike

natural_image
Simple line drawing of a circular bowl or container (no text or symbols)natural_image
Line drawing of a hand adjusting a metal shelf with a valve (no text or symbols)natural_image
Technical diagram showing a mechanical assembly with an inset close-up of a component (no text or symbols present)natural_image
Mechanical assembly diagram showing a clamping mechanism with a rotating arrow (no text or symbols)natural_image
Illustration of a hand holding a folder with curved arrows indicating rotation (no text or symbols)natural_image
Diagram of a hand pressing a curved arrow on a layered object (no text or symbols)12.7 Mënyra e ndërrimit: Llamba

PARALAJMĚRIM!
How to install your AEG/Electrolux Oven - Column installation

natural_image
Technical illustration of a kitchen appliance with an inset close-up showing a screw being inserted into a slot (no text or symbols present)4. ОПИСАНИЕ НА УРЕДА
4.1 Общ преглед
4.2 Аксесоари
• Скара/рафт
natural_image
Technical line drawing of a metal frame structure with two magnified views showing internal details (no text or symbols)natural_image
Line drawing of a curved architectural or mechanical component with railings, no text or symbols present9.2 Термосонда
natural_image
Diagram of a fish being lifted by a rack-mounted device, showing structural components and directional arrows (no text or labels)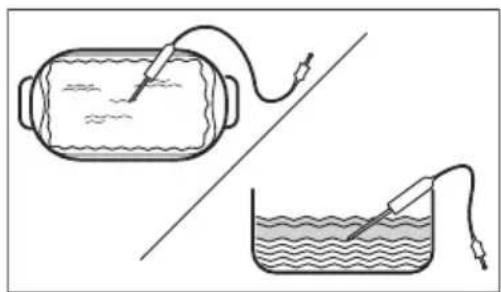
natural_image
Two laboratory setups: one with a test tube and probe, the other with a beaker and probe (no text or symbols)natural_image
Line drawing of a cooking pot with two handles (no text or symbols)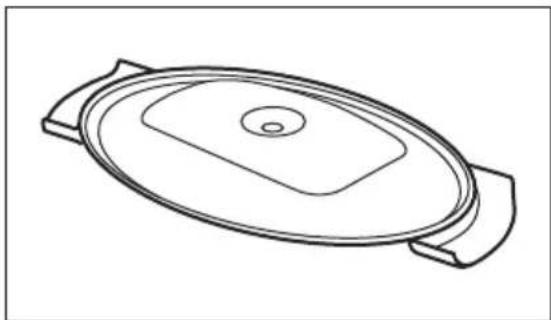
natural_image
Line drawing of a lid with a circular top and flange (no text or symbols)natural_image
Line drawing of an oval-shaped metal tray with two handles and a perforated interior (no text or symbols)natural_image
Simple line drawing of an oval-shaped object with no text or symbolsТава за пица
natural_image
Simple line drawing of a circular sieve or pan with a handle (no text or symbols)Съд за печене
natural_image
Simple line drawing of a circular bowl or container (no text or symbols)natural_image
Line drawing of a hand inserting a component into a metal rack (no text or symbols)How to install your AEG/Electrolux Oven - Column installation

natural_image
Technical illustration of a door opening with an inset close-up showing mechanical components (no text or symbols)4. OPIS PROIZVODA
4.1 Opći pregled
4.2 Dodatna oprema
• Mreža za pečenje
Za posuđe, kalupe za torte, pečenje.
- Pekač za pecivo
Za torte i biskvite.
• Duboka plitica za roštilj/prženje
Za pečenje ili kao plitica za skupljanje masnoće.
1 Upravljačka ploča
2 Elektronski programator
3 Spremnik za vodu
4 Utičnica za senzor za hranu
5 Toplinski element
6 Žarulja
7 Ventilator
8 Nosač polica, uklonjiv
9 Cijev za ispuštanje
10 Ventil za izlaz vode
11 Položaji polica
12 Otvor za paru
- Senzor za hranu
Za mjerenje koliko je hrana kuhana. - Teleskopske vodilice
Pomoću teleskopskih vodilica možete lakše staviti i ukloniti police.
5. UPRAVLJAČKA PLOČA
5.1 Pregled upravljačke ploče
natural_image
Technical line drawing of a wooden bench with two magnified views showing internal structure details (no text or symbols)Pekač za pecivo / Duboka plitica:
Gurnite pladanj za pečenje između vodilica police.
natural_image
Line drawing of a curved architectural or mechanical component with railings and supports (no text or symbols)9.2 Senzor za hranu
Senzor za hranu - mjeri temperaturu unutar hrane. Možete ga koristiti sa svakom funkcijom pećnice.
Potrebno je podesiti dvije temperature:
| [6000] | [272Y] |
| Temperaturu pećnice minimum 120 °C. | Temperaturu jezgre. |
natural_image
Diagram of a fish being lifted by a rack-mounted device, showing structural components and airflow direction (no text or labels)
natural_image
Diagram showing two methods of heating a submerged object and a submerged container with a probe, both without any text or labels.- korak Utaknite Senzor za hranu u utičnicu na prednjoj strani pećnice.
Na zaslonu se prikazuje aktualna temperatura: Senzor za hranu.
5. korak
- pritisnite za postavljanje temperature jezgre senzora.
6. korak
- pritisnite za postavljanje preferirane opcije:
- Zvučni alarm - kad hrana dosegne temperaturu jezgre, oglašava se signal.
- Zvučni alarm i zaustavljanje kuhanja - kad hrana dosegne temperaturu jezgre, oglasava se signal a pećnica se isključuje.
7. korak
Odaberite opciju i nekoliko puta pritisnite: za prijelaz na glavni zaslon.
8. korak
Pritisnite: \$START
natural_image
Line drawing of a cooking pot with two handles (no text or symbols)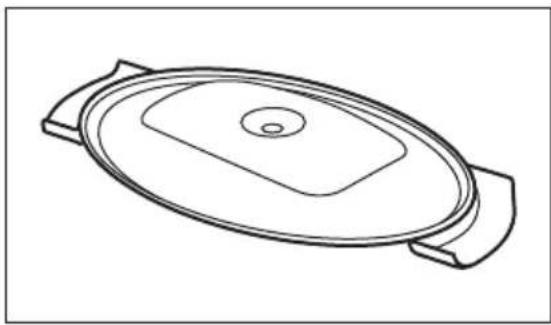
natural_image
Line drawing of a lid with a square opening and two side handles (no text or symbols)natural_image
Line drawing of an oval-shaped metal tray with two handles and a perforated interior (no text or symbols)natural_image
Simple line drawing of an oval-shaped object with no text or symbolsTava za pizzu
natural_image
Simple line drawing of a circular sieve or pan with a handle (no text or symbols)Posuda za pečenje
Ramekin posude
natural_image
Simple line drawing of a bowl or container with no text, numbers, or symbolsKalup za flan
natural_image
Line drawing of a hand adjusting a metal shelf with a valve (no text or symbols)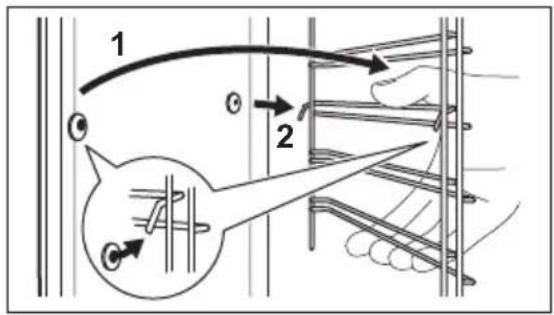
12.3 Način upotrebe: Pirolitičko čišćenje
natural_image
Technical diagram showing a mechanical assembly with an inset close-up of a component (no text or symbols present)- korak Podignite i povucite zasune dok ne kliknu.
natural_image
Mechanical assembly diagram showing a clamping mechanism with an arrow indicating rotational motion (no text or symbols present)natural_image
Illustration of a hand holding a folder with curved arrows indicating rotation (no text or symbols)natural_image
Diagram of a hand pressing a curved arrow on a layered object (no text or symbols)-
korak Staklene ploče očistite sapunom i vodom. Pažljivo osušite staklene ploče. Staklene ploče ne perite u perilici posuđa.
-
korak Nakon čišćenja, postavite staklene ploče i vrata pećnice.
How to install your AEG/Electrolux Oven - Column installation
natural_image
Technical illustration of a door opening with inset close-up showing mechanical assembly (no text or symbols)4. BESCHRIJVING VAN HET PRODUCT
Wi-Fi verbinding is ingeschakeld.
natural_image
Technical line drawing of a metal frame structure with two magnified views showing internal details (no text or symbols)natural_image
Line drawing of a curved architectural or mechanical component with railings, no text or symbols present9.2 Voedselsensor
natural_image
Diagram of a fish being lifted by a rack-mounted device, showing structural components and directional arrows (no text or labels)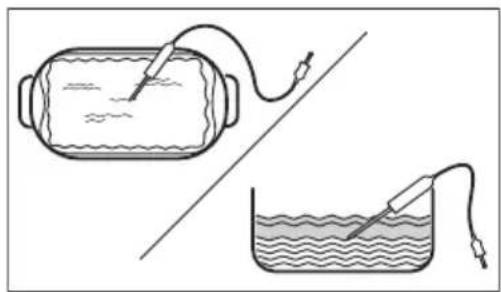
natural_image
Two laboratory setups: a cylindrical container with a probe and wire, and a beaker with a probe and wire submerged in liquid (no text or symbols)natural_image
Line drawing of a cooking pot with two handles (no text or symbols)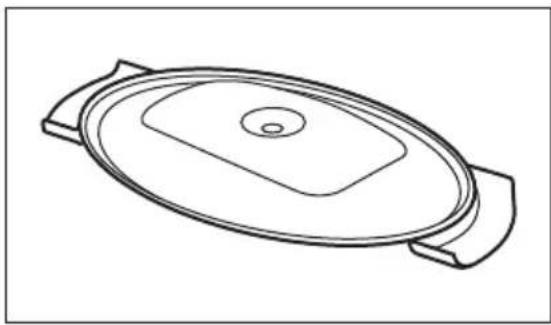
natural_image
Line drawing of a lid with a square opening and two side handles (no text or symbols)Spuitmond, spuitmondslang en stalen grill.
natural_image
Line drawing of an oval-shaped metal tray with two handles and a perforated interior (no text or symbols)natural_image
Simple line drawing of an oval-shaped object with no text or symbolsPizza pan
natural_image
Simple line drawing of a circular sieve or pan with a handle (no text or symbols)Ovenschaal
Ovenvormpjes
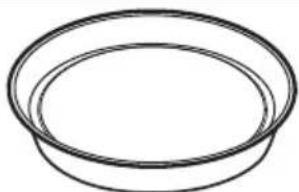
natural_image
Simple line drawing of a bowl or container with no text, numbers, or symbolsBlik voor flanbodem
natural_image
Line drawing of a hand inserting a small component into a metal frame (no text or symbols)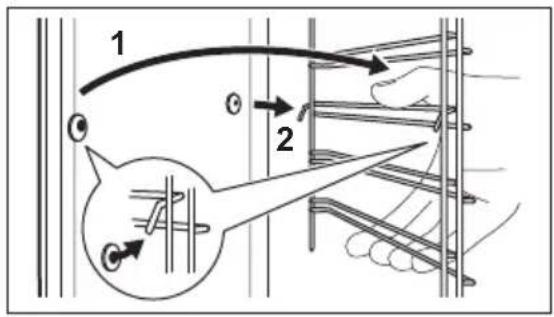
natural_image
Technical diagram showing mechanical assembly with an inset close-up of a component (no text or symbols)natural_image
Mechanical assembly diagram showing a gear mechanism with an arrow indicating rotational motion (no text or symbols present)natural_image
Illustration of a hand holding a folder with curved arrows indicating rotation (no text or symbols)natural_image
Diagram of a hand pressing a curved arrow on a layered platform (no text or symbols)13. PROBLEEMOPLOSSING

WAARSCHUWING!
BSK778380M 949494838
How to install your AEG/Electrolux Oven - Column installation
natural_image
Technical illustration of a door opening with inset close-up showing mechanical assembly (no text or symbols)4. DESCRIPTION DE L'APPAREIL
natural_image
Technical line drawing of a wooden ladder with two magnified views showing internal structure details (no text or symbols)natural_image
Line drawing of a curved architectural or mechanical component with railings, no text or symbols presentnatural_image
Line drawing of a fish being lifted by a ladder inside a storage unit (no text or symbols)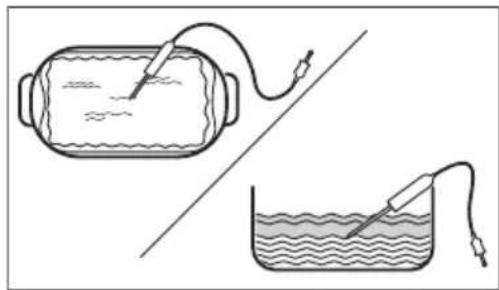
natural_image
Two diagrams showing a test tube connected to a rectangular container and a beaker with a probe inserted, both without any text or symbols.natural_image
Line drawing of a cooking pot with two handles (no text or symbols)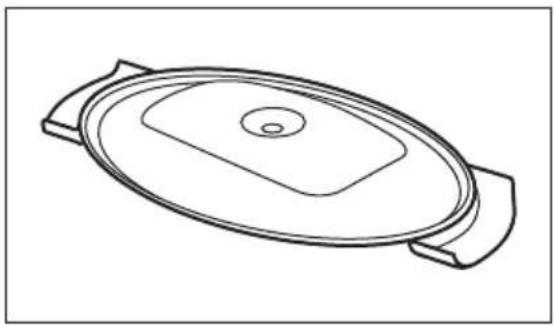
natural_image
Line drawing of a lid with a square opening and two side handles (no text or symbols)natural_image
Line drawing of an oval-shaped metal tray with two handles and a perforated interior (no text or symbols)natural_image
Line drawing of a hand inserting a lock into a metal rack (no text or symbols)natural_image
Technical diagram showing a mechanical assembly with an inset close-up of a component (no text or symbols present)natural_image
Mechanical assembly diagram showing a turning mechanism with an arrow indicating rotational motion (no text or symbols present)natural_image
Line drawing of a hand holding a folder with arrows indicating rotation (no text or symbols)natural_image
Diagram of a hand pressing a curved arrow on a layered rectangular object (no text or symbols)BSK778380M 949494838
How to install your AEG/Electrolux Oven - Column installation
natural_image
Technical illustration of a door opening with inset close-up showing mechanical assembly (no text or symbols)natural_image
Technical line drawing of a metal frame structure with two magnified views showing internal details (no text or symbols)natural_image
Line drawing of a curved architectural or mechanical component with railings, no text or symbols present9.2 Temperatursensor
natural_image
Line drawing of a fish being lifted by a rack-mounted device, showing structural components and airflow direction (no text or symbols)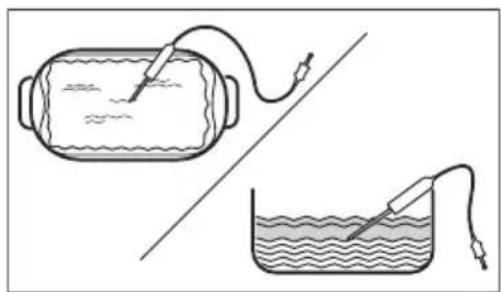
natural_image
Two laboratory setups: one with a test tube and probe, the other with a beaker and probe (no text or symbols)natural_image
Line drawing of a cooking pot with two handles (no text or symbols)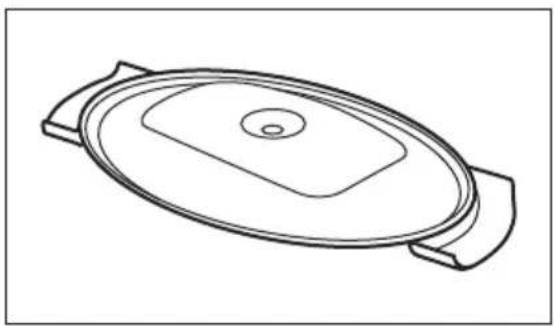
natural_image
Line drawing of a closed lid with a circular top and two side handles (no text or symbols)natural_image
Line drawing of an oval-shaped metal tray with two handles and a perforated interior (no text or symbols)natural_image
Simple line drawing of an oval-shaped object with no text or symbolsPizzapfanne
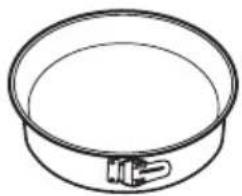
natural_image
Simple line drawing of a circular container with a small protrusion on the side (no text or symbols)Backform
Förmchen
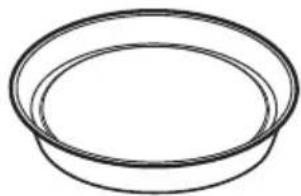
natural_image
Simple line drawing of a bowl or container with no text, numbers, or symbolsTortenbodenform
natural_image
Line drawing of a hand adjusting a metal shelf with a valve (no text or symbols)natural_image
Technical diagram showing a mechanical assembly with an inset close-up of a component (no text or symbols present)natural_image
Mechanical assembly diagram showing a clamping mechanism with an arrow indicating rotational motion (no text or symbols present)natural_image
Symbol of a trash bin crossed with a diagonal line, representing no waste or discharge (no text or labels)natural_image
Recycling symbol with three arrows forming a triangle (no text or labels)Welcome to AEG! Thank you for choosing our appliance.


In our drive to be sustainable, we are reducing paper assets and provide full user manuals online. Access your full user manual at aeg.com/manuals
Get usage advice, brochures, trouble shooter, service and repair information at aeg.com/support
For more recipes, hints, troubleshooting download My AEG Kitchen app.

Subject to change without notice.
CONTENTS
- SAFETY INFORMATION.... 241
- SAFETY INSTRUCTIONS.... 243
- INSTALLATION....246
- PRODUCT DESCRIPTION....248
- CONTROL PANEL 248
- BEFORE FIRST USE....250
- DAILY USE....251
- CLOCK FUNCTIONS....256
- HOW TO USE: ACCESSORIES.... 257
- ADDITIONAL FUNCTIONS....261
- HINTS AND TIPS....262
- CARE AND CLEANING.... 265
- TROUBLESHOOTING.... 269
- ENERGY EFFICIENCY....272
- MENU STRUCTURE....273
- IT'S EASY!......275
- ENVIRONMENTAL CONCERNS....276

flowchart
graph TD
    A["Open Book"] -->|Wi-Fi| B["AEG"]
    B --> C["My AEG Kitchen app"]
    C --> D["App Store: Apple Apple"]
    C --> E["Google Play: Google Play"]
1. ⚠SAFETY INFORMATION
Before the installation and use of the appliance, carefully read the supplied instructions. The manufacturer is not responsible for any injuries or damage that are the result of incorrect installation or usage. Always keep the instructions in a safe and accessible location for future reference.
1.1 Children and vulnerable people safety
- This appliance can be used by children aged from 8 years and above and persons with reduced physical, sensory or mental capabilities or lack of experience and knowledge if they have been given supervision or instruction concerning the use of the appliance in a safe way and understand the hazards involved. Children of less than 8 years of age and persons with very extensive and complex disabilities shall be kept away from the appliance unless continuously supervised.
- Children should be supervised to ensure that they do not play with the appliance and mobile devices with My AEG Kitchen.
- Keep all packaging away from children and dispose of it appropriately.
- WARNING: The appliance and its accessible parts become hot during use. Keep children and pets away from the appliance when in use and when cooling down.
- If the appliance has a child safety device, it should be activated.
- Children shall not carry out cleaning and user maintenance of the appliance without supervision.
1.2 General Safety
- This appliance is for cooking purposes only.
-
This appliance is designed for single household domestic use in an indoor environment.
-
This appliance may be used in, offices, hotel guest rooms, bed & breakfast guest rooms, farm guest houses and other similar accommodation where such use does not exceed (average) domestic usage levels.
- Only a qualified person must install this appliance and replace the cable.
- Do not use the appliance before installing it in the built-in structure.
- Disconnect the appliance from the power supply before carrying out any maintenance.
- If the mains power supply cable is damaged, it must be replaced by the manufacturer, its Authorised Service Centre or similarly qualified persons to avoid an electrical hazard.
- WARNING: Ensure that the appliance is switched off before replacing the lamp to avoid the possibility of electric shock.
- WARNING: The appliance and its accessible parts become hot during use. Care should be taken to avoid touching heating elements or the surface of the appliance cavity.
- Always use oven gloves to remove or insert accessories or ovenware.
- Use only the food sensor (core temperature sensor) recommended for this appliance.
- To remove the shelf supports first pull the front of the shelf support and then the rear end away from the side walls. Install the shelf supports in the opposite sequence.
- Do not use a steam cleaner to clean the appliance.
- Do not use harsh abrasive cleaners or sharp metal scrapers to clean the glass door since they can scratch the surface, which may result in shattering of the glass.
- Before pyrolytic cleaning, remove all accessories and excessive deposits/spills from the appliance cavity.
2. SAFETY INSTRUCTIONS
2.1 Installation

WARNING!
Only a qualified person must install this appliance.
- Remove all the packaging.
- Do not install or use a damaged appliance.
- Follow the installation instructions supplied with the appliance.
• Always take care when moving the appliance as it is heavy. Always use safety gloves and enclosed footwear. - Do not pull the appliance by the handle.
• Install the appliance in a safe and suitable place that meets installation requirements. - Keep the minimum distance from other appliances and units.
- Before mounting the appliance, check if the appliance door opens without restraint.
- The appliance is equipped with an electric cooling system. It must be operated with the electric power supply.
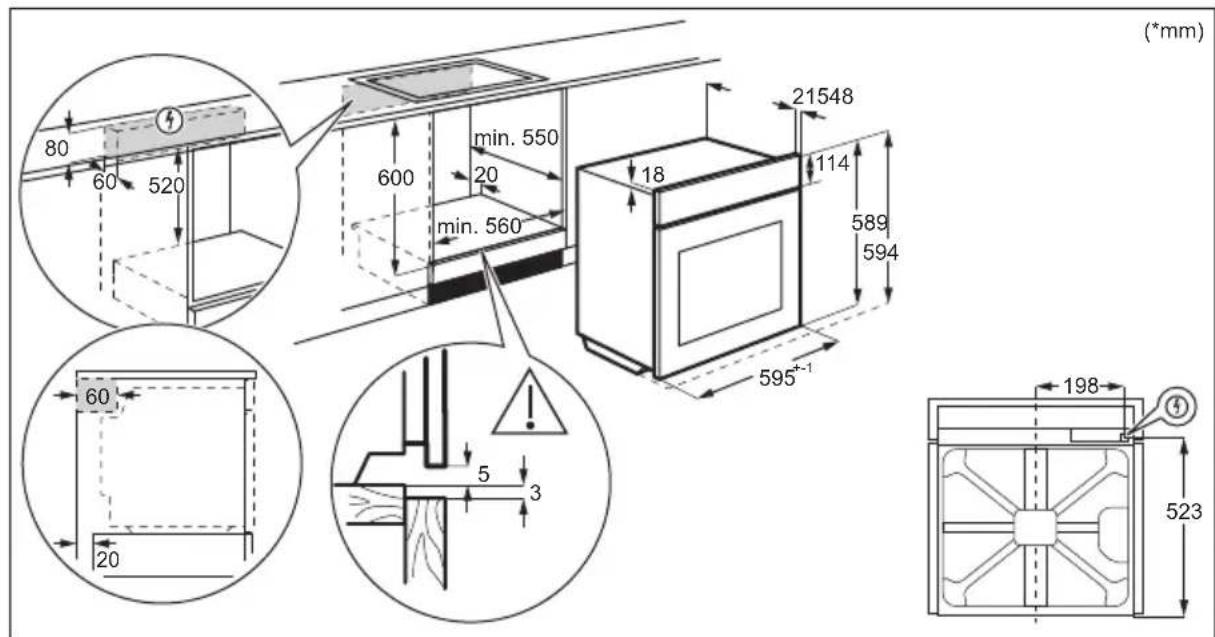
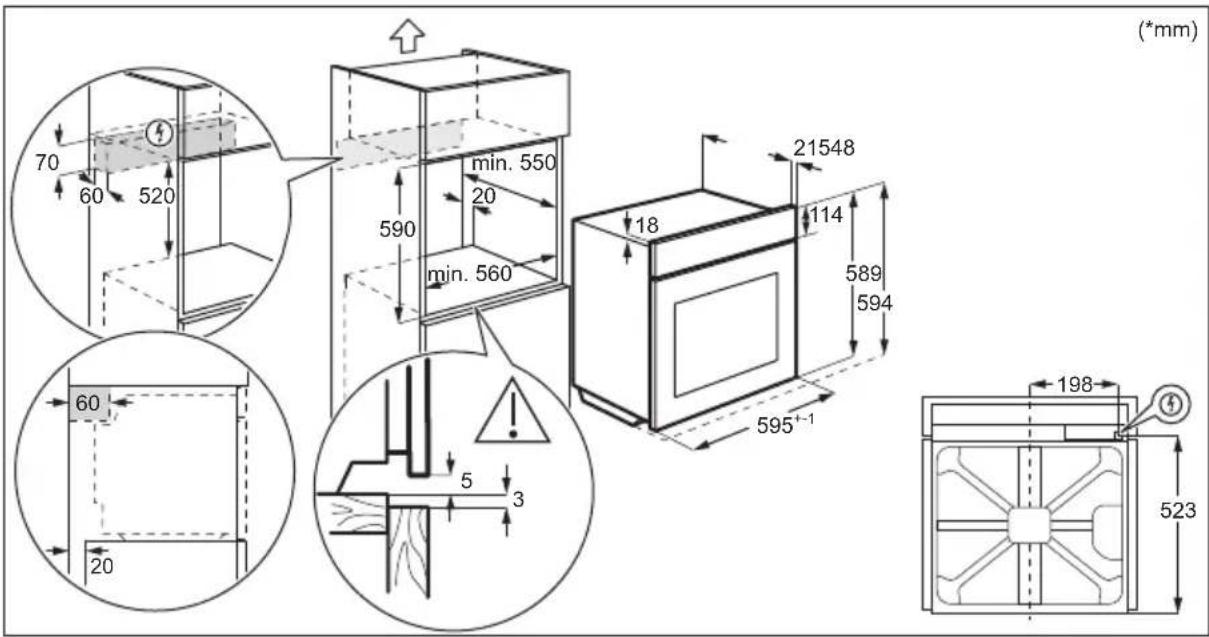
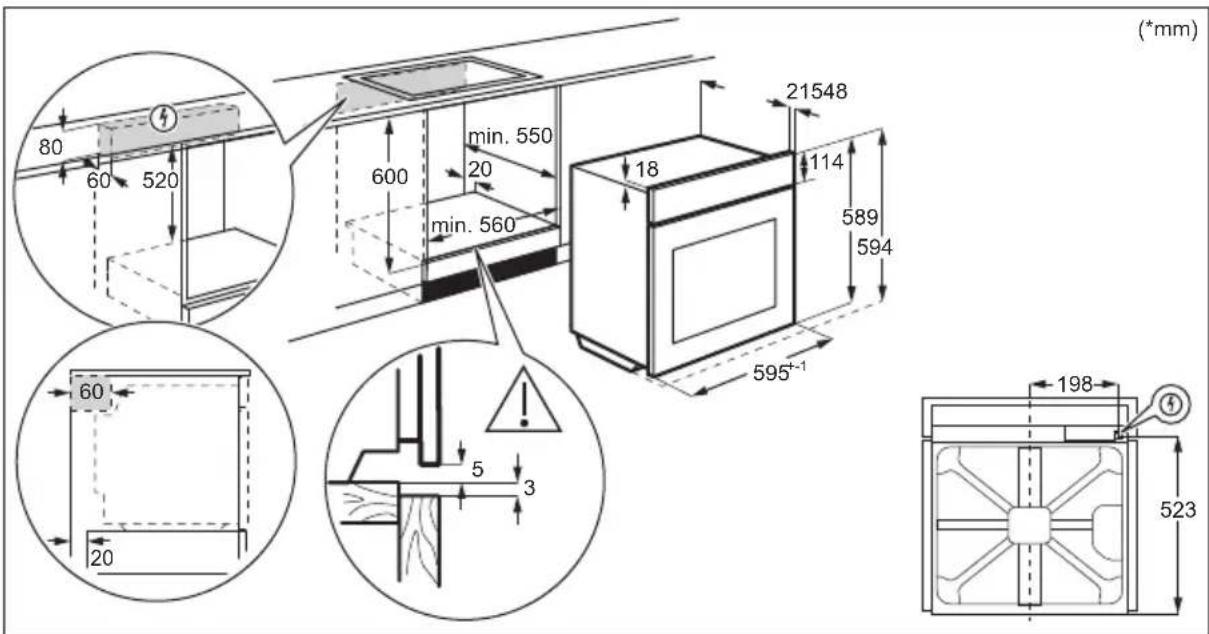
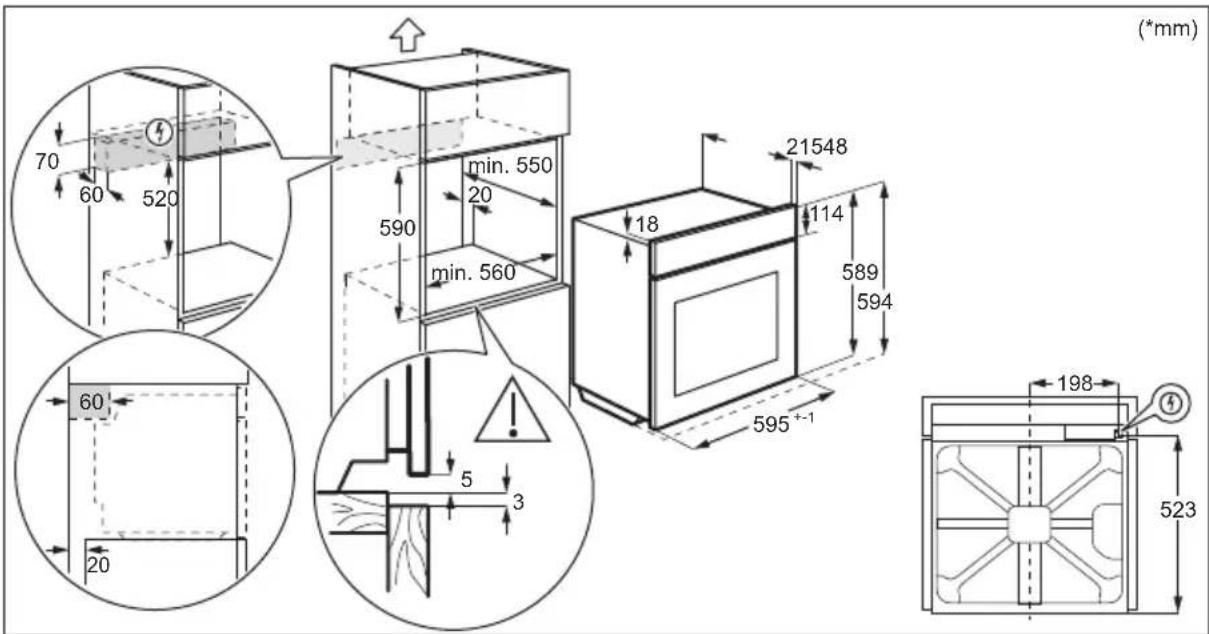
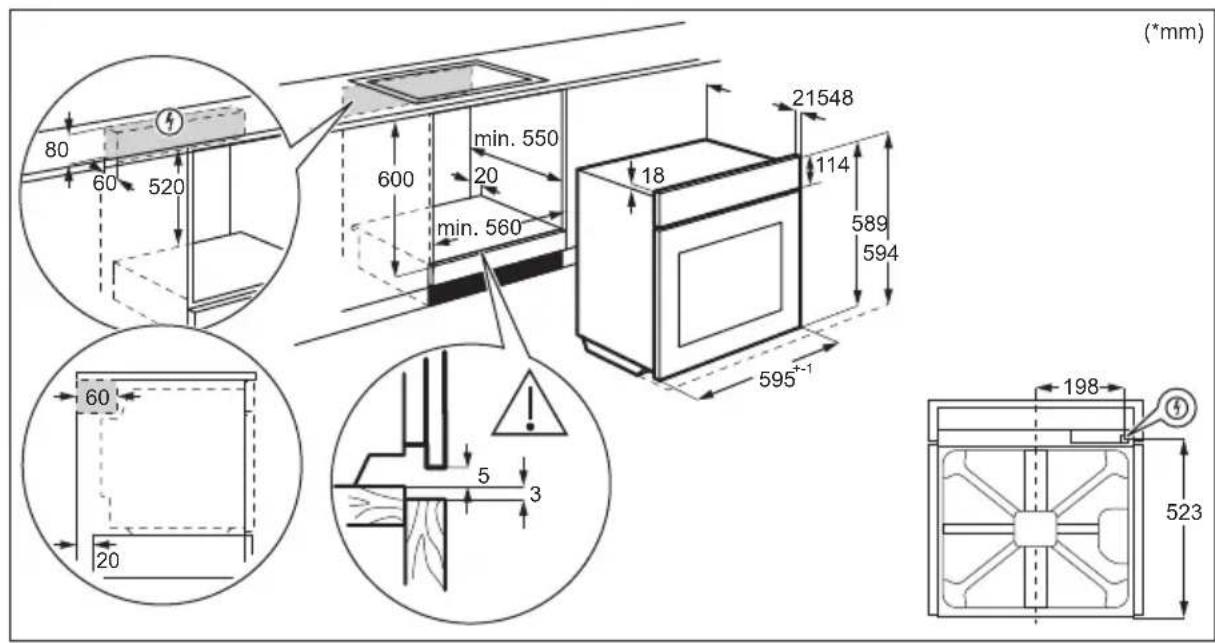
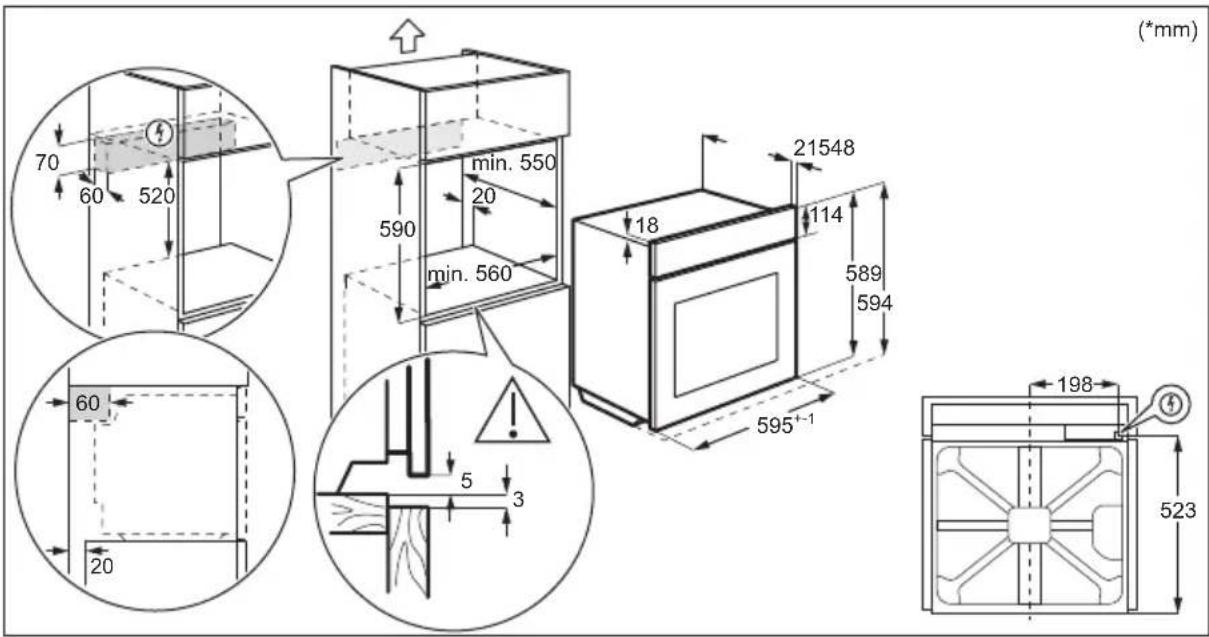
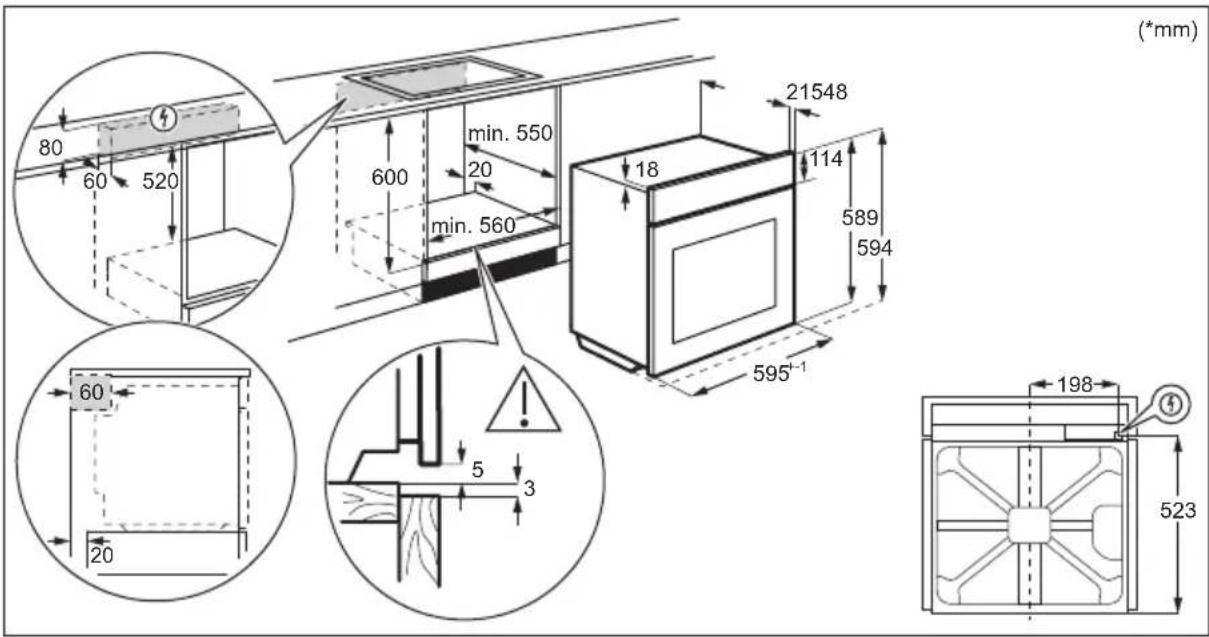
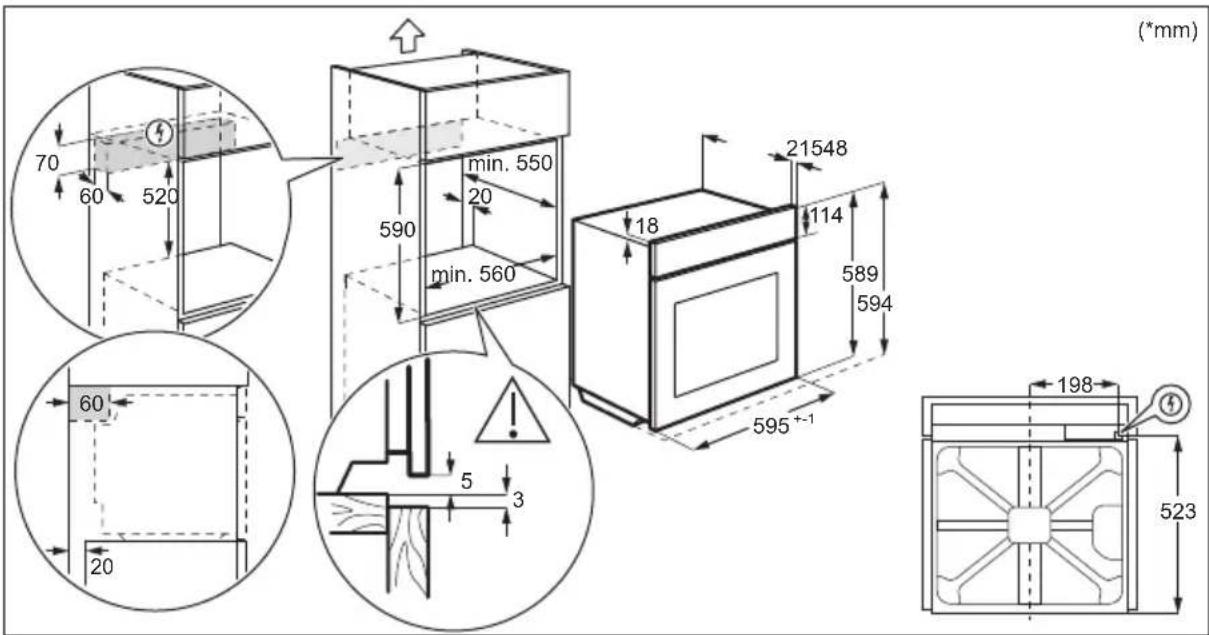
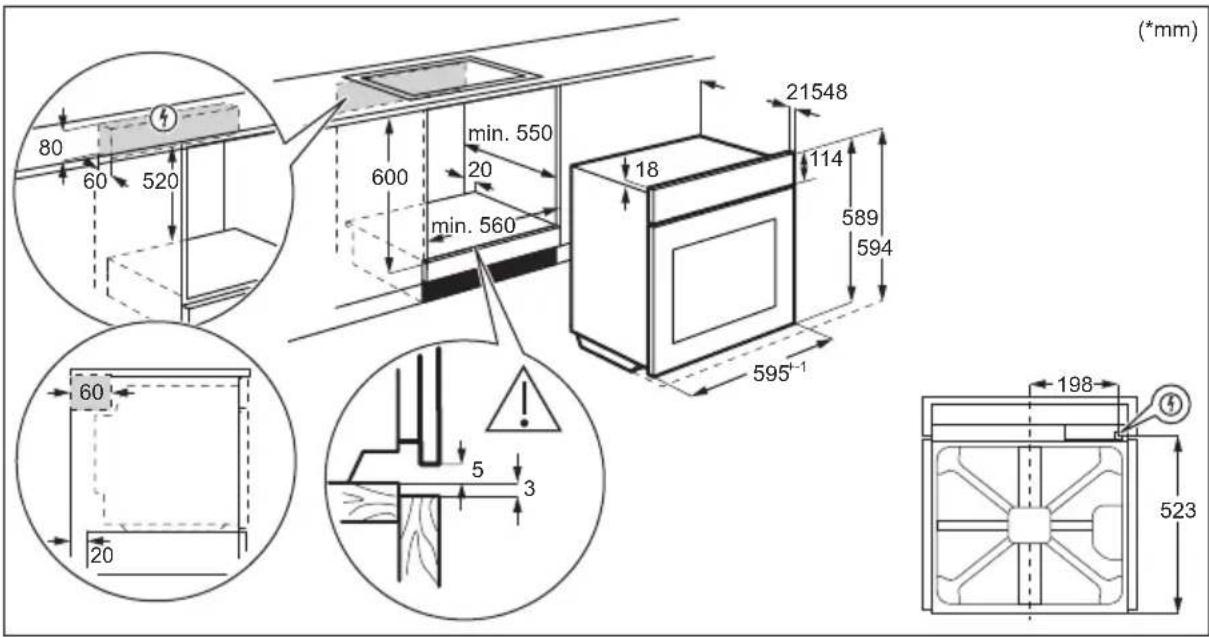
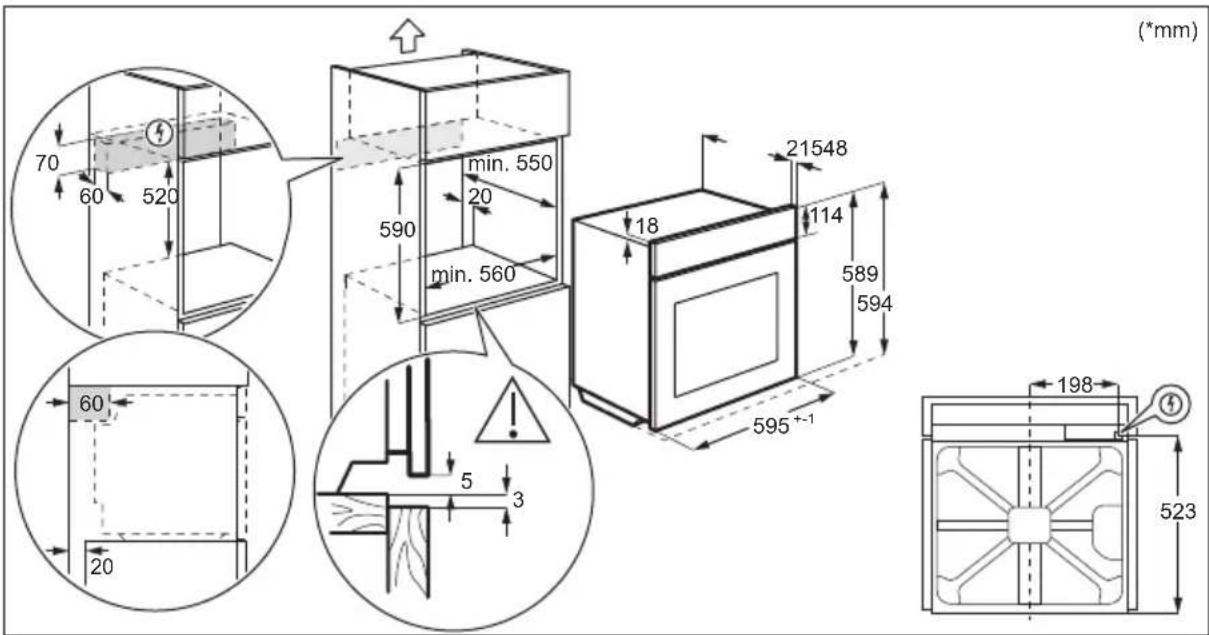
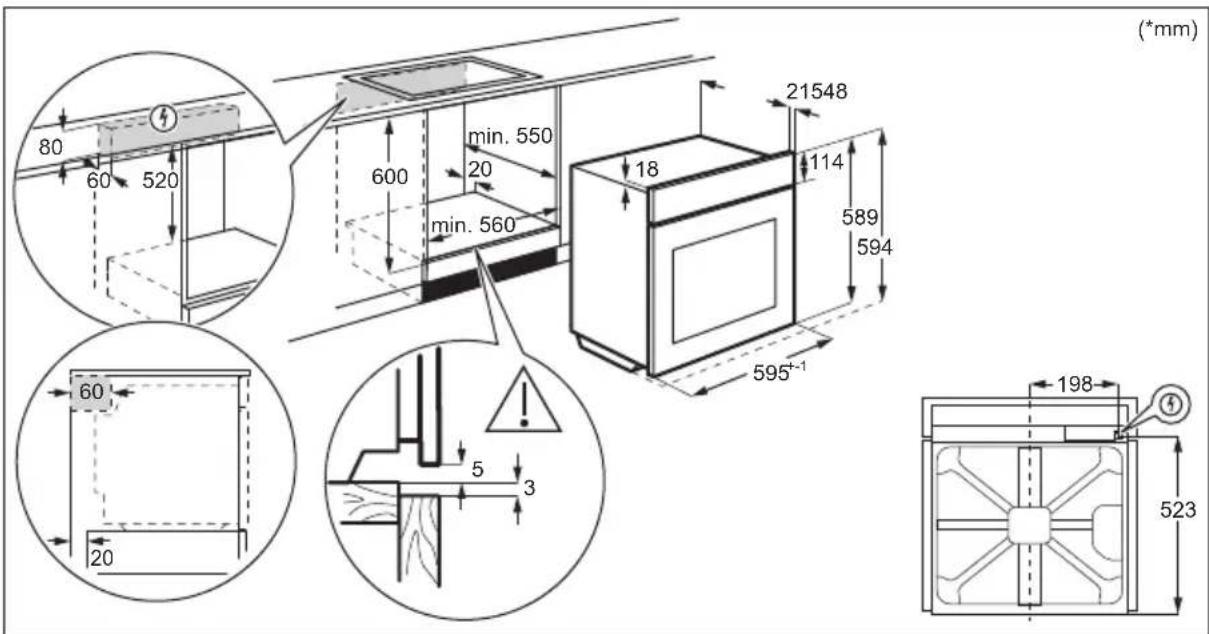
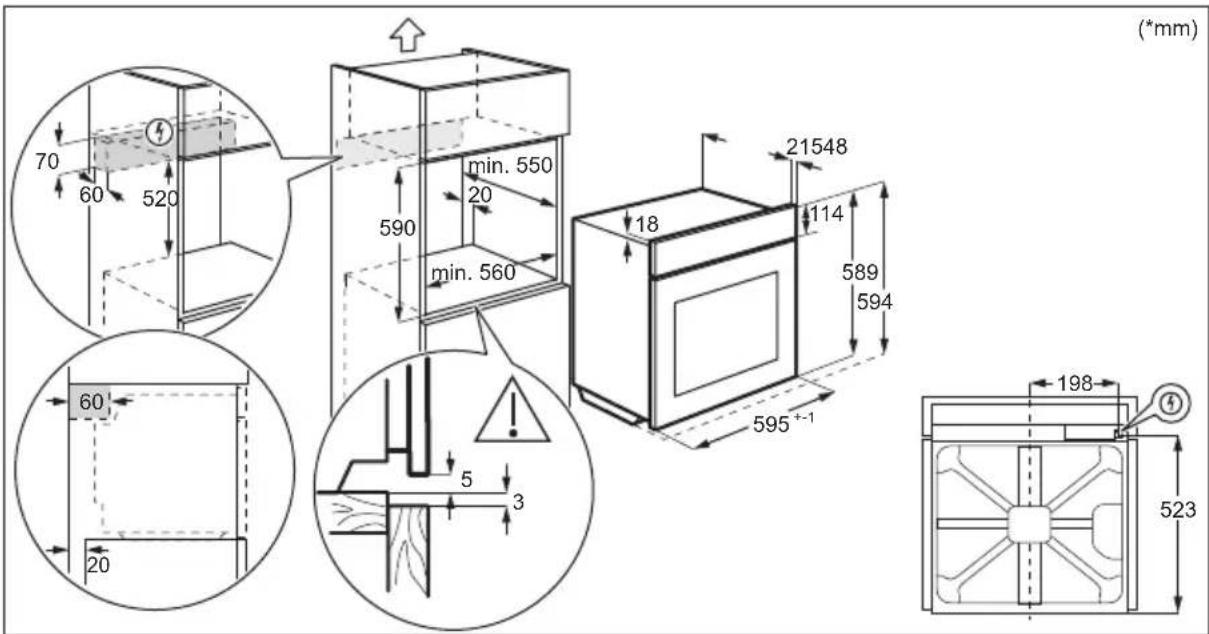
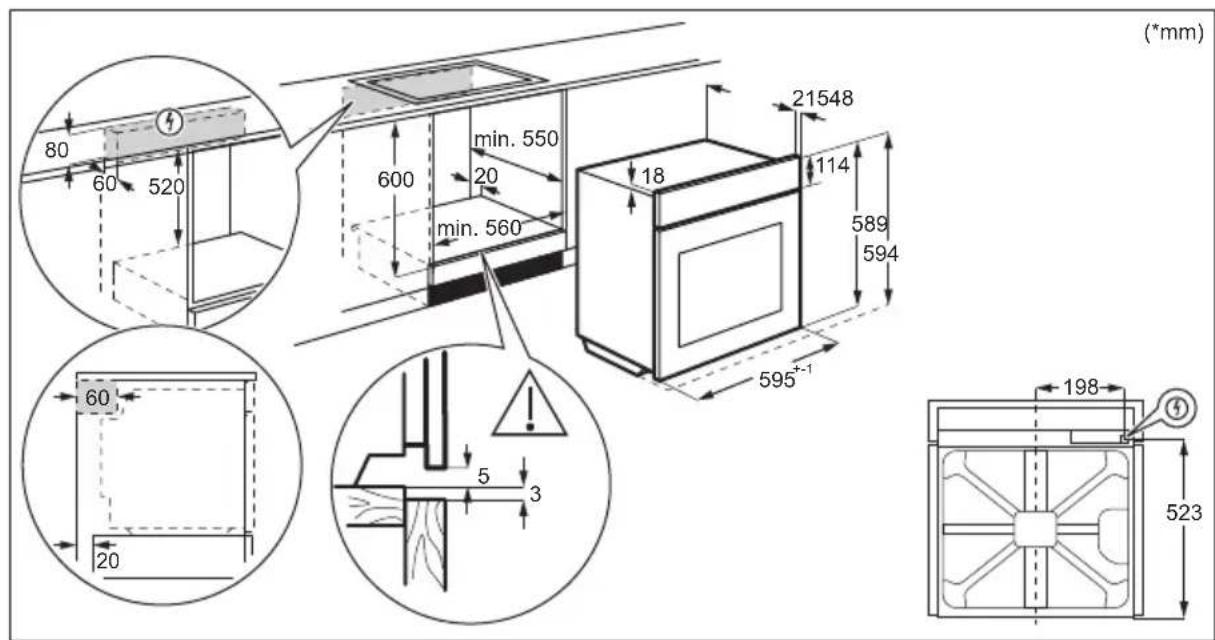
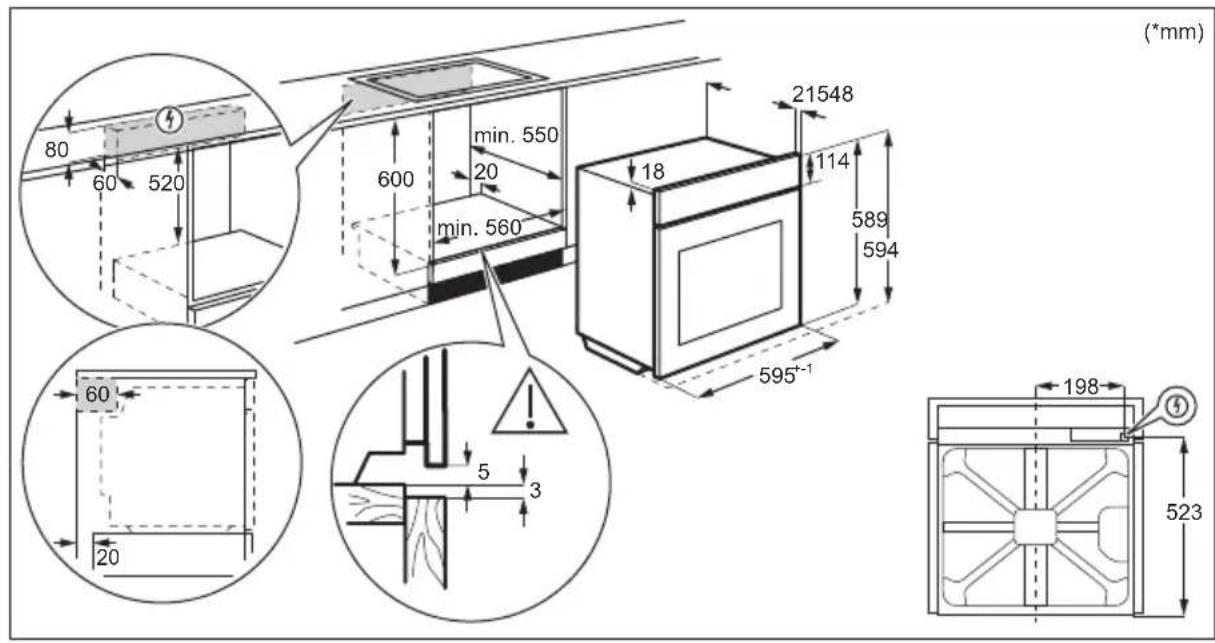
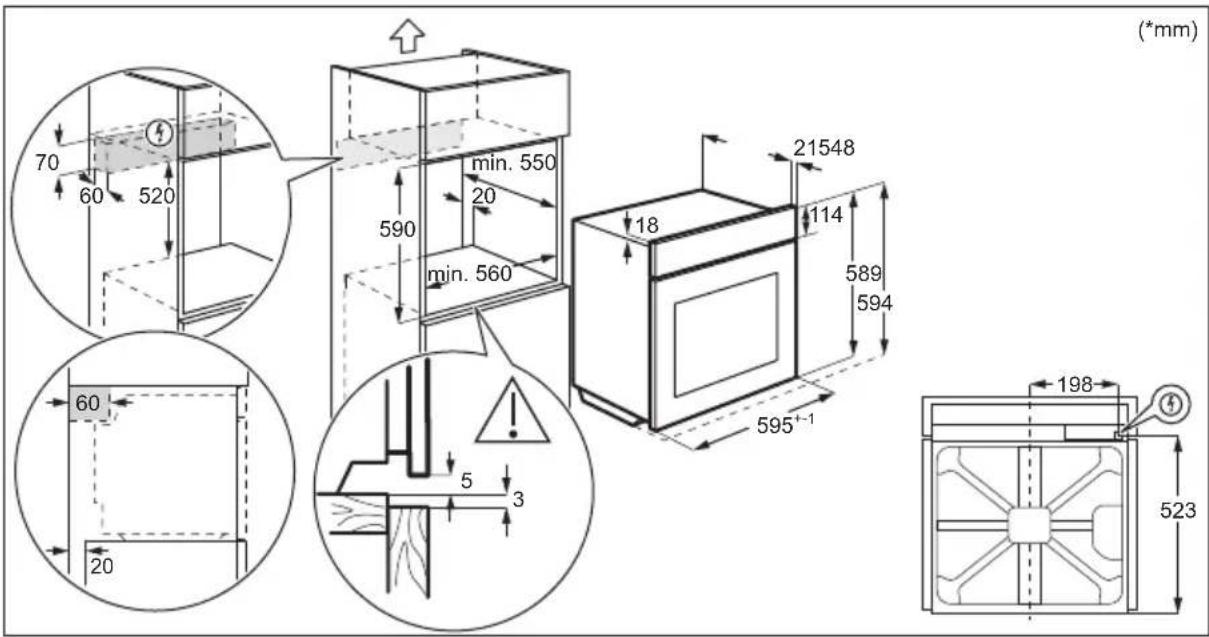
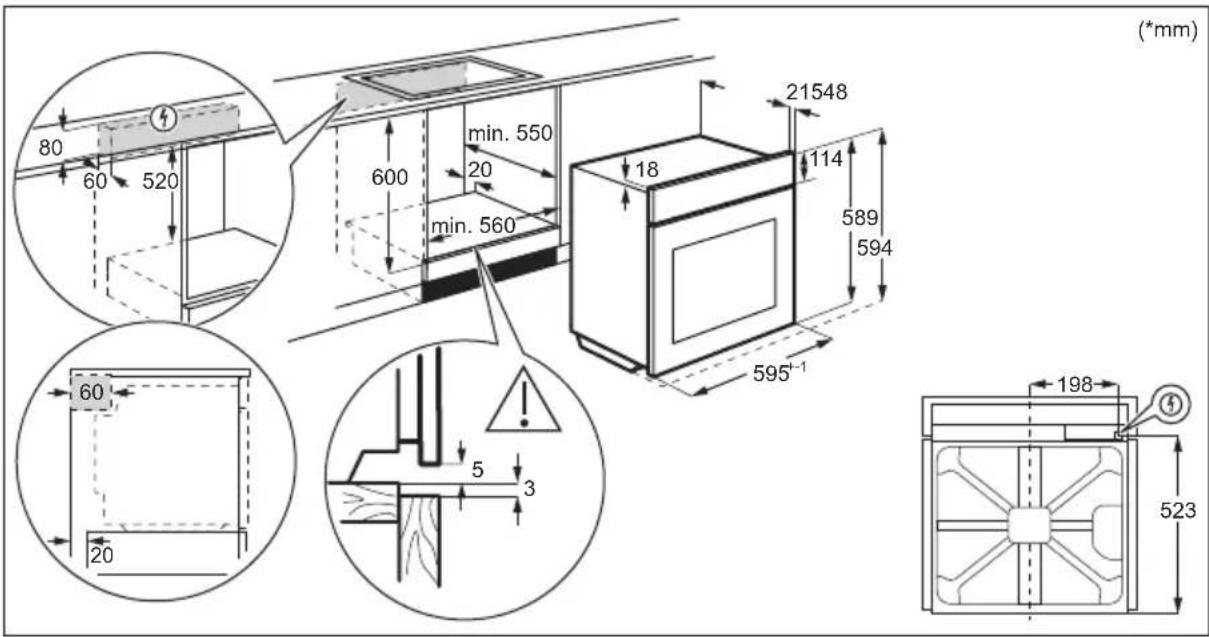
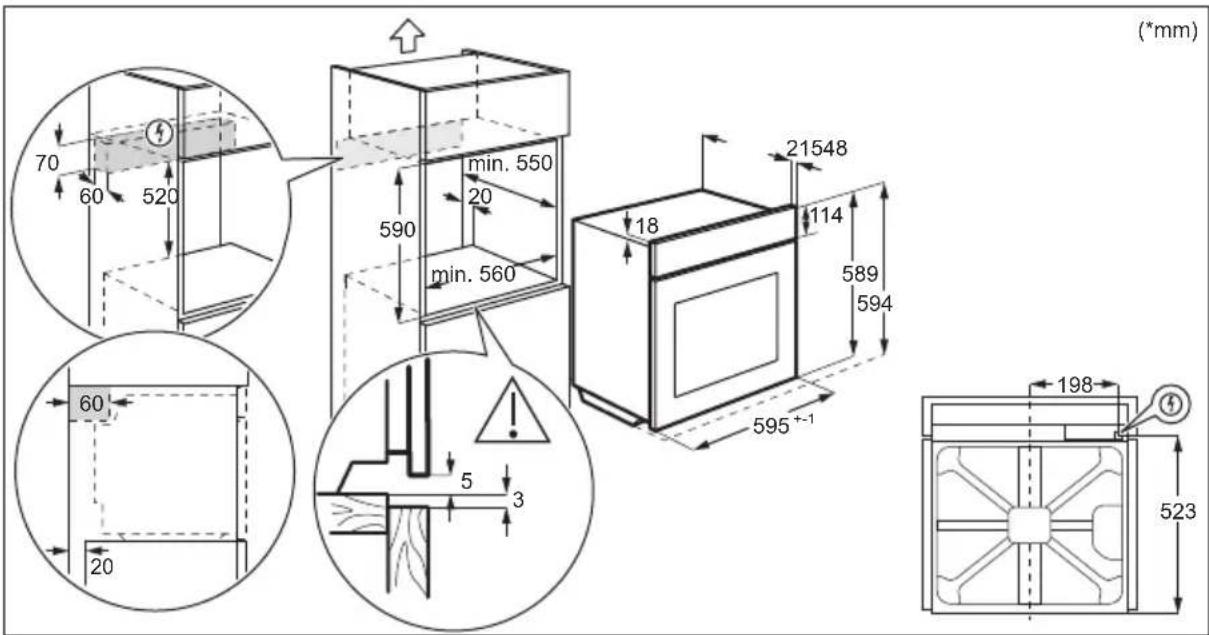
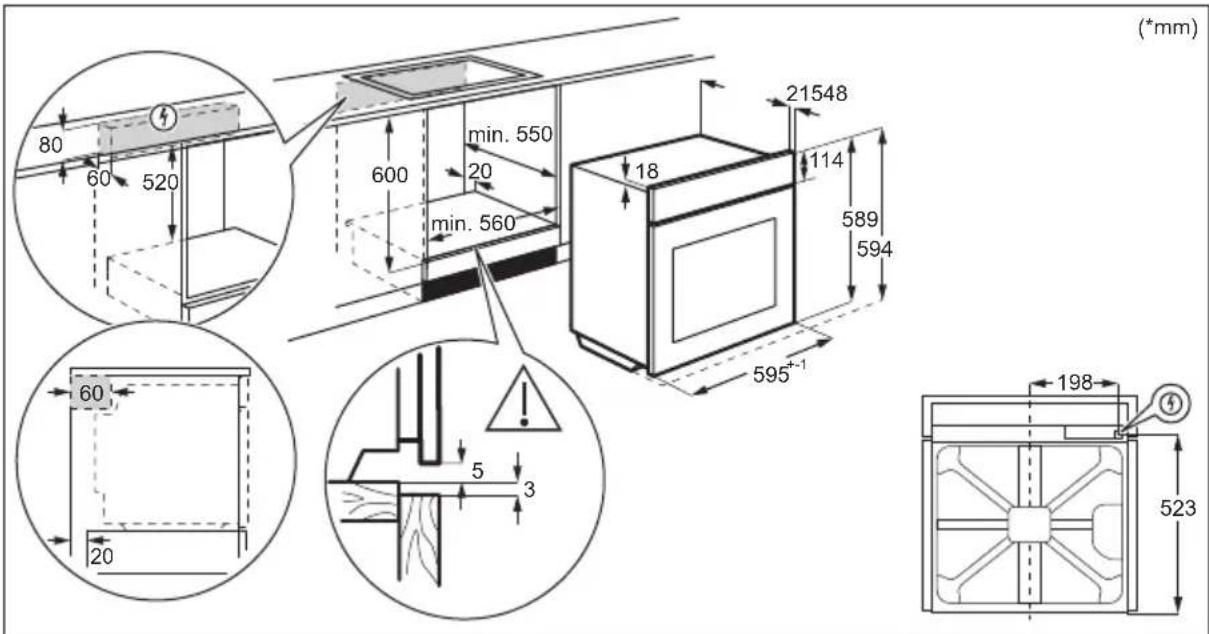
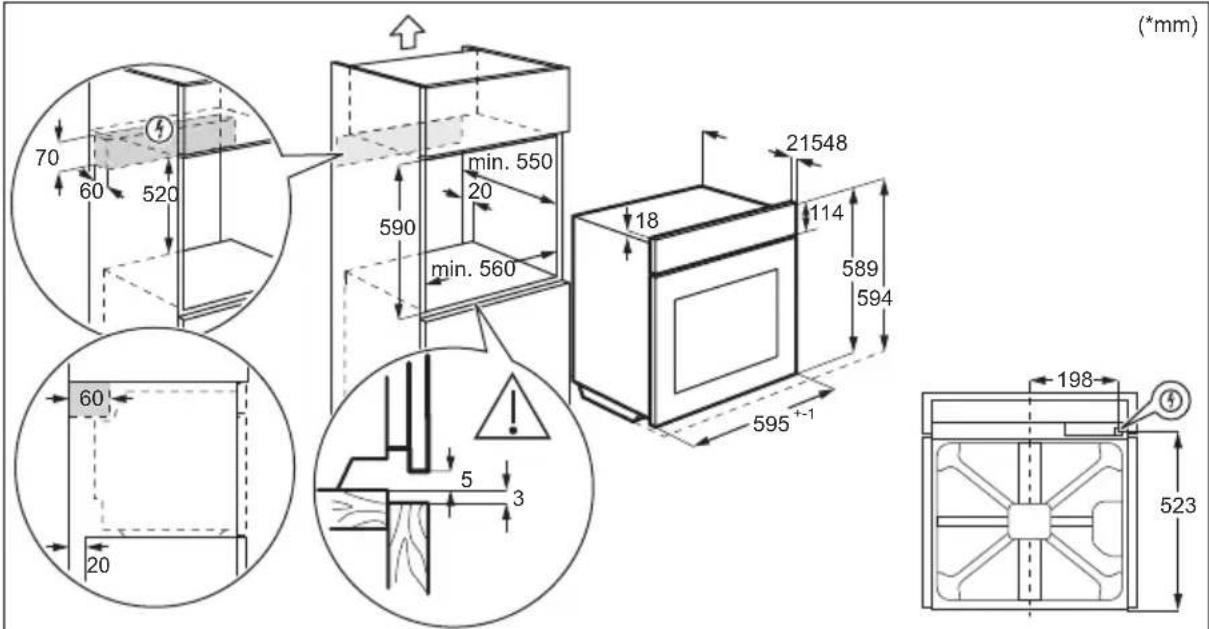
| Cabinet minimum height (Cabinet under the worktop minimum height) | 590 (600) mm |
| Cabinet width 560 mm | |
| Cabinet depth 550 (550) mm | |
| Height of the front of the appliance | 594 mm |
| Height of the back of the appliance | 576 mm |
| Width of the front of the appliance | 595 mm |
| Width of the back of the appliance | 559 mm |
| Depth of the appliance 569 mm | |
| Built in depth of the appliance | 548 mm |
| Depth with open door 1022 mm | |
| Ventilation opening minimum size. Opening placed on the bottom rear side | 560x20 mm |
| Mains supply cable length. | 1500 mm |
| Cable is placed in the right corner of the back side |
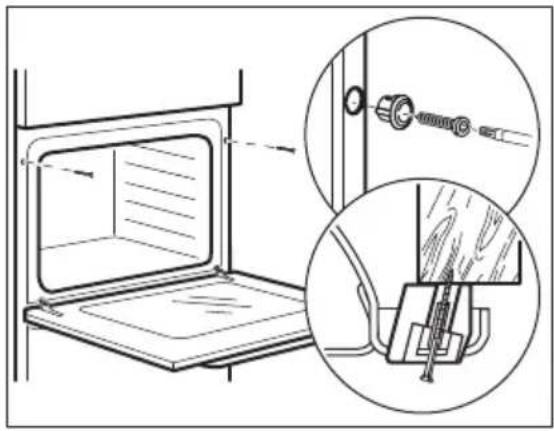
Mounting screws 4x25 mm
2.2 Electrical connection

WARNING!
Risk of fire and electric shock.
- All electrical connections should be made by a qualified electrician.
• The appliance must be earthed. - Make sure that the parameters on the rating plate are compatible with the electrical ratings of the mains power supply.
• Always use a correctly installed shockproof socket. - Do not use multi-plug adapters and extension cables.
- Make sure not to cause damage to the mains plug and to the mains cable. Should the mains cable need to be replaced, this must be carried out by our Authorised Service Centre.
- Do not let mains cables touch or come near the appliance door or the niche below the appliance, especially when it operates or the door is hot.
- The shock protection of live and insulated parts must be fastened in such a way that it cannot be removed without tools.
- Connect the mains plug to the mains socket only at the end of the installation. Make sure that there is access to the mains plug after the installation.
- If the mains socket is loose, do not connect the mains plug.
- Do not pull the mains cable to disconnect the appliance. Always pull the mains plug.
- Use only correct isolation devices: line protecting cut-outs, fuses (screw type fuses removed from the holder), earth leakage trips and contactors.
- The electrical installation must have an isolation device which lets you disconnect the appliance from the mains at all poles.
The isolation device must have a contact opening width of minimum 3 mm.
- Fully close the appliance door before you connect the mains plug to the mains socket.
- This appliance is supplied with a main plug and a main cable.
Cable types applicable for installation or replacement for Europe:
H07 RN-F, H05 RN-F, H05 RRF, H05 VV-F, H05 V2V2-F (T90), H05 BB-F
For the section of the cable refer to the total power on the rating plate. You can also refer to the table:
Total power (W) Section of the cable (mm ^4 )
maximum 1380 3x0.75
maximum 2300 3x1
maximum 3680 3x1.5
The earth cord (green / yellow cable) must be 2 cm longer than the brown phase and blue neutral cables.
2.3 Use

WARNING!
Risk of injury, burns and electric shock or explosion.
- Do not change the specification of this appliance.
- Make sure that the ventilation openings are not blocked.
- Do not let the appliance stay unattended during operation.
- Deactivate the appliance after each use.
- Be careful when you open the appliance door while the appliance is in operation. Hot air can release.
- Do not operate the appliance with wet hands or when it has contact with water.
- Do not apply pressure on the open door.
- Do not use the appliance as a work surface or as a storage surface.
-
Open the appliance door carefully. The use of ingredients with alcohol can cause a mixture of alcohol and air.
-
Do not let sparks or open flames to come in contact with the appliance when you open the door.
- Do not put flammable products or items that are wet with flammable products in, near or on the appliance.
- Do not share your Wi-Fi password.

WARNING!
Risk of damage to the appliance.
- To prevent damage or discoloration to the enamel:
– do not put ovenware or other objects in the appliance directly on the bottom.
– do not put aluminium foil directly on the bottom of cavity of the appliance.
– do not put water directly into the hot appliance.
– do not keep moist dishes and food in the appliance after you finish the cooking.
– be careful when you remove or install the accessories.
- Discoloration of the enamel or stainless steel has no effect on the performance of the appliance.
- Use a deep pan for moist cakes. Fruit juices cause stains that can be permanent.
• Always cook with the appliance door closed. - If the appliance is installed behind a furniture panel (e.g. a door) make sure the door is never closed when the appliance operates. Heat and moisture can build up behind a closed furniture panel and cause subsequent damage to the appliance, the housing unit or the floor. Do not close the furniture panel until the appliance has cooled down completely after use.
2.4 Care and cleaning

WARNING!
Risk of injury, fire, or damage to the appliance.
- Before maintenance, deactivate the appliance and disconnect the mains plug from the mains socket.
-
Make sure the appliance is cold. There is the risk that the glass panels can break.
-
Replace immediately the door glass panels when they are damaged. Contact the Authorised Service Centre.
- Be careful when you remove the door from the appliance. The door is heavy!
- Clean regularly the appliance to prevent the deterioration of the surface material.
- Clean the appliance with a moist soft cloth. Use only neutral detergents. Do not use abrasive products, abrasive cleaning pads, solvents or metal objects.
- If you use an oven spray, follow the safety instructions on its packaging.
2.5 Pyrolytic cleaning

WARNING!
Risk of Injury / Fires / Chemical Emissions (Fumes) in Pyrolytic Mode.
- Before carrying out the pyrolytic cleaning and initial preheating remove from the oven cavity:
– any excess food residues, oil or grease spills / deposits.
– any removable objects (including shelves, side rails, etc., provided with the appliance) especially any non-stick pots, pans, trays, utensils, etc. - Read carefully all the instructions for pyrolytic cleaning.
- Keep children away from the appliance while the pyrolytic cleaning operates. The appliance becomes very hot and hot air is released from the front cooling vents.
- Pyrolytic cleaning is a high temperature operation that can release fumes from cooking residues and construction materials, as such consumers are advised to:
– provide good ventilation during and after the pyrolytic cleaning.
– provide good ventilation during and after the initial preheating. - Do not spill or apply water on the oven door during and after the pyrolytic cleaning to avoid damaging the glass panels.
- Fumes released from all pyrolytic ovens / cooking residues as described are not harmful to humans, including children, or persons with medical conditions.
- Keep pets away from the appliance during and after the pyrolytic cleaning and initial
preheating. Small pets (especially birds and reptiles) can be highly sensitive to temperature changes and emitted fumes.
- Non-stick surfaces on pots, pans, trays, utensils etc., can be damaged by the high temperature pyrolytic cleaning operation of all pyrolytic ovens and can be also a source for low level harmful fumes.
2.6 Steam Cooking

WARNING!
Risk of burns and damage to the appliance.
- Released Steam can cause burns:
- Do not open the appliance door during the steam cooking operation.
- Open the appliance door with care after the steam cooking operation.
2.7 Internal lighting

WARNING!
Risk of electric shock.
- Concerning the lamp(s) inside this product and spare part lamps sold separately: These lamps are intended to withstand extreme physical conditions in household appliances, such as temperature, vibration, humidity, or are intended to signal information about the operational status of the appliance. They are not intended to be used in other applications and are not suitable for household room illumination.
- This product contains a light source of energy efficiency class G.
- Use only lamps with the same specifications.
2.8 Service
• To repair the appliance contact the Authorised Service Centre.
- Use original spare parts only.
2.9 Disposal

WARNING!
Risk of injury or suffocation.
- Contact your municipal authority for information on how to dispose of the appliance.
- Disconnect the appliance from the mains supply.
- Cut off the mains electrical cable close to the appliance and dispose of it.
- Remove the door catch to prevent children or pets from becoming trapped in the appliance.
3. INSTALLATION

WARNING!
Refer to Safety chapters.
3.1 Building in

YouTube
www.youtube.com/electrolux www.youtube.com/aeg
How to install your AEG/Electrolux Oven - Column installation

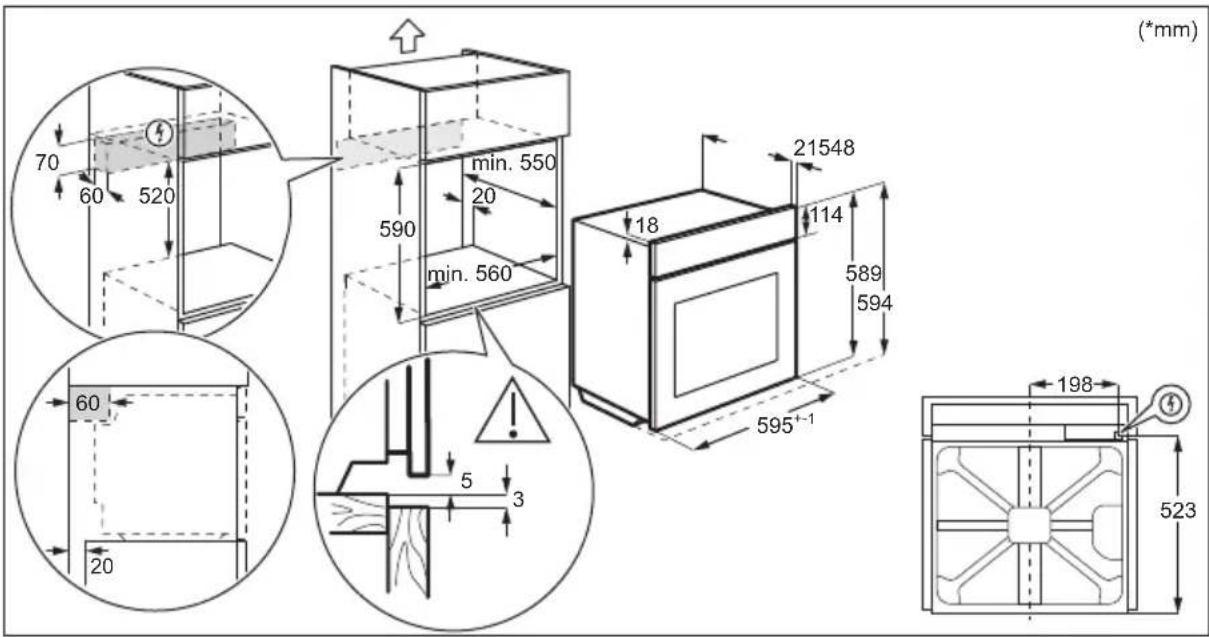
3.2 Securing the oven to the cabinet
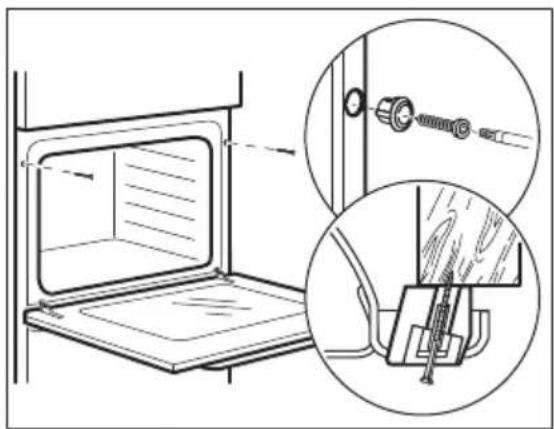
natural_image
Technical illustration of a door opening with an inset close-up showing mechanical components (no text or symbols)4. PRODUCT DESCRIPTION
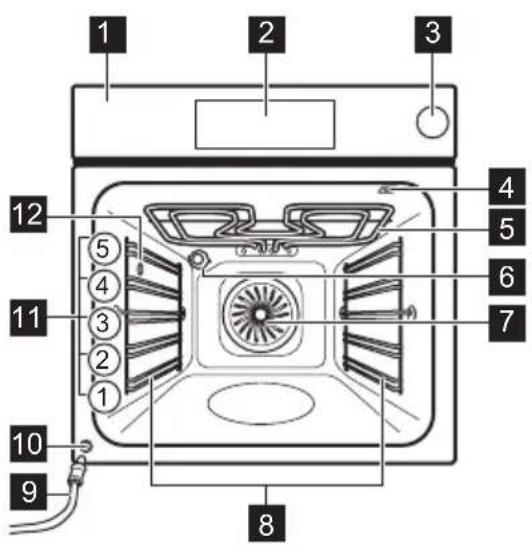
4.1 General overview
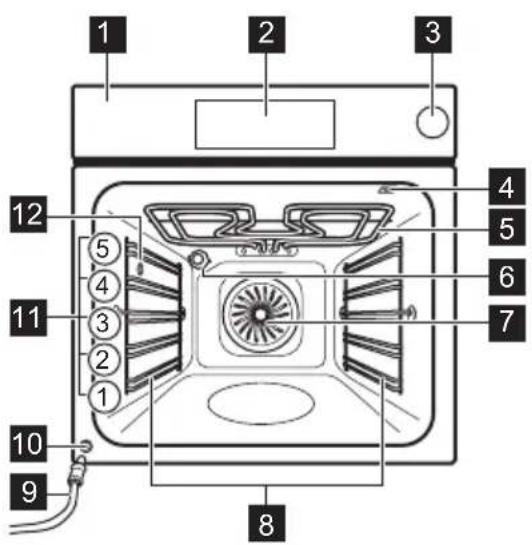
4.2 Accessories
- Wire shelf
For cookware, cake tins, roasts.
- Baking tray
For cakes and biscuits.
- Grill- / Roasting pan
To bake and roast or as pan to collect fat.
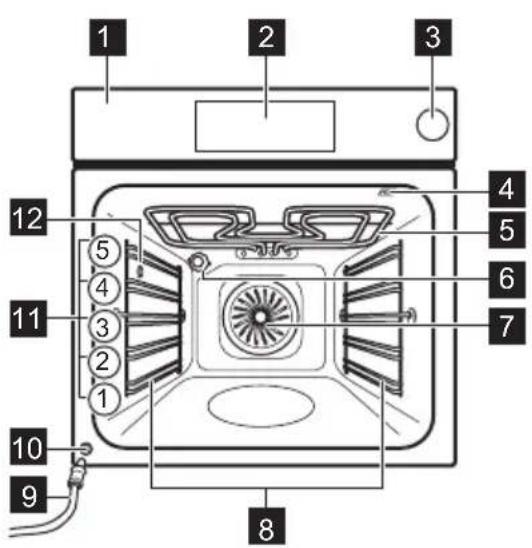
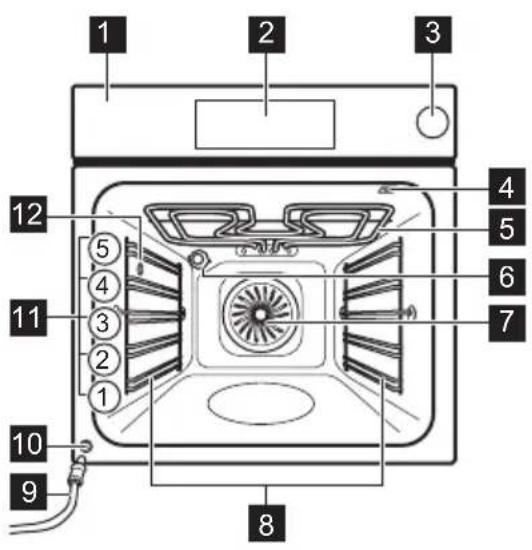
1 Control panel
2 Electronic programmer
3 Water drawer
4 Socket for the food sensor
5 Heating element
6 Lamp
7 Fan
8 Shelf support, removable
9 Draining pipe
10 Water outlet valve
11 Shelf positions
12 Steam inlet
- Food sensor
To measure how far the food is cooked.
- Telescopic runners
With the telescopic runners you can put in and remove the shelves more easily.
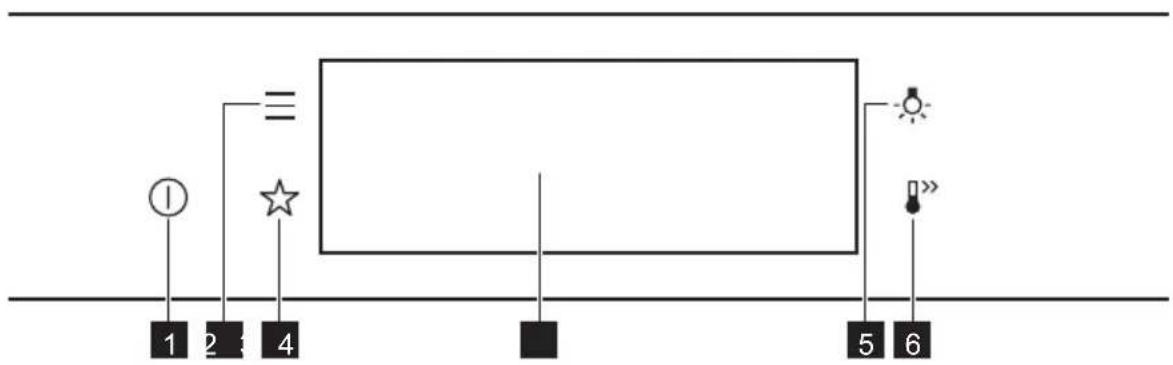
5. CONTROL PANEL
5.1 Control panel overview
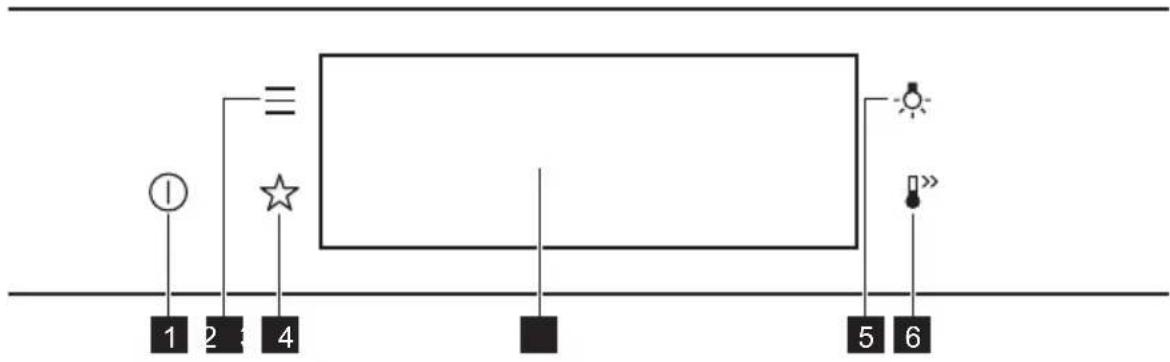
1 ON / OFF Press and hold to turn the appliance on and off.
2 Menu Lists the appliance functions.
3 Favourites Lists the favourite settings.
4 Display Shows the current settings of the appliance.
5 Lamp switch To turn the lamp on and off.
6 Fast Heat Up To turn on and off the function: Fast Heat Up.
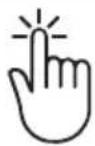
Press Move

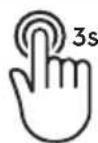
Press and hold
Touch the surface with fingertip. Slide fingertip over the surface. Touch the surface for 3 seconds.
5.2 Display
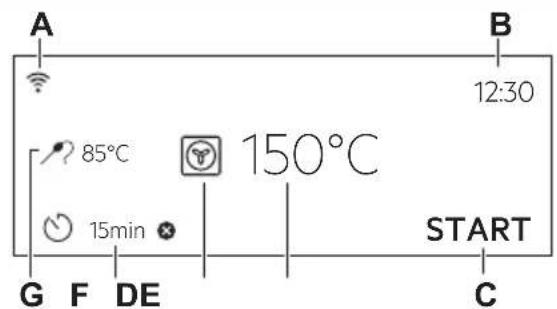
Display with key functions set.
A. Wi-Fi
B. Time of day
C. START/STOP
D. Temperature
E. Heating functions
F. Timer
G. Food sensor (selected models only)
Display indicators
Basic indicators - to navigate on the display.

To confirm the selection / setting.

To go one level back in the menu.

To undo the last action.

To turn the options on and off.
Sound alarm function indicators - when the set time of cooking ends, the signal sounds.

The function is on.

The function is on. Cooking stops automatically.

Sound alarm is off.
Timer indicators

To set the function: Delayed start.

To cancel the setting.
Wi-Fi indicator - the appliance can be connected to Wi-Fi.

Wi-Fi connection is turned on.
Remote operation indicator - the appliance can be controlled remotely.
6. BEFORE FIRST USE

WARNING!
Refer to Safety chapters.
6.1 Initial Cleaning
| Step 1 Step 2 Step 3 | ||
| Remove all accessories and removable shelf supports from the appliance. | Clean the appliance and the accessories only with a microfibre cloth, warm water and a mild detergent. | Place the accessories and the removable shelf supports in the appliance. |
6.2 First connection
The display shows welcome message after the first connection.
You have to set: Language, Display brightness, Key tones, Buzzer volume, Time of day.
6.3 Wireless connection
To connect the appliance you need:
- Wireless network with the Internet connection.
- Mobile device connected to the same wireless network.
| Step 1 | To download My AEG Kitchen app: Scan the QR code on the rating plate with the camera on your mobile device to be redirected to AEG Homepage. The rating plate is on the front frame of the appliance cavity. You can also download the app directly from the app store. |
| Step 2 Follow the app onboarding instructions. |
| Step 3 Turn on the appliance. |
| Step 4 |

Press: Select: Settings / Connections.
| Step 5 |

- slide or press to turn on: Wi-Fi.
| Step 6 The appliance wireless module starts within 90 sec. |
| Frequency 2.4 GHz WLAN |
2400 - 2483.5 MHz
| Protocol IEEE 802.11b DSSS, 802.11g/n OFDM |
| Max Power EIRP < 20 dBm (100 mW) |
| Wi-Fi module NIUS-50 |
6.4 Software licences
The software in this product contains components that are based on free and open source software. AEG acknowledges the contributions of the open software and robotics communities to the development project.
To access the source code of these free and open source software components whose
license conditions require publishing, and to see their full copyright information and applicable license terms, visit: http://aeg.opensoftwarerepository.com (folder NIUS).
6.5 Initial preheating
Preheat the empty oven before the first use.
| Step 1 Remove all accessories and removable shelf supports from the oven. | |
| Step 2 | Set the maximum temperature for the function:☐Let the oven operate for 1 h. |
| Step 3 | Set the maximum temperature for the function:☐Let the oven operate for 15 min. |
| i The oven can emit an odour and smoke during preheating. Make sure that the room is ventilated. | |
7. DAILY USE

WARNING!
Refer to Safety chapters.
7.1 How to set: Heating functions
| Step 1 Turn on the oven. The display shows the default heating function. | |
| Step 2 Press the symbol of the heating function to enter the submenu. | |
| Step 3 | Select the heating function and press: OKThe display shows: temperature. |
| Step 4 | Set: temperature. Press: OK |
| Step 5 | Press: STARTFood Sensor - you can plug the sensor at any time before or during cooking. |
| STOP - press to turn off the heating function. | |
| Step 6 Turn off the oven. | |
7.2 How to set: Steam heating function
| Step 1 Turn on the oven.Select the symbol of the heating function and press it to enter the submenu. |
| Step 2 Set the steam heating function. |
| Step 3 | Press: OK The display shows the temperature settings. |
| Step 4 Set the temperature. | |
| Step 5 | Press: OK |
| Step 6 Press the cover of the water drawer to open it. | |
| Step 7 | Fill the water drawer with cold water to the maximum level (around 900 ml) until the signal sounds or the display shows the message. Do not fill the water drawer over its maximum capacity. There is a risk of water leakage, overflow and furniture damage. |
| WARNING! Use only cold tap water. Do not use filtered (demineralised) or distilled water. Do not use other liquids. Do not pour flammable or alcoholic liquids into the water drawer. | |
| Step 8 Push the water drawer to its initial position. | |
| Step 9 | Press: START When the oven reaches the set temperature, the signal sounds. |
| Step 10 When the water drawer runs out of water, the signal sounds. Refill the water drawer. | |
| Step 11 Turn off the oven. | |
| Step 12 Empty the water drawer after cooking ends. | |
| WARNING! The oven is hot. There is a risk of burns. Be careful when you empty the water drawer. | |
| Step 13 | Residual water can condensate in the cavity. After cooking, carefully open the oven door. When the oven is cold, dry the cavity with a soft cloth. Wait for at least 60 minutes after each use to prevent hot water from exiting the water outlet valve. |
7.3 Water tank
| Water tank indicator | |
| The tank is full. | |
| The tank is half full. | |
| Water tank indicator | |
| The tank is empty. Refill the tank. | |
| If you put too much water into the tank, the safety outlet moves the excess water to the bottom of the cavity. Remove the water with a sponge. | |
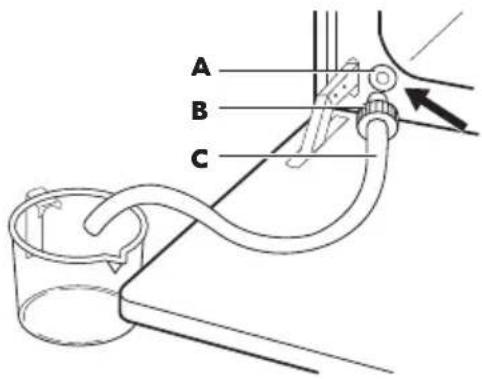
Emptying the water tank
| Step 1 | Turn off the oven, leave it with the door open and wait until the oven is cold. |
| Step 2 | Connect the draining pipe (C) to the outlet valve (A) through the connector (B). |
| Step 3 | Keep the end of the pipe below the level of A and push B repeatedly to collect remaining water. |
| Step 4 | Detach the C and B and dry the oven with a soft sponge. |
7.4 How to set: Assisted Cooking
Every dish in this submenu has a recommended function and temperature. You can adjust the time and the temperature.
For some of the dishes you can also cook with:
- Weight Automatic
- Food Sensor
The degree to which a dish is cooked:
- Rare or Less
- Medium
- Well done or More
Step 1 Turn on the oven.
| Step 2 | Press: |
| Step 3 | Press: ✗ Enter: Assisted Cooking. |
Step 4 Choose a dish or a food type.
| Step 5 | Press: $START |
7.5 Heating functions
STANDARD
Heating function Application

Grill
To grill thin pieces of food and to toast bread.

Turbo Grilling
To roast large meat joints or poultry with bones on one shelf position. To make gratins and to brown.
| Heating function Application | |
 | To bake on up to three shelf positions at the same time and to dry food. Set the temperature 20 - 40 °C lower than for Conventional Cooking. |
| True Fan Cooking | |
 | To make convenience food (e.g., french fries, potato wedges or spring rolls) crispy. |
| Frozen Foods | |
 | To bake and roast food on one shelf position. |
| Conventional Cooking | |
 | To bake cakes with crispy bottom and to preserve food. |
| Bottom Heat | |
 | To speed up the rising of the yeast dough. It prevents dough surface from drying and keeps the dough elastic. |
| Dough Proving | |
| iTrue Fan Cooking, Conventional Cooking: When you set the temperature below 80 °C the lamp automatically turns off after 30 sec. | |
SPECIALS
| Heating function Application | |
 | To preserve vegetables (e.g., pickles). |
| Preserving | |
 | To dry sliced fruit, vegetables and mushrooms. |
| Dehydrating | |
| Plate Warming | To preheat plates for serving. |
 | To defrost food (vegetables and fruit). The defrosting time depends on the amount and size of the frozen food. |
| Defrost | |
 | For dishes such as lasagna or potato gratin. To make gratins and to brown. |
Au Gratin | To prepare tender, succulent roasts. |
| Slow Cooking | |
 | To keep food warm. |
| Keep Warm | |
 | This function is designed to save energy during cooking. When you use this function, the temperature in the cavity may differ from the set temperature. The residual heat is used. The heating power may be reduced. For more information refer to "Daily Use" chapter, Notes on: Moist Fan Baking. |
| Moist Fan Baking | |
STEAM
| Heating function Application | ||
 | Food reheating with steam prevents surface drying. Heat is distributed in a gentle and even way, which allows to recover taste and aroma of food as just prepared. This function can be used to reheat food directly on a plate. You can reheat more than one plate at the same time, using different shelf positions. | |
| Steam Regenerating | ||
 | Baking pizza. | |
| Pizza Function | ||
 | Use this function to prepare bread and bread rolls with a very good professional-like result in terms of crispiness, colour and crust gloss. | |
| Bread Baking | ||
 | The function is suitable for meat, poultry, oven dishes and casseroles. Thanks to the combination of steam and heat, meat gets a tender and juicy texture along with a crusty surface. | |
| Humidity Low | ||
7.6 Notes on: Moist Fan Baking
This function was used to comply with the energy efficiency class and ecodesign requirements (according to EU 65/2014 and EU 66/2014). Tests according to:
IEC/EN 60350-1
The oven door should be closed during cooking so that the function is not interrupted and the oven operates with the highest energy efficiency possible.
When you use this function the lamp automatically turns off after 30 sec.
For the cooking instructions refer to "Hints and tips" chapter, Moist Fan Baking. For general energy saving recommendations refer to "Energy Efficiency" chapter, Energy Saving.
8. CLOCK FUNCTIONS
8.1 Clock functions description
| Clock function | Application |
| Cooking time | To set the length of cooking. Maximum is 23 h 59 min. |
| End action | To set what happens when the timer ends counting. |
| Delayed start | To postpone the start and / or end of cooking. |
| Clock function | Application |
| Time extension | To extend cooking time. |
| Reminder To set a countdown. Maximum is 23 h 59 min. This function has no effect on the operation of the appliance. | |
| Uptimer Monitors how long the function operates. Uptimer - you can turn it on and off. | |
8.2 How to set: Clock functions
| How to set the clock | |
| Step 1 Press: Time of day. | |
| Step 2 Set the time. Press: OK | |
| How to set cooking time | |
| Step 1 Choose the heating function and set the temperature. | |
| Step 2 Press: ☑ | |
| Step 3 Set the time. Press: OK | |
| How to choose end option | |
| Step 1 Choose the heating function and set the temperature. | |
| Step 2 Press: ☑ | |
| Step 3 Set the cooking time. | |
| Step 4 Press: ● ● ● | |
| Step 5 Press: End action. | |
| Step 6 Choose the preferred: End action. | |
| Step 7 Press: OK Repeat the action until the display shows the main screen. | |
| How to delay start of cooking | |
| Step 1 Set the heating function and the temperature. | |
| Step 2 Press: ☑ | |
| How to delay start of cooking | |
| Step 3 Set the cooking time. | |
| Step 4Press: ● ● ● | |
| Step 5 Press: Delayed start. | |
| Step 6 Choose the value. | |
| Step 7Press: OK Repeat the action until the display shows the main screen. | |
| How to extend cooking time | |
| When 10% of cooking time is left and the food seems not to be ready, you can extend cooking time. You can also change the heating function. | |
| Press +1min to extend the cooking time. | |
| How to change timer settings | |
| Step 1Press: ⏻ | |
| Step 2 Set the timer value. | |
| Step 3Press: OK | |
| You can change the set time during cooking at any time. |
9. HOW TO USE: ACCESSORIES
9.1 Inserting accessories
A small indentation at the top increases safety. The indentations are also anti-tip
devices. The high rim around the shelf prevents cookware from slipping of the shelf.
Wire shelf:
Push the shelf between the guide bars of the shelf support and make sure that the feet point down.

natural_image
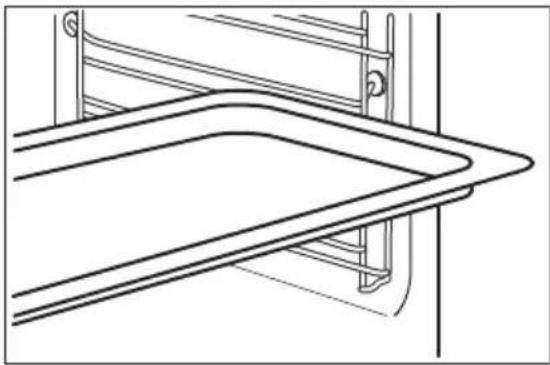
Technical line drawing of a wooden ladder with two magnified views showing internal structure details (no text or symbols)Baking tray / Deep pan:
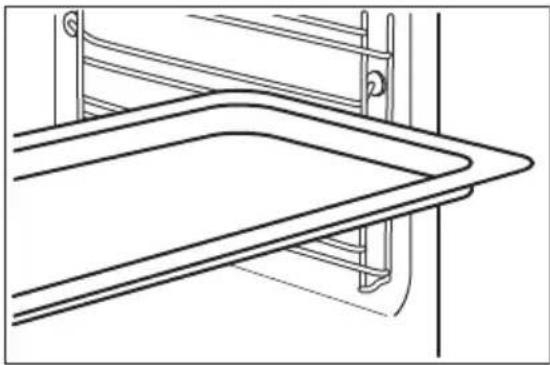
Push the tray between the guide bars of the shelf support.
natural_image
Line drawing of a curved architectural or mechanical component with railings and supports (no text or symbols)9.2 Food Sensor
Food Sensor - measures the temperature inside the food. You can use it with every heating function.
There are two temperatures to be set:
 |  |
| The oven temperature: minimum 120 °C. | The core temperature. |
For the best cooking results:
| Ingredients should be at room temperature. | Do not use it for liquid dishes. During cooking it must remain in the dish. |
The oven calculates an approximate end of cooking time. It depends on the quantity of food, the set oven function and the temperature.
How to use: Food Sensor
| Step 1 Turn on the oven. |
| Step 2 Set a heating function and, if necessary, the oven temperature. |
Step 3 Insert: Food Sensor.
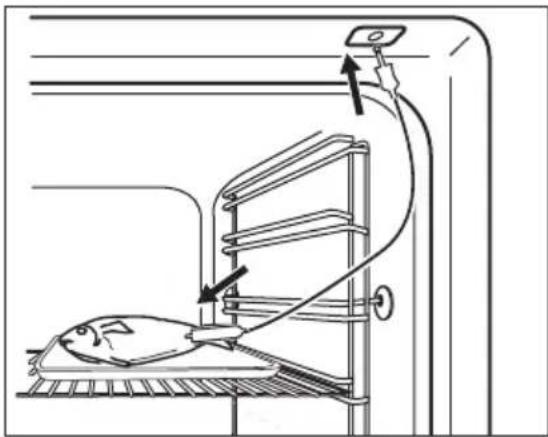
| Meat, poultry and fish Casserole | |
| Insert the tip of Food Sensor into the centre of meat, fish, in the thickest part if possible. Make sure that at least 3/4 of Food Sensor is inside of the dish. | Insert the tip of Food Sensor exactly in the centre of the casserole. Food Sensor should be stabilized in one place during baking. Use a solid ingredient to achieve that. Use the rim of the baking dish to support the silicone handle of Food Sensor. The tip of Food Sensor should not touch the bottom of a baking dish. |
natural_image
Diagram of a fish being lifted by a rack-mounted device, showing structural components and airflow direction (no text or labels)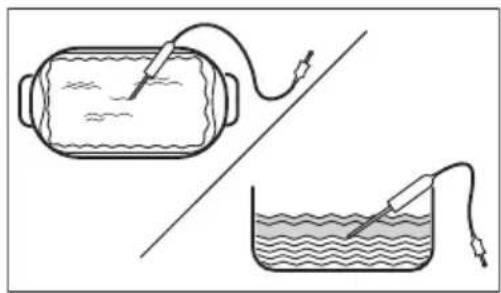
natural_image
Diagram showing two methods of heating a submerged object and a submerged container with a probe, both without any text or labels.| Step 4 Plug Food Sensor into the socket at the front of the oven.The display shows the current temperature of: Food Sensor. | |
| Step 5 | - press to set the core temperature of the sensor. |
| Step 6 | ●●● - press to set the preferred option:Sound alarm - when food reaches the core temperature, the signal sounds.Sound alarm and stop cooking - when food reaches the core temperature, the signal soundsand the oven stops. |
| Step 7 | Select the option and repeatedly press: OKto go to main screen. |
| Step 8 | Press: STARTWhen food reaches the set temperature, the signal sounds. You can choose to stop or to continuecooking to make sure the food is well done. |
| Step 9 Remove Food Sensor plug from the socket and remove the dish from the oven. | |
| WARNING!There is a risk of burns as Food Sensor becomes hot. Be careful when youunplug it and remove it from the food. | |
9.3 Accessories for steam cooking

The steam kit accessories are not supplied with the oven. For more information, please contact your local supplier.
The dietary baking dish for steam cooking functions
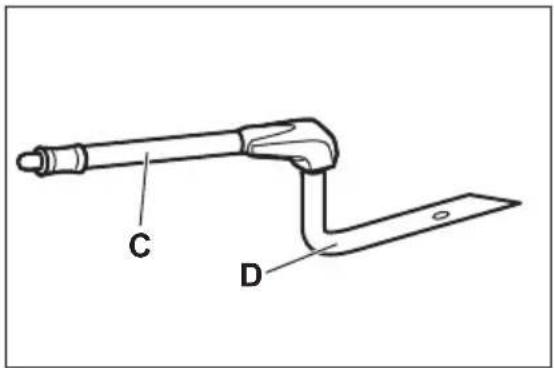
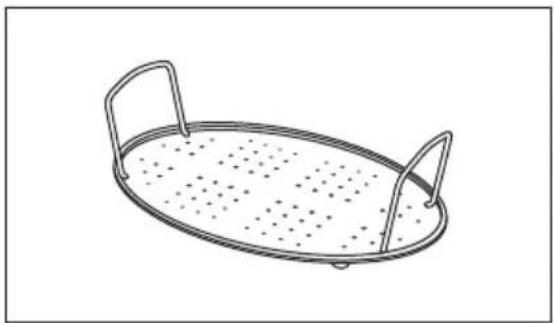
Dietary Baking dish consists of a glass bowl (A), a lid (B), injector tube (C), injector (D), and a steel grill (E).
Glass bowl (A) Lid (B)

natural_image
Line drawing of a cooking pot with two handles (no text or symbols)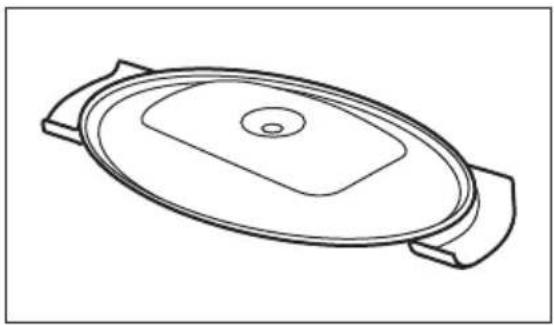
natural_image
Line drawing of a lid with a square opening and two side handles (no text or symbols)Injector, injector tube, and a steel grill.
Injector tube (C) is for steam cooking, injector (D) is for direct steam cooking.
Steel grill (E)
natural_image
Line drawing of an oval-shaped metal tray with two handles and a perforated interior (no text or symbols)- Do not put the hot baking dish on cold / wet surfaces.
- Do not pour cold liquids into the baking dish when it is hot.
- Do not use the baking dish on a hot cooking surface.
- Do not clean the baking dish with abrasives, scourers and powders.
9.4 Steam cooking in a dietary baking dish
Step 1
Put the baking dish on the steel grill and cover it with the lid. Put the injector tube into the hole in the lid. Put the baking dish onto the second shelf position from the bottom.
Step 2 Connect the injector tube to the steam inlet.
Step 3 Set the oven for the steam cooking function.
9.5 Direct steam cooking
Put the baking dish on the steel grill. Add some water. Do not use the lid.

WARNING!
The injector may be hot when oven operates. Always use oven gloves. Remove the injector from the oven when you do not use steam function.
Step 1 Connect injector with injector tube. Connect injector tube to the steam inlet.
Step 2 Put the baking dish onto the first or second shelf position from the bottom. Make sure that injector tube is not jammed. Keep the injector away from the heating element.
Step 3 Set the oven for the steam cooking function.
When you cook food such as chicken, duck, turkey or large fish, put the injector inside the food.
10. ADDITIONAL FUNCTIONS
10.1 How to save: Favourites
You can save your favourite settings, such as the heating function, the cooking time, the
temperature or the cleaning function. You can save 3 favourite settings.
Step 1 Turn on the appliance.
Step 2 Select the preferred setting.
Step 3
Press: Select: Favourites.
Step 4 Select: Save current settings.
Step 5
Press + to add the setting to the list of: Favourites. Press OK

- press to reset the setting.

- press to cancel the setting.
10.2 Function lock
This function prevents an accidental change of the heating function.
Step 1 Turn on the appliance.
Step 2 Set a heating function.
Step 3

press at the same time to turn on the function.
To turn off the function repeat step 3.
10.3 Automatic switch-off
For safety reasons the appliance turns off after some time, if a heating function works and you do not change any settings.

(°C) (h)

30 - 115 12.5
120 - 195 8.5
200 - 245 5.5
250 - maximum 3
The Automatic switch-off does not work with the functions: Light, Food sensor, End time, Slow Cooking.
10.4 Cooling fan
When the appliance operates, the cooling fan turns on automatically to keep the surfaces of the appliance cool. If you turn off the appliance, the cooling fan can continue to operate until the appliance cools down.
11. HINTS AND TIPS
11.1 Cooking recommendations

The temperature and cooking times in the tables are guidelines only. They depend on the recipes and the quality and quantity of the ingredients used.
Your appliance may bake or roast differently to the appliance you had before. The hints below show recommended settings for temperature, cooking time and shelf position for specific types of the food.
If you cannot find the settings for a special recipe, look for the similar one.
11.2 Moist Fan Baking
For the best results follow suggestions listed in the table below.



(°C) (min)
Sweet rolls, 16 pieces baking tray or dripping pan 180 2 20 - 30
Rolls, 9 pieces baking tray or dripping pan 180 2 30 - 40
Pizza, frozen, 0.35 kg wire shelf 220 2 10 - 15
Swiss Roll baking tray or dripping pan 170 2 25 - 35
Brownie baking tray or dripping pan 175 3 25 - 30
Soufflè, 6 pieces ceramic ramekins on wire shelf 200 3 25 - 30
Sponge flan base flan base tin on wire shelf 180 2 15 - 25
Victoria sandwich baking dish on wire shelf 170 2 40 - 50
Poached fish, 0.3 kg baking tray or dripping pan 180 3 20 - 25
Whole fish, 0.2 kg baking tray or dripping pan 180 3 25 - 35
Fish fillet, 0.3 kg pizza pan on wire shelf 180 3 25 - 30
 |  |  |  |  |
| (°C) (min) | ||||
| Poached meat, 0.25 kg | baking tray or dripping pan 200 3 35 - 45 | |||
| Shashlik, 0.5 kg baking tray or dripping pan 200 3 25 - 30 | ||||
| Cookies, 16 pieces baking tray or dripping pan 180 2 20 - 30 | ||||
| Macaroons, 24 pieces baking tray or dripping pan 180 2 25 - 35 | ||||
| Muffins, 12 pieces baking tray or dripping pan 170 2 30 - 40 | ||||
| Savory pastry, 20 pieces | baking tray or dripping pan 180 2 25 - 30 | |||
| Short crust biscuits, 20 pieces | baking tray or dripping pan 150 2 25 - 35 | |||
| Tartlets, 8 pieces baking tray or dripping pan 170 2 20 - 30 | ||||
| Vegetables, poached, 0.4 kg | baking tray or dripping pan 180 3 35 - 45 | |||
| Vegetarian omelette pizza pan on wire shelf 200 3 25 - 30 | ||||
| Mediterranean vegetables, 0.7 kg | baking tray or dripping pan 180 4 25 - 30 | |||
11.3 Moist Fan Baking - recommended accessories
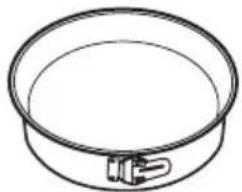
Use the dark and non-reflective tins and containers. They have better heat absorption than the light colour and reflective dishes.
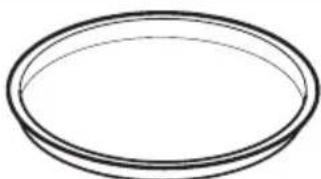
natural_image
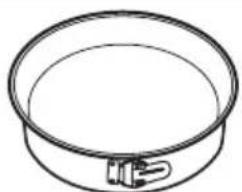
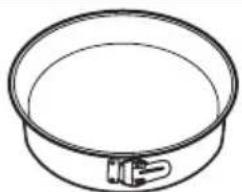
Simple line drawing of an oval-shaped object with no text or symbolsPizza pan
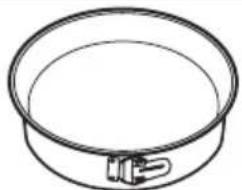
natural_image
Simple line drawing of a circular container with a small handle at the bottom (no text or symbols)Baking dish
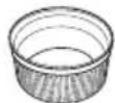
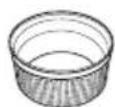
Ramekins
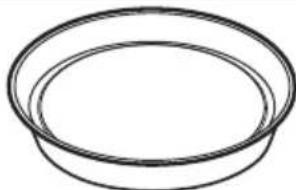
natural_image
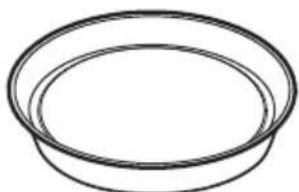
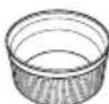
Simple line drawing of a bowl with no text or symbolsFlan base tin
Dark, non-reflective 28 cm diameter
Dark, non-reflective 26 cm diameter
Ceramic 8 cm diameter, 5 cm height
Dark, non-reflective 28 cm diameter
11.4 Cooking tables for test institutes
Information for test institutes
Tests according to IEC 60350-1.
 |  |  | [GXY] |  |  |  |
| (°C) (min) | ||||||
| Small cakes, 20 per tray | Conventional Cooking | Baking tray 3 170 20 - 35 - | ||||
| Small cakes, 20 per tray | True Fan Cooking | Baking tray 3 150 - 160 20 - 35 - | ||||
| Small cakes, 20 per tray | True Fan Cooking | Baking tray 2 and 4 150 - 160 20 - 35 - | ||||
| Apple pie, 2 tins ∅20 cm | Conventional Cooking | Wire shelf 2 180 70 - 90 - | ||||
| Apple pie, 2 tins ∅20 cm | True Fan Cooking | Wire shelf 2 160 70 - 90 - | ||||
| Fatless sponge cake, cake mould ∅26 cm | Conventional Cooking | Wire shelf 2 170 40 - 50 Preheat the oven for | 10 min. | |||
| Fatless sponge cake, cake mould ∅26 cm | True Fan Cooking | Wire shelf 2 160 40 - 50 Preheat the oven for | 10 min. | |||
| Fatless sponge cake, cake mould ∅26 cm | True Fan Cooking | Wire shelf 2 and 4 160 40 - 60 Preheat the oven for | 10 min. | |||
| Short bread True Fan Cooking | Baking tray 3 140 - 150 20 - 40 - | |||||
| Short bread True Fan Cooking | Baking tray 2 and 4 140 - 150 25 - 45 - | |||||
| Short bread Conventional Cooking | Baking tray 3 140 - 150 25 - 45 - | |||||
| Toast, 4 - 6 pieces | Grill Wire shelf 4 max. 1 - 5 Preheat the oven for | 10 min. | ||||
| Beef burger, 6 pieces, 0.6 kg | Grill Wire shelf, dripping pan | 4 max. 20 - 30 Put the wire shelf on | the fourth level and the dripping pan on the third level of the oven. Turn the food halfway through the cooking time.Preheat the oven for 10 min. | |||
12. CARE AND CLEANING

WARNING!
Refer to Safety chapters.
12.1 Notes on cleaning
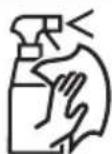
Cleaning Agents
Clean the front of the appliance only with a microfibre cloth with warm water and a mild detergent.
Use a cleaning solution to clean metal surfaces.
Clean stains with a mild detergent.

Everyday Use
Clean the cavity after each use. Fat accumulation or other residue may cause fire.
Moisture can condense in the appliance or on the door glass panels. To decrease the condensation, let the appliance work for 10 minutes before cooking. Do not store the food in the appliance for longer than 20 minutes. Dry the cavity only with a microfibre cloth after each use.

Accessories
Clean all accessories after each use and let them dry. Use only a microfibre cloth with warm water and a mild detergent. Do not clean the accessories in a dishwasher.
Do not clean the non-stick accessories using abrasive cleaner or sharp-edged objects.
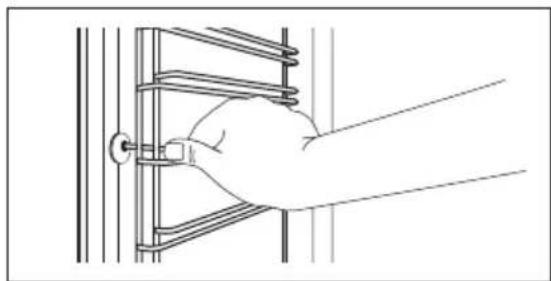
12.2 How to remove: Shelf supports
Remove the shelf supports to clean the oven.
Step 1 Turn off the oven and wait until it is cold.
Step 2 Pull the front of the shelf support away from the side wall.
natural_image
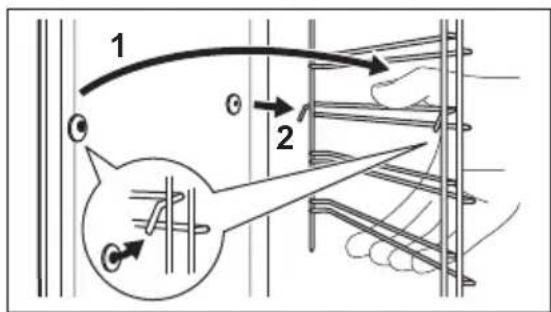
Line drawing of a hand inserting a small component into a metal rack (no text or symbols)Step 3 Pull the rear end of the shelf support away from the side wall and remove it.
Step 4 Install the shelf supports in the opposite sequence. The retaining pins on the telescopic runners must point to the front.
12.3 How to use: Pyrolytic Cleaning
Clean the oven with Pyrolytic Cleaning.

WARNING!
There is a risk of burns.

CAUTION!
If there are other appliances installed in the same cabinet, do not use them at the same time as this function. It can cause damage to the oven.
| Before the Pyrolytic Cleaning: | |
| Turn off the oven and wait until it is cold. | Remove all accessories. Clean the oven floor and the inner door glass with warm water, a soft cloth and a mild detergent. |
| Step 1 Step 2 Step 3 | |
| Turn on the oven. | Press:Cleaning. Select the cleaning mode. |
| Option Cleaning mode Duration | |
| Pyrolytic cleaning, quick Light cleaning 1 h | |
| Pyrolytic cleaning, normal Normal cleaning 1 h 30 min | |
| Pyrolytic cleaning, intense Thorough cleaning 2 h 30 min | |
| When the cleaning starts, the oven door is locked and the lamp is off. The cooling fan works at a higher speed. | |
| STOP - press to stop the cleaning before it is completed.Do not use the oven until the door lock symbol disappears from the display. | |
| When the cleaning ends: | |
| Turn off the oven and wait until it is cold. | Clean the cavity with a soft cloth. Remove the residue from the bottom of the cavity. |
12.4 How to clean: Water tank
| Step 1 Turn off the oven. | |
| Step 2 Place a deep pan below the steam inlet. | |
| Step 3 Pour water into the water drawer: 850 ml. Add citric acid: 5 teaspoons. Wait for 60 min. | |
| Step 4 | Turn on the oven and set the function: Humidity Low. Set the temperature to 230 °C. Turn off the oven after 25 min and wait until it is cold. |
| Step 5 | Turn on the oven and set the function: Humidity Low. Set the temperature between 130 and 230 °C. Turn off the oven after 10 minutes and wait until it is cold. |
| i To prevent limestone residue empty the water tank after each steam cooking. | |
When the cleaning ends:
| Turn off the oven. Empty the water tank.Refer to Daily use,"Emptying the water tank" chapter. | Rinse the water tank and clean the remaining limestone residue with a soft cloth. | Clean the drain pipe with warm water and a mild detergent. |
The table below shows water hardness range (dH) with the corresponding level of calcium deposit and the quality of water. When water hardness exceeds level 4, fill the water drawer with bottled water.
| Water hardness Test strip Calcium deposit | (mg/l) | Water classi-fication | Clean the wa-ter tank every | |
| Level dH | ||||
| 1 0 - 7 0 - 50 soft 75 cycles - 2.5 | 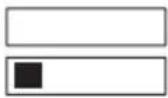 | months | ||
| 2 8 - 14 51 - 100 moderately hard | 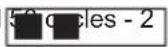 | months | ||
| 3 15 - 21 101 - 150 hard 40 cycle | 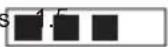 | months | ||
| 4 22 - 28 over 151 very hard 30 c | 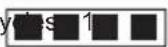 | month | ||
12.5 Cleaning Reminder
When the reminder appears, cleaning is recommended.
Use the function: Pyrolytic Cleaning.
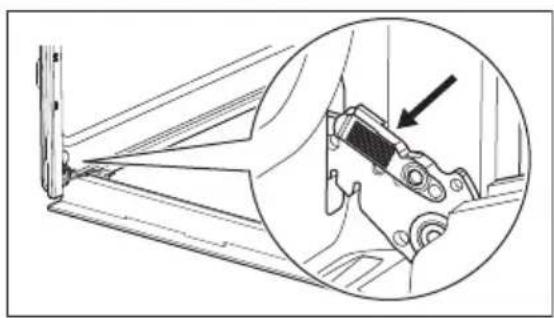
12.6 How to remove and install: Door
The oven door has three glass panels. You can remove the oven door and the internal glass panels to clean them. Read the whole "Removing and installing door" instruction before you remove the glass panels.

CAUTION!
Do not use the oven without the glass panels.
Step 1
Open the door fully and hold both hinges.
natural_image
Technical diagram showing a mechanical assembly with an inset close-up of a component (no text or symbols present)| Step 2 Lift and pull the latches until they click. | 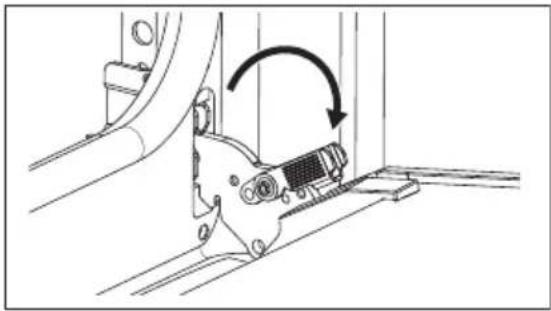 |
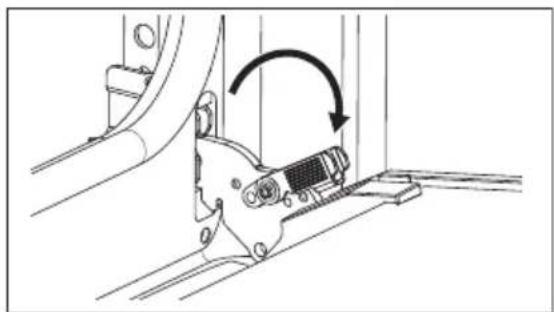
| Step 3 Close the oven door halfway to the first opening position. Then lift and pull to remove the door from its seat. | 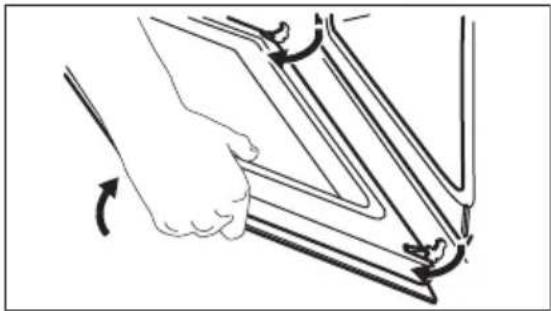 |
| Step 4 Put the door on a soft cloth on a stable surface. | |
| Step 5 Hold the door trim (B) on the top edge of the door at the two sides and push inwards to release the clip seal. | 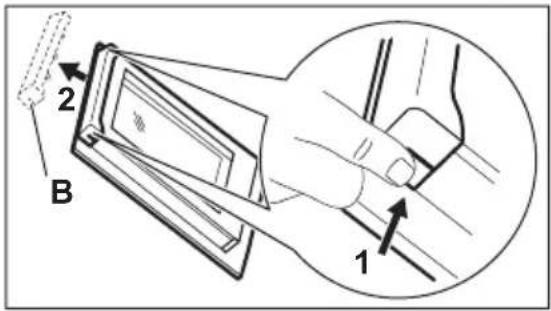 |
| Step 6 Pull the door trim to the front to remove it. | |
| Step 7 Hold the door glass panels by their top edge and carefully pull them out one by one. Start from the top panel. Make sure the glass slides out of the supports completely. | 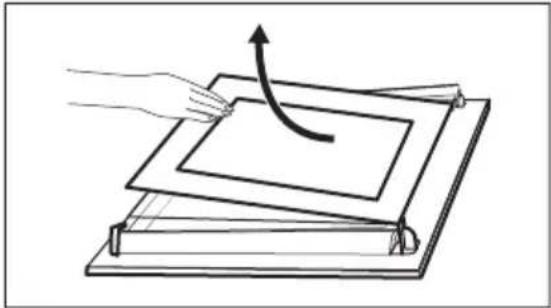 |
| Step 8 Clean the glass panels with water and soap. Dry the glass panels carefully. Do not clean the glass panels in the dishwasher. | |
| Step 9 After cleaning, install the glass panels and the oven door. | |
| If the door is installed correctly, you will hear a click when closing the latches. | |
Make sure that you put the glass panels (A and B) back in the correct sequence. Check for the symbol / printing on the side of the glass panel, each of the glass panels looks different to make the disassembly and assembly easier.
When installed correctly the door trim clicks.
Make sure that you install the middle panel of glass in the seats correctly.
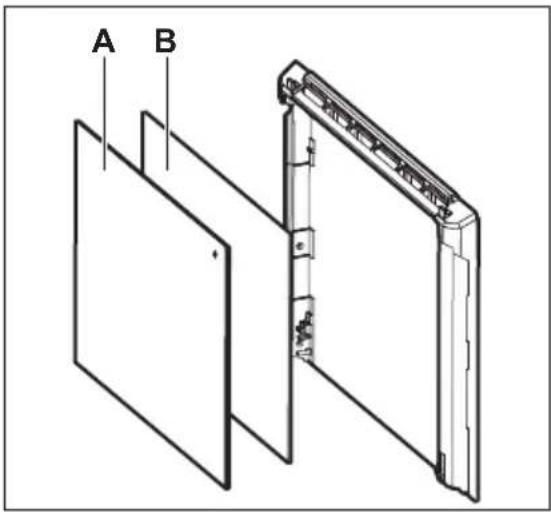
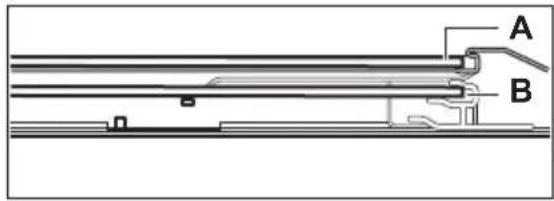
12.7 How to replace: Lamp

WARNING!
Risk of electric shock.
The lamp can be hot.
Always hold the halogen lamp with a cloth to prevent grease residue from burning on the lamp.
Before you replace the lamp:
| Step 1 Step 2 Step 3 | ||
| Turn off the oven. Wait until the oven is cold. | Disconnect the oven from the mains. | Put a cloth on the bottom of the cavity. |
Back lamp
Step 1 Turn the glass cover to remove it.
Step 2 Clean the glass cover.
Step 3 Replace the lamp with a suitable 300^ C heat-resistant lamp.
Step 4 Install the glass cover.
13. TROUBLESHOOTING

WARNING!
Refer to Safety chapters.
13.1 What to do if...

The appliance does not turn on or does not heat up

Possible cause

Remedy
The appliance is not connected to an electrical supply or it is connected incorrectly.
Check if the appliance is correctly connected to the electrical supply. Refer to the connection diagram.
The clock is not set. Set the clock, for details refer to Clock functions chapter, How to set: Clock functions.
The door is not closed correctly. Fully close the door.
The fuse is blown. Make sure the fuse is the cause of the problem. If the problem recurs, contact a qualified electrician.
The appliance Child Lock is on. Refer to "Menu" chapter, Submenu for: Options.

Components

Description

Remedy
The lamp is burnt out. Replace the lamp, for details refer to "Care and Cleaning" chapter, How to replace: Lamp.

Cleaning

Description

Remedy
There is water in the appliance cavity. There is not too much water in the water tank.
The steam cooking does not work. There is no lime residue in the steam inlet opening.
The steam cooking does not work. There is water in the water tank.
It takes more than three minutes to empty the water tank or the water leaks from the steam inlet opening. There is no lime residue in the steam inlet opening. Clean the water tank.
Power cut always stops cleaning. Repeat cleaning if it's interrupted by power failure.

Problems with Wi-Fi signal

Possible cause

Remedy
Trouble with wireless network signal. Check if your mobile device is connected to the wire-
less network.
Check your wireless network and router.
Restart the router.
New router installed or router configuration changed. To configure appliance and mobile device again, refer to "Before first use" chapter, Wireless connection.
The wireless network signal is weak. Move router as close to the appliance as possible.
The wireless signal is disrupted by another microwave oven placed near the appliance.
Turn off the microwave oven.
Avoid using another microwave oven and the Remote Control of the appliance at the same time. Microwaves disrupt Wi-Fi signal.
13.2 How to manage: Error codes
When the software error occurs, the display shows error message.
In this section, you will find the list of the problems that you can handle on your own.

Code and description Remedy

C2 - the Food sensor is in the appliance cavity during Pyrolytic Cleaning.
Take out the Food sensor.
C3 - the door is not fully closed during Pyrolytic Cleaning.
Close the door.
F111 - Food sensor is not correctly inserted into the socket.
Fully plug Food sensor into the socket.
F240, F439 - the touch fields on the display do not work properly.
Clean the surface of the display. Make sure there is no dirt on the touch fields.
F601 - there is a problem with Wi-Fi signal. Check your network connection. Refer to "Before first use" chapter, Wireless connection.
F604 - the first connection to Wi-Fi failed. Turn the appliance off and on and try again. Refer to "Before first use" chapter, Wireless connection.
F908 - the appliance system cannot connect with the control panel.
Turn the appliance off and on.
When one of these error messages continues to appear on the display, it means a faulty subsystem may have been disabled. In such a case contact your dealer or an Authorized Service Centre. If one of these errors occurs, the rest of the appliance functions will continue to work as usually.
F602, F603 - Wi-Fi is not available. Turn the appliance off and on.
13.3 Service data
If you cannot find a solution to the problem yourself, contact your dealer or an Authorised Service Centre.
The necessary data for the service centre is on the rating plate. The rating plate is on the front frame of the appliance cavity. Do not remove the rating plate from the appliance cavity.
We recommend that you write the data here:
| Model (MOD.) | ...... |
| Product number (PNC) | ...... |
| Serial number (S.N.) | ...... |
14. ENERGY EFFICIENCY
14.1 Product Information and Product Information Sheet
| Supplier's name AEG | |
| Model identification | BSE778380B 949494837 |
| BSE778380M 949494836 | |
| BSK778380M 949494838 | |
| Energy Efficiency Index 81.2 | |
| Energy efficiency class A+ | |
| Energy consumption with a standard load, conventional mode 0.93 kWh/cycle | |
| Energy consumption with a standard load, fan-forced mode 0.69 kWh/cycle | |
| Number of cavities 1 | |
| Heat source Electricity | |
| Volume 72 l | |
| Type of oven Built-In Oven | |
| Mass | BSE778380B 34.0 kg |
| BSE778380M 33.6 kg | |
| BSK778380M 33.5 kg | |
| IEC/EN 60350-1 - Household electric cooking appliances - Part 1: Ranges, ovens, steam ovens and grills - Methods for measuring performance. | |
14.2 Energy saving

The appliance has features which help you save energy during everyday cooking.
Make sure that the appliance door is closed when the appliance operates. Do not open the appliance door too often during cooking. Keep the door gasket clean and make sure it is well fixed in its position.
Use metal cookware to improve energy saving.
When possible, do not preheat the appliance before cooking.
Keep breaks between baking as short as possible when you prepare a few dishes at one time.
Cooking with fan
When possible, use the cooking functions with fan to save energy.
Residual heat
If a programme with Duration is activated and the cooking time is longer than 30 min, the heating elements automatically turn off earlier in some appliance functions.
The fan and lamp continue to operate. When you turn off the appliance, the display shows the residual heat. You can use that heat to keep the food warm.
When the cooking duration is longer than 30 min, reduce the appliance temperature to minimum 3 - 10 min before the end of cooking. The residual heat inside the appliance will continue to cook.
Use the residual heat to warm up other dishes.
Keep food warm
Choose the lowest possible temperature setting to use residual heat and keep a meal warm. The residual heat indicator or temperature appears on the display.
Cooking with the lamp off
Turn off the lamp during cooking. Turn it on only when you need it.
Moist Fan Baking
Function designed to save energy during cooking.
When you use this function the lamp automatically turns off after 30 sec. You may turn on the lamp again but this action will reduce the expected energy savings.
15. MENU STRUCTURE
15.1 Menu
Menu item Application
| Assisted Cooking Lists automatic programmes. |
| Cleaning Lists cleaning programmes. |
| Favourites Lists the favourite settings. |
| Options To set the appliance configuration. |
| Settings Connections To set the network configuration. |
| Setup To set the appliance configuration. |
| Service Shows the software version and configuration. |
15.2 Submenu for: Cleaning
| Submenu Application |
| Pyrolytic cleaning, quick Duration: 1 h. |
| Pyrolytic cleaning, normal Duration: 1 h 30 min. |
| Pyrolytic cleaning, intense Duration: 2 h 30 min. |
15.3 Submenu for: Options
| Submenu Application |
| Light Turns the lamp on and off. |
| Child Lock Prevents accidental activation of the appliance. When the option is on,the text Child Lock appears in the display when you turn on the appli-ance. To enable the appliance use, choose the code letters in the al-phabetical order. When the option is on, and the appliance is turned off the appliance door is locked. Access to the timer, the remote operation and the lamp is available with the option on. |
| Fast Heat Up Shortens the heat up time. It is available only for some of the appli-ance functions. |
| Cleaning Reminder Turns the reminder on and off. |
| Time indication Turns the clock on and off. |
| Digital clock style Changes the format of the displayed time indication. |
15.4 Submenu for: Connections
| Submenu Description |
| Wi-Fi To enable and disable: Wi-Fi. |
| Remote operation To enable and disable remote control.Option visible only after you turn on: Wi-Fi. |
| Auto remote operation To start remote operation automatically after pressing START.Option visible only after you turn on: Wi-Fi. |
| Network To check network status and the signal power of: Wi-Fi. |
| Forget network To disable current network from auto connection with the appliance. |
15.5 Submenu for: Setup
| Submenu Description | |
| Language | Sets the appliance language. |
| Display brightness | Sets the display brightness. |
| Key tones | Turns the tone of the touch fields on and off. It is not possible to mute the tone for: ➀. |
| Submenu Description |
| Buzzer volume Sets the volume of key tones and signals. |
| Time of day Sets the current time and date. |
15.6 Submenu for: Service
Submenu Description
Demo mode Activation / deactivation code: 2468
Software version Information about software version.
Reset all settings Restores factory settings.
16. IT'S EASY!
Before first use you have to set:
Language Display brightness Key tones Buzzer volume Time of day
Familiarize yourself with the basic icons on the control panel and the display:

ON / OFF Menu Favourites


Timer

Food sensor
START / STOP
Start using the appliance
Quick start Turn on the appli-
ance and start cooking with the default temperature and time of the function.
Step 1 Step 2 Step 3
Press and hold: Ⓐ select the preferred function.
Press: START
Quick Off Turn off the appli-
ance, any screen or message at any time.
① - press and hold until the appliance turns off.
Start cooking
Step 1 Step 2 Step 3 Step 4 Step 5

- press to turn on the appliance.

- select the heating function.

- set the temperature.

- press to confirm.
- press to start cooking.
Steam cooking
Pour the cold tap water to the water drawer. Follow the instructions on the display.
| Steam cooking | |||
| Steam Re-generatingReheat the food. | Pizza Function | Bread Baking | Humidity LowSteam cooking.Speeds up cooking. |
| Steam cooking | |||
| 130 °C | 200 - 220°C | 150 - 210°C | 160 - 200°C |
| Get to know how to cook quickly | |||
| Use the automatic programmes to prepare a dish quickly with the default settings: | |||
| Assisted Cooking | Step 1 Step 2 Step 3 Step 4 | ||
| Press: .Press: . Press: Assisted | Cooking. | Choose the dish. | |
| Use quick functions to set the cooking time | |||
| 10% Finish assist Use 10% Finish assist to add extra time when 10% of the cooking time is left. | To extend the cooking time press +1min. | ||
17. ENVIRONMENTAL CONCERNS
Recycle materials with the symbol .Put the packaging in relevant containers to recycle it. Help protect the environment and human health by recycling waste of electrical and electronic appliances. Do not dispose of
appliances marked with the symbol 📀 with the household waste. Return the product to your local recycling facility or contact your municipal office.
How to install your AEG/Electrolux Oven - Column installation

3.2 Seadme kinnitamine köögimööblisse
natural_image
Technical illustration of a door opening with an inset close-up showing mechanical components (no text or symbols)4. TOOTE KIRJELDUS
4.1 Ülevaade
4.2 Lisatarvikud
- Traatrest
natural_image
Technical line drawing of a ladder with two magnified views showing internal structure (no text or symbols)Küpsetusplaat / Sügav pann:
natural_image
Line drawing of a curved architectural or mechanical component with railings and supports (no text or symbols)9.2 Toidusensor
natural_image
Diagram of a fish being lifted by a rack-mounted device, showing structural components and airflow direction (no text or labels)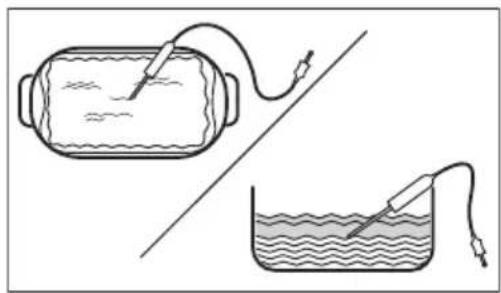
natural_image
Diagram showing two experimental setups: a cylindrical container with a probe and wire connected to a line, and a beaker with a probe and wire submerged in liquid.natural_image
Line drawing of a cooking pot with two handles (no text or symbols)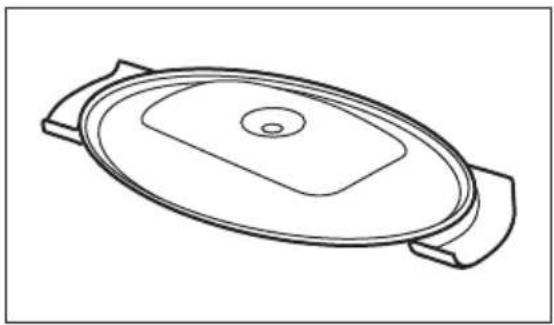
natural_image
Line drawing of a lid with a square opening and two side handles (no text or symbols)Pihusti, pihustitoru ja terasest grill.
natural_image
Line drawing of an oval-shaped metal tray with two handles and a perforated interior (no text or symbols)natural_image
Simple line drawing of an oval-shaped object with no text or symbolsPitsapann
natural_image
Simple line drawing of a circular container with a handle (no text or symbols)Küpsetusnõu
natural_image
Simple line drawing of a bowl or container with no text, numbers, or symbolsPirukavorm
natural_image
Line drawing of a hand holding a vertical panel with a lock, no text or symbols presentnatural_image
Technical diagram showing a mechanical assembly with an inset close-up of a component (no text or symbols present)natural_image
Mechanical assembly diagram showing a clamping mechanism with an arrow indicating rotational motion (no text or symbols present)natural_image
Line drawing of a hand holding a folder with curved arrows indicating rotation (no text or symbols)natural_image
Diagram of a hand pressing a curved arrow on a layered rectangular object (no text or symbols)How to install your AEG/Electrolux Oven - Column installation

natural_image
Technical illustration of a door opening with inset close-up showing mechanical assembly (no text or symbols)4. TERMÉKLEÍRÁS
natural_image
Technical line drawing of a metal frame structure with two magnified views showing internal details (no text or symbols)natural_image
Line drawing of a curved architectural or mechanical component with railings, no text or symbols presentnatural_image
Line drawing of a fish inside a storage machine with an attached control panel (no text or symbols)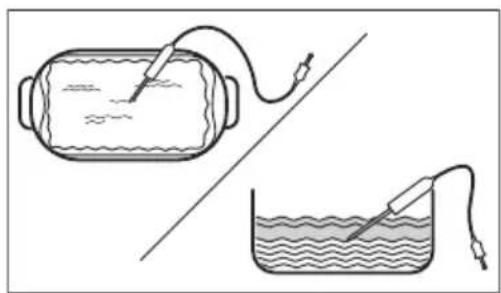
natural_image
Diagram showing two experimental setups: a cylindrical container with a probe and wire connected to a submerged object, and a beaker with a probe inserted into liquid.natural_image
Line drawing of a cooking pot with two handles (no text or symbols)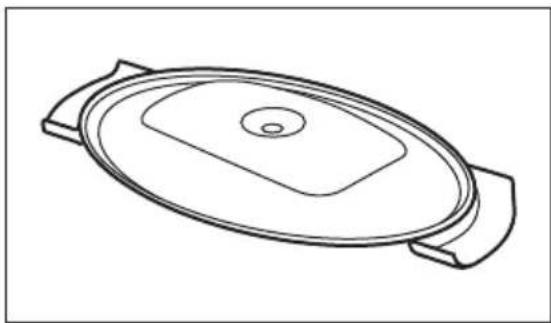
natural_image
Line drawing of a closed lid with a square vent and two side handles (no text or symbols)natural_image
Line drawing of an oval-shaped metal tray with two handles and perforated interior (no text or symbols)natural_image
Simple line drawing of an oval-shaped object with no text or symbolsPizzaserpenyő
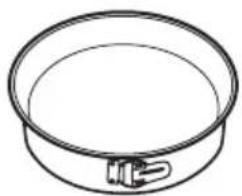
natural_image
Simple line drawing of a circular container with a small protrusion on the side (no text or symbols)Sütőedény
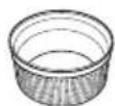
Bögrés sütemény
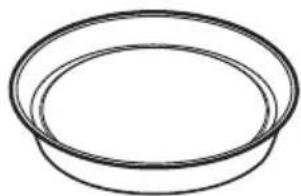
natural_image
Simple line drawing of a bowl or container with no text, numbers, or symbolsTortasütő forma
natural_image
Line drawing of a hand inserting a small component into a metal rack (no text or symbols)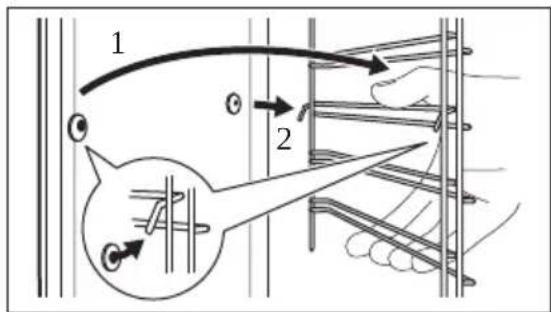
natural_image
Technical diagram showing a mechanical assembly with an inset close-up of a component (no text or symbols present)natural_image
Technical line drawing of a mechanical assembly with a curved arrow indicating rotation (no text or symbols)natural_image
Line drawing of a hand holding a folder with curved arrows indicating rotation (no text or symbols)natural_image
Diagram of a hand pressing a curved arrow on a layered platform (no text or symbols)BSK778380M 949494838
How to install your AEG/Electrolux Oven - Column installation

natural_image
Technical illustration of a kitchen appliance with an inset close-up showing a screw being inserted into a slot (no text or symbols present)4. IZSTRĀDĀJUMA APRAKSTS
natural_image
Technical line drawing of a metal frame structure with two magnified views showing internal details (no text or symbols)natural_image
Line drawing of a curved architectural or mechanical component with railings, no text or symbols present9.2 Termozonde
natural_image
Diagram of a fish being lifted by a rack-mounted device, showing structural components and airflow direction (no text or labels)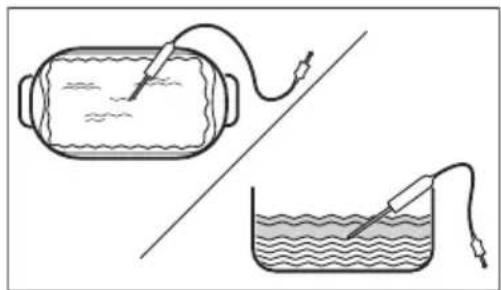
natural_image
Two diagrams showing a test tube connected to a probe in a container and a submerged object with a probe, separated by a diagonal line (no text or symbols)natural_image
Line drawing of a cooking pot with two handles (no text or symbols)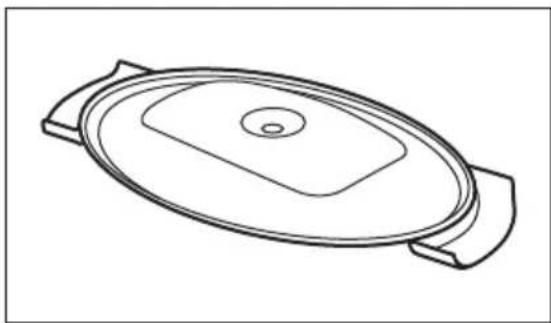
natural_image
Line drawing of a lid with a square opening and two side handles (no text or symbols)Inžektors, inžektora caurule un metāla restes.
natural_image
Line drawing of an oval-shaped metal tray with two handles and perforated interior (no text or symbols)natural_image
Line drawing of a hand installing or adjusting a metal shelf panel (no text or symbols)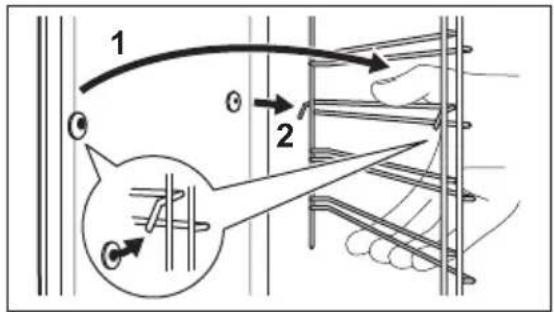
natural_image
Technical diagram showing mechanical assembly with an inset close-up of a component (no text or symbols)natural_image
Mechanical assembly diagram showing a clamping mechanism with an arrow indicating rotational motion (no text or symbols present)natural_image
Illustration of a hand holding a folder with arrows indicating rotation (no text or symbols)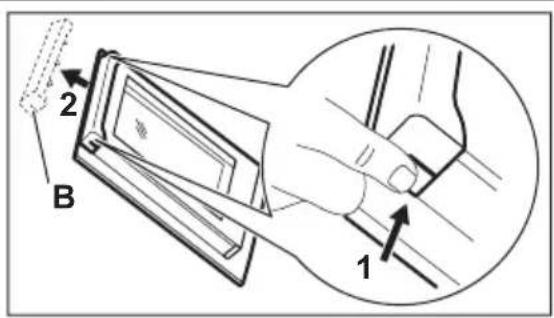
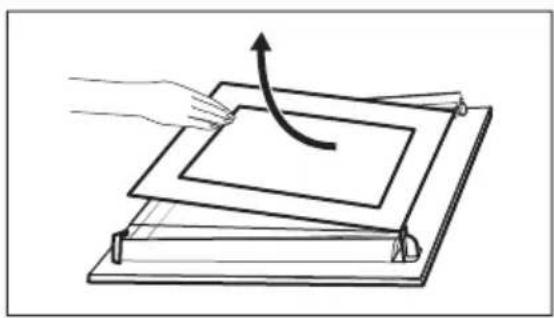
natural_image
Diagram of a hand pressing a curved arrow on a layered rectangular object (no text or symbols)How to install your AEG/Electrolux Oven - Column installation

(*mm)
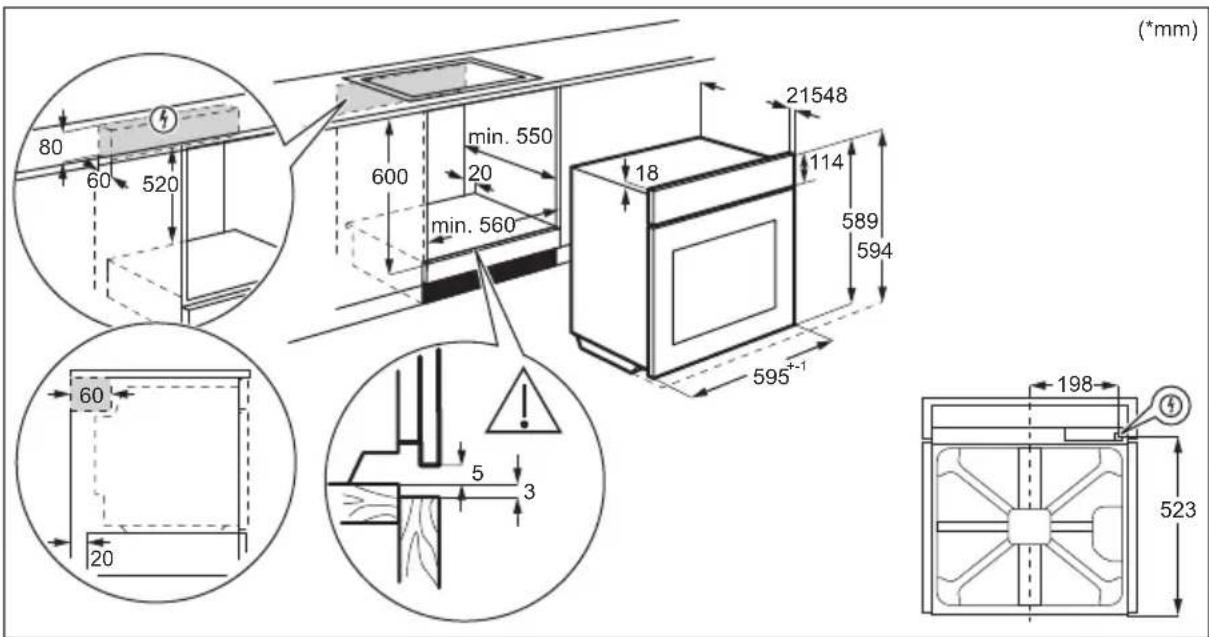
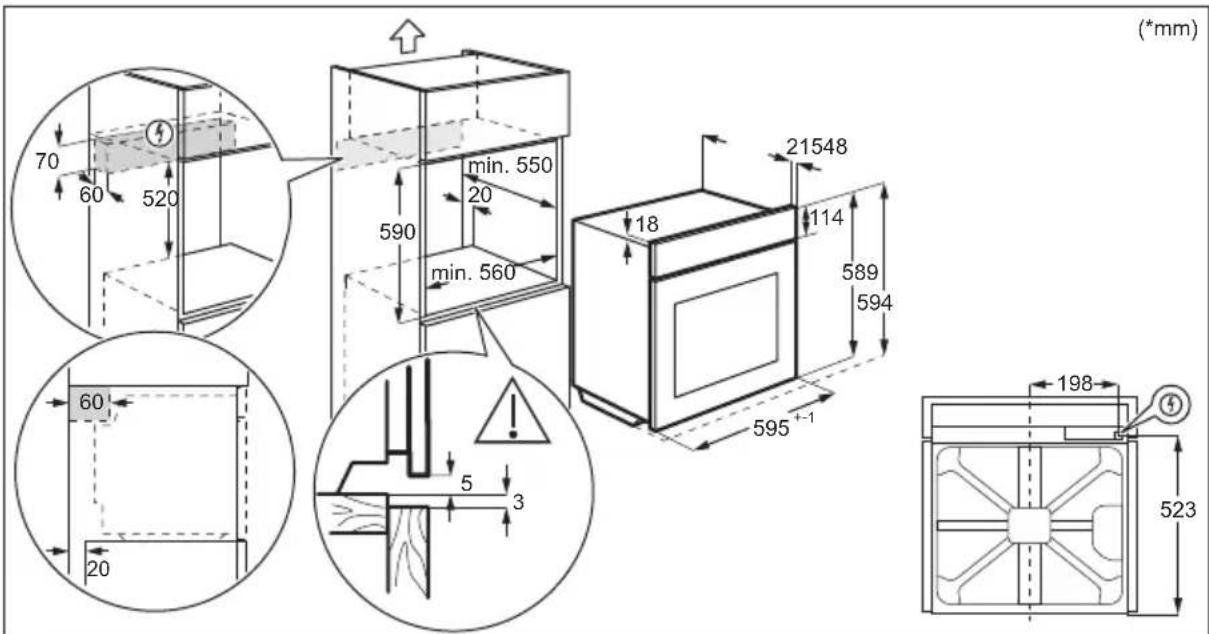
natural_image
Technical illustration of a window with a close-up inset showing a screw being inserted into a bracket (no text or symbols present)4. GAMINIO APRAŠYMAS
4.1 Bendra apžvalga
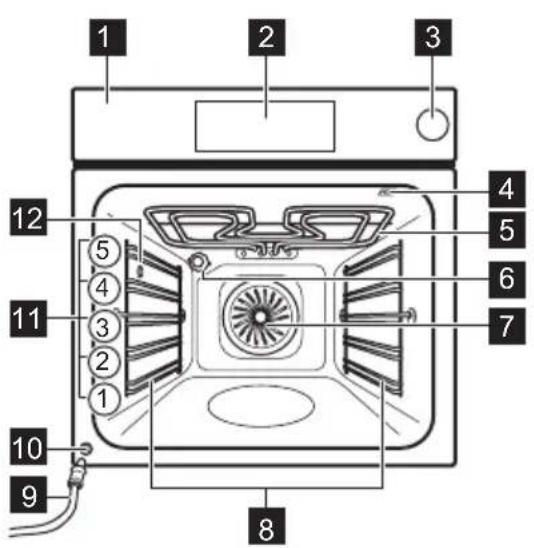
4.2 Priedai
• Grotelès
natural_image
Technical line drawing of a metal frame structure with two magnified views showing internal details (no text or symbols)natural_image
Line drawing of a curved architectural or mechanical component with railings, no text or symbols present9.2 Maisto termometras
natural_image
Line drawing of a fish being lifted by a device, showing structural components and airflow direction (no text or symbols)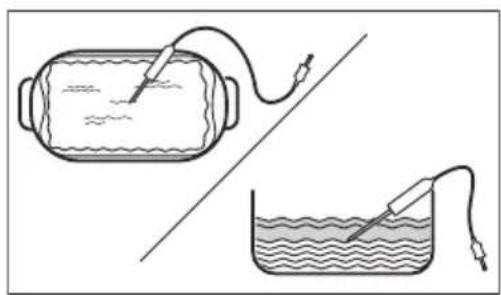
natural_image
Two laboratory setups: a cylindrical container with a probe and wire, and a beaker with a probe inserted into liquid (no text or symbols)natural_image
Line drawing of a cooking pot with two handles (no text or symbols)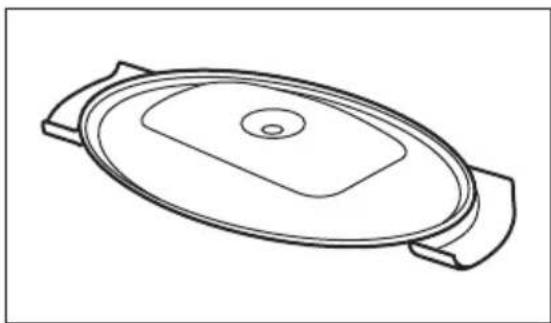
natural_image
Line drawing of a closed lid with a circular top and two side handles (no text or symbols)natural_image
Simple line drawing of an oval-shaped object with no text or symbolsPicos kepimo skarda
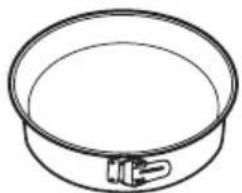
natural_image
Simple line drawing of a circular sieve or pan with a handle (no text or symbols)Kepimo indas
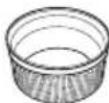
Indeliai atskiroms valgio porcijoms paruošti
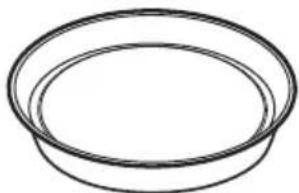
natural_image
Simple line drawing of a circular bowl or container (no text or symbols)Apkepo skarda
| Tamsi, neatspindinti28 cm skersmens | Tamsi, neatspindinti26 cm skersmens | Keraminė8 cm skersmens, 5cm aukščio | Tamsi, neatspindinti28 cm skersmens |
natural_image
Line drawing of a hand inserting a small component into a metal rack (no text or symbols)natural_image
Technical diagram showing a mechanical assembly with an inset close-up of a component (no text or symbols present)natural_image
Mechanical assembly diagram showing a clamping mechanism with an arrow indicating rotational motion (no text or symbols present)natural_image
Illustration of a hand holding a folder with curved arrows indicating rotation (no text or symbols)Paspauskite: ① Paspauskite: . Paspauskite
Ke-

pimo vadovas.
Pasirinkite patiekala.
How to install your AEG/Electrolux Oven - Column installation

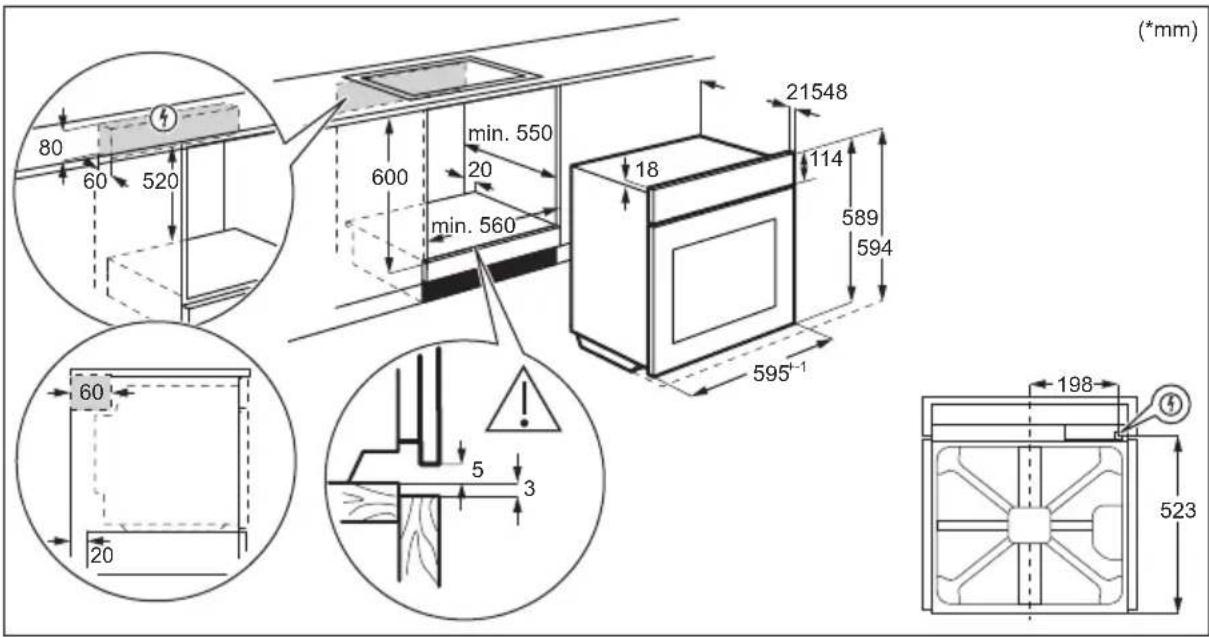
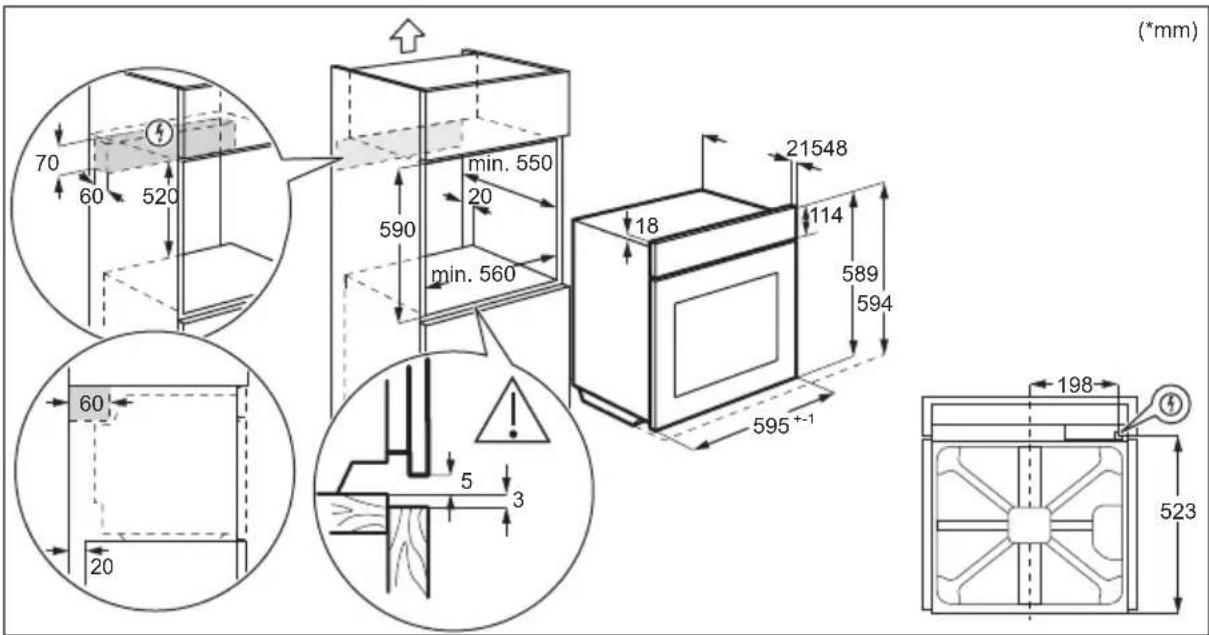
natural_image
Technical illustration of a cabinet with an inset close-up showing mechanical components (no text or symbols)4. ОПИС НА ПРОИЗВОДОТ
natural_image
Technical line drawing of a wooden ladder with two magnified views showing internal structure details (no text or symbols)natural_image
Line drawing of a curved architectural or mechanical component with railings, no text or symbols present9.2 Сензор за храна
natural_image
Line drawing of a fish inside a storage tank with an attached device (no text or symbols)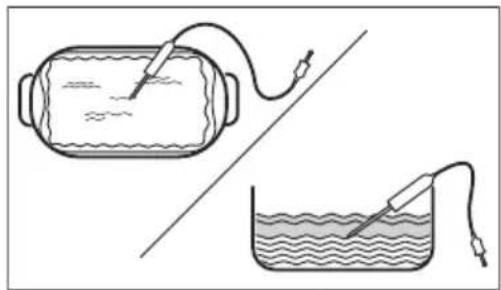
natural_image
Two laboratory setups: a rectangular tank with a probe and wire connected to a beaker with a probe inserted, both without any text or symbols.natural_image
Line drawing of a cooking pot with two handles (no text or symbols)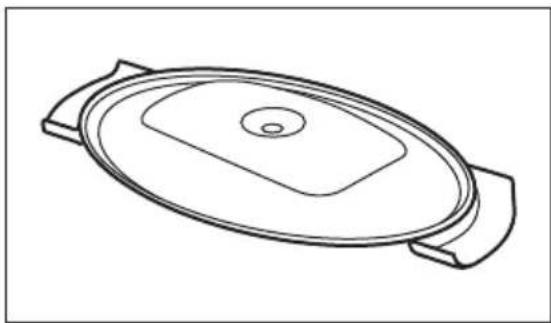
natural_image
Line drawing of a closed lid with a circular top and two side handles (no text or symbols)natural_image
Line drawing of an oval-shaped metal tray with two handles and perforated interior (no text or symbols)natural_image
Simple line drawing of an oval-shaped object with no text or symbolsТавче за пица

natural_image
Simple line drawing of a circular sieve or pan with a handle (no text or symbols)Сад за печење
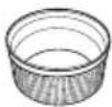
Керамички сад
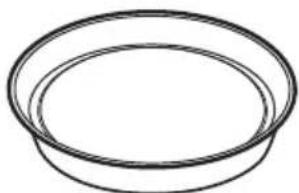
natural_image
Simple line drawing of a bowl or container with no text, numbers, or symbolsnatural_image
Line drawing of a hand holding a metal frame with a circular valve (no text or symbols)BSK778380M 949494838
How to install your AEG/Electrolux Oven - Column installation

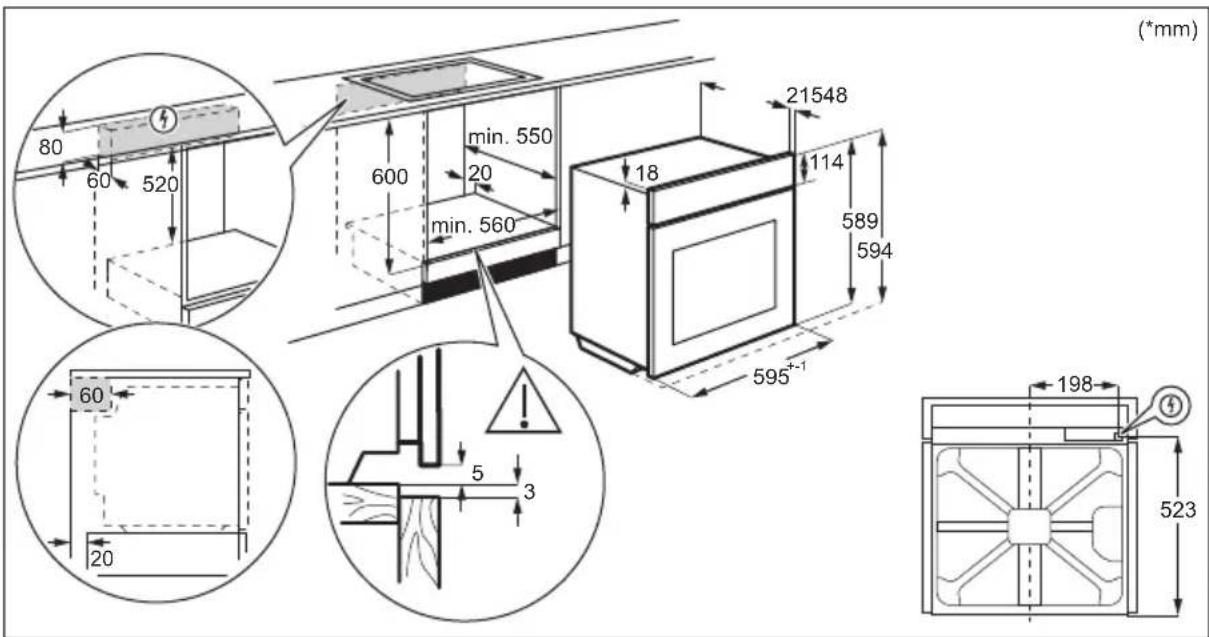
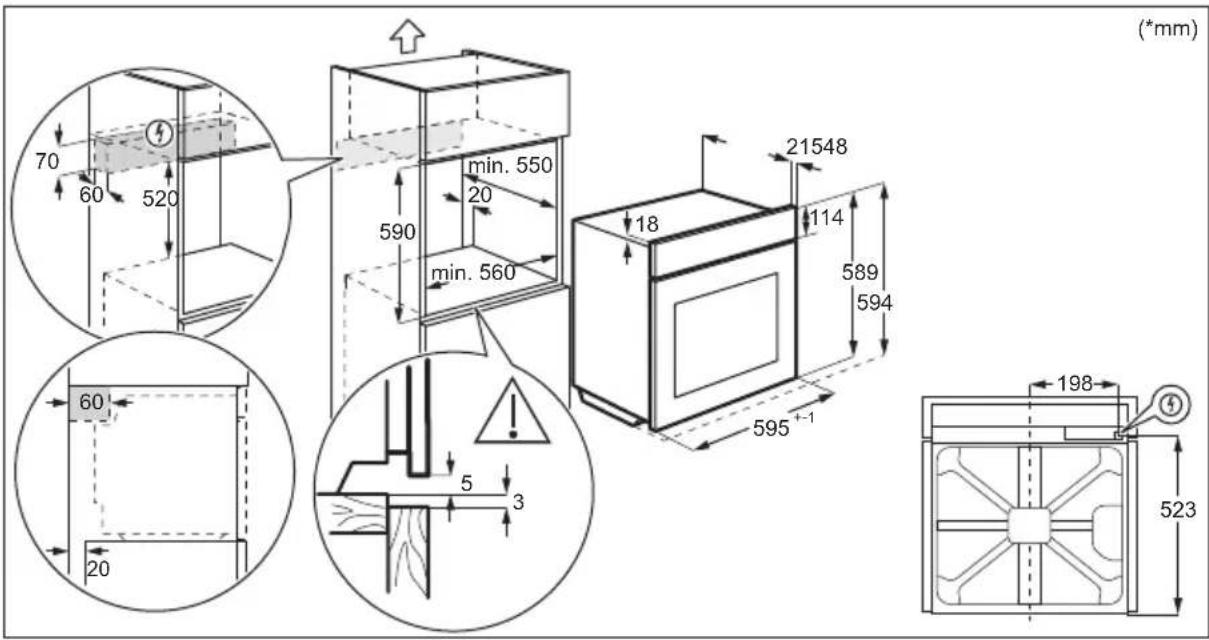
natural_image
Technical illustration of a cabinet with an inset close-up showing a screw being inserted into a chair (no text or symbols present)4. OPIS URZĄDZENIA
natural_image
Technical line drawing of a metal frame structure with two magnified insets showing internal details (no text or symbols)natural_image
Line drawing of a curved architectural or mechanical component with railings, no text or symbols present9.2 Termosonda
natural_image
Line drawing of a fish inside a storage machine with an arrow indicating force or movement (no text or symbols)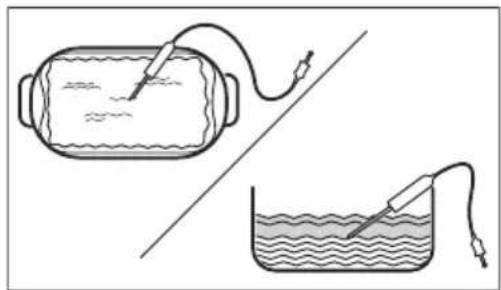
natural_image
Two laboratory setups: one with a test tube and wire, the other with a beaker connected to a probe (no text or symbols)natural_image
Line drawing of a cooking pot with two handles (no text or symbols)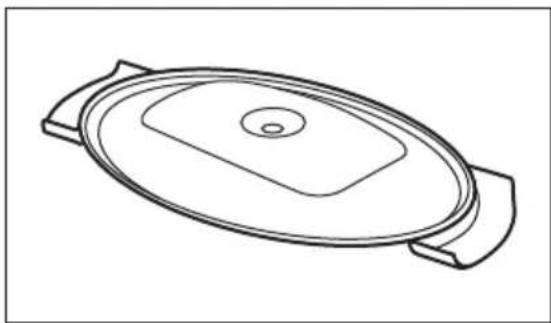
natural_image
Line drawing of a lid with a square opening and two side handles (no text or symbols)natural_image
Line drawing of an oval-shaped metal tray with two handles and perforated interior (no text or symbols)natural_image
Simple line drawing of an oval-shaped object with no text or symbolsBlacha do pizzy
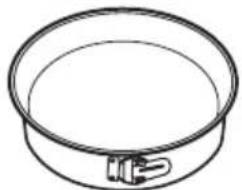
natural_image
Simple line drawing of a circular container with a handle and a small protrusion at the bottom (no text or symbols)Forma do pieczenia
Kokilki
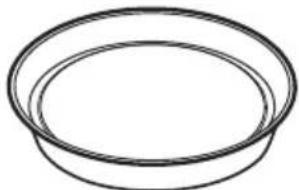
natural_image
Simple line drawing of a bowl or container with no text, numbers, or symbolsForma do tarty
natural_image
Line drawing of a hand holding a wall-mounted device (no text or symbols)How to install your AEG/Electrolux
Oven - Column installation
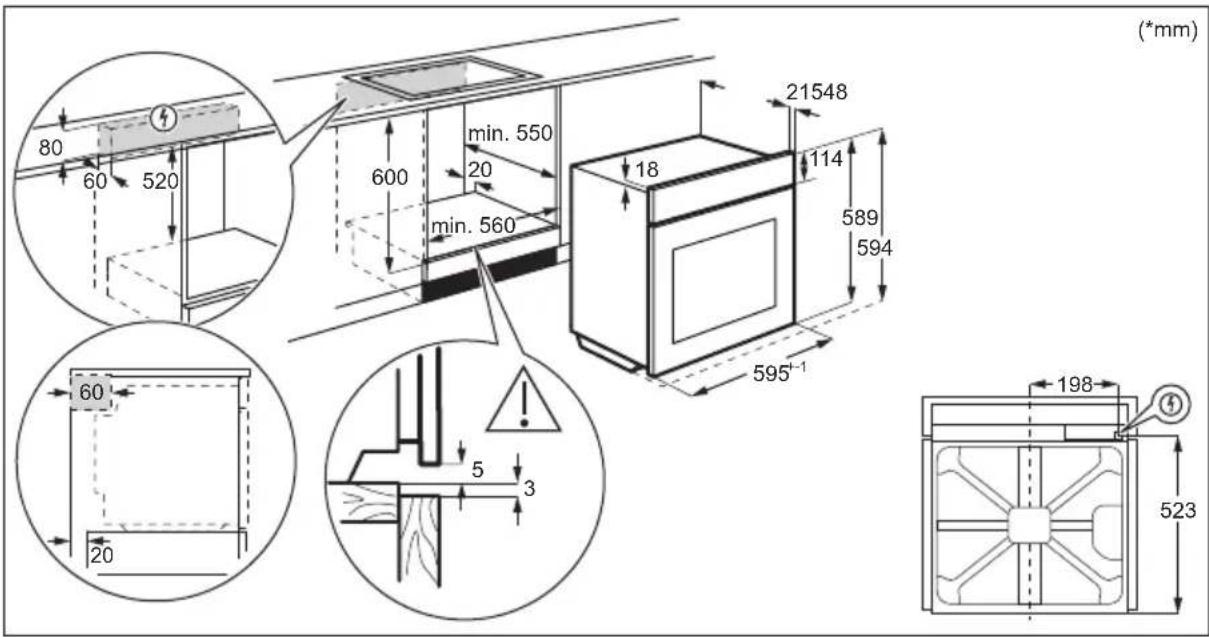
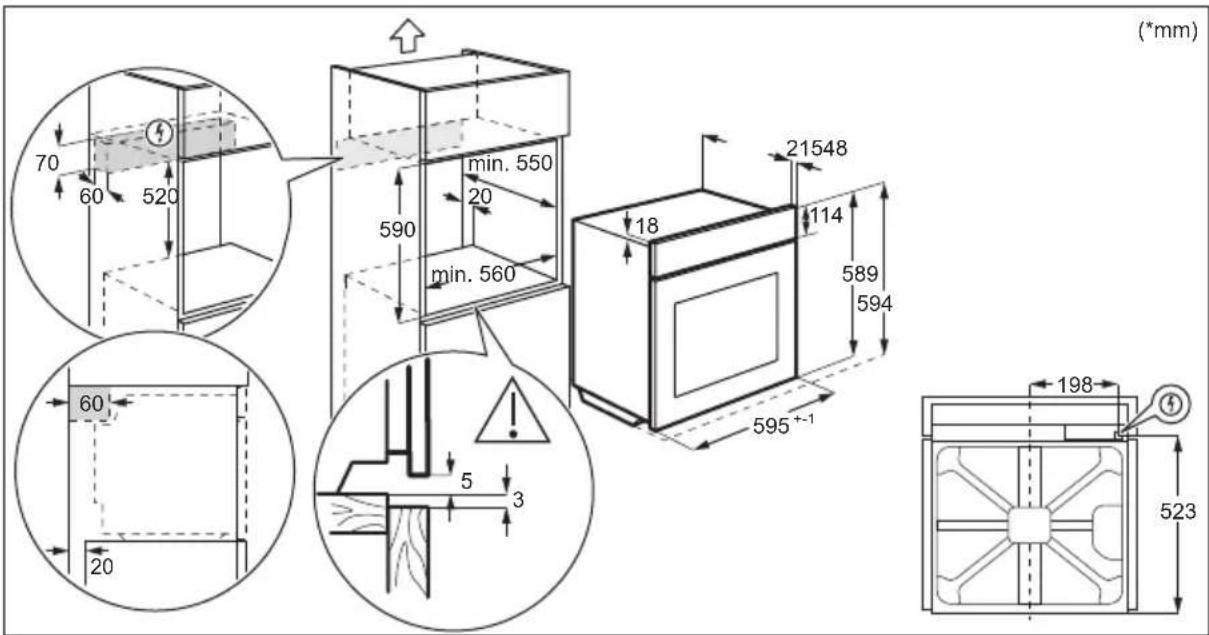
natural_image
Technical illustration of a cabinet with an inset close-up showing mechanical components (no text or symbols)4. ОПИС ПРОИЗВОДА
4.1 Општи приказ
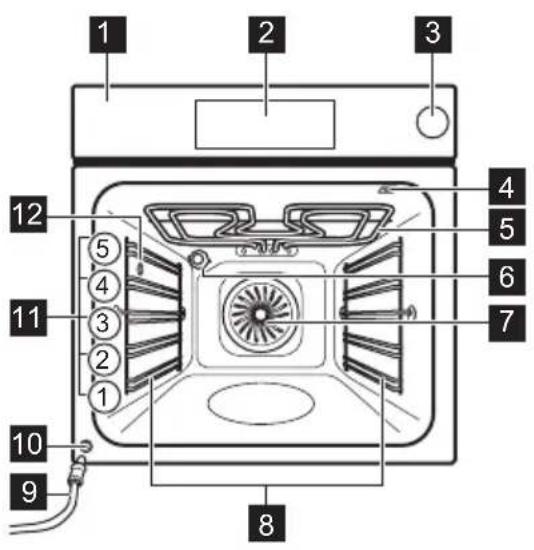
4.2 Прибор
- Решеткаста полица
natural_image
Technical line drawing of a ladder support structure with two magnified insets showing internal details (no text or symbols)natural_image
Line drawing of a curved architectural or mechanical component with railings, no text or symbols presentnatural_image
Line drawing of a fish inside a bed with a wall-mounted device and cable, no text or symbols present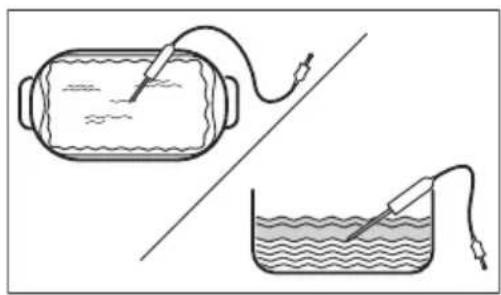
natural_image
Two laboratory setups: a cylindrical container with liquid and connected tubing, and a beaker with a probe inserted into liquid (no text or symbols)natural_image
Line drawing of a cooking pot with two handles (no text or symbols)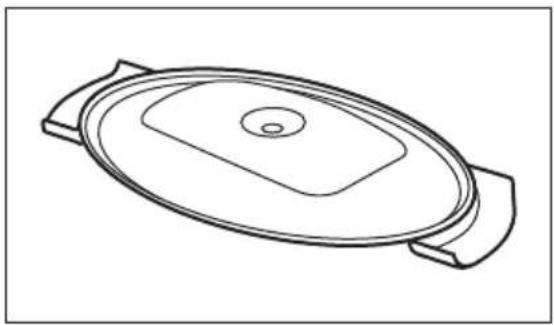
natural_image
Line drawing of a lid with a square opening and two side handles (no text or symbols)natural_image
Line drawing of an oval-shaped metal tray with two handles and a perforated interior (no text or symbols)natural_image
Simple line drawing of an oval-shaped object with no text or symbolsПлех за пицу
natural_image
Simple line drawing of a circular sieve or pan with a handle (no text or symbols)Посуда за печење
natural_image
Simple line drawing of a bowl or container with no text, numbers, or symbolsПлех за флан
natural_image
Line drawing of a hand holding a metal frame with a circular connector (no text or symbols)How to install your AEG/Electrolux Oven - Column installation

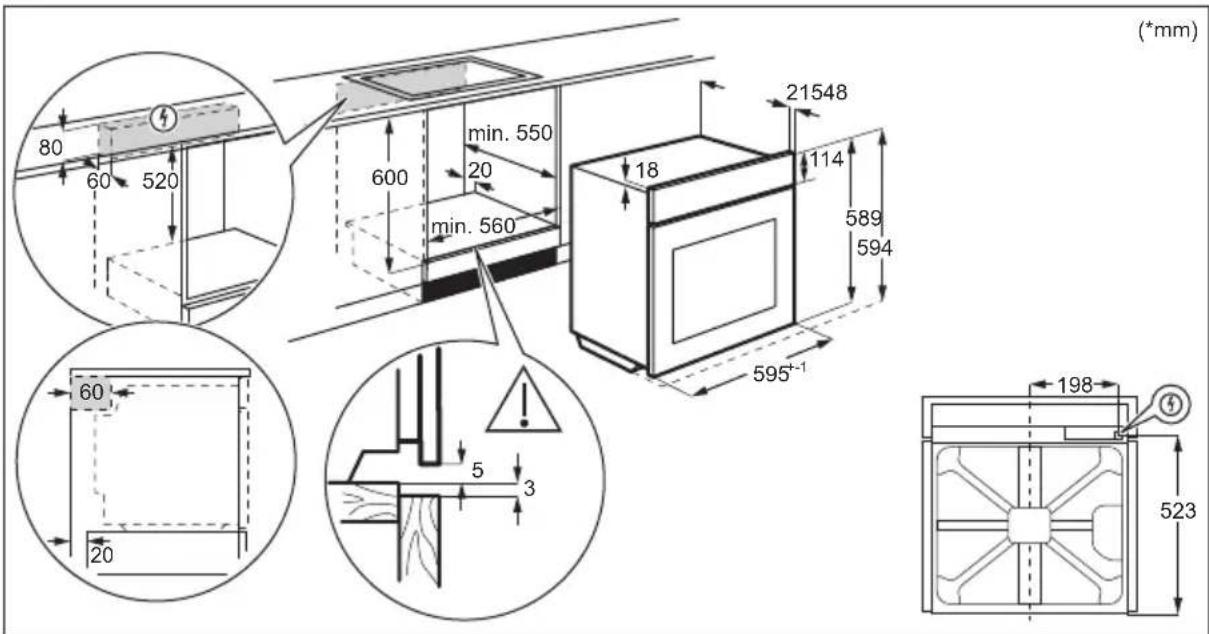
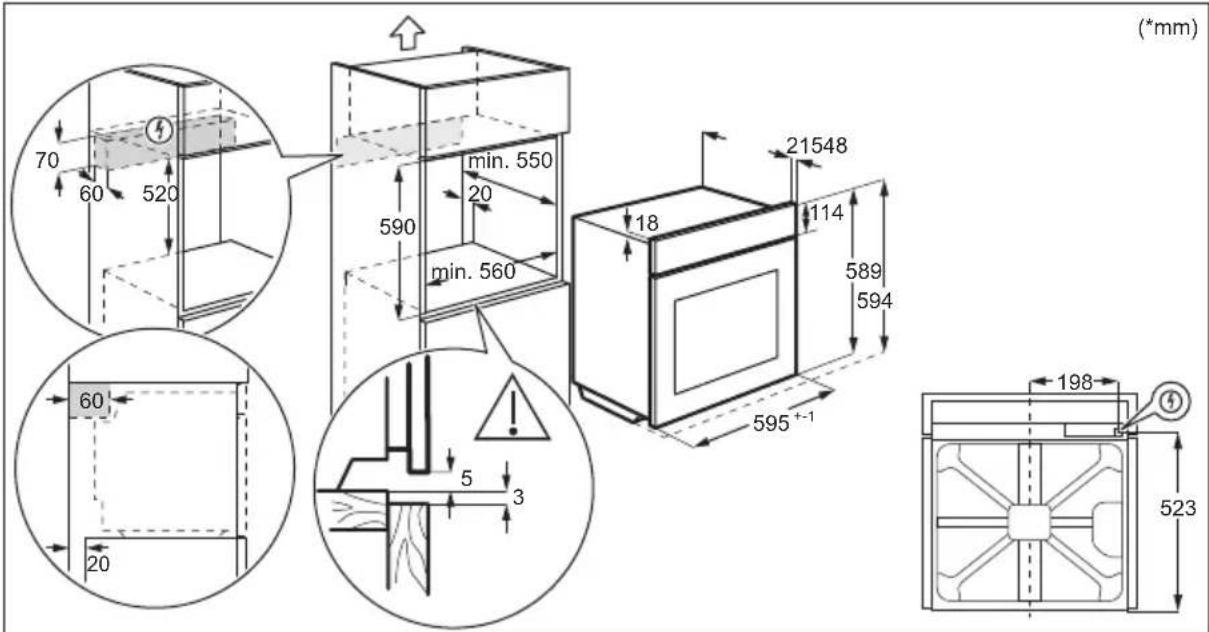
natural_image
Technical illustration of a cabinet with an open door and two views of a mechanical assembly (no text or symbols)4. OPIS IZDELKA
4.1 Splošni pregled
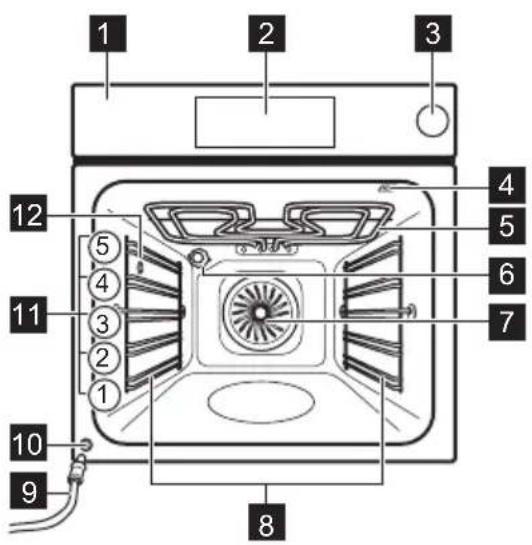
4.2 Pripomočki
• Mreža za pečenje
natural_image
Technical line drawing of a wooden ladder with two magnified views showing internal structure details (no text or symbols)Pekač za pecivo / Globok pekač:
Pekač potisnite med vodili nosilca rešetk.
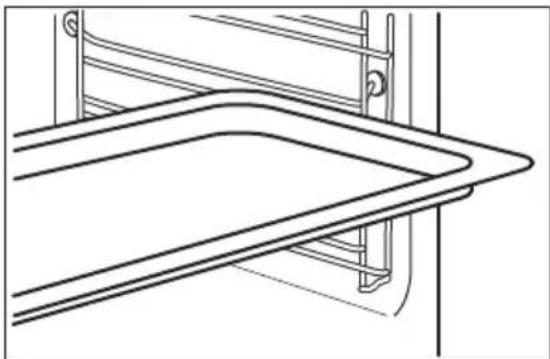
natural_image
Line drawing of a curved architectural or mechanical component with railings, no text or symbols present9.2 Sonda za hrano
natural_image
Line drawing of a fish being lifted by a rack-mounted device, showing structural components and airflow direction (no text or symbols)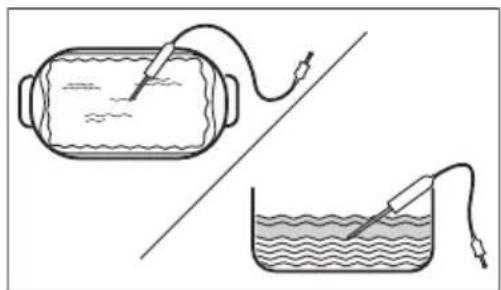
natural_image
Illustration of a cylindrical device connected to a wire with a probe, and a beaker with a probe inserted into liquid (no text or symbols)natural_image
Line drawing of a cooking pot with two handles (no text or symbols)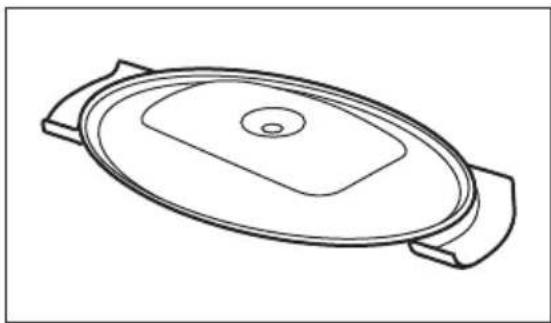
natural_image
Line drawing of a closed lid with a circular top and two side handles (no text or symbols)natural_image
Line drawing of an oval-shaped metal tray with two handles and perforated interior (no text or symbols)natural_image
Simple line drawing of an oval-shaped object with no text or symbols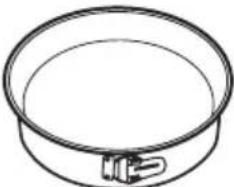
natural_image
Simple line drawing of a circular container with a small handle at the bottom (no text or symbols)
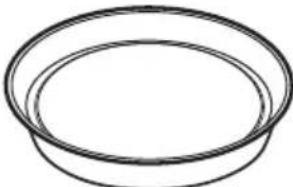
natural_image
Simple line drawing of a bowl or container with no text, numbers, or symbolsnatural_image
Simple line drawing of an oval-shaped object with no text or symbolsPosoda za pico
natural_image
Simple line drawing of a circular container with a small handle at the bottom (no text or symbols)Pekač za peko
Majhne posodice
za pečenje in ser-
viranje
natural_image
Simple line drawing of a bowl or container with no text, numbers, or symbolsModel za testo za kolač
Temen, neodbojen premer 28 cm
Temen, neodbojen premer 26 cm
Keramika premer 8 cm, viši- na 5 cm
Temen, neodbojen premer 28 cm
natural_image
Line drawing of a hand adjusting a metal frame structure (no text or symbols)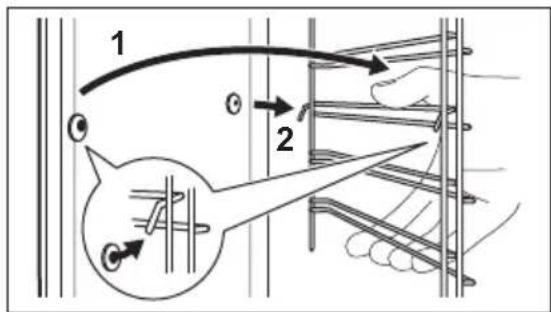
natural_image
Technical diagram showing mechanical assembly with an inset close-up of a component (no text or symbols)- korak Dvignite in vlecite zapahe, dokler se ne za- skočijo.
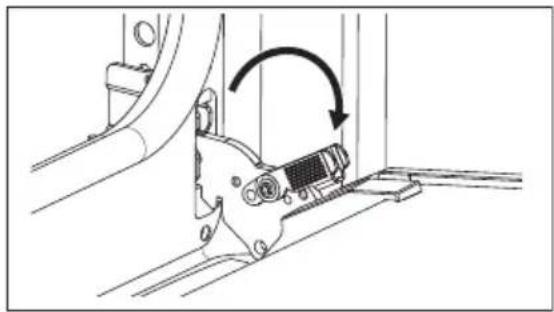
natural_image
Mechanical assembly diagram showing a gear mechanism with an arrow indicating rotational motion (no text or symbols present)natural_image
Illustration of a hand holding a folder with curved arrows indicating rotation (no text or symbols)-
korak Okvir vrat (B) pridržite na njihovem zgornjem robu na obeh straneh in potisnete navznoter, da sprostite tesnilo sponke.
-
korak Okvir vrat potegnite k sebi in ga odstranite.
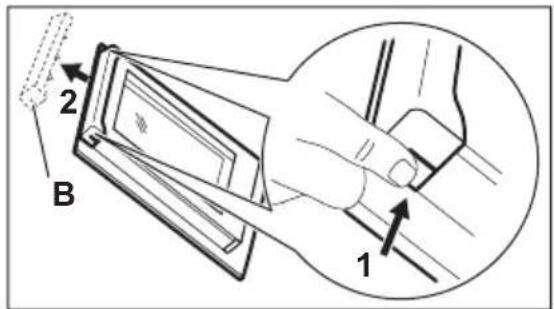
natural_image
Diagram of a hand pressing a curved arrow on a layered platform (no text or symbols)BSK778380M 949494838
Indeks energijske učinkovitosti 81.2
How to install your AEG/Electrolux Oven - Column installation

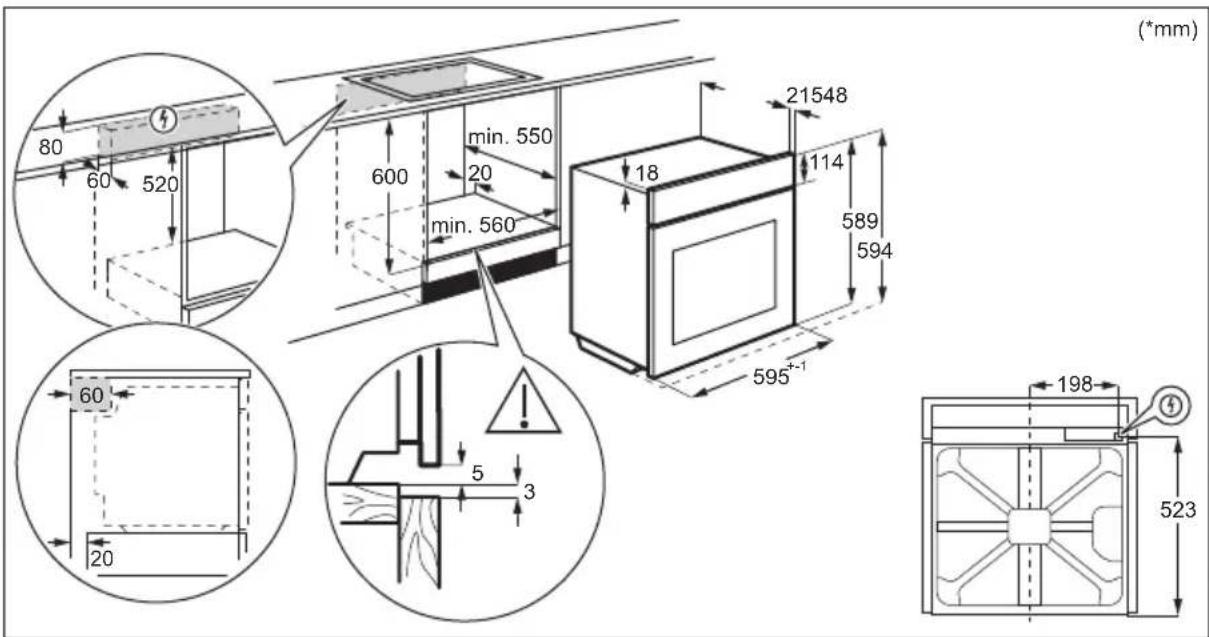
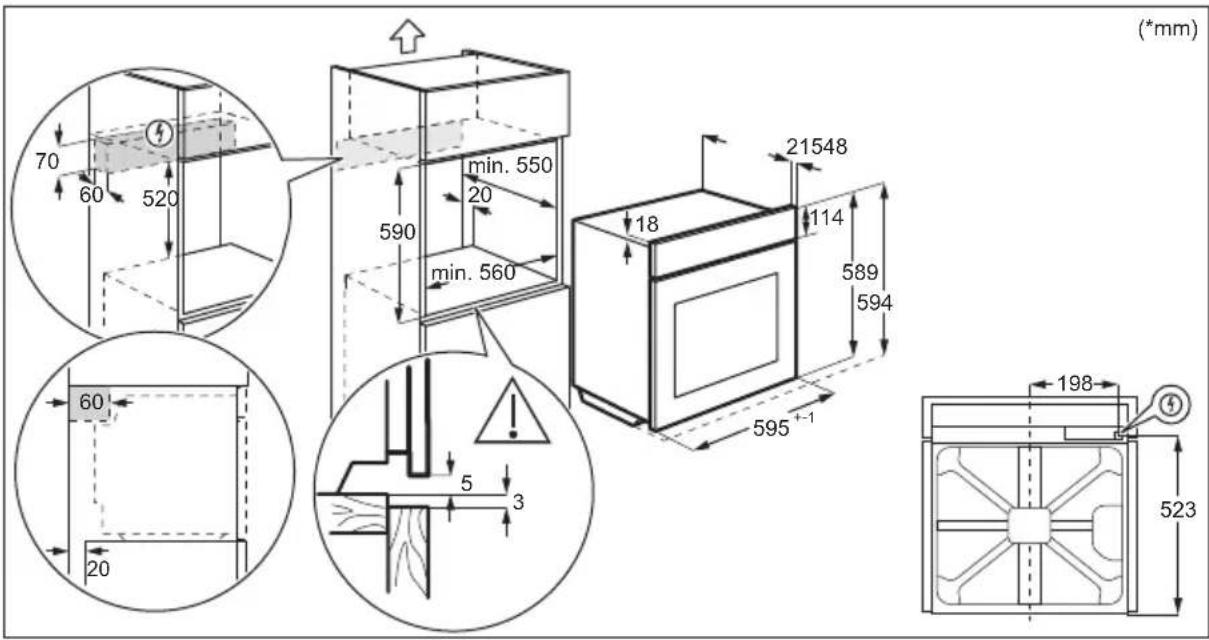
natural_image
Technical illustration of a cabinet with an inset close-up showing a mechanical assembly (no text or symbols)4. ОПИС ВИРОБУ
4.1 Загальний огляд
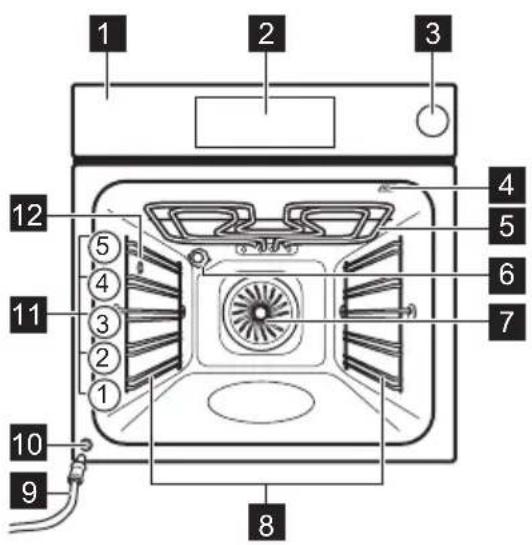
4.2 Аксесуари
natural_image
Technical line drawing of a ladder structure with two magnified views showing internal details (no text or symbols)natural_image
Line drawing of a curved architectural or mechanical component with railings, no text or symbols present9.2 Термощуп
natural_image
Line drawing of a fish inside a rack with an arrow indicating force or movement (no text or symbols)
natural_image
Illustration of a battery and a submerged object with wires, no text or symbols presentnatural_image
Line drawing of a cooking pot with two handles (no text or symbols)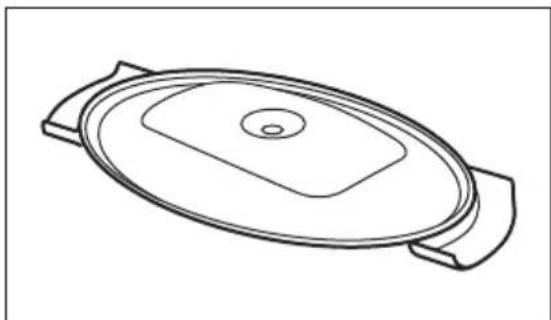
natural_image
Line drawing of a closed lid with a circular top and two side handles (no text or symbols)natural_image
Line drawing of an oval-shaped metal tray with two handles and perforated interior (no text or symbols)natural_image
Line drawing of a hand holding a wall-mounted device (no text or symbols)natural_image
Technical diagram showing a mechanical assembly with an inset close-up of a component (no text or symbols present)natural_image
Mechanical assembly diagram showing a clamping mechanism with an arrow indicating rotational motion (no text or symbols present)natural_image
Illustration of a hand holding a folder with curved arrows indicating rotation (no text or symbols)natural_image
Diagram of a hand using a curved arrow to lift a rectangular object on a flat base (no text or symbols)natural_image
Five circular icons representing shopping and e-commerce activities: cart, printer, gear, and shopping cart (no text or symbols)
CE
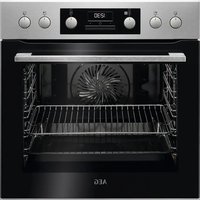
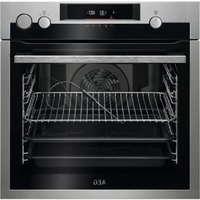
- PËRSHKRIM I PRODUKTIT
- Sensori i ushqimit
- Mënyra e ndërrimit: Llamba
- PARALAJMĚRIM!
- ОПИСАНИЕ НА УРЕДА
- Общ преглед
- Аксесоари
- Термосонда
- OPIS PROIZVODA
- Opći pregled
- Dodatna oprema
- UPRAVLJAČKA PLOČA
- Pregled upravljačke ploče
- Senzor za hranu
- korak
- korak
- korak
- korak
- Način upotrebe: Pirolitičko čišćenje
- BESCHRIJVING VAN HET PRODUCT
- Voedselsensor
- PROBLEEMOPLOSSING
- WAARSCHUWING!
- DESCRIPTION DE L'APPAREIL
- Temperatursensor
- Welcome to AEG! Thank you for choosing our appliance.
- CONTENTS
- ⚠SAFETY INFORMATION
- Children and vulnerable people safety
- General Safety
- SAFETY INSTRUCTIONS
- Installation
- WARNING!
- Electrical connection
- Cable types applicable for installation or replacement for Europe:
- Total power (W) Section of the cable (mm 4 )
- Use
- Care and cleaning
- Pyrolytic cleaning
- Steam Cooking
- Internal lighting
- Service
- Disposal
- INSTALLATION
- Building in
- YouTube
- PRODUCT DESCRIPTION
- General overview
- Accessories
- CONTROL PANEL
- Control panel overview
- Display
- Display indicators
- Timer indicators
- BEFORE FIRST USE
- Initial Cleaning
- First connection
- Wireless connection
- Software licences
- Initial preheating
- DAILY USE
- How to set: Heating functions
- How to set: Steam heating function
- Water tank
- How to set: Assisted Cooking
- Heating functions
- STANDARD
- Notes on: Moist Fan Baking
- CLOCK FUNCTIONS
- Clock functions description
- How to set: Clock functions
- HOW TO USE: ACCESSORIES
- Inserting accessories
- Wire shelf:
- Baking tray / Deep pan:
- Food Sensor
- Accessories for steam cooking
- The dietary baking dish for steam cooking functions
- Steam cooking in a dietary baking dish
- Direct steam cooking
- ADDITIONAL FUNCTIONS
- How to save: Favourites
- Function lock
- Automatic switch-off
- Cooling fan
- HINTS AND TIPS
- Cooking recommendations
- Moist Fan Baking
- Moist Fan Baking - recommended accessories
- Cooking tables for test institutes
- CARE AND CLEANING
- Notes on cleaning
- How to remove: Shelf supports
- How to use: Pyrolytic Cleaning
- CAUTION!
- How to clean: Water tank
- Cleaning Reminder
- How to remove and install: Door
- How to replace: Lamp
- Back lamp
- TROUBLESHOOTING
- What to do if...
- The appliance does not turn on or does not heat up
- Possible cause
- Remedy
- Components
- Description
- Cleaning
- Problems with Wi-Fi signal
- How to manage: Error codes
- Code and description Remedy
- Service data
- ENERGY EFFICIENCY
- Product Information and Product Information Sheet
- Energy saving
- Cooking with fan
- Residual heat
- Keep food warm
- Cooking with the lamp off
- Moist Fan Baking
- MENU STRUCTURE
- Menu
- Submenu for: Cleaning
- Submenu for: Options
- Submenu for: Connections
- Submenu for: Setup
- Submenu for: Service
- Submenu Description
- IT'S EASY!
- Before first use you have to set:
- Familiarize yourself with the basic icons on the control panel and the display:
- Start using the appliance
- Start cooking
- Steam cooking
- ENVIRONMENTAL CONCERNS
- TOOTE KIRJELDUS
- Ülevaade
- Lisatarvikud
- Toidusensor
- TERMÉKLEÍRÁS
- IZSTRĀDĀJUMA APRAKSTS
- Termozonde
- GAMINIO APRAŠYMAS
- Bendra apžvalga
- Priedai
- Maisto termometras
- ОПИС НА ПРОИЗВОДОТ
- Сензор за храна
- OPIS URZĄDZENIA
- Termosonda
- ОПИС ПРОИЗВОДА
- Општи приказ
- Прибор
- OPIS IZDELKA
- Splošni pregled
- Pripomočki
- Pekač za pecivo / Globok pekač:
- Sonda za hrano
- ОПИС ВИРОБУ
- Загальний огляд
- Аксесуари
- Термощуп
Brand : AEG
Model : BSE778380B
Category : Electric oven