
HyperDeck Studio 4K Pro - VCR Blackmagic Design - Free user manual and instructions
Find the device manual for free HyperDeck Studio 4K Pro Blackmagic Design in PDF.
| Product Type | Professional Disk Recorder / Player |
| Model | HyperDeck Studio 4K Pro |
| Brand | Blackmagic Design |
| Dimensions (approx.) | 48.3 x 4.4 x 30.5 cm (W x H x D, standard rack 1U) |
| Weight (approx.) | 4.5 kg |
| Power Supply | AC 100-240V via IEC input (dual for redundancy); DC 12V input for external battery |
| Power Consumption | Approx. 60 W |
| Supported Resolutions | HD up to 1080p60, Ultra HD up to 2160p60 |
| Video Codecs | H.264, H.265, Apple ProRes, DNxHD, DNxHR |
| Storage Media | SD UHS-II cards, 9.5 mm SSDs, USB-C flash drives, MultiDock 10G |
| Video Connectivity | 2 x 12G-SDI inputs, 2 x 12G-SDI outputs; HDMI input/output; 3G-SDI monitor output |
| Audio Connectivity | Embedded SDI/HDMI audio; built-in speaker; headphone jack output |
| Network | 10GbE Ethernet for control and FTP transfer |
| Remote Control | RS-422 (input/output); Ethernet (Blackmagic protocol); compatible with ATEM switchers |
| Timecode Generation | Timecode input/output (XLR); modes: video, external, internal, Regen, preset |
| Reference (Genlock) | Reference input/output: black burst / tri-sync; adjustable input synchronization |
| Main Functions | Recording and playback on multiple media; loop playback; Jog/Shuttle/Scrub modes; 3D LUT on monitor output; USB webcam mode |
| Display | Color LCD screen with audio, timecode, and media status indicators |
| Maintenance and Cleaning | Clean with a soft, dry cloth. Do not use liquids or abrasive products. |
| Safety | Connect to a socket with protective conductor; do not expose to moisture; use in tropical climate up to 40°C; max altitude 2000 m; adequate ventilation |
| Spare Parts and Repairability | No user-serviceable parts. Contact Blackmagic Design support for any repairs. |
| Warranty | 12 months limited (parts and labor) |
Frequently Asked Questions - HyperDeck Studio 4K Pro Blackmagic Design
User questions about HyperDeck Studio 4K Pro Blackmagic Design
0 question about this device. Answer the ones you know or ask your own.
Ask a new question about this device
Download the instructions for your VCR in PDF format for free! Find your manual HyperDeck Studio 4K Pro - Blackmagic Design and take your electronic device back in hand. On this page are published all the documents necessary for the use of your device. HyperDeck Studio 4K Pro by Blackmagic Design.
USER MANUAL HyperDeck Studio 4K Pro Blackmagic Design
HyperDeck Disk Recorders

Languages
To go directly to your preferred language, simply click on the hyperlinks listed in the contents below.
English 3
日本語...73
Français 144
Deutsch 215
Español 286
中文 357
한국어 428
Русский 499
Italiano 570
Português 641
Türkçe 712

natural_image
Circular portrait photo of a smiling man in a black polo shirt against a gray background (no text or symbols)Welcome
Thank you for purchasing your Blackmagic HyperDeck disk recorder!
When we designed the original Blackmagic HyperDeck disk recorders back in 2011, we wanted to make it easier and more affordable to record and play back professional video on removable 2.5" Solid State Disks.
Now we are excited to present our new range of HyperDeck disk recorders that let you record HD and Ultra HD video using SD cards, SSDs and now USB flash disks. You can even connect a Blackmagic MultiDock 10G and record or play back files on external hard drives!
HyperDeck Studio Plus and Pro models feature familiar broadcast deck controls with a search dial for jog, shuttle and scroll playback. The search dial's clutch mechanism lets you feel the playback so you can search through your clips without taking your eyes off the monitor. They even include a front headphone connection and speaker so you can quickly check your audio directly from your HyperDeck, plus many more features!
We hope you get years of use from your HyperDeck disk recorder and that it will serve you well with your productions!
Please check the support page at www.blackmagicdesign.com for the latest version of this manual and updates to the HyperDeck software. Keeping your software up to date will always ensure you get all the latest features. When downloading software, please register with your information so we can keep you updated when new software is released. We are constantly working on new features and improvements, so we would love to hear from you!
Grant Petty
Grant Petty
CEO Blackmagic Design
Contents
Introducing HyperDeck Disk Recorders 5
Getting Started 6
Plugging in Power 6
Connecting Video and Audio 6
Checking Audio 7
Plugging in Media 7
Recording Video 9
Recording on multiple media 9
Playback
Playing Video with HyperDeck 10
Using the Search Dial 11
Using the Front Panel 13
Media Slot Indicators 13
Using the LCD Menu 14
Settings 15
Rear Panel 27
Using the Monitor Output 29
Storage Media 32
SD Card 32
SSD 34
EXT Disk 35
Formatting Media 37
Preparing Media on a Computer 37
Using your HyperDeck as a Webcam 38
Setting the Webcam Source 38
Setting up Open Broadcaster 39
Blackmagic HyperDeck Setup 41
Using HyperDeck Setup 41
LUTs Page 42
Updating the Internal Software 43
Teranex Mini Rack Shelf 10 44
RS-422 Control 45
Transferring Files over a Network 50
Connecting to an ATEM Switcher 52
Understanding Post
Production Workflows 53
Developer Information 54
Blackmagic HyperDeck Ethernet
Protocol 54
Protocol Commands 54
Protocol Details 58
Help 69
Regulatory Notices 70
Safety Information 71
Warranty 72
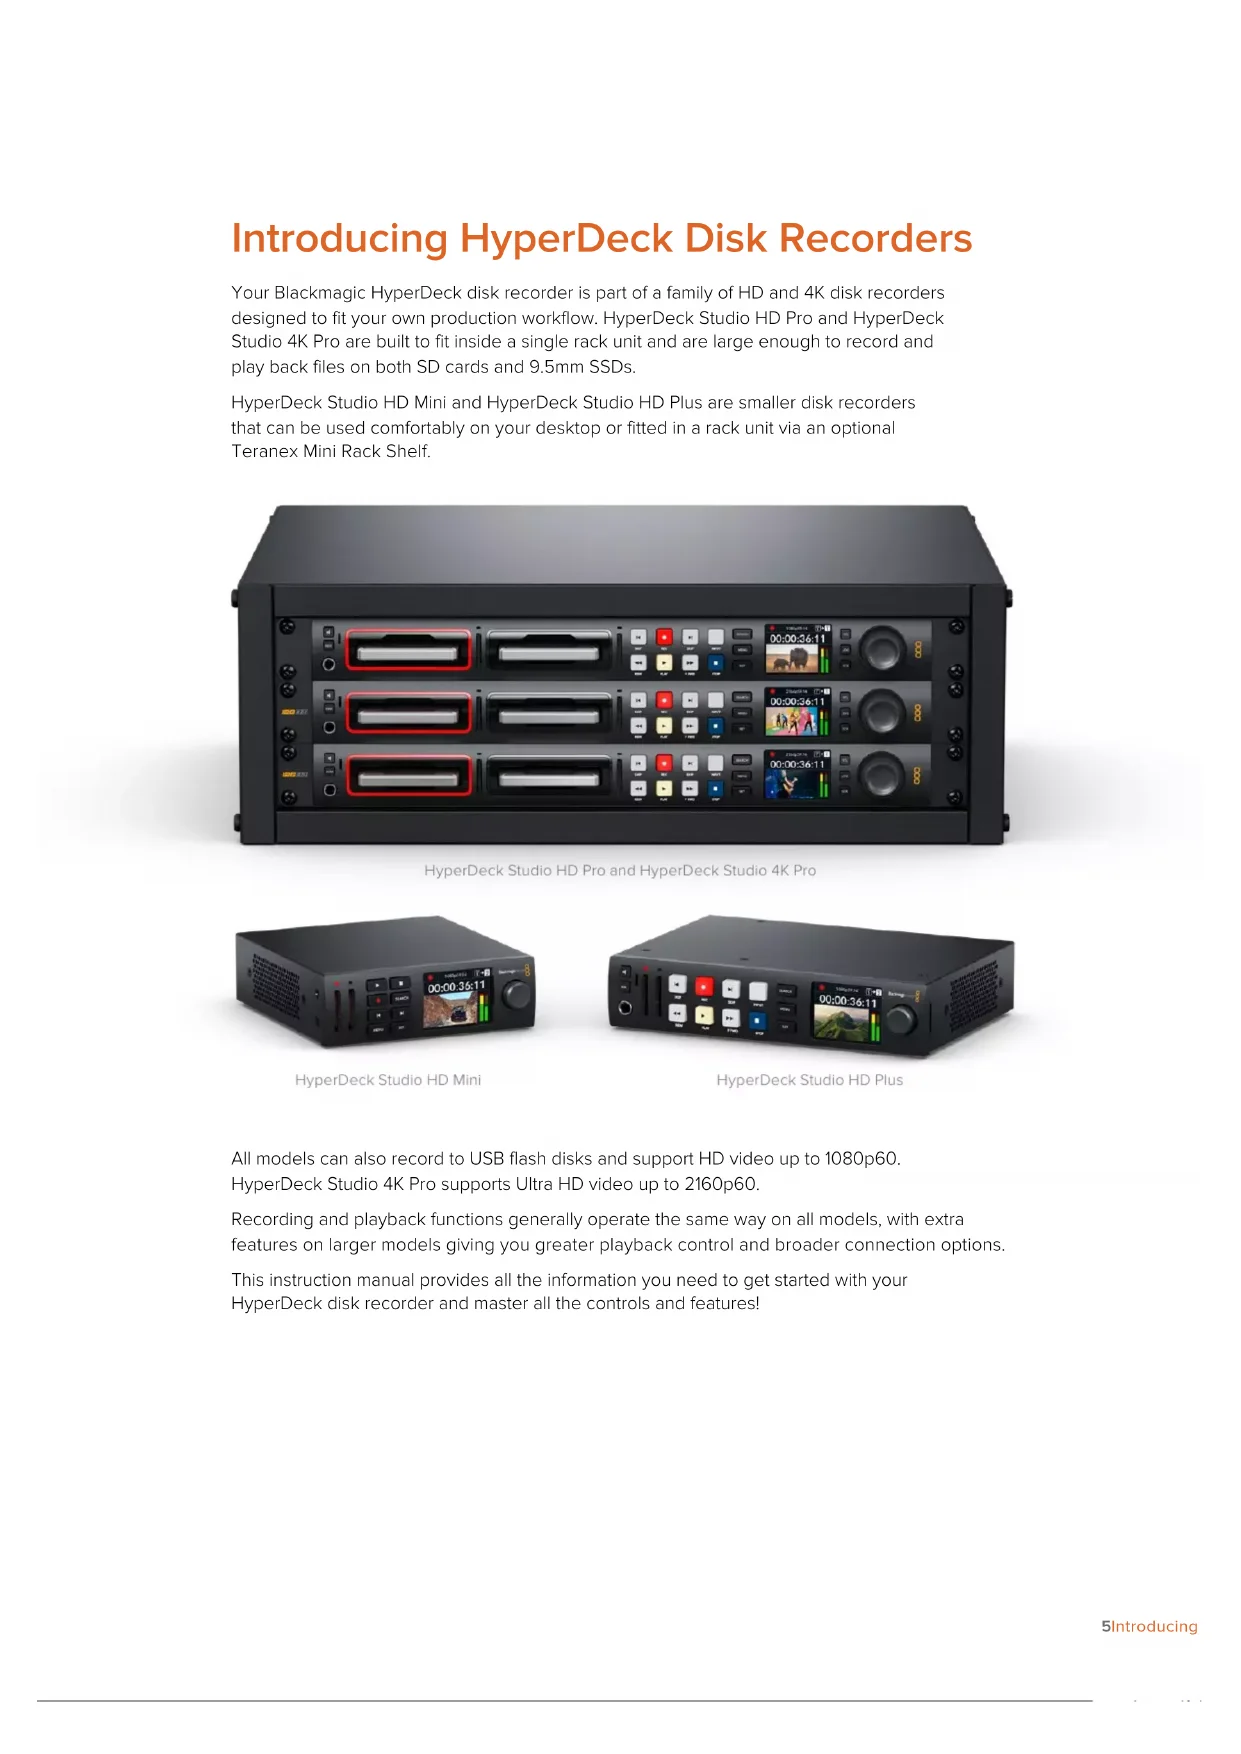
Introducing HyperDeck Disk Recorders
Your Blackmagic HyperDeck disk recorder is part of a family of HD and 4K disk recorders designed to fit your own production workflow. HyperDeck Studio HD Pro and HyperDeck Studio 4K Pro are built to fit inside a single rack unit and are large enough to record and play back files on both SD cards and 9.5mm SSDs.
HyperDeck Studio HD Mini and HyperDeck Studio HD Plus are smaller disk recorders that can be used comfortably on your desktop or fitted in a rack unit via an optional Teranex Mini Rack Shelf.

natural_image
Front view of a black audio workstation with multiple video player channels and playback controls (no readable text or symbols)HyperDeck Studio HD Pro and HyperDeck Studio 4K Pro

natural_image
Black audio recording device with playback controls and a digital display showing time, battery, and track (no readable text or symbols)HyperDeck Studio HD Mini

natural_image
Black audio recording device with control buttons and playback screen (no readable text or symbols)HyperDeck Studio HD Plus
All models can also record to USB flash disks and support HD video up to 1080p60. HyperDeck Studio 4K Pro supports Ultra HD video up to 2160p60.
Recording and playback functions generally operate the same way on all models, with extra features on larger models giving you greater playback control and broader connection options.
This instruction manual provides all the information you need to get started with your HyperDeck disk recorder and master all the controls and features!
Getting Started
Getting started with your HyperDeck Studio disk recorder is as easy as connecting power, plugging in your video sources and destination equipment and inserting your SSDs or SD cards.
Plugging in Power
To power your HyperDeck, plug a standard IEC cable to your HyperDeck's power input on the rear panel.

If your HyperDeck model has an additional IEC power input, you can connect to another power source for redundancy. For example, connecting the second input to an uninterrupted power supply, or UPS, will instantly take over if the primary source fails.
All models also include a 12V DC input, which lets you connect power from an external 12V battery.

natural_image
Front panel of an electronic device showing various ports and connectors (no readable text or symbols)HyperDeck Studio HD Mini can also be powered via an AC plug pack. If your power supply has a locking ring, secure the connection to HyperDeck Studio HD Mini by tightening the connector to the unit. This locks the power cable in place to prevent accidental disconnection.
Once powered, the LCD display will prompt you to select your language. Using the search dial, scroll to the language you wish to use and press the flashing 'set' button. This will take you to the home screen. For more information about the home screen and LCD menus, refer to the 'using the front panel' section.

Connecting Video and Audio
Plug your source video to the SDI or HDMI inputs, and your destination equipment to the SDI or HDMI outputs. For example, a source could be a digital cinema camera and a destination could be an HDMI television or SDI monitor.
All HyperDeck models support HD video up to 1080p60. HyperDeck Studio 4K Pro has 12G-SDI connectors so you can input or output Ultra HD up to 2160p60 using a single BNC cable.

You can confirm the SDI or HDMI video signal by monitoring the built in LCD on the front panel.
TIP If you don't see the video source on the LCD, it might be because you have connected to the other source input. Press the 'input' button on the front panel to cycle through the SDI or HDMI sources.
Audio is embedded in the SDI or HDMI signal so you don't have to worry about connecting audio. You can check the audio levels by observing the meters next to the video image on the LCD.
Checking Audio
If your HyperDeck features a speaker and headphone port on the front panel, you can quickly check your audio using the built in speaker or by plugging in headphones. To listen, press and hold the speaker button and rotate the search dial to adjust the volume. A volume indicator will appear on the LCD home screen.
Double press the speaker button to keep the speaker enabled. Double press again to disable.

natural_image
Illustration of hands holding a device panel with buttons and media icons (no readable text or symbols)Plugging in Media
All HyperDeck Studio models ship ready to record immediately without having to configure any settings. All you need is a formatted SSD or SD card.
You can easily format media via the LCD menu settings. You can also format using a computer. Refer to the 'Formatting Media' section in this manual for more information on how to format your media. You can also find information about the types of media that are best for recording video and a list of recommended drives and cards.
To plug in an SSD:
1 Hold a 9.5mm SSD with the connection pins facing the bottom and aligned with your HyperDeck's drive bay. Gently push the SSD into the drive bay until you feel it slot into place.
2 Your HyperDeck Studio will verify the SSD. This is shown by an illuminated green indicator surrounding the drive bay. When the green indicator stops, your HyperDeck is ready to record!

The drive indicator will illuminate green when reading the media and then turn off when your HyperDeck is ready to record
To remove the SSD, grip the outer edge and gently pull away from the unit. You will feel the SSD disconnect from the slot.

Hold your SSD with the connection pins facing the bottom, aligned with your HyperDeck Studio's drive bay and gently push the SSD into the drive bay until you feel it slot into place
To plug in an SD card:
1 Hold the SD card with the gold connectors facing your HyperDeck Studio's LCD and align it with the media slot. Now gently push the card into the slot until you feel it lock firmly into place.

natural_image
Diagram of a server rack with ports and an orange arrow indicating a specific component (no text or symbols present)2 Your HyperDeck Studio will verify the SD card. This is shown by an illuminated green indicator above the SD card slot.

natural_image
Front panel of a video recording device showing playback buttons, track, and a digital display (no readable text or symbols)When the indicator turns off and the stop button is illuminated, your HyperDeck Studio is ready to record.
TIP To remove the card, gently push until you feel it click, then release. The card will eject a short distance, allowing you to hold the edge of the card and remove it from the slot.
Your HyperDeck Studio is now ready for recording and playback!
Recording Video
After confirming that your video source is displayed on the LCD, you can start recording straight away!
To start recording, press the record button. When recording to an SD card, the slot indicator will illuminate red along with the record button, the play button will illuminate and a record icon will appear in the LCD home screen. When recording to an SSD, the dynamic media indicator will illuminate red.

While HyperDeck Studio is recording, the storage indicator on the LCD will alternate between displaying the active slot and record time remaining on the media.
To finish the recording, press the stop button. Press the 'play' button to start playback immediately.
TIP If you want to change the codec being used, you can change the codec setting using the Blackmagic HyperDeck Setup utility. For more information, refer to the 'Blackmagic HyperDeck Setup' section later in this manual.
Recording on multiple media
When there is less than 3 minutes of record time remaining on your SD card or SSD, the timecode counter on your HyperDeck Studio's LCD will turn red and the 'stop' button will flash slowly.

This also means there is no second disk with space that recording can continue onto. In this case, you simply need to insert a disk with space so recording can continue. Once you insert a blank disk into an empty slot or the ext disk input, the slow flashing will stop and the timecode
will revert to white. This means HyperDeck can continue to record, because this second disk has been checked ok and there is space to keep recording.
When more than one media is connected to HyperDeck Studio, the recording will spill from one disk or drive to the next. This will be shown in the upper right corner of the home screen.

Swapping Disks During Recording
If you want to change the disk you are recording to at any time, and you have a second disk that has free space, then simply hold down the record button and the recording will move from the current disk to the next disk. This is very useful when you want to get that disk out of the HyperDeck without pausing recording. This can happen during live events when you need to get an important recording out to another location, but you don't want to miss anything or stop recording.
If the record button flashes during a recording, there may be problems with your media resulting in dropped frames. This can occur when recording Ultra HD using slower media, for example, recording 2160p30 ProRes HQ uses a higher data rate compared to ProRes Proxy, so your SD cards or SSDs need to be the fastest available. For a list of approved media, refer the 'storage media' section in this manual.
Playback
The transport controls feature buttons commonly found on traditional broadcast decks including 'record', 'rewind', 'play', 'fast fwd' and 'stop'. 'Skip' reverse and 'skip' forward buttons operate like previous and next buttons so you can quickly navigate from clip to clip.
Playing Video with HyperDeck
1 Press the 'play' button once for instant playback and you'll see your video on the LCD and any displays connected to your HyperDeck's video outputs.
2 To skip to the next clip, press the 'next clip' button on the control panel.
3 Press 'previous clip' once to go to the start of the current clip or press twice to skip back to the start of the previous clip.

Press the play button on your HyperDeck's control panel to play back a clip and press the forward or reverse skip buttons to restart the current clip or skip to a different one
TIP To play back video files on your HyperDeck, you will need to set the codec to match. You can do this using the LCD menu. Refer to the 'using the LCD menu' and 'settings' sections for more information.
Loop Playback
If you want playback to continue indefinitely, you can set your HyperDeck to loop by pressing the play button again during playback. When loop playback is enabled, you will see the loop icon appear on the LCD. There are two loop modes available.

Dynamic LEDs
During playback, the bezel surrounding the drive bay illuminates green in a circular motion to indicate the playback speed and direction

TIP If the play button flashes on HyperDecks that record on SSDs, this means the disk is not fast enough and playback cannot keep up. We recommend you change to a more compressed recording format such as H.264 or use a faster recommended SSD or external disk for Ultra HD recording.
Using the Search Dial
Using the search dial during playback is a fast way to move through your clips and select specific moments to play, or review them frame by frame. This can be important if you need to locate a specific moment in a clip, either by visually monitoring the clip as you turn the dial, or by searching for a specific timecode point. It is also helpful for parking the playhead at a specific cue point, ready for the clip to be rolled to air during a live broadcast.

Press the 'search' button to cycle through search dial modes
Search dial modes include Jog, Shuttle and Scroll.
 | Jog Plays forwards or backwards through the clip frame by frame allowing precise control. |
 | Shuttle Plays forwards or backwards at a faster rate. The playback will vary based on how far you turn the dial. |
 | Scroll Even faster playback depending on how far you turn the dial. This mode is helpful to move quickly through a long clip when searching for a specific moment. |
Larger models have dedicated search mode buttons and feature a search dial with a built in clutch mechanism that provides tactile feedback during use. This allows you to feel your way through the clip while watching it on a television or monitor.

Press the dedicated 'JOG', 'STL' and 'SCR' buttons to select jog, shuttle and scroll search modes

TIP To resume normal playback, press the 'play' or 'stop' button.
Using the Front Panel
When recording or playing video with HyperDeck, any information you need to know is displayed on the unit itself via LED indicators for each media slot and the built in LCD.
HyperDeck Studio Home Screen
Time Remaining and Media Indicator –
During recording, the icon will consistently change between the time remaining on the disk and the current drive in use. During playback, the active media icon will be displayed.
Format Indicator – Shows the format of the input or file for playback. It will also indicate the input source when toggling the 'input' button on some HyperDeck Studio models along with the current volume when adjusting the speaker and headphone volumes via the front panel button and search dial.
Status Indicator – Displays the current status of the deck, including the current playback mode.

Audio Meters – Displays
the audio levels of the source
or file during playback.
Media Slot Indicators
When you first power on HyperDeck, or any time you insert an SSD or SD card, the slot indicator will illuminate green while checking the media and then switch off. If the disk has not been formatted correctly, or fails to work, the slot will illuminate solid orange until the disk is removed. In this case, check if the disk is formatted correctly and also that it works with a computer.

HyperDeck's media slot indicators illuminate to let you know the status of the disk, for example red when recording, and green during playback
Using the LCD Menu
Press the 'menu' button on the front panel to open the menu settings.

Turn the search dial or press the skip buttons to navigate between the menu options and press 'set' to select a submenu.

Turn the search dial to move through the menu settings
With the menu item selected, press the 'set' button.

Adjust settings using the search dial or skip fwd and skip bwd buttons and confirm them by pressing the 'set' button.
Press 'menu' to step back through the options and return to the home screen.
Settings
Record Menu
| Record | |
| Input | SDI |
| Codec | H.264 SDI |
| Trigger Record | None |
| Input Re-Sync | On |
Input
Select your SDI or HDMI source using the input setting. You can also change your input source using the 'input' button on the front panel.
Codec
All HyperDeck Studio models can record compressed video using H.264, Apple ProRes and DNxHD codecs. HyperDeck Studio 4K Pro models can also use H.265 and DNxHR codecs when recording 4K media.
Trigger Record
There are two trigger record modes available, video start/stop and timecode run.
Some cameras, such as the URSA Mini, send a signal over SDI to start and stop recording on external recorders. Tapping on 'video start/stop' will trigger the HyperDeck to start or stop recording when the record button is pressed on the camera.
Use the time 'timecode run' option to trigger the unit to start recording when it receives a valid timecode signal via the inputs. When the signal stops, recording will also stop. Disable trigger recording by tapping the 'none' option.
NOTE When recording from an HDMI or SDI camera, make sure the output is clean with overlays turned off as any overlays that are present in your camera's video output will be recorded with your image.
Input Re-Sync
This setting will enable a re-sync on the video input and ensure video is locked to the external reference before recording. The video output will remain locked to reference even when switched to recording, as the input itself is being resynchronized. This feature is used for ISO recording where you need multiple decks timecode locked but some sources are non-sync. This feature is normally turned off so video inputs are recorded without frames being added or removed from the input video.
All broadcast decks can normally use a reference input to lock the video output during playback. This means the output of the HyperDeck playback will be locked to the reference input so it won't need to be resynchronized when connected to a large broadcast system.
However, when the deck goes into record, the output will switch over to the input because you normally want the input video recorded untouched with the same untouched video sent to other downstream equipment that's connected to the HyperDeck video outputs.
However, HyperDeck Studio has a unique feature that helps with ISO recording. It will allow you to completely reverse this process and resynchronize the video input to the reference input. What this means is you can connect a non-sync source to the HyperDeck and it will retime the video input to the video reference and then record it.
Non-sync sources could be computers, consumer cameras or any video equipment that is unable to have a reference connected to it. It could even be an incoming video feed from another studio or external broadcaster. Non-sync sources cause problems with ISO recording, as you need the timecode on all recordings to match perfectly over time. A non-sync source will run faster or slower than your other sources and slip out of sync vs the timecode quite quickly during the recording. This makes multi-cam editing a horrific process as the sources won't have matching timecode.
With input re-sync turned on, the HyperDeck video input will be analyzed and if it starts falling behind a frame will be repeated, or if it starts running ahead of the reference, a frame will be removed. This is called resynchronization and the processing on the input is called a frame re-sync. It means the timecode in the clips being recorded on all decks will have the same events happening at the same timecode. It makes multi-cam editing possible.
Of course the downside is you are adding some frames to the input, or removing some frames from the input before recording. This is why it's best to leave this feature turned off and to only use it when you absolutely cannot do anything to connect a reference to an ISO source because it's a computer or consumer device.
However, there is one situation where you can turn the input re-sync feature on and use it. When input re-sync is turned on, the HyperDeck video output will remain reference locked even when the deck is recording. What this means is you can connect the SDI output of the HyperDeck to a camera to lock the camera to the reference via the program return feed. A good example is the Blackmagic Studio Camera 4K Pro and it can set its reference to the external video. Then the camera feed will be reference locked from the HyperDeck and the HyperDeck input re-sync won't have to add or remove frames because the camera is not running fast or slow.
The input re-sync only does something if the video input is not locked to the same reference as the HyperDeck. But in this case, the HyperDeck output is the reference source to the camera and the HyperDeck is locked to its video reference input. If you have multiple HyperDecks all locked together by looping the reference connections, then all cameras and HyperDecks will be locked as a single group. Then if one of the HyperDecks in a group has a non-sync source, such as a computer, then that one input will be resynchronized, but the other sources won't need anything.
The re-sync is automatic so you can just connect sources and it will work. The input re-sync feature can be extremely powerful, however, it's important to know when it's going to do something and what it will do. Try some experiments with multiple HyperDecks and multi-cam editing software to see how it works! It's a fantastic way to do program production that's very fast.
Monitor Menu

The monitor menu is included on HyperDeck Studio models with the monitor out connection on the rear panel.
Clean Feed
Turning clean feed to on will remove the status text from appearing on displays connected to the monitor out on the rear of HyperDeck Studio. For more information on the monitor out display, including what information is displayed, refer to the monitor out section later in this manual.
3D LUT
Display LUTs can be especially helpful when using the HyperDeck Studio as a field recorder. They work by telling the unit what color and luminance output to display. This can be useful for when you are using the 'film' dynamic range on your camera which has an intentionally undersaturated, 'flat' appearance. By applying a display LUT, you can get an idea of what your video will look like after it has been graded.
Display LUTs are selected via Blackmagic HyperDeck Setup can be applied on the SDI monitor out.
To turn a 3D LUT on or off:
1 Press the 'menu' button and using the search dial, scroll to the 'monitor' menu.
2 Press the 'set' button.
3 Using the search dial, scroll down until '3D LUT' is highlighted blue.
4 Toggle the set button to turn the LUT on or off.
For more information on selecting a LUT, refer to the Blackmagic HyperDeck Setup section later in this manual.
TIP For more information on the monitor out view, see the 'monitor out' section later in the manual.
Audio Menu
| Audio | |
| Recorded Audio Channels | PCM 2 |
| Monitor Channels | 1 and 2 |
| Audio Meters | VU (-20dBFS) |
| Headphone Level | 50% |
| Speaker Level | 50% |
Recorded Audio Channels
HyperDeck Studio can record up to 16 channels of PCM audio at a time. To select the number of channels to record, expand the recorded audio channels list and select 2, 4, 8 or 16 channels. If the codec is set to H.264 or H.265, you can also select 2 channels of AAC audio so you can upload recordings directly to YouTube. This setting also selects the number of channels to appear via the monitor out connection.
Monitor Channels
When recording more than two channels, you can select which channels you want to see on the front panel LCD. This can be done via the monitor channels option. For HyperDeck Studio models featuring a front panel speaker, this setting also sets which channels of audio will play back through the speaker and headphones connection.
Audio Meters
The built in LCD displays audio meters for embedded audio channels. You can select to display PPM or VU Meters. To change your meter type, expand the menu setting and select your preferred audio meter display from the options.
| Audio Meters | |
| VU (-18dBFS) | √ |
| VU (-20dBFS) | |
| PPM (-18dBFS) | |
| PPM (-20dBFS) | |
Headphone Level
For models featuring a headphone port on the front panel you can adjust the headphone volume via the headphone level setting.
Speaker Level
Adjust the speaker volume by turning the search dial. The default level is 50%.
TIP Headphone and speaker volume can also be adjusted directly via the front panel. Press and hold the speaker button and turn the search dial to increase or decrease the playback volume. The volume level will appear in the upper center of the front panel.
Storage Menu
| Storage | |
| Media 1 | SD 1: SanDisk 256 |
| Media 2 | SD 2: SanDisk 256 |
| Media 3 | USB: Drive A |
| USB Spill | On |
| Format Media |
Format Media
SD Cards, SSDs and media connected via the rear ext disk connection can be formatted directly on the unit or via a Mac or Windows computer.
Preparing Media on HyperDeck Studio:
1 Using the search dial and set button, select format media.
2 Select the media to format from the list and press set.
3 Choose the format and press set.
4 A confirmation window will appear detailing which card is to be formatted and the selected format option, select format.
5 A formatting window will appear once completed, select Ok.
HFS+, is also known as Mac OS X Extended, and is the recommended format as it supports 'journaling'. Data on journaled media is more likely to be recovered in the rare event that your storage media becomes corrupted. HFS+ is natively supported by Mac. exFAT is supported natively by Mac and Windows without needing any additional software but does not support journaling.
To format media on a Mac or Windows computer, refer to the formatting media section in this manual.
Setup Menu
| Setup | |
| Name | HyperDeck Studio 4K Pro |
| Language | English |
| Date | 16 Jul 2021 |
| Time | 15:12 |
| Software | 8.0.1 |
| Front Panel | Light Appearance |
| Camera | A |
| Default Standard | 1080p30 |
Name
When more than one HyperDeck Studio is on the network, you may wish to give them discrete names. This can be done via Blackmagic HyperDeck Setup or Blackmagic HyperDeck Ethernet Protocol using a terminal application.
Language
HyperDeck Studio supports 13 languages, including English, Chinese, Japanese, Korean, Spanish, German, French, Russian, Italian, Portuguese, Turkish, Ukrainian and Polish.
To select the language:
1 Once the setup menu is highlighted, press set.
2 Scroll the search dial down to select language and press set.
3 Using the search dial to select the language and press set. Once selected you will automatically return to the setup menu.
Date
To adjust the date, select the date field and press set. Using the search dial you can select the day, month and year. This will populate the timestamp file suffix.
Time
To adjust the time, select time and press set. Use the search dial to adjust the hours and minutes. HyperDeck Studio clock is a 24 hour clock.
Software
Displays the current software version.
Front Panel
Set your HyperDeck's front panel to 'light' mode for a brightly illuminated LCD. Use 'dark' mode for dimly lit environments where a bright LCD may be distracting, for example multiple HyperDeck units mounted in a rack in a production facility.


Camera
This setting is helpful when using HyperDeck to record ISO files from multiple cameras and then editing them on a multicamera timeline in DaVinci Resolve.
Each individual camera identification letter will appear in the files' metadata, allowing DaVinci Resolve to identify each angle easily when using the sync bin feature.

Assign you camera using characters A-Z or 1-9
Default Standard
Sometimes the HyperDeck Studio does not know what video standard you want to use. This setting will let the HyperDeck know the video standard you want to use most of the time.
A good example is if you have turn on a HyperDeck Studio, it has no video input connected and you insert a disk with files on it with 2 different video standards. Which video standard should the HyperDeck play? The default video standard will give it an indication which video standard you prefer and it will switch to that format and play those files.
The default video standard is also useful when you first turn on a HyperDeck, and it has no video input and no media disk inserted. In this case, the HyperDeck Studio does not know which video standard to use for the monitoring output. The default video standard will guide it on what to do.
However, the default video standard is only a guide. It won't override anything. So if you had a media disk with only 1 type of video file on it and you press play, the HyperDeck Studio will switch to that video standard and play. It will ignore the default video standard because it's obvious you just want to play the files on the disk.
It's a similar situation with recording. If you press record, the HyperDeck will just record whatever video standard is connected to the video input. Plus, once you have done the recording, the HyperDeck Studio will playback the same video standard files on the disk, even if there are other files on the disk that match the default video standard. It's assumed you want to playback the same video standard as you just recorded. If you unplug the media disk and plug it back in again, only then will the default video standard be used to choose which type of files to play back.
The default video standard is only a guide to help the HyperDeck Studio make decisions about what to do when it's not sure. It's not an override that forces the deck to behave in any specific way.
| Default Standard |
| SD |
| 525i59.94 NTSC |
| 625i50 PAL |
| HD |
| 720p50 |
| 720p59.94 |
| 720p60 |
| 1080i50 |
| 1080i59.94 |
| 1080i60 |
Network Settings
| Network | |
| Protocol | Static IP |
| IP Address | 192.168.1.10 |
| Subnet Mask | 255.255.255.0 |
| Gateway | 192.168.1.1 |
Protocol
Blackmagic HyperDeck is shipped set to DHCP, so once connected, your network server will automatically assign an IP address and no other network settings will need to be adjusted. If you need to set a manual address, you can connect via a static IP.
With 'protocol' selected press the flashing 'set' button to access the menu, scroll to 'Static IP' and press 'set'.
IP Address, Subnet Mask and Gateway
Once Static IP is selected, you can enter your network details manually.
To change the IP address:
1 Use the search dial to highlight 'IP address' and press the flashing 'set' button on your HyperDeck's front panel.
2 Using the search dial, adjust the IP address, rotate the search dial to adjust your IP address, pressing 'set' to confirm before adjusting the next set of values.
3 Press 'set' to confirm the change and move to the next value.
When you have finished entering your IP address, you can repeat these steps to adjust the Subnet Mask and Gateway. Once finished, press the flashing 'menu' button to exit and return to the home screen.
Timecode Settings
| Timecode | |
| Input | Video Input |
| Drop Frame | Default |
| Preset | 00:00:00:00 |
| Output | Timeline |
Input
There are five timecode input options available when recording.
| Video Input | Selecting video input will take the embedded timecode from SDI and HDMI sources with SMPTE RP 188 metadata. This will maintain sync between your SDI or HDMI source and the file recorded on the HyperDeck Studio. |
| External Click | this option when using the timecode in connection on the rear panel. |
| Internal | Use this option to record time of day timecode via the built in timecode generator. |
| Last Clip Regen | By selecting ‘last clip regen’ for your timecode input, each file will start one frame after the last frame of the previous clip. For example, if your first clip ends on 10:28:30:10, the next clip timecode will start at 10:28:30:11. |
| Preset | If you want to set a timecode manually, select the preset option. Recorded clips will start at the timecode set via the preset later in the manual. |
Drop Frame
For NTSC sources at frame rates of 29.97 or 59.94, you can select 'drop frame' or 'non-drop frame' timecode. If the source is unknown, select 'default'. This will maintain the standard of the input, or default to drop frame if there is no valid timecode.
Preset
You can set your time code manually by pressing the set button and entering the start time code using the search dial and set button. Make sure the 'preset' option is selected under the input menu.
Output
Select your timecode options for your outputs.
| Timeline To output a continuous timecode for all clips recorded on a card or drive, select timeline. |
| Clip Selecting the clip option will output the time code of each individual clip. |
SDI Output
| SDI Output | |
| 3G-SDI Output | Level A |
3G-SDI Output
Some broadcast equipment can only receive level A or level B 3G-SDI video.
To maintain compatibility with other broadcast equipment, select Level A for direct stream 3G-SDI or Level B for dual stream multiplexed 3G-SDI.
Genlock Settings
| Genlock | |
| Reference Source | Auto |
| Reference Timing Lines | 0 |
| Reference Timing Pixels | 0 |
Reference Source
Select your reference source from the following three options.
| Auto | ‘Auto’ mode will default to external if there is a signal connected to the ‘ref in’ connection on the rear panel. If there is no reference connected, it will default to the input SDI or HDMI source. |
| Input | Select ‘input’ if your SDI or HDMI source has embedded reference that you want to sync to. An example of this would be where your analog deck may have a genlock source directly connected. |
| External Select ‘external’ if you have an external reference device, for example the Blackmagic Sync Generator, connected via the ‘ref in’ connector on the rear panel. | |

Reference Timing
Reference timing can be adjusted if you are archiving from analog tape decks and you need frame synchronization. The reference adjustment is in samples so you can get an extremely accurate timing adjustment down to the sample level.
To adjust the timing:
In the setup menu, use the search dial to highlight 'reference timing lines' and press the flashing 'set' button.
2 Adjust the timeline lines value by turning the dial clockwise to increase or counter clockwise to decrease.
3 To confirm your selection, press the flashing 'set' button.
4 To adjust the pixels, press the flashing 'menu' button to return to the setup menu and repeat the steps for reference timing pixels.
File Settings

Timestamp File Suffix
The timestamp added to the filename is set to 'off' by default. If you would like the date and time recorded in your filename, press the set button and use the search dial to turn the 'timestamp file suffix' option to on.
| HyperDeck_2105061438_0001 | |
| HyperDeck_2105061438_0001 Filename | |
| HyperDeck_2105061438_0001 | Year |
| HyperDeck_2105061438_0001 | Month |
| HyperDeck_2105061438_0001 | Day |
| HyperDeck_2105061438_0001 | Hour |
| HyperDeck_2105061438_0001 | Minute |
| HyperDeck_2105061438_0001 Clip Number | |
HDR Format Override

HyperDeck Studio 4K Pro will automatically detect embedded HDR metadata in a 4K video signal or file and display it via the HDMI output. If the signal or file is tagged incorrectly, or your display is not HDR compatible, you can override the HDR format.
To do this, set the 'HDR format override' setting to an SDR option, such as Rec.2020 SDR.
The available HDR playback and record settings are:
Auto
Auto is the default setting that will let HyperDeck automatically select the output format that conforms to the clip's HDR metadata.
Rec.709
For high definition video using standard dynamic range.
Rec.2020 SDR
This setting is used for Ultra HD video using standard dynamic range.
HLG
HLG stands for 'hybrid log gamma'. This format allows HDR video to be played back on HDR capable TVs and monitors, including those that support up to Rec.2020 SDR.
The following settings support the Rec.2020 color gamut, plus PQ, or perceptual quantizer published as SMPTE ST2084. PQ is the function of wide gamut HDR that allows for the display of brighter images. Luminance values in candelas per meter squared, for example 1000 cd/m ^2 indicate the maximum luminance per square meter supported by the corresponding format.
ST2084 (300)
300 cd/m ^2 luminance.
ST2084 (500)
500 cd/m² luminance.
ST2084 (800)
800 cd/m ^2 luminance.
ST2084 (1000)
1000 cd/m² luminance.
ST2084 (2000)
2000 cd/m² luminance.
ST2084 (4000)
4000 cd/m² luminance.
Remote

Remote
Select 'remote' to enable remote control via RS-422, this will let the HyperDeck be controlled remotely by another device, for example, HyperDeck Extreme Control. When selected, the dedicated remote button on some HyperDeck models will illuminate to indicate it is active. Deselect remote to control the unit locally.
Deck Control
When remote is enabled, you can mirror the transport controls from one HyperDeck to multiple additional HyperDeck units. Daisy chain your HyperDecks by connecting the remote out connector from the master HyperDeck to the remote in connector on a second unit, then continue the RS-422 chain for additional units. When all additional units have their remote setting enabled, transport controls on the master unit will also control the additional units.
For example, when you press the 'record' button on the master HyperDeck, all the additional HyperDecks connected will begin recording simultaneously.
It's worth noting that while you cannot use HyperDeck Studio HD Mini as a controller, it can be controlled by a HyperDeck Pro or Plus model.
Reset

Factory Reset
Highlight 'Factory Reset' in the setup menu to restore your HyperDeck to factory settings.
Once you press 'set', you will be prompted to confirm your selection.
Rear Panel

1 Power
All HyperDecks feature an IEC power input for AC mains power. HyperDeck Studio 4K Pro features two for redundancy. The DC input allows for external 12V battery power, which can also be used for redundancy. Ensure any DC power source is compatible with the input voltage and current rating marked below the DC in connector.
2 Ethernet
The Ethernet port lets you connect to your network for fast ftp transfers or to remotely control the unit using the HyperDeck Ethernet Protocol. File transfers speeds are supported via 1GbE on HD models and 10GbE on HyperDeck Studio 4K Pro. For more details on transferring files via an FTP client, see the 'transferring files over a network' section later in this manual.
When connected to the same network shared with an ATEM switcher, you can also control your HyperDeck using the ATEM switcher or an ATEM hardware panel.
3 Remote
Some HyperDeck Studio models feature two RS-422 DE-9 connectors for remote in and out. HyperDeck Studio HD Mini supports remote in only.
4 Ext Disk
Connect a flash disk to the USB-C connector so you can record to external disks at up to 5Gb/s on HyperDeck Studio HD models. HyperDeck Studio 4K Pro models feature a USB 3.1 gen 2 connection for transfer speeds up to 10Gb/s. You can also connect to multi port USB-C hubs or Blackmagic MultiDock 10G to connect one or multiple SSDs.
When your HyperDeck is connected to your computer via USB, you can use the HyperDeck as your webcam source in software including Open Broadcaster and Skype. For more information, see 'Setting up Open Broadcaster' later in this manual.
5 Monitor Out
The 3G-SDI monitor out connection provides a downscaled output with overlays so that you can monitor on an external display. The overlays include drive icons, audio meters and a time counter display as well as a display LUT. For more information on the Monitor SDI settings, including how to output a clean signal, see the 'settings' section earlier in this manual.
6 Ref
All HyperDeck models have their own built in sync generator that generates stabilized black burst and tri-sync video reference signals. This means you can connect your HyperDeck's reference output to other video equipment's reference input and lock them to a master reference signal generated by your HyperDeck.
You can also connect a reference signal to the reference input and sync your HyperDeck to an external master sync source.
For more information on selecting a reference source, including when looping multiple HyperDeck disk recorders together, see 'setup' settings earlier in this manual.
7 Timecode
All HyperDecks also have their own time of day timecode generator. In a similar fashion to reference, you can loop the timecode signal from a master HyperDeck to other HyperDecks or video equipment so that each recording shares the same timecode.
Depending on the HyperDeck model you are using, the timecode connectors will be either BNC or XLR. For more information on how to select your timecode options, see the 'settings' section earlier in this manual.
8 HDMI
Connect the HDMI output to HDMI televisions and monitors.
HyperDeck will auto detect SDR and HDR video standards when the signal is flagged with the correct metadata. You can also override the HDR flag using the settings menu. For more information, refer to the 'settings' section earlier in this manual.
9 SDI
HyperDeck Studio HD Mini models feature a single 3G SDI for signals up to 1080p60. HyperDeck Studio HD Plus and HyperDeck Studio HD Pro models features 6G-SDI allowing for signals from SD up to 2160p30. HyperDeck Studio 4K Pro features 12G-SDI inputs and outputs allowing for resolutions up to 2160p60.
HyperDecks with two SDI outputs can be used to play back ProRes 4444 files for simultaneous fill and key when connected to ATEM switchers.
Using the Monitor Output
The monitor output is a fast way to visually check your recording or playback video, with overlays displaying important status information such as the codec being used, the video and signal format, frame rate, timecode, file name, transport control status, storage media status, and audio levels.

Below is a description of the information displayed.
Codec
Displays the codec selected via the LCD menu.
Format
Displays the current clip's resolution and frame rate when in playback mode. If you are in record mode, it will display the resolution and frame rate of the video connected to the currently selected source.
Timecode
Displays the timecode present in your video clip during playback, or currently being recorded via the video or timecode inputs. You can also select between displaying clip timecode or the time counter for the timeline.
Source
Displays the currently selected SDI or HDMI source. If 'no signal' appears, it means a valid signal is not detected.
Name
Shows the name of your HyperDeck disk recorder. For information on how to change the name, see 'Blackmagic HyperDeck Setup' later in this manual.
Status
As you play back or record a clip, this indicator will display the transport control status and controls currently being used. These include:
| STOP | HyperDeck is in standby mode. Indicates playback is set to 'loop' | ||
| LOOP | all recorded clips sharing the currently selected video format. | ||
 | Video is being played. Indicates playback is set to loop | a single clip. | |
 | Video is being recorded.The indicator will illuminate red during recording. | SHUTTLE | Indicates shuttle mode is enabled, but in standby. |
 | Displayed during fast forward or rewind. The numbers indicate the speed. | JOG | HyperDeck is in jog mode. |
 | SCROLL | HyperDeck is in scroll mode. | |
Storage Media Status
These three indicators display the name and status of the SD card, SSDs and active USB drive and vary slightly depending on the HyperDeck model.
 Studio HD Plus Studio HD Plus | SD 126:14 | SD 230:12 | USB $1:03:16 |
| SD Card slot 1 SD Card slot 2 Active external disk | |||
  models models | SSD 126:14 | SD 130:12 | USB 31:03:16 |
| Current SD or SSD slot in use | Next SD or SSD slot in order | Active external disk |
On all HyperDeck models, the third indicator displays the USB drive. If you are using a USB hub, or a dock such as Blackmagic MultiDock 10G, the active drive will be displayed.
Disk or Drive Indicator
The text above the progress bar indicates the SD card slot or SSD slot. If you are recording, 'current' will appear to the left of the drive so you can easily identify which disk is recording. 'Next' will appear above the progress bar to indicate the next disk or drive to be recorded to.

Media Bar
The media bar icon will be either blue, white or red depending on its current status and will display the used space on the card.
 | The blue drive icon indicates the active drive. This is the drive that will be used for playback and recording. |
 | A white drive icon indicates there is media present, but not active. A solid white icon indicates the media is full. |
 | The bar will illuminate red during recording. |
Text underneath the media bar will display either the record time remaining or the status of the slot.
Time remaining
When your SD card or SSD drive has space remaining, the duration available will be displayed in hours:minutes:seconds based on the current source format and your chosen codec and quality settings. If there is less than an hour left, minutes:seconds remaining will be displayed.

Slot status
'No card' and 'no drive' will display if there is no media connected to that media slot.
Once an SD card, SSD or USB drive is full, the icon will display 'card full' or 'drive full' so you know it's time to swap out the storage media. If you have another SD card or SSD inserted, the recording will automatically spill over and start recording onto it. If you have an external disk connected, the recording will spill over once all the SD cards and SSDs are full.

A locked drive will be shown with 'locked' under the progress bar.

Audio Meters
On screen audio meters will display up to 16 channels of audio, depending on how many channels you wish to record. These can be set to either PPM or VU meters via the audio tab of the LCD menu.


bar
| Category | Value | |---|---| | 1 | -30 | | 2 | -30 | | 3 | -30 | | 4 | -30 |

To select your number of recorded audio channels, or to change to a different audio meter, use the audio tab of the LCD menu. For more information, refer to the 'settings' section earlier in this manual.
Storage Media
SD Card
For high quality Ultra HD recording we recommend high speed UHS-II SD cards. These cards need to be capable of write speeds above 220MB/s for recording up to Ultra HD 2160p60. However, if you are recording at a lower bit rate with higher compression you might be able to use slower cards. Generally, the faster the cards the better.
It's worth regularly checking the latest version of this manual for more up to date information and can always be downloaded from the Blackmagic Design website at www.blackmagicdesign.com/support
What SD cards should I use with HyperDeck Studio 4K Pro?
The following SD Cards are recommended for recording 2160p up to 60 fps
| Brand Model Capacity | ||
| Angelbird AV Pro MK2 V90 | SDXC 128GB | |
| Angelbird AV Pro MK2 V90 | SDXC 256GB | |
| ProGrade Digital SDXC UHS-II | V90 300R 128GB | |
| ProGrade Digital SDXC UHS-II | V90 300R 256GB | |
| Wise SD2-128U3 | SDXC UHS-II 128GB |
What SD cards should I use with HyperDeck Studio HD Pro?
The following SD Cards are recommended for recording 2160p up to 30 fps
| Brand Model Capacity | ||
| Angelbird AV Pro MK2 V90 | SDXC 64GB | |
| Angelbird AV Pro MK2 V90 | SDXC 128GB | |
| Angelbird AV Pro MK2 V90 | SDXC 256GB | |
| ProGrade Digital SDXC UHS-II V90 | 300R 64GB | |
| ProGrade Digital SDXC UHS-II V90 | 300R 128GB | |
| ProGrade Digital SDXC UHS-II V90 | 300R 256GB | |
| Wise SD2-64U3 SDXC UHS-II | 64GB | |
| Wise SD2-128U3 SDXC UHS-II | 128GB |
What SD cards should I use with HyperDeck Studio HD Plus?
The following SD Cards are recommended for recording 2160p up to 30 fps
| Brand Model Capacity | ||
| Angelbird AV Pro MK2 V90 | SDXC 64GB | |
| Angelbird AV Pro MK2 V90 | SDXC 128GB | |
| Angelbird AV Pro MK2 V90 | SDXC 256GB | |
| ProGrade Digital SDXC UHS-II V90 300R 64GB | ||
| ProGrade Digital SDXC UHS-II V90 300R 128GB | ||
| ProGrade Digital SDXC UHS-II V90 300R 256GB | ||
| Wise SD2-64U3 SDXC UHS-II 64GB | ||
| Wise SD2-128U3 SDXC UHS-II 128GB | ||
What SD cards should I use with HyperDeck Studio HD Mini?
The following SD Cards are recommended for recording 1080p ProRes 422 HQ up to 60 fps
| Brand Model Capacity | ||
| Angelbird AV Pro MK2 V90 | SDXC 64GB | |
| Angelbird AV Pro MK2 V90 | SDXC 128GB | |
| Angelbird AV Pro MK2 V90 | SDXC 256GB | |
| ProGrade Digital SDXC UHS-II V90 | 300R 64GB | |
| ProGrade Digital SDXC UHS-II V90 | 300R 128GB | |
| ProGrade Digital SDXC UHS-II V90 | 300R 256GB | |
| Wise SD2-64U3 SDXC UHS-II | 64GB | |
| Wise SD2-128U3 SDXC UHS-II | 128GB |
SSD
When working with high data rate video it's important to carefully check the SSD you would like to use. This is because some SSDs can have up to 50% lower write speed than the manufacturer's claimed speed, so even though the disk specifications claim an SSD is fast enough to handle video, in reality the disk is not fast enough for real time video recording.
Hidden data compression mostly affects recording and often these disks can still be used for real time playback.
In our testing, we have found larger newer models of SSD and larger capacity SSDs are generally faster. SSDs recommended for use include:
What SSDs should I use with HyperDeck Studio 4K Pro?
The following USB-C drives are recommended for recording 2160p up to 60 fps
| Brand Model Capacity | ||
| Samsung 860 PRO 512GB | ||
| Samsung 860 PRO 1TB | ||
| Samsung 870 EVO (MZ-77E250BW) 250GB | ||
| Samsung 870 EVO (MZ-77E500BW) 500GB | ||
| Samsung 870 EVO (MZ-77E1T0BW) 1TB | ||
| Samsung 870 EVO (MZ-77E2T0BW) 2TB |
What SSDs should I use with HyperDeck Studio HD Pro?
The following USB-C drives are recommended for recording 2160p up to 30 fps
| Brand Model Capacity | ||
| Samsung 860 PRO 512GB | ||
| Samsung 860 PRO 1TB | ||
| Samsung 870 EVO (MZ-77E250BW) 250GB | ||
| Samsung 870 EVO (MZ-77E500BW) 500GB | ||
| Samsung 870 EVO (MZ-77E1T0BW) 1TB | ||
| Samsung 870 EVO (MZ-77E2T0BW) 2TB |
EXT Disk
All HyperDeck models can record directly to USB-C flash disks. These fast, high capacity drives allow you to record video for long periods. You can then connect the flash disk to your computer and edit directly from them!
For even higher storage capacities, you can connect a USB-C dock or external hard drive. To connect your Blackmagic MultiDock 10G or USB-C flash disk, connect a cable from your USB-C connected device to the 'ext disk' port on the rear panel of your HyperDeck.
What USB-C drives should I use with HyperDeck Studio 4K Pro?
The following USB-C drives are recommended for recording 2160p up to 60 fps
| Brand Model Capacity | ||
| Angelbird SSD2GO PKT MK2 512GB | ||
| Angelbird SSD2GO PKT MK2 2TB | ||
| DelKinDevices Juggler 1TB | ||
| DelKinDevices Juggler 2TB | ||
| LaCie Rugged SSD STHR2000800 2TB | ||
| LaCie Rugged SSD Pro STHZ1000800 1TB | ||
| Wise PTS-512 Portable SSD 512GB | ||
| Wise PTS-1024 Portable SSD 1TB |
What USB-C drives should I use with HyperDeck Studio HD Pro?
The following USB-C drives are recommended for recording 2160p up to 30 fps
| Brand Model Capacity | ||
| Angelbird SSD2GO PKT MK2 512GB | ||
| Angelbird SSD2GO PKT MK2 2TB | ||
| DelKinDevices Juggler 1TB | ||
| DelKinDevices Juggler 2TB | ||
| LaCie Rugged SSD STHR2000800 2TB | ||
| LaCie Rugged SSD Pro STHZ1000800 1TB | ||
| Wise PTS-512 Portable SSD 512GB | ||
| Wise PTS-1024 Portable SSD 1TB |
What USB-C drives should I use with HyperDeck Studio HD Plus?
The following USB-C drives are recommended for recording 2160p up to 30 fps
| Brand Model Capacity | ||
| Angelbird SSD2GO PKT MK2 512GB | ||
| Angelbird SSD2GO PKT MK2 2TB | ||
| DelKinDevices Juggler 1TB | ||
| DelKinDevices Juggler 2TB | ||
| LaCie Rugged SSD STHR2000800 2TB | ||
| LaCie Rugged SSD Pro STHZ1000800 1TB | ||
| Wise PTS-512 Portable SSD 512GB | ||
| Wise PTS-1024 Portable SSD 1TB |
What USB-C drives should I use with HyperDeck Studio HD Mini?
The following USB-C drives are recommended for recording 1080p ProRes 422 HQ up to 60 fps
| Brand Model Capacity | ||
| Angelbird SSD2GO PKT MK2 512GB | ||
| Angelbird SSD2GO PKT MK2 2TB | ||
| DelKinDevices Juggler 1TB | ||
| DelKinDevices Juggler 2TB | ||
| Wise PTS-512 Portable SSD 512GB | ||
| Wise PTS-1024 Portable SSD 1TB |
Formatting Media
Preparing Media on a Computer
Formatting Media on a Mac Computer
The Disk Utility application included with Mac can format a drive in the HFS+ or exFAT formats.
Make sure you back up anything important from your disk as you will lose everything on it when it is formatted.
1 Connect an SSD to your computer with an external dock or cable adapter and dismiss any message offering to use your SSD for Time Machine backups. For CFast cards, connect it to your computer via an external card reader.
2 Go to applications/utilities and launch Disk Utility.
3 Click on the disk icon of your SSD or CFast card and then click the erase tab.
4 Set the format to Mac OS Extended (Journaled) or exFAT.
5 Type a name for the new volume and then click erase. Your media will quickly be formatted and made ready for use with HyperDeck.

Formatting Media on a Windows computer
The format dialog box can format a drive in the exFAT format on a Windows PC. Make sure you back up anything important from your SSD or SD card as you will lose everything on it when it is formatted.
1 Connect an SSD to your computer with an external dock or cable adapter. For CFast cards, connect it to your computer via an external CFast card reader.
2 Open the start menu or start screen and choose computer. Right-click on your SSD or CFast card.
3 From the contextual menu, choose format.
4 Set the file system to exFAT and the allocation unit size to 128 kilobytes.
5 Type a volume label, select quick format and click Start.
6 Your media will quickly be formatted and made ready for use with HyperDeck.

Using your HyperDeck as a Webcam
When connected to a computer via USB, your HyperDeck disk recorder will be detected as a webcam. This means you can broadcast the playback or recording from your HyperDeck using streaming software such as Open Broadcaster.
Setting the Webcam Source
In most cases, your streaming software will automatically set HyperDeck as the webcam, so when you launch your streaming software you will see the picture from your HyperDeck Studio straight away. If your software doesn't select it automatically, simply set the software to use HyperDeck as the webcam and microphone.
Below is an example of how to set the webcam settings on Skype.
1 In Skype's menu bar, open the 'audio and video settings'.
2 Click on the 'Camera' menu and select your HyperDeck from the list. You will see the video from HyperDeck appear in the preview window.
3 Now go to the 'microphone' menu and select your HyperDeck as the audio source.
With your Skype settings set correctly, perhaps try out a Skype call with a friend as a quick test to check your webcam setup is working.
That's all you need to do, your HyperDeck Studio is now ready to broadcast your video to the world live!
Setting up Open Broadcaster
Open Broadcaster is an open source application that works as a streaming platform between your HyperDeck Studio and your favorite streaming software like YouTube, Twitch, Facebook Live and others. Broadcaster compresses your video to a bit rate that is easily managed by your streaming app.
Below is a demonstration of how to set up Open Broadcaster to stream the webcam output from your HyperDeck Studio using YouTube Live as the streaming service.


YouTube will now generate a stream key that will direct Open Broadcaster to your YouTube account.
Click the 'copy' button next to the stream key. Copy the stream key that you will now paste into Open Broadcaster.

Return to Open Broadcaster and open the preferences by clicking on 'OBS/preferences' in the menu bar. Select 'stream'. Now paste in the stream key you copied from YouTube and click 'OK'.
You will now see the video from your HyperDeck in the Open Broadcaster streaming preview window.

To connect Open Broadcaster's broadcast link to YouTube, click 'start streaming' in the bottom right corner of the screen. This establishes the link to YouTube from Open Broadcaster and from here everything will now be set using YouTube Live.

Go back to YouTube Live and you will see the webcam program output from your HyperDeck in the background. Click 'done'.

With Open Broadcaster now communicating with YouTube Live, you are ready to begin your broadcast. Now it's time to perform your final checks and make sure everything is good.

If you are all set, you can now begin your broadcast by clicking 'go live'.
You are now broadcasting live on YouTube with Open Broadcaster.
NOTE Due to the nature of internet streaming there can often be a delay, so it's important to watch the stream on YouTube and confirm your program has finished before clicking 'end stream' to make sure you don't accidentally cut the end of your broadcast short.
Blackmagic HyperDeck Setup
Using HyperDeck Setup
Blackmagic HyperDeck Setup is used to change settings and update the internal software in your HyperDeck.
To use HyperDeck Setup:
1 Connect HyperDeck to your computer via USB or Ethernet.
2 Launch HyperDeck Setup. Your HyperDeck model will be named in the setup utility home page.
3 Click on the circular 'setup' icon or the image of your HyperDeck to open the setup page.
Setup Page

If you have more than one HyperDeck Studio, you may wish to give each unit a discrete name to make them easy to identify. You can do this via the 'name' option.

Network

Protocol
To use your HyperDeck Studio with ATEM switchers, or to control it remotely via HyperDeck Ethernet Protocol, the HyperDeck Studio needs be on the same network as your other equipment using DHCP or by manually adding a fixed IP address.
| DHCP | HyperDeck Studio disk recorders arrive set to DHCP by default. The dynamic host configuration protocol, or DHCP, is a service on network servers that automatically finds your HyperDeck Studio and assigns an IP address. The DHCP is a great service that makes it easy to connect equipment via Ethernet and ensure their IP addresses do not conflict with each other. Most computers and network switchers support DHCP. |
| Static IP | When ‘static ip’ is selected, you can enter your network details manually. When setting IP addresses manually so all units can communicate, they must share the same subnet mask and gateway settings. In addition, the first three fields of numbers in the panel’s IP address also need to match. If there are other devices on the network that have the same identifying number in their IP address, there will be a conflict and the units won’t connect. If you encounter a conflict, simply change the identifying number in the unit’s IP address. |
LUTs Page
HyperDeck models with monitor out connections on the rear panel can display the input video with 3D LUTs applied. 17 point, 33 point and 65 point .cube LUT files are supported.
This can be useful for when you are using the 'film' dynamic range on your camera which has an intentionally undersaturated, 'flat' appearance. By applying a display LUT, you can get a representation of what your video will look like after it has been graded.
The 3D LUT is only used on the monitor out display and not actually recorded into the video itself, so you don't need to worry that your recorded image will have the look permanently applied.
If you want to apply the same LUT to your image in DaVinci Resolve, you can simply import the exact same LUT .cube file used on your HyperDeck Studio into DaVinci Resolve and apply it to your grade.

To view a LUT
1 First you need to select your display LUT. Click on the 'import' button.
2 From the file window, navigate to the LUT you wish to import and press 'open'.
3 Once your LUT is imported, toggle the '3D LUT' option to 'on' and press the 'save' button.
The selected display LUT will appear on the monitor out display. You can now turn the LUT on or off via the monitor settings in the LCD menu.
Updating the Internal Software
The setup utility lets you update your HyperDeck disk recorder's internal software in addition to configuring the streaming settings, network settings and streaming quality.
To update the internal software:
1 Download the newest Blackmagic HyperDeck Setup installer from www.blackmagicdesign.com/support.
2 Run the Blackmagic HyperDeck Setup installer on your computer and follow the onscreen instructions.
3 After installation is complete, connect your HyperDeck Studio to the computer via the USB or Ethernet connector on the rear panel.
4 Launch Blackmagic HyperDeck Setup and follow any onscreen prompt to update the internal software. If no prompt appears, the internal software is up to date and there is nothing further you need to do.

Download the latest setup utility for your Blackmagic HyperDeck Studio from the Blackmagic Design support center at www.blackmagicdesign.com/support
Teranex Mini Rack Shelf
Teranex Mini Rack Shelf is a 1 RU shelf that lets you install Blackmagic HyperDeck Studio HD Mini and HyperDeck Studio HD Plus models into a broadcast rack or road case. Blackmagic HyperDeck Studio HD Mini is so small, you can install it next to other Blackmagic Design equipment that shares a similar form factor, such as Teranex Mini converters, Blackmagic MultiView 4 and Blackmagic Web Presenter. For example, installing a Blackmagic HyperDeck Studio HD Mini together with ATEM Television Studio HD gives you the ability to switch eight video inputs and record the program output on your HyperDeck Studio HD Mini. This modular design lets you build your own custom video solutions that are portable and easy to use!

natural_image
Illustration of a server rack with ports and control panel (no text or symbols)Teranex Mini Rack Shelf lets you rack mount your Blackmagic HyperDeck Studio HD Mini and HyperDeck Studio HD Plus with other Blackmagic Design equipment that shares the same form factor.
To install your Blackmagic HyperDeck into a Teranex Mini Rack Shelf, remove the unit's rubber feet, if installed, and fasten the unit to the base of the shelf using the supplied screws.
The Teranex Mini Rack Shelf ships with two original blank panels which you can use to cover gaps if you don't need to install additional Blackmagic Design equipment.
For more information check the Blackmagic Design website at www.blackmagicdesign.com
RS-422 Control
What is RS-422 Control?
The RS-422 standard is a serial deck control broadcast standard and has been used by broadcasters since the early 1980s and is found on many decks, linear editors, nonlinear editors and broadcast automation products. All current HyperDeck models support this standard so can be integrated into broadcast automation, remote control systems, editing systems and any kind of custom control you might like to design yourself.
HyperDeck Studio also supports file based commands from the Advanced Media Protocol via RS-422. This lets you control your HyperDeck with an external device using AMP commands such as adding clips to a playlist, determining the filename of the next clip, looping a single clip or timeline, or clearing a playlist.
Using an External RS-422 Controller
All current HyperDeck models feature an industry standard Sony™ compatible RS-422 deck control port, which has the correct pin connections for a direct connection to any remote controller with RS-422, for example HyperDeck Extreme Control.
You can use pre-manufactured 9 pin cables as long as each end of the cable is wired 'pin for pin' where the same pin numbers on each end of the cable are connected together. If you would like to make custom cables, please refer to the accompanying wiring diagram.
You can remotely control your HyperDeck from HyperDeck Extreme Control instead of locally pushing buttons.
1 Connect a video signal to your HyperDeck's video input.
2 Connect an RS-422 cable from your HyperDeck Extreme Control to your HyperDeck Studio.
3 Enable remote control by pressing the remote button on the front control panel, or via the LCD menu in HyperDeck Studio Mini, to allow remote deck control.
You can now remotely start and stop recording and playback of your HyperDeck as well as performing other common jog and shuttle functions. The full list of supported RS-422 commands is in the following section named 'supported RS-422 commands'.

| Receive (-) | Receive (+) | Transmit (-) | Transmit (+) | Ground Pins |
| 2783 | 1,4,6,9 |
RS-422 remote pin connections

natural_image
Front view of a computer interface panel with buttons and ports (no text or symbols visible)Make sure your HyperDeck has remote set to 'on' in the LCD menu, or via the front panel remote button, to enable RS-422 deck control

All HyperDeck models support remote control via the RS-422 port on the rear panel
Supported RS-422 Commands
| Command Reply No Remote Notes | |||||
| 0 - System Control | |||||
| 0x00 0x11 DeviceTypeRequest | NTSC: 0xF0E0PAL: 0xF1E024P: 0xF2E0 | Enabled | |||
| 1 - Slave Response | |||||
| 0x20 | 0x00 | Stop | Acknowledge | Disabled | |
| 0x20 | 0x01 | Play | Acknowledge | Disabled | |
| 0x20 | 0x02 | Record | Acknowledge | Disabled | |
| 0x20 | 0x04 | StandbyOff | Acknowledge | Disabled | |
| 0x20 | 0x05 | StandbyOn | Acknowledge | Disabled | |
| 0x20 | 0x0F | Eject | Acknowledge | Disabled | |
| 0x20 | 0x10 | FastFwd | Acknowledge | Disabled | |
| 0x21 | 0x11 | JogFwd1 | Acknowledge | Disabled | |
| 0x22 | 0x11 | JogFwd2 | Acknowledge | Disabled | Treated as N=1;Same as JogFwd1 |
| 0x21 | 0x12 | VarFwd1 | Acknowledge | Disabled | Uses ShuttleFwd1 |
| 0x22 | 0x12 | VarFwd2 | Acknowledge | Disabled | Treated as N=1;Same as VarFwd1 |
| 0x21 | 0x13 | ShuttleFwd1 | Acknowledge | Disabled | |
| 0x22 | 0x13 | ShuttleFwd2 | Acknowledge | Disabled | Treated as N=1;Same as ShuttleFwd1 |
| 0x20 | 0x20 | Rewind | Acknowledge | Disabled | |
| 0x21 | 0x21 | JogRev1 | Acknowledge | Disabled | |
| 0x22 | 0x21 | JogRev2 | Acknowledge | Disabled | Treated as N=1;Same as JogRev1 |
| 0x21 | 0x22 | VarRev1 | Acknowledge | Disabled | Uses ShuttleRev1 |
Command Reply No Remote Notes
| 0x22 0x22 VarRev2 Acknowledge Disabled | Treated as N=1;Same as VarRev1 | ||||
| 0x21 | 0x23 | ShuttleRev1 | Acknowledge | Disabled | |
| 0x22 | 0x23 | ShuttleRev2 | Acknowledge | Disabled | Treated as N=1;Same as ShuttleRev1 |
| 0x20 | 0x30 | Preroll | Acknowledge | Disabled | |
| 0x24 0x31 CueData Acknowledge Disabled | |||||
| 0x20 | 0x34 | SyncPlay | Acknowledge | Disabled | |
| 0x20 | 0x40 | Preview | Acknowledge | Disabled | Status bits are set |
| 0x20 | 0x41 | Review | Acknowledge | Disabled | Status bits are set |
| 0x20 | 0x43 | OutpointPreview | Acknowledge | Disabled | |
| 0x22 | 0x5C | DMCSetFwd | Acknowledge | Disabled | |
| 0x22 | 0x5D | DMCSetRev | Acknowledge | Disabled | |
| 0x20 | 0x60 | FullEEOff | Acknowledge | Disabled | |
| 0x20 | 0x61 | FullEEOn | Acknowledge | Disabled | |
| 0x20 | 0x63 | SelectEEOn | Acknowledge | Disabled | |
| 4 - Preset/Select Control | |||||
| 0x40 | 0x10 | InEntry | Acknowledge | Disabled | |
| 0x40 | 0x11 | OutEntry | Acknowledge | Disabled | |
| 0x44 | 0x14 | InDataPreset | Acknowledge | Disabled | |
| 0x44 | 0x15 | OutDataPreset | Acknowledge | Disabled | |
| 0x40 | 0x18 | InShift+ | Acknowledge | Disabled | |
| 0x40 | 0x19 | InShift- | Acknowledge | Disabled | |
| 0x40 | 0x1A | OutShift+ | Acknowledge | Disabled | |
| 0x40 | 0x1B | OutShift- | Acknowledge | Disabled | |
| 0x40 | 0x20 | InReset | Acknowledge | Disabled | |
| 0x40 | 0x21 | OutReset | Acknowledge | Disabled | |
| 0x40 | 0x22 | AlnReset | Acknowledge | Disabled | |
| 0x40 | 0x23 | AOutReset | Acknowledge | Disabled | |
| 0x44 | 0x31 | PrerollPreset | Acknowledge | Disabled | |
| 0x40 | 0x40 | AutoModeOff | Acknowledge | Disabled | ignored, Status bit remembered |
| 0x40 | 0x41 | AutoModeOn | Acknowledge | Disabled | ignored, Status bit remembered |
| 0x41 | 0x37 | InputCheck | Acknowledge | Disabled | |
Command Reply No Remote Notes
6 - Sense Request
| 0x61 0x0A TimeCodeGenSense — — | |||||
| 0x61 0x0C CurrentTimeSense — — | |||||
| 0x60 0x10 InDataSense InData Enabled | |||||
| 0x60 | 0x11 | OutDataSense | OutData | Enabled | |
| 0x60 | 0x12 | AlnDataSense | AlnData | Enabled | |
| 0x60 | 0x13 | AOutDataSense | AOutData | Enabled | |
| 0x61 | 0x20 | StatusSense | StatusData | Enabled | |
| 0x60 | 0x2B | RemainTimeSense | RemainTimeData | Enabled | |
| 0x60 | 0x2E | SpeedSense | SpeedData | Enabled | |
| 0x60 | 0x31 | PrerollTimeSense | PreRollTimeData | Enabled | |
| 0x60 | 0x36 | TimerModeSense | TimerModeData | Enabled | |
| 0x60 | 0x3E | RecordInhibitSense | RecordInhibitStatus | Enabled | |
7 - Sense Reply
| 0x78 | 0x00 | Timer1Data | — | — | Current Time and 00:00:00:00 |
| 0x78 | 0x04 | LTCUserBitsTimeData | — | — | Current Time and 00:00:00:00 |
| 0x78 | 0x06 | VITCUserBitsTimeData | — | — | Current Time and 00:00:00:00 |
| 0x74 | 0x06 | VITCTimeData | — | — | Current Time |
| 0x74 | 0x07 | UserBitsVITCTimeData | — | — | 00:00:00:00 |
| 0x74 | 0x08 | GenTCDATA | — | — | Current Time |
| 0x78 | 0x08 | GenTCUBData | — | — | Current Time and 00:00:00:00 |
| 0x74 | 0x09 | GenUBData | — | — | 00:00:00:00 |
| 0x74 0x10 InData | — — | ||||
| 0x74 | 0x11 | OutData | — | — | |
| 0x74 | 0x12 | AlnData | — | — | |
| 0x74 | 0x13 | AOutData | — | — | |
| 0x74 | 0x14 | CorrectedLTCTimeData | — | — | Current Time |
| 0x70 | 0x20 | StatusData | — | — | Please see “Status Bits” sheet: Limited to 9 bytes of status, silently truncated |
| 0x76 | 0x2B | RemainTimeData | — | — | |
| 0x71 | 0x2E | SpeedData | — | — | |
| 0x74 | 0x31 | PrerollTimeData | — | — | |
| 0x71 | 0x36 | TimerModeData | — | — | Returns 0 (TimeCode) |
| 0x72 | 0x3E | RecordInhibitStatus | — | — | |
Command Reply No Remote Notes
A - Advanced Media Protocol
| 0xA1 | 0x01 | AutoSkip | Acknowledge | Disabled | 8-bit signed number of clips to skip from current clip |
| 0xAX | 0x15 | ListNextID | IDListing | Enabled | when x = 0 single clip request when x = 1, # clips can be specified in the send data |
| 0x20 | 0x29 | ClearPlaylist | Acknowledge | Disabled | |
| 0x41 | 0x42 | SetPlaybackLoop | Acknowledge | Disabled | Bit 0 loop mode enable, 0=false 1=trueBit 1 is single clip/timeline0=single clip1=timeline |
| 0x41 | 0x44 | SetStopMode | Acknowledge | Disabled | 0 = Off1 = Freeze on last frame2 = Freeze on next clip3 = Show black |
| 0x4f | 0x16 | AppendPreset | Acknowledge | Disabled | 2 Bytes for the length N of the clip nameN Bytes for each character of the clip name4 Byte in point timecode (format is FFSSMMHH)4 Byte out point timecode (format is FFSSMMHH) |
Blackmagic Extensions
| 0x82 | 0x02 | BMDSeekToTimelinePosition | Acknowledge | Disabled | 16-bit little endian fractional position [0..65535] |
| 0x81 | 0x03 | BMDSeekRelativeClip | Acknowledge | Disabled | One-byte signed integer, which is the number of clips to skip (negative for backwards). |
RS-422 Developer Information
| bit 7 | bit 6 | bit 5 | bit 4 | bit 3 | bit 2 | bit 1 | bit 0 | |
| Byte 0 | 0 | 0 | Cassette out | 0 | 0 | 0 | 0 | Local |
| Byte 1 | Standby | 0 | Stop | 0 | Rewind | Forward | Record | Play |
| Byte 2 | Servo Lock | 0 | Shuttle | Jog | Var | Direction | Still | 1 |
| Byte 3 | Auto Mode | 0 | 0 | 0 | Aout Set | Ain Set | Out Set | In Set |
| Byte 4 | Select EE | Full EE | Loop Playback | 0 | 0 | 0 | 0 | 0 |
| Byte 5 | 0 | 0 | 0 | 0 | 0 | 0 | 0 | 0 |
| Byte 6 | 0 | Lamp Still | Lamp Fwd | Lamp Rev | 0 | 0 | 0 | 0 |
| Byte 7 | 0 | 0 | 0 | 0 | 0 | 0 | 0 | 0 |
| Byte 8 | 0 | 0 | Near EOT | EOT | 0 | 0 | 0 | 0 |
| Byte 9 | 0 | 0 | 0 | 0 | 0 | 0 | 0 | 0 |
| Variables | |
| Cassette Out | Set if no SSD is present |
| Local | Set if Remote is disabled (local control) |
| Standby | Set if a disk is available |
| Direction | Clear if playback is forwarding, set if playback is reversing |
| Still | Set if playback is paused, or if in input preview mode |
| Auto Mode | Set if in Auto Mode |
| Select EE, Full EE | Set if in input preview mode |
| Lamp Still/Fwd/Rev | Set according to playback speed and direction |
| Near EOT | Set if total space left on available SSDs is less than 3 minutes |
| EOT | Set if total space left on available SSDs is less than 30 seconds |
| Others | |
| Cue Complete (byte 2, bit 0) | Always 1: Cue requests are always instantaneous |
| HyperDeck Serial RS-422 Protocol | ||
| Protocol | Based on Sony 9-pin protocol | |
| Interface | Baud rate 38.4 Kbps | |
| 1 start bit | ||
| 8 data bits | ||
| 1 stop bit | ||
| 1 parity bit | ||
| Odd parity | ||
Transferring Files over a Network
Your HyperDeck disk recorder supports file transfer via file transfer protocol, or ftp. This powerful feature lets you copy files directly from your computer to your HyperDeck via a network with the fast speeds a local network can provide. For example, you could be copying new files to a remote HyperDeck unit based at another location for digital signage.
Connecting to HyperDeck Studio
With your computer and HyperDeck Studio on the same network, all you'll need is an ftp client and your HyperDeck Studio's IP address.
1 Download and install an FTP client on the computer you want to connect your HyperDeck to. We recommend Cyberduck, FileZilla or Transmit but most FTP applications will work. Cyberduck and FileZilla are free downloads.
2 Connect your HyperDeck Studio to your network using an Ethernet cable and note its IP address. To access the IP address, press the 'menu' button and rotate the search dial to access the 'network' screen. You'll see your HyperDeck Studio's IP address at the bottom of this screen.

You can find your HyperDeck Studio's IP address in the smart panel's 'network' screen
3 Enter your HyperDeck's IP address into your TCP application's connection dialog. The naming and position of this box can vary between applications, but it is usually labeled 'server' or 'host.' If your FTP program includes an 'anonymous login' checkbox, make sure this is checked.

When connecting to HyperDeck Studio, you don't need to enter a username or password. Simply enter your disk recorder's IP address in your FTP application's 'server' or 'host' field and check an 'anonymous login' checkbox if one is available.
Transferring Files
Once connected to your HyperDeck you can transfer files as you normally would with your ftp program. Most ftp applications have a drag and drop interface but check your particular application for the appropriate method.
You can transfer any file to and from your HyperDeck, but it's worth noting that any files you intend to play back from HyperDeck Studio will need to conform to your HyperDeck's supported codecs and resolutions. You can find a list of supported codecs in the 'Blackmagic HyperDeck Setup' section of this manual.
TIP You can transfer files over a network while your HyperDeck is recording. HyperDeck will automatically adjust transfer speeds to make sure recording is not affected.
Connecting to an ATEM Switcher
If you're using an ATEM switcher, you can plug in up to 4 Blackmagic HyperDeck disk recorders and control them using the ATEM software or hardware panel. This is a very powerful feature that effectively gives you an entire videotape department at your fingertips. You can also trigger recording on your HyperDeck from an ATEM switcher, which is a great way of making an archive copy of a live broadcast, or capturing B roll when live switching a production that will be fine tuned later.


ATEM switchers, such as the ATEM 4 M/E Broadcast Studio 4K, can connect with up to four HyperDeck disk recorders
To connect HyperDecks to an ATEM switcher:
1 Connect your HyperDeck to the same network as your ATEM Switcher and note its IP address.
Your HyperDeck's IP address can be found via its front panel and LCD menu by entering the 'setup', then 'Ethernet' menus from the main menu.
Alternatively, you can access your HyperDeck's IP address on your Mac or PC via the 'configure' tab in Blackmagic HyperDeck Setup utility.
2 Connect one of your HyperDeck's SDI or HDMI outputs to an SDI or HDMI source input on your ATEM Switcher.
3 If you want to use your ATEM Switcher to trigger recording on your HyperDeck, you'll also need to connect a video source to your HyperDeck.
Simply connect an SDI or HDMI source to your HyperDeck as usual. To record your ATEM switcher's program output, connect one of your switcher's auxiliary SDI outputs to your HyperDeck's SDI input.
4 Enable remote by pressing the remote button on HyperDeck's front panel, or via the LCD menu on HyperDeck Studio Mini, to allow remote control from the switcher.
5 Complete the connection process by entering your HyperDeck's source and IP address information into your ATEM software or ATEM broadcast panel. This is very straightforward and laid out in your ATEM switcher manual.

natural_image
Front view of a 12G SDI computer chassis showing front panel, buttons, and drive slots (no text or symbols beyond branding)Make sure your HyperDeck has remote set to 'on' in the LCD menu, or via the control panel remote button, to enable Ethernet control with an ATEM switcher
Understanding Post Production Workflows
Accessing Your Clips
To access your clips, simply plug the SD card or SSD into your computer via an SD card slot, external reader, or SSD dock. You can either drag the files from the SSD or SD card directly to a local hard drive, or you can work directly from the SSD or SD card. You can also connect SSDs to your computer with a 2.5" eSATA to USB cable adapter, however this won't be fast enough to handle working directly from the SSD and is really only recommended as a portable solution for getting your video files off the SSD and onto a laptop.
Mac OS
QuickTime is built into Mac OS. Apple ProRes, Avid DNxHD and DNxHR QuickTime movies recorded by HyperDeck can be opened in almost any video software on Mac OS.
DNxHD and DNxHR MXF files recorded by HyperDeck can be opened with Avid Media Composer and DaVinci Resolve for Mac. DNxHD codecs can be downloaded free from http://www.avid.com/products/avid-dnxhr-and-dnxhd
MCC closed caption data files recorded by HyperDeck can be opened with MacCaption software for Mac OS from http://www.telestream.net/captioning/overview.htm
Windows
Apple ProRes QuickTime movies recorded by HyperDeck require QuickTime to be installed on your PC. Almost any video software on Windows that supports QuickTime can open movies recorded by HyperDeck. QuickTime for Windows can be downloaded free from http://www.apple.com/quicktime/download/.
DNxHD and DNxHR MXF files recorded by HyperDeck can be opened with Avid Media Composer and DaVinci Resolve for Windows. DNxHD codecs can be downloaded free from http://www.avid.com/products/avid-dnxhr-and-dnxhd
MCC closed caption data files recorded by HyperDeck can be opened with CaptionMaker software for Windows from http://www.telestream.net/captioning/overview.htm
Developer Information
Blackmagic HyperDeck Ethernet Protocol
The Blackmagic HyperDeck Ethernet Protocol is a text based protocol accessed by connecting to TCP port 9993 on HyperDeck Studio models that have a built in Ethernet connection. If you are a software developer, you can use the protocol to construct devices that integrate with our products. Here at Blackmagic Design our approach is to open up our protocols and we eagerly look forward to seeing what you come up with!
Protocol Commands
Command Command Description
| help or ? Provides help text on all commands and parameters | |
| commands return commands in XML format | |
| device info return device information | |
| disk list query clip list on active disk | |
| disk list: slot id: {n} query clip list on disk in slot {n} | |
| quit disconnect ethernet control | |
| ping check device is responding | |
| preview: enable: {true/false} switch to preview or output | |
| play play from current timecode | |
| play: speed: {-5000 to 5000} play at specific speed | |
| play: loop: {true/false} play in loops or stop-at-end | |
| play: single clip: {true/false} play current clip or all clips | |
| playrange | query playrange setting |
| playrange set: clip id: {n} | set play range to play clip {n} only |
| playrange set: clip id: {n} count: {m} | set play range to {m} clips starting from clip {n} |
| playrange set: in: {inT} out: {outT} | set play range to play between:- timecode {inT} and timecode {outT} |
| playrange set: timeline in: {in} timeline out:{out} | set play range in units of frames between:- timeline position {in} and position {out} clear/reset play range setting |
| playrange clear | clear/reset play range setting |
| play on startup | query unit play on startup state |
| play on startup: enable: {true/false} | enable or disable play on startup |
| play on startup: single clip: {true/false} | play single clip or all clips on startup |
| play option query play options | |
| play option: stop mode:{lastframe/nextframe/black} | set output frame when playback stops |
| record | record from current input |
| record: name: {name} | record named clip |
| record spill | spill current recording to next slot |
Command Command Description
| record: spill: slot id: {n} | spill current recording to specified slotuse current id to spill to same slot |
| stop stop playback or recording | |
| clips count query number of clips on timeline | |
| clips get query all timeline clips | |
| clips get: clip id: {n} query a timeline clip info | |
| clips get: clip id: {n} count: {m} query m clips starting from n | |
| clips get: version: {1/2} | query clip info using specified output version:version 1: is: name startT durationversion 2: id: startT duration inT outT name |
| clips add: name: {name} append a clip to timeline | |
| clips add: clip id: {n} name: {name} insert clip before existing clip {n} | |
| clips add: in: {inT} out: {outT} name: {name} append the {inT} to {outT} portion of clip | |
| clips remove: clip id: {n} | remove clip {n} from the timeline(invalidates clip ids following clip {n}) |
| clips clear empty timeline clip list | |
| transport info query current activity | |
| slot info query active slot | |
| slot info: slot id: {n} query slot {n} | |
| slot select: slot id: {n} switch to specified slot | |
| slot select: video format: {format} | load clips of specified format |
| slot unblock | unblock active slot |
| slot unblock: slot id: {n} | unblock slot {n} |
| cache info | query cache status |
| dynamic range | query dynamic range settings |
| dynamic range: playback override:{off/Rec709/Rec2020_SDR/HLG/ST2084_300/ST2084_500/ST2084_800/ST2084_1000/ST2084_2000/ST2084_4000/ST2084 | set playback dynamic range override |
| dynamic range: record override:{off/Rec709/Rec2020_SDR/HLG/ST2084_300/ST2084_500/ST2084_800/ST2084_1000/ST2084_2000/ST2084_4000/ST2048} | set record dynamic range override |
| notify | query notification status |
| notify: remote: {true/false} | set remote notifications |
| notify: transport: {true/false} | set transport notifications |
| notify: slot: {true/false} | set slot notifications |
| notify: configuration: {true/false} | set configuration notifications |
| notify: dropped frames: {true/false} | set dropped frames notifications |
| notify: display timecode: {true/false} | set display timecode notifications |
Command Command Description
| notify: timeline position: {true/false} set playback timeline position notifications | |
| notify: playrange: {true/false} set playrange notifications | |
| notify: cache: {true/false} set cache notifications | |
| notify: dynamic range: {true/false} set dynamic range settings notifications | |
| notify: slate: {true/false} set digital slate notifications | |
| goto: clip id: {start/end} goto first clip or last clip | |
| goto: clip id: {n} goto clip id {n} | |
| goto: clip id: +{n} go forward {n} clips | |
| goto: clip id: -(n) go backward {n} clips | |
| goto: clip: {n} goto frame position {n} within current clip | |
| goto: clip: +{n} go forward {n} frames within current clip | |
| goto: clip: -(n) go backward {n} frames within current clip | |
| goto: clip: {start/end} | goto start or end of clip |
| goto: timeline: {n} | goto frame position {n} within timeline |
| goto: timeline: +{n} | o forward {n} frames within timeline |
| goto: timeline: -(n} | go backward {n} frames within timeline |
| goto: timeline: {start/end} | goto start or end of timeline |
| goto: timecode: {timecode} | goto specified timecode |
| goto: timecode: +{timecode} | go forward {timecode} duration |
| goto: timecode: -(timecode} | go backward {timecode} duration |
| goto: slot id: {n} | goto slot id {n} |
| jog: timecode: {timecode} | jog to timecode |
| jog: timecode: +{timecode} | jog forward {timecode} duration |
| jog: timecode: -(timecode} | jog backward {timecode} duration |
| shuttle: speed: {-5000 to 5000} | shuttle with speed |
| remote | query unit remote control state |
| remote: enable: {true/false} | enable or disable remote control |
| remote: override: {true/false} | session override remote control |
| configuration | query configuration settings |
| configuration: video input: SDI | switch to SDI input |
| configuration: video input: HDMI | switch to HDMI input |
| configuration: video input: component | switch to component input |
| configuration: audio input: embedded | capture embedded audio |
| configuration: audio input: XLR | capture XLR audio |
| configuration: audio input: RCA | capture RCA audio |
| configuration: file format: {format} | switch to specific file format |
| configuration: audio codec: PCM | switch to PCM audio |
| configuration: audio codec: AAC | switch to AAC audio |
Command Command Description
| configuration: timecode input:{external/embedded/preset/clip} | change the timecode input |
| configuration: timecode output:{clip/timeline/internal} | change the timecode output |
| configuration: timecode preference:{default/dropframe/nondropframe} | whether or not to use drop frame timecodes when not otherwise specified |
| configuration: timecode preset:{timecode} | set the timecode preset |
| configuration: audio input channels: {n} set the number of audio channels recorded to {n} | |
| configuration: record trigger:{none/recordbit/timecoderun} | change the record trigger |
| configuration: record prefix: {name} set the record prefix name (supports UTF-8 name) | |
| configuration: append timestamp:{true/false} | append timestamp to recorded filename |
| configuration: xlr input id: {n} xlr type:{line/mic} | configure xlr input typemultiple xlr inputs can be configured in a single command |
| configuration: genlock input resync:{true/false} | enable or disable genlock input resync |
| uptime return time since last boot | |
| format: prepare: {format} prepare a disk formatting operation to filesystem {format} | |
| format: confirm: {token} perform a pre-prepared formatting operation using token | |
| identify: enable: {true/false} identify the device | |
| watchdog: period: {period in seconds} client | connection timeout |
| reboot reboot device | |
| slate clips slate clips information | |
| slate project slate project information | |
| slate project:←camera: {index}← | set camera index e.g. A |
Command Combinations
You can combine the parameters into a single command, for example:
play: speed: 200 loop: true single clip: true
Or for configuration:
configuration: video input: SDI audio input: XLR
Or to switch to the second disk, but only play NTSC clips:
slot select: slot id: 2 video format: NTSC
Using XML
While you can use the Terminal to talk to HyperDeck, if you are writing software, you can use XML to confirm the existence of a specific command based on the firmware of the HyperDeck you are communicating with. This helps your software user interface adjust to the capabilities of the specific HyperDeck model and software version.
Protocol Details
Connection
The HyperDeck Ethernet server listens on TCP port 9993.
Basic syntax
The HyperDeck protocol is a line oriented text protocol. Lines from the server will be separated by an ascii CR LF sequence. Messages from the client may be separated by LF or CR LF.
New lines are represented in this document as a "←" symbol.
Single line command syntax
Command parameters are usually optional. A command with no parameters is terminated with a new line:
{Command name}
If parameters are specified, the command name is followed by a colon, then pairs of parameter names and values. Each parameter name is terminated with a colon character:
{Command name}: {Parameter}: {Value} {Parameter}: {Value} ...
Multiline command syntax
The HyperDeck protocol also supports an equivalent multiline syntax where each parameter-value pair is entered on a new line. E.g.
{Command name}:←
{Pa ra meter}: { Va lu e}←
{Pa ra meter}: { Va lu e}←
Response syntax
Simple responses from the server consist of a three digit response code and descriptive text terminated by a new line:
{Response code} {Response text}
If a response carries parameters, the response text is terminated with a colon, and parameter name and value pairs follow on subsequent lines until a blank line is returned:
{Response code} {Response text}:←
{Pa ra m e t e r}: { Va lu e}←
{Pa ra m e t e r}: { Va lu e}←
...
←
Successful response codes
A simple acknowledgement of a command is indicated with a response code of 200:
200 ok←
Other successful responses carry parameters and are indicated with response codes in the range of 201 to 299.
Failure response codes
Failure responses to commands are indicated with response codes in the range of 100 to 199:
100 syntax error
101 unsupported parameter
102 invalid value
103 unsupported
104 disk full
105 no disk
106 disk error
107 timeline empty
108 internal error
109 out of range
110 no input
111 remote control disabled
112 clip not found
120 connection rejected
150 invalid state
151 invalid codec
160 invalid format
161 invalid token
162 format not prepared
163 parameterized single line command not supported
Asynchronous response codes
The server may return asynchronous messages at any time. These responses are indicated with response codes in the range of 500 to 599:
5xx {Response Text}:←
{Pa ra m e t e r}: {Va lu e}←
{Pa ra m e t e r}: {Va lu e}←
←
Connection response
On connection, an asynchronous message will be delivered:
500 connection info:←
protocol version: {Version}←
model: {Model Name}←
Connection rejection
Only one client may connect to the server at a time. If other clients attempt to connect concurrently, they will receive an error and be disconnected:
120 connection rejected
Timecode syntax
Timecodes are expressed as non-drop-frame timecode in the format:
HH:MM:SS:FF
Handling of deck "remote" state
The “remote” command may be used to enable or disable the remote control of the deck. Any attempt to change the deck state over ethernet while remote access is disabled will generate an error:
111 remote control disabled
To enable or disable remote control:
remote: enable: {"true", "false"}
The current remote control state may be overridden allowing remote access over ethernet irrespective of the current remote control state:
remote: override: {"true", "false"}
The override state is only valid for the currently connected ethernet client and only while the connection remains open.
The “remote” command may be used to query the remote control state of the deck by specifying no parameters:
remote
The deck will return the current remote control state:
210 remote info:←
enabled: {"true", "false"}
override: {"true", "false"}
←
Asynchronous remote control information change notification is disabled by default and may be configured with the "notify" command. When enabled, changes in remote state will generate a "510 remote info:" asynchronous message with the same parameters as the "210 remote info:" message.
Closing connection
The "quit" command instructs the server to cleanly shut down the connection:
quit
Checking connection status
The "ping" command has no function other than to determine if the server is responding:
ping←
Getting help
The "help" or "?" commands return human readable help text describing all available commands and parameters:
help
Or:
?←
The server will respond with a list of all supported commands:
201 help:
{Help Tex t}
{Help Tex t}
Switching to preview mode
The "preview" command instructs the deck to switch between preview mode and output mode:
preview: enable: {"true", "false"}
Playback will be stopped when the deck is switched to preview mode. Capturing will be stopped when the deck is switched to output mode.
Controlling device playback
The "play" command instructs the deck to start playing:
play←
The play command accepts a number of parameters which may be used together in most combinations.
By default, the deck will play all remaining clips on the timeline then stop.
The "single clip" parameter may be used to override this behavior:
play: single clip: {"true", "false"}
By default, the deck will play at normal (100%) speed. An alternate speed may be specified in percentage between -1600 and 1600:
play: speed: {$ normal speed}
By default, the deck will stop playing when it reaches to the end of the timeline. The "loop" parameter may be used to override this behavior:
play: loop: {"true", "false"}
The “playrange” command instructs the deck to play all the clips. To override this behavior: and select a particular clip:
playrange set: clip id: {Clip ID}
To only play a certain timecode range:
playrange set: in: {in timecode} out: {out timecode}
To clear a set playrange and return to the default value:
playrange clear
The “play on startup command” instructs the deck on what action to take on startup. By default, the deck will not play. Use the “enable” command to start playback after each power up.
play on startup: enable { "true", "false" }
By default, the unit will play back all clips on startup. Use the "single clip" command to override.
play on startup: single clip: {"true", "false"}
Stopping deck operation
The "stop" command instructs the deck to stop the current playback or capture:
stop
Changing timeline position
The "goto" command instructs the deck to switch to playback mode and change its position within the timeline.
To go to the start of a specific clip:
goto: clip id: {Clip ID}
To move forward/back {count} clips from the current clip on the current timeline:
goto: clip id: +/- {count}
Note that if the resultant clip id goes beyond the first or last clip on timeline, it will be clamp at the first or last clip.
To go to the start or end of the current clip:
goto: clip: { "start", "end"}
To go to the start of the first clip or the end of the last clip:
goto: timeline: { "start", "end"}
To go to a specified timecode:
goto: timecode: {timecode}
To move forward or back a specified duration in timecode:
goto: timecode: {"+", "-"}{duration in timecode}
To specify between slot 1 and slot 2:
goto: slot id: {Slot ID}
Note that only one parameter/value pair is allowed for each goto command.
Enumerating supported commands and parameters
The "commands" command returns the supported commands:
commands
The command list is returned in a computer readable XML format:
212 commands:
<commands>
<command name="..."><parameter name="..."/>...</command>
<command name="..."><parameter name="..."/>...</command>
...
</commands>
More XML tokens and parameters may be added in later releases.
Controlling asynchronous notifications
The "notify" command may be used to enable or disable asynchronous notifications from the server.
To enable or disable transport notifications:
notify: transport: {"true", "false"}
To enable or disable slot notifications:
notify: slot: {"true", "false"}
To enable or disable remote notifications:
notify: remote: {"true", "false"}
To enable or disable configuration notifications:
notify: configuration: {"true", "false"}
Multiple parameters may be specified. If no parameters are specified, the server returns the current state of all notifications:
209 notify:←
transport: { "true", "false" }←
slot: { "true", "false" }←
remote: { "true", "false" }←
configuration: { "true", "false" }←
dropped frames: { "true", "false" }←
display timecode: { "true", "false" }←
timeline position: { "true", "false" }←
playrange: { "true", "false" }←
cache: { "true", "false" }←
dynamic range: { "true", "false" }←
slate: { "true", "false" }←
Retrieving device information
The "device info" command returns information about the connected deck device:
device info
The server will respond with:
204 device info:←
protocol version: {Version}←
model: {Model Name}←
unique id: {unique alphanumeric identifier}←
slot count: {number of storage slots}←
software version: {software version}←
Retrieving slot information
The "slot info" command returns information about a slot. Without parameters, the command returns information for the currently selected slot:
slot info
If a slot Id is specified, that slot will be queried:
slot info: slot id: {Slot ID}
The server will respond with slot specific information:
202 slot info:←
slot id: {Slot ID}←
    status: {"empty", "mounting", "error", "mounted"}←
volume name: {Volume name}←
recording time: {recording time available in seconds}←
video format: {disk's default video format}←
blocked: {"true", "false"}←
Asynchronous slot information change notification is disabled by default and may be configured with the "notify" command. When enabled, changes in slot state will generate a "502 slot info:" asynchronous message with the same parameters as the "202 slot info:" message.
Retrieving clip information
The "disk list" command returns the information for each playable clip on a given disk. Without parameters, the command returns information for the current active disk:
disk list
If a slot id is specified, the disk in that slot will be queried:
disk list: slot id: {Slot ID}
The server responds with the list of all playable clips on the disk in the format of: Index, name, formats, and duration in timecode:
206 disk list:←
slot id: {Slot ID}←
{clip index}: {name} {file format} {video format} {Duration timecode}←
{clip index}: {name} {file format} {video format} {Duration timecode}←
...
←
Note that the clip index starts from 1.
Retrieving clip count
The "clips count" command returns the number of clips on the current timeline:
clips count ←
The server responds with the number of clips:
214 clips count: ←
clip count: {Count}←
Retrieving timeline information
The "clips get" command returns information for each available clip on the current timeline. Without parameters, the command returns information for all clips on timeline:
clips get←
The server responds with a list of clip IDs, names and timecodes:
205 clips info:
clip count: {Count}
{Clip ID}: {Name} {Start timecode} {Duration timecode}
{Clip ID}: {Name} {Start timecode} {Duration timecode}
...
Retrieving transport information
The "transport info" command returns the state of the transport:
transport info
The server responds with transport specific information:
208 transport info:
status: { "preview", "stopped", "play", "forward", "rewind", "jog", "shuttle", "record"}←
speed: {Play speed between -5000 and 5000 %}←
slot id: {Slot ID or "none"}←
clip id: {Clip ID or "none"}←
single clip: { "true", "false"}←
display timecode: {timecode}←
timecode: {timecode}←
video format: {Video format}←
loop: { "true", "false"}←
timeline: {n}←
input video format: {Video format"}←
dynamic range: { "off", "Rec709", "Rec2020_SDR", "HLG", "ST2084_300", "ST2084_500", "ST2084_800", "ST2084_1000", "ST2084_2000", "ST2084_4000", "ST2048" or "none"}←
The "timecode" value is the timecode within the current timeline for playback or the clip for record. The "display timecode" is the timecode displayed on the front of the deck. The two timecodes will differ in some deck modes.
Asynchronous transport information change notification is disabled by default and may be configured with the "notify" command. When enabled, changes in transport state will generate a "508 transport info:" asynchronous message with the same parameters as the "208 transport info:" message.
Video Formats
The following video formats are currently supported on HyperDeck Studio:
NTSC, PAL, NTSCp, PALp
720p50, 720p5994, 720p60
1080p23976, 1080p24, 1080p25, 1080p2997, 1080p30
1080i50, 1080i5994, 1080i60
HyperDeck Studio Pro and Plus models support these 4k formats:
4Kp23976, 4Kp24, 4Kp25, 4Kp2997, 4Kp30
HyperDeck Studio 4K Pro adds support for the following 4k formats:
4Kp50, 4Kp5994, 4Kp60
Video format support may vary between models and software releases.
File Formats
All HyperDeck models currently support the following file formats:
H.264High_SDI
H.264High
H.264Medium
H.264Low
QuickTimeProResHQ
QuickTimeProRes
QuickTimeProResLT
QuickTimeProResProxy
QuickTimeDNxHD220x
DNxHD220x
QuickTimeDNxHD145
DNxHD145
QuickTimeDNxHD45
DNxHD45
HyperDeck Studio 4K Pro also supports the following file formats:
H.265High_SDI
H.265High
H.265Medium
H.265Low
QuickTimeDNxHR_HQX
DNxHR_HQX 4Kp60
QuickTimeDNxHR_SQ
DNxHR_SQ
QuickTimeDNxHR_LB
DNxHR_LB
Supported file formats may vary between models and software releases.
Querying and updating configuration information
The "configuration" command may be used to query the current configuration of the deck:
configuration
The server returns the configuration of the deck:
211 configuration:
audio input: { "embedded", "XLR", "RCA" }
audio mapping: {n}
video input: { "SDI", "HDMI", "component", "composite" }
file format: {format}
audio codec: { "PCM", "AAC" }
timecode input: { "external", "embedded", "preset", "clip" }
timecode output: { "clip", "timeline" }
timecode preference: { "default", "dropframe", "nondropframe" }
timecode preset: {timecode}
audio input channels: {n}
record trigger: { "none", "recordbit", "timecoderun" }
record prefix: {name}
append timestamp: { "true", "false" }
One or more configuration parameters may be specified to change the configuration of the deck.
To change the current video input:
configuration: video input: {"SDI", "HDMI", "component"}
Valid video inputs may vary between models. To configure the current audio input:
configuration: audio input: {"embedded", "XLR", "RCA"}
Valid audio inputs may vary between models.
To configure the current file format:
configuration: file format: {File format}
Note that changes to the file format may require the deck to reset, which will cause the client connection to be closed. In such case, response code 213 will be returned (instead of 200) before the client connection is closed:
"213 deck rebooting"
Asynchronous configuration information change notification is disabled by default and may be configured with the "notify" command. When enabled, changes in configuration will generate a "511 configuration:" asynchronous message with the same parameters as the "211 configuration:" message.
Selecting active slot and video format
The "slot select" command instructs the deck to switch to a specified slot, or/and to select a specified output video format.
To switch to a specified slot:
slot select: slot id: {slot ID}
To select the output video format:
slot select: video format: {video format}
Either or all slot select parameters may be specified. Note that selecting video format will result in a rescan of the disk to reconstruct the timeline with all clips of the specified video format.
Clearing the current timeline
The "clips clear" command instructs the deck to empty the current timeline:
clips clear
The server responds with
200 ok←
Adding a clip to the current timeline
The "clips add:" command instructs the deck to add a clip to the current timeline:
clips add: name: {"clip name"}
The server responds with
200 ok←
or in case of error
1xx {error description}
Configuring the watchdog
The “watchdog” command instructs the deck to monitor the connected client and terminate the connection if the client is inactive for at least a specified period of time.
To configure the watchdog:
watchdog: period: {period in seconds}
To avoid disconnection, the client must send a command to the server at least every [period] seconds. Note that if the period is set to 0 or less than 0, connection monitoring will be disabled.
Help
Getting Help
The fastest way to obtain help is to go to the Blackmagic Design online support pages and check the latest support material available for your Blackmagic HyperDeck disk recorder.
Blackmagic Design Online Support Pages
The latest manual, software and support notes can be found at the Blackmagic Design support center at www.blackmagicdesign.com/support.
Blackmagic Design Forum
The Blackmagic Design forum on our website is a helpful resource you can visit for more information and creative ideas. This can also be a faster way of getting help as there may already be answers you can find from other experienced users and Blackmagic Design staff which will keep you moving forward. You can visit the forum at https://forum.blackmagicdesign.com
Contacting Blackmagic Design Support
If you can't find the help you need in our support material or on the forum, please use the "Send us an email" button on the support page to email a support request. Alternatively, click on the "Find your local support team" button on the support page and call your nearest Blackmagic Design support office.
Checking the Software Version Currently Installed
To check which version of Blackmagic HyperDeck software is installed on your computer, open the About Blackmagic HyperDeck Setup window.
- On Mac OS, open Blackmagic HyperDeck Setup from the Applications folder. Select About Blackmagic HyperDeck Setup from the application menu to reveal the version number.
- On Windows, open Blackmagic HyperDeck Setup utility from your Start menu or Start Screen. Click on the Help menu and select About Blackmagic HyperDeck Setup to reveal the version number.
How to Get the Latest Software Updates
After checking the version of Blackmagic HyperDeck Setup software installed on your computer, please visit the Blackmagic Design support center at www.blackmagicdesign.com/support to check for the latest updates. While it is usually a good idea to run the latest updates, it is wise to avoid updating any software if you are in the middle of an important project.
Regulatory Notices
Disposal of Waste of Electrical and Electronic Equipment Within the European Union.

The symbol on the product indicates that this equipment must not be disposed of with other waste materials. In order to dispose of your waste equipment, it must be handed over to a designated collection point for recycling. The separate collection and recycling of your waste equipment at the time of disposal will help conserve natural resources and ensure that it is recycled in a manner that protects human health and the environment. For more information about where you can drop off your waste equipment for recycling, please contact your local city recycling office or the dealer from whom you purchased the product.

This equipment has been tested and found to comply with the limits for a Class A digital device, pursuant to Part 15 of the FCC rules. These limits are designed to provide reasonable protection against harmful interference when the equipment is operated in a commercial environment. This equipment generates, uses, and can radiate radio frequency energy and, if not installed and used in accordance with the instructions, may cause harmful interference to radio communications. Operation of this product in a residential area is likely to cause harmful interference, in which case the user will be required to correct the interference at personal expense.
Operation is subject to the following two conditions:
1 This device may not cause harmful interference.
2 This device must accept any interference received, including interference that may cause undesired operation.

R-R-BMD-20210202002
R-R-BMD-20210202003
R-R-BMD-20201201003
R-R-BMD-20210301001
ISED Canada Statement

This device complies with Canadian standards for Class A digital apparatus.
Any modifications or use of this product outside its intended use could void compliance to these standards.
Connection to HDMI interfaces must be made with high quality shielded HDMI cables.
This equipment has been tested for compliance with the intended use in a commercial environment. If the equipment is used in a domestic environment, it may cause radio interference.
Safety Information
For protection against electric shock, the equipment must be connected to a mains socket outlet with a protective earth connection. In case of doubt contact a qualified electrician.
To reduce the risk of electric shock, do not expose this equipment to dripping or splashing.
Product is suitable for use in tropical locations with an ambient temperature of up to 40 °C.
Ensure that adequate ventilation is provided around the product and that it is not restricted.
When rack mounting, ensure that the ventilation is not restricted by adjacent equipment.
No operator serviceable parts inside product. Refer servicing to your local Blackmagic Design service center.

Use only at altitudes not more than 2000m above sea level.
State of California statement
This product can expose you to chemicals such as trace amounts of polybrominated biphenyls within plastic parts, which is known to the state of California to cause cancer and birth defects or other reproductive harm.
For more information go to www.P65Warnings.ca.gov.
Warning for Authorized Service Personnel


Disconnect power from both power inlets before servicing!
Warranty
12 Month Limited Warranty
Blackmagic Design warrants that this product will be free from defects in materials and workmanship for a period of 12 months from the date of purchase. If a product proves to be defective during this warranty period, Blackmagic Design, at its option, either will repair the defective product without charge for parts and labor, or will provide a replacement in exchange for the defective product.
In order to obtain service under this warranty, you the Customer, must notify Blackmagic Design of the defect before the expiration of the warranty period and make suitable arrangements for the performance of service. The Customer shall be responsible for packaging and shipping the defective product to a designated service center nominated by Blackmagic Design, with shipping charges pre paid. Customer shall be responsible for paying all shipping charges, insurance, duties, taxes, and any other charges for products returned to us for any reason.
This warranty shall not apply to any defect, failure or damage caused by improper use or improper or inadequate maintenance and care. Blackmagic Design shall not be obligated to furnish service under this warranty: a) to repair damage resulting from attempts by personnel other than Blackmagic Design representatives to install, repair or service the product, b) to repair damage resulting from improper use or connection to incompatible equipment, c) to repair any damage or malfunction caused by the use of non Blackmagic Design parts or supplies, or d) to service a product that has been modified or integrated with other products when the effect of such a modification or integration increases the time or difficulty of servicing the product. THIS WARRANTY IS GIVEN BY BLACKMAGIC DESIGN IN LIEU OF ANY OTHER WARRANTIES, EXPRESS OR IMPLIED. BLACKMAGIC DESIGN AND ITS VENDORS DISCLAIM ANY IMPLIED WARRANTIES OF MERCHANTABILITY OR FITNESS FOR A PARTICULAR PURPOSE. BLACKMAGIC DESIGN'S RESPONSIBILITY TO REPAIR OR REPLACE DEFECTIVE PRODUCTS IS THE WHOLE AND EXCLUSIVE REMEDY PROVIDED TO THE CUSTOMER FOR ANY INDIRECT, SPECIAL, INCIDENTAL OR CONSEQUENTIAL DAMAGES IRRESPECTIVE OF WHETHER BLACKMAGIC DESIGN OR THE VENDOR HAS ADVANCE NOTICE OF THE POSSIBILITY OF SUCH DAMAGES. BLACKMAGIC DESIGN IS NOT LIABLE FOR ANY ILLEGAL USE OF EQUIPMENT BY CUSTOMER. BLACKMAGIC IS NOT LIABLE FOR ANY DAMAGES RESULTING FROM USE OF THIS PRODUCT. USER OPERATES THIS PRODUCT AT OWN RISK.
Copyright 2021 Blackmagic Design. All rights reserved. 'Blackmagic Design', 'DeckLink', 'HDLink', 'Workgroup Videohub', 'Multibridge Pro', 'Multibridge Extreme', 'Intensity' and 'Leading the creative video revolution' are registered trademarks in the US and other countries. All other company and product names may be trade marks of their respective companies with which they are associated.
HyperDeck ディスクレコーダー


natural_image
Circular portrait photo of a smiling man in a black polo shirt (no text or symbols visible)ようこそ
Blackmagic Design CEO
グ ラント・ペ ティ
目次
natural_image
Front view of a black audio workstation with multiple audio equipment panels and control knobs (no visible text or symbols)HyperDeck Studio HD ProおよびHyperDeck Studio 4K Pro

natural_image
Black audio recording device with digital display and control buttons (no readable text or symbols)HyperDeck Studio HD Mini

natural_image
Black audio recording device with multiple control knobs and a digital display showing time, location, and terrain (no readable text or symbols)HyperDeck Studio HD Plus
natural_image
Front panel of a network equipment rack with multiple ports and connectors (no visible text or labels)natural_image
Illustration of a hand holding a device panel with buttons and a video player interface (no text or symbols on the device itself)メディアの 接 続
natural_image
Diagram of a server rack with ports and an orange arrow indicating a specific component (no text or symbols present)メディアバー
natural_image
Front view of a rack-mounted server unit with control panel and drive slots (no visible text or labels)natural_image
Front view of a computer drive chassis showing ports, buttons, and memory slots (no text or symbols)| Command Reply No Remote Notes | |||||
| 0 - System Control | |||||
| 0x00 0x11 DeviceTypeRequest | NTSC: 0xF0E0PAL: 0xF1E024P: 0xF2E0 | Enabled | |||
| 1 - Slave Response | |||||
| 0x20 | 0x00 | Stop | Acknowledge | Disabled | |
| 0x20 | 0x01 | Play | Acknowledge | Disabled | |
| 0x20 | 0x02 | Record | Acknowledge | Disabled | |
| 0x20 | 0x04 | StandbyOff | Acknowledge | Disabled | |
| 0x20 | 0x05 | StandbyOn | Acknowledge | Disabled | |
| 0x20 | 0x0F | Eject | Acknowledge | Disabled | |
| 0x20 | 0x10 | FastFwd | Acknowledge | Disabled | |
| 0x21 | 0x11 | JogFwd1 | Acknowledge | Disabled | |
| 0x22 | 0x11 | JogFwd2 | Acknowledge | Disabled | Treated as N=1;Same as JogFwd1 |
| 0x21 | 0x12 | VarFwd1 | Acknowledge | Disabled | Uses ShuttleFwd1 |
| 0x22 | 0x12 | VarFwd2 | Acknowledge | Disabled | Treated as N=1;Same as VarFwd1 |
| 0x21 | 0x13 | ShuttleFwd1 | Acknowledge | Disabled | |
| 0x22 | 0x13 | ShuttleFwd2 | Acknowledge | Disabled | Treated as N=1;Same as ShuttleFwd1 |
| 0x20 | 0x20 | Rewind | Acknowledge | Disabled | |
| 0x21 | 0x21 | JogRev1 | Acknowledge | Disabled | |
| 0x22 | 0x21 | JogRev2 | Acknowledge | Disabled | Treated as N=1;Same as JogRev1 |
| 0x21 | 0x22 | VarRev1 | Acknowledge | Disabled | Uses ShuttleRev1 |
Command Reply No Remote Notes
| 0x22 0x22 VarRev2 Acknowledge Disabled | Treated as N=1;Same as VarRev1 | ||||
| 0x21 | 0x23 | ShuttleRev1 | Acknowledge | Disabled | |
| 0x22 | 0x23 | ShuttleRev2 | Acknowledge | Disabled | Treated as N=1;Same as ShuttleRev1 |
| 0x20 | 0x30 | Preroll | Acknowledge | Disabled | |
| 0x24 0x31 CueData Acknowledge Disabled | |||||
| 0x20 | 0x34 | SyncPlay | Acknowledge | Disabled | |
| 0x20 | 0x40 | Preview | Acknowledge | Disabled | Status bits are set |
| 0x20 | 0x41 | Review | Acknowledge | Disabled | Status bits are set |
| 0x20 | 0x43 | OutpointPreview | Acknowledge | Disabled | |
| 0x22 | 0x5C | DMCSetFwd | Acknowledge | Disabled | |
| 0x22 | 0x5D | DMCSetRev | Acknowledge | Disabled | |
| 0x20 | 0x60 | FullEEOff | Acknowledge | Disabled | |
| 0x20 | 0x61 | FullEEOn | Acknowledge | Disabled | |
| 0x20 | 0x63 | SelectEEOn | Acknowledge | Disabled | |
| 4 - Preset/Select Control | |||||
| 0x40 | 0x10 | InEntry | Acknowledge | Disabled | |
| 0x40 | 0x11 | OutEntry | Acknowledge | Disabled | |
| 0x44 | 0x14 | InDataPreset | Acknowledge | Disabled | |
| 0x44 | 0x15 | OutDataPreset | Acknowledge | Disabled | |
| 0x40 | 0x18 | InShift+ | Acknowledge | Disabled | |
| 0x40 | 0x19 | InShift- | Acknowledge | Disabled | |
| 0x40 | 0x1A | OutShift+ | Acknowledge | Disabled | |
| 0x40 | 0x1B | OutShift- | Acknowledge | Disabled | |
| 0x40 | 0x20 | InReset | Acknowledge | Disabled | |
| 0x40 | 0x21 | OutReset | Acknowledge | Disabled | |
| 0x40 | 0x22 | AlnReset | Acknowledge | Disabled | |
| 0x40 | 0x23 | AOutReset | Acknowledge | Disabled | |
| 0x44 | 0x31 | PrerollPreset | Acknowledge | Disabled | |
| 0x40 | 0x40 | AutoModeOff | Acknowledge | Disabled | ignored, Status bit remembered |
| 0x40 | 0x41 | AutoModeOn | Acknowledge | Disabled | ignored, Status bit remembered |
| 0x41 | 0x37 | InputCheck | Acknowledge | Disabled | |
Command Reply No Remote Notes
6 - Sense Request
| 0x61 0x0A TimeCodeGenSense — — | |||||
| 0x61 0x0C CurrentTimeSense — — | |||||
| 0x60 0x10 InDataSense InData Enabled | |||||
| 0x60 | 0x11 | OutDataSense | OutData | Enabled | |
| 0x60 | 0x12 | AlnDataSense | AlnData | Enabled | |
| 0x60 | 0x13 | AOutDataSense | AOutData | Enabled | |
| 0x61 | 0x20 | StatusSense | StatusData | Enabled | |
| 0x60 | 0x2B | RemainTimeSense | RemainTimeData | Enabled | |
| 0x60 | 0x2E | SpeedSense | SpeedData | Enabled | |
| 0x60 | 0x31 | PrerollTimeSense | PreRollTimeData | Enabled | |
| 0x60 | 0x36 | TimerModeSense | TimerModeData | Enabled | |
| 0x60 | 0x3E | RecordInhibitSense | RecordInhibitStatus | Enabled | |
7 - Sense Reply
| 0x78 | 0x00 | Timer1Data | — | — | Current Time and 00:00:00:00 |
| 0x78 | 0x04 | LTCUserBitsTimeData | — | — | Current Time and 00:00:00:00 |
| 0x78 | 0x06 | VITCUserBitsTimeData | — | — | Current Time and 00:00:00:00 |
| 0x74 | 0x06 | VITCTimeData | — | — | Current Time |
| 0x74 | 0x07 | UserBitsVITCTimeData | — | — | 00:00:00:00 |
| 0x74 | 0x08 | GenTCDATA | — | — | Current Time |
| 0x78 | 0x08 | GenTCUBData | — | — | Current Time and 00:00:00:00 |
| 0x74 | 0x09 | GenUBData | — | — | 00:00:00:00 |
| 0x74 0x10 InData | — — | ||||
| 0x74 | 0x11 | OutData | — | — | |
| 0x74 | 0x12 | AlnData | — | — | |
| 0x74 | 0x13 | AOutData | — | — | |
| 0x74 | 0x14 | CorrectedLTCTimeData | — | — | Current Time |
| 0x70 | 0x20 | StatusData | — | — | Please see “Status Bits” sheet: Limited to 9 bytes of status, silently truncated |
| 0x76 | 0x2B | RemainTimeData | — | — | |
| 0x71 | 0x2E | SpeedData | — | — | |
| 0x74 | 0x31 | PrerollTimeData | — | — | |
| 0x71 | 0x36 | TimerModeData | — | — | Returns 0 (TimeCode) |
| 0x72 | 0x3E | RecordInhibitStatus | — | — | |
Command Reply No Remote Notes
A - Advanced Media Protocol
| 0xA1 | 0x01 | AutoSkip | Acknowledge | Disabled | 8-bit signed number of clips to skip from current clip |
| 0xAX | 0x15 | ListNextID | IDListing | Enabled | when x = 0 single clip request when x = 1, # clips can be specified in the send data |
| 0x20 | 0x29 | ClearPlaylist | Acknowledge | Disabled | |
| 0x41 | 0x42 | SetPlaybackLoop | Acknowledge | Disabled | Bit 0 loop mode enable, 0=false 1=trueBit 1 is single clip/timeline0=single clip1=timeline |
| 0x41 | 0x44 | SetStopMode | Acknowledge | Disabled | 0 = Off1 = Freeze on last frame2 = Freeze on next clip3 = Show black |
| 0x4f | 0x16 | AppendPreset | Acknowledge | Disabled | 2 Bytes for the length N of the clip nameN Bytes for each character of the clip name4 Byte in point timecode (format is FFSSMMHH)4 Byte out point timecode (format is FFSSMMHH) |
Blackmagic Extensions
| 0x82 | 0x02 | BMDSeekToTimelinePosition | Acknowledge | Disabled | 16-bit little endian fractional position [0..65535] |
| 0x81 | 0x03 | BMDSeekRelativeClip | Acknowledge | Disabled | One-byte signed integer, which is the number of clips to skip (negative for backwards). |
RS-422デベロッパー情報
| bit 7 | bit 6 | bit 5 | bit 4 | bit 3 | bit 2 | bit 1 | bit 0 | |
| Byte 0 | 0 | 0 | Cassette out | 0 | 0 | 0 | 0 | Local |
| Byte 1 | Standby | 0 | Stop | 0 | Rewind | Forward | Record | Play |
| Byte 2 | Servo Lock | 0 | Shuttle | Jog | Var | Direction | Still | 1 |
| Byte 3 | Auto Mode | 0 | 0 | 0 | Aout Set | Ain Set | Out Set | In Set |
| Byte 4 | Select EE | Full EE | Loop Playback | 0 | 0 | 0 | 0 | 0 |
| Byte 5 | 0 | 0 | 0 | 0 | 0 | 0 | 0 | 0 |
| Byte 6 | 0 | Lamp Still | Lamp Fwd | Lamp Rev | 0 | 0 | 0 | 0 |
| Byte 7 | 0 | 0 | 0 | 0 | 0 | 0 | 0 | 0 |
| Byte 8 | 0 | 0 | Near EOT | EOT | 0 | 0 | 0 | 0 |
| Byte 9 | 0 | 0 | 0 | 0 | 0 | 0 | 0 | 0 |
| Variables | |
| Cassette Out | Set if no SSD is present |
| Local | Set if Remote is disabled (local control) |
| Standby | Set if a disk is available |
| Direction | Clear if playback is forwarding, set if playback is reversing |
| Still | Set if playback is paused, or if in input preview mode |
| Auto Mode | Set if in Auto Mode |
| Select EE, Full EE | Set if in input preview mode |
| Lamp Still/Fwd/Rev | Set according to playback speed and direction |
| Near EOT | Set if total space left on available SSDs is less than 3 minutes |
| EOT | Set if total space left on available SSDs is less than 30 seconds |
| Others | |
| Cue Complete (byte 2, bit 0) | Always 1: Cue requests are always instantaneous |
| HyperDeck Serial RS-422 Protocol | ||
| Protocol | Based on Sony 9-pin protocol | |
| Interface | Baud rate 38 | .4 Kbps |
| 1 start bit | ||
| 8 data bits | ||
| 1 stop bit | ||
| 1 parity bit | ||
| Odd parity | ||
ネットワークでファイルを転送
natural_image
Front view of a 12G SDI computer chassis showing front panel, buttons, and drive slots (no text or symbols beyond branding)The Blackmagic HyperDeck Ethernet Protocol is a text based protocol accessed by connecting to TCP port 9993 on HyperDeck Studio models that have a built in Ethernet connection. If you are a software developer, you can use the protocol to construct devices that integrate with our products. Here at Blackmagic Design our approach is to open up our protocols and we eagerly look forward to seeing what you come up with!
Protocol Commands
| Command Command Description | |
| help or ? Provides help text on all commands and parameters | |
| commands return commands in XML format | |
| device info return device information | |
| disk list query clip list on active disk | |
| disk list: slot id: {n} query clip list on disk in slot {n} | |
| quit disconnect ethernet control | |
| ping check device is responding | |
| preview: enable: {true/false} switch to preview or output | |
| play play from current timecode | |
| play: speed: {-5000 to 5000} play at specific speed | |
| play: loop: {true/false} play in loops or stop-at-end | |
| play: single clip: {true/false} | play current clip or all clips |
| playrange | query playrange setting |
| playrange set: clip id: {n} | set play range to play clip {n} only |
| playrange set: clip id: {n} count: {m} | set play range to {m} clips starting from clip {n} |
| playrange set: in: {inT} out: {outT} | set play range to play between:- timecode {inT} and timecode {outT} |
| playrange set: timeline in: {in} timeline out: {out} | set play range in units of frames between:- timeline position {in} and position {out} clear/reset play range setting |
| playrange clear | clear/reset play range setting |
| play on startup | query unit play on startup state |
| play on startup: enable: {true/false} | enable or disable play on startup |
| play on startup: single clip: {true/false} | play single clip or all clips on startup |
| play option query play options | |
| play option: stop mode:{lastframe/nextframe/black} | set output frame when playback stops |
| record | record from current input |
| record: name: {name} | record named clip |
| record spill | spill current recording to next slot |
Command Command Description
| record: spill: slot id: {n} | spill current recording to specified slotuse current id to spill to same slot |
| stop stop playback or recording | |
| clips count query number of clips on timeline | |
| clips get query all timeline clips | |
| clips get: clip id: {n} query a timeline clip info | |
| clips get: clip id: {n} count: {m} query m clips starting from n | |
| clips get: version: {1/2} | query clip info using specified output version:version 1: is: name startT durationversion 2: id: startT duration inT outT name |
| clips add: name: {name} append a clip to timeline | |
| clips add: clip id: {n} name: {name} insert clip before existing clip {n} | |
| clips add: in: {inT} out: {outT} name: {name} append the {inT} to {outT} portion of clip | |
| clips remove: clip id: {n} | remove clip {n} from the timeline(invalidates clip ids following clip {n}) |
| clips clear empty timeline clip list | |
| transport info query current activity | |
| slot info query active slot | |
| slot info: slot id: {n} query slot {n} | |
| slot select: slot id: {n} switch to specified slot | |
| slot select: video format: {format} | load clips of specified format |
| slot unblock | unblock active slot |
| slot unblock: slot id: {n} | unblock slot {n} |
| cache info | query cache status |
| dynamic range | query dynamic range settings |
| dynamic range: playback override:{off/Rec709/Rec2020_SDR/HLG/ST2084_300/ST2084_500/ST2084_800/ST2084_1000/ST2084_2000/ST2084_4000/ST2084 | set playback dynamic range override |
| dynamic range: record override:{off/Rec709/Rec2020_SDR/HLG/ST2084_300/ST2084_500/ST2084_800/ST2084_1000/ST2084_2000/ST2084_4000/ST2048} | set record dynamic range override |
| notify | query notification status |
| notify: remote: {true/false} | set remote notifications |
| notify: transport: {true/false} | set transport notifications |
| notify: slot: {true/false} | set slot notifications |
| notify: configuration: {true/false} | set configuration notifications |
| notify: dropped frames: {true/false} | set dropped frames notifications |
| notify: display timecode: {true/false} | set display timecode notifications |
Command Command Description
| notify: timeline position: {true/false} set playback timeline position notifications | |
| notify: playrange: {true/false} set playrange notifications | |
| notify: cache: {true/false} set cache notifications | |
| notify: dynamic range: {true/false} set dynamic range settings notifications | |
| notify: slate: {true/false} set digital slate notifications | |
| goto: clip id: {start/end} goto first clip or last clip | |
| goto: clip id: {n} goto clip id {n} | |
| goto: clip id: +{n} go forward {n} clips | |
| goto: clip id: -(n) go backward {n} clips | |
| goto: clip: {n} goto frame position {n} within current clip | |
| goto: clip: +{n} go forward {n} frames within current clip | |
| goto: clip: -(n) go backward {n} frames within current clip | |
| goto: clip: {start/end} | goto start or end of clip |
| goto: timeline: {n} | goto frame position {n} within timeline |
| goto: timeline: +{n} | o forward {n} frames within timeline |
| goto: timeline: -(n} | go backward {n} frames within timeline |
| goto: timeline: {start/end} | goto start or end of timeline |
| goto: timecode: {timecode} | goto specified timecode |
| goto: timecode: +{timecode} | go forward {timecode} duration |
| goto: timecode: -(timecode} | go backward {timecode} duration |
| goto: slot id: {n} | goto slot id {n} |
| jog: timecode: {timecode} | jog to timecode |
| jog: timecode: +{timecode} | jog forward {timecode} duration |
| jog: timecode: -(timecode} | jog backward {timecode} duration |
| shuttle: speed: {-5000 to 5000} | shuttle with speed |
| remote | query unit remote control state |
| remote: enable: {true/false} | enable or disable remote control |
| remote: override: {true/false} | session override remote control |
| configuration | query configuration settings |
| configuration: video input: SDI | switch to SDI input |
| configuration: video input: HDMI | switch to HDMI input |
| configuration: video input: component | switch to component input |
| configuration: audio input: embedded | capture embedded audio |
| configuration: audio input: XLR | capture XLR audio |
| configuration: audio input: RCA | capture RCA audio |
| configuration: file format: {format} | switch to specific file format |
| configuration: audio codec: PCM | switch to PCM audio |
| configuration: audio codec: AAC | switch to AAC audio |
Command Command Description
| configuration: timecode input:{external/embedded/preset/clip} | change the timecode input |
| configuration: timecode output:{clip/timeline/internal} | change the timecode output |
| configuration: timecode preference:{default/dropframe/nondropframe} | whether or not to use drop frame timecodes when not otherwise specified |
| configuration: timecode preset:{timecode} | set the timecode preset |
| configuration: audio input channels: {n} set the number of audio channels recorded to {n} | |
| configuration: record trigger:{none/recordbit/timecoderun} | change the record trigger |
| configuration: record prefix: {name} set the record prefix name (supports UTF-8 name) | |
| configuration: append timestamp:{true/false} | append timestamp to recorded filename |
| configuration: xlr input id: {n} xlr type:{line/mic} | configure xlr input typemultiple xlr inputs can be configured in a single command |
| configuration: genlock input resync:{true/false} | enable or disable genlock input resync |
| uptime return time since last boot | |
| format: prepare: {format} prepare a disk formatting operation to filesystem {format} | |
| format: confirm: {token} perform a pre-prepared formatting operation using token | |
| identify: enable: {true/false} identify the device | |
| watchdog: period: {period in seconds} client | connection timeout |
| reboot reboot device | |
| slate clips slate clips information | |
| slate project slate project information | |
| slate project:←camera: {index}← | set camera index e.g. A |
Command Combinations
You can combine the parameters into a single command, for example:
play: speed: 200 loop: true single clip: true
Or for configuration:
configuration: video input: SDI audio input: XLR
Or to switch to the second disk, but only play NTSC clips:
slot select: slot id: 2 video format: NTSC
Using XML
While you can use the Terminal to talk to HyperDeck, if you are writing software, you can use XML to confirm the existence of a specific command based on the firmware of the HyperDeck you are communicating with. This helps your software user interface adjust to the capabilities of the specific HyperDeck model and software version.
Protocol Details
Connection
The HyperDeck Ethernet server listens on TCP port 9993.
Basic syntax
The HyperDeck protocol is a line oriented text protocol. Lines from the server will be separated by an ascii CR LF sequence. Messages from the client may be separated by LF or CR LF.
New lines are represented in this document as a "←" symbol.
Single line command syntax
Command parameters are usually optional. A command with no parameters is terminated with a new line:
{Command name}
If parameters are specified, the command name is followed by a colon, then pairs of parameter names and values. Each parameter name is terminated with a colon character:
{Command name}: {Parameter}: {Value} {Parameter}: {Value} ...
Multiline command syntax
The HyperDeck protocol also supports an equivalent multiline syntax where each parameter-value pair is entered on a new line. E.g.
{Command name}:←
{Pa ra m e t e r}: { Va lu e}←
{Pa ra m e t e r}: { Va lu e}←
Response syntax
Simple responses from the server consist of a three digit response code and descriptive text terminated by a new line:
{Response code} {Response text}
If a response carries parameters, the response text is terminated with a colon, and parameter name and value pairs follow on subsequent lines until a blank line is returned:
{Response code} {Response text}:←
{Pa ra m e t e r}: { Va lu e}←
{Pa ra m e t e r}: { Va lu e}←
...
←
Successful response codes
A simple acknowledgement of a command is indicated with a response code of 200:
200 ok←
Other successful responses carry parameters and are indicated with response codes in the range of 201 to 299.
Failure response codes
Failure responses to commands are indicated with response codes in the range of 100 to 199:
100 syntax error
101 unsupported parameter
102 invalid value
103 unsupported
104 disk full
105 no disk
106 disk error
107 timeline empty
108 internal error
109 out of range
110 no input
111 remote control disabled
112 clip not found
120 connection rejected
150 invalid state
151 invalid codec
160 invalid format
161 invalid token
162 format not prepared
163 parameterized single line command not supported
Asynchronous response codes
The server may return asynchronous messages at any time. These responses are indicated with response codes in the range of 500 to 599:
5xx {Response Text}:←
{Pa ra m e t e r}: {Va lu e}←
{Pa ra m e t e r}: {Va lu e}←
←
Connection response
On connection, an asynchronous message will be delivered:
500 connection info:←
protocol version: {Version}←
model: {Model Name}←
Connection rejection
Only one client may connect to the server at a time. If other clients attempt to connect concurrently, they will receive an error and be disconnected:
120 connection rejected
Timecode syntax
Timecodes are expressed as non-drop-frame timecode in the format:
HH:MM:SS:FF
Handling of deck "remote" state
The “remote” command may be used to enable or disable the remote control of the deck. Any attempt to change the deck state over ethernet while remote access is disabled will generate an error:
111 remote control disabled
To enable or disable remote control:
remote: enable: {"true", "false"}
The current remote control state may be overridden allowing remote access over ethernet irrespective of the current remote control state:
remote: override: {"true", "false"}
The override state is only valid for the currently connected ethernet client and only while the connection remains open.
The “remote” command may be used to query the remote control state of the deck by specifying no parameters:
remote
The deck will return the current remote control state:
210 remote info:←
enabled: {"true", "false"}
override: {"true", "false"}
Asynchronous remote control information change notification is disabled by default and may be configured with the "notify" command. When enabled, changes in remote state will generate a "510 remote info:" asynchronous message with the same parameters as the "210 remote info:" message.
Closing connection
The "quit" command instructs the server to cleanly shut down the connection:
quit
Checking connection status
The "ping" command has no function other than to determine if the server is responding:
ping←
Getting help
The "help" or "?" commands return human readable help text describing all available commands and parameters:
help
Or:
?←
The server will respond with a list of all supported commands:
201 help:
{Help Tex t}
{Help Tex t}
Switching to preview mode
The "preview" command instructs the deck to switch between preview mode and output mode:
preview: enable: {"true", "false"}
Playback will be stopped when the deck is switched to preview mode. Capturing will be stopped when the deck is switched to output mode.
Controlling device playback
The "play" command instructs the deck to start playing:
play←
The play command accepts a number of parameters which may be used together in most combinations.
By default, the deck will play all remaining clips on the timeline then stop.
The "single clip" parameter may be used to override this behavior:
play: single clip: {"true", "false"}
By default, the deck will play at normal (100%) speed. An alternate speed may be specified in percentage between -1600 and 1600:
play: speed: {$ normal speed}
By default, the deck will stop playing when it reaches to the end of the timeline. The "loop" parameter may be used to override this behavior:
play: loop: {"true", "false"}
The “playrange” command instructs the deck to play all the clips. To override this behavior: and select a particular clip:
playrange set: clip id: {Clip ID}
To only play a certain timecode range:
playrange set: in: {in timecode} out: {out timecode}
To clear a set playrange and return to the default value:
playrange clear
The “play on startup command” instructs the deck on what action to take on startup. By default, the deck will not play. Use the “enable” command to start playback after each power up.
play on startup: enable { "true", "false" }
By default, the unit will play back all clips on startup. Use the "single clip" command to override.
play on startup: single clip: {"true", "false"}
Stopping deck operation
The "stop" command instructs the deck to stop the current playback or capture:
stop
Changing timeline position
The "goto" command instructs the deck to switch to playback mode and change its position within the timeline.
To go to the start of a specific clip:
goto: clip id: {Clip ID}
To move forward/back {count} clips from the current clip on the current timeline:
goto: clip id: +/- {count}
Note that if the resultant clip id goes beyond the first or last clip on timeline, it will be clamp at the first or last clip.
To go to the start or end of the current clip:
goto: clip: { "start", "end"}
To go to the start of the first clip or the end of the last clip:
goto: timeline: { "start", "end"}
To go to a specified timecode:
goto: timecode: {timecode}
To move forward or back a specified duration in timecode:
goto: timecode: {“+”, “-”} {duration in timecode}
To specify between slot 1 and slot 2:
goto: slot id: {Slot ID}
Note that only one parameter/value pair is allowed for each goto command.
Enumerating supported commands and parameters
The "commands" command returns the supported commands:
commands
The command list is returned in a computer readable XML format:
212 commands:
<commands>
<command name="..."><parameter name="..."/>...</command>
<command name="..."><parameter name="..."/>...</command>
...
</commands>
More XML tokens and parameters may be added in later releases.
Controlling asynchronous notifications
The "notify" command may be used to enable or disable asynchronous notifications from the server.
To enable or disable transport notifications:
notify: transport: {"true", "false"}
To enable or disable slot notifications:
notify: slot: {"true", "false"}
To enable or disable remote notifications:
notify: remote: {"true", "false"}
To enable or disable configuration notifications:
notify: configuration: {"true", "false"}
Multiple parameters may be specified. If no parameters are specified, the server returns the current state of all notifications:
209 notify:
transport: {"true", "false"}
slot: {"true", "false"}
remote: {"true", "false"}
configuration: {"true", "false"}
dropped frames: {"true", "false"}
display timecode: {"true", "false"}
timeline position: {"true", "false"}
playrange: {"true", "false"}
cache: {"true", "false"}
dynamic range: {"true", "false"}
slate: {"true", "false"}
Retrieving device information
The "device info" command returns information about the connected deck device:
device info
The server will respond with:
204 device info:←
protocol version: {Version}←
model: {Model Name}←
unique id: {unique alphanumeric identifier}←
slot count: {number of storage slots}←
software version: {software version}←
Retrieving slot information
The "slot info" command returns information about a slot. Without parameters, the command returns information for the currently selected slot:
slot info
If a slot Id is specified, that slot will be queried:
slot info: slot id: {Slot ID}
The server will respond with slot specific information:
202 slot info:←
slot id: {Slot ID}←
    status: {"empty", "mounting", "error", "mounted"}←
volume name: {Volume name}←
recording time: {recording time available in seconds}←
video format: {disk's default video format}←
blocked: {"true", "false"}←
Asynchronous slot information change notification is disabled by default and may be configured with the "notify" command. When enabled, changes in slot state will generate a "502 slot info:" asynchronous message with the same parameters as the "202 slot info:" message.
Retrieving clip information
The "disk list" command returns the information for each playable clip on a given disk. Without parameters, the command returns information for the current active disk:
disk list
If a slot id is specified, the disk in that slot will be queried:
disk list: slot id: {Slot ID}
The server responds with the list of all playable clips on the disk in the format of: Index, name, formats, and duration in timecode:
206 disk list:←
slot id: {Slot ID}←
{clip index}: {name} {file format} {video format} {Duration timecode}←
{clip index}: {name} {file format} {video format} {Duration timecode}←
...
←
Note that the clip index starts from 1.
Retrieving clip count
The "clips count" command returns the number of clips on the current timeline:
clips count ←
The server responds with the number of clips:
214 clips count: ←
clip count: {Count}←
Retrieving timeline information
The "clips get" command returns information for each available clip on the current timeline. Without parameters, the command returns information for all clips on timeline:
clips get
The server responds with a list of clip IDs, names and timecodes:
205 clips info:←
clip count: {Count}←
{Clip ID}: {Name} {Start timecode} {Duration timecode}←
{Clip ID}: {Name} {Start timecode} {Duration timecode}←
...
Retrieving transport information
The "transport info" command returns the state of the transport:
transport info
The server responds with transport specific information:
208 transport info:
status: { "preview", "stopped", "play", "forward", "rewind", "jog", "shuttle", "record"}←
speed: {Play speed between -5000 and 5000 %}←
slot id: {Slot ID or "none"}←
clip id: {Clip ID or "none"}←
single clip: { "true", "false"}←
display timecode: {timecode}←
timecode: {timecode}←
video format: {Video format}←
loop: { "true", "false"}←
timeline: {n}←
input video format: {Video format"}←
dynamic range: { "off", "Rec709", "Rec2020_SDR", "HLG", "ST2084_300", "ST2084_500", "ST2084_800", "ST2084_1000", "ST2084_2000", "ST2084_4000", "ST2048" or "none"}←
The "timecode" value is the timecode within the current timeline for playback or the clip for record. The "display timecode" is the timecode displayed on the front of the deck. The two timecodes will differ in some deck modes.
Asynchronous transport information change notification is disabled by default and may be configured with the "notify" command. When enabled, changes in transport state will generate a "508 transport info:" asynchronous message with the same parameters as the "208 transport info:" message.
Video Formats
The following video formats are currently supported on HyperDeck Studio:
NTSC, PAL, NTSCp, PALp
720p50, 720p5994, 720p60
1080p23976, 1080p24, 1080p25, 1080p2997, 1080p30
1080i50, 1080i5994, 1080i60
HyperDeck Studio Pro and Plus models support these 4k formats:
4Kp23976, 4Kp24, 4Kp25, 4Kp2997, 4Kp30
HyperDeck Studio 4K Pro adds support for the following 4k formats:
4Kp50, 4Kp5994, 4Kp60
Video format support may vary between models and software releases.
File Formats
All HyperDeck models currently support the following file formats:
H.264High_SDI
H.264High
H.264Medium
H.264Low
QuickTimeProResHQ
QuickTimeProRes
QuickTimeProResLT
QuickTimeProResProxy
QuickTimeDNxHD220x
DNxHD220x
QuickTimeDNxHD145
DNxHD145
QuickTimeDNxHD45
DNxHD45
HyperDeck Studio 4K Pro also supports the following file formats:
H.265High_SDI
H.265High
H.265Medium
H.265Low
QuickTimeDNxHR_HQX
DNxHR_HQX 4Kp60
QuickTimeDNxHR_SQ
DNxHR_SQ
QuickTimeDNxHR_LB
DNxHR_LB
Supported file formats may vary between models and software releases.
Querying and updating configuration information
The "configuration" command may be used to query the current configuration of the deck:
configuration
The server returns the configuration of the deck:
211 configuration:
audio input: { "embedded", "XLR", "RCA" }
audio mapping: {n}
video input: { "SDI", "HDMI", "component", "composite" }
file format: {format}
audio codec: { "PCM", "AAC" }
timecode input: { "external", "embedded", "preset", "clip" }
timecode output: { "clip", "timeline" }
timecode preference: { "default", "dropframe", "nondropframe" }
timecode preset: {timecode}
audio input channels: {n}
record trigger: { "none", "recordbit", "timecoderun" }
record prefix: {name}
append timestamp: { "true", "false" }
One or more configuration parameters may be specified to change the configuration of the deck.
To change the current video input:
configuration: video input: {"SDI", "HDMI", "component"}
Valid video inputs may vary between models. To configure the current audio input:
configuration: audio input: {"embedded", "XLR", "RCA"}
Valid audio inputs may vary between models.
To configure the current file format:
configuration: file format: {File format}
Note that changes to the file format may require the deck to reset, which will cause the client connection to be closed. In such case, response code 213 will be returned (instead of 200) before the client connection is closed:
"213 deck rebooting"
Asynchronous configuration information change notification is disabled by default and may be configured with the "notify" command. When enabled, changes in configuration will generate a "511 configuration:" asynchronous message with the same parameters as the "211 configuration:" message.
Selecting active slot and video format
The "slot select" command instructs the deck to switch to a specified slot, or/and to select a specified output video format.
To switch to a specified slot:
slot select: slot id: {slot ID}
To select the output video format:
slot select: video format: {video format}
Either or all slot select parameters may be specified. Note that selecting video format will result in a rescan of the disk to reconstruct the timeline with all clips of the specified video format.
Clearing the current timeline
The "clips clear" command instructs the deck to empty the current timeline:
clips clear
The server responds with
200 ok←
Adding a clip to the current timeline
The "clips add:" command instructs the deck to add a clip to the current timeline:
clips add: name: {"clip name"}
The server responds with
200 ok←
or in case of error
1xx {error description}
Configuring the watchdog
The “watchdog” command instructs the deck to monitor the connected client and terminate the connection if the client is inactive for at least a specified period of time.
To configure the watchdog:
watchdog: period: {period in seconds}
To avoid disconnection, the client must send a command to the server at least every [period] seconds. Note that if the period is set to 0 or less than 0, connection monitoring will be disabled.
ヘルプ
ヘルプライン

natural_image
Circular portrait photo of a smiling man in a dark shirt against a gray background (no text or symbols)Chère cliente, cher client,
Supports de stockage 174
Carte SD 174
SSD 176
Disque externe 177
Formater les supports 179
natural_image
Front view of a black audio workstation with multiple audio equipment panels and control knobs (no readable text or symbols)HyperDeck Studio HD Pro et HyperDeck Studio 4K Pro

natural_image
Black audio recording device with playback controls and a digital display showing 00:00:36:11 (no readable text or symbols on device body)
natural_image
Black audio recording device with control buttons and a digital display showing time, timestamp, and preview (no readable text or symbols)HyperDeck Studio HD Mini HyperDeck Studio HD Plus
natural_image
Illustration of hands interacting with a device panel showing playback controls and a digital display (no text or symbols visible)Brancher un support
natural_image
Diagram of a rack-mounted server unit with ports and connectors, showing an orange arrow pointing to a component (no text or symbols present)Timing de référence
Barre du support
Configurer Open Broadcaster
natural_image
Front view illustration of a server rack unit with ports and control panel (no text or symbols)natural_image
Front view of a computer rack with indicator lights and ports (no text or symbols)| Command Reply No Remote Notes | |||||
| 0 - System Control | |||||
| 0x00 0x11 DeviceTypeRequest | NTSC: 0xF0E0PAL: 0xF1E024P: 0xF2E0 | Enabled | |||
| 1 - Slave Response | |||||
| 0x20 | 0x00 | Stop | Acknowledge | Disabled | |
| 0x20 | 0x01 | Play | Acknowledge | Disabled | |
| 0x20 | 0x02 | Record | Acknowledge | Disabled | |
| 0x20 | 0x04 | StandbyOff | Acknowledge | Disabled | |
| 0x20 | 0x05 | StandbyOn | Acknowledge | Disabled | |
| 0x20 | 0x0F | Eject | Acknowledge | Disabled | |
| 0x20 | 0x10 | FastFwd | Acknowledge | Disabled | |
| 0x21 | 0x11 | JogFwd1 | Acknowledge | Disabled | |
| 0x22 | 0x11 | JogFwd2 | Acknowledge | Disabled | Treated as N=1;Same as JogFwd1 |
| 0x21 | 0x12 | VarFwd1 | Acknowledge | Disabled | Uses ShuttleFwd1 |
| 0x22 | 0x12 | VarFwd2 | Acknowledge | Disabled | Treated as N=1;Same as VarFwd1 |
| 0x21 | 0x13 | ShuttleFwd1 | Acknowledge | Disabled | |
| 0x22 | 0x13 | ShuttleFwd2 | Acknowledge | Disabled | Treated as N=1;Same as ShuttleFwd1 |
| 0x20 | 0x20 | Rewind | Acknowledge | Disabled | |
| 0x21 | 0x21 | JogRev1 | Acknowledge | Disabled | |
| 0x22 | 0x21 | JogRev2 | Acknowledge | Disabled | Treated as N=1;Same as JogRev1 |
| 0x21 | 0x22 | VarRev1 | Acknowledge | Disabled | Uses ShuttleRev1 |
Command Reply No Remote Notes
| 0x22 0x22 VarRev2 Acknowledge Disabled | Treated as N=1;Same as VarRev1 | ||||
| 0x21 | 0x23 | ShuttleRev1 | Acknowledge | Disabled | |
| 0x22 | 0x23 | ShuttleRev2 | Acknowledge | Disabled | Treated as N=1;Same as ShuttleRev1 |
| 0x20 | 0x30 | Preroll | Acknowledge | Disabled | |
| 0x24 0x31 CueData Acknowledge Disabled | |||||
| 0x20 | 0x34 | SyncPlay | Acknowledge | Disabled | |
| 0x20 | 0x40 | Preview | Acknowledge | Disabled | Status bits are set |
| 0x20 | 0x41 | Review | Acknowledge | Disabled | Status bits are set |
| 0x20 | 0x43 | OutpointPreview | Acknowledge | Disabled | |
| 0x22 | 0x5C | DMCSetFwd | Acknowledge | Disabled | |
| 0x22 | 0x5D | DMCSetRev | Acknowledge | Disabled | |
| 0x20 | 0x60 | FullEEOff | Acknowledge | Disabled | |
| 0x20 | 0x61 | FullEEOn | Acknowledge | Disabled | |
| 0x20 | 0x63 | SelectEEOn | Acknowledge | Disabled | |
| 4 - Preset/Select Control | |||||
| 0x40 | 0x10 | InEntry | Acknowledge | Disabled | |
| 0x40 | 0x11 | OutEntry | Acknowledge | Disabled | |
| 0x44 | 0x14 | InDataPreset | Acknowledge | Disabled | |
| 0x44 | 0x15 | OutDataPreset | Acknowledge | Disabled | |
| 0x40 | 0x18 | InShift+ | Acknowledge | Disabled | |
| 0x40 | 0x19 | InShift- | Acknowledge | Disabled | |
| 0x40 | 0x1A | OutShift+ | Acknowledge | Disabled | |
| 0x40 | 0x1B | OutShift- | Acknowledge | Disabled | |
| 0x40 | 0x20 | InReset | Acknowledge | Disabled | |
| 0x40 | 0x21 | OutReset | Acknowledge | Disabled | |
| 0x40 | 0x22 | AlnReset | Acknowledge | Disabled | |
| 0x40 | 0x23 | AOutReset | Acknowledge | Disabled | |
| 0x44 | 0x31 | PrerollPreset | Acknowledge | Disabled | |
| 0x40 | 0x40 | AutoModeOff | Acknowledge | Disabled | ignored, Status bit remembered |
| 0x40 | 0x41 | AutoModeOn | Acknowledge | Disabled | ignored, Status bit remembered |
| 0x41 | 0x37 | InputCheck | Acknowledge | Disabled | |
Command Reply No Remote Notes
6 - Sense Request
| 0x61 0x0A TimeCodeGenSense — — | |||||
| 0x61 0x0C CurrentTimeSense — — | |||||
| 0x60 0x10 InDataSense InData Enabled | |||||
| 0x60 | 0x11 | OutDataSense | OutData | Enabled | |
| 0x60 | 0x12 | AlnDataSense | AlnData | Enabled | |
| 0x60 | 0x13 | AOutDataSense | AOutData | Enabled | |
| 0x61 | 0x20 | StatusSense | StatusData | Enabled | |
| 0x60 | 0x2B | RemainTimeSense | RemainTimeData | Enabled | |
| 0x60 | 0x2E | SpeedSense | SpeedData | Enabled | |
| 0x60 | 0x31 | PrerollTimeSense | PreRollTimeData | Enabled | |
| 0x60 | 0x36 | TimerModeSense | TimerModeData | Enabled | |
| 0x60 | 0x3E | RecordInhibitSense | RecordInhibitStatus | Enabled | |
7 - Sense Reply
| 0x78 | 0x00 | Timer1Data | — | — | Current Time and 00:00:00:00 |
| 0x78 | 0x04 | LTCUserBitsTimeData | — | — | Current Time and 00:00:00:00 |
| 0x78 | 0x06 | VITCUserBitsTimeData | — | — | Current Time and 00:00:00:00 |
| 0x74 | 0x06 | VITCTimeData | — | — | Current Time |
| 0x74 | 0x07 | UserBitsVITCTimeData | — | — | 00:00:00:00 |
| 0x74 | 0x08 | GenTCDATA | — | — | Current Time |
| 0x78 | 0x08 | GenTCUBData | — | — | Current Time and 00:00:00:00 |
| 0x74 | 0x09 | GenUBData | — | — | 00:00:00:00 |
| 0x74 0x10 InData | — — | ||||
| 0x74 | 0x11 | OutData | — | — | |
| 0x74 | 0x12 | AlnData | — | — | |
| 0x74 | 0x13 | AOutData | — | — | |
| 0x74 | 0x14 | CorrectedLTCTimeData | — | — | Current Time |
| 0x70 | 0x20 | StatusData | — | — | Please see “Status Bits” sheet: Limited to 9 bytes of status, silently truncated |
| 0x76 | 0x2B | RemainTimeData | — | — | |
| 0x71 | 0x2E | SpeedData | — | — | |
| 0x74 | 0x31 | PrerollTimeData | — | — | |
| 0x71 | 0x36 | TimerModeData | — | — | Returns 0 (TimeCode) |
| 0x72 | 0x3E | RecordInhibitStatus | — | — | |
Command Reply No Remote Notes
A - Advanced Media Protocol
| 0xA1 | 0x01 | AutoSkip | Acknowledge | Disabled | 8-bit signed number of clips to skip from current clip |
| 0xAX | 0x15 | ListNextID | IDListing | Enabled | when x = 0 single clip request when x = 1, # clips can be specified in the send data |
| 0x20 | 0x29 | ClearPlaylist | Acknowledge | Disabled | |
| 0x41 | 0x42 | SetPlaybackLoop | Acknowledge | Disabled | Bit 0 loop mode enable, 0=false 1=trueBit 1 is single clip/timeline0=single clip1=timeline |
| 0x41 | 0x44 | SetStopMode | Acknowledge | Disabled | 0 = Off1 = Freeze on last frame2 = Freeze on next clip3 = Show black |
| 0x4f | 0x16 | AppendPreset | Acknowledge | Disabled | 2 Bytes for the length N of the clip nameN Bytes for each character of the clip name4 Byte in point timecode (format is FFSSMMHH)4 Byte out point timecode (format is FFSSMMHH) |
Blackmagic Extensions
| 0x82 | 0x02 | BMDSeekToTimelinePosition | Acknowledge | Disabled | 16-bit little endian fractional position [0..65535] |
| 0x81 | 0x03 | BMDSeekRelativeClip | Acknowledge | Disabled | One-byte signed integer, which is the number of clips to skip (negative for backwards). |
| Variables | |
| Cassette Out | Set if no SSD is present |
| Local | Set if Remote is disabled (local control) |
| Standby | Set if a disk is available |
| Direction | Clear if playback is forwarding, set if playback is reversing |
| Still | Set if playback is paused, or if in input preview mode |
| Auto Mode | Set if in Auto Mode |
| Select EE, Full EE | Set if in input preview mode |
| Lamp Still/Fwd/Rev | Set according to playback speed and direction |
| Near EOT | Set if total space left on available SSDs is less than 3 minutes |
| EOT | Set if total space left on available SSDs is less than 30 seconds |
| Others | |
| Cue Complete (byte 2, bit 0) | Always 1: Cue requests are always instantaneous |
| HyperDeck Serial RS-422 Protocol | ||
| Protocol | Based on Sony 9-pin protocol | |
| Interface | Baud rate 38.4 Kbps | |
| 1 start bit | ||
| 8 data bits | ||
| 1 stop bit | ||
| 1 parity bit | ||
| Odd parity | ||
natural_image
Front view of a 12G3D1 computer interface panel showing ports, buttons, and memory slots (no text or symbols beyond branding)| Command Command Description | |
| help or ? Provides help text on all commands and parameters | |
| commands return commands in XML format | |
| device info return device information | |
| disk list query clip list on active disk | |
| disk list: slot id: {n} query clip list on disk in slot {n} | |
| quit disconnect ethernet control | |
| ping check device is responding | |
| preview: enable: {true/false} switch to preview or output | |
| play play from current timecode | |
| play: speed: {-5000 to 5000} play at specific speed | |
| play: loop: {true/false} play in loops or stop-at-end | |
| play: single clip: {true/false} play current clip or all clips | |
| playrange query playrange setting | |
| playrange set: clip id: {n} | set play range to play clip {n} only |
| playrange set: clip id: {n} count: {m} | set play range to {m} clips starting from clip {n} |
| playrange set: in: {inT} out: {outT} | set play range to play between:- timecode {inT} and timecode {outT} |
| playrange set: timeline in: {in} timeline out:{out} | set play range in units of frames between:- timeline position {in} and position {out} clear/reset play range setting |
| playrange clear | clear/reset play range setting |
| play on startup | query unit play on startup state |
| play on startup: enable: {true/false} | enable or disable play on startup |
| play on startup: single clip: {true/false} | play single clip or all clips on startup |
| play option query play options | |
| play option: stop mode:{lastframe/nextframe/black} | set output frame when playback stops |
| record | record from current input |
| record: name: {name} | record named clip |
| record spill | spill current recording to next slot |
Command Command Description
| record: spill: slot id: {n} | spill current recording to specified slotuse current id to spill to same slot |
| stop stop playback or recording | |
| clips count query number of clips on timeline | |
| clips get query all timeline clips | |
| clips get: clip id: {n} query a timeline clip info | |
| clips get: clip id: {n} count: {m} query m clips starting from n | |
| clips get: version: {1/2} | query clip info using specified output version:version 1: is: name startT durationversion 2: id: startT duration inT outT name |
| clips add: name: {name} append a clip to timeline | |
| clips add: clip id: {n} name: {name} insert clip before existing clip {n} | |
| clips add: in: {inT} out: {outT} name: {name} append the {inT} to {outT} portion of clip | |
| clips remove: clip id: {n} | remove clip {n} from the timeline(invalidates clip ids following clip {n}) |
| clips clear empty timeline clip list | |
| transport info query current activity | |
| slot info query active slot | |
| slot info: slot id: {n} query slot {n} | |
| slot select: slot id: {n} switch to specified slot | |
| slot select: video format: {format} | load clips of specified format |
| slot unblock | unblock active slot |
| slot unblock: slot id: {n} | unblock slot {n} |
| cache info | query cache status |
| dynamic range | query dynamic range settings |
| dynamic range: playback override:{off/Rec709/Rec2020_SDR/HLG/ST2084_300/ST2084_500/ST2084_800/ST2084_1000/ST2084_2000/ST2084_4000/ST2084 | set playback dynamic range override |
| dynamic range: record override:{off/Rec709/Rec2020_SDR/HLG/ST2084_300/ST2084_500/ST2084_800/ST2084_1000/ST2084_2000/ST2084_4000/ST2048} | set record dynamic range override |
| notify | query notification status |
| notify: remote: {true/false} | set remote notifications |
| notify: transport: {true/false} | set transport notifications |
| notify: slot: {true/false} | set slot notifications |
| notify: configuration: {true/false} | set configuration notifications |
| notify: dropped frames: {true/false} | set dropped frames notifications |
| notify: display timecode: {true/false} | set display timecode notifications |
Command Command Description
| notify: timeline position: {true/false} set playback timeline position notifications | |
| notify: playrange: {true/false} set playrange notifications | |
| notify: cache: {true/false} set cache notifications | |
| notify: dynamic range: {true/false} set dynamic range settings notifications | |
| notify: slate: {true/false} set digital slate notifications | |
| goto: clip id: {start/end} goto first clip or last clip | |
| goto: clip id: {n} goto clip id {n} | |
| goto: clip id: +{n} go forward {n} clips | |
| goto: clip id: -(n) go backward {n} clips | |
| goto: clip: {n} goto frame position {n} within current clip | |
| goto: clip: +{n} go forward {n} frames within current clip | |
| goto: clip: -(n) go backward {n} frames within current clip | |
| goto: clip: {start/end} | goto start or end of clip |
| goto: timeline: {n} | goto frame position {n} within timeline |
| goto: timeline: +{n} | o forward {n} frames within timeline |
| goto: timeline: -(n) | go backward {n} frames within timeline |
| goto: timeline: {start/end} | goto start or end of timeline |
| goto: timecode: {timecode} | goto specified timecode |
| goto: timecode: +{timecode} | go forward {timecode} duration |
| goto: timecode: -(timecode} | go backward {timecode} duration |
| goto: slot id: {n} | goto slot id {n} |
| jog: timecode: {timecode} | jog to timecode |
| jog: timecode: +{timecode} | jog forward {timecode} duration |
| jog: timecode: -(timecode} | jog backward {timecode} duration |
| shuttle: speed: [-5000 to 5000] | shuttle with speed |
| remote | query unit remote control state |
| remote: enable: {true/false} | enable or disable remote control |
| remote: override: {true/false} | session override remote control |
| configuration | query configuration settings |
| configuration: video input: SDI | switch to SDI input |
| configuration: video input: HDMI | switch to HDMI input |
| configuration: video input: component | switch to component input |
| configuration: audio input: embedded | capture embedded audio |
| configuration: audio input: XLR | capture XLR audio |
| configuration: audio input: RCA | capture RCA audio |
| configuration: file format: {format} | switch to specific file format |
| configuration: audio codec: PCM | switch to PCM audio |
| configuration: audio codec: AAC | switch to AAC audio |
Command Command Description
| configuration: timecode input:{external/embedded/preset/clip} | change the timecode input |
| configuration: timecode output:{clip/timeline/internal} | change the timecode output |
| configuration: timecode preference:{default/dropframe/nondropframe} | whether or not to use drop frame timecodes when not otherwise specified |
| configuration: timecode preset:{timecode} | set the timecode preset |
| configuration: audio input channels: {n} set the number of audio channels recorded to {n} | |
| configuration: record trigger:{none/recordbit/timecoderun} | change the record trigger |
| configuration: record prefix: {name} set the record prefix name (supports UTF-8 name) | |
| configuration: append timestamp:{true/false} | append timestamp to recorded filename |
| configuration: xlr input id: {n} xlr type:{line/mic} | configure xlr input typemultiple xlr inputs can be configured in a single command |
| configuration: genlock input resync:{true/false} | enable or disable genlock input resync |
| uptime return time since last boot | |
| format: prepare: {format} prepare a disk formatting operation to filesystem {format} | |
| format: confirm: {token} perform a pre-prepared formatting operation using token | |
| identify: enable: {true/false} identify the device | |
| watchdog: period: {period in seconds} client | connection timeout |
| reboot reboot device | |
| slate clips slate clips information | |
| slate project slate project information | |
| slate project:←camera: {index}← | set camera index e.g. A |
Command Combinations
You can combine the parameters into a single command, for example:
play: speed: 200 loop: true single clip: true
Or for configuration:
configuration: video input: SDI audio input: XLR
Or to switch to the second disk, but only play NTSC clips:
slot select: slot id: 2 video format: NTSC
Using XML
While you can use the Terminal to talk to HyperDeck, if you are writing software, you can use XML to confirm the existence of a specific command based on the firmware of the HyperDeck you are communicating with. This helps your software user interface adjust to the capabilities of the specific HyperDeck model and software version.
Protocol Details
Connection
The HyperDeck Ethernet server listens on TCP port 9993.
Basic syntax
The HyperDeck protocol is a line oriented text protocol. Lines from the server will be separated by an ascii CR LF sequence. Messages from the client may be separated by LF or CR LF.
New lines are represented in this document as a "←" symbol.
Single line command syntax
Command parameters are usually optional. A command with no parameters is terminated with a new line:
{Command name}
If parameters are specified, the command name is followed by a colon, then pairs of parameter names and values. Each parameter name is terminated with a colon character:
{Command name}: {Parameter}: {Value} {Parameter}: {Value} ...
Multiline command syntax
The HyperDeck protocol also supports an equivalent multiline syntax where each parameter-value pair is entered on a new line. E.g.
{Command name}:←
{Pa ra m e t e r}: { Va lu e}←
{Pa ra m e t e r}: { Va lu e}←
Response syntax
Simple responses from the server consist of a three digit response code and descriptive text terminated by a new line:
{Response code} {Response text}
If a response carries parameters, the response text is terminated with a colon, and parameter name and value pairs follow on subsequent lines until a blank line is returned:
{Response code} {Response text}:←
{Pa ra m e t e r}: { Va lu e}←
{Pa ra m e t e r}: { Va lu e}←
...
←
Successful response codes
A simple acknowledgement of a command is indicated with a response code of 200:
200 ok←
Other successful responses carry parameters and are indicated with response codes in the range of 201 to 299.
Failure response codes
Failure responses to commands are indicated with response codes in the range of 100 to 199:
100 syntax error
101 unsupported parameter
102 invalid value
103 unsupported
104 disk full
105 no disk
106 disk error
107 timeline empty
108 internal error
109 out of range
110 no input
111 remote control disabled
112 clip not found
120 connection rejected
150 invalid state
151 invalid codec
160 invalid format
161 invalid token
162 format not prepared
163 parameterized single line command not supported
Asynchronous response codes
The server may return asynchronous messages at any time. These responses are indicated with response codes in the range of 500 to 599:
5xx {Response Text}:←
{Pa ra m e t e r}: {Va lu e}←
{Pa ra m e t e r}: {Va lu e}←
Connection response
On connection, an asynchronous message will be delivered:
500 connection info:←
protocol version: {Version}←
model: {Model Name}←
Connection rejection
Only one client may connect to the server at a time. If other clients attempt to connect concurrently, they will receive an error and be disconnected:
120 connection rejected
Timecode syntax
Timecodes are expressed as non-drop-frame timecode in the format:
HH:MM:SS:FF
Handling of deck "remote" state
The “remote” command may be used to enable or disable the remote control of the deck. Any attempt to change the deck state over ethernet while remote access is disabled will generate an error:
111 remote control disabled
To enable or disable remote control:
remote: enable: {"true", "false"}
The current remote control state may be overridden allowing remote access over ethernet irrespective of the current remote control state:
remote: override: {"true", "false"}
The override state is only valid for the currently connected ethernet client and only while the connection remains open.
The “remote” command may be used to query the remote control state of the deck by specifying no parameters:
remote
The deck will return the current remote control state:
210 remote info:←
enabled: {"true", "false"}
override: {"true", "false"}
←
Asynchronous remote control information change notification is disabled by default and may be configured with the "notify" command. When enabled, changes in remote state will generate a "510 remote info:" asynchronous message with the same parameters as the "210 remote info:" message.
Closing connection
The "quit" command instructs the server to cleanly shut down the connection:
quit
Checking connection status
The "ping" command has no function other than to determine if the server is responding:
ping←
Getting help
The "help" or "?" commands return human readable help text describing all available commands and parameters:
help
Or:
?←
The server will respond with a list of all supported commands:
201 help:
{Help Tex t}
{Help Tex t}
Switching to preview mode
The "preview" command instructs the deck to switch between preview mode and output mode:
preview: enable: {"true", "false"}
Playback will be stopped when the deck is switched to preview mode. Capturing will be stopped when the deck is switched to output mode.
Controlling device playback
The "play" command instructs the deck to start playing:
play←
The play command accepts a number of parameters which may be used together in most combinations.
By default, the deck will play all remaining clips on the timeline then stop.
The "single clip" parameter may be used to override this behavior:
play: single clip: {"true", "false"}
By default, the deck will play at normal (100%) speed. An alternate speed may be specified in percentage between -1600 and 1600:
play: speed: {% normal speed}
By default, the deck will stop playing when it reaches to the end of the timeline. The "loop" parameter may be used to override this behavior:
play: loop: {"true", "false"}
The “playrange” command instructs the deck to play all the clips. To override this behavior; and select a particular clip:
playrange set: clip id: {Clip ID}
To only play a certain timecode range:
playrange set: in: {in timecode} out: {out timecode}
To clear a set playrange and return to the default value:
playrange clear
The “play on startup command” instructs the deck on what action to take on startup. By default, the deck will not play. Use the “enable” command to start playback after each power up.
play on startup: enable {"true", "false"}
By default, the unit will play back all clips on startup. Use the "single clip" command to override.
play on startup: single clip: {"true", "false"}
Stopping deck operation
The "stop" command instructs the deck to stop the current playback or capture:
stop←
Changing timeline position
The "goto" command instructs the deck to switch to playback mode and change its position within the timeline.
To go to the start of a specific clip:
goto: clip id: {Clip ID}
To move forward/back {count} clips from the current clip on the current timeline:
goto: clip id: +/- {count}
Note that if the resultant clip id goes beyond the first or last clip on timeline, it will be clamp at the first or last clip.
To go to the start or end of the current clip:
goto: clip: {"start", "end"}
To go to the start of the first clip or the end of the last clip:
goto: timeline: { "start", "end"}
To go to a specified timecode:
goto: timecode: {timecode}
To move forward or back a specified duration in timecode:
goto: timecode: {“+”, “-”} {duration in timecode}
To specify between slot 1 and slot 2:
goto: slot id: {Slot ID}
Note that only one parameter/value pair is allowed for each goto command.
Enumerating supported commands and parameters
The "commands" command returns the supported commands:
commands
The command list is returned in a computer readable XML format:
212 commands:
<commands>
<command name="..."><parameter name="..."/>...</command>
<command name="..."><parameter name="..."/>...</command>
...
</commands>
More XML tokens and parameters may be added in later releases.
Controlling asynchronous notifications
The "notify" command may be used to enable or disable asynchronous notifications from the server.
To enable or disable transport notifications:
notify: transport: { "true", "false" }
To enable or disable slot notifications:
notify: slot: {"true", "false"}
To enable or disable remote notifications:
notify: remote: {"true", "false"}
To enable or disable configuration notifications:
notify: configuration: {"true", "false"}
Multiple parameters may be specified. If no parameters are specified, the server returns the current state of all notifications:
209 notify:←
transport: { "true", "false" }←
slot: { "true", "false" }←
remote: { "true", "false" }←
configuration: { "true", "false" }←
dropped frames: { "true", "false" }←
display timecode: { "true", "false" }←
timeline position: { "true", "false" }←
playrange: { "true", "false" }←
cache: { "true", "false" }←
dynamic range: { "true", "false" }←
slate: { "true", "false" }←
Retrieving device information
The "device info" command returns information about the connected deck device:
device info
The server will respond with:
204 device info:←
protocol version: {Version}←
model: {Model Name}←
unique id: {unique alphanumeric identifier}←
slot count: {number of storage slots}←
software version: {software version}←
Retrieving slot information
The "slot info" command returns information about a slot. Without parameters, the command returns information for the currently selected slot:
slot info
If a slot id is specified, that slot will be queried:
slot info: slot id: {Slot ID}
The server will respond with slot specific information:
202 slot info:←
slot id: {Slot ID}←
    status: {"empty", "mounting", "error", "mounted"}←
volume name: {Volume name}←
recording time: {recording time available in seconds}←
video format: {disk's default video format}←
blocked: {"true", "false"}←
Asynchronous slot information change notification is disabled by default and may be configured with the "notify" command. When enabled, changes in slot state will generate a "502 slot info:" asynchronous message with the same parameters as the "202 slot info:" message.
Retrieving clip information
The "disk list" command returns the information for each playable clip on a given disk. Without parameters, the command returns information for the current active disk:
disk list
If a slot id is specified, the disk in that slot will be queried:
disk list: slot id: {Slot ID}
The server responds with the list of all playable clips on the disk in the format of: Index, name, formats, and duration in timecode:
206 disk list:←
slot id: {Slot ID}←
{clip index}: {name} {file format} {video format} {Duration timecode}←
{clip index}: {name} {file format} {video format} {Duration timecode}←
...
←
Note that the clip index starts from 1.
Retrieving clip count
The "clips count" command returns the number of clips on the current timeline:
clips count ←
The server responds with the number of clips:
214 clips count: ←
clip count: {Count}←
Retrieving timeline information
The "clips get" command returns information for each available clip on the current timeline. Without parameters, the command returns information for all clips on timeline:
clips get←
The server responds with a list of clip IDs, names and timecodes:
205 clips info:←
clip count: {Count}←
{Clip ID}: {Name} {Start timecode} {Duration timecode}←
{Clip ID}: {Name} {Start timecode} {Duration timecode}←
...
Retrieving transport Information
The "transport info" command returns the state of the transport:
transport info ←
The server responds with transport specific information:
208 transport info:
status: { "preview", "stopped", "play", "forward", "rewind", "jog", "shuttle","record"}←
speed: {Play speed between -5000 and 5000 %}←
slot id: {Slot ID or "none"}←
clip id: {Clip ID or "none"}←
single clip: { "true", "false"}←
display timecode: {timecode}←
timecode: {timecode}←
video format: {Video format}←
loop: { "true", "false"}←
timeline: {n}←
input video format: {Video format"}←
dynamic range: { "off", "Rec709", "Rec2020_SDR", "HLG", "ST2084_300", "ST2084_500", "ST2084_800", "ST2084_1000", "ST2084_2000", "ST2084_4000", "ST2048" or "none"}←
The "timecode" value is the timecode within the current timeline for playback or the clip for record. The "display timecode" is the timecode displayed on the front of the deck. The two timecodes will differ in some deck modes.
Asynchronous transport information change notification is disabled by default and may be configured with the "notify" command. When enabled, changes in transport state will generate a "508 transport info:" asynchronous message with the same parameters as the "208 transport info:" message.
Video Formats
The following video formats are currently supported on HyperDeck Studio:
NTSC, PAL, NTSCp, PALp
720p50, 720p5994, 720p60
1080p23976, 1080p24, 1080p25, 1080p2997, 1080p30
1080i50, 1080i5994, 1080i60
HyperDeck Studio Pro and Plus models support these 4k formats:
4Kp23976, 4Kp24, 4Kp25, 4Kp2997, 4Kp30
HyperDeck Studio 4K Pro adds support for the following 4k formats:
4Kp50, 4Kp5994, 4Kp60
Video format support may vary between models and software releases.
File Formats
All HyperDeck models currently support the following file formats:
H.264High_SDI
H.264High
H.264Medium
H.264Low
QuickTimeProResHQ
QuickTimeProRes
QuickTimeProResLT
QuickTimeProResProxy
QuickTimeDNxHD220x
DNxHD220x
QuickTimeDNxHD145
DNxHD145
QuickTimeDNxHD45
DNxHD45
HyperDeck Studio 4K Pro also supports the following file formats:
H.265High_SDI
H.265High
H.265Medium
H.265Low
QuickTimeDNxHR_HQX
DNxHR_HQX 4Kp60
QuickTimeDNxHR_SQ
DNxHR_SQ
QuickTimeDNxHR_LB
DNxHR_LB
Supported file formats may vary between models and software releases.
Querying and updating configuration information
The "configuration" command may be used to query the current configuration of the deck:
configuration
The server returns the configuration of the deck:
211 configuration:
audio input: { "embedded", "XLR", "RCA" }←
audio mapping: {n}←
video input: { "SDI", "HDMI", "component", "composite" }←
file format: {format}←
audio codec: { "PCM", "AAC" }←
timecode input: { "external", "embedded", "preset", "clip" }←
timecode output: { "clip", "timeline" }←
timecode preference: { "default", "dropframe", "nondropframe" }←
timecode preset: {timecode}←
audio input channels: {n}←
record trigger: { "none", "recordbit", "timecoderun" }←
record prefix: {name}←
append timestamp: { "true", "false" }←
One or more configuration parameters may be specified to change the configuration of the deck.
To change the current video input:
configuration: video input: {"SDI", "HDMI", "component"}
Valid video inputs may vary between models. To configure the current audio input:
configuration: audio input: {"embedded", "XLR", "RCA"}
Valid audio inputs may vary between models.
To configure the current file format:
configuration: file format: {File format}
Note that changes to the file format may require the deck to reset, which will cause the client connection to be closed. In such case, response code 213 will be returned (instead of 200) before the client connection is closed:
"213 deck rebooting"
Asynchronous configuration information change notification is disabled by default and may be configured with the "notify" command. When enabled, changes in configuration will generate a "511 configuration:" asynchronous message with the same parameters as the "211 configuration:" message.
Selecting active slot and video format
The "slot select" command instructs the deck to switch to a specified slot, or/and to select a specified output video format.
To switch to a specified slot:
slot select: slot id: {slot ID}
To select the output video format:
slot select: video format: {video format}
Either or all slot select parameters may be specified. Note that selecting video format will result in a rescan of the disk to reconstruct the timeline with all clips of the specified video format.
Clearing the current timeline
The "clips clear" command instructs the deck to empty the current timeline:
clips clear
The server responds with
200 ok←
Adding a clip to the current timeline
The "clips add:" command instructs the deck to add a clip to the current timeline:
clips add: name: {"clip name"}
The server responds with
200 ok←
or in case of error
1xx {error description}
Configuring the watchdog
The “watchdog” command instructs the deck to monitor the connected client and terminate the connection if the client is inactive for at least a specified period of time.
To configure the watchdog:
watchdog: period: {period in seconds}
To avoid disconnection, the client must send a command to the server at least every {period} seconds. Note that if the period is set to 0 or less than 0, connection monitoring will be disabled.
Assistance

natural_image
Circular portrait photo of a smiling man in a dark shirt against a gray background (no text or symbols)Willkommen!
CEO Blackmagic Design
Inhaltsverzeichnis
natural_image
Front view of a black audio workstation with multiple video player channels and control knobs (no readable text or symbols)natural_image
Black audio recording device with playback controls and a digital display showing time (no readable text or symbols)
natural_image
Black audio recording device with control panel and display screen (no readable text or symbols)HyperDeck Studio Mini HyperDeck Studio HD Plus
natural_image
Illustration of hands interacting with a device panel and control buttons (no text or symbols visible)natural_image
Diagram of a server rack with ports and an orange arrow indicating a specific component (no text or symbols present)Menü „Remote“
Datenträgerbalken
natural_image
Illustration of a server rack unit with ports and control panel (no text or symbols)| Receive(−) | Receive(+) | Transmit(−) | Transmit(+) | GroundPins |
| 2 7 8 3 | 1, 4, 6, 9 |
natural_image
Front view of a computer rack with indicator lights and ports (no text or symbols)| Command Reply No Remote Notes | |||||
| 0 - System Control | |||||
| 0x00 0x11 DeviceTypeRequest | NTSC: 0xF0E0PAL: 0xF1E024P: 0xF2E0 | Enabled | |||
| 1 - Slave Response | |||||
| 0x20 | 0x00 | Stop | Acknowledge | Disabled | |
| 0x20 | 0x01 | Play | Acknowledge | Disabled | |
| 0x20 | 0x02 | Record | Acknowledge | Disabled | |
| 0x20 | 0x04 | StandbyOff | Acknowledge | Disabled | |
| 0x20 | 0x05 | StandbyOn | Acknowledge | Disabled | |
| 0x20 | 0x0F | Eject | Acknowledge | Disabled | |
| 0x20 | 0x10 | FastFwd | Acknowledge | Disabled | |
| 0x21 | 0x11 | JogFwd1 | Acknowledge | Disabled | |
| 0x22 | 0x11 | JogFwd2 | Acknowledge | Disabled | Treated as N=1;Same as JogFwd1 |
| 0x21 | 0x12 | VarFwd1 | Acknowledge | Disabled | Uses ShuttleFwd1 |
| 0x22 | 0x12 | VarFwd2 | Acknowledge | Disabled | Treated as N=1;Same as VarFwd1 |
| 0x21 | 0x13 | ShuttleFwd1 | Acknowledge | Disabled | |
| 0x22 | 0x13 | ShuttleFwd2 | Acknowledge | Disabled | Treated as N=1;Same as ShuttleFwd1 |
| 0x20 | 0x20 | Rewind | Acknowledge | Disabled | |
| 0x21 | 0x21 | JogRev1 | Acknowledge | Disabled | |
| 0x22 | 0x21 | JogRev2 | Acknowledge | Disabled | Treated as N=1;Same as JogRev1 |
| 0x21 | 0x22 | VarRev1 | Acknowledge | Disabled | Uses ShuttleRev1 |
Command Reply No Remote Notes
| 0x22 0x22 VarRev2 Acknowledge Disabled | Treated as N=1;Same as VarRev1 | ||||
| 0x21 | 0x23 | ShuttleRev1 | Acknowledge | Disabled | |
| 0x22 | 0x23 | ShuttleRev2 | Acknowledge | Disabled | Treated as N=1;Same as ShuttleRev1 |
| 0x20 | 0x30 | Preroll | Acknowledge | Disabled | |
| 0x24 0x31 CueData Acknowledge Disabled | |||||
| 0x20 | 0x34 | SyncPlay | Acknowledge | Disabled | |
| 0x20 | 0x40 | Preview | Acknowledge | Disabled | Status bits are set |
| 0x20 | 0x41 | Review | Acknowledge | Disabled | Status bits are set |
| 0x20 | 0x43 | OutpointPreview | Acknowledge | Disabled | |
| 0x22 | 0x5C | DMCSetFwd | Acknowledge | Disabled | |
| 0x22 | 0x5D | DMCSetRev | Acknowledge | Disabled | |
| 0x20 | 0x60 | FullEEOff | Acknowledge | Disabled | |
| 0x20 | 0x61 | FullEEOn | Acknowledge | Disabled | |
| 0x20 | 0x63 | SelectEEOn | Acknowledge | Disabled | |
| 4 - Preset/Select Control | |||||
| 0x40 | 0x10 | InEntry | Acknowledge | Disabled | |
| 0x40 | 0x11 | OutEntry | Acknowledge | Disabled | |
| 0x44 | 0x14 | InDataPreset | Acknowledge | Disabled | |
| 0x44 | 0x15 | OutDataPreset | Acknowledge | Disabled | |
| 0x40 | 0x18 | InShift+ | Acknowledge | Disabled | |
| 0x40 | 0x19 | InShift- | Acknowledge | Disabled | |
| 0x40 | 0x1A | OutShift+ | Acknowledge | Disabled | |
| 0x40 | 0x1B | OutShift- | Acknowledge | Disabled | |
| 0x40 | 0x20 | InReset | Acknowledge | Disabled | |
| 0x40 | 0x21 | OutReset | Acknowledge | Disabled | |
| 0x40 | 0x22 | AlnReset | Acknowledge | Disabled | |
| 0x40 | 0x23 | AOutReset | Acknowledge | Disabled | |
| 0x44 | 0x31 | PrerollPreset | Acknowledge | Disabled | |
| 0x40 | 0x40 | AutoModeOff | Acknowledge | Disabled | ignored, Status bit remembered |
| 0x40 | 0x41 | AutoModeOn | Acknowledge | Disabled | ignored, Status bit remembered |
| 0x41 | 0x37 | InputCheck | Acknowledge | Disabled | |
Command Reply No Remote Notes
6 - Sense Request
| 0x61 0x0A TimeCodeGenSense — — | |||||
| 0x61 0x0C CurrentTimeSense — — | |||||
| 0x60 0x10 InDataSense InData Enabled | |||||
| 0x60 | 0x11 | OutDataSense | OutData | Enabled | |
| 0x60 | 0x12 | AlnDataSense | AlnData | Enabled | |
| 0x60 | 0x13 | AOutDataSense | AOutData | Enabled | |
| 0x61 | 0x20 | StatusSense | StatusData | Enabled | |
| 0x60 | 0x2B | RemainTimeSense | RemainTimeData | Enabled | |
| 0x60 | 0x2E | SpeedSense | SpeedData | Enabled | |
| 0x60 | 0x31 | PrerollTimeSense | PreRollTimeData | Enabled | |
| 0x60 | 0x36 | TimerModeSense | TimerModeData | Enabled | |
| 0x60 | 0x3E | RecordInhibitSense | RecordInhibitStatus | Enabled | |
7 - Sense Reply
| 0x78 | 0x00 | Timer1Data | — | — | Current Time and 00:00:00:00 |
| 0x78 | 0x04 | LTCUserBitsTimeData | — | — | Current Time and 00:00:00:00 |
| 0x78 | 0x06 | VITCUserBitsTimeData | — | — | Current Time and 00:00:00:00 |
| 0x74 | 0x06 | VITCTimeData | — | — | Current Time |
| 0x74 | 0x07 | UserBitsVITCTimeData | — | — | 00:00:00:00 |
| 0x74 | 0x08 | GenTCDATA | — | — | Current Time |
| 0x78 | 0x08 | GenTCUBData | — | — | Current Time and 00:00:00:00 |
| 0x74 | 0x09 | GenUBData | — | — | 00:00:00:00 |
| 0x74 0x10 InData | — — | ||||
| 0x74 | 0x11 | OutData | — | — | |
| 0x74 | 0x12 | AlnData | — | — | |
| 0x74 | 0x13 | AOutData | — | — | |
| 0x74 | 0x14 | CorrectedLTCTimeData | — | — | Current Time |
| 0x70 | 0x20 | StatusData | — | — | Please see “Status Bits” sheet: Limited to 9 bytes of status, silently truncated |
| 0x76 | 0x2B | RemainTimeData | — | — | |
| 0x71 | 0x2E | SpeedData | — | — | |
| 0x74 | 0x31 | PrerollTimeData | — | — | |
| 0x71 | 0x36 | TimerModeData | — | — | Returns 0 (TimeCode) |
| 0x72 | 0x3E | RecordInhibitStatus | — | — | |
Command Reply No Remote Notes
A - Advanced Media Protocol
| 0xA1 | 0x01 | AutoSkip | Acknowledge | Disabled | 8-bit signed number of clips to skip from current clip |
| 0xAX | 0x15 | ListNextID | IDListing | Enabled | when x = 0 single clip request when x = 1, # clips can be specified in the send data |
| 0x20 | 0x29 | ClearPlaylist | Acknowledge | Disabled | |
| 0x41 | 0x42 | SetPlaybackLoop | Acknowledge | Disabled | Bit 0 loop mode enable, 0=false 1=trueBit 1 is single clip/timeline0=single clip1=timeline |
| 0x41 | 0x44 | SetStopMode | Acknowledge | Disabled | 0 = Off1 = Freeze on last frame2 = Freeze on next clip3 = Show black |
| 0x4f | 0x16 | AppendPreset | Acknowledge | Disabled | 2 Bytes for the length N of the clip nameN Bytes for each character of the clip name4 Byte in point timecode (format is FFSSMMHH)4 Byte out point timecode (format is FFSSMMHH) |
Blackmagic Extensions
| 0x82 | 0x02 | BMDSeekToTimelinePosition | Acknowledge | Disabled | 16-bit little endian fractional position [0..65535] |
| 0x81 | 0x03 | BMDSeekRelativeClip | Acknowledge | Disabled | One-byte signed integer, which is the number of clips to skip (negative for backwards). |
| Variables | |
| Cassette Out | Set if no SSD is present |
| Local | Set if Remote is disabled (local control) |
| Standby | Set if a disk is available |
| Direction | Clear if playback is forwarding, set if playback is reversing |
| Still | Set if playback is paused, or if in input preview mode |
| Auto Mode | Set if in Auto Mode |
| Select EE, Full EE | Set if in input preview mode |
| Lamp Still/Fwd/Rev | Set according to playback speed and direction |
| Near EOT | Set if total space left on available SSDs is less than 3 minutes |
| EOT | Set if total space left on available SSDs is less than 30 seconds |
| Others | |
| Cue Complete (byte 2, bit 0) | Always 1: Cue requests are always instantaneous |
| HyperDeck Serial RS-422 Protocol | ||
| Protocol | Based on Sony 9-pin protocol | |
| Interface | Baud rate 38.4 Kbps | |
| 1 start bit | ||
| 8 data bits | ||
| 1 stop bit | ||
| 1 parity bit | ||
| Odd parity | ||
natural_image
Front view of a server rack with I2G SDJ branding and control buttons (no text or symbols on main body)| Command Command Description | |
| help or ? Provides help text on all commands and parameters | |
| commands return commands in XML format | |
| device info return device information | |
| disk list query clip list on active disk | |
| disk list: slot id: {n} query clip list on disk in slot {n} | |
| quit disconnect ethernet control | |
| ping check device is responding | |
| preview: enable: {true/false} switch to preview or output | |
| play play from current timecode | |
| play: speed: {-5000 to 5000} play at specific speed | |
| play: loop: {true/false} play in loops or stop-at-end | |
| play: single clip: {true/false} play current clip or all clips | |
| playrange query playrange setting | |
| playrange set: clip id: {n} | set play range to play clip {n} only |
| playrange set: clip id: {n} count: {m} | set play range to {m} clips starting from clip {n} |
| playrange set: in: {inT} out: {outT} | set play range to play between:- timecode {inT} and timecode {outT} |
| playrange set: timeline in: {in} timeline out:{out} | set play range in units of frames between:- timeline position {in} and position {out} clear/reset play range setting |
| playrange clear | clear/reset play range setting |
| play on startup | query unit play on startup state |
| play on startup: enable: {true/false} | enable or disable play on startup |
| play on startup: single clip: {true/false} | play single clip or all clips on startup |
| play option query play options | |
| play option: stop mode:{lastframe/nextframe/black} | set output frame when playback stops |
| record | record from current input |
| record: name: {name} | record named clip |
| record spill | spill current recording to next slot |
Command Command Description
| record: spill: slot id: {n} | spill current recording to specified slotuse current id to spill to same slot |
| stop stop playback or recording | |
| clips count query number of clips on timeline | |
| clips get query all timeline clips | |
| clips get: clip id: {n} query a timeline clip info | |
| clips get: clip id: {n} count: {m} query m clips starting from n | |
| clips get: version: {1/2} | query clip info using specified output version:version 1: is: name startT durationversion 2: id: startT duration inT outT name |
| clips add: name: {name} append a clip to timeline | |
| clips add: clip id: {n} name: {name} insert clip before existing clip {n} | |
| clips add: in: {inT} out: {outT} name: {name} append the {inT} to {outT} portion of clip | |
| clips remove: clip id: {n} | remove clip {n} from the timeline(invalidates clip ids following clip {n}) |
| clips clear empty timeline clip list | |
| transport info query current activity | |
| slot info query active slot | |
| slot info: slot id: {n} query slot {n} | |
| slot select: slot id: {n} switch to specified slot | |
| slot select: video format: {format} | load clips of specified format |
| slot unblock | unblock active slot |
| slot unblock: slot id: {n} | unblock slot {n} |
| cache info | query cache status |
| dynamic range | query dynamic range settings |
| dynamic range: playback override:{off/Rec709/Rec2020_SDR/HLG/ST2084_300/ST2084_500/ST2084_800/ST2084_1000/ST2084_2000/ST2084_4000/ST2084 | set playback dynamic range override |
| dynamic range: record override:{off/Rec709/Rec2020_SDR/HLG/ST2084_300/ST2084_500/ST2084_800/ST2084_1000/ST2084_2000/ST2084_4000/ST2048} | set record dynamic range override |
| notify | query notification status |
| notify: remote: {true/false} | set remote notifications |
| notify: transport: {true/false} | set transport notifications |
| notify: slot: {true/false} | set slot notifications |
| notify: configuration: {true/false} | set configuration notifications |
| notify: dropped frames: {true/false} | set dropped frames notifications |
| notify: display timecode: {true/false} | set display timecode notifications |
Command Command Description
| notify: timeline position: {true/false} set playback timeline position notifications | |
| notify: playrange: {true/false} set playrange notifications | |
| notify: cache: {true/false} set cache notifications | |
| notify: dynamic range: {true/false} set dynamic range settings notifications | |
| notify: slate: {true/false} set digital slate notifications | |
| goto: clip id: {start/end} goto first clip or last clip | |
| goto: clip id: {n} goto clip id {n} | |
| goto: clip id: +{n} go forward {n} clips | |
| goto: clip id: -(n) go backward {n} clips | |
| goto: clip: {n} goto frame position {n} within current clip | |
| goto: clip: +{n} go forward {n} frames within current clip | |
| goto: clip: -(n) go backward {n} frames within current clip | |
| goto: clip: {start/end} | goto start or end of clip |
| goto: timeline: {n} | goto frame position {n} within timeline |
| goto: timeline: +{n} | o forward {n} frames within timeline |
| goto: timeline: -(n} | go backward {n} frames within timeline |
| goto: timeline: {start/end} | goto start or end of timeline |
| goto: timecode: {timecode} | goto specified timecode |
| goto: timecode: +{timecode} | go forward {timecode} duration |
| goto: timecode: -(timecode} | go backward {timecode} duration |
| goto: slot id: {n} | goto slot id {n} |
| jog: timecode: {timecode} | jog to timecode |
| jog: timecode: +{timecode} | jog forward {timecode} duration |
| jog: timecode: -(timecode} | jog backward {timecode} duration |
| shuttle: speed: {-5000 to 5000} | shuttle with speed |
| remote | query unit remote control state |
| remote: enable: {true/false} | enable or disable remote control |
| remote: override: {true/false} | session override remote control |
| configuration | query configuration settings |
| configuration: video input: SDI | switch to SDI input |
| configuration: video input: HDMI | switch to HDMI input |
| configuration: video input: component | switch to component input |
| configuration: audio input: embedded | capture embedded audio |
| configuration: audio input: XLR | capture XLR audio |
| configuration: audio input: RCA | capture RCA audio |
| configuration: file format: {format} | switch to specific file format |
| configuration: audio codec: PCM | switch to PCM audio |
| configuration: audio codec: AAC | switch to AAC audio |
Command Command Description
| configuration: timecode input:{external/embedded/preset/clip} | change the timecode input |
| configuration: timecode output:{clip/timeline/internal} | change the timecode output |
| configuration: timecode preference:{default/dropframe/nondropframe} | whether or not to use drop frame timecodes when not otherwise specified |
| configuration: timecode preset:{timecode} | set the timecode preset |
| configuration: audio input channels: {n} set the number of audio channels recorded to {n} | |
| configuration: record trigger:{none/recordbit/timecoderun} | change the record trigger |
| configuration: record prefix: {name} set the record prefix name (supports UTF-8 name) | |
| configuration: append timestamp:{true/false} | append timestamp to recorded filename |
| configuration: xlr input id: {n} xlr type:{line/mic} | configure xlr input typemultiple xlr inputs can be configured in a single command |
| configuration: genlock input resync:{true/false} | enable or disable genlock input resync |
| uptime return time since last boot | |
| format: prepare: {format} prepare a disk formatting operation to filesystem {format} | |
| format: confirm: {token} perform a pre-prepared formatting operation using token | |
| identify: enable: {true/false} identify the device | |
| watchdog: period: {period in seconds} client | connection timeout |
| reboot reboot device | |
| slate clips slate clips information | |
| slate project slate project information | |
| slate project:←camera: {index}← | set camera index e.g. A |
Command Combinations
You can combine the parameters into a single command, for example:
play: speed: 200 loop: true single clip: true
Or for configuration:
configuration: video input: SDI audio input: XLR
Or to switch to the second disk, but only play NTSC clips:
slot select: slot id: 2 video format: NTSC
Using XML
While you can use the Terminal to talk to HyperDeck, if you are writing software, you can use XML to confirm the existence of a specific command based on the firmware of the HyperDeck you are communicating with. This helps your software user interface adjust to the capabilities of the specific HyperDeck model and software version.
Protocol Details
Connection
The HyperDeck Ethernet server listens on TCP port 9993.
Basic syntax
The HyperDeck protocol is a line oriented text protocol. Lines from the server will be separated by an ascii CR LF sequence. Messages from the client may be separated by LF or CR LF.
New lines are represented in this document as a "←" symbol.
Single line command syntax
Command parameters are usually optional. A command with no parameters is terminated with a new line:
{Command name}
If parameters are specified, the command name is followed by a colon, then pairs of parameter names and values. Each parameter name is terminated with a colon character:
{Command name}: {Parameter}: {Value} {Parameter}: {Value} ...
Multiline command syntax
The HyperDeck protocol also supports an equivalent multiline syntax where each parameter-value pair is entered on a new line. E.g.
{Command name}:←
{Pa ra m e t e r}: { Va lu e}←
{Pa ra m e t e r}: { Va lu e}←
Response syntax
Simple responses from the server consist of a three digit response code and descriptive text terminated by a new line:
{Response code} {Response text}
If a response carries parameters, the response text is terminated with a colon, and parameter name and value pairs follow on subsequent lines until a blank line is returned:
{Response code} {Response text}:←
{Pa ra m e t e r}: { Va lu e}←
{Pa ra m e t e r}: { Va lu e}←
...
←
Successful response codes
A simple acknowledgement of a command is indicated with a response code of 200:
200 ok←
Other successful responses carry parameters and are indicated with response codes in the range of 201 to 299.
Failure response codes
Failure responses to commands are indicated with response codes in the range of 100 to 199:
100 syntax error
101 unsupported parameter
102 invalid value
103 unsupported
104 disk full
105 no disk
106 disk error
107 timeline empty
108 internal error
109 out of range
110 no input
111 remote control disabled
112 clip not found
120 connection rejected
150 invalid state
151 invalid codec
160 invalid format
161 invalid token
162 format not prepared
163 parameterized single line command not supported
Asynchronous response codes
The server may return asynchronous messages at any time. These responses are indicated with response codes in the range of 500 to 599:
5xx {Response Text}:←
{Pa ra m e t e r}: {Va lu e}←
{Pa ra m e t e r}: {Va lu e}←
Connection response
On connection, an asynchronous message will be delivered:
500 connection info:←
protocol version: {Version}←
model: {Model Name}←
Connection rejection
Only one client may connect to the server at a time. If other clients attempt to connect concurrently, they will receive an error and be disconnected:
120 connection rejected
Timecode syntax
Timecodes are expressed as non-drop-frame timecode in the format:
HH:MM:SS:FF
Handling of deck "remote" state
The “remote” command may be used to enable or disable the remote control of the deck. Any attempt to change the deck state over ethernet while remote access is disabled will generate an error:
111 remote control disabled
To enable or disable remote control:
remote: enable: {"true", "false"}
The current remote control state may be overridden allowing remote access over ethernet irrespective of the current remote control state:
remote: override: {"true", "false"}
The override state is only valid for the currently connected ethernet client and only while the connection remains open.
The “remote” command may be used to query the remote control state of the deck by specifying no parameters:
remote
The deck will return the current remote control state:
210 remote info:←
enabled: {"true", "false"}←
override: {"true", "false"}←
Asynchronous remote control information change notification is disabled by default and may be configured with the "notify" command. When enabled, changes in remote state will generate a "510 remote info:" asynchronous message with the same parameters as the "210 remote info:" message.
Closing connection
The "quit" command instructs the server to cleanly shut down the connection:
quit
Checking connection status
The "ping" command has no function other than to determine if the server is responding:
ping←
Getting help
The "help" or "?" commands return human readable help text describing all available commands and parameters:
help
Or:
?←
The server will respond with a list of all supported commands:
201 help:
{Help Tex t}
{Help Tex t}
Switching to preview mode
The "preview" command instructs the deck to switch between preview mode and output mode:
preview: enable: {"true", "false"}
Playback will be stopped when the deck is switched to preview mode. Capturing will be stopped when the deck is switched to output mode.
Controlling device playback
The "play" command instructs the deck to start playing:
play←
The play command accepts a number of parameters which may be used together in most combinations.
By default, the deck will play all remaining clips on the timeline then stop.
The "single clip" parameter may be used to override this behavior:
play: single clip: {"true", "false"}
By default, the deck will play at normal (100%) speed. An alternate speed may be specified in percentage between -1600 and 1600:
play: speed: {% normal speed}
By default, the deck will stop playing when it reaches to the end of the timeline. The "loop" parameter may be used to override this behavior:
play: loop: {"true", "false"}
The “playrange” command instructs the deck to play all the clips. To override this behavior; and select a particular clip:
playrange set: clip id: {Clip ID}
To only play a certain timecode range:
playrange set: in: {in timecode} out: {out timecode}
To clear a set playrange and return to the default value:
playrange clear
The “play on startup command” instructs the deck on what action to take on startup. By default, the deck will not play. Use the “enable” command to start playback after each power up.
play on startup: enable { "true", "false" }
By default, the unit will play back all clips on startup. Use the "single clip" command to override.
play on startup: single clip: {"true", "false"}
Stopping deck operation
The "stop" command instructs the deck to stop the current playback or capture:
stop←
Changing timeline position
The "goto" command instructs the deck to switch to playback mode and change its position within the timeline.
To go to the start of a specific clip:
goto: clip id: {Clip ID}
To move forward/back {count} clips from the current clip on the current timeline:
goto: clip id: +/- {count}
Note that if the resultant clip id goes beyond the first or last clip on timeline, it will be clamp at the first or last clip.
To go to the start or end of the current clip:
goto: clip: {"start", "end"}
To go to the start of the first clip or the end of the last clip:
goto: timeline: { "start", "end"}
To go to a specified timecode:
goto: timecode: {timecode}
To move forward or back a specified duration in timecode:
goto: timecode: {“+”, “-”} {duration in timecode}
To specify between slot 1 and slot 2:
goto: slot id: {Slot ID}
Note that only one parameter/value pair is allowed for each goto command.
Enumerating supported commands and parameters
The "commands" command returns the supported commands:
commands
The command list is returned in a computer readable XML format:
212 commands:
<commands>
<command name="..."><parameter name="..."/>...</command>
<command name="..."><parameter name="..."/>...</command>
...
</commands>
More XML tokens and parameters may be added in later releases.
Controlling asynchronous notifications
The "notify" command may be used to enable or disable asynchronous notifications from the server.
To enable or disable transport notifications:
notify: transport: {"true", "false"}
To enable or disable slot notifications:
notify: slot: {"true", "false"}
To enable or disable remote notifications:
notify: remote: {"true", "false"}
To enable or disable configuration notifications:
notify: configuration: {"true", "false"}
Multiple parameters may be specified. If no parameters are specified, the server returns the current state of all notifications:
209 notify:←
transport: { "true", "false" }←
slot: { "true", "false" }←
remote: { "true", "false" }←
configuration: { "true", "false" }←
dropped frames: { "true", "false" }←
display timecode: { "true", "false" }←
timeline position: { "true", "false" }←
playrange: { "true", "false" }←
cache: { "true", "false" }←
dynamic range: { "true", "false" }←
slate: { "true", "false" }←
Retrieving device information
The "device info" command returns information about the connected deck device:
device info
The server will respond with:
204 device info:←
protocol version: {Version}←
model: {Model Name}←
unique id: {unique alphanumeric identifier}←
slot count: {number of storage slots}←
software version: {software version}←
Retrieving slot information
The "slot info" command returns information about a slot. Without parameters, the command returns information for the currently selected slot:
slot info
If a slot id is specified, that slot will be queried:
slot info: slot id: {Slot ID}
The server will respond with slot specific information:
202 slot info:←
slot id: {Slot ID}←
    status: {"empty", "mounting", "error", "mounted"}←
volume name: {Volume name}←
recording time: {recording time available in seconds}←
video format: {disk's default video format}←
blocked: {"true", "false"}←
Asynchronous slot information change notification is disabled by default and may be configured with the "notify" command. When enabled, changes in slot state will generate a "502 slot info:" asynchronous message with the same parameters as the "202 slot info:" message.
Retrieving clip information
The "disk list" command returns the information for each playable clip on a given disk. Without parameters, the command returns information for the current active disk:
disk list
If a slot id is specified, the disk in that slot will be queried:
disk list: slot id: {Slot ID}
The server responds with the list of all playable clips on the disk in the format of: Index, name, formats, and duration in timecode:
206 disk list:←
slot id: {Slot ID}←
{clip index}: {name} {file format} {video format} {Duration timecode}←
{clip index}: {name} {file format} {video format} {Duration timecode}←
...
←
Note that the clip index starts from 1.
Retrieving clip count
The "clips count" command returns the number of clips on the current timeline:
clips count ←
The server responds with the number of clips:
214 clips count: ←
clip count: {Count}←
Retrieving timeline information
The "clips get" command returns information for each available clip on the current timeline. Without parameters, the command returns information for all clips on timeline:
clips get←
The server responds with a list of clip IDs, names and timecodes:
205 clips info:←
clip count: {Count}←
{Clip ID}: {Name} {Start timecode} {Duration timecode}←
{Clip ID}: {Name} {Start timecode} {Duration timecode}←
...
Retrieving transport Information
The "transport info" command returns the state of the transport:
transport info ←
The server responds with transport specific information:
208 transport info:
status: { "preview", "stopped", "play", "forward", "rewind", "jog", "shuttle","record"}←
speed: {Play speed between -5000 and 5000 %}←
slot id: {Slot ID or "none"}←
clip id: {Clip ID or "none"}←
single clip: { "true", "false"}←
display timecode: {timecode}←
timecode: {timecode}←
video format: {Video format}←
loop: { "true", "false"}←
timeline: {n}←
input video format: {Video format"}←
dynamic range: { "off", "Rec709", "Rec2020_SDR", "HLG", "ST2084_300", "ST2084_500", "ST2084_800", "ST2084_1000", "ST2084_2000", "ST2084_4000", "ST2048" or "none"}←
The "timecode" value is the timecode within the current timeline for playback or the clip for record. The "display timecode" is the timecode displayed on the front of the deck. The two timecodes will differ in some deck modes.
Asynchronous transport information change notification is disabled by default and may be configured with the "notify" command. When enabled, changes in transport state will generate a "508 transport info:" asynchronous message with the same parameters as the "208 transport info:" message.
Video Formats
The following video formats are currently supported on HyperDeck Studio:
NTSC, PAL, NTSCp, PALp
720p50, 720p5994, 720p60
1080p23976, 1080p24, 1080p25, 1080p2997, 1080p30
1080i50, 1080i5994, 1080i60
HyperDeck Studio Pro and Plus models support these 4k formats:
4Kp23976, 4Kp24, 4Kp25, 4Kp2997, 4Kp30
HyperDeck Studio 4K Pro adds support for the following 4k formats:
4Kp50, 4Kp5994, 4Kp60
Video format support may vary between models and software releases.
File Formats
All HyperDeck models currently support the following file formats:
H.264High_SDI
H.264High
H.264Medium
H.264Low
QuickTimeProResHQ
QuickTimeProRes
QuickTimeProResLT
QuickTimeProResProxy
QuickTimeDNxHD220x
DNxHD220x
QuickTimeDNxHD145
DNxHD145
QuickTimeDNxHD45
DNxHD45
HyperDeck Studio 4K Pro also supports the following file formats:
H.265High_SDI
H.265High
H.265Medium
H.265Low
QuickTimeDNxHR_HQX
DNxHR_HQX 4Kp60
QuickTimeDNxHR_SQ
DNxHR_SQ
QuickTimeDNxHR_LB
DNxHR_LB
Supported file formats may vary between models and software releases.
Querying and updating configuration information
The "configuration" command may be used to query the current configuration of the deck:
configuration
The server returns the configuration of the deck:
211 configuration:
audio input: { "embedded", "XLR", "RCA" }←
audio mapping: {n}←
video input: { "SDI", "HDMI", "component", "composite" }←
file format: {format}←
audio codec: { "PCM", "AAC" }←
timecode input: { "external", "embedded", "preset", "clip" }←
timecode output: { "clip", "timeline" }←
timecode preference: { "default", "dropframe", "nondropframe" }←
timecode preset: {timecode}←
audio input channels: {n}←
record trigger: { "none", "recordbit", "timecoderun" }←
record prefix: {name}←
append timestamp: { "true", "false" }←
One or more configuration parameters may be specified to change the configuration of the deck.
To change the current video input:
configuration: video input: {"SDI", "HDMI", "component"}
Valid video inputs may vary between models. To configure the current audio input:
configuration: audio input: {"embedded", "XLR", "RCA"}
Valid audio inputs may vary between models.
To configure the current file format:
configuration: file format: {File format}
Note that changes to the file format may require the deck to reset, which will cause the client connection to be closed. In such case, response code 213 will be returned (instead of 200) before the client connection is closed:
"213 deck rebooting"
Asynchronous configuration information change notification is disabled by default and may be configured with the "notify" command. When enabled, changes in configuration will generate a "511 configuration:" asynchronous message with the same parameters as the "211 configuration:" message.
Selecting active slot and video format
The "slot select" command instructs the deck to switch to a specified slot, or/and to select a specified output video format.
To switch to a specified slot:
slot select: slot id: {slot ID}
To select the output video format:
slot select: video format: {video format}
Either or all slot select parameters may be specified. Note that selecting video format will result in a rescan of the disk to reconstruct the timeline with all clips of the specified video format.
Clearing the current timeline
The "clips clear" command instructs the deck to empty the current timeline:
clips clear
The server responds with
200 ok←
Adding a clip to the current timeline
The "clips add:" command instructs the deck to add a clip to the current timeline:
clips add: name: {"clip name"}
The server responds with
200 ok←
or in case of error
1xx {error description}
Configuring the watchdog
The “watchdog” command instructs the deck to monitor the connected client and terminate the connection if the client is inactive for at least a specified period of time.
To configure the watchdog:
watchdog: period: {period in seconds}
To avoid disconnection, the client must send a command to the server at least every {period} seconds. Note that if the period is set to 0 or less than 0, connection monitoring will be disabled.
Hilfe
California Proposition 65

natural_image
Circular portrait photo of a smiling man in a dark shirt against a gray textured background (no text or symbols)Bienvenido
natural_image
Front view of a black audio workstation with multiple video and audio equipment modules (no readable text or symbols)HyperDeck Studio HD Pro y HyperDeck Studio 4K Pro

natural_image
Black audio recording device with digital display and control buttons (no readable text or symbols)
natural_image
Black audio recording device with multiple control knobs and a digital display showing time, date, and preview (no readable text or symbols)HyperDeck Studio HD Mini Modelo HyperDeck Studio HD Plus
natural_image
Illustration of hands interacting with a device panel showing playback controls and a video player interface (no text or symbols on the device itself)natural_image
Diagram of a server rack with ports and connectors, showing an orange arrow indicating a specific component (no text or symbols present)Barra
Para ver una LUT:
natural_image
Front view illustration of a rack-mounted server unit with control panel and drive slots (no text or symbols)natural_image
Front view of a computer rack with indicator lights and ports (no text or symbols)| Command Reply No Remote Notes | |||||
| 0 - System Control | |||||
| 0x00 0x11 DeviceTypeRequest | NTSC: 0xF0E0PAL: 0xF1E024P: 0xF2E0 | Enabled | |||
| 1 - Slave Response | |||||
| 0x20 | 0x00 | Stop | Acknowledge | Disabled | |
| 0x20 | 0x01 | Play | Acknowledge | Disabled | |
| 0x20 | 0x02 | Record | Acknowledge | Disabled | |
| 0x20 | 0x04 | StandbyOff | Acknowledge | Disabled | |
| 0x20 | 0x05 | StandbyOn | Acknowledge | Disabled | |
| 0x20 | 0x0F | Eject | Acknowledge | Disabled | |
| 0x20 | 0x10 | FastFwd | Acknowledge | Disabled | |
| 0x21 | 0x11 | JogFwd1 | Acknowledge | Disabled | |
| 0x22 | 0x11 | JogFwd2 | Acknowledge | Disabled | Treated as N=1;Same as JogFwd1 |
| 0x21 | 0x12 | VarFwd1 | Acknowledge | Disabled | Uses ShuttleFwd1 |
| 0x22 | 0x12 | VarFwd2 | Acknowledge | Disabled | Treated as N=1;Same as VarFwd1 |
| 0x21 | 0x13 | ShuttleFwd1 | Acknowledge | Disabled | |
| 0x22 | 0x13 | ShuttleFwd2 | Acknowledge | Disabled | Treated as N=1;Same as ShuttleFwd1 |
| 0x20 | 0x20 | Rewind | Acknowledge | Disabled | |
| 0x21 0x21 JogRev1 Acknowledge Disabled | |||||
| 0x22 | 0x21 | JogRev2 | Acknowledge | Disabled | Treated as N=1;Same as JogRev1 |
| 0x21 | 0x22 | VarRev1 | Acknowledge | Disabled | Uses ShuttleRev1 |
Command Reply No Remote Notes
| 0x22 0x22 VarRev2 Acknowledge Disabled | Treated as N=1;Same as VarRev1 | ||||
| 0x21 | 0x23 | ShuttleRev1 | Acknowledge | Disabled | |
| 0x22 | 0x23 | ShuttleRev2 | Acknowledge | Disabled | Treated as N=1;Same as ShuttleRev1 |
| 0x20 | 0x30 | Preroll | Acknowledge | Disabled | |
| 0x24 0x31 CueData Acknowledge Disabled | |||||
| 0x20 | 0x34 | SyncPlay | Acknowledge | Disabled | |
| 0x20 | 0x40 | Preview | Acknowledge | Disabled | Status bits are set |
| 0x20 | 0x41 | Review | Acknowledge | Disabled | Status bits are set |
| 0x20 | 0x43 | OutpointPreview | Acknowledge | Disabled | |
| 0x22 | 0x5C | DMCSetFwd | Acknowledge | Disabled | |
| 0x22 | 0x5D | DMCSetRev | Acknowledge | Disabled | |
| 0x20 | 0x60 | FullEEOff | Acknowledge | Disabled | |
| 0x20 | 0x61 | FullEEOn | Acknowledge | Disabled | |
| 0x20 | 0x63 | SelectEEOn | Acknowledge | Disabled | |
| 4 - Preset/Select Control | |||||
| 0x40 | 0x10 | InEntry | Acknowledge | Disabled | |
| 0x40 | 0x11 | OutEntry | Acknowledge | Disabled | |
| 0x44 | 0x14 | InDataPreset | Acknowledge | Disabled | |
| 0x44 | 0x15 | OutDataPreset | Acknowledge | Disabled | |
| 0x40 | 0x18 | InShift+ | Acknowledge | Disabled | |
| 0x40 | 0x19 | InShift- | Acknowledge | Disabled | |
| 0x40 | 0x1A | OutShift+ | Acknowledge | Disabled | |
| 0x40 | 0x1B | OutShift- | Acknowledge | Disabled | |
| 0x40 | 0x20 | InReset | Acknowledge | Disabled | |
| 0x40 | 0x21 | OutReset | Acknowledge | Disabled | |
| 0x40 | 0x22 | AlnReset | Acknowledge | Disabled | |
| 0x40 | 0x23 | AOutReset | Acknowledge | Disabled | |
| 0x44 | 0x31 | PrerollPreset | Acknowledge | Disabled | |
| 0x40 | 0x40 | AutoModeOff | Acknowledge | Disabled | ignored, Status bit remembered |
| 0x40 | 0x41 | AutoModeOn | Acknowledge | Disabled | ignored, Status bit remembered |
| 0x41 | 0x37 | InputCheck | Acknowledge | Disabled | |
Command Reply No Remote Notes
6 - Sense Request
| 0x61 0x0A TimeCodeGenSense — — | |||||
| 0x61 0x0C CurrentTimeSense — — | |||||
| 0x60 0x10 InDataSense InData Enabled | |||||
| 0x60 | 0x11 | OutDataSense | OutData | Enabled | |
| 0x60 | 0x12 | AlnDataSense | AlnData | Enabled | |
| 0x60 | 0x13 | AOutDataSense | AOutData | Enabled | |
| 0x61 | 0x20 | StatusSense | StatusData | Enabled | |
| 0x60 | 0x2B | RemainTimeSense | RemainTimeData | Enabled | |
| 0x60 | 0x2E | SpeedSense | SpeedData | Enabled | |
| 0x60 | 0x31 | PrerollTimeSense | PreRollTimeData | Enabled | |
| 0x60 | 0x36 | TimerModeSense | TimerModeData | Enabled | |
| 0x60 | 0x3E | RecordInhibitSense | RecordInhibitStatus | Enabled | |
7 - Sense Reply
| 0x78 | 0x00 | Timer1Data | — | — | Current Time and 00:00:00:00 |
| 0x78 | 0x04 | LTCUserBitsTimeData | — | — | Current Time and 00:00:00:00 |
| 0x78 | 0x06 | VITCUserBitsTimeData | — | — | Current Time and 00:00:00:00 |
| 0x74 | 0x06 | VITCTimeData | — | — | Current Time |
| 0x74 | 0x07 | UserBitsVITCTimeData | — | — | 00:00:00:00 |
| 0x74 | 0x08 | GenTCDATA | — | — | Current Time |
| 0x78 | 0x08 | GenTCUBData | — | — | Current Time and 00:00:00:00 |
| 0x74 | 0x09 | GenUBData | — | — | 00:00:00:00 |
| 0x74 0x10 InData | — — | ||||
| 0x74 | 0x11 | OutData | — | — | |
| 0x74 | 0x12 | AlnData | — | — | |
| 0x74 | 0x13 | AOutData | — | — | |
| 0x74 | 0x14 | CorrectedLTCTimeData | — | — | Current Time |
| 0x70 | 0x20 | StatusData | — | — | Please see “Status Bits” sheet: Limited to 9 bytes of status, silently truncated |
| 0x76 | 0x2B | RemainTimeData | — | — | |
| 0x71 | 0x2E | SpeedData | — | — | |
| 0x74 | 0x31 | PrerollTimeData | — | — | |
| 0x71 | 0x36 | TimerModeData | — | — | Returns 0 (TimeCode) |
| 0x72 | 0x3E | RecordInhibitStatus | — | — | |
Command Reply No Remote Notes
A - Advanced Media Protocol
| 0xA1 | 0x01 | AutoSkip | Acknowledge | Disabled | 8-bit signed number of clips to skip from current clip |
| 0xAX | 0x15 | ListNextID | IDListing | Enabled | when x = 0 single clip request when x = 1, # clips can be specified in the send data |
| 0x20 | 0x29 | ClearPlaylist | Acknowledge | Disabled | |
| 0x41 | 0x42 | SetPlaybackLoop | Acknowledge | Disabled | Bit 0 loop mode enable, 0=false 1=trueBit 1 is single clip/timeline0=single clip1=timeline |
| 0x41 | 0x44 | SetStopMode | Acknowledge | Disabled | 0 = Off1 = Freeze on last frame2 = Freeze on next clip3 = Show black |
| 0x4f | 0x16 | AppendPreset | Acknowledge | Disabled | 2 Bytes for the length N of the clip nameN Bytes for each character of the clip name4 Byte in point timecode (format is FFSSMMHH)4 Byte out point timecode (format is FFSSMMHH) |
Blackmagic Extensions
| 0x82 | 0x02 | BMDSeekToTimelinePosition | Acknowledge | Disabled | 16-bit little endian fractional position [0..65535] |
| 0x81 | 0x03 | BMDSeekRelativeClip | Acknowledge | Disabled | One-byte signed integer, which is the number of clips to skip (negative for backwards). |
| Variables | |
| Cassette Out | Set if no SSD is present |
| Local | Set if Remote is disabled (local control) |
| Standby | Set if a disk is available |
| Direction | Clear if playback is forwarding, set if playback is reversing |
| Still | Set if playback is paused, or if in input preview mode |
| Auto Mode | Set if in Auto Mode |
| Select EE, Full EE | Set if in input preview mode |
| Lamp Still/Fwd/Rev | Set according to playback speed and direction |
| Near EOT | Set if total space left on available SSDs is less than 3 minutes |
| EOT | Set if total space left on available SSDs is less than 30 seconds |
| Others | |
| Cue Complete (byte 2, bit 0) | Always 1: Cue requests are always instantaneous |
| HyperDeck Serial RS-422 Protocol | ||
| Protocol | Based on Sony 9-pin protocol | |
| Interface | Baud rate 38.4 Kbps | |
| 1 start bit | ||
| 8 data bits | ||
| 1 stop bit | ||
| 1 parity bit | ||
| Odd parity | ||
natural_image
Front view of a server rack with I2G SDJ branding and control buttons (no text or symbols on main body)| Command Command Description | |
| help or ? Provides help text on all commands and parameters | |
| commands return commands in XML format | |
| device info return device information | |
| disk list query clip list on active disk | |
| disk list: slot id: {n} query clip list on disk in slot {n} | |
| quit disconnect ethernet control | |
| ping check device is responding | |
| preview: enable: {true/false} switch to preview or output | |
| play play from current timecode | |
| play: speed: {-5000 to 5000} play at specific speed | |
| play: loop: {true/false} play in loops or stop-at-end | |
| play: single clip: {true/false} play current clip or all clips | |
| playrange query playrange setting | |
| playrange set: clip id: {n} set play range to play clip {n} only | |
| playrange set: clip id: {n} count: {m} | set play range to {m} clips starting from clip {n} |
| playrange set: in: {inT} out: {outT} | set play range to play between:- timecode {inT} and timecode {outT} |
| playrange set: timeline in: {in} timeline out: {out} | set play range in units of frames between:- timeline position {in} and position {out} clear/reset play range setting |
| playrange clear | clear/reset play range setting |
| play on startup | query unit play on startup state |
| play on startup: enable: {true/false} | enable or disable play on startup |
| play on startup: single clip: {true/false} | play single clip or all clips on startup |
| play option query play options | |
| play option: stop mode:{lastframe/nextframe/black} | set output frame when playback stops |
| record | record from current input |
| record: name: {name} | record named clip |
| record spill | spill current recording to next slot |
Command Command Description
| record: spill: slot id: {n} | spill current recording to specified slotuse current id to spill to same slot |
| stop stop playback or recording | |
| clips count query number of clips on timeline | |
| clips get query all timeline clips | |
| clips get: clip id: {n} query a timeline clip info | |
| clips get: clip id: {n} count: {m} query m clips starting from n | |
| clips get: version: {1/2} | query clip info using specified output version:version 1: is: name startT durationversion 2: id: startT duration inT outT name |
| clips add: name: {name} append a clip to timeline | |
| clips add: clip id: {n} name: {name} insert clip before existing clip {n} | |
| clips add: in: {inT} out: {outT} name: {name} append the {inT} to {outT} portion of clip | |
| clips remove: clip id: {n} | remove clip {n} from the timeline(invalidates clip ids following clip {n}) |
| clips clear empty timeline clip list | |
| transport info query current activity | |
| slot info query active slot | |
| slot info: slot id: {n} query slot {n} | |
| slot select: slot id: {n} switch to specified slot | |
| slot select: video format: {format} | load clips of specified format |
| slot unblock | unblock active slot |
| slot unblock: slot id: {n} | unblock slot {n} |
| cache info | query cache status |
| dynamic range | query dynamic range settings |
| dynamic range: playback override:{off/Rec709/Rec2020_SDR/HLG/ST2084_300/ST2084_500/ST2084_800/ST2084_1000/ST2084_2000/ST2084_4000/ST2084 | set playback dynamic range override |
| dynamic range: record override:{off/Rec709/Rec2020_SDR/HLG/ST2084_300/ST2084_500/ST2084_800/ST2084_1000/ST2084_2000/ST2084_4000/ST2048} | set record dynamic range override |
| notify | query notification status |
| notify: remote: {true/false} | set remote notifications |
| notify: transport: {true/false} | set transport notifications |
| notify: slot: {true/false} | set slot notifications |
| notify: configuration: {true/false} | set configuration notifications |
| notify: dropped frames: {true/false} | set dropped frames notifications |
| notify: display timecode: {true/false} | set display timecode notifications |
Command Command Description
| notify: timeline position: {true/false} set playback timeline position notifications | |
| notify: playrange: {true/false} set playrange notifications | |
| notify: cache: {true/false} set cache notifications | |
| notify: dynamic range: {true/false} set dynamic range settings notifications | |
| notify: slate: {true/false} set digital slate notifications | |
| goto: clip id: {start/end} goto first clip or last clip | |
| goto: clip id: {n} goto clip id {n} | |
| goto: clip id: +{n} go forward {n} clips | |
| goto: clip id: -(n) go backward {n} clips | |
| goto: clip: {n} goto frame position {n} within current clip | |
| goto: clip: +{n} go forward {n} frames within current clip | |
| goto: clip: -(n) go backward {n} frames within current clip | |
| goto: clip: {start/end} | goto start or end of clip |
| goto: timeline: {n} | goto frame position {n} within timeline |
| goto: timeline: +{n} | o forward {n} frames within timeline |
| goto: timeline: -(n} | go backward {n} frames within timeline |
| goto: timeline: {start/end} | goto start or end of timeline |
| goto: timecode: {timecode} | goto specified timecode |
| goto: timecode: +{timecode} | go forward {timecode} duration |
| goto: timecode: -(timecode} | go backward {timecode} duration |
| goto: slot id: {n} | goto slot id {n} |
| jog: timecode: {timecode} | jog to timecode |
| jog: timecode: +{timecode} | jog forward {timecode} duration |
| jog: timecode: -(timecode} | jog backward {timecode} duration |
| shuttle: speed: {-5000 to 5000} | shuttle with speed |
| remote | query unit remote control state |
| remote: enable: {true/false} | enable or disable remote control |
| remote: override: {true/false} | session override remote control |
| configuration | query configuration settings |
| configuration: video input: SDI | switch to SDI input |
| configuration: video input: HDMI | switch to HDMI input |
| configuration: video input: component | switch to component input |
| configuration: audio input: embedded | capture embedded audio |
| configuration: audio input: XLR | capture XLR audio |
| configuration: audio input: RCA | capture RCA audio |
| configuration: file format: {format} | switch to specific file format |
| configuration: audio codec: PCM | switch to PCM audio |
| configuration: audio codec: AAC | switch to AAC audio |
Command Command Description
| configuration: timecode input:{external/embedded/preset/clip} | change the timecode input |
| configuration: timecode output:{clip/timeline/internal} | change the timecode output |
| configuration: timecode preference:{default/dropframe/nondropframe} | whether or not to use drop frame timecodes when not otherwise specified |
| configuration: timecode preset:{timecode} | set the timecode preset |
| configuration: audio input channels: {n} set the number of audio channels recorded to {n} | |
| configuration: record trigger:{none/recordbit/timecoderun} | change the record trigger |
| configuration: record prefix: {name} set the record prefix name (supports UTF-8 name) | |
| configuration: append timestamp:{true/false} | append timestamp to recorded filename |
| configuration: xlr input id: {n} xlr type:{line/mic} | configure xlr input typemultiple xlr inputs can be configured in a single command |
| configuration: genlock input resync:{true/false} | enable or disable genlock input resync |
| uptime return time since last boot | |
| format: prepare: {format} prepare a disk formatting operation to filesystem {format} | |
| format: confirm: {token} perform a pre-prepared formatting operation using token | |
| identify: enable: {true/false} identify the device | |
| watchdog: period: {period in seconds} client | connection timeout |
| reboot reboot device | |
| slate clips slate clips information | |
| slate project slate project information | |
| slate project:←camera: {index}← | set camera index e.g. A |
Command Combinations
You can combine the parameters into a single command, for example:
play: speed: 200 loop: true single clip: true
Or for configuration:
configuration: video input: SDI audio input: XLR
Or to switch to the second disk, but only play NTSC clips:
slot select: slot id: 2 video format: NTSC
Using XML
While you can use the Terminal to talk to HyperDeck, if you are writing software, you can use XML to confirm the existence of a specific command based on the firmware of the HyperDeck you are communicating with. This helps your software user interface adjust to the capabilities of the specific HyperDeck model and software version.
Protocol Details
Connection
The HyperDeck Ethernet server listens on TCP port 9993.
Basic syntax
The HyperDeck protocol is a line oriented text protocol. Lines from the server will be separated by an ascii CR LF sequence. Messages from the client may be separated by LF or CR LF.
New lines are represented in this document as a "←" symbol.
Single line command syntax
Command parameters are usually optional. A command with no parameters is terminated with a new line:
{Command name}
If parameters are specified, the command name is followed by a colon, then pairs of parameter names and values. Each parameter name is terminated with a colon character:
{Command name}: {Parameter}: {Value} {Parameter}: {Value} ...
Multiline command syntax
The HyperDeck protocol also supports an equivalent multiline syntax where each parameter-value pair is entered on a new line. E.g.
{Command name}:←
{Pa ra m e t e r}: { Va lu e}←
{Pa ra m e t e r}: { Va lu e}←
Response syntax
Simple responses from the server consist of a three digit response code and descriptive text terminated by a new line:
{Response code} {Response text}
If a response carries parameters, the response text is terminated with a colon, and parameter name and value pairs follow on subsequent lines until a blank line is returned:
{Response code} {Response text}:←
{Pa ra m e t e r}: { Va lu e}←
{Pa ra m e t e r}: { Va lu e}←
...
←
Successful response codes
A simple acknowledgement of a command is indicated with a response code of 200:
200 ok←
Other successful responses carry parameters and are indicated with response codes in the range of 201 to 299.
Failure response codes
Failure responses to commands are indicated with response codes in the range of 100 to 199:
100 syntax error
101 unsupported parameter
102 invalid value
103 unsupported
104 disk full
105 no disk
106 disk error
107 timeline empty
108 internal error
109 out of range
110 no input
111 remote control disabled
112 clip not found
120 connection rejected
150 invalid state
151 invalid codec
160 invalid format
161 invalid token
162 format not prepared
163 parameterized single line command not supported
Asynchronous response codes
The server may return asynchronous messages at any time. These responses are indicated with response codes in the range of 500 to 599:
5xx {Response Text}:←
{Pa ra m e t e r}: {Va lu e}←
{Pa ra m e t e r}: {Va lu e}←
←
Connection response
On connection, an asynchronous message will be delivered:
500 connection info:←
protocol version: {Version}←
model: {Model Name}←
Connection rejection
Only one client may connect to the server at a time. If other clients attempt to connect concurrently, they will receive an error and be disconnected:
120 connection rejected
Timecode syntax
Timecodes are expressed as non-drop-frame timecode in the format:
HH:MM:SS:FF
Handling of deck "remote" state
The “remote” command may be used to enable or disable the remote control of the deck. Any attempt to change the deck state over ethernet while remote access is disabled will generate an error:
111 remote control disabled
To enable or disable remote control:
remote: enable: {"true", "false"}
The current remote control state may be overridden allowing remote access over ethernet irrespective of the current remote control state:
remote: override: { "true", "false" }
The override state is only valid for the currently connected ethernet client and only while the connection remains open.
The "remote" command may be used to query the remote control state of the deck by specifying no parameters:
remote
The deck will return the current remote control state:
210 remote info:←
enabled: {"true", "false"}←
override: {"true", "false"}←
Asynchronous remote control information change notification is disabled by default and may be configured with the "notify" command. When enabled, changes in remote state will generate a "510 remote info:" asynchronous message with the same parameters as the "210 remote info:" message.
Closing connection
The "quit" command instructs the server to cleanly shut down the connection:
quit
Checking connection status
The "ping" command has no function other than to determine if the server is responding:
ping←
Getting help
The "help" or "?" commands return human readable help text describing all available commands and parameters:
help
Or:
?←
The server will respond with a list of all supported commands:
201 help:
{Help Tex t}
{Help Tex t}
Switching to preview mode
The "preview" command instructs the deck to switch between preview mode and output mode:
preview: enable: {"true", "false"}
Playback will be stopped when the deck is switched to preview mode. Capturing will be stopped when the deck is switched to output mode.
Controlling device playback
The "play" command instructs the deck to start playing:
play←
The play command accepts a number of parameters which may be used together in most combinations.
By default, the deck will play all remaining clips on the timeline then stop.
The "single clip" parameter may be used to override this behavior:
play: single clip: {"true", "false"}
By default, the deck will play at normal (100%) speed. An alternate speed may be specified in percentage between -1600 and 1600:
play: speed: {$ normal speed}
By default, the deck will stop playing when it reaches to the end of the timeline. The “loop” parameter may be used to override this behavior:
play: loop: {"true", "false"}
The “playrange” command instructs the deck to play all the clips. To override this behavior: and select a particular clip:
playrange set: clip id: {Clip ID}
To only play a certain timecode range:
playrange set: in: {in timecode} out: {out timecode}
To clear a set playrange and return to the default value:
playrange clear
The “play on startup command” instructs the deck on what action to take on startup. By default, the deck will not play. Use the “enable” command to start playback after each power up.
play on startup: enable { "true", "false" }
By default, the unit will play back all clips on startup. Use the "single clip" command to override.
play on startup: single clip: {"true", "false"}
Stopping deck operation
The "stop" command instructs the deck to stop the current playback or capture:
stop
Changing timeline position
The "goto" command instructs the deck to switch to playback mode and change its position within the timeline.
To go to the start of a specific clip:
goto: clip id: {Clip ID}
To move forward/back {count} clips from the current clip on the current timeline:
goto: clip id: +/- {count}
Note that if the resultant clip id goes beyond the first or last clip on timeline, it will be clamp at the first or last clip.
To go to the start or end of the current clip:
goto: clip: { "start", "end"}
To go to the start of the first clip or the end of the last clip:
goto: timeline: {"start", "end"}
To go to a specified timecode:
goto: timecode: {timecode}
To move forward or back a specified duration in timecode:
goto: timecode: { "+", "-"}{duration in timecode}
To specify between slot 1 and slot 2:
goto: slot id: {Slot ID}
Note that only one parameter/value pair is allowed for each goto command.
Enumerating supported commands and parameters
The "commands" command returns the supported commands:
commands
The command list is returned in a computer readable XML format:
212 commands:
<commands>
<command name="..."><parameter name="..."/>...</command>
<command name="..."><parameter name="..."/>...</command>
...
</commands>
More XML tokens and parameters may be added in later releases.
Controlling asynchronous notifications
The "notify" command may be used to enable or disable asynchronous notifications from the server.
To enable or disable transport notifications:
notify: transport: { "true", "false" }
To enable or disable slot notifications:
notify: slot: {"true", "false"}
To enable or disable remote notifications:
notify: remote: {"true", "false"}
To enable or disable configuration notifications:
notify: configuration: {"true", "false"}
Multiple parameters may be specified. If no parameters are specified, the server returns the current state of all notifications:
209 notify:
transport: {"true", "false"}
slot: {"true", "false"}
remote: {"true", "false"}
configuration: {"true", "false"}
dropped frames: {"true", "false"}
display timecode: {"true", "false"}
timeline position: {"true", "false"}
playrange: {"true", "false"}
cache: {"true", "false"}
dynamic range: {"true", "false"}
slate: {"true", "false"}
Retrieving device information
The "device info" command returns information about the connected deck device:
device info
The server will respond with:
204 device info:←
protocol version: {Version}←
model: {Model Name}←
unique id: {unique alphanumeric identifier}←
slot count: {number of storage slots}←
software version: {software version}←
Retrieving slot information
The "slot info" command returns information about a slot. Without parameters, the command returns information for the currently selected slot:
slot info
If a slot id is specified, that slot will be queried:
slot info: slot id: {Slot ID}
The server will respond with slot specific information:
202 slot info:←
slot id: {Slot ID}←
    status: {"empty", "mounting", "error", "mounted"}←
volume name: {Volume name}←
recording time: {recording time available in seconds}←
video format: {disk's default video format}←
blocked: {"true", "false"}←
Asynchronous slot information change notification is disabled by default and may be configured with the "notify" command. When enabled, changes in slot state will generate a "502 slot info:" asynchronous message with the same parameters as the "202 slot info:" message.
Retrieving clip information
The “disk list” command returns the information for each playable clip on a given disk. Without parameters, the command returns information for the current active disk:
disk list
If a slot id is specified, the disk in that slot will be queried:
disk list: slot id: {Slot ID}
The server responds with the list of all playable clips on the disk in the format of: Index, name, formats, and duration in timecode:
206 disk list:←
slot id: {Slot ID}←
{clip index}: {name} {file format} {video format} {Duration timecode}←
{clip index}: {name} {file format} {video format} {Duration timecode}←
...
←
Note that the clip index starts from 1.
Retrieving clip count
The "clips count" command returns the number of clips on the current timeline:
clips count ←
The server responds with the number of clips:
214 clips count: ←
clip count: {Count}←
Retrieving timeline information
The "clips get" command returns information for each available clip on the current timeline. Without parameters, the command returns information for all clips on timeline:
clips get←
The server responds with a list of clip IDs, names and timecodes:
205 clips info:←
clip count: {Count}←
{Clip ID}: {Name} {Start timecode} {Duration timecode}←
{Clip ID}: {Name} {Start timecode} {Duration timecode}←
...
Retrieving transport information
The "transport info" command returns the state of the transport:
transport info ←
The server responds with transport specific information:
208 transport info:
status: { "preview", "stopped", "play", "forward", "rewind", "jog", "shuttle", "record" }←
speed: {Play speed between -5000 and 5000 %}←
slot id: {Slot ID or "none"}←
clip id: {Clip ID or "none"}←
single clip: { "true", "false" }←
display timecode: {timecode}←
timecode: {timecode}←
video format: {Video format}←
loop: { "true", "false" }←
timeline: {n}←
input video format: {Video format"}←
dynamic range: { "off", "Rec709", "Rec2020_SDR", "HLG", "ST2084_300", "ST2084_500", "ST2084_800", "ST2084_1000", "ST2084_2000", "ST2084_4000", "ST2048" or "none" }←
The "timecode" value is the timecode within the current timeline for playback or the clip for record. The "display timecode" is the timecode displayed on the front of the deck. The two timecodes will differ in some deck modes.
Asynchronous transport information change notification is disabled by default and may be configured with the "notify" command. When enabled, changes in transport state will generate a "508 transport info:" asynchronous message with the same parameters as the "208 transport info:" message.
Video Formats
The following video formats are currently supported on HyperDeck Studio:
NTSC, PAL, NTSCp, PALp
720p50, 720p5994, 720p60
1080p23976, 1080p24, 1080p25, 1080p2997, 1080p30
1080i50, 1080i5994, 1080i60
HyperDeck Studio Pro and Plus models support these 4k formats:
4Kp23976, 4Kp24, 4Kp25, 4Kp2997, 4Kp30
HyperDeck Studio 4K Pro adds support for the following 4k formats:
4Kp50, 4Kp5994, 4Kp60
Video format support may vary between models and software releases.
File Formats
All HyperDeck models currently support the following file formats:
H.264High_SDI
H.264High
H.264Medium
H.264Low
QuickTimeProResHQ
QuickTimeProRes
QuickTimeProResLT
QuickTimeProResProxy
QuickTimeDNxHD220x
DNxHD220x
QuickTimeDNxHD145
DNxHD145
QuickTimeDNxHD45
DNxHD45
HyperDeck Studio 4K Pro also supports the following file formats:
H.265High_SDI
H.265High
H.265Medium
H.265Low
QuickTimeDNxHR_HQX
DNxHR_HQX 4Kp60
QuickTimeDNxHR_SQ
DNxHR_SQ
QuickTimeDNxHR_LB
DNxHR_LB
Supported file formats may vary between models and software releases.
Querying and updating configuration information
The "configuration" command may be used to query the current configuration of the deck:
configuration
The server returns the configuration of the deck:
211 configuration:
audio input: { "embedded", "XLR", "RCA" }←
audio mapping: {n}←
video input: { "SDI", "HDMI", "component", "composite" }←
file format: {format}←
audio codec: { "PCM", "AAC" }←
timecode input: { "external", "embedded", "preset", "clip" }←
timecode output: { "clip", "timeline" }←
timecode preference: { "default", "dropframe", "nondropframe" }←
timecode preset: {timecode}←
audio input channels: {n}←
record trigger: { "none", "recordbit", "timecoderun" }←
record prefix: {name}←
append timestamp: { "true", "false" }←
One or more configuration parameters may be specified to change the configuration of the deck.
To change the current video input:
configuration: video input: {"SDI", "HDMI", "component"}
Valid video inputs may vary between models. To configure the current audio input:
configuration: audio input: {"embedded", "XLR", "RCA"}
Valid audio inputs may vary between models.
To configure the current file format:
configuration: file format: {File format}
Note that changes to the file format may require the deck to reset, which will cause the client connection to be closed. In such case, response code 213 will be returned (instead of 200) before the client connection is closed:
"213 deck rebooting"
Asynchronous configuration information change notification is disabled by default and may be configured with the "notify" command. When enabled, changes in configuration will generate a "511 configuration:" asynchronous message with the same parameters as the "211 configuration:" message.
Selecting active slot and video format
The "slot select" command instructs the deck to switch to a specified slot, or/and to select a specified output video format.
To switch to a specified slot:
slot select: slot id: {slot ID}
To select the output video format:
slot select: video format: {video format}
Either or all slot select parameters may be specified. Note that selecting video format will result in a rescan of the disk to reconstruct the timeline with all clips of the specified video format.
Clearing the current timeline
The "clips clear" command instructs the deck to empty the current timeline:
clips clear←
The server responds with
200 ok←
Adding a clip to the current timeline
The "clips add:" command instructs the deck to add a clip to the current timeline:
clips add: name: {"clip name"}
The server responds with
200 ok←
or in case of error
1xx {error description}
Configuring the watchdog
The “watchdog” command instructs the deck to monitor the connected client and terminate the connection if the client is inactive for at least a specified period of time.
To configure the watchdog:
watchdog: period: {period in seconds}
To avoid disconnection, the client must send a command to the server at least every {period} seconds. Note that if the period is set to 0 or less than 0, connection monitoring will be disabled.
Ayuda
Cómo obtener ayuda

natural_image
Circular portrait photo of a smiling man in a dark shirt against a gray background (no text or symbols)欢迎辞
感谢您购买Blackmagic HyperDeck硬盘录机!
设置Open Broadcaster 394
Blackmagic HyperDeck Setup 396
natural_image
Front view of a black audio workstation with multiple video and audio equipment modules (no visible text or labels)HyperDeck Studio HD Pro和HyperDeck Studio 4K Pro

natural_image
Black audio player device with playback controls and a digital display showing time (no readable text or symbols)HyperDeck Studio HD Mini HyperDeck

natural_image
Black audio recording device with multiple control knobs and a digital display showing time, location, and waveform (no readable text or symbols)Studio HD Plus
natural_image
Illustration of hands interacting with a device panel showing playback controls and a digital display (no readable text or symbols)连接媒体
natural_image
Diagram of a server rack with ports and an orange arrow indicating a specific component (no text or symbols present)同步时间校准
存储条
在Windows计算机上格式化存储介质
为新信号源命名并点击“Ok”。

查看LUT
natural_image
Front view of a rack-mounted server unit with ports and control panel (no visible text or labels)natural_image
Front view of a computer interface panel with buttons and ports (no text or symbols visible)| Command Reply No Remote Notes | |||||
| 0 - System Control | |||||
| 0x00 0x11 DeviceTypeRequest | NTSC: 0xF0E0PAL: 0xF1E024P: 0xF2E0 | Enabled | |||
| 1 - Slave Response | |||||
| 0x20 | 0x00 | Stop | Acknowledge | Disabled | |
| 0x20 | 0x01 | Play | Acknowledge | Disabled | |
| 0x20 | 0x02 | Record | Acknowledge | Disabled | |
| 0x20 | 0x04 | StandbyOff | Acknowledge | Disabled | |
| 0x20 | 0x05 | StandbyOn | Acknowledge | Disabled | |
| 0x20 | 0x0F | Eject | Acknowledge | Disabled | |
| 0x20 | 0x10 | FastFwd | Acknowledge | Disabled | |
| 0x21 | 0x11 | JogFwd1 | Acknowledge | Disabled | |
| 0x22 | 0x11 | JogFwd2 | Acknowledge | Disabled | Treated as N=1;Same as JogFwd1 |
| 0x21 | 0x12 | VarFwd1 | Acknowledge | Disabled | Uses ShuttleFwd1 |
| 0x22 | 0x12 | VarFwd2 | Acknowledge | Disabled | Treated as N=1;Same as VarFwd1 |
| 0x21 | 0x13 | ShuttleFwd1 | Acknowledge | Disabled | |
| 0x22 | 0x13 | ShuttleFwd2 | Acknowledge | Disabled | Treated as N=1;Same as ShuttleFwd1 |
| 0x20 | 0x20 | Rewind | Acknowledge | Disabled | |
| 0x21 | 0x21 | JogRev1 | Acknowledge | Disabled | |
| 0x22 | 0x21 | JogRev2 | Acknowledge | Disabled | Treated as N=1;Same as JogRev1 |
| 0x21 | 0x22 | VarRev1 | Acknowledge | Disabled | Uses ShuttleRev1 |
Command Reply No Remote Notes
| 0x22 0x22 VarRev2 Acknowledge Disabled | Treated as N=1;Same as VarRev1 | ||||
| 0x21 | 0x23 | ShuttleRev1 | Acknowledge | Disabled | |
| 0x22 | 0x23 | ShuttleRev2 | Acknowledge | Disabled | Treated as N=1;Same as ShuttleRev1 |
| 0x20 | 0x30 | Preroll | Acknowledge | Disabled | |
| 0x24 0x31 CueData Acknowledge Disabled | |||||
| 0x20 | 0x34 | SyncPlay | Acknowledge | Disabled | |
| 0x20 | 0x40 | Preview | Acknowledge | Disabled | Status bits are set |
| 0x20 | 0x41 | Review | Acknowledge | Disabled | Status bits are set |
| 0x20 | 0x43 | OutpointPreview | Acknowledge | Disabled | |
| 0x22 | 0x5C | DMCSetFwd | Acknowledge | Disabled | |
| 0x22 | 0x5D | DMCSetRev | Acknowledge | Disabled | |
| 0x20 | 0x60 | FullEEOff | Acknowledge | Disabled | |
| 0x20 | 0x61 | FullEEOn | Acknowledge | Disabled | |
| 0x20 | 0x63 | SelectEEOn | Acknowledge | Disabled | |
| 4 - Preset/Select Control | |||||
| 0x40 | 0x10 | InEntry | Acknowledge | Disabled | |
| 0x40 | 0x11 | OutEntry | Acknowledge | Disabled | |
| 0x44 | 0x14 | InDataPreset | Acknowledge | Disabled | |
| 0x44 | 0x15 | OutDataPreset | Acknowledge | Disabled | |
| 0x40 | 0x18 | InShift+ | Acknowledge | Disabled | |
| 0x40 | 0x19 | InShift- | Acknowledge | Disabled | |
| 0x40 | 0x1A | OutShift+ | Acknowledge | Disabled | |
| 0x40 | 0x1B | OutShift- | Acknowledge | Disabled | |
| 0x40 | 0x20 | InReset | Acknowledge | Disabled | |
| 0x40 | 0x21 | OutReset | Acknowledge | Disabled | |
| 0x40 | 0x22 | AlnReset | Acknowledge | Disabled | |
| 0x40 | 0x23 | AOutReset | Acknowledge | Disabled | |
| 0x44 | 0x31 | PrerollPreset | Acknowledge | Disabled | |
| 0x40 | 0x40 | AutoModeOff | Acknowledge | Disabled | ignored, Status bit remembered |
| 0x40 | 0x41 | AutoModeOn | Acknowledge | Disabled | ignored, Status bit remembered |
| 0x41 | 0x37 | InputCheck | Acknowledge | Disabled | |
Command Reply No Remote Notes
6 - Sense Request
| 0x61 0x0A TimeCodeGenSense — — | |||||
| 0x61 0x0C CurrentTimeSense — — | |||||
| 0x60 0x10 InDataSense InData Enabled | |||||
| 0x60 | 0x11 | OutDataSense | OutData | Enabled | |
| 0x60 | 0x12 | AlnDataSense | AlnData | Enabled | |
| 0x60 | 0x13 | AOutDataSense | AOutData | Enabled | |
| 0x61 | 0x20 | StatusSense | StatusData | Enabled | |
| 0x60 | 0x2B | RemainTimeSense | RemainTimeData | Enabled | |
| 0x60 | 0x2E | SpeedSense | SpeedData | Enabled | |
| 0x60 | 0x31 | PrerollTimeSense | PreRollTimeData | Enabled | |
| 0x60 | 0x36 | TimerModeSense | TimerModeData | Enabled | |
| 0x60 | 0x3E | RecordInhibitSense | RecordInhibitStatus | Enabled | |
7 - Sense Reply
| 0x78 | 0x00 | Timer1Data | — | — | Current Time and 00:00:00:00 |
| 0x78 | 0x04 | LTCUserBitsTimeData | — | — | Current Time and 00:00:00:00 |
| 0x78 | 0x06 | VITCUserBitsTimeData | — | — | Current Time and 00:00:00:00 |
| 0x74 | 0x06 | VITCTimeData | — | — | Current Time |
| 0x74 | 0x07 | UserBitsVITCTimeData | — | — | 00:00:00:00 |
| 0x74 | 0x08 | GenTCDATA | — | — | Current Time |
| 0x78 | 0x08 | GenTCUBData | — | — | Current Time and 00:00:00:00 |
| 0x74 | 0x09 | GenUBData | — | — | 00:00:00:00 |
| 0x74 0x10 InData | — — | ||||
| 0x74 | 0x11 | OutData | — | — | |
| 0x74 | 0x12 | AlnData | — | — | |
| 0x74 | 0x13 | AOutData | — | — | |
| 0x74 | 0x14 | CorrectedLTCTimeData | — | — | Current Time |
| 0x70 | 0x20 | StatusData | — | — | Please see “Status Bits” sheet: Limited to 9 bytes of status, silently truncated |
| 0x76 | 0x2B | RemainTimeData | — | — | |
| 0x71 | 0x2E | SpeedData | — | — | |
| 0x74 | 0x31 | PrerollTimeData | — | — | |
| 0x71 | 0x36 | TimerModeData | — | — | Returns 0 (TimeCode) |
| 0x72 | 0x3E | RecordInhibitStatus | — | — | |
Command Reply No Remote Notes
A - Advanced Media Protocol
| 0xA1 | 0x01 | AutoSkip | Acknowledge | Disabled | 8-bit signed number of clips to skip from current clip |
| 0xAX | 0x15 | ListNextID | IDListing | Enabled | when x = 0 single clip request when x = 1, # clips can be specified in the send data |
| 0x20 | 0x29 | ClearPlaylist | Acknowledge | Disabled | |
| 0x41 | 0x42 | SetPlaybackLoop | Acknowledge | Disabled | Bit 0 loop mode enable, 0=false 1=trueBit 1 is single clip/timeline0=single clip1=timeline |
| 0x41 | 0x44 | SetStopMode | Acknowledge | Disabled | 0 = Off1 = Freeze on last frame2 = Freeze on next clip3 = Show black |
| 0x4f | 0x16 | AppendPreset | Acknowledge | Disabled | 2 Bytes for the length N of the clip nameN Bytes for each character of the clip name4 Byte in point timecode (format is FFSSMMHH)4 Byte out point timecode (format is FFSSMMHH) |
Blackmagic Extensions
| 0x82 | 0x02 | BMDSeekToTimelinePosition | Acknowledge | Disabled | 16-bit little endian fractional position [0..65535] |
| 0x81 | 0x03 | BMDSeekRelativeClip | Acknowledge | Disabled | One-byte signed integer, which is the number of clips to skip (negative for backwards). |
RS-422开发人员信息
| bit 7 | bit 6 | bit 5 | bit 4 | bit 3 | bit 2 | bit 1 | bit 0 | |
| Byte 0 | 0 | 0 | Cassette out | 0 | 0 | 0 | 0 | Local |
| Byte 1 | Standby | 0 | Stop | 0 | Rewind | Forward | Record | Play |
| Byte 2 | Servo Lock | 0 | Shuttle | Jog | Var | Direction | Still | 1 |
| Byte 3 | Auto Mode | 0 | 0 | 0 | Aout Set | Ain Set | Out Set | In Set |
| Byte 4 | Select EE | Full EE | Loop Playback | 0 | 0 | 0 | 0 | 0 |
| Byte 5 | 0 | 0 | 0 | 0 | 0 | 0 | 0 | 0 |
| Byte 6 | 0 | Lamp Still | Lamp Fwd | Lamp Rev | 0 | 0 | 0 | 0 |
| Byte 7 | 0 | 0 | 0 | 0 | 0 | 0 | 0 | 0 |
| Byte 8 | 0 | 0 | Near EOT | EOT | 0 | 0 | 0 | 0 |
| Byte 9 | 0 | 0 | 0 | 0 | 0 | 0 | 0 | 0 |
| Variables | |
| Cassette Out | Set if no SSD is present |
| Local | Set if Remote is disabled (local control) |
| Standby | Set if a disk is available |
| Direction | Clear if playback is forwarding, set if playback is reversing |
| Still | Set if playback is paused, or if in input preview mode |
| Auto Mode | Set if in Auto Mode |
| Select EE, Full EE | Set if in input preview mode |
| Lamp Still/Fwd/Rev | Set according to playback speed and direction |
| Near EOT | Set if total space left on available SSDs is less than 3 minutes |
| EOT | Set if total space left on available SSDs is less than 30 seconds |
| Others | |
| Cue Complete (byte 2, bit 0) | Always 1: Cue requests are always instantaneous |
| HyperDeck Serial RS-422 Protocol | ||
| Protocol | Based on Sony 9-pin protocol | |
| Interface | Baud rate | 38.4 Kbps |
| 1 start bit | ||
| 8 data bits | ||
| 1 stop bit | ||
| 1 parity bit | ||
| Odd parity | ||
通过网络传输文件
natural_image
Front view of a 12G SDJ device rear panel showing ports, buttons, and ventilation slots (no readable text or symbols beyond branding)DNxHD编解码器免费下载链接: http://www.avid.com/products/avid-dnxhr-and-dnxhd
| Command Command Description | |
| help or ? Provides help text on all commands and parameters | |
| commands return commands in XML format | |
| device info return device information | |
| disk list query clip list on active disk | |
| disk list: slot id: {n} query clip list on disk in slot {n} | |
| quit disconnect ethernet control | |
| ping check device is responding | |
| preview: enable: {true/false} | switch to preview or output |
| play | play from current timecode |
| play: speed: {-5000 to 5000} | play at specific speed |
| play: loop: {true/false} | play in loops or stop-at-end |
| play: single clip: {true/false} | play current clip or all clips |
| playrange | query playrange setting |
| playrange set: clip id: {n} | set play range to play clip {n} only |
| playrange set: clip id: {n} count: {m} | set play range to {m} clips starting from clip {n} |
| playrange set: in: {inT} out: {outT} | set play range to play between:- timecode {inT} and timecode {outT} |
| playrange set: timeline in: {in} timeline out:{out} | set play range in units of frames between:- timeline position {in} and position {out} clear/reset play range setting |
| playrange clear | clear/reset play range setting |
| play on startup | query unit play on startup state |
| play on startup: enable: {true/false} | enable or disable play on startup |
| play on startup: single clip: {true/false} | play single clip or all clips on startup |
| play option query play options | |
| play option: stop mode:{lastframe/nextframe/black} | set output frame when playback stops |
| record | record from current input |
| record: name: {name} | record named clip |
| record spill | spill current recording to next slot |
Command Command Description
| record: spill: slot id: {n} | spill current recording to specified slotuse current id to spill to same slot |
| stop stop playback or recording | |
| clips count query number of clips on timeline | |
| clips get query all timeline clips | |
| clips get: clip id: {n} query a timeline clip info | |
| clips get: clip id: {n} count: {m} query m clips starting from n | |
| clips get: version: {1/2} | query clip info using specified output version:version 1: is: name startT durationversion 2: id: startT duration inT outT name |
| clips add: name: {name} append a clip to timeline | |
| clips add: clip id: {n} name: {name} insert clip before existing clip {n} | |
| clips add: in: {inT} out: {outT} name: {name} append the {inT} to {outT} portion of clip | |
| clips remove: clip id: {n} | remove clip {n} from the timeline(invalidates clip ids following clip {n}) |
| clips clear empty timeline clip list | |
| transport info query current activity | |
| slot info query active slot | |
| slot info: slot id: {n} query slot {n} | |
| slot select: slot id: {n} switch to specified slot | |
| slot select: video format: {format} | load clips of specified format |
| slot unblock | unblock active slot |
| slot unblock: slot id: {n} | unblock slot {n} |
| cache info | query cache status |
| dynamic range | query dynamic range settings |
| dynamic range: playback override:{off/Rec709/Rec2020_SDR/HLG/ST2084_300/ST2084_500/ST2084_800/ST2084_1000/ST2084_2000/ST2084_4000/ST2084 | set playback dynamic range override |
| dynamic range: record override:{off/Rec709/Rec2020_SDR/HLG/ST2084_300/ST2084_500/ST2084_800/ST2084_1000/ST2084_2000/ST2084_4000/ST2048} | set record dynamic range override |
| notify | query notification status |
| notify: remote: {true/false} | set remote notifications |
| notify: transport: {true/false} | set transport notifications |
| notify: slot: {true/false} | set slot notifications |
| notify: configuration: {true/false} | set configuration notifications |
| notify: dropped frames: {true/false} | set dropped frames notifications |
| notify: display timecode: {true/false} | set display timecode notifications |
Command Command Description
| notify: timeline position: {true/false} set playback timeline position notifications | |
| notify: playrange: {true/false} set playrange notifications | |
| notify: cache: {true/false} set cache notifications | |
| notify: dynamic range: {true/false} set dynamic range settings notifications | |
| notify: slate: {true/false} set digital slate notifications | |
| goto: clip id: {start/end} goto first clip or last clip | |
| goto: clip id: {n} goto clip id {n} | |
| goto: clip id: +{n} go forward {n} clips | |
| goto: clip id: -(n) go backward {n} clips | |
| goto: clip: {n} goto frame position {n} within current clip | |
| goto: clip: +{n} go forward {n} frames within current clip | |
| goto: clip: -(n) go backward {n} frames within current clip | |
| goto: clip: {start/end} | goto start or end of clip |
| goto: timeline: {n} | goto frame position {n} within timeline |
| goto: timeline: +{n} | o forward {n} frames within timeline |
| goto: timeline: -(n} | go backward {n} frames within timeline |
| goto: timeline: {start/end} | goto start or end of timeline |
| goto: timecode: {timecode} | goto specified timecode |
| goto: timecode: +{timecode} | go forward {timecode} duration |
| goto: timecode: -(timecode} | go backward {timecode} duration |
| goto: slot id: {n} | goto slot id {n} |
| jog: timecode: {timecode} | jog to timecode |
| jog: timecode: +{timecode} | jog forward {timecode} duration |
| jog: timecode: -(timecode} | jog backward {timecode} duration |
| shuttle: speed: (-5000 to 5000) | shuttle with speed |
| remote | query unit remote control state |
| remote: enable: {true/false} | enable or disable remote control |
| remote: override: {true/false} | session override remote control |
| configuration | query configuration settings |
| configuration: video input: SDI | switch to SDI input |
| configuration: video input: HDMI | switch to HDMI input |
| configuration: video input: component | switch to component input |
| configuration: audio input: embedded | capture embedded audio |
| configuration: audio input: XLR | capture XLR audio |
| configuration: audio input: RCA | capture RCA audio |
| configuration: file format: {format} | switch to specific file format |
| configuration: audio codec: PCM | switch to PCM audio |
| configuration: audio codec: AAC | switch to AAC audio |
Command Command Description
| configuration: timecode input:{external/embedded/preset/clip} | change the timecode input |
| configuration: timecode output:{clip/timeline/internal} | change the timecode output |
| configuration: timecode preference:{default/dropframe/nondropframe} | whether or not to use drop frame timecodes when not otherwise specified |
| configuration: timecode preset:{timecode} | set the timecode preset |
| configuration: audio input channels: {n} set the number of audio channels recorded to {n} | |
| configuration: record trigger:{none/recordbit/timecoderun} | change the record trigger |
| configuration: record prefix: {name} set the record prefix name (supports UTF-8 name) | |
| configuration: append timestamp:{true/false} | append timestamp to recorded filename |
| configuration: xlr input id: {n} xlr type:{line/mic} | configure xlr input typemultiple xlr inputs can be configured in a single command |
| configuration: genlock input resync:{true/false} | enable or disable genlock input resync |
| uptime return time since last boot | |
| format: prepare: {format} prepare a disk formatting operation to filesystem {format} | |
| format: confirm: {token} perform a pre-prepared formatting operation using token | |
| identify: enable: {true/false} identify the device | |
| watchdog: period: {period in seconds} client connection timeout | |
| reboot reboot device | |
| slate clips slate clips information | |
| slate project slate project information | |
| slate project:←camera: {index}← | set camera index e.g. A |
Command Combinations
You can combine the parameters into a single command, for example:
play: speed: 200 loop: true single clip: true
Or for configuration:
configuration: video input: SDI audio input: XLR
Or to switch to the second disk, but only play NTSC clips:
slot select: slot id: 2 video format: NTSC
Using XML
While you can use the Terminal to talk to HyperDeck, if you are writing software, you can use XML to confirm the existence of a specific command based on the firmware of the HyperDeck you are communicating with. This helps your software user interface adjust to the capabilities of the specific HyperDeck model and software version.
Protocol Details
Connection
The HyperDeck Ethernet server listens on TCP port 9993.
Basic syntax
The HyperDeck protocol is a line oriented text protocol. Lines from the server will be separated by an ascii CR LF sequence. Messages from the client may be separated by LF or CR LF.
New lines are represented in this document as a "←" symbol.
Single line command syntax
Command parameters are usually optional. A command with no parameters is terminated with a new line:
{Command name}
If parameters are specified, the command name is followed by a colon, then pairs of parameter names and values. Each parameter name is terminated with a colon character:
{Command name}: {Parameter}: {Value} {Parameter}: {Value} ...
Multiline command syntax
The HyperDeck protocol also supports an equivalent multiline syntax where each parameter-value pair is entered on a new line. E.g.
{Command name}:←
{Pa ra m e t e r}: { Va lu e}←
{Pa ra m e t e r}: { Va lu e}←
Response syntax
Simple responses from the server consist of a three digit response code and descriptive text terminated by a new line:
{Response code} {Response text}
If a response carries parameters, the response text is terminated with a colon, and parameter name and value pairs follow on subsequent lines until a blank line is returned:
{Response code} {Response text}:←
{Pa ra m e t e r}: { Va lu e}←
{Pa ra m e t e r}: { Va lu e}←
...
←
Successful response codes
A simple acknowledgement of a command is indicated with a response code of 200:
200 ok←
Other successful responses carry parameters and are indicated with response codes in the range of 201 to 299.
Failure response codes
Failure responses to commands are indicated with response codes in the range of 100 to 199:
100 syntax error
101 unsupported parameter
102 invalid value
103 unsupported
104 disk full
105 no disk
106 disk error
107 timeline empty
108 internal error
109 out of range
110 no input
111 remote control disabled
112 clip not found
120 connection rejected
150 invalid state
151 invalid codec
160 invalid format
161 invalid token
162 format not prepared
163 parameterized single line command not supported
Asynchronous response codes
The server may return asynchronous messages at any time. These responses are indicated with response codes in the range of 500 to 599:
5xx {Response Text}:←
{Pa ra m e t e r}: {Va lu e}←
{Pa ra m e t e r}: {Va lu e}←
←
Connection response
On connection, an asynchronous message will be delivered:
500 connection info:←
protocol version: {Version}←
model: {Model Name}←
Connection rejection
Only one client may connect to the server at a time. If other clients attempt to connect concurrently, they will receive an error and be disconnected:
120 connection rejected
Timecode syntax
Timecodes are expressed as non-drop-frame timecode in the format:
HH:MM:SS:FF
Handling of deck "remote" state
The “remote” command may be used to enable or disable the remote control of the deck. Any attempt to change the deck state over ethernet while remote access is disabled will generate an error:
111 remote control disabled
To enable or disable remote control:
remote: enable: {"true", "false"}
The current remote control state may be overridden allowing remote access over ethernet irrespective of the current remote control state:
remote: override: {"true", "false"}
The override state is only valid for the currently connected ethernet client and only while the connection remains open.
The “remote” command may be used to query the remote control state of the deck by specifying no parameters:
remote
The deck will return the current remote control state:
210 remote info:←
enabled: {"true", "false"}
←
override: {"true", "false"}
←
Asynchronous remote control information change notification is disabled by default and may be configured with the "notify" command. When enabled, changes in remote state will generate a "510 remote info:" asynchronous message with the same parameters as the "210 remote info:" message.
Closing connection
The "quit" command instructs the server to cleanly shut down the connection:
quit
Checking connection status
The "ping" command has no function other than to determine if the server is responding:
ping←
Getting help
The "help" or "?" commands return human readable help text describing all available commands and parameters:
help
Or:
?←
The server will respond with a list of all supported commands:
201 help:
{Help Tex t}
{Help Tex t}
Switching to preview mode
The "preview" command instructs the deck to switch between preview mode and output mode:
preview: enable: {"true", "false"}
Playback will be stopped when the deck is switched to preview mode. Capturing will be stopped when the deck is switched to output mode.
Controlling device playback
The "play" command instructs the deck to start playing:
play←
The play command accepts a number of parameters which may be used together in most combinations.
By default, the deck will play all remaining clips on the timeline then stop.
The "single clip" parameter may be used to override this behavior:
play: single clip: {"true", "false"}
By default, the deck will play at normal (100%) speed. An alternate speed may be specified in percentage between -1600 and 1600:
play: speed: {$ normal speed}
By default, the deck will stop playing when it reaches to the end of the timeline. The "loop" parameter may be used to override this behavior:
play: loop: {"true", "false"}
The “playrange” command instructs the deck to play all the clips. To override this behavior: and select a particular clip:
playrange set: clip id: {Clip ID}
To only play a certain timecode range:
playrange set: in: {in timecode} out: {out timecode}
To clear a set playrange and return to the default value:
playrange clear
The “play on startup command” instructs the deck on what action to take on startup. By default, the deck will not play. Use the “enable” command to start playback after each power up.
play on startup: enable { "true", "false" }
By default, the unit will play back all clips on startup. Use the "single clip" command to override.
play on startup: single clip: {"true", "false"}
Stopping deck operation
The "stop" command instructs the deck to stop the current playback or capture:
stop
Changing timeline position
The "goto" command instructs the deck to switch to playback mode and change its position within the timeline.
To go to the start of a specific clip:
goto: clip id: {Clip ID}
To move forward/back {count} clips from the current clip on the current timeline:
goto: clip id: +/- {count}
Note that if the resultant clip id goes beyond the first or last clip on timeline, it will be clamp at the first or last clip.
To go to the start or end of the current clip:
goto: clip: {"start", "end"}
To go to the start of the first clip or the end of the last clip:
goto: timeline: { "start", "end"}
To go to a specified timecode:
goto: timecode: {timecode}
To move forward or back a specified duration in timecode:
goto: timecode: {“+”, “-”} {duration in timecode}
To specify between slot 1 and slot 2:
goto: slot id: {Slot ID}
Note that only one parameter/value pair is allowed for each goto command.
Enumerating supported commands and parameters
The "commands" command returns the supported commands:
commands
The command list is returned in a computer readable XML format:
212 commands:
<commands>
<command name="..."><parameter name="..."/>...</command>
<command name="..."><parameter name="..."/>...</command>
...
</commands>
More XML tokens and parameters may be added in later releases.
Controlling asynchronous notifications
The "notify" command may be used to enable or disable asynchronous notifications from the server.
To enable or disable transport notifications:
notify: transport: {"true", "false"}
To enable or disable slot notifications:
notify: slot: {"true", "false"}
To enable or disable remote notifications:
notify: remote: {"true", "false"}
To enable or disable configuration notifications:
notify: configuration: {"true", "false"}
Multiple parameters may be specified. If no parameters are specified, the server returns the current state of all notifications:
209 notify:
transport: { "true", "false" }←
slot: { "true", "false" }←
remote: { "true", "false" }←
configuration: { "true", "false" }←
dropped frames: { "true", "false" }←
display timecode: { "true", "false" }←
timeline position: { "true", "false" }←
playrange: { "true", "false" }←
cache: { "true", "false" }←
dynamic range: { "true", "false" }←
slate: { "true", "false" }←
Retrieving device information
The "device info" command returns information about the connected deck device:
device info
The server will respond with:
204 device info:←
protocol version: {Version}←
model: {Model Name}←
unique id: {unique alphanumeric identifier}←
slot count: {number of storage slots}←
software version: {software version}←
Retrieving slot information
The "slot info" command returns information about a slot. Without parameters, the command returns information for the currently selected slot:
slot info
If a slot Id is specified, that slot will be queried:
slot info: slot id: {Slot ID}
The server will respond with slot specific information:
202 slot info:←
slot id: {Slot ID}←
    status: {"empty", "mounting", "error", "mounted"}←
volume name: {Volume name}←
recording time: {recording time available in seconds}←
video format: {disk's default video format}←
blocked: {"true", "false"}←
Asynchronous slot information change notification is disabled by default and may be configured with the "notify" command. When enabled, changes in slot state will generate a "502 slot info:" asynchronous message with the same parameters as the "202 slot info:" message.
Retrieving clip information
The "disk list" command returns the information for each playable clip on a given disk. Without parameters, the command returns information for the current active disk:
disk list
If a slot id is specified, the disk in that slot will be queried:
disk list: slot id: {Slot ID}
The server responds with the list of all playable clips on the disk in the format of: Index, name, formats, and duration in timecode:
206 disk list:←
slot id: {Slot ID}←
{clip index}: {name} {file format} {video format} {Duration timecode}←
{clip index}: {name} {file format} {video format} {Duration timecode}←
...
←
Note that the clip index starts from 1.
Retrieving clip count
The "clips count" command returns the number of clips on the current timeline:
clips count ←
The server responds with the number of clips:
214 clips count: ←
clip count: {Count}←
Retrieving timeline information
The "clips get" command returns information for each available clip on the current timeline. Without parameters, the command returns information for all clips on timeline:
clips get←
The server responds with a list of clip IDs, names and timecodes:
205 clips info:←
clip count: {Count}←
{Clip ID}: {Name} {Start timecode} {Duration timecode}←
{Clip ID}: {Name} {Start timecode} {Duration timecode}←
...
Retrieving transport information
The "transport info" command returns the state of the transport:
transport info
The server responds with transport specific information:
208 transport info:
status: { "preview", "stopped", "play", "forward", "rewind", "jog", "shuttle", "record"}←
speed: {Play speed between -5000 and 5000 %}←
slot id: {Slot ID or "none"}←
clip id: {Clip ID or "none"}←
single clip: { "true", "false"}←
display timecode: {timecode}←
timecode: {timecode}←
video format: {Video format}←
loop: { "true", "false"}←
timeline: {n}←
input video format: {Video format"}←
dynamic range: { "off", "Rec709", "Rec2020_SDR", "HLG", "ST2084_300", "ST2084_500", "ST2084_800", "ST2084_1000", "ST2084_2000", "ST2084_4000", "ST2048" or "none"}←
The "timecode" value is the timecode within the current timeline for playback or the clip for record. The "display timecode" is the timecode displayed on the front of the deck. The two timecodes will differ in some deck modes.
Asynchronous transport information change notification is disabled by default and may be configured with the "notify" command. When enabled, changes in transport state will generate a "508 transport info:" asynchronous message with the same parameters as the "208 transport info:" message.
Video Formats
The following video formats are currently supported on HyperDeck Studio:
NTSC, PAL, NTSCp, PALp
720p50, 720p5994, 720p60
1080p23976, 1080p24, 1080p25, 1080p2997, 1080p30
1080i50, 1080i5994, 1080i60
HyperDeck Studio Pro and Plus models support these 4k formats:
4Kp23976, 4Kp24, 4Kp25, 4Kp2997, 4Kp30
HyperDeck Studio 4K Pro adds support for the following 4k formats:
4Kp50, 4Kp5994, 4Kp60
Video format support may vary between models and software releases.
File Formats
All HyperDeck models currently support the following file formats:
H.264High_SDI
H.264High
H.264Medium
H.264Low
QuickTimeProResHQ
QuickTimeProRes
QuickTimeProResLT
QuickTimeProResProxy
QuickTimeDNxHD220x
DNxHD220x
QuickTimeDNxHD145
DNxHD145
QuickTimeDNxHD45
DNxHD45
HyperDeck Studio 4K Pro also supports the following file formats:
H.265High_SDI
H.265High
H.265Medium
H.265Low
QuickTimeDNxHR_HQX
DNxHR_HQX 4Kp60
QuickTimeDNxHR_SQ
DNxHR_SQ
QuickTimeDNxHR_LB
DNxHR_LB
Supported file formats may vary between models and software releases.
Querying and updating configuration information
The "configuration" command may be used to query the current configuration of the deck:
configuration
The server returns the configuration of the deck:
211 configuration:
audio input: { "embedded", "XLR", "RCA" }←
audio mapping: {n}←
video input: { "SDI", "HDMI", "component", "composite" }←
file format: {format}←
audio codec: { "PCM", "AAC" }←
timecode input: { "external", "embedded", "preset", "clip" }←
timecode output: { "clip", "timeline" }←
timecode preference: { "default", "dropframe", "nondropframe" }←
timecode preset: {timecode}←
audio input channels: {n}←
record trigger: { "none", "recordbit", "timecoderun" }←
record prefix: {name}←
append timestamp: { "true", "false" }←
One or more configuration parameters may be specified to change the configuration of the deck.
To change the current video input:
configuration: video input: {"SDI", "HDMI", "component"}
Valid video inputs may vary between models. To configure the current audio input:
configuration: audio input: {"embedded", "XLR", "RCA"}
Valid audio inputs may vary between models.
To configure the current file format:
configuration: file format: {File format}
Note that changes to the file format may require the deck to reset, which will cause the client connection to be closed. In such case, response code 213 will be returned (instead of 200) before the client connection is closed:
"213 deck rebooting"
Asynchronous configuration information change notification is disabled by default and may be configured with the "notify" command. When enabled, changes in configuration will generate a "511 configuration:" asynchronous message with the same parameters as the "211 configuration:" message.
Selecting active slot and video format
The "slot select" command instructs the deck to switch to a specified slot, or/and to select a specified output video format.
To switch to a specified slot:
slot select: slot id: {slot ID}
To select the output video format:
slot select: video format: {video format}
Either or all slot select parameters may be specified. Note that selecting video format will result in a rescan of the disk to reconstruct the timeline with all clips of the specified video format.
Clearing the current timeline
The "clips clear" command instructs the deck to empty the current timeline:
clips clear
The server responds with
200 ok←
Adding a clip to the current timeline
The "clips add:" command instructs the deck to add a clip to the current timeline:
clips add: name: {"clip name"}
The server responds with
200 ok←
or in case of error
1xx {error description}
Configuring the watchdog
The “watchdog” command instructs the deck to monitor the connected client and terminate the connection if the client is inactive for at least a specified period of time.
To configure the watchdog:
watchdog: period: {period in seconds}
To avoid disconnection, the client must send a command to the server at least every [period] seconds. Note that if the period is set to 0 or less than 0, connection monitoring will be disabled.
帮助
获得帮助

natural_image
Circular portrait photo of a smiling man in a dark shirt against a gray background (no text or symbols)환영합니다
natural_image
Front view of a black audio workstation with multiple video player channels and playback controls (no readable text or symbols)HyperDeck Studio HD Pro와 HyperDeck Studio 4K Pro

natural_image
Black audio player interface with playback controls and digital display (no readable text or symbols)HyperDeck Studio HD Mini

natural_image
Black audio recording device with multiple control knobs and a digital display showing time, timestamp, and preview (no readable text or symbols on main body)HyperDeck Studio HD Plus
natural_image
Illustration of hands interacting with a device panel showing playback controls and a video player interface (no readable text or symbols)미디어 연결하기
natural_image
Diagram of a server rack with ports and an orange arrow indicating a specific component (no text or symbols present)미디어 바
LUT 확인하기
natural_image
Front view of a rack-mounted server unit with control panel and drive bays (no visible text or labels)natural_image
Front view of a computer interface panel with ports and buttons (no text or symbols visible)| Command Reply No Remote Notes | |||||
| 0 - System Control | |||||
| 0x00 0x11 DeviceTypeRequest | NTSC: 0xF0E0PAL: 0xF1E024P: 0xF2E0 | Enabled | |||
| 1 - Slave Response | |||||
| 0x20 | 0x00 | Stop | Acknowledge | Disabled | |
| 0x20 | 0x01 | Play | Acknowledge | Disabled | |
| 0x20 | 0x02 | Record | Acknowledge | Disabled | |
| 0x20 | 0x04 | StandbyOff | Acknowledge | Disabled | |
| 0x20 | 0x05 | StandbyOn | Acknowledge | Disabled | |
| 0x20 | 0x0F | Eject | Acknowledge | Disabled | |
| 0x20 | 0x10 | FastFwd | Acknowledge | Disabled | |
| 0x21 | 0x11 | JogFwd1 | Acknowledge | Disabled | |
| 0x22 | 0x11 | JogFwd2 | Acknowledge | Disabled | Treated as N=1;Same as JogFwd1 |
| 0x21 | 0x12 | VarFwd1 | Acknowledge | Disabled | Uses ShuttleFwd1 |
| 0x22 | 0x12 | VarFwd2 | Acknowledge | Disabled | Treated as N=1;Same as VarFwd1 |
| 0x21 | 0x13 | ShuttleFwd1 | Acknowledge | Disabled | |
| 0x22 | 0x13 | ShuttleFwd2 | Acknowledge | Disabled | Treated as N=1;Same as ShuttleFwd1 |
| 0x20 | 0x20 | Rewind | Acknowledge | Disabled | |
| 0x21 | 0x21 | JogRev1 | Acknowledge | Disabled | |
| 0x22 | 0x21 | JogRev2 | Acknowledge | Disabled | Treated as N=1;Same as JogRev1 |
| 0x21 | 0x22 | VarRev1 | Acknowledge | Disabled | Uses ShuttleRev1 |
Command Reply No Remote Notes
| 0x22 0x22 VarRev2 Acknowledge Disabled | Treated as N=1;Same as VarRev1 | ||||
| 0x21 | 0x23 | ShuttleRev1 | Acknowledge | Disabled | |
| 0x22 | 0x23 | ShuttleRev2 | Acknowledge | Disabled | Treated as N=1;Same as ShuttleRev1 |
| 0x20 | 0x30 | Preroll | Acknowledge | Disabled | |
| 0x24 0x31 CueData Acknowledge Disabled | |||||
| 0x20 | 0x34 | SyncPlay | Acknowledge | Disabled | |
| 0x20 | 0x40 | Preview | Acknowledge | Disabled | Status bits are set |
| 0x20 | 0x41 | Review | Acknowledge | Disabled | Status bits are set |
| 0x20 | 0x43 | OutpointPreview | Acknowledge | Disabled | |
| 0x22 | 0x5C | DMCSetFwd | Acknowledge | Disabled | |
| 0x22 | 0x5D | DMCSetRev | Acknowledge | Disabled | |
| 0x20 | 0x60 | FullEEOff | Acknowledge | Disabled | |
| 0x20 | 0x61 | FullEEOn | Acknowledge | Disabled | |
| 0x20 | 0x63 | SelectEEOn | Acknowledge | Disabled | |
| 4 - Preset/Select Control | |||||
| 0x40 | 0x10 | InEntry | Acknowledge | Disabled | |
| 0x40 | 0x11 | OutEntry | Acknowledge | Disabled | |
| 0x44 | 0x14 | InDataPreset | Acknowledge | Disabled | |
| 0x44 | 0x15 | OutDataPreset | Acknowledge | Disabled | |
| 0x40 | 0x18 | InShift+ | Acknowledge | Disabled | |
| 0x40 | 0x19 | InShift- | Acknowledge | Disabled | |
| 0x40 | 0x1A | OutShift+ | Acknowledge | Disabled | |
| 0x40 | 0x1B | OutShift- | Acknowledge | Disabled | |
| 0x40 | 0x20 | InReset | Acknowledge | Disabled | |
| 0x40 | 0x21 | OutReset | Acknowledge | Disabled | |
| 0x40 | 0x22 | AlnReset | Acknowledge | Disabled | |
| 0x40 | 0x23 | AOutReset | Acknowledge | Disabled | |
| 0x44 | 0x31 | PrerollPreset | Acknowledge | Disabled | |
| 0x40 | 0x40 | AutoModeOff | Acknowledge | Disabled | ignored, Status bit remembered |
| 0x40 | 0x41 | AutoModeOn | Acknowledge | Disabled | ignored, Status bit remembered |
| 0x41 | 0x37 | InputCheck | Acknowledge | Disabled | |
Command Reply No Remote Notes
6 - Sense Request
| 0x61 0x0A TimeCodeGenSense — — | |||||
| 0x61 0x0C CurrentTimeSense — — | |||||
| 0x60 0x10 InDataSense InData Enabled | |||||
| 0x60 | 0x11 | OutDataSense | OutData | Enabled | |
| 0x60 | 0x12 | AlnDataSense | AlnData | Enabled | |
| 0x60 | 0x13 | AOutDataSense | AOutData | Enabled | |
| 0x61 | 0x20 | StatusSense | StatusData | Enabled | |
| 0x60 | 0x2B | RemainTimeSense | RemainTimeData | Enabled | |
| 0x60 | 0x2E | SpeedSense | SpeedData | Enabled | |
| 0x60 | 0x31 | PrerollTimeSense | PreRollTimeData | Enabled | |
| 0x60 | 0x36 | TimerModeSense | TimerModeData | Enabled | |
| 0x60 | 0x3E | RecordInhibitSense | RecordInhibitStatus | Enabled | |
7 - Sense Reply
| 0x78 | 0x00 | Timer1Data | — | — | Current Time and 00:00:00:00 |
| 0x78 | 0x04 | LTCUserBitsTimeData | — | — | Current Time and 00:00:00:00 |
| 0x78 | 0x06 | VITCUserBitsTimeData | — | — | Current Time and 00:00:00:00 |
| 0x74 | 0x06 | VITCTimeData | — | — | Current Time |
| 0x74 | 0x07 | UserBitsVITCTimeData | — | — | 00:00:00:00 |
| 0x74 | 0x08 | GenTCDATA | — | — | Current Time |
| 0x78 | 0x08 | GenTCUBData | — | — | Current Time and 00:00:00:00 |
| 0x74 | 0x09 | GenUBData | — | — | 00:00:00:00 |
| 0x74 0x10 InData | — — | ||||
| 0x74 | 0x11 | OutData | — | — | |
| 0x74 | 0x12 | AlnData | — | — | |
| 0x74 | 0x13 | AOutData | — | — | |
| 0x74 | 0x14 | CorrectedLTCTimeData | — | — | Current Time |
| 0x70 | 0x20 | StatusData | — | — | Please see “Status Bits” sheet: Limited to 9 bytes of status, silently truncated |
| 0x76 | 0x2B | RemainTimeData | — | — | |
| 0x71 | 0x2E | SpeedData | — | — | |
| 0x74 | 0x31 | PrerollTimeData | — | — | |
| 0x71 | 0x36 | TimerModeData | — | — | Returns 0 (TimeCode) |
| 0x72 | 0x3E | RecordInhibitStatus | — | — | |
Command Reply No Remote Notes
A - Advanced Media Protocol
| 0xA1 | 0x01 | AutoSkip | Acknowledge | Disabled | 8-bit signed number of clips to skip from current clip |
| 0xAX | 0x15 | ListNextID | IDListing | Enabled | when x = 0 single clip request when x = 1, # clips can be specified in the send data |
| 0x20 | 0x29 | ClearPlaylist | Acknowledge | Disabled | |
| 0x41 | 0x42 | SetPlaybackLoop | Acknowledge | Disabled | Bit 0 loop mode enable, 0=false 1=trueBit 1 is single clip/timeline0=single clip1=timeline |
| 0x41 | 0x44 | SetStopMode | Acknowledge | Disabled | 0 = Off1 = Freeze on last frame2 = Freeze on next clip3 = Show black |
| 0x4f | 0x16 | AppendPreset | Acknowledge | Disabled | 2 Bytes for the length N of the clip nameN Bytes for each character of the clip name4 Byte in point timecode (format is FFSSMMHH)4 Byte out point timecode (format is FFSSMMHH) |
Blackmagic Extensions
| 0x82 | 0x02 | BMDSeekToTimelinePosition | Acknowledge | Disabled | 16-bit little endian fractional position [0..65535] |
| 0x81 | 0x03 | BMDSeekRelativeClip | Acknowledge | Disabled | One-byte signed integer, which is the number of clips to skip (negative for backwards). |
RS-422 개발자 정보
| bit 7 | bit 6 | bit 5 | bit 4 | bit 3 | bit 2 | bit 1 | bit 0 | |
| Byte 0 | 0 | 0 | Cassette out | 0 | 0 | 0 | 0 | Local |
| Byte 1 | Standby | 0 | Stop | 0 | Rewind | Forward | Record | Play |
| Byte 2 | Servo Lock | 0 | Shuttle | Jog | Var | Direction | Still | 1 |
| Byte 3 | Auto Mode | 0 | 0 | 0 | Aout Set | Ain Set | Out Set | In Set |
| Byte 4 | Select EE | Full EE | Loop Playback | 0 | 0 | 0 | 0 | 0 |
| Byte 5 | 0 | 0 | 0 | 0 | 0 | 0 | 0 | 0 |
| Byte 6 | 0 | Lamp Still | Lamp Fwd | Lamp Rev | 0 | 0 | 0 | 0 |
| Byte 7 | 0 | 0 | 0 | 0 | 0 | 0 | 0 | 0 |
| Byte 8 | 0 | 0 | Near EOT | EOT | 0 | 0 | 0 | 0 |
| Byte 9 | 0 | 0 | 0 | 0 | 0 | 0 | 0 | 0 |
| Variables | |
| Cassette Out | Set if no SSD is present |
| Local | Set if Remote is disabled (local control) |
| Standby | Set if a disk is available |
| Direction | Clear if playback is forwarding, set if playback is reversing |
| Still | Set if playback is paused, or if in input preview mode |
| Auto Mode | Set if in Auto Mode |
| Select EE, Full EE | Set if in input preview mode |
| Lamp Still/Fwd/Rev | Set according to playback speed and direction |
| Near EOT | Set if total space left on available SSDs is less than 3 minutes |
| EOT | Set if total space left on available SSDs is less than 30 seconds |
| Others | |
| Cue Complete (byte 2, bit 0) | Always 1: Cue requests are always instantaneous |
| HyperDeck Serial RS-422 Protocol | ||
| Protocol | Based on Sony 9-pin protocol | |
| Interface | Baud rate | 38.4 Kbps |
| 1 start bit | ||
| 8 data bits | ||
| 1 stop bit | ||
| 1 parity bit | ||
| Odd parity | ||
네트워크를 통해 파일 전송하기
natural_image
Front view of a 12G SDJ computer interface panel showing ports, buttons, and memory slots (no text or symbols beyond branding)| Command Command Description | |
| help or ? Provides help text on all commands and parameters | |
| commands return commands in XML format | |
| device info return device information | |
| disk list query clip list on active disk | |
| disk list: slot id: {n} query clip list on disk in slot {n} | |
| quit disconnect ethernet control | |
| ping check device is responding | |
| preview: enable: {true/false} switch to preview or output | |
| play play from current timecode | |
| play: speed: { -5000 to 5000} play at specific speed | |
| play: loop: {true/false} play in loops or stop-at-end | |
| play: single clip: {true/false} | play current clip or all clips |
| playrange | query playrange setting |
| playrange set: clip id: {n} | set play range to play clip {n} only |
| playrange set: clip id: {n} count: {m} | set play range to {m} clips starting from clip {n} |
| playrange set: in: {inT} out: {outT} | set play range to play between:- timecode {inT} and timecode {outT} |
| playrange set: timeline in: {in} timeline out:{out} | set play range in units of frames between:- timeline position {in} and position {out} clear/reset play range setting |
| playrange clear | clear/reset play range setting |
| play on startup | query unit play on startup state |
| play on startup: enable: {true/false} | enable or disable play on startup |
| play on startup: single clip: {true/false} | play single clip or all clips on startup |
| play option query play options | |
| play option: stop mode:{lastframe/nextframe/black} | set output frame when playback stops |
| record | record from current input |
| record: name: {name} | record named clip |
| record spill | spill current recording to next slot |
Command Command Description
| record: spill: slot id: {n} | spill current recording to specified slotuse current id to spill to same slot |
| stop stop playback or recording | |
| clips count query number of clips on timeline | |
| clips get query all timeline clips | |
| clips get: clip id: {n} query a timeline clip info | |
| clips get: clip id: {n} count: {m} query m clips starting from n | |
| clips get: version: {1/2} | query clip info using specified output version:version 1: is: name startT durationversion 2: id: startT duration inT outT name |
| clips add: name: {name} append a clip to timeline | |
| clips add: clip id: {n} name: {name} insert clip before existing clip {n} | |
| clips add: in: {inT} out: {outT} name: {name} append the {inT} to {outT} portion of clip | |
| clips remove: clip id: {n} | remove clip {n} from the timeline(invalidates clip ids following clip {n}) |
| clips clear empty timeline clip list | |
| transport info query current activity | |
| slot info query active slot | |
| slot info: slot id: {n} query slot {n} | |
| slot select: slot id: {n} switch to specified slot | |
| slot select: video format: {format} | load clips of specified format |
| slot unblock | unblock active slot |
| slot unblock: slot id: {n} | unblock slot {n} |
| cache info | query cache status |
| dynamic range | query dynamic range settings |
| dynamic range: playback override:{off/Rec709/Rec2020_SDR/HLG/ST2084_300/ST2084_500/ST2084_800/ST2084_1000/ST2084_2000/ST2084_4000/ST2084 | set playback dynamic range override |
| dynamic range: record override:{off/Rec709/Rec2020_SDR/HLG/ST2084_300/ST2084_500/ST2084_800/ST2084_1000/ST2084_2000/ST2084_4000/ST2048} | set record dynamic range override |
| notify | query notification status |
| notify: remote: {true/false} | set remote notifications |
| notify: transport: {true/false} | set transport notifications |
| notify: slot: {true/false} | set slot notifications |
| notify: configuration: {true/false} | set configuration notifications |
| notify: dropped frames: {true/false} | set dropped frames notifications |
| notify: display timecode: {true/false} | set display timecode notifications |
Command Command Description
| notify: timeline position: {true/false} set playback timeline position notifications | |
| notify: playrange: {true/false} set playrange notifications | |
| notify: cache: {true/false} set cache notifications | |
| notify: dynamic range: {true/false} set dynamic range settings notifications | |
| notify: slate: {true/false} set digital slate notifications | |
| goto: clip id: {start/end} goto first clip or last clip | |
| goto: clip id: {n} goto clip id {n} | |
| goto: clip id: +{n} go forward {n} clips | |
| goto: clip id: -(n) go backward {n} clips | |
| goto: clip: {n} goto frame position {n} within current clip | |
| goto: clip: +{n} go forward {n} frames within current clip | |
| goto: clip: -(n) go backward {n} frames within current clip | |
| goto: clip: {start/end} | goto start or end of clip |
| goto: timeline: {n} | goto frame position {n} within timeline |
| goto: timeline: +{n} | o forward {n} frames within timeline |
| goto: timeline: -(n} | go backward {n} frames within timeline |
| goto: timeline: {start/end} | goto start or end of timeline |
| goto: timecode: {timecode} | goto specified timecode |
| goto: timecode: +{timecode} | go forward {timecode} duration |
| goto: timecode: -(timecode} | go backward {timecode} duration |
| goto: slot id: {n} | goto slot id {n} |
| jog: timecode: {timecode} | jog to timecode |
| jog: timecode: +{timecode} | jog forward {timecode} duration |
| jog: timecode: -(timecode} | jog backward {timecode} duration |
| shuttle: speed: {-5000 to 5000} | shuttle with speed |
| remote | query unit remote control state |
| remote: enable: {true/false} | enable or disable remote control |
| remote: override: {true/false} | session override remote control |
| configuration | query configuration settings |
| configuration: video input: SDI | switch to SDI input |
| configuration: video input: HDMI | switch to HDMI input |
| configuration: video input: component | switch to component input |
| configuration: audio input: embedded | capture embedded audio |
| configuration: audio input: XLR | capture XLR audio |
| configuration: audio input: RCA | capture RCA audio |
| configuration: file format: {format} | switch to specific file format |
| configuration: audio codec: PCM | switch to PCM audio |
| configuration: audio codec: AAC | switch to AAC audio |
Command Command Description
| configuration: timecode input:{external/embedded/preset/clip} | change the timecode input |
| configuration: timecode output:{clip/timeline/internal} | change the timecode output |
| configuration: timecode preference:{default/dropframe/nondropframe} | whether or not to use drop frame timecodes when not otherwise specified |
| configuration: timecode preset:{timecode} | set the timecode preset |
| configuration: audio input channels: {n} set the number of audio channels recorded to {n} | |
| configuration: record trigger:{none/recordbit/timecoderun} | change the record trigger |
| configuration: record prefix: {name} set the record prefix name (supports UTF-8 name) | |
| configuration: append timestamp:{true/false} | append timestamp to recorded filename |
| configuration: xlr input id: {n} xlr type:{line/mic} | configure xlr input typemultiple xlr inputs can be configured in a single command |
| configuration: genlock input resync:{true/false} | enable or disable genlock input resync |
| uptime return time since last boot | |
| format: prepare: {format} prepare a disk formatting operation to filesystem {format} | |
| format: confirm: {token} perform a pre-prepared formatting operation using token | |
| identify: enable: {true/false} identify the device | |
| watchdog: period: {period in seconds} client | connection timeout |
| reboot reboot device | |
| slate clips slate clips information | |
| slate project slate project information | |
| slate project:←camera: {index}← | set camera index e.g. A |
Command Combinations
You can combine the parameters into a single command, for example:
play: speed: 200 loop: true single clip: true
Or for configuration:
configuration: video input: SDI audio input: XLR
Or to switch to the second disk, but only play NTSC clips:
slot select: slot id: 2 video format: NTSC
Using XML
While you can use the Terminal to talk to HyperDeck, if you are writing software, you can use XML to confirm the existence of a specific command based on the firmware of the HyperDeck you are communicating with. This helps your software user interface adjust to the capabilities of the specific HyperDeck model and software version.
Protocol Details
Connection
The HyperDeck Ethernet server listens on TCP port 9993.
Basic syntax
The HyperDeck protocol is a line oriented text protocol. Lines from the server will be separated by an ascii CR LF sequence. Messages from the client may be separated by LF or CR LF.
New lines are represented in this document as a "←" symbol.
Single line command syntax
Command parameters are usually optional. A command with no parameters is terminated with a new line:
{Command name}
If parameters are specified, the command name is followed by a colon, then pairs of parameter names and values. Each parameter name is terminated with a colon character:
{Command name}: {Parameter}: {Value} {Parameter}: {Value} ...
Multiline command syntax
The HyperDeck protocol also supports an equivalent multiline syntax where each parameter-value pair is entered on a new line. E.g.
{Command name}:←
{Pa ra m e t e r}: { Va lu e}←
{Pa ra m e t e r}: { Va lu e}←
Response syntax
Simple responses from the server consist of a three digit response code and descriptive text terminated by a new line:
{Response code} {Response text}
If a response carries parameters, the response text is terminated with a colon, and parameter name and value pairs follow on subsequent lines until a blank line is returned:
{Response code} {Response text}:←
{Pa ra m e t e r}: { Va lu e}←
{Pa ra m e t e r}: { Va lu e}←
...
←
Successful response codes
A simple acknowledgement of a command is indicated with a response code of 200:
200 ok←
Other successful responses carry parameters and are indicated with response codes in the range of 201 to 299.
Failure response codes
Failure responses to commands are indicated with response codes in the range of 100 to 199:
100 syntax error
101 unsupported parameter
102 invalid value
103 unsupported
104 disk full
105 no disk
106 disk error
107 timeline empty
108 internal error
109 out of range
110 no input
111 remote control disabled
112 clip not found
120 connection rejected
150 invalid state
151 invalid codec
160 invalid format
161 invalid token
162 format not prepared
163 parameterized single line command not supported
Asynchronous response codes
The server may return asynchronous messages at any time. These responses are indicated with response codes in the range of 500 to 599:
5xx {Response Text}:←
{Pa ra m e t e r}: {Va lu e}←
{Pa ra m e t e r}: {Va lu e}←
←
Connection response
On connection, an asynchronous message will be delivered:
500 connection info:←
protocol version: {Version}←
model: {Model Name}←
Connection rejection
Only one client may connect to the server at a time. If other clients attempt to connect concurrently, they will receive an error and be disconnected:
120 connection rejected
Timecode syntax
Timecodes are expressed as non-drop-frame timecode in the format:
HH:MM:SS:FF
Handling of deck "remote" state
The “remote” command may be used to enable or disable the remote control of the deck. Any attempt to change the deck state over ethernet while remote access is disabled will generate an error:
111 remote control disabled
To enable or disable remote control:
remote: enable: {"true", "false"}
The current remote control state may be overridden allowing remote access over ethernet irrespective of the current remote control state:
remote: override: {"true", "false"}
The override state is only valid for the currently connected ethernet client and only while the connection remains open.
The “remote” command may be used to query the remote control state of the deck by specifying no parameters:
remote
The deck will return the current remote control state:
210 remote info:←
enabled: {"true", "false"}
←
override: {"true", "false"}
←
Asynchronous remote control information change notification is disabled by default and may be configured with the "notify" command. When enabled, changes in remote state will generate a "510 remote info:" asynchronous message with the same parameters as the "210 remote info:" message.
Closing connection
The "quit" command instructs the server to cleanly shut down the connection:
quit
Checking connection status
The "ping" command has no function other than to determine if the server is responding:
ping←
Getting help
The "help" or "?" commands return human readable help text describing all available commands and parameters:
help
Or:
?←
The server will respond with a list of all supported commands:
201 help:
{Help Tex t}
{Help Tex t}
Switching to preview mode
The "preview" command instructs the deck to switch between preview mode and output mode:
preview: enable: {"true", "false"}
Playback will be stopped when the deck is switched to preview mode. Capturing will be stopped when the deck is switched to output mode.
Controlling device playback
The "play" command instructs the deck to start playing:
play←
The play command accepts a number of parameters which may be used together in most combinations.
By default, the deck will play all remaining clips on the timeline then stop.
The "single clip" parameter may be used to override this behavior:
play: single clip: {"true", "false"}
By default, the deck will play at normal (100%) speed. An alternate speed may be specified in percentage between -1600 and 1600:
play: speed: {$ normal speed}
By default, the deck will stop playing when it reaches to the end of the timeline. The "loop" parameter may be used to override this behavior:
play: loop: {"true", "false"}
The “playrange” command instructs the deck to play all the clips. To override this behavior: and select a particular clip:
playrange set: clip id: {Clip ID}
To only play a certain timecode range:
playrange set: in: {in timecode} out: {out timecode}
To clear a set playrange and return to the default value:
playrange clear
The “play on startup command” instructs the deck on what action to take on startup. By default, the deck will not play. Use the “enable” command to start playback after each power up.
play on startup: enable { "true", "false" }
By default, the unit will play back all clips on startup. Use the "single clip" command to override.
play on startup: single clip: {"true", "false"}
Stopping deck operation
The "stop" command instructs the deck to stop the current playback or capture:
stop←
Changing timeline position
The "goto" command instructs the deck to switch to playback mode and change its position within the timeline.
To go to the start of a specific clip:
goto: clip id: {Clip ID}
To move forward/back {count} clips from the current clip on the current timeline:
goto: clip id: +/- {count}
Note that if the resultant clip id goes beyond the first or last clip on timeline, it will be clamp at the first or last clip.
To go to the start or end of the current clip:
goto: clip: { "start", "end"}
To go to the start of the first clip or the end of the last clip:
goto: timeline: { "start", "end"}
To go to a specified timecode:
goto: timecode: {timecode}
To move forward or back a specified duration in timecode:
goto: timecode: {"+", "-"}{duration in timecode}
To specify between slot 1 and slot 2:
goto: slot id: {Slot ID}
Note that only one parameter/value pair is allowed for each goto command.
Enumerating supported commands and parameters
The "commands" command returns the supported commands:
commands
The command list is returned in a computer readable XML format:
212 commands:
<commands>
<command name="..."><parameter name="..."/>...</command>
<command name="..."><parameter name="..."/>...</command>
...
</commands>
More XML tokens and parameters may be added in later releases.
Controlling asynchronous notifications
The "notify" command may be used to enable or disable asynchronous notifications from the server.
To enable or disable transport notifications:
notify: transport: {"true", "false"}
To enable or disable slot notifications:
notify: slot: {"true", "false"}
To enable or disable remote notifications:
notify: remote: {"true", "false"}
To enable or disable configuration notifications:
notify: configuration: {"true", "false"}
Multiple parameters may be specified. If no parameters are specified, the server returns the current state of all notifications:
209 notify:
transport: { "true", "false" }←
slot: { "true", "false" }←
remote: { "true", "false" }←
configuration: { "true", "false" }←
dropped frames: { "true", "false" }←
display timecode: { "true", "false" }←
timeline position: { "true", "false" }←
playrange: { "true", "false" }←
cache: { "true", "false" }←
dynamic range: { "true", "false" }←
slate: { "true", "false" }←
Retrieving device information
The "device info" command returns information about the connected deck device:
device info
The server will respond with:
204 device info:←
protocol version: {Version}←
model: {Model Name}←
unique id: {unique alphanumeric identifier}←
slot count: {number of storage slots}←
software version: {software version}←
Retrieving slot information
The "slot info" command returns information about a slot. Without parameters, the command returns information for the currently selected slot:
slot info
If a slot Id is specified, that slot will be queried:
slot info: slot id: {Slot ID}
The server will respond with slot specific information:
202 slot info:←
slot id: {Slot ID}←
    status: {"empty", "mounting", "error", "mounted"}←
volume name: {Volume name}←
recording time: {recording time available in seconds}←
video format: {disk's default video format}←
blocked: {"true", "false"}←
Asynchronous slot information change notification is disabled by default and may be configured with the "notify" command. When enabled, changes in slot state will generate a "502 slot info:" asynchronous message with the same parameters as the "202 slot info:" message.
Retrieving clip information
The "disk list" command returns the information for each playable clip on a given disk. Without parameters, the command returns information for the current active disk:
disk list
If a slot id is specified, the disk in that slot will be queried:
disk list: slot id: {Slot ID}
The server responds with the list of all playable clips on the disk in the format of: Index, name, formats, and duration in timecode:
206 disk list:←
slot id: {Slot ID}←
{clip index}: {name} {file format} {video format} {Duration timecode}←
{clip index}: {name} {file format} {video format} {Duration timecode}←
...
←
Note that the clip index starts from 1.
Retrieving clip count
The "clips count" command returns the number of clips on the current timeline:
clips count ←
The server responds with the number of clips:
214 clips count: ←
clip count: {Count}←
Retrieving timeline information
The "clips get" command returns information for each available clip on the current timeline. Without parameters, the command returns information for all clips on timeline:
clips get
The server responds with a list of clip IDs, names and timecodes:
205 clips info:←
clip count: {Count}←
{Clip ID}: {Name} {Start timecode} {Duration timecode}←
{Clip ID}: {Name} {Start timecode} {Duration timecode}←
...
Retrieving transport information
The "transport info" command returns the state of the transport:
transport info
The server responds with transport specific information:
208 transport info:
status: { "preview", "stopped", "play", "forward", "rewind", "jog", "shuttle", "record"}←
speed: {Play speed between -5000 and 5000 %}←
slot id: {Slot ID or "none"}←
clip id: {Clip ID or "none"}←
single clip: { "true", "false"}←
display timecode: {timecode}←
timecode: {timecode}←
video format: {Video format}←
loop: { "true", "false"}←
timeline: {n}←
input video format: {Video format"}←
dynamic range: { "off", "Rec709", "Rec2020_SDR", "HLG", "ST2084_300", "ST2084_500", "ST2084_800", "ST2084_1000", "ST2084_2000", "ST2084_4000", "ST2048" or "none"}←
The "timecode" value is the timecode within the current timeline for playback or the clip for record. The "display timecode" is the timecode displayed on the front of the deck. The two timecodes will differ in some deck modes.
Asynchronous transport information change notification is disabled by default and may be configured with the "notify" command. When enabled, changes in transport state will generate a "508 transport info:" asynchronous message with the same parameters as the "208 transport info:" message.
Video Formats
The following video formats are currently supported on HyperDeck Studio:
NTSC, PAL, NTSCp, PALp
720p50, 720p5994, 720p60
1080p23976, 1080p24, 1080p25, 1080p2997, 1080p30
1080i50, 1080i5994, 1080i60
HyperDeck Studio Pro and Plus models support these 4k formats:
4Kp23976, 4Kp24, 4Kp25, 4Kp2997, 4Kp30
HyperDeck Studio 4K Pro adds support for the following 4k formats:
4Kp50, 4Kp5994, 4Kp60
Video format support may vary between models and software releases.
File Formats
All HyperDeck models currently support the following file formats:
H.264High_SDI
H.264High
H.264Medium
H.264Low
QuickTimeProResHQ
QuickTimeProRes
QuickTimeProResLT
QuickTimeProResProxy
QuickTimeDNxHD220x
DNxHD220x
QuickTimeDNxHD145
DNxHD145
QuickTimeDNxHD45
DNxHD45
HyperDeck Studio 4K Pro also supports the following file formats:
H.265High_SDI
H.265High
H.265Medium
H.265Low
QuickTimeDNxHR_HQX
DNxHR_HQX 4Kp60
QuickTimeDNxHR_SQ
DNxHR_SQ
QuickTimeDNxHR_LB
DNxHR_LB
Supported file formats may vary between models and software releases.
Querying and updating configuration information
The "configuration" command may be used to query the current configuration of the deck:
configuration
The server returns the configuration of the deck:
211 configuration:
audio input: { "embedded", "XLR", "RCA" }
audio mapping: {n}
video input: { "SDI", "HDMI", "component", "composite" }
file format: {format}
audio codec: { "PCM", "AAC" }
timecode input: { "external", "embedded", "preset", "clip" }
timecode output: { "clip", "timeline" }
timecode preference: { "default", "dropframe", "nondropframe" }
timecode preset: {timecode}
audio input channels: {n}
record trigger: { "none", "recordbit", "timecoderun" }
record prefix: {name}
append timestamp: { "true", "false" }
One or more configuration parameters may be specified to change the configuration of the deck.
To change the current video input:
configuration: video input: {"SDI", "HDMI", "component"}
Valid video inputs may vary between models. To configure the current audio input:
configuration: audio input: {"embedded", "XLR", "RCA"}
Valid audio inputs may vary between models.
To configure the current file format:
configuration: file format: {File format}
Note that changes to the file format may require the deck to reset, which will cause the client connection to be closed. In such case, response code 213 will be returned (instead of 200) before the client connection is closed:
"213 deck rebooting"
Asynchronous configuration information change notification is disabled by default and may be configured with the "notify" command. When enabled, changes in configuration will generate a "511 configuration:" asynchronous message with the same parameters as the "211 configuration:" message.
Selecting active slot and video format
The "slot select" command instructs the deck to switch to a specified slot, or/and to select a specified output video format.
To switch to a specified slot:
slot select: slot id: {slot ID}
To select the output video format:
slot select: video format: {video format}
Either or all slot select parameters may be specified. Note that selecting video format will result in a rescan of the disk to reconstruct the timeline with all clips of the specified video format.
Clearing the current timeline
The "clips clear" command instructs the deck to empty the current timeline:
clips clear
The server responds with
200 ok←
Adding a clip to the current timeline
The "clips add:" command instructs the deck to add a clip to the current timeline:
clips add: name: {"clip name"}
The server responds with
200 ok←
or in case of error
1xx {error description}
Configuring the watchdog
The “watchdog” command instructs the deck to monitor the connected client and terminate the connection if the client is inactive for at least a specified period of time.
To configure the watchdog:
watchdog: period: {period in seconds}
To avoid disconnection, the client must send a command to the server at least every [period] seconds. Note that if the period is set to 0 or less than 0, connection monitoring will be disabled.
도움말
지원 받기

natural_image
Circular portrait photo of a smiling man in a dark shirt against a gray background (no text or symbols)natural_image
Front view of a black audio workstation with multiple video player channels and control knobs (no readable text or symbols)HyperDeck Studio HD Pro и HyperDeck Studio 4K Pro

natural_image
Black audio player interface with playback controls and digital display (no readable text or symbols)
natural_image
Black audio recording device with control buttons and playback screen (no readable text or symbols)HyperDeck Studio HD Mini HyperDeck Studio HD Plus
natural_image
Illustration of hands interacting with a device panel showing playback controls and a video player interface (no readable text or symbols)natural_image
Diagram of a server rack with ports and an orange arrow indicating a specific component (no text or symbols present)natural_image
Front view of a rack-mounted server unit with ports and control panel (no visible text or labels)natural_image
Front view of a computer interface panel with buttons and ports (no text or symbols visible)| Command Reply No Remote Notes | |||||
| 0 - System Control | |||||
| 0x00 0x11 DeviceTypeRequest | NTSC: 0xF0E0PAL: 0xF1E024P: 0xF2E0 | Enabled | |||
| 1 - Slave Response | |||||
| 0x20 | 0x00 | Stop | Acknowledge | Disabled | |
| 0x20 | 0x01 | Play | Acknowledge | Disabled | |
| 0x20 | 0x02 | Record | Acknowledge | Disabled | |
| 0x20 | 0x04 | StandbyOff | Acknowledge | Disabled | |
| 0x20 | 0x05 | StandbyOn | Acknowledge | Disabled | |
| 0x20 | 0x0F | Eject | Acknowledge | Disabled | |
| 0x20 | 0x10 | FastFwd | Acknowledge | Disabled | |
| 0x21 | 0x11 | JogFwd1 | Acknowledge | Disabled | |
| 0x22 | 0x11 | JogFwd2 | Acknowledge | Disabled | Treated as N=1;Same as JogFwd1 |
| 0x21 | 0x12 | VarFwd1 | Acknowledge | Disabled | Uses ShuttleFwd1 |
| 0x22 | 0x12 | VarFwd2 | Acknowledge | Disabled | Treated as N=1;Same as VarFwd1 |
| 0x21 | 0x13 | ShuttleFwd1 | Acknowledge | Disabled | |
| 0x22 | 0x13 | ShuttleFwd2 | Acknowledge | Disabled | Treated as N=1;Same as ShuttleFwd1 |
| 0x20 | 0x20 | Rewind | Acknowledge | Disabled | |
| 0x21 | 0x21 | JogRev1 | Acknowledge | Disabled | |
| 0x22 | 0x21 | JogRev2 | Acknowledge | Disabled | Treated as N=1;Same as JogRev1 |
| 0x21 | 0x22 | VarRev1 | Acknowledge | Disabled | Uses ShuttleRev1 |
Command Reply No Remote Notes
| 0x22 0x22 VarRev2 Acknowledge Disabled | Treated as N=1;Same as VarRev1 | ||||
| 0x21 | 0x23 | ShuttleRev1 | Acknowledge | Disabled | |
| 0x22 | 0x23 | ShuttleRev2 | Acknowledge | Disabled | Treated as N=1;Same as ShuttleRev1 |
| 0x20 | 0x30 | Preroll | Acknowledge | Disabled | |
| 0x24 0x31 CueData Acknowledge Disabled | |||||
| 0x20 | 0x34 | SyncPlay | Acknowledge | Disabled | |
| 0x20 | 0x40 | Preview | Acknowledge | Disabled | Status bits are set |
| 0x20 | 0x41 | Review | Acknowledge | Disabled | Status bits are set |
| 0x20 | 0x43 | OutpointPreview | Acknowledge | Disabled | |
| 0x22 | 0x5C | DMCSetFwd | Acknowledge | Disabled | |
| 0x22 | 0x5D | DMCSetRev | Acknowledge | Disabled | |
| 0x20 | 0x60 | FullEEOff | Acknowledge | Disabled | |
| 0x20 | 0x61 | FullEEOn | Acknowledge | Disabled | |
| 0x20 | 0x63 | SelectEEOn | Acknowledge | Disabled | |
| 4 - Preset/Select Control | |||||
| 0x40 | 0x10 | InEntry | Acknowledge | Disabled | |
| 0x40 | 0x11 | OutEntry | Acknowledge | Disabled | |
| 0x44 | 0x14 | InDataPreset | Acknowledge | Disabled | |
| 0x44 | 0x15 | OutDataPreset | Acknowledge | Disabled | |
| 0x40 | 0x18 | InShift+ | Acknowledge | Disabled | |
| 0x40 | 0x19 | InShift- | Acknowledge | Disabled | |
| 0x40 | 0x1A | OutShift+ | Acknowledge | Disabled | |
| 0x40 | 0x1B | OutShift- | Acknowledge | Disabled | |
| 0x40 | 0x20 | InReset | Acknowledge | Disabled | |
| 0x40 | 0x21 | OutReset | Acknowledge | Disabled | |
| 0x40 | 0x22 | AlnReset | Acknowledge | Disabled | |
| 0x40 | 0x23 | AOutReset | Acknowledge | Disabled | |
| 0x44 | 0x31 | PrerollPreset | Acknowledge | Disabled | |
| 0x40 | 0x40 | AutoModeOff | Acknowledge | Disabled | ignored, Status bit remembered |
| 0x40 | 0x41 | AutoModeOn | Acknowledge | Disabled | ignored, Status bit remembered |
| 0x41 | 0x37 | InputCheck | Acknowledge | Disabled | |
Command Reply No Remote Notes
6 - Sense Request
| 0x61 0x0A TimeCodeGenSense — — | |||||
| 0x61 0x0C CurrentTimeSense — — | |||||
| 0x60 0x10 InDataSense InData Enabled | |||||
| 0x60 | 0x11 | OutDataSense | OutData | Enabled | |
| 0x60 | 0x12 | AlnDataSense | AlnData | Enabled | |
| 0x60 | 0x13 | AOutDataSense | AOutData | Enabled | |
| 0x61 | 0x20 | StatusSense | StatusData | Enabled | |
| 0x60 | 0x2B | RemainTimeSense | RemainTimeData | Enabled | |
| 0x60 | 0x2E | SpeedSense | SpeedData | Enabled | |
| 0x60 | 0x31 | PrerollTimeSense | PreRollTimeData | Enabled | |
| 0x60 | 0x36 | TimerModeSense | TimerModeData | Enabled | |
| 0x60 | 0x3E | RecordInhibitSense | RecordInhibitStatus | Enabled | |
7 - Sense Reply
| 0x78 | 0x00 | Timer1Data | — | — | Current Time and 00:00:00:00 |
| 0x78 | 0x04 | LTCUserBitsTimeData | — | — | Current Time and 00:00:00:00 |
| 0x78 | 0x06 | VITCUserBitsTimeData | — | — | Current Time and 00:00:00:00 |
| 0x74 | 0x06 | VITCTimeData | — | — | Current Time |
| 0x74 | 0x07 | UserBitsVITCTimeData | — | — | 00:00:00:00 |
| 0x74 | 0x08 | GenTCDATA | — | — | Current Time |
| 0x78 | 0x08 | GenTCUBData | — | — | Current Time and 00:00:00:00 |
| 0x74 | 0x09 | GenUBData | — | — | 00:00:00:00 |
| 0x74 0x10 InData | — — | ||||
| 0x74 | 0x11 | OutData | — | — | |
| 0x74 | 0x12 | AlnData | — | — | |
| 0x74 | 0x13 | AOutData | — | — | |
| 0x74 | 0x14 | CorrectedLTCTimeData | — | — | Current Time |
| 0x70 | 0x20 | StatusData | — | — | Please see “Status Bits” sheet: Limited to 9 bytes of status, silently truncated |
| 0x76 | 0x2B | RemainTimeData | — | — | |
| 0x71 | 0x2E | SpeedData | — | — | |
| 0x74 | 0x31 | PrerollTimeData | — | — | |
| 0x71 | 0x36 | TimerModeData | — | — | Returns 0 (TimeCode) |
| 0x72 | 0x3E | RecordInhibitStatus | — | — | |
Command Reply No Remote Notes
A - Advanced Media Protocol
| 0xA1 | 0x01 | AutoSkip | Acknowledge | Disabled | 8-bit signed number of clips to skip from current clip |
| 0xAX | 0x15 | ListNextID | IDListing | Enabled | when x = 0 single clip request when x = 1, # clips can be specified in the send data |
| 0x20 | 0x29 | ClearPlaylist | Acknowledge | Disabled | |
| 0x41 | 0x42 | SetPlaybackLoop | Acknowledge | Disabled | Bit 0 loop mode enable, 0=false 1=trueBit 1 is single clip/timeline0=single clip1=timeline |
| 0x41 | 0x44 | SetStopMode | Acknowledge | Disabled | 0 = Off1 = Freeze on last frame2 = Freeze on next clip3 = Show black |
| 0x4f | 0x16 | AppendPreset | Acknowledge | Disabled | 2 Bytes for the length N of the clip nameN Bytes for each character of the clip name4 Byte in point timecode (format is FFSSMMHH)4 Byte out point timecode (format is FFSSMMHH) |
Blackmagic Extensions
| 0x82 | 0x02 | BMDSeekToTimelinePosition | Acknowledge | Disabled | 16-bit little endian fractional position [0..65535] |
| 0x81 | 0x03 | BMDSeekRelativeClip | Acknowledge | Disabled | One-byte signed integer, which is the number of clips to skip (negative for backwards). |
| Variables | |
| Cassette Out | Set if no SSD is present |
| Local | Set if Remote is disabled (local control) |
| Standby | Set if a disk is available |
| Direction | Clear if playback is forwarding, set if playback is reversing |
| Still | Set if playback is paused, or if in input preview mode |
| Auto Mode | Set if in Auto Mode |
| Select EE, Full EE | Set if in input preview mode |
| Lamp Still/Fwd/Rev | Set according to playback speed and direction |
| Near EOT | Set if total space left on available SSDs is less than 3 minutes |
| EOT | Set if total space left on available SSDs is less than 30 seconds |
| Others | |
| Cue Complete (byte 2, bit 0) | Always 1: Cue requests are always instantaneous |
| HyperDeck Serial RS-422 Protocol | ||
| Protocol | Based on Sony 9-pin protocol | |
| Interface | Baud rate 38.4 Kbps | |
| 1 start bit | ||
| 8 data bits | ||
| 1 stop bit | ||
| 1 parity bit | ||
| Odd parity | ||
natural_image
Front view of a server rack with I2G SDI branding and multiple ports (no readable text or symbols beyond branding)Command Command Description
| help or ? Provides help text on all commands and parameters | |
| commands return commands in XML format | |
| device info return device information | |
| disk list query clip list on active disk | |
| disk list: slot id: {n} query clip list on disk in slot {n} | |
| quit disconnect ethernet control | |
| ping check device is responding | |
| preview: enable: {true/false} switch to preview or output | |
| play play from current timecode | |
| play: speed: {-5000 to 5000} play at specific speed | |
| play: loop: {true/false} play in loops or stop-at-end | |
| play: single clip: {true/false} play current clip or all clips | |
| playrange query playrange setting | |
| playrange set: clip id: {n} | set play range to play clip {n} only |
| playrange set: clip id: {n} count: {m} | set play range to {m} clips starting from clip {n} |
| playrange set: in: {inT} out: {outT} | set play range to play between:- timecode {inT} and timecode {outT} |
| playrange set: timeline in: {in} timeline out:{out} | set play range in units of frames between:- timeline position {in} and position {out} clear/reset play range setting |
| playrange clear | clear/reset play range setting |
| play on startup | query unit play on startup state |
| play on startup: enable: {true/false} | enable or disable play on startup |
| play on startup: single clip: {true/false} | play single clip or all clips on startup |
| play option query play options | |
| play option: stop mode:{lastframe/nextframe/black} | set output frame when playback stops |
| record | record from current input |
| record: name: {name} | record named clip |
| record spill | spill current recording to next slot |
Command Command Description
| record: spill: slot id: {n} | spill current recording to specified slotuse current id to spill to same slot |
| stop stop playback or recording | |
| clips count query number of clips on timeline | |
| clips get query all timeline clips | |
| clips get: clip id: {n} query a timeline clip info | |
| clips get: clip id: {n} count: {m} query m clips starting from n | |
| clips get: version: {1/2} | query clip info using specified output version:version 1: is: name startT durationversion 2: id: startT duration inT outT name |
| clips add: name: {name} append a clip to timeline | |
| clips add: clip id: {n} name: {name} insert clip before existing clip {n} | |
| clips add: in: {inT} out: {outT} name: {name} append the {inT} to {outT} portion of clip | |
| clips remove: clip id: {n} | remove clip {n} from the timeline(invalidates clip ids following clip {n}) |
| clips clear empty timeline clip list | |
| transport info query current activity | |
| slot info query active slot | |
| slot info: slot id: {n} query slot {n} | |
| slot select: slot id: {n} switch to specified slot | |
| slot select: video format: {format} | load clips of specified format |
| slot unblock | unblock active slot |
| slot unblock: slot id: {n} | unblock slot {n} |
| cache info | query cache status |
| dynamic range | query dynamic range settings |
| dynamic range: playback override:{off/Rec709/Rec2020_SDR/HLG/ST2084_300/ST2084_500/ST2084_800/ST2084_1000/ST2084_2000/ST2084_4000/ST2084 | set playback dynamic range override |
| dynamic range: record override:{off/Rec709/Rec2020_SDR/HLG/ST2084_300/ST2084_500/ST2084_800/ST2084_1000/ST2084_2000/ST2084_4000/ST2048} | set record dynamic range override |
| notify | query notification status |
| notify: remote: {true/false} | set remote notifications |
| notify: transport: {true/false} | set transport notifications |
| notify: slot: {true/false} | set slot notifications |
| notify: configuration: {true/false} | set configuration notifications |
| notify: dropped frames: {true/false} | set dropped frames notifications |
| notify: display timecode: {true/false} | set display timecode notifications |
Command Command Description
| notify: timeline position: {true/false} set playback timeline position notifications | |
| notify: playrange: {true/false} set playrange notifications | |
| notify: cache: {true/false} set cache notifications | |
| notify: dynamic range: {true/false} set dynamic range settings notifications | |
| notify: slate: {true/false} set digital slate notifications | |
| goto: clip id: {start/end} goto first clip or last clip | |
| goto: clip id: {n} goto clip id {n} | |
| goto: clip id: +{n} go forward {n} clips | |
| goto: clip id: -(n) go backward {n} clips | |
| goto: clip: {n} goto frame position {n} within current clip | |
| goto: clip: +{n} go forward {n} frames within current clip | |
| goto: clip: -(n) go backward {n} frames within current clip | |
| goto: clip: {start/end} | goto start or end of clip |
| goto: timeline: {n} | goto frame position {n} within timeline |
| goto: timeline: +{n} | o forward {n} frames within timeline |
| goto: timeline: -(n} | go backward {n} frames within timeline |
| goto: timeline: {start/end} | goto start or end of timeline |
| goto: timecode: {timecode} | goto specified timecode |
| goto: timecode: +{timecode} | go forward {timecode} duration |
| goto: timecode: -(timecode} | go backward {timecode} duration |
| goto: slot id: {n} | goto slot id {n} |
| jog: timecode: {timecode} | jog to timecode |
| jog: timecode: +{timecode} | jog forward {timecode} duration |
| jog: timecode: -(timecode} | jog backward {timecode} duration |
| shuttle: speed: {-5000 to 5000} | shuttle with speed |
| remote | query unit remote control state |
| remote: enable: {true/false} | enable or disable remote control |
| remote: override: {true/false} | session override remote control |
| configuration | query configuration settings |
| configuration: video input: SDI | switch to SDI input |
| configuration: video input: HDMI | switch to HDMI input |
| configuration: video input: component | switch to component input |
| configuration: audio input: embedded | capture embedded audio |
| configuration: audio input: XLR | capture XLR audio |
| configuration: audio input: RCA | capture RCA audio |
| configuration: file format: {format} | switch to specific file format |
| configuration: audio codec: PCM | switch to PCM audio |
| configuration: audio codec: AAC | switch to AAC audio |
Command Command Description
| configuration: timecode input:{external/embedded/preset/clip} | change the timecode input |
| configuration: timecode output:{clip/timeline/internal} | change the timecode output |
| configuration: timecode preference:{default/dropframe/nondropframe} | whether or not to use drop frame timecodes when not otherwise specified |
| configuration: timecode preset:{timecode} | set the timecode preset |
| configuration: audio input channels: {n} set the number of audio channels recorded to {n} | |
| configuration: record trigger:{none/recordbit/timecoderun} | change the record trigger |
| configuration: record prefix: {name} set the record prefix name (supports UTF-8 name) | |
| configuration: append timestamp:{true/false} | append timestamp to recorded filename |
| configuration: xlr input id: {n} xlr type:{line/mic} | configure xlr input typemultiple xlr inputs can be configured in a single command |
| configuration: genlock input resync:{true/false} | enable or disable genlock input resync |
| uptime return time since last boot | |
| format: prepare: {format} prepare a disk formatting operation to filesystem {format} | |
| format: confirm: {token} perform a pre-prepared formatting operation using token | |
| identify: enable: {true/false} identify the device | |
| watchdog: period: {period in seconds} client | connection timeout |
| reboot reboot device | |
| slate clips slate clips information | |
| slate project slate project information | |
| slate project:←camera: {index}← | set camera index e.g. A |
Command Combinations
You can combine the parameters into a single command, for example:
play: speed: 200 loop: true single clip: true
Or for configuration:
configuration: video input: SDI audio input: XLR
Or to switch to the second disk, but only play NTSC clips:
slot select: slot id: 2 video format: NTSC
Using XML
While you can use the Terminal to talk to HyperDeck, if you are writing software, you can use XML to confirm the existence of a specific command based on the firmware of the HyperDeck you are communicating with. This helps your software user interface adjust to the capabilities of the specific HyperDeck model and software version.
Protocol Details
Connection
The HyperDeck Ethernet server listens on TCP port 9993.
Basic syntax
The HyperDeck protocol is a line oriented text protocol. Lines from the server will be separated by an ascii CR LF sequence. Messages from the client may be separated by LF or CR LF.
New lines are represented in this document as a "←" symbol.
Single line command syntax
Command parameters are usually optional. A command with no parameters is terminated with a new line:
{Command name}
If parameters are specified, the command name is followed by a colon, then pairs of parameter names and values. Each parameter name is terminated with a colon character:
{Command name}: {Parameter}: {Value} {Parameter}: {Value} ...
Multiline command syntax
The HyperDeck protocol also supports an equivalent multiline syntax where each parameter-value pair is entered on a new line. E.g.
{Command name}:←
{Pa ra m e t e r}: { Va lu e}←
{Pa ra m e t e r}: { Va lu e}←
Response syntax
Simple responses from the server consist of a three digit response code and descriptive text terminated by a new line:
{Response code} {Response text}
If a response carries parameters, the response text is terminated with a colon, and parameter name and value pairs follow on subsequent lines until a blank line is returned:
{Response code} {Response text}:←
{Pa ra m e t e r}: { Va lu e}←
{Pa ra m e t e r}: { Va lu e}←
...
←
Successful response codes
A simple acknowledgement of a command is indicated with a response code of 200:
200 ok←
Other successful responses carry parameters and are indicated with response codes in the range of 201 to 299.
Failure response codes
Failure responses to commands are indicated with response codes in the range of 100 to 199:
100 syntax error
101 unsupported parameter
102 invalid value
103 unsupported
104 disk full
105 no disk
106 disk error
107 timeline empty
108 internal error
109 out of range
110 no input
111 remote control disabled
112 clip not found
120 connection rejected
150 invalid state
151 invalid codec
160 invalid format
161 invalid token
162 format not prepared
163 parameterized single line command not supported
Asynchronous response codes
The server may return asynchronous messages at any time. These responses are indicated with response codes in the range of 500 to 599:
5xx {Response Text}:←
{Pa ra m e t e r}: {Va lu e}←
{Pa ra m e t e r}: {Va lu e}←
Connection response
On connection, an asynchronous message will be delivered:
500 connection info:←
protocol version: {Version}←
model: {Model Name}←
Connection rejection
Only one client may connect to the server at a time. If other clients attempt to connect concurrently, they will receive an error and be disconnected:
120 connection rejected
Timecode syntax
Timecodes are expressed as non-drop-frame timecode in the format:
HH:MM:SS:FF
Handling of deck "remote" state
The “remote” command may be used to enable or disable the remote control of the deck. Any attempt to change the deck state over ethernet while remote access is disabled will generate an error:
111 remote control disabled←
To enable or disable remote control:
remote: enable: {"true", "false"}
The current remote control state may be overridden allowing remote access over ethernet irrespective of the current remote control state:
remote: override: {"true", "false"}
The override state is only valid for the currently connected ethernet client and only while the connection remains open.
The “remote” command may be used to query the remote control state of the deck by specifying no parameters:
remote
The deck will return the current remote control state:
210 remote info:←
enabled: {"true", "false"}←
override: {"true", "false"}←
Asynchronous remote control information change notification is disabled by default and may be configured with the "notify" command. When enabled, changes in remote state will generate a "510 remote info:" asynchronous message with the same parameters as the "210 remote info:" message.
Closing connection
The "quit" command instructs the server to cleanly shut down the connection:
quit
Checking connection status
The "ping" command has no function other than to determine if the server is responding:
ping←
Getting help
The "help" or "?" commands return human readable help text describing all available commands and parameters:
help
Or:
?←
The server will respond with a list of all supported commands:
201 help:
{Help Tex t}
{Help Tex t}
Switching to preview mode
The "preview" command instructs the deck to switch between preview mode and output mode:
preview: enable: {"true", "false"}
Playback will be stopped when the deck is switched to preview mode. Capturing will be stopped when the deck is switched to output mode.
Controlling device playback
The "play" command instructs the deck to start playing:
play←
The play command accepts a number of parameters which may be used together in most combinations.
By default, the deck will play all remaining clips on the timeline then stop.
The "single clip" parameter may be used to override this behavior:
play: single clip: {"true", "false"}
By default, the deck will play at normal (100%) speed. An alternate speed may be specified in percentage between -1600 and 1600:
play: speed: {% normal speed}
By default, the deck will stop playing when it reaches to the end of the timeline. The "loop" parameter may be used to override this behavior:
play: loop: {"true", "false"}
The “playrange” command instructs the deck to play all the clips. To override this behavior: and select a particular clip:
playrange set: clip id: {Clip ID}
To only play a certain timecode range:
playrange set: in: {in timecode} out: {out timecode}
To clear a set playrange and return to the default value:
playrange clear
The “play on startup command” instructs the deck on what action to take on startup. By default, the deck will not play. Use the “enable” command to start playback after each power up.
play on startup: enable { "true", "false"}
By default, the unit will play back all clips on startup. Use the "single clip" command to override.
play on startup: single clip: {"true", "false"}
Stopping deck operation
The "stop" command instructs the deck to stop the current playback or capture:
stop←
Changing timeline position
The "goto" command instructs the deck to switch to playback mode and change its position within the timeline.
To go to the start of a specific clip:
goto: clip id: {Clip ID}
To move forward/back {count} clips from the current clip on the current timeline:
goto: clip id: +/- {count}
Note that if the resultant clip id goes beyond the first or last clip on timeline, it will be clamp at the first or last clip.
To go to the start or end of the current clip:
goto: clip: {"start", "end"}
To go to the start of the first clip or the end of the last clip:
goto: timeline: { "start", "end"}
To go to a specified timecode:
goto: timecode: {timecode}
To move forward or back a specified duration in timecode:
goto: timecode: {“+”, “-”} {duration in timecode}
To specify between slot 1 and slot 2:
goto: slot id: {Slot ID}
Note that only one parameter/value pair is allowed for each goto command.
Enumerating supported commands and parameters
The "commands" command returns the supported commands:
commands
The command list is returned in a computer readable XML format:
212 commands:
<commands>
<command name="..."><parameter name="..."/>...</command>
<command name="..."><parameter name="..."/>...</command>
...
</commands>
More XML tokens and parameters may be added in later releases.
Controlling asynchronous notifications
The "notify" command may be used to enable or disable asynchronous notifications from the server.
To enable or disable transport notifications:
notify: transport: {"true", "false"}
To enable or disable slot notifications:
notify: slot: {"true", "false"}
To enable or disable remote notifications:
notify: remote: {"true", "false"}
To enable or disable configuration notifications:
notify: configuration: {"true", "false"}
Multiple parameters may be specified. If no parameters are specified, the server returns the current state of all notifications:
209 notify:←
transport: { "true", "false" }←
slot: { "true", "false" }←
remote: { "true", "false" }←
configuration: { "true", "false" }←
dropped frames: { "true", "false" }←
display timecode: { "true", "false" }←
timeline position: { "true", "false" }←
playrange: { "true", "false" }←
cache: { "true", "false" }←
dynamic range: { "true", "false" }←
slate: { "true", "false" }←
Retrieving device information
The "device info" command returns information about the connected deck device:
device info
The server will respond with:
204 device info:←
protocol version: {Version}←
model: {Model Name}←
unique id: {unique alphanumeric identifier}←
slot count: {number of storage slots}←
software version: {software version}←
Retrieving slot information
The "slot info" command returns information about a slot. Without parameters, the command returns information for the currently selected slot:
slot info
If a slot id is specified, that slot will be queried:
slot info: slot id: {Slot ID}
The server will respond with slot specific information:
202 slot info:←
slot id: {Slot ID}←
    status: {"empty", "mounting", "error", "mounted"}←
volume name: {Volume name}←
recording time: {recording time available in seconds}←
video format: {disk's default video format}←
blocked: {"true", "false"}←
Asynchronous slot information change notification is disabled by default and may be configured with the "notify" command. When enabled, changes in slot state will generate a "502 slot info:" asynchronous message with the same parameters as the "202 slot info:" message.
Retrieving clip information
The "disk list" command returns the information for each playable clip on a given disk. Without parameters, the command returns information for the current active disk:
disk list
If a slot id is specified, the disk in that slot will be queried:
disk list: slot id: {Slot ID}
The server responds with the list of all playable clips on the disk in the format of: Index, name, formats, and duration in timecode:
206 disk list:←
slot id: {Slot ID}←
{clip index}: {name} {file format} {video format} {Duration timecode}←
{clip index}: {name} {file format} {video format} {Duration timecode}←
...
←
Note that the clip index starts from 1.
Retrieving clip count
The "clips count" command returns the number of clips on the current timeline:
clips count ←
The server responds with the number of clips:
214 clips count: ←
clip count: {Count}←
Retrieving timeline information
The "clips get" command returns information for each available clip on the current timeline. Without parameters, the command returns information for all clips on timeline:
clips get←
The server responds with a list of clip IDs, names and timecodes:
205 clips info:←
clip count: {Count}←
{Clip ID}: {Name} {Start timecode} {Duration timecode}←
{Clip ID}: {Name} {Start timecode} {Duration timecode}←
...
Retrieving transport Information
The "transport info" command returns the state of the transport:
transport info ←
The server responds with transport specific information:
208 transport info:
status: { "preview", "stopped", "play", "forward", "rewind", "jog", "shuttle","record"}←
speed: {Play speed between -5000 and 5000 %}←
slot id: {Slot ID or "none"}←
clip id: {Clip ID or "none"}←
single clip: { "true", "false"}←
display timecode: {timecode}←
timecode: {timecode}←
video format: {Video format}←
loop: { "true", "false"}←
timeline: {n}←
input video format: {Video format"}←
dynamic range: { "off", "Rec709", "Rec2020_SDR", "HLG", "ST2084_300", "ST2084_500", "ST2084_800", "ST2084_1000", "ST2084_2000", "ST2084_4000", "ST2048" or "none"}←
The "timecode" value is the timecode within the current timeline for playback or the clip for record. The "display timecode" is the timecode displayed on the front of the deck. The two timecodes will differ in some deck modes.
Asynchronous transport information change notification is disabled by default and may be configured with the "notify" command. When enabled, changes in transport state will generate a "508 transport info:" asynchronous message with the same parameters as the "208 transport info:" message.
Video Formats
The following video formats are currently supported on HyperDeck Studio:
NTSC, PAL, NTSCp, PALp
720p50, 720p5994, 720p60
1080p23976, 1080p24, 1080p25, 1080p2997, 1080p30
1080i50, 1080i5994, 1080i60
HyperDeck Studio Pro and Plus models support these 4k formats:
4Kp23976, 4Kp24, 4Kp25, 4Kp2997, 4Kp30
HyperDeck Studio 4K Pro adds support for the following 4k formats:
4Kp50, 4Kp5994, 4Kp60
Video format support may vary between models and software releases.
File Formats
All HyperDeck models currently support the following file formats:
H.264High_SDI
H.264High
H.264Medium
H.264Low
QuickTimeProResHQ
QuickTimeProRes
QuickTimeProResLT
QuickTimeProResProxy
QuickTimeDNxHD220x
DNxHD220x
QuickTimeDNxHD145
DNxHD145
QuickTimeDNxHD45
DNxHD45
HyperDeck Studio 4K Pro also supports the following file formats:
H.265High_SDI
H.265High
H.265Medium
H.265Low
QuickTimeDNxHR_HQX
DNxHR_HQX 4Kp60
QuickTimeDNxHR_SQ
DNxHR_SQ
QuickTimeDNxHR_LB
DNxHR_LB
Supported file formats may vary between models and software releases.
Querying and updating configuration information
The "configuration" command may be used to query the current configuration of the deck:
configuration
The server returns the configuration of the deck:
211 configuration:←
audio input: { "embedded", "XLR", "RCA" }←
audio mapping: {n}←
video input: { "SDI", "HDMI", "component", "composite" }←
file format: {format}←
audio codec: { "PCM", "AAC" }←
timecode input: { "external", "embedded", "preset", "clip" }←
timecode output: { "clip", "timeline" }←
timecode preference: { "default", "dropframe", "nondropframe" }←
timecode preset: {timecode}←
audio input channels: {n}←
record trigger: { "none", "recordbit", "timecoderun" }←
record prefix: {name}←
append timestamp: { "true", "false" }←
One or more configuration parameters may be specified to change the configuration of the deck.
To change the current video input:
configuration: video input: {"SDI", "HDMI", "component"}
Valid video inputs may vary between models. To configure the current audio input:
configuration: audio input: {"embedded", "XLR", "RCA"}
Valid audio inputs may vary between models.
To configure the current file format:
configuration: file format: {File format}
Note that changes to the file format may require the deck to reset, which will cause the client connection to be closed. In such case, response code 213 will be returned (instead of 200) before the client connection is closed:
"213 deck rebooting"
Asynchronous configuration information change notification is disabled by default and may be configured with the "notify" command. When enabled, changes in configuration will generate a "511 configuration:" asynchronous message with the same parameters as the "211 configuration:" message.
Selecting active slot and video format
The "slot select" command instructs the deck to switch to a specified slot, or/and to select a specified output video format.
To switch to a specified slot:
slot select: slot id: {slot ID}
To select the output video format:
slot select: video format: {video format}
Either or all slot select parameters may be specified. Note that selecting video format will result in a rescan of the disk to reconstruct the timeline with all clips of the specified video format.
Clearing the current timeline
The "clips clear" command instructs the deck to empty the current timeline:
clips clear
The server responds with
200 ok←
Adding a clip to the current timeline
The "clips add:" command instructs the deck to add a clip to the current timeline:
clips add: name: {"clip name"}
The server responds with
200 ok←
or in case of error
1xx {error description}
Configuring the watchdog
The “watchdog” command instructs the deck to monitor the connected client and terminate the connection if the client is inactive for at least a specified period of time.
To configure the watchdog:
watchdog: period: {period in seconds}
To avoid disconnection, the client must send a command to the server at least every {period} seconds. Note that if the period is set to 0 or less than 0, connection monitoring will be disabled.
Помощь
Как получить помощь

natural_image
Circular portrait photo of a smiling man in a dark shirt against a gray background (no text or symbols)Gentile utente,
CEO Blackmagic Design
Indice
Registratori su disco HyperDeck 573
natural_image
Front view of a black audio workstation with multiple video player channels and control knobs (no readable text or symbols)HyperDeck Studio HD Pro e HyperDeck Studio 4K Pro

natural_image
Black electronic audio recording device with control panel and digital display (no readable text or symbols)
natural_image
Black audio recording device with control buttons and a digital display showing time, location, and terrain (no readable text or symbols)HyperDeck Studio HD Mini HyperDeck Studio HD Plus
natural_image
Illustration of a computer interface with buttons and a video player (no text or symbols on the device itself)natural_image
Diagram of a server rack with ports and an orange arrow indicating a specific component (no text or symbols present)
Camera
Remoto
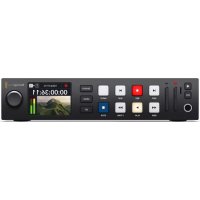

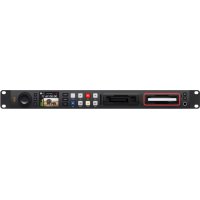
- HyperDeck Disk Recorders
- Languages
- Welcome
- Grant Petty
- Contents
- Introducing HyperDeck Disk Recorders
- Getting Started
- Plugging in Power
- Connecting Video and Audio
- Checking Audio
- Plugging in Media
- To plug in an SSD:
- To plug in an SD card:
- Recording Video
- Recording on multiple media
- Swapping Disks During Recording
- Playback
- Playing Video with HyperDeck
- Loop Playback
- Dynamic LEDs
- Using the Search Dial
- Using the Front Panel
- HyperDeck Studio Home Screen
- Media Slot Indicators
- Using the LCD Menu
- Settings
- Input
- Codec
- Trigger Record
- Input Re-Sync
- Monitor Menu
- Clean Feed
- 3D LUT
- To turn a 3D LUT on or off:
- Audio Menu
- Recorded Audio Channels
- Monitor Channels
- Audio Meters
- Headphone Level
- Speaker Level
- Storage Menu
- Format Media
- Preparing Media on HyperDeck Studio:
- Setup Menu
- Name
- Language
- To select the language:
- Date
- Time
- Software
- Front Panel
- Camera
- Default Standard
- Network Settings
- Protocol
- IP Address, Subnet Mask and Gateway
- To change the IP address:
- Timecode Settings
- Drop Frame
- Preset
- Output
- SDI Output
- 3G-SDI Output
- Genlock Settings
- Reference Source
- Reference Timing
- To adjust the timing:
- File Settings
- Timestamp File Suffix
- HDR Format Override
- Auto
- Rec.709
- Rec.2020 SDR
- HLG
- ST2084 (300)
- ST2084 (500)
- ST2084 (800)
- ST2084 (1000)
- ST2084 (2000)
- ST2084 (4000)
- Remote
- Deck Control
- Reset
- Factory Reset
- Rear Panel
- Power
- Ethernet
- Remote
- Ext Disk
- Monitor Out
- Ref
- Timecode
- HDMI
- SDI
- Using the Monitor Output
- Format
- Timecode
- Source
- Status
- Storage Media Status
- Disk or Drive Indicator
- Media Bar
- Time remaining
- Slot status
- Storage Media
- SD Card
- SSD
- EXT Disk
- Formatting Media
- Preparing Media on a Computer
- Formatting Media on a Mac Computer
- Formatting Media on a Windows computer
- Using your HyperDeck as a Webcam
- Setting the Webcam Source
- Setting up Open Broadcaster
- Blackmagic HyperDeck Setup
- Using HyperDeck Setup
- To use HyperDeck Setup:
- Setup Page
- Network
- LUTs Page
- To view a LUT
- Updating the Internal Software
- To update the internal software:
- Teranex Mini Rack Shelf
- RS-422 Control
- What is RS-422 Control?
- Using an External RS-422 Controller
- Transferring Files over a Network
- Connecting to HyperDeck Studio
- Transferring Files
- Connecting to an ATEM Switcher
- Understanding Post Production Workflows
- Accessing Your Clips
- Mac OS
- Windows
- Developer Information
- Blackmagic HyperDeck Ethernet Protocol
- Protocol Commands
- Command Combinations
- Using XML
- Protocol Details
- Connection
- Basic syntax
- Single line command syntax
- Multiline command syntax
- Response syntax
- Successful response codes
- Failure response codes
- Asynchronous response codes
- Connection response
- Connection rejection
- Timecode syntax
- Handling of deck "remote" state
- Closing connection
- Checking connection status
- Getting help
- Switching to preview mode
- Controlling device playback
- Stopping deck operation
- Changing timeline position
- Enumerating supported commands and parameters
- Controlling asynchronous notifications
- Retrieving device information
- Retrieving slot information
- Retrieving clip information
- Retrieving clip count
- Retrieving timeline information
- Retrieving transport information
- Video Formats
- File Formats
- Querying and updating configuration information
- Selecting active slot and video format
- Clearing the current timeline
- Adding a clip to the current timeline
- Configuring the watchdog
- Help
- Blackmagic Design Online Support Pages
- Blackmagic Design Forum
- Contacting Blackmagic Design Support
- Checking the Software Version Currently Installed
- How to Get the Latest Software Updates
- Regulatory Notices
- Disposal of Waste of Electrical and Electronic Equipment Within the European Union.
- ISED Canada Statement
- Safety Information
- State of California statement
- Warning for Authorized Service Personnel
- Warranty
- Month Limited Warranty
- HyperDeck ディスクレコーダー
- ようこそ
- 目次
- メディアの 接 続
- メディアバー
- ネットワークでファイルを転送
- ヘルプ
- ヘルプライン
- Chère cliente, cher client,
- Brancher un support
- Timing de référence
- Barre du support
- Configurer Open Broadcaster
- Assistance
- Willkommen!
- Inhaltsverzeichnis
- Menü „Remote“
- Datenträgerbalken
- Hilfe
- California Proposition 65
- Bienvenido
- Barra
- Para ver una LUT:
- Ayuda
- Cómo obtener ayuda
- 欢迎辞
- 连接媒体
- 同步时间校准
- 存储条
- 在Windows计算机上格式化存储介质
- 查看LUT
- 通过网络传输文件
- 帮助
- 获得帮助
- 환영합니다
- 미디어 연결하기
- 미디어 바
- LUT 확인하기
- 네트워크를 통해 파일 전송하기
- 도움말
- 지원 받기
- Помощь
- Как получить помощь
- Gentile utente,
- Indice
- Remoto
Brand : Blackmagic Design
Model : HyperDeck Studio 4K Pro
Category : VCR