Glassy Jet - Water pump ASTRALPOOL - Free user manual and instructions
Find the device manual for free Glassy Jet ASTRALPOOL in PDF.


User questions about Glassy Jet ASTRALPOOL
0 question about this device. Answer the ones you know or ask your own.
Ask a new question about this device
Download the instructions for your Water pump in PDF format for free! Find your manual Glassy Jet - ASTRALPOOL and take your electronic device back in hand. On this page are published all the documents necessary for the use of your device. Glassy Jet by ASTRALPOOL.
USER MANUAL Glassy Jet ASTRALPOOL
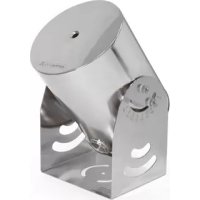
Glassy L with jumping effect 66562
Glassy S with jumping effect 66560
Glassy L 66561
Glassy S 66559
Glassy L without light 67307
Glassy S without light 67306
Glassy S with RGB light 70744
Made in C E
INSTALLATION, OPERATION AND MAINTENANCE MANUAL
Glassy Jet
CONTENTS
1 GENERAL SAFETY 16
1.1 ELECTRICAL SAFETY 16
1.2 SAFE USE AND CONTACT WITH WATER 16
1.3 SAFETY DURING OPERATION AND MAINTENANCE 16
2 INSTALLATION AND ASSEMBLY 17
2.1 ANCHORING AND LEVELING THE EQUIPMENT 17
2.2 CONNECTIONS 17
1.1 ELECTRICAL SAFETY
- Disconnect the equipment from the power supply when carrying out any assembly or maintenance work.
- Do not touch or get into the water while the equipment is connected to the electrical power supply.
- Use H07RN-F heavy-duty waterproof trailing cable to connect the unit.
1.2 SAFE USE AND CONTACT WITH WATER
- The water where the equipment is installed should comply with the following specifications:
| Water characteristic | Minimum value | Maximum value |
| Temperature | 4 °C | 35 °C |
| pH | 6.9 | 7.8 |
| Free chlorine | 0.5 ppm | 2.0 ppm |
| Complete Alkalimetric Titre (CAT) | 80 ppm | 120 ppm |
| Calcium Hardness (CH) | - | 1,000 ppm |
| Salinity | - | 2 g/L |
| Total dissolved solids (TDS) | - | 2,000 ppm |
- In freezing conditions with temperatures below 4^ , empty the equipment to avoid breakage due to ice forming inside it.
- Do not manipulate the factory waterproofing seals. This could void the guarantee.
1.3 SAFETY DURING OPERATION AND MAINTENANCE
- Do not open or manipulate any component in the equipment except as explained in this manual.
- Do not handle the equipment with damp or wet hands.
- Only authorised personnel or trained technicians may have access to the equipment. Do not allow access to unauthorised personnel or untrained technicians.
2 INSTALLATION AND ASSEMBLY
NOTICE:
- Read the entire manual carefully before installing the equipment.
- When you receive the equipment, check that all items are in good condition.
- Identify all components prior to their installation.
2.1 ANCHORING AND LEVELING THE EQUIPMENT
NOTICE: Risk of damage to the equipment. The maximum water level (⑦) when the equipment is in operation is 4 cm below the opening in the upper part of the cover (①).
Components required to anchor the equipment (4):
| Component | Quantity |
| Chemical anchor: sleeve and AISI 316 M10 threaded rod | 3 |
| Flat washer, DIN 9021 Ø10 A4 | 6 |
| DIN 934 M10 A4 Nut | 9 |
1) Cement the threaded rods into the pool bottom.
2) Attach the equipment to the threaded rods and level it
- use two nuts and a washer below it (with the washer on top)
- use one nut and a washer above it.
2.2 CONNECTIONS
NOTICE: Risk of damage to the equipment. Clean all tubes before connecting and starting-up the equipment.
NOTICE: Risk of damage to the equipment. Install a 130 m filter in the water supply to the equipment.
NOTICE: Risk of damage to the equipment. All electrical connections should use resin-filled connections or IP68 connections. Check that all IP68 connections are properly closed so that no water can get in. The electrical components can be damaged if inundated and this may void the guarantee.
NOTICE: Risk of damage to the equipment. Install a 2-Amp fuse in the connection between the relay and the jumping function positive drive cable.
1) Models 66559, 66560, 66561 and 66562: Connect the illumination control cables. ID label on the cable end: 24VDC - DMX (3, connect to the DMX driver).
2) Models 66560 and 66562: Connect the jumping control cables. ID label on the cable end: 24VDC - CUT (1), connect to the jumping function water cut-off relay).
[en] Fountain units
3) Connect the water supply (②, 1"G).
4) Connect an earth wire to the Glassy anchor (⑧, connect to the anchor). Ensure that the earth connection complies with applicable regulations in the country of installation.
NOTICE: Protect the water outlet of the equipment from wind and do not operate the equipment in high winds. If the equipment is installed in an area exposed to winds, the water outlet may be affected and the water jet may not be regular throughout its trajectory (even when exposed to only moderate winds).
3.1 OPERATION
NOTICE: Risk of damage to the equipment. Use only an Astralpool DMX driver that is compatible with the LED light source in the equipment (Astralpool DMX driver references: 66594 and 66595).
The illumination in the equipment is controlled using the DMX protocol.
Models 66560 and 66562: The micro-cuts of the jumping function are controlled by a relay suitable for the product's technical characteristics.
The equipment can be inclined at angles between 30^ and 90^ (5).
3.2 MAINTENANCE
See the attached manual for maintenance instructions for the stainless steel components. Check the condition of the internal foam pieces 2 years after installing the equipment. Repeat this check every six months following this first check.
NOTE: The screws of the lower cover must be tightened to 8N (⑨) to ensure tightness.
4 TECHNICAL FEATURES
| 66559 Glassy S | 66561 Glassy L | 66560 Glassy S w.J/E | 66562 Glassy L w.J/E | 67306 Glassy S Without Led | 67307 Glassy L Without Led | |
| Illumination control voltage | 24 V DC | - | ||||
| Jumping function control voltage | - | 24 V DC | - | |||
| Total power | 4.5 W | 4.5 W | 28.5 W | 28.5 W | - | |
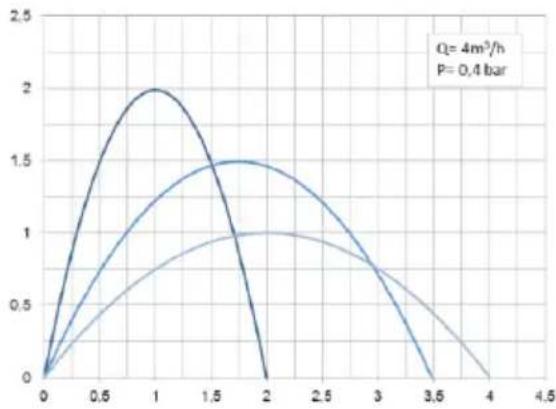
Water jet trajectories for models: 66559, 66560 and 67306 (x, y in metres, angles of 75^ , 60^ and 45^ )
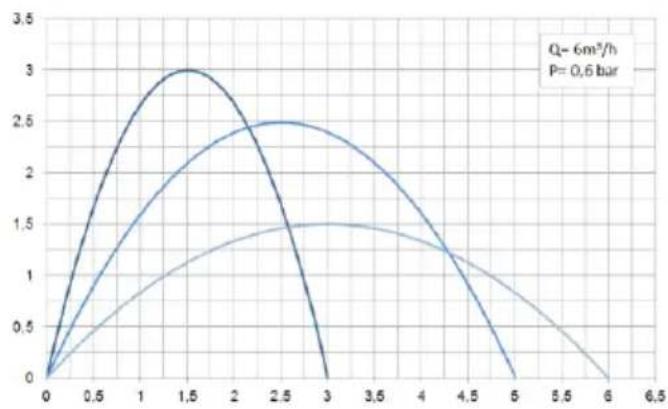
Water jet trajectories for models: 66561, 6662 and 67307 (x, y in metres, angles of 75^ , 60^ and 45^ )
5 TROUBLESHOOTING
Problem
The Glassy water jet is not regular throughout its trajectory.
Solution
The Glassy's water jet is extremely sensitive to winds (including moderate winds).
- Protect the Glassy from currents of air.
- Check that the internal foam pieces are in good condition and do not obstruct the water flow.
The LED in the Glassy does not turn on.
- Check that the LED is connected correctly (③).
- Check the installation and programming of the DMX modules.
The jumping function micro cuts do not work.
- Check that the water jet cut-off blade is connected correctly (①).
- If the jumping function is operated manually, check that the relay is correctly installed.
In the case of other problems, or if the solutions above do not resolve the problem, contact our technical department (see the contact list included with the product guarantee).
6 PRODUCTLABELLING
| IP 68 4 m | ||||
| IP68 protection. | Do not operate if T < 4℃. | Safe disposal of waste electrical and electronic equipment Directive 2012/19CE (WEEE). | Equipment documentation must be read. | Danger of electric shock. |
7 GUARANTEE
See document "Guarantee certificate for fountain units".
8 ENVIRONMENTAL PROTECTION
At the end of its useful life, dispose of the different components according to applicable legislation regarding waste disposal in the country where the equipment is installed.
3 OPERACAO E MANUTENCAO 38
3.1 OPERACAO 38
3.2 MANUTENÇA 38
4 CHARACTERISTICAS TECNICAS 38
5 PERGUNTAS E RESPOSTAS 39
6 ETIQUETAS DO PRODUCTO 40
7 GARANTIA 40
8 AMBIENTE 40
1 SEGURANÇA GERAL
1.1 SEGURANÇA ELETRICA
5 PERGUNTAS RESPOSTAS
Pergunta
DIMENSIONES ABMESSAGENGEN DIMENSIONS DIMENSIONS DIMENSIONI DIMENSOES
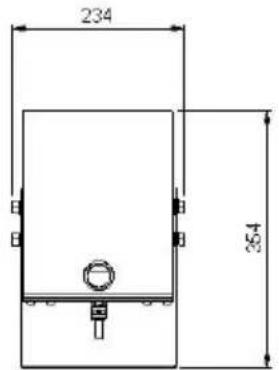
66559 Glassy S 67306 Glassy S without Light
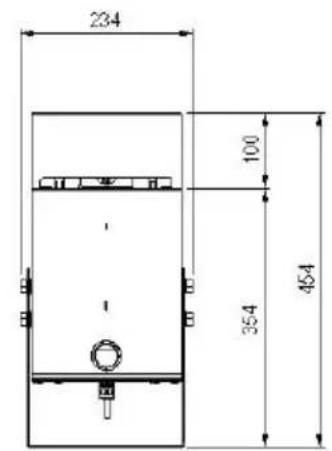
66560 Glassy Sw.J/E
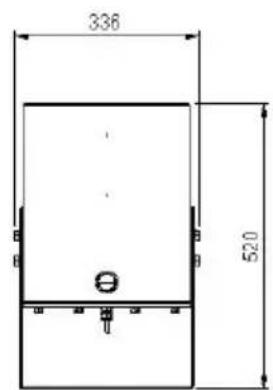
66561 Glassy L 67307 Glassy L without Light
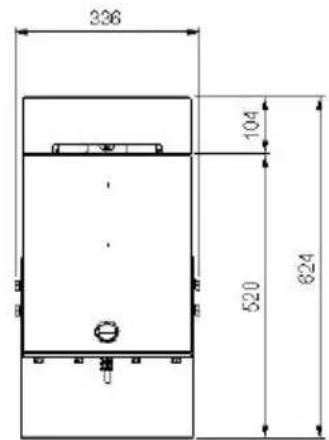
66562 Glassy Lw.J/E
Cod. 66561E202_00 / Rev. 00
Made in SPAIN
VAT:ES
A08246274
[en] We reserve the right to change all or part of the features of the articles or contents of this document, without prior notice.