
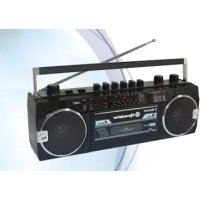
HIF1996D+BT - Hi-fi system ROADSTAR - Free user manual and instructions
Find the device manual for free HIF1996D+BT ROADSTAR in PDF.
| Product type | Hi-Fi system |
| Brand | ROADSTAR |
| Model | HIF1996D+BT |
| Power supply | AC 230V ~ 50Hz |
| Output power | 2 x 2.5 W RMS |
| Speakers | 2 speakers |
| Tuner | DAB+ / DAB (Band III) and FM 87.5-108 MHz |
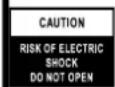
| CD player | Yes |
| Cassette deck | Yes |
| Turntable | Yes, 33/45/78 RPM |
| Bluetooth connectivity | Yes, device name HIF-1996D+BT |
| AUX input | 3.5 mm jack socket |
| USB port | USB 2.0, playback and recording |
| Equalizer | Presets: Flat, Pop, Classic, Rock, Jazz |
| Remote control | Yes |
| Headphone output | 3.5 mm jack socket |
| Dimensions (approx.) | 300 x 250 x 200 mm |
| Weight (approx.) | 3.5 kg |
| Maintenance | Clean with a soft, dry cloth |
| Safety | Do not expose to moisture or heat |
| Spare parts and repairability | Contact customer service, no user-serviceable parts |
Frequently Asked Questions - HIF1996D+BT ROADSTAR
User questions about HIF1996D+BT ROADSTAR
0 question about this device. Answer the ones you know or ask your own.
Ask a new question about this device
Download the instructions for your Hi-fi system in PDF format for free! Find your manual HIF1996D+BT - ROADSTAR and take your electronic device back in hand. On this page are published all the documents necessary for the use of your device. HIF1996D+BT by ROADSTAR.
USER MANUAL HIF1996D+BT ROADSTAR
VERY IMPORTANT: In order to use the turntable, turn the TRANSIT
SCREW with a coin or screwdriver in clockwise sense
ENGLISH (turntable adjustment)
To make sure the turntable can play completely records with different standard, a hole with "SERVICE" (20) plate is located at the TOP of the unit to adjust the screw inside the turntable.
If the auto-return function is activated before the end of the record, please use a screw driver to turn the screw inside the hole about 45 degrees in unscrew clockwise direction. If the record is still not played completely, stop play and turn the screw 45 degrees in clockwise direction again. Repeat until the turntable fully plays the disc and then the tonearm returns to the initial position.
If the turntable doesn't stop and auto-return, but keep turning after playing the record completely, please use a screw driver to turn the screw inside the hole about 45 degrees in counterclockwise direction. If the turntable is still not stopping and auto-returning, stop play and turn the screw 45 degree in counter-clockwise direction again. Repeat this until the turntable fully plays the disc and then the tonearm auto-returns to the initial position.
This unit operates from a main supply of 230V 50Hz . Connect the AC power cord to the AC household main outlet. Ensure that the voltage is as indicated on the rating plate on the rear of the unit.
Connect the unit to the power supply. Switch ON/OFF SWITCH (24) to ON position to turn the unit ON. Switch ON/OFF SWITCH (24) to OFF position to switch the unit OFF.
This unit has two working modes:
STANDBY MODE: The display shows the current time and the speakers and backlight are off.
PLAYBACK MODE: The blue backlight is on and you can listen to music.
When no sound is produced, the unit will switch to STANDBY MODE automatically after 15 minutes.
To switch between PLAYBACK MODE and STANDBY MODE, press ON/OFF (1) on remote control.
SETTING THE CORRECT TIME
In STANDBY mode:
1, Simply press STOP (15)(6 on remote) to begin to set time and date.
2, Press SKIP +/- (16/17)(12/13 on remote) repeatedly to set correct TIME or DATE, then press ENTER (9) (16 on remote) to confirm.
3, Once TIME and DATE are set, "Time Saved" will shown on LCD display.
In ON mode:
1, Press MENU(13)(17 on remote) to enter menu to set TIME and DATE.
2, Press SKIP +/- (16/17)(12/13 on remote) repeatedly, you will see SYSTEM, then press ENTER (9) (16 on remote) and SKIP +/- (16/17)(12/13 on remote) to set TIME and DATE until you see "Time Saved".
SETTING THE ALARM
Alarms can only be set in Standby mode via remote control. There are 2 alarms with the product.
- Simply press TIMER (20 on remote) repeatedly select Alarm 1 or 2, then press ENTER (16 on remote) to begin Alarms setting. You can press SKIP (12 or 13 on remote) and ENTER to set ON TIME, Duration, Alarm Source, Alarm Frequency, and Alarm Volume Level, etc. Once all the settings are done, you will see "Alarm Saved" and Alarm Icon 1 or 2 on LCD display.
Once Alarm OFF is set, the Alarm Icon will disappear.
NAVIGATE THE MENU
In FM/DAB mode there is an option menu.
- Press MENU (13) (17 on remote) to access to the options.
- Press SKIP + / - (16/17) (12/13 on remote) to search the options.
- Press ENTER (9) (16 on remote) to select the options.
- Press MENU (13) (17 on remote) to exit the menu.
SYSTEM SETTINGS
In any mode, you can press MENU (13)(17 on remote) to access the options. Presss SKIP+/- (16/17)(12/13 on remote) select the option then press ENTER(9) (16 on remote) to confirm.
You can set SLEEP, TIME, Backlight, Language. and also you can perform Factory Reset in the MENU.
DAB MODE
Press MODE (8) (5 on remote) repeatedly to select DAB mode. Press SKIP + / - (16/17) (12/13 on remote) to search the program.
DAB MENU
Press MENU (13) (17 on remote) to access to the options.
- Full Scan: select this option to perform a full scan of the available DAB programs. You can press SCAN (10) to perform the same action.
- Manual Tune: select this option to select manually the DAB frequency.
- DRC: select this option to choose between DRC low, DRC high and DRC off.
- Prune: select this option to choose between PRUNE stations on or off.
DAB PRESET
You can program a maximum of 30 preset radio stations.
Simply press PRESET (11) (19 on remote), PRESET STORE will appear on display. Press SKIP +/- (16/17)(12/13 on remote) to select the preset number. Press ENTER (9)(16 on remote) to confirm.
Press and hold PRESET (11) (19 on remote) and then SKIP button to navigate through the presets. then press ENTER to confirm.
DAB INFO
Repeatedly press INFO (12) (18 on remote) to see the following informations: NAME / KBPS / DATE / TIME.
FM MODE
Press MODE (8) (5 on remote) repeatedly to select FM mode. Turn the TUNING KNOB (7) to manually select the frequence.
FM MENU
Press MENU (13) (17 on remote) to access to the options.
- Scan Setting: select this option to choose between scanning all stations or only the strong stations.
- Audio Setting: select this option to choose between forcing mono audio or allowing stereo sound.
FM PRESET
See DAB PRESET instructions.
FM INFO
Repeatedly press INFO (12) (18 on remote) to see the following informations: KIND OF PROGRAM / FREQUENCY / AUDIO / DATE / TIME.
LISTENING TO TAPE
- Press MODE (8) (5 on remote) repeatedly to select TAPE mode.
- Load a cassette tape into the unit. The system will start playback automatically after inserting the cassette tape.
- Press FFD/EJ (27) half inwards during playback mode. The tape will wind forward. Slightly press FFD/EJ (27) again to resume playback.
- Press FFD/EJ (27) completely inwards and the cassette tape will be ejected through the CASSETTE MECHANISM (26).
PLAYING COMPACT DISC
- Press MODE (8) (5 on remote) repeatedly to select CD mode.
- Press CD DOOR OPEN/CLOSE BUTTON (19) (2 on remote) to open the cd door. Place a cd with the printed side facing up inside the tray, then close the cd door. The first track will start playback.
- Press SKIP -/+ (16/17) (12/13 on remote) to select your favorite tunes. If you hold SKIP -/+ (16/17) (13/12 on remote), the playing track will go fast backward or forward until you release the button.
- Press PLAY/PAUSE (14) (9 on remote) to pause the playback. The track number will start blinking. Press PLAY/PAUSE (14) (9 on remote) again to resume the playback.
- Press STOP (15) (6 on remote) to stop the playback.
REPEAT MODE
During playback, repeatedly press (7) on remote on the remote control to select:
- Repeat1: The current track is played repeatedly.
- RepeatFolder: The current folder is played repeatedly.
- RepeatAll: All tracks are played repeatedly.
CD PROGRAMMING
You can program up to 99 tracks to play in any desired order.
1. Insert a disc and press STOP (15) (6 on remote) when it starts playing.
2. Press (8) on remote. "P01" will be shown on the display.
3. Press SKIP -/+ (16/17) (12/13 on remote) to select your favorite tunes.
4. Press (8) on remote to store the track in the program memory. "P02" will be shown on the display.
5. Repeat steps 3-4 to select and store all desired tracks.
6. Press PLAY/PAUSE (14) (9 on remote) to start program play.
7. Press STOP (15) (6 on remote) once to stop the program play. Press STOP (15) (6 on remote) twice to clear programme.
To prevent damages from transportation, a transit screw is located at the upper right side of the turntable platform. Before start playing, use a screwdriver and turn the transit screw in clockwise direction (screw going down) completely. In case of transportation, remember to clock again this screw in counter-clockwise direction to prevent damages.
- Press MODE (8) (5 on remote) repeatedly to select PHONO mode.
- Open the Record Player Cover. Release the Tonearm Clamp, and remove the stylus protector. Place a record on the turntable, over the central spindle. Place the EP adapter over the central spindle when playing 17cm EP records.
- Set 33/45/78 RPM SPEED SELECTOR (32) to 33 / 45 / 78 rpm according to the record.
- Lift the Tonearm with the Tonearm Lift Lever. Move the tonearm to the beginning of the record, or to the start of a particular track. Gently lower the tone arm onto the record with the Tonearm Lift lever to start playing.
- When the record is finished the tonearm will automatically stop and return automatically to the rest. To stop manually, lift the tonearm from the record and return it to the rest.
- Moving or jarring the turntable without securing the Tonearm clamp could result in damage to the Tonearm. Replace the protective cap on the stylus when not in use.
AUX-IN
This unit provides an auxiliary audio input jack for connecting external audio device like MP3 players, CD players and allow playback of your external source through the system speakers.
- Use an audio cable (not included) with a RCA stereo plugs on one end of the cable. Plug one end into the AUX-IN jack on the main unit and plug the other end of the cable into the LINE OUT or HEADPHONE Jack of your external audio device.
- Turn ON the unit and your external audio device. Press MODE (8) (5 on remote) repeatedly to select CD mode.
- Start to play the external device (see the user manual of the external device).
BLUETOOTH OPERATION
- Press BT (9) to select BLUETOOTH function. "BT" will be shown on the display.
- Select from your portable device (Smartphone, Tablet...) the ID Bluetooth tagged as HIF-1996D+BT, then confirm connection.
- When the pairing is successful the LED will stop blinking.
- Now you can transfer the music to the HIF-1996D+BT and all operations can only be operated from your mobile device.
PLAYBACK FROM USB
- Insert the USB device's plug into the USB socket.
- Press MODE (8) (5 on remote) repeatedly to select USB mode.
- The unit will start reading the device automatically after the connection.
- Use the same procedure as CD to listen to your USB device.
DELETE USB
- During playback, press and hold REC (18) (4 on remote). "DEL" will be shown on the display.
- Press SKIP -/+ (16/17) (12/13 on remote) repeatedly to select between ONE/FOLDER/ALL.
- Press REC (18) (4 on remote) again to confirm.
RECORDING FUNCTION
- While listening to PHONO/TAPE/BLUETOOTH/AUX-IN/DAB, press REC (18) (4 on remote). "REC" will be shown on the display. The REC indicator will light up. Encoding is performing now. Note that the encoding speed is 1:1.
- Press STOP (15) (6 on remote) to stop recording.
- The unit will create a folder in the USB device, that contain all recorded tracks.
CD
- Press REC (18) (3 on remote).
- Press SKIP +/- (16/17) (12/13 on remote) repeatedly to select between ONE/FOLDER/ALL.
- Press REC (18) (3 on remote) once more to start recording.
EQ OPERATIONS
In any mode, you may simply press EQ button (20 on remote) repeatedly to select FLAT, POP, CLASSIC, ROCK or JAZZ.
TECNICAL SPECIFICATIONS
Power Supply: AC 230V ~ 50Hz. Radio Frequency Coverage
DAB+ / DAB: BAND III 174.928MHz - 239.200MHz. FM: 87.5 - 108 MHz.
Speaker
Output Power: 2 × 2.5 Watt RMS.
General
Aux-In: RCA (L + R) plugs. Headphones Out: 3.5mm jack plug.
BT Maximum radiated Power: < 4 dBm (2.5 mW).
USB Port Version: USB 2.0
Specifications and design are subject to possible modifications without notice due to improvement.
WARNING

The exclamation point within the triangle is a warning sign alerting the user of important instructions accompanying the product.

The lightening flash with arrowhead symbol within the triangle is a warning sign alerting the user of "dangerous voltage" inside the unit.
To reduce the risk of electric shock, do not remove the cover. No user serviceable parts inside the unit. Refer all servicing to qualified personnel.

This unit operates on 230V 50Hz . If the unit is not used for a long period of time, remove the plug from the AC mains.

Ensure all connections are properly made before operating the unit.
This unit must not be exposed to moisture or rain.

This unit should be positioned so that it is properly ventilated. Avoid placing it, for example, close to curtains, on the carpet or in a built-in installation such as a bookcase.

Do not expose this unit to direct sunlight or heat radiating sources.

CORRECT DISPOSAL OF THIS PRODUCT
This mark sh on the product or its literature, indates that it should not be disposed with other household wastes at the end of its working life. To prevent possible harm to the environment or human health from uncontrolled waste disposal, please separate this from other types of wastes and recycle it responsibly to promote the sustainable reuse of material resources. Household users should contact the retailer where they purchased this product, or their local government office, for details of where and how they can take this item for environmentally safe recycling. Business users should contact their supplier and check the terms and conditions of the purchase contract. This product should not be mixed with other commercial wastes for disposal.
LAGE DER BEDIENELEMENTE
Viz DAB PRESETPokyny.
FM INFO
Hereby, Roadstar Management SA declares that the radio equipment type HIF-1996D+BT is in compliance with Directive 2014/53/EU. The full text of the EU declaration of conformity is available at the following internet address: http://roadstar.com/images/ce/HIF-1996D+BT.pdf or by scanning the following QR Code.
is a registered Trademark of Roadstar S.A. - Switzerland. All rights reserved
FRANÇAIS
Conditions Générales de Garantie Roadstar
Roadstar Warranty Terms and Conditions
Roadstar- by means of its sales organisation, representative or distributor- guarantees its products against manufacturing defects in material and/or workmanship throughout the peri warranty.
Should the product fail to work or shows manufacturing defect within the warranty period,
Roadstar- by means of its sales organisation, representative or distributor - will take the necessary actions to restore the perfect functioning of the product. To repair or to replace is at discretion of Roadstar or it's representative or distributor.
The warranty period is in accordance with directive 99/44/CE of the European Union. For all non EU members, please refer to the local law of each country. This warranty does not cover normal wear and tear of the product and/or its parts, any damage, failure, or loss caused by accident, misuse, and any other failure not directly related to a defect of the product.
This warranty does not void consumer's rights in accordance with EU Directive99/44/CE. For further information please visit the website www roadstar.com, or write to aftersales@roadstar.com.
DEUTSCH
Allgemeine "Roadstar" Garantiebedingungen
Roadstar Management SA, via Passegiata 7 CH 6883 Novazzano (Switzerland)
- ENGLISH (turntable adjustment)
- SETTING THE CORRECT TIME
- In STANDBY mode:
- In ON mode:
- SETTING THE ALARM
- NAVIGATE THE MENU
- SYSTEM SETTINGS
- DAB MODE
- DAB MENU
- DAB PRESET
- DAB INFO
- FM MODE
- FM MENU
- FM PRESET
- FM INFO
- LISTENING TO TAPE
- PLAYING COMPACT DISC
- REPEAT MODE
- CD PROGRAMMING
- AUX-IN
- BLUETOOTH OPERATION
- PLAYBACK FROM USB
- DELETE USB
- RECORDING FUNCTION
- CD
- EQ OPERATIONS
- TECNICAL SPECIFICATIONS
- WARNING
- CORRECT DISPOSAL OF THIS PRODUCT
- LAGE DER BEDIENELEMENTE
- FRANÇAIS
- Conditions Générales de Garantie Roadstar
- Roadstar Warranty Terms and Conditions
- DEUTSCH
- Allgemeine "Roadstar" Garantiebedingungen
Brand : ROADSTAR
Model : HIF1996D+BT
Category : Hi-fi system