
M16FHD60P - Monitor LC-Power - Free user manual and instructions
Find the device manual for free M16FHD60P LC-Power in PDF.
| Product type | 15.8 inch portable monitor |
| Model | M16FHD60P (product code 15K3F-C) |
| Brand | LC-Power |
| Screen size | 15.8 inches (diagonal) |
| Screen type | IPS |
| Native resolution | 1920 x 1080 pixels (Full HD) |
| Brightness | 220 cd/m² |
| Static contrast | 800:1 |
| Number of colors | 16.7 million (6 bit + FRC) |
| Color gamut | 45% NTSC |
| Refresh rate | 60 Hz |
| Built-in speakers | 2 x 1 W |
| Connectivity | 2 USB-C ports (signal and power), 1 Mini HDMI port |
| Power supply | DC power adapter 20V/1.5A, 15V/2A, 12V/2.5A, 9V/3A |
| Dimensions (W x H) | 373.2 x 236.8 mm |
| Thickness | 9.4 mm |
| Net weight | 990 g |
| Operating temperature | 0°C to 45°C |
| OSD menu functions | Brightness, contrast, sound, picture mode, color temperature, color (chroma, saturation, sharpness), eye protection, mute, source selection (USB-C/HDMI), OD, DCR, reset |
| Safety precautions | Keep away from water and heat sources, do not block openings, use in a stable and ventilated place |
Frequently Asked Questions - M16FHD60P LC-Power
User questions about M16FHD60P LC-Power
0 question about this device. Answer the ones you know or ask your own.
Ask a new question about this device
Download the instructions for your Monitor in PDF format for free! Find your manual M16FHD60P - LC-Power and take your electronic device back in hand. On this page are published all the documents necessary for the use of your device. M16FHD60P by LC-Power.
USER MANUAL M16FHD60P LC-Power
Operating Instructions of
15.8-inch Portable Monitor
LC-M16-FHD-60-P
Before using this product, please carefully read through this manual and keep it properly
Table of Contents
Product introduction 2
Product appearance 2
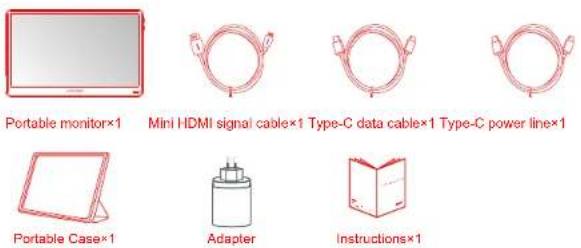
Packaging list---- 2
Use 3
Connect to desktop PC 3
Connect to laptop 3
Connect to mobile phone 4
Introduction of function keys 4
Menu description 5
Notes 9
Troubleshooting 10
Health Recommendation 10
Low blue ray description 10
Basic parameters---- 11
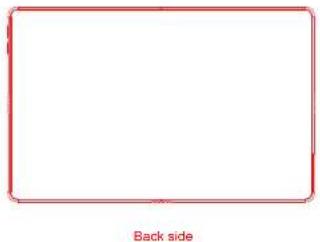
Product introduction
Product appearance
natural_image
Empty rectangular frame with red border and 'Back side' label at bottom (no other text or symbols)Packaging list
Use
Connect to desktop PC
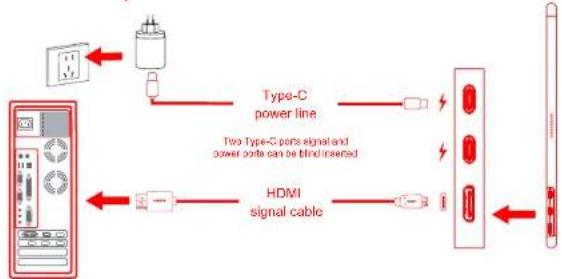
flowchart
graph LR
    A["Device Interface"] --> B["Type-C power line"]
    B --> C["Two Type-C ports signal and power ports can be blind inserted"]
    C --> D["HDMI signal cable"]
    D --> E["External Device"]
- Connect the HDMI cable with the Mini-HDMI port of the product and the HDMI port of the PC.
- Connect one end of the Type-C power line to one of the Type-C ports of the product and the other end to the adapter and then plug the adapter into the power socket to power the machine.
Connect to laptop

- Connect one end of the Type-C data cable to one of the two Type-C ports of the machine and the other end to the Type-C signal port of the laptop.
- Connect the Type-C power line to the remaining Type-C port and the corresponding power adapter.


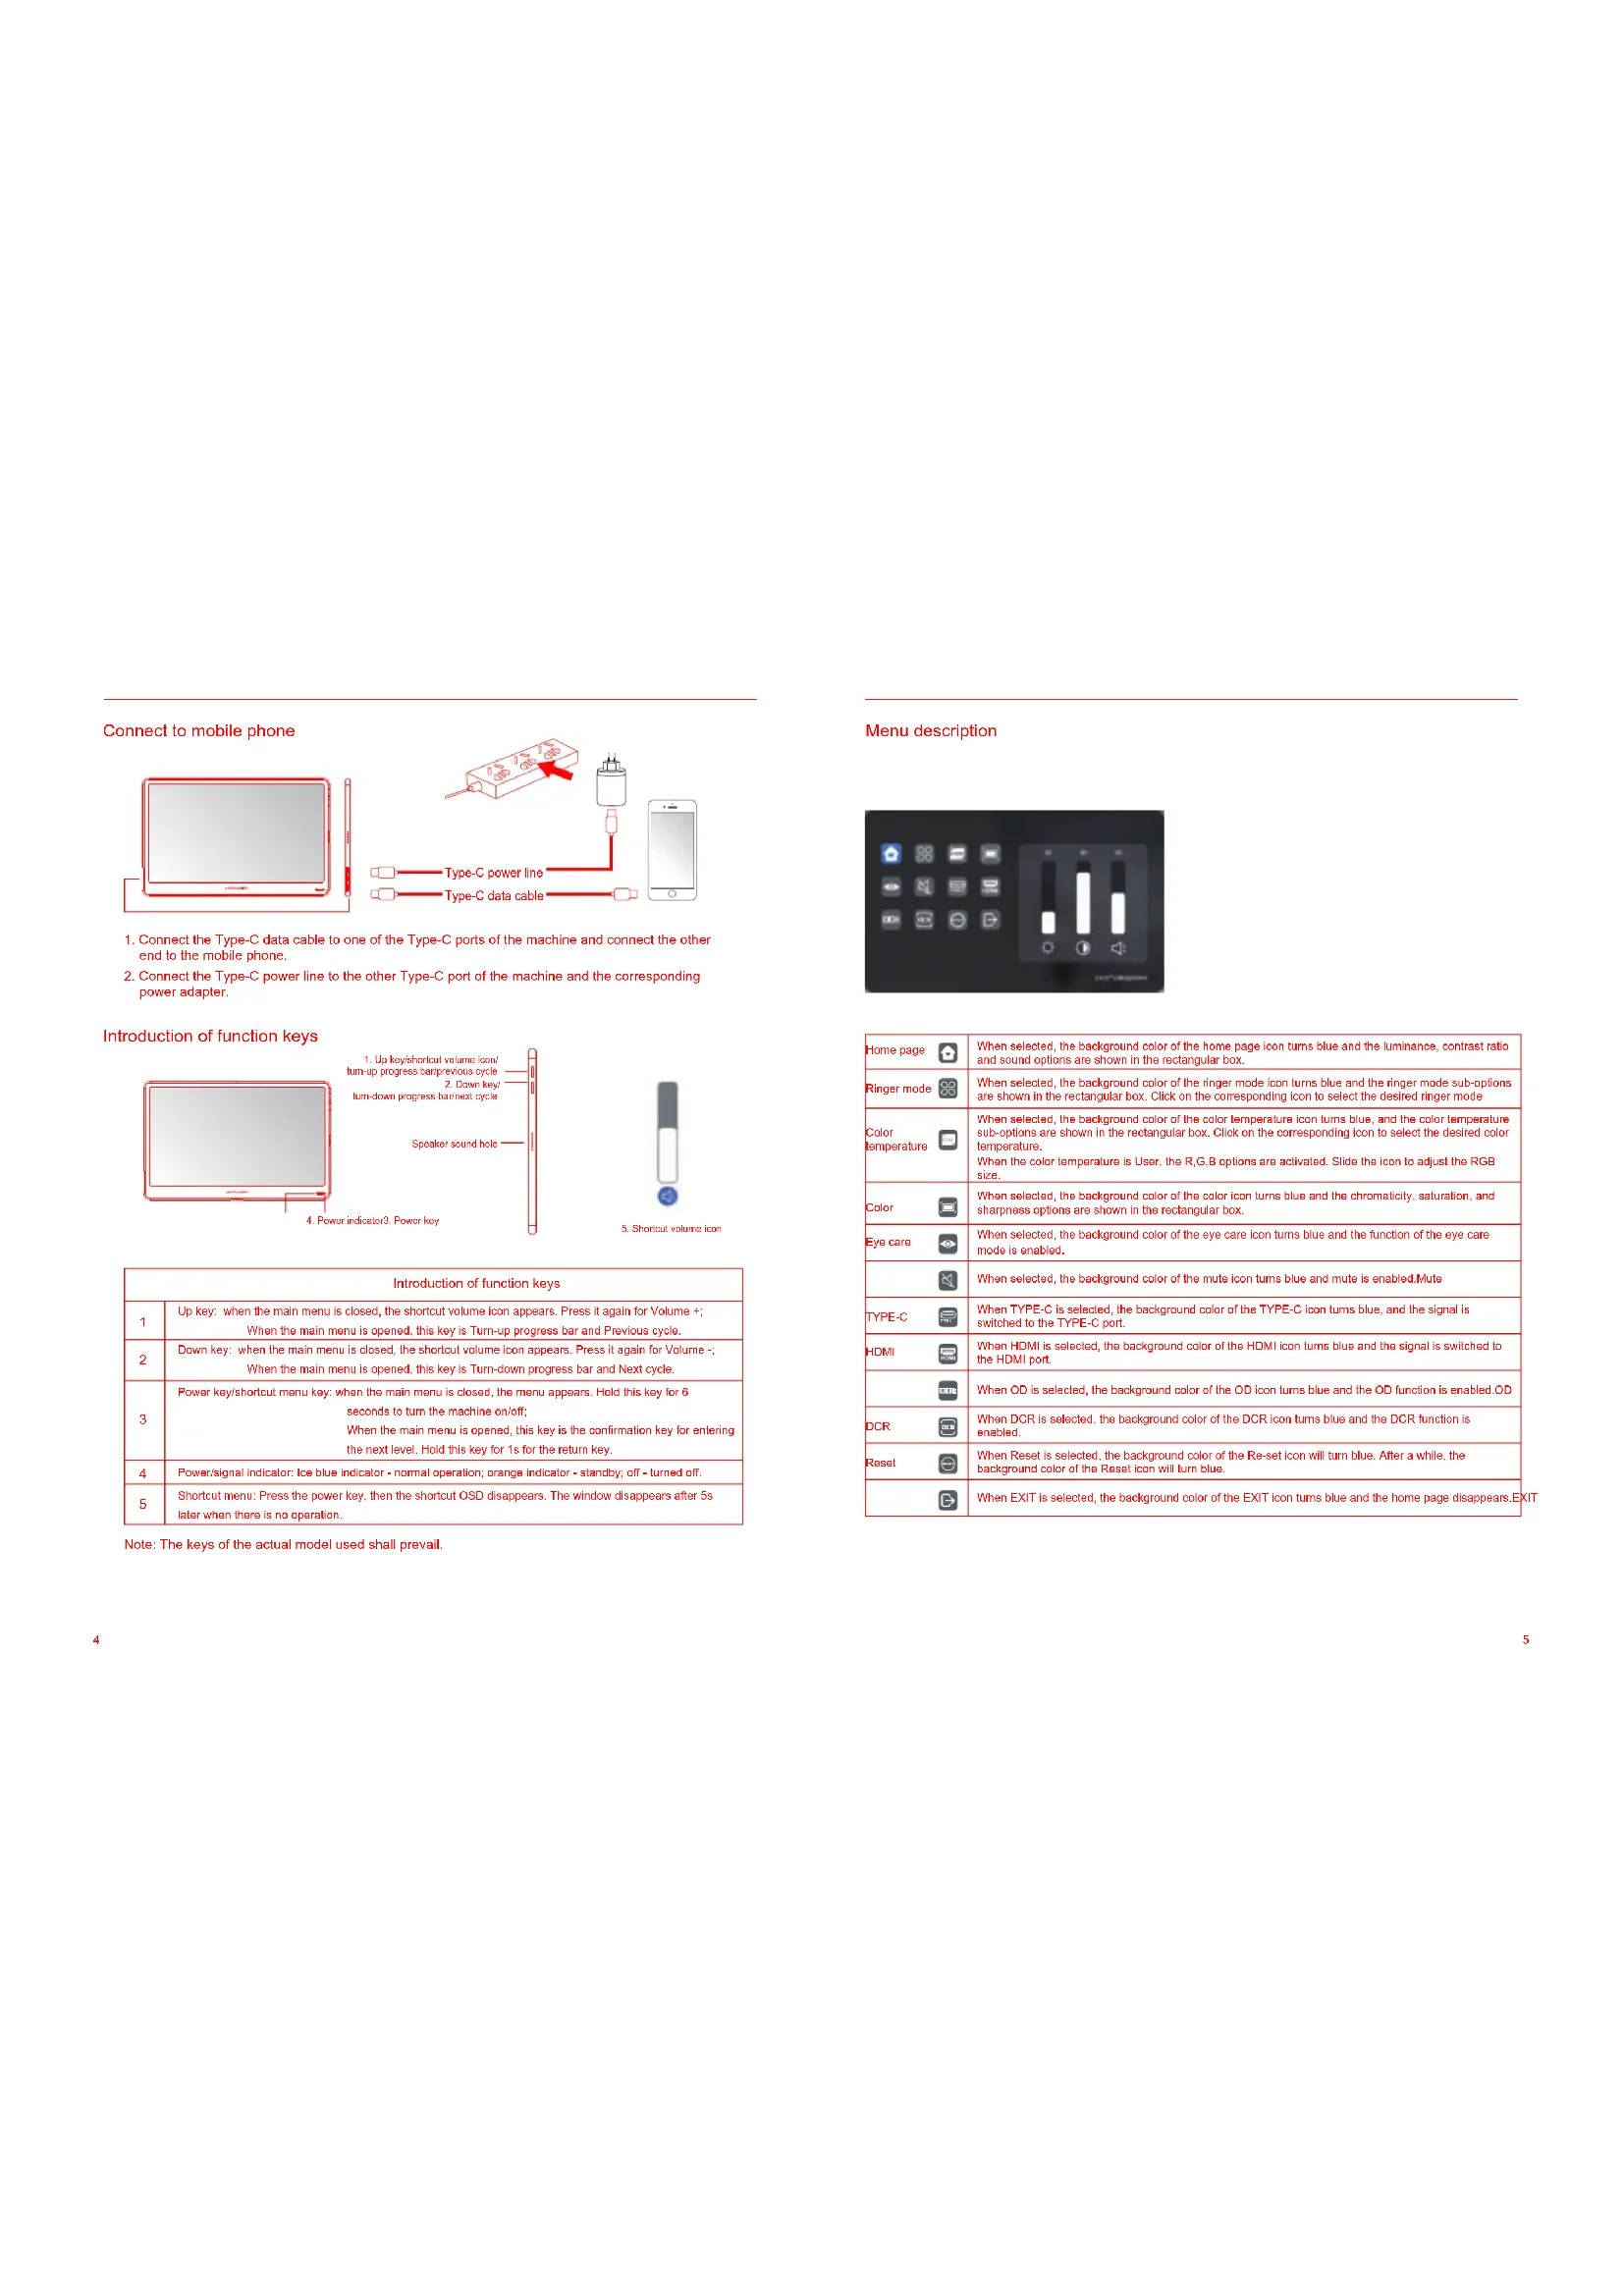
Connect to mobile phone
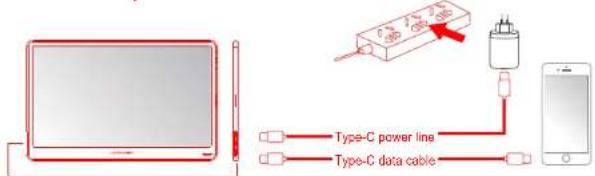
-
Connect the Type-C data cable to one of the Type-C ports of the machine and connect the other end to the mobile phone.
-
Connect the Type-C power line to the other Type-C port of the machine and the corresponding power adapter.
Introduction of function keys

| Introduction of function keys | |
| 1 | Up key: when the main menu is closed, the shortcut volume icon appears. Press it again for Volume +;When the main menu is opened, this key is Turn-up progress bar and Previous cycle. |
| 2 | Down key: when the main menu is closed, the shortcut volume icon appears. Press it again for Volume -;When the main menu is opened, this key is Turn-down progress bar and Next cycle. |
| 3 | Power key/shortcut menu key: when the main menu is closed, the menu appears. Hold this key for 6 seconds to turn the machine on/off;When the main menu is opened, this key is the confirmation key for entering the next level. Hold this key for 1s for the return key. |
| 4 | Power/signal indicator: Ice blue indicator - normal operation; orange indicator - standby; off - turned off. |
| 5 | Shortcut menu: Press the power key, then the shortcut OSD disappears. The window disappears after 5s later when there is no operation. |
Note: The keys of the actual model used shall prevail.
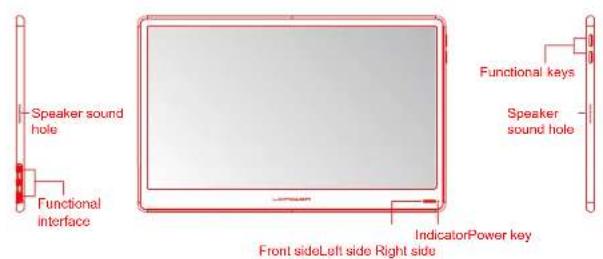
Menu description
| Home page | When selected, the background color of the home page icon turns blue and the luminance, contrast ratio and sound options are shown in the rectangular box. | |
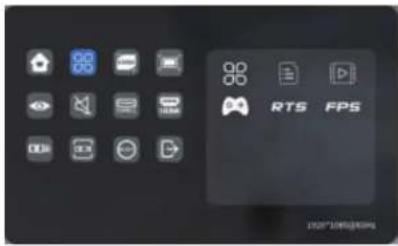
| Ringer mode | When selected, the background color of the ringer mode icon turns blue and the ringer mode sub-options are shown in the rectangular box. Click on the corresponding icon to select the desired ringer mode | |
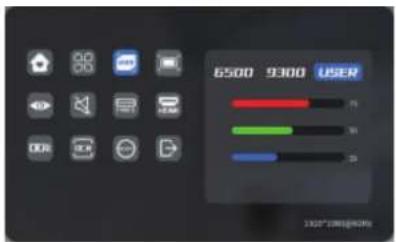
| Color temperature | When selected, the background color of the color temperature icon turns blue, and the color temperature sub-options are shown in the rectangular box. Click on the corresponding icon to select the desired color temperature.When the color temperature is User, the R,G,B options are activated. Slide the icon to adjust the RGB size. | |
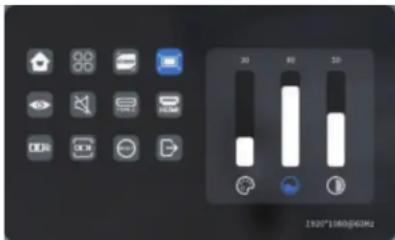
| Color | When selected, the background color of the color icon turns blue and the chromaticity, saturation, and sharpness options are shown in the rectangular box. | |
| Eye care | When selected, the background color of the eye care icon turns blue and the function of the eye care mode is enabled. | |
| When selected, the background color of the mute icon turns blue and mute is enabled.Mute | ||
| TYPE-C | When TYPE-C is selected, the background color of the TYPE-C icon turns blue, and the signal is switched to the TYPE-C port. | |
| HDMI | When HDMI is selected, the background color of the HDMI icon turns blue and the signal is switched to the HDMI port. | |
| When OD is selected, the background color of the OD icon turns blue and the OD function is enabled.OD | ||
| DCR | When DCR is selected, the background color of the DCR icon turns blue and the DCR function is enabled. | |
| Reset | When Reset is selected, the background color of the Re-set icon will turn blue. After a while, the background color of the Reset icon will turn blue. | |
| When EXIT is selected, the background color of the EXIT icon turns blue and the home page disappears.E |
2. Key control method
After the main menu appears, adjust the Up and Down keys to select the desired function
- Switch between the Up and Down keys to switch among options.
- Press the power key to enter the next menu, and long-press for 1s to return to the previous menu.
The window disappears after 3s later when there is no operation.
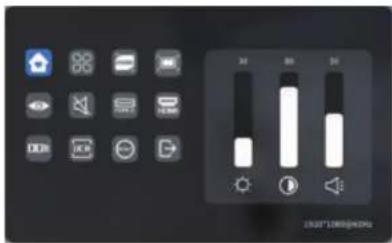
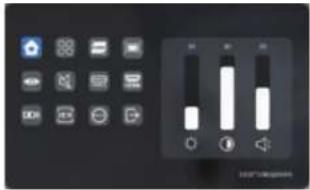
Home page
- Switch the Down key to switch among options.
- Press the power key to enter the next menu, and long-press for 1s to return to the previous menu.
After selecting a function (as shown below), press the Up and Down keys to adjust the function.
The window disappears 3s later when there is no operation.

Luminance: Press the Up and Down keys
to adjust the luminance.
Contrast ratio: Press the Up and Down keys
to adjust the contrast ratio.
Sound: Press the Up and Down keys
to adjust the sound
Ringer mode
- Switch between the Up and Down keys to switch among options.
- Press the power key to enter the next menu, and long-press for 1s to return to the previous menu.
The window disappears 3s later when there is no operation.
Color temperature
- Switch the Down key to switch among options.
Press the power key to enter the next menu and long-press for 1s to return to the previous menu.
After selecting a function (as shown below), press the Up and Down keys to adjust the function.
The window disappears 3s later when there is no operation.
Color
- Press the Down key to switch among options.
- Press the power key to enter the next menu, and long-press for 1s to return to the previous menu.
After selecting a function (as shown below), press the Up and Down keys to adjust the function. - The window disappears 3s later when there is no operation.
Chroma: Press the Up and Down keys
to adjust the chromaticity.
Saturation: Press the Up and Down keys
to adjust the saturation.
Sharpness: Press the Up and Down keys
to adjust the sharpness.
Other icons
- Switch between the Up and Down keys to switch among options.
- Use the power key to select the corresponding function.
- The window disappears 3s later when there is no operation.

Notes
- Keep away from water sources or damp places, such as bathrooms, kitchens, basements and swimming pools.
- Ensure that the device is installed and placed on a stable place. Falling may cause personal injury or equipment damage.
- Store and use the product in a cool, dry and well-ventilated place and keep away from radiation and heat sources.
- Do not cover or block the vent holes on the back cover and do not use it on the surface of a bed, sofa, blanket or similar objects.
- The power supply voltage range for the operation of the device is indicated on the label of the back cover. If not sure about the supplied voltage, you can consult the dealer or local electric utility.
- When the device remains idle for a long time, disconnect the power to prevent electric shock and abnormal power voltage damage during thunderstorms.
• Do not overload the socket, otherwise it may cause fire or electric shock. - Do not put foreign objects into the machine, otherwise it may cause a short circuit which causes a fire or electric shock.
- Do not disassemble or repair this product without authorization. If any malfunction, please contact the after-sales service personnel directly.
• Do not pull or twist the signal and data cables excessively.
Troubleshooting
| Faults Causes of faults | Solutions | |
| Unable to start up | The power supply port is not properly connected | Correctly connect the power supply lineLong-press the power key to start up the machine |
| Dim images | The luminance/contrast ratio is not adjusted | Adjust the luminance and the contrast ratio |
| Jumping image or ripple screen | Interfered | Keep away from electrical equipment that may cause electronic interference |
| The indicator is not lit up and no picture is shown | The power line is not properly connected | Connect the power supply of the computer and the portable monitorCorrectly insert into the ports of the computer and the portable monitorConnect the Type-C power line correctly |
| The screen displays “Out of range” | Incorrect resolution | Please set the resolution as the recommended value in the basic parameters |
Health Recommendation
In order to avoid eye fatigue and neck, arms, elbows and shoulder pain caused by prolonged use of the monitor, pay attention to the following points in use:
- Keep your eyes 20 to 28 inches (about 50-70 cm) from the monitor screen.
- In using the monitor, you are recommended to increase blinking frequency to relieve eye fatigue.
- Please take a rest for 20 minutes every two hours.
- While you are at rest, take your eyes away from the monitor and look at a distant target for at least 20s.
- While you are at rest, you can stretch to soothe the neck, arms, back and shoulders.
Low blue ray description
In recent years, the damage caused by blue rays to the eyes has attracted more and more attention. Generally, the wavelength of blue rays is 400-480nm and the wavelength of harmful blue rays is 415-455nm. This monitor has the function of reducing blue ray emission and the user can enable the low blue ray mode of this monitor through menu settings.
Basic parameters
| Product name | 15.8-in portable monitor |
| Product code | 15K3F-C |
| Screen size | 15.8 inch |
| Screen type | IPS |
| Resolution | 1920*1080P |
| Luminance | 220 cd/m^2 |
| Touch control or not | Not supported |
| Speaker | 2*1W |
| Refresh rate | 60Hz |
| FreeSync | None |
| Color gamut | 45%NTSC |
| Display color | 16.7M (6BIT+FRC) |
| Static contrast ratio | 800:1 |
| Interface | Type-C*2 and Mini HDMI*1 |
| Overall dimensions | 373.2*236.8mm |
| Product thickness | 9.4mm |
| Net weight | 990g |
| Input voltage | DC 20V ==1.5AV15V == 2.0AV12V == 2.5AV9V == 3.0A |
| Ambient temperature | 0°C-45°C |

The terms HDMI and HDMI High-Definition Multimedia Interface, and the HDMI Logo are trademarks or registered trademarks of HDMI Licensing Administrator, Inc. in the United States and other countries.
LCPOWER
Silent Power Electronics GmbH
Formerweg 8
47877 Willich
Germany
www.lc-power.com
LC-POWER™
Page d'accueil
Startseite
Hinweise
natural_image
Empty white rectangle with a thin red border (no text or symbols)Lato posteriore
Elenco componenti

Monitor portable×1

Homepage
Note
natural_image
Empty rectangular frame with red border (no text or symbols)Lado trasero
Página de inicio
Notas
Note: The page numbers are uniformly facing outward

Brand : LC-Power
Model : M16FHD60P
Category : Monitor