1901304904 - Saw SCHEPPACH - Free user manual and instructions
Find the device manual for free 1901304904 SCHEPPACH in PDF.

User questions about 1901304904 SCHEPPACH
0 question about this device. Answer the ones you know or ask your own.
Ask a new question about this device
Download the instructions for your Saw in PDF format for free! Find your manual 1901304904 - SCHEPPACH and take your electronic device back in hand. On this page are published all the documents necessary for the use of your device. 1901304904 by SCHEPPACH.
USER MANUAL 1901304904 SCHEPPACH
Translation from original manual
NL
- After unpacking, check all park for any transport damage. Inform the supplier immediately of any faults.
- Later complaints cannot be considered.
Make Sure the delivery is cornplete. - Before putting into operation, familiarize yourself with the rnachine by carefully reading these instructions.
- Use only original scheppach accessories, wearing or replacement parts. You can find replacement parts at your scheppach dealer.
- When ordering, include our item number and the type and year of construction of the machine.
Note
In accordance with valid product liability laws, the manufacturer of this device shall not be responsible for damage to and from this device which results from:
- Irnproper care.
Noncompliance with the Operating Instructions. - Repairs made by unauthorized persons.
- The installation and use of any parts which are not original scheppach replacernent parts.
- Irnproper use and application.
- Failure of the electrical system as a result of noncompliance with the legal and applicable electrical directives and VDE regulations 01 00, DIN 571 13 I VDE 01 13.
We recommend
that you read through the entire operating instructions before putting into operation.
These operating instructions are to assist you in getting to know your rnachine and utilize its proper applications.
The operating instructions contain important notes on how you work with the machine safely, expertly, and economically, and how you can avoid hazards, save repair costs, reduce downtime and increase the reliability and service life of the machine.
In addition to the safety requirements contained in these operating instructions, you must be careful to observe your country's applicable regulations
The operating instructions must always be near the machine. Put them in a plastic folder to protect them from dirt and humidity. They must be read by every operator before beginning work and observed conscientiously. Only persons who have been trained in the use of the machine and have been informed of the various dangers may work with the machine. The required minimum age must be observed.
In addition to the safety requirements contained in these operating instructions and your country's applicable regulations, you should observe the generally recognized technical rules concerning the operation of woodworking machines.
Contents
| Seite | |||
| General | notes | 16 | |
| Safety | notes | 16 | |
| Use only as authorized 17 | |||
| Rernaining | hazards | 18 | |
| Scope of delivery / Accessories 18 | |||
| Technical | data | 19 | |
| Mounting | 21 | ||
| Setting into operation 25 | |||
| Maintenance | 28 | ||
| Electrical | connection | 28 | |
| Malfunction | Rendies | 71 | |
| Working | area | 68 | |
| EC declaration of conformity 78 | |||
| Spare parts list | 73 | ||
| Guarantee | 79 | ||
Safety notes

- In these operating instructions we have marked the places that have to do with your safety with this sign.
- Please pass on safety notes and instructions to all those who work on the machine.
- The machine has been built in accordance with state-of-the-art standards and the recognized safety rules. Nevertheless, its use may constitute a risk to life and limb of the User or of third parties, or cause damage to the machine and to other material property.
- Only tools which conform to European standard EN 847-1 may be used.
- Observe all safety instructions and warnings attached to the machine.
See to it that safety instructions and warnings attached to the machine are always complete and perfectly legible. - The bench circular saw may not be used to cut fire wood.
- Caution when working: There is a danger to fingers and hands from the rotating cutting tool.
- Check all power supply lines. Do not use defective lines.
- Insure that the saw bench is Set up in a stable position on firm ground.
- Keep children away from the machine when it is connected to the power supply.
- Operating personal must be at least 18 years of age. Trainees must be at least 16 years of age, but may only operate the machine under adult supervision.
- Persons working on the machine may not be diverted from their work.
-
The working space on the machine must be free of chips and wood scrap.
-
If a second Person is at the circular saw bench to remove cut workpieces, the machine must be equipped with a table extension. The second person may only stand at the removal end of the table extension.
- Fit only sharp, crack-free and undistorted circular saw blades.
- Circular saw blades made of super-high-speed steel must not be used.
- Safety devices on the machine must not be dismantled or put out of action.
- The splitting wedge is an important safety feature. The workpiece is fed through the splitting wedge, which prevents the cut from closing behind the saw blade and also prevents the workpiece from kicking back.
- Always lower the protective Cover over the work- piece for each operation.
- The cowl must stand horizontally above the saw blade during all working procedures
Always use the push-stick for longitudinal cutting of narrow workpieces of less than 120~mm - Always stop the machine and disconnect the mains plug before remedying faults or removing jammed pieces of wood.
- Replace the blade-slot insert if it is damaged. Disconnect the mains plug!
- Wear only close-fitting clothes. Remove rings, bracelets and other jewelry.
- Pay attention to the rotational direction of the motor and tool - See Electrical Connection.
- Cleaning, changing, calibrating, and setting of the machine may only be carried out when the motor is switched off. Pull the power supply plug and wait for the rotating tool to completely stop.
- Switch the machine off and pull power supply plug when rectifying any malfunctions
- For all working procedures the machine must be connected to a scheppach Dust extractor. Observe instructions for proper use.
- When working on the machine, all safety mechanisms and Covers must be mounted.
- Circular saw blades made from superspeed steel may not be used.
- The splitting wedge is an important safety feature. The workpiece is fed through the splitting wedge, which prevents the cut from closing behind the saw blade and also prevents the workpiece from kicking back.
- Note the thickness of the splitting wedge - See figures stamped into the splitting wedge. The splitting wedge may not be thinner than the saw blade and not thicker than cutting joint width.
- Before the machine is put into operation it must be connected to a dust extractor with a flexible, non-flammable suction hose. The suction should switch on automatically when the machine is switched on.
- When leaving the work place, switch the motor off. Pull the power supply plug.
- Cut off the external power supply of the machine or plant even if only minor changes of place are envisaged. Properly reconnect the machine to the supply mains before recommissioning.
- Connection and repair work on the electrical installation may be carried out by a qualified electrician only.
- All protection and safety devices must be replaced after completing repair and maintenance procedures.
- Pay attention to an sufficient illumination of the workplace.
Proof the braking time till the saw blade stops daily. It must not be longer than 10 seconds, otherwise do not continue working.
Always wear ear protection and protection glasses during working
- Wear gloves when you change the saw blade
- Power down the machine when you clean it
- Operating conditions: Do not use the machine outside only inside in closed rooms
- Store conditions: humidity should not be under 90% and not condensed
- Safe big work pieces of canting
Use only as authorized
- The machine corresponds to the valid EC guideline.
- The scheppach Precisa 6.0 circular sawbench is defined as a machine in accord dance with EN 1870-1.
- For transporting the machine within the workshop area use the scheppach wheel assembly (accessory)
- The working position is to the front of the machine either to the right or the left sawblade.
- The machining range and surrounding areas of the machine must be clear of interfering foreign matter to prevent accidents occurring.
- Workpieces must be completely free of foreign objects, i.e. nails or screws.
- Before the machine is put into operation it must be connected to a dust extractor with a flexible, non-flammable suction hose. The suction should switch on automatically when the machine is switched On.
- Use the scheppach dust extractor ha 3200 or ha 2600 to remove matchwood or saw dust. The vacuum support flow rate must be 20mls . Subat-mospheric pressure 1200Pa .
- The scheppach automatic switching unit is avail- lable as a special accessory.
Typ ALV 2
Art. Nr. 791 0 401 0 230 V150 Hz
Typ ALV 10
Art. Nr. 791 0 4020 400 V150 Hz
The vacuum exhaust unit automatically switches on after a 2-3 second delay after the machine tool is turned On. This avoids overloading the circuit fuse.
After turning off the machine tool, the vacuum exhaust unit remains on for an additional 3 - 4 seconds and is then automatically switched off. Remaining dust is thereby removed by vacuum exhaust, as required by German regulations governing hazardous materials. This results in savings in electricity consumption and reduces noise levels, as the vacuum exhaust unit is on only during machine tool operation.
For work in commercial spaces, the scheppach dust extractor rg 4000 must be used. Do not remove or shut off vacuum exhaust systems or dust removers while machine tools are operating.
- The scheppach circular sawbench is designed exclusively for the machining of wood and materi- als similar to wood. Only original scheppach tools and accessories may be used. Use the required sawblade in accordance with the EN 847-1 norm depending on the type of cut and type of wood (solid wood, plywood or chipboard). Please observe the scheppach „Special Tool Accessories“ (page 18).
- For using the machine not as intended, the manufacturer will not take any liabilities
- The machine is designated for commercially use
Rernaining hazards
The rnachine has been built using modern techno-logy in accordance with recognized safety rules. Some remaining hazards, however, may still existi.
- The rotating saw blade can cause injuries to fingers and hands if the work piece is incorrectly fed.
- Thrown work pieces can lead to injury if the work piece is not properly secured or fed, such as working without a limit stop.
- Noise can be a health hazard. The pernitted noise level is exceeded when working. Be Sure to wear personal protective gear such as ear protection.
Defective saw blades can cause injuries. Regularly inspect the structural integrity of saw blades. - The use of incorrect or damaged mains cables can lead to injuries caused by electricity.
Even when all safety measures are taken, some remaining hazards which are not yet evident may still be present - Remaining hazards can be reninimized by following the instructions in „Safety Precautions“, „Proper Use“ and in the entire operating manual.
Scope of delivery
Circular saw bench Precisa 6.0 - partly assembled
Sawblade 0315
Long fence
Crosscut / litre gauge
Riving knife
Dust extractor hood
Dust extractor accessories
Suction connection piece
Push-stick
Push-grip
Assembly too
Holding mandre
Assembly accessories (accessory pack)
Operating instructions
scorer saw blade 0120 (only 1901304903/1901304904)
Accessories
Model No.
Sliding table carriage 1400 5463 0701
Sliding table carriage 2000 5463 0702
Sliding table carriage 1400 5463 0703
Sliding table carriage 2000 5463 0704
Hingle arm 54630705
Fence rail 1350 extendible 5320 8180
Wheel base 5300 0705
Table width extension foldable 5463 0706
Table length extension 79017 00701
SUVA suction attachment 5460 1100
Table insert and collar nut for
adjustable grooving cutter 5463 0707
Adjustable grooving cutter 7231 0709
only allowed to use in correspondence with
SUVA-suction attachment)
clamping fence cpl. rightside 7939 0301
fence rail 1500 5300 0077
automatic switch-on
mechanism ALV 2 7910 4010
automatic switch-on
mechanism ALV 10 7910 4020
Acessory sawblades
Only install Original scheppach sawblades!
Model Nr.
Special sawblade 63104101
Hardened metal sawblade for coated furniture boards
Dimensions:
Total 0 mm 250
Bore 0 mm 30
No.of teeth 80Z
sawblade 5100 5556
Universal trimming blade hardened metal teeth for long and cross cuts in wood and chip board.
Dimensions:
Total 0 mm 315
Bore 0 mm 30
No.of teeth 48 WZ
sawblade 5100 5504
Universal trimming blade hardened metal tipped for long and cross cuts in solid wood.
Dimensions:
Total 0 mm 300
Bore 0 mm 30
No.of teeth 48 WZ
sawblade 5100 5507
Universal TCT sawblade for length and cross cuts in solid wood.
Dimensions:
Total 0 mm 300
Bore 0 mm 30
No.of teeth 72Z
sawblade 79863001
Special low noise sawblade, hardened metal tipped for plastic coated furniture boards.
Dimensions:
Total mm 300
Bohrung 0 mm 30
No.of teeth 60Z
sawblade 5100 5501
Universal trimming blade for soft and hard wood.
Dimensions:
Total 0 mm 300
Bore mm 30
No.of teeth 28 WZ
Scoring sawblade 54720313
Hardened metal sawblade for scoring plastic coated
furniture boards.
Dimensions:
Total 0 mm 120
Bore mm 20
No.of teeth 26 Z
54720313
Technical data
Dimensions:
mm
general
length
total length with table extension mm 1400
total
width
mm
total
height
mm
table
size
mm
table
height
mm
circular sawblade max.
mm 315
circular sawblade min.
mm 250
cut height 90^
mm 110
cut height 45^
mm 77
sawblade adjustment ranae
mm 110
rotary speed
1/min. 400
cutting speed
m/sec. 6
scoring sawblade 0
mm 120
scoring sawblade rotary speed
1/min. 8000
cutting speed - scoring
m/sec. 50
parallel stop longitudinal
mm 800
parallel cut max. width
mm 390
parallel cut width with table width
extension - foldable
mm 1100
angling fence
mm T-Profil
0-60°
Cut width 90^ angular cut:
with Cross / mitre gauge
mm 270
with sliding table carriag
nm 900
with sliding table carriag
nm 960
suction connection piece
mm 50
suction connection piece
mm 100
suction volume flow at 20m / s
0 100 = 560 m³/h
suction at suction connection piece
0 100 = 170 Pa
ambient conditions
050 = 918Pa
nett weight
-5°C
nett weight with scorer
- 35° kg 215
kg 224
Drive
Electric motor
230V
400V
input power P1
kW 3,0
4.8
output power P2
kW 2,2
4.0
motor rotary speed 1/min.
2800
drive type
S6/40%
S6/40%
rated current
11.6A
8,2A
Scorer
input power P1
kW 0,8
output power P2
kW 0,5
Noise characteristic values
Measurement conditions in accordance with draft pr EN 1870-1: 1995-07; DIN EN ISO 11202; DIN EN ISO 3746
The values stated are emission values and are there-fore not necessarily safe operating values. Although there is a correlation between emission and immis-sion levels, you cannot reliably deduce from this whether additional safety measures are required or not. Factors which can influence the immission level currently at the workstation comprise thdsO duration of the effects, the characteristics of the work room, other sources of noise etc., for example, the
Number of machines and adjacent operations. The
permissiblevalue per workstation can also vary from
$05x68@try to country. This information should nevertheless
850 enable the user to make a better esti- mation of dangers and risks.
Sound intensity level in dB
ldling L_WA =
97,5 dB(A),
Working L_WA =
100,4 dB(A)
Work place based emission values in dB
Idling L_pAeq =
86,7 dB(A),
Working L_pAeq
87,1 dB(A)
A measurement error factor of K = 4 dB applies to the stated emission values.
Information on dust emission
The dust emission values measured in accordance with the „principles for testing dust emission“ of the committee of experts of wood are below 2mg / m3 . This means that the TRK limit for wood dust which is valid in the Federal Republic of Germany will be per- manently kept to if the machine is connected to a properly working dust extractor with at least 20 mls air speed.
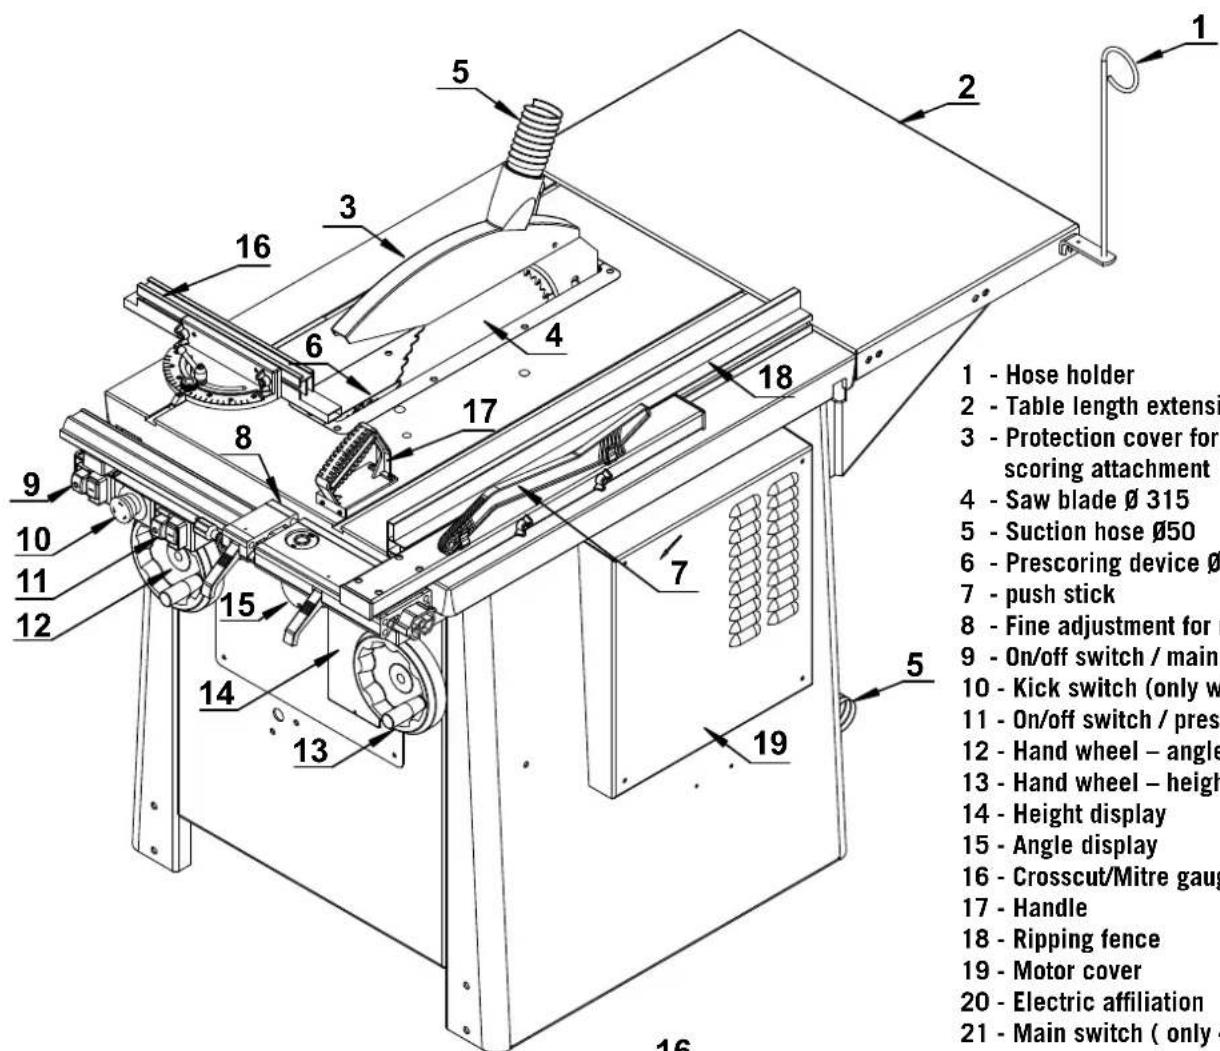
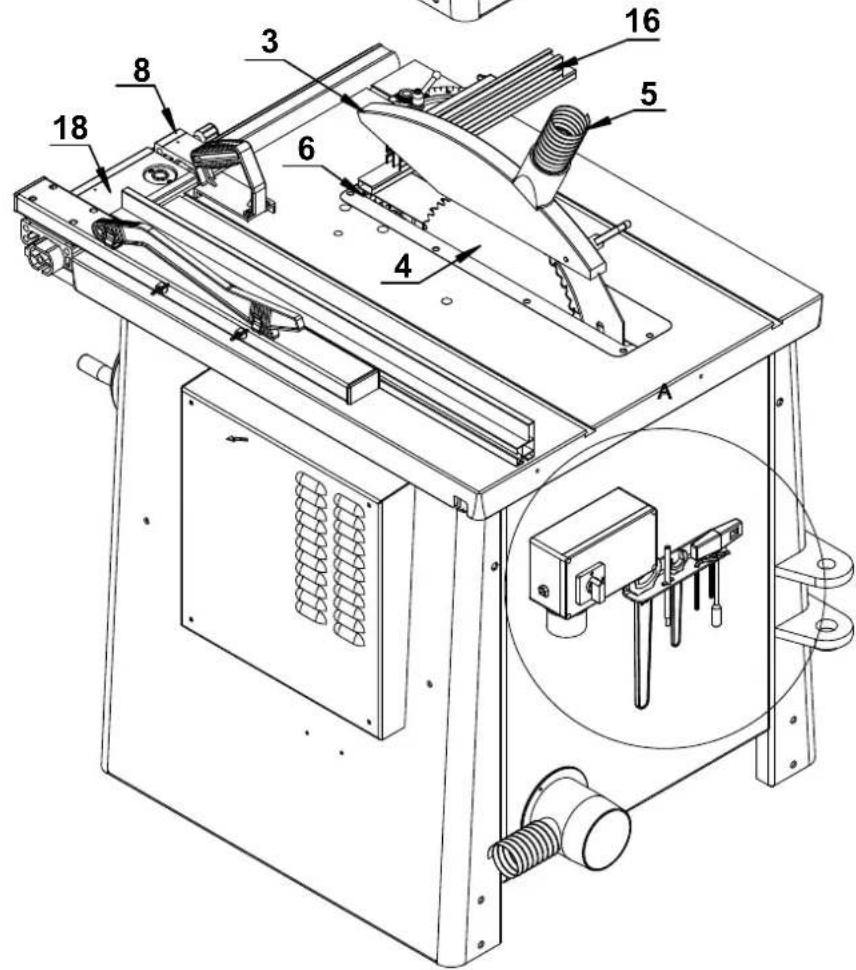
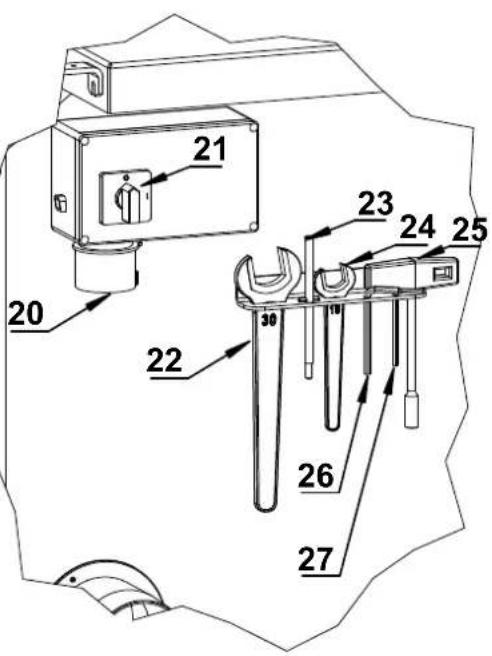
1 - Hose holder
2 - Table length extension
3 - Protection cover for sawblade scoring attachment
4 - Saw blade 0 315
5 - Suction hose 050
6 - Prescoring device 0120
7 - push stick
8 - Fine adjustment for ripping fence
9 - On/off switch / main saw blade
10 - Kick switch (only with prescoring device)
11 - On/off switch / prescoring device
12 - Hand wheel - angle adjustment
13 - Hand wheel - height adjustment
14 - Height display
15 - Angle display
16 - Crosscut/Mitre gauge
17- Handle
18 - Ripping fence
19 - Motor cover
20 - Electric affiliation
21 - Main switch (only 4,8 kW)
22 - Key SW30
23 - Holding mandrel
24 - Key SW19
25 - Key SW8 (only with scoring attachment)
26 - Hexagonal key SW5
27 - Hexagonal key SW4
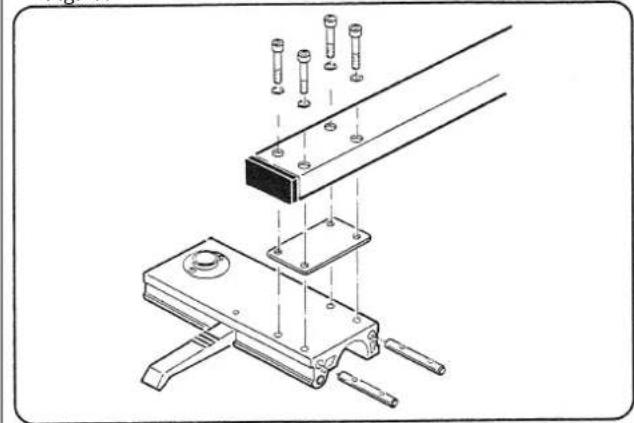
Fig. "A"
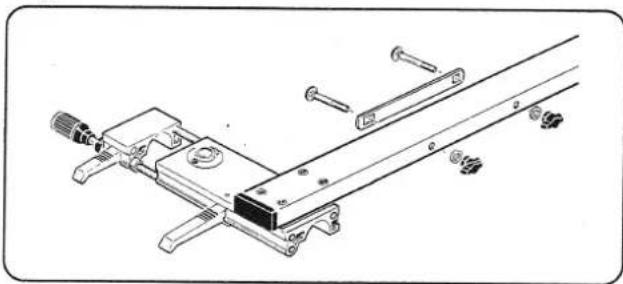
Fig. "B"
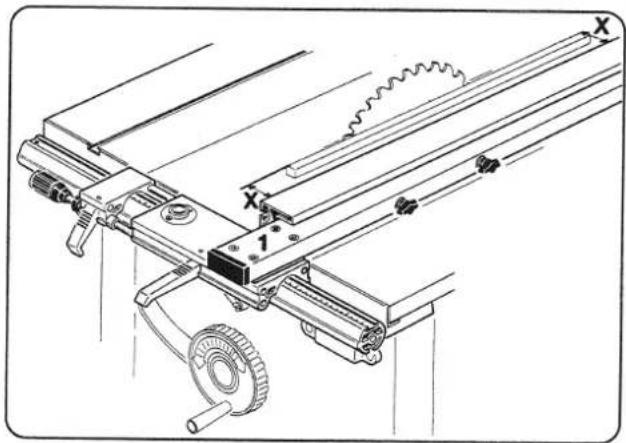
Fig. "F"
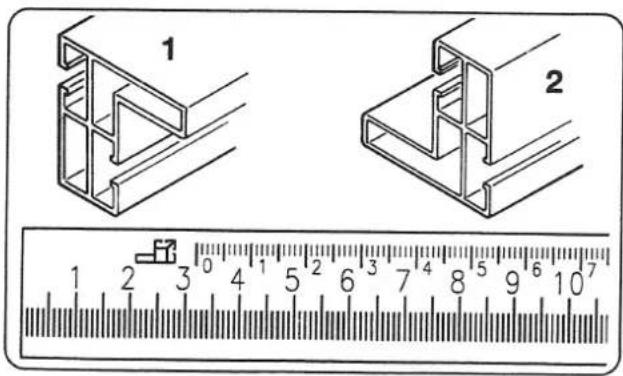
Fig. "G"
Mounting
All assembly and retrofitting work may only be performed when the mains plug has been disconnected.
Your scheppach circular sawbench is not completely assembled for packaging reasons.
Assembly tools
The following are included in the scope of delivery:
1 open-end spanner 19 mm width across flats
1 open-end spanner 30 mm width across flats
1 allen key 5 mm width across flats
1 allen key 6 mm width across flats
1 allen key 4 mm width across flats
Parallel fence Fig. "A"
Screw the fence section, in-between plate and guiding slide together. For this purpose, insert the threaded bolts in the guiding slide.
4 intermediate bushes
4 cheese head screws M 6 x 40
Fig. "B"
Attach the intermediate plate to the fence section.
- Do not tighten -
2 cheese head screws M 6 x 75
2 washers 6
2wing nuts M6
Parallel fence adjustment
Fig. "F"
- Open the extender lever on the sliding table (pull upwards) and put it condescendingly on the guide tube
For precise adjustment of the parallel fence in relation to the circular saw blade, release the four cheese head screws (1), and clamp the guide slide at a distance of approx. 100mm from the blade. Place a straight slat of approx. 600mm length against the blade. Align the fence parallel with the saw blade by repeated measurement (X) and readjustment. Retighten the cheese head screws (1)
Important!
For cutting widths below 120mm always use a push stick.
Stop rail
Fig. "G"
Position 1:
For working with raised stop bar surface. The displayed cut width is on the black display scale.
Position 2;
For working with lowered stop bar surface.
The displayed cut width is on the blue display scale. (Lower stop bar surface symbol)
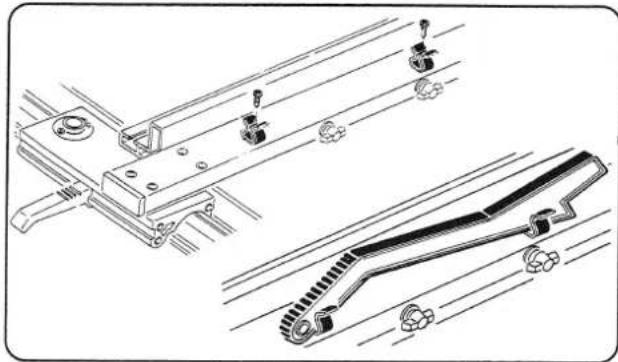
Fig. "H"

Fig. "I"
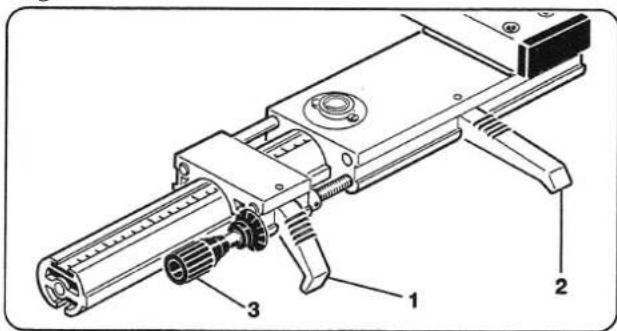
Fig. "J"
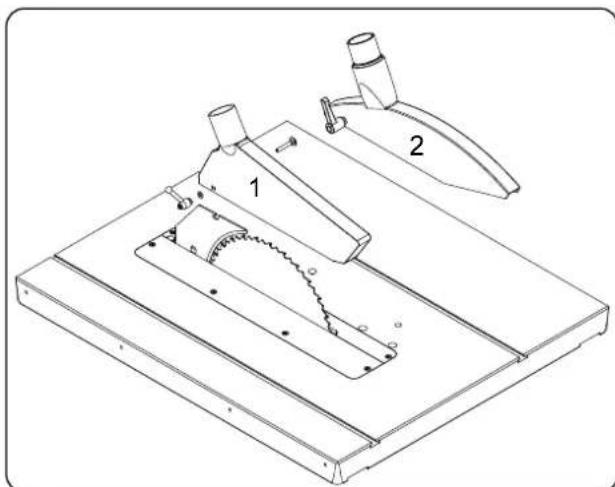
Fig. "K"
Push-stick
Fig. "H"
Secure the 2 holding brackets on the long stop. each with
1 oval head screw
B 4,2 x 9,5
Insert the push-stick into the holding brackets.
When cutting narrow workpieces lengthwise (i.e. smaller than 120mm ) it is essential to use the push-stick).
Parallel fence
Fig. "I"
Adjusting the reading microscope
Adjust the fence against the saw blade and clamp the eccentric levers (1 + 2) . Release the fastening screws of the reading magnifier; position the hairline precisely over the Zero line of the scale. Retighten the fastening screwa.
Fig. "J"
Fine-adjustmen
Fine adjustment is with the adjusting spindle (3) while the eccentric lever (1) is locked, and the eccentric lever (2) is open.
Suction hood
Fig. "K"
Screw the saucer-head screw M 6 X 40 with washer and lock lever into the suction hood. Clamp the suction hood securely on the riving knife.
Suction hood,1" without scorer
Suction hood,2 with scorer
IMPORTANT!

The suction hood must be lowered onto the workpiece for each new job.

Fig. "L"
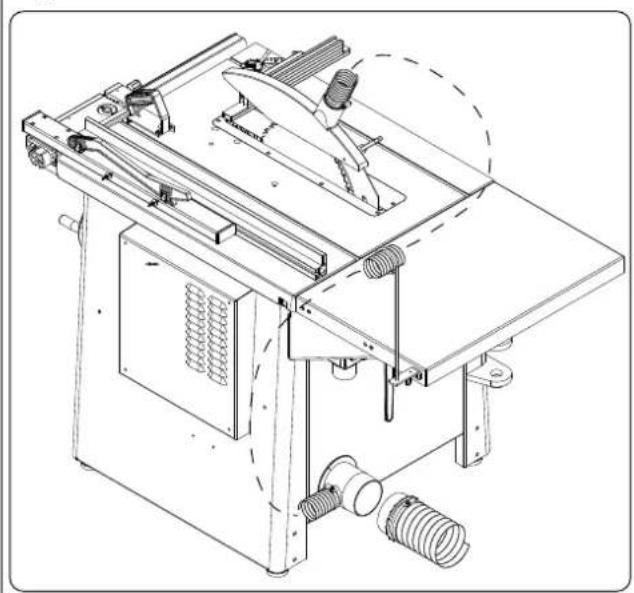
Fig. "L1"
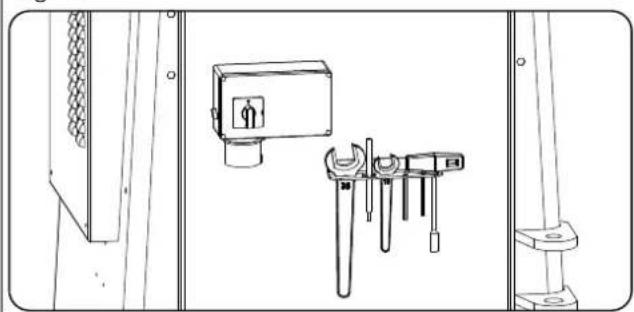
Fig. "M"
Sawblade - riving knife Fig. "L"
1 holding rnandrel
2 left-handed hex. nut
Take out the left hand table inlay.
- Insert the holding mandrel (1) into the saw spindle via the bore in the right-hand side of the table. For releasing or tightening the hex. nut M 20 (2) the saw spindle is locked with the holding mandrel.
Note the sawblade running direction.
Riving knife
- Release the screw (3), insert and clamp in the riving knife. The distance between the sawblade and the riving knife (4) must amount to no more than 8mm and must be checked each time the sawblade is changed and reset as necessary. The riving knife tip must never be set lower than the height of the base of the topmost sawtooth. A setting to r . 2mm under the topmost sawtooth tip is ideal.
The riving knife is an important safety device, which guides the workpiece and prevents the cut pinching and the workpiece being thrown backwards. Note the riving knife thickness - refer to the numbers starnped on the riving knife. The riving knife must not be thinner than the sawblade body and not thicker than its cutting joint width.
Attention! Close the protection cap (5) Risk of damage!
Suction hose Fig."L1"
attach suction hose 050 and affix hose band clip
Suction connection piece
Place the suction connection piece for the dust extractor onto the back emission tube
Tool holder Fig. "M"
Place the supplied tools for the Precisa 6.0 within easy reach in the tool holder.
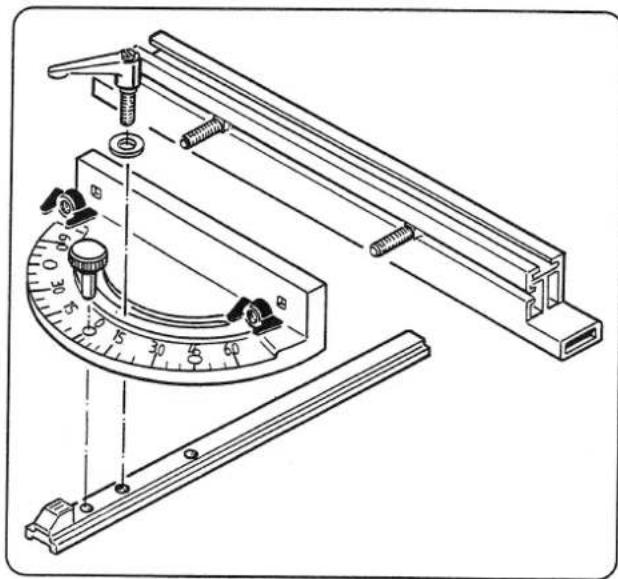
Fig. "N"
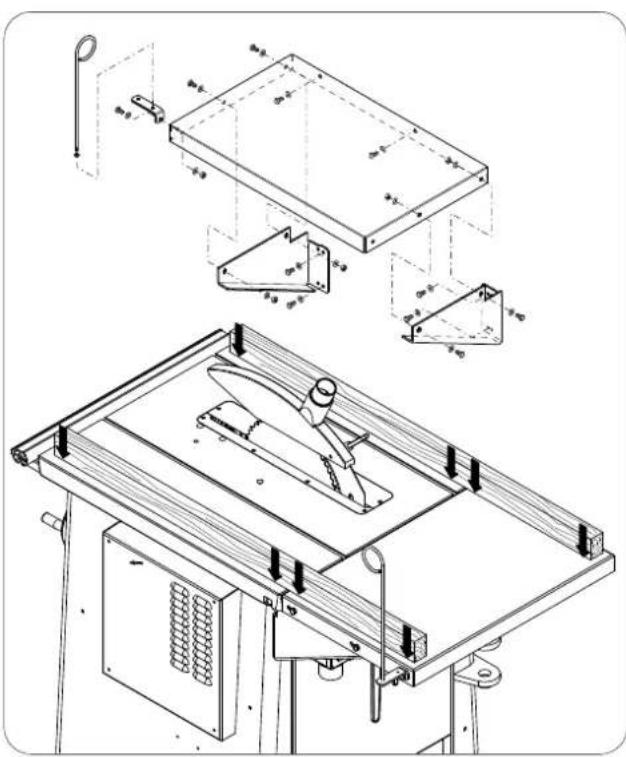
Fig. "0"
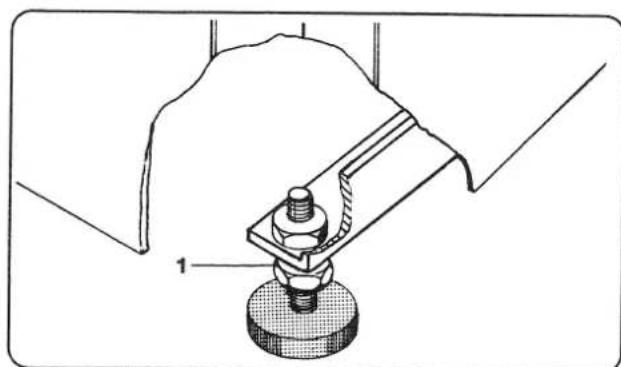
Fig. "P"
Crosscut 1 litre gauge Fig."N"
Screw the swivelling part and the sliding rail together.
1 washer 6,4
1 lock lever M6
Mount the stop rail onto the swivelling part
2 oval head screws M6 x 25
2 wing-nuts M6
Set the crosscut / litre gauge as required to the right or left of the sawblade.
Locking at 0^ and 45^ is effected with the socket pin and lock lever.
table length extension Fig."0"
Attach table lenght extension to the machine. Bolt the screws to the machine only by hand.
11 hexagonal screws M8x16
16 washers 08
5 hexagonal nut M8
Adjust the table length extension to the saw table flat (with two wood lathes) and fix all screws.
Fit the hose holder and attach the suction hose 0 50.
Your Circular saw bench Precisa 6.0 is now fully assembled.
Installing and adjusting Fig."P"
Make sure that your scheeppach Circular saw bench ts 4020 is installed so that it is level and stable on a solid surface. Level out surface unevenness.
To this end at the adjustable feet
- Release the hex. nut (1)
- Carry out the height adjustment
- Tighten up (1) the hex. nut

Fig. "Q"
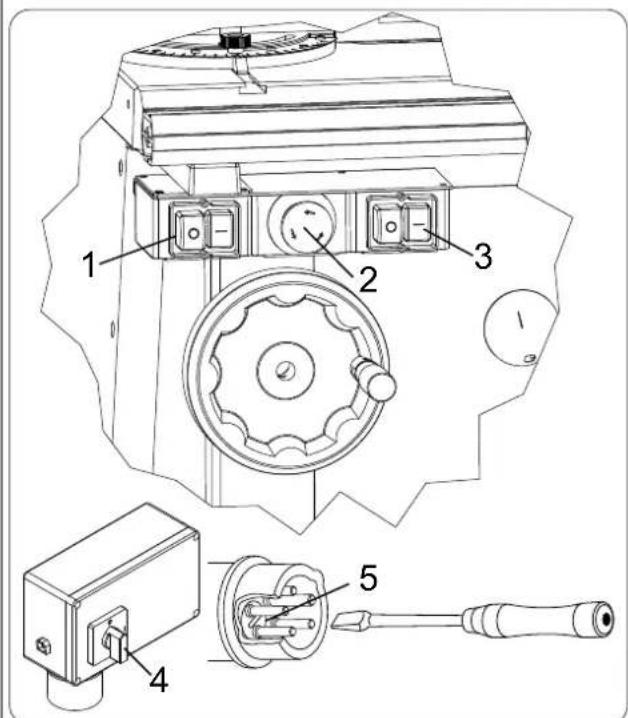
Fig."Q1"
Starting operations

Please read the safety instrc-tions before setting the saw bench into operation.
All protective and auxiliary devices must have been mounted. The scheppach Precisa 6.0 is ready for operation when it has been connected to the mains.
NOTE:
In accordance with valid product liability laws, the manufacturer of this device shall not be responsible for damage to and from this device which results from:
- Improper care
Noncompliance with the Operating Instructions - Repairs made by unauthorized persons
- The installation and use of any parts which are not original scheppach replacement parts.
- Improper use and application
- Failure of the electrical system as a result of noncompliance with the legal and applicable electrical directives and VDE regulations 0100, DIN 57113 / VDE 0113
Sawblade height adjustment
Sawblade angle adjustment
Fig. "Q"
- The height is adjusted simply by turning the hand wheel "1" left or right.
- With a sawblade 315mm read off the height to which the blade has been adjusted on the left-hand scale.
-
Sawblade 315mm= Cut depth from O - 110 mm
-
The height is adjusted simply by turning the hand wheel "2" left or right.
-
For adjusting the sawblade angle setting (max. 45^ ) pull out the hand wheel with both hands and hold firmly. Release the lock handle (1).
- Set the desired angle by turning the hand wheel.
- To return to 0^ turn the hand wheel back until the end stop is reached.
Switch
Fig."Q1"
1 - On/off switch saw blade
2 - Kick switch (only with scoring attachment)
3 - On/off switch prescoring device
4 - Main switch /only with 4,8 kW motor)
5 - Phase inverter (when changing the power supply line or the location it is necessary to proof the direction of rotation, if necessary polarity must be changed)
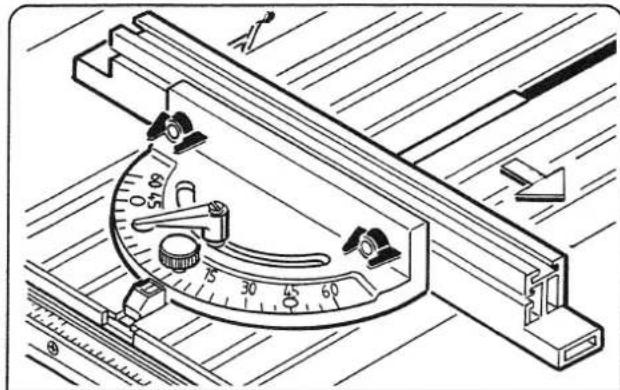
Fig. "R"
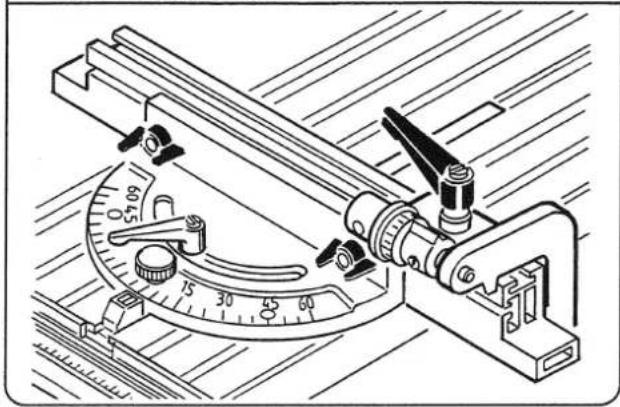
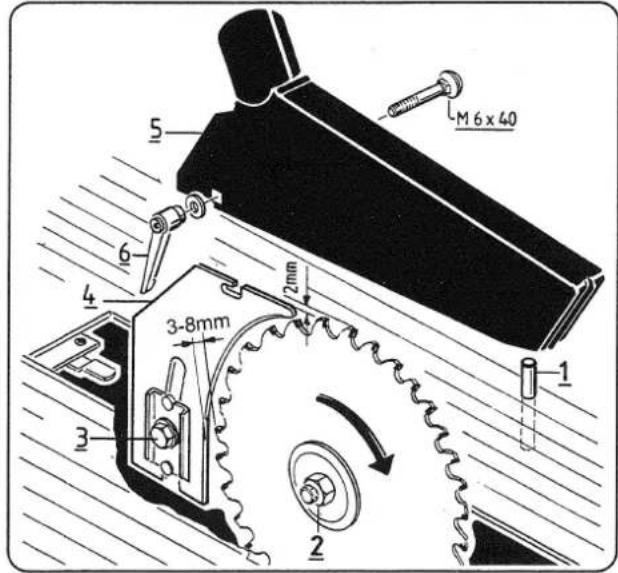
Fig. "S"
Fig. "T"
Crosscut/mitre gauge Fig."R"
The crosscut / mitre gauge can be fitted to the left or to the right of the sawblade.
The infinitely adjustable turning Zone is 0 - 60^ on both sides and is fixed with a tommy screw.
Fix the setting at 0^ and 45^ with the socket pin and tighten up the tommy screw.
Folcling stop (accessory)
The folding stop which is fitted onto the stop rail, is an ideal supplement to the crosscut / litre gauge.
The fine adjustment on the end stop enables exact settings via the knurled screw.
Changing the sawblades Fig."S"
IMPORTANT!
Only use sharp, tear-free, unde-formed „Original scheppach sawblades".
If the saw blade slot becomes worn out replace the table inlay.
CAUTION!
When changing the sawblade take out the mains plug!
1 Holding mandre
2 Left-handed hex. nut M 20
Take out the left-hand table inlay.
- Insert the holding mandrel (1) into the saw spindle through the bore in the right-hand side of the table. For releasing or tightening up the hex, nut M 20 (2) the saw spindle is locked with the holding mandrel.
- Make note of the running direction of the sawblade.
Push-stick and push-grip Fig. "T"
- For cutting narrow workpieces with a distance between the sawblade and the stop rail of less than 120mm , it is essential to use the push-stick.
- For pushing narrow specially shaped workpieces use the push-grip. The respective push-blocks can be prepared by the User and attached to the push-grip.
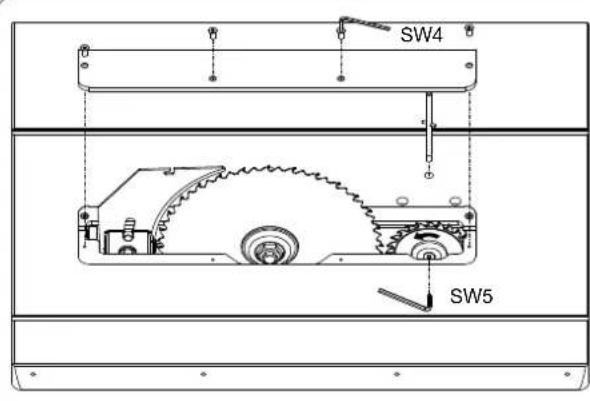
Fig. "U"
Fig. "V"
Fig. "W"
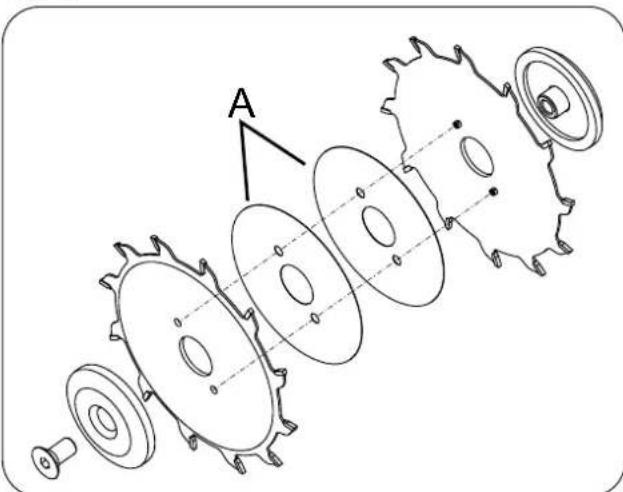
Fig. "Y"
Precutting device for panel sizing circular saws Abb."U"
Important:
Do only use sharpened, faultless ,original" SCHEPPACH saw blades
In case of an redbounded saw balde change the table insert.
ATTENTION!
Pull power cable before changing the saw balde
1 holding mandrel
2 screw M8
- Remove the left table insert
- Put the holding mandrel (1) in the saw shaft through the drilling in the left table half. For unfasting or fixing the screw (2) the saw shaft will be fixed with the holding mandrel
Take care of the running direction of the saw blade
ATTENTION! Close protection cap (5)
Risk of damage! (Picture ^ L^ )
Fig. V, W, Y
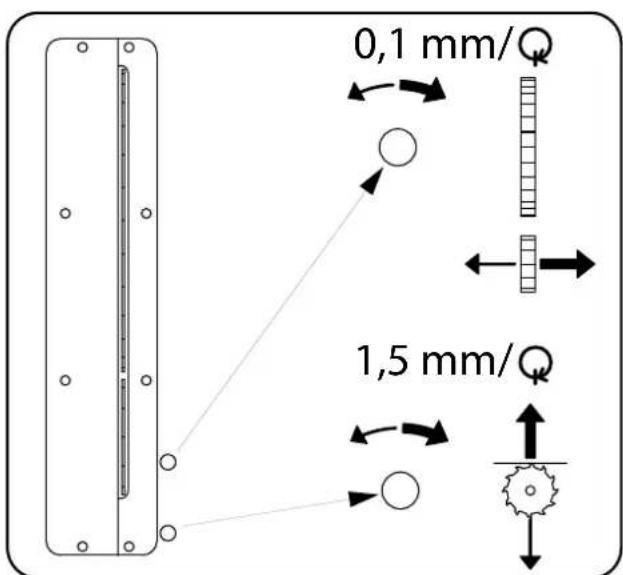
the potrusion of the scoring saw balde on the table surface modifies to the cutting band form 1,0 - 2mm
With the screw (2) Fig ^ you will do the high adjustment 1 rotation conforms 1,5mm (Fig. ^ )
The band of the scoring saw blade will be regulated with the spacer washer (A). (1x0,1mm 2x0,2mm 1x0,3mm) Fig. W The prescoring device should have the same size (band) than the saw blade of the machine, 2,8mm - 3,6mm are possible.
The alignment of the scoring saw blade to the saw blade of the machine will be adjusted with the screw (3) Fig. ^ . 1 rotation conforms 0,1 mm (Fig ^ )
For checking make a cut sample.
If the machine is not used, prescoring device and the screw (2) is to be dropped unter the table.
Maintenance
Always switch off the motor and disconnect the plug from the power supply prior to any maintenance and cleaning work.
The following maintenance points should be checked on the scheppach Precisa 6.0 circular saw blench.
- Check the belt tension after approximately one operating hour; retension if necessary.
For this purpose Open the upper side wall. By uniform adjustment of the fastening nuts on the motor, adjust the
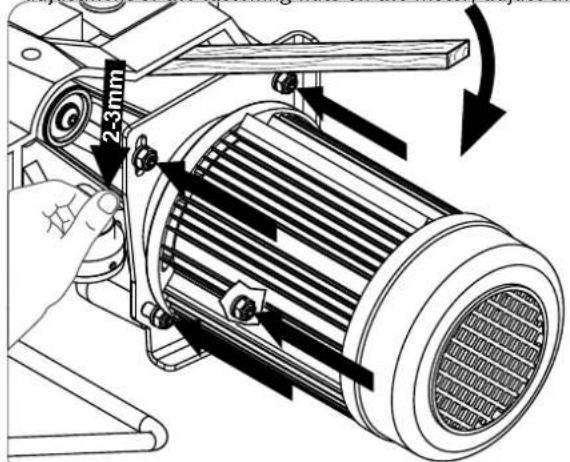
necessary belt tension. After this first initial adjustment, check the belt tension at regular intervals.
- Occasionally, oil the roller chain and moving parts (height and angle adjust-ment).
- Ensure that the bench surface is always free of resin.
- If the circular saw bench is not connected to an extractor, then it will be necessary to remove the saw dust and wood chips that accumulate in the protective blade box. This is important to ensure trouble-free ejection of the saw dust. Remove the left blade-slot insert. If suction System is not connected when working, the height and angle adjustment range may be restricted due to chip accumulation.
All protection and safety devices must be replaced after completing repair and maintenance procedures.
- The saw protection box must be clea- red occasionally of wood shavings and saw dust so that shavings do not jam when ejected.
- he height and angular adjustment area may be reduced by shaving deposits. Remove the left bench inlay and clean the adjustment area.
Electrical connection
The installed electric motor is completely wired ready for operation.
The customer's connection to the power supply system, and any extension cables that may be used, must conform with local regulations.
Motor braking unit
The scheppach machine is fitted with an automatic motor braking unit which becomes effective as soon as the driving motor is switched off.
The saw blade must stop maximal 10 seconds after switching it off. Poof daily!
If it takes longer, do not use the machine anymore.
Important information
The 230V / 50Hz and 400V / 50Hz electric motor is designed for the S6/40% operating mode.
The motor automatically switches off if it is overloaded. The motor can be switched on again after a cooling-down period (varies timewise).
Faulty electrical connecting leads
Insulation damage often occurs at elec-trical connecting leads.
Causes include:
- Pressure marks caused when connec-ting leads are run through windows or the cracks of doors.
- Folds caused by the improper attachment of running of the connecting leads.
- Cuts resulting from the crossing of the connecting lead.
Insulation damages caused by the ripping out of the connecting lead from the wall socket. - Cracks due to the ageing of the insulation.
Faulty electrical connecting leads such as these may not be used and are highly dangerous due to the insu- lation damage.
Check electrical connecting leads regularly for damage. Ensure that the connecting lead is not attached to the mains supply when you are checking it.
Electrical connecting leads must correspond to the relevant VDE and DIN regulations. Only use connecting leads with the code H 07 RN.
The type designation must be printed on the connecting lead by regulation.
Single-phase motor
The supply voltage must be 230 volt - 50 Hz.
- Extension leads up to 25m in length must have a cross-section of 1.5mm^2 . Extension leads whose length is over 25m must have a cross-section of at least 2.5mm^2
The mains connection is fused with a 16 A slow-blow fuse.
Three-phase motor
The 400V / 50Hz electric motor is designed for the S6/40% operating mode.
The supply voltage must be 400 volt - 50 Hz.
The mains connection and the extension lead must have 5 wires = 3P + N + PE
The extension cables must have a minimum cross-section of 1.5mm2
The mains connection is maximally fused with a 16 A fuse.
The phase-sequence must be checked if the mains connection or the location is changed. The polarity must be changed, if necessary (wall socket)
Connections or repairs on the electrical equipment may only be carried out by an electrician.
Please give the following information if you have any enquiries.
- Motor manufacturer
- Kind of current
Machine type label data
If your are sending back the motor, always send the complete drive unit with the switch.
Fabrikant:
Scheppach
Zaagsnelheid m/sec. 66
Vooritszaagblad 0 mm
Toerental Vooritszaagblad 1/min. 8000
Tafelverlenging Fig."0"
Vitesse de coupe m/sec. 66
Porte-outsils Fig."M"
| Malfunction Mögliche Ursache Remedy | ||
| 1. Saw blade loosens itself after the motor has switched on | fastening nut not tightened enough tighten fastening nut, M 20 left thread. | |
| 2. Motor doesn't start a) power breakdownb) extension cord defeckc) connections to motor or switch not correct, brake doesn't ventilated) motor or switch defect | a) check power fuseb) See operating instructions for electrical contacts, pages 28c) take it to your electrician for examinationd) See operating instructions for electrical contacts, pages 28 | |
| 3. Motor advances or retreats a) condenser defectb) incorrectly connected | a) have your electrician exchange itb) have an electrician change the polarity of the electrical outlet | |
| 4. Motor has no power, shuts itself offa) overloading through a dull saw bladeb) thermo protection responds | a) insert a sharpened saw blade.b) ready to turn on again after cool-down time has been met | |
| 5. Burns on the cutting surface length cutsdiagonal cuts | a) dull saw bladeb) wrong saw bladec) length stop not parallel to saw bladed) slide carriage not parallel to saw blade | a) insert a sharpened saw bladeb) insert a saw blade for length cutsc) exchange length stopd) adjust slide carriage to the saw blade |
| 6. Cutting power drops at full motor speed | belt loose tighten belt, See Maintenance | |
| 7. Workpiece jams between saw blade and longitudinal fence | Longitudinal fence not running parallel to saw blade | Check longitudinal fence setting and readjust |
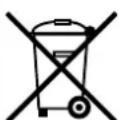
Only for EU countries.
Do not dispose of electric tools together with household waste material!
In observance of european directive 2002/96/EC on wasted electrical and electronic equipment and its implementation in accordance with national law, electric tools that have reached the end of their life must be collected separately and returned to an environmentally compatible recycling facility.
France
EC Declaration of Conformity
that the machine described below due to its con struc tion and design and in the version delivered by us complies with the relevant provisions of the following EC Directives.
In case of a modification of the machine this declaration ceases to be valid.
Machine description: Circular sawbench
Machine type: Precisa 6.0
Applicable EC
Directives:
Applied harmonized European Standards
EN ISO 12100-1, EN ISO 12100-2, EN ISO 13857, EN
349, EN 418, EN 847-1, EN 13849-1, EN 1088, EN 1870-1, EN
60204-1,EN 55014,EN 60555-2,EN 60555-3
Notified Body ISO 7960
(EC type-examination certificate
Apparent defects must be notified within 8 days from the receipt of the goods. Otherwise, the buyer's rights of claim due to such defects are invalidated. We guarantee for our machines in case of proper treatment for the time of the statutory warranty period from delivery in such a way that we replace any machine part free of charge which provably becomes unusable due to faulty material or defects of fabrication within such period of time. With respect to parts not manufactured by us we only warrant insofar as we are entitled to warranty claims against the upstream suppliers. The costs for the installation of the new parts shall be borne by the buyer. The cancellation of sale or the reduction of purchase price as well as any other claims for damages shall be excluded.