IAN 388318 - Tent Rocktrail - Free user manual and instructions
Find the device manual for free IAN 388318 Rocktrail in PDF.

User questions about IAN 388318 Rocktrail
0 question about this device. Answer the ones you know or ask your own.
Ask a new question about this device
Download the instructions for your Tent in PDF format for free! Find your manual IAN 388318 - Rocktrail and take your electronic device back in hand. On this page are published all the documents necessary for the use of your device. IAN 388318 by Rocktrail.
USER MANUAL IAN 388318 Rocktrail
text_image
PDF ONLINE www.lidl-service.com
natural_image
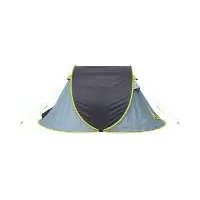
Exterior view of a gray camping tent with arched roof and open interior (no signage or text)4-PERSONEN-FAMILIENZELT 4 PERSON FAMILY TENT TENTE 4 PERSONNES
DE AT CH
4-PERSONEN-FAMILIENZELT
Aufbauanleitung
FR BE
TENTE 4 PERSONNES
Notice de montage
PL
NAMIOT RODZINNY 4-OSOBOWY
Instrukcja montażu
SK
RODINNY STAN PRE 4 OSOBY
Montážny návod
DK
FAMILIETELT TIL 4 PERSONER
Assembly instructions
NL BE
4-PERSOONS GEZINSTENT
Montagehandleiding
CZ
RODINNY STAN PRO 4 OSOBY
Návod k sestavení
ES
text_image
Diagram illustrating a medical procedure with labeled steps and directional arrows indicating movement or positioning.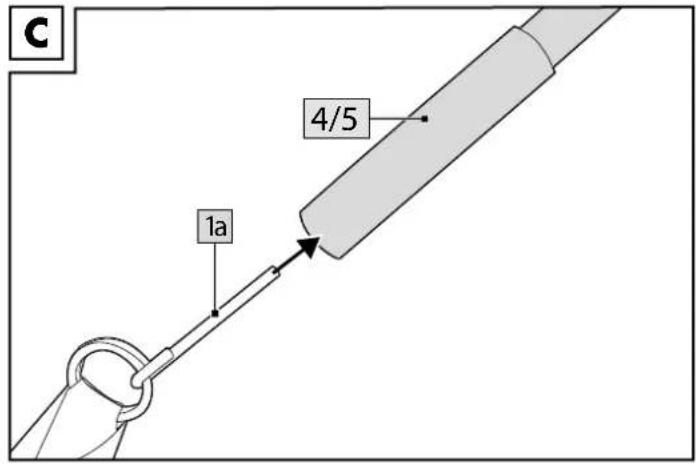
text_image
C 1a 4/5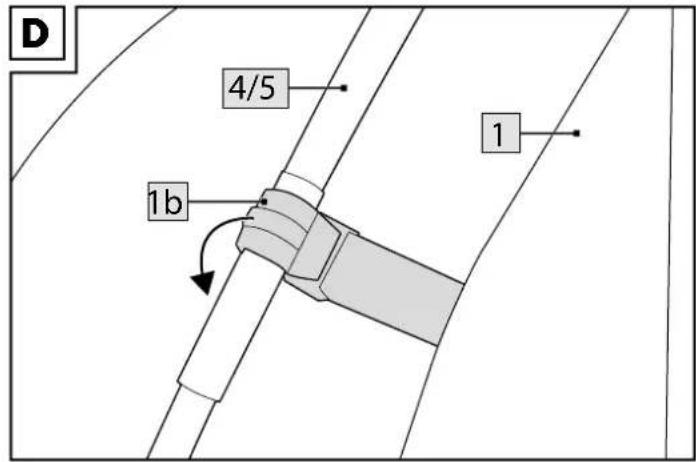
text_image
D 4/5 1b 1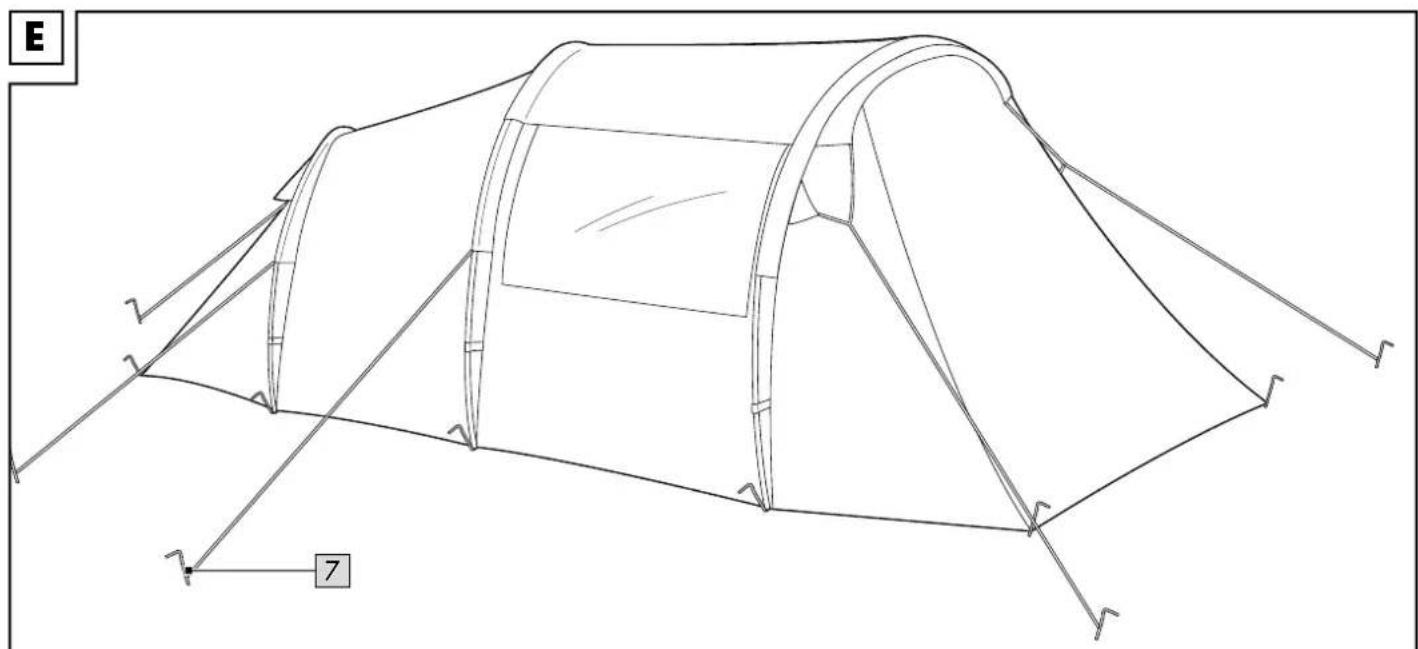
natural_image
Line drawing of a camping tent with arched roof and support poles, no text or symbols present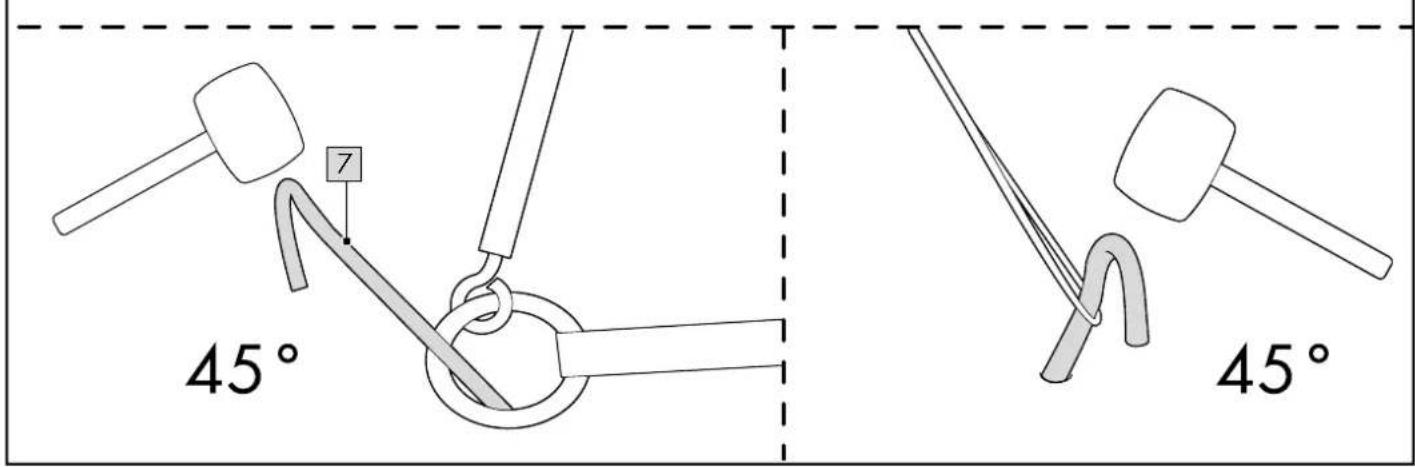
text_image
45° 7 45°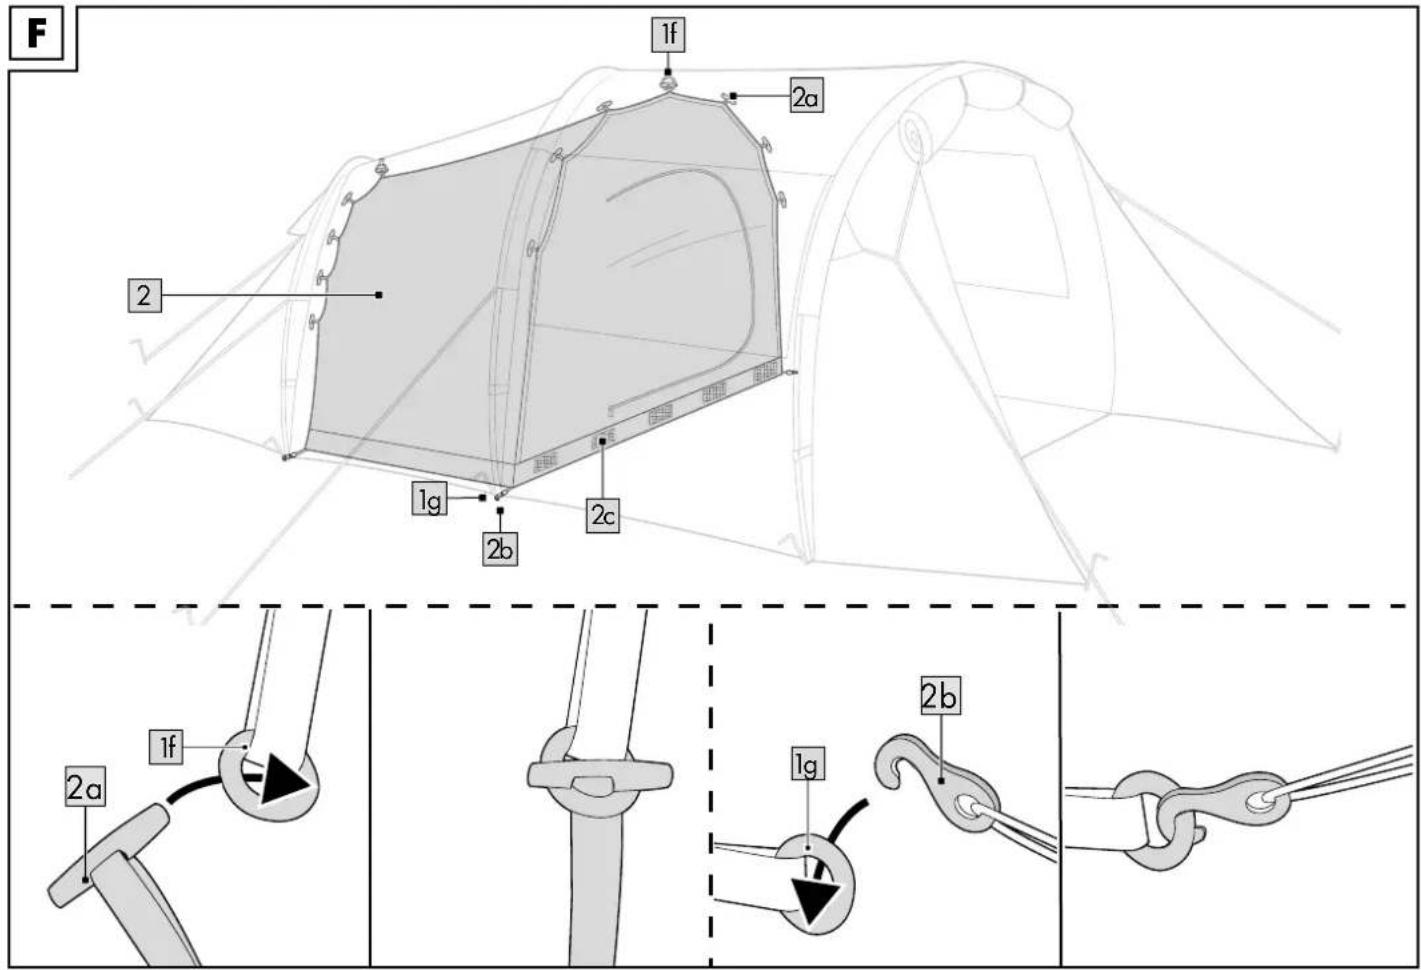
text_image
F 1f 2a 2 1g 2b 2c 2a 1f 1g 2b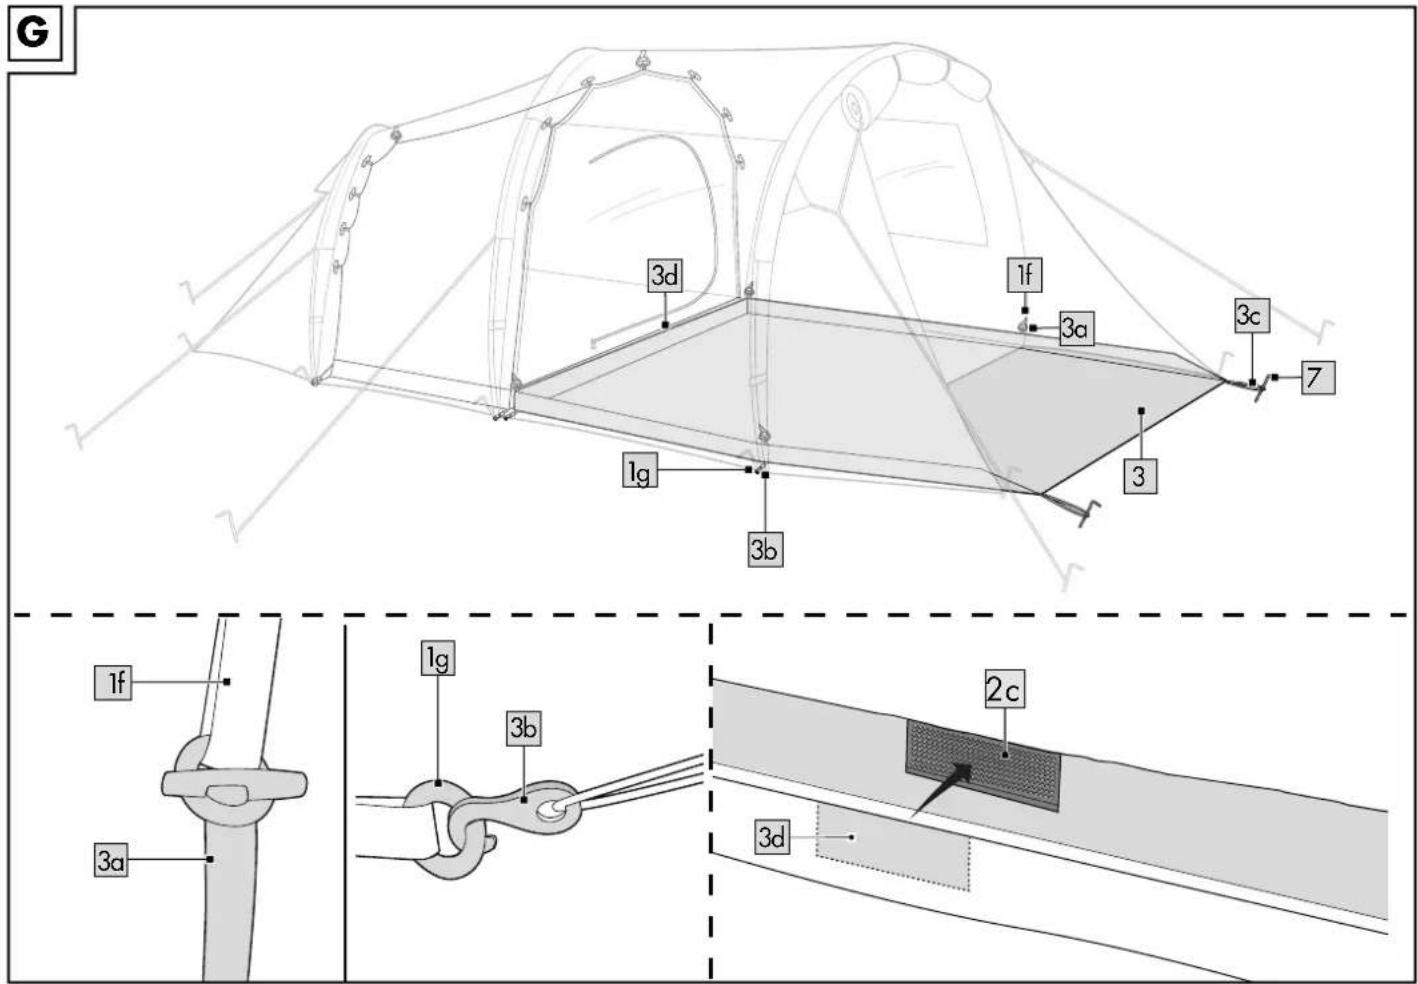
text_image
G 3d 1f 3a 3c 7 1g 3b 3 1f 3a 1g 3b 2c 3d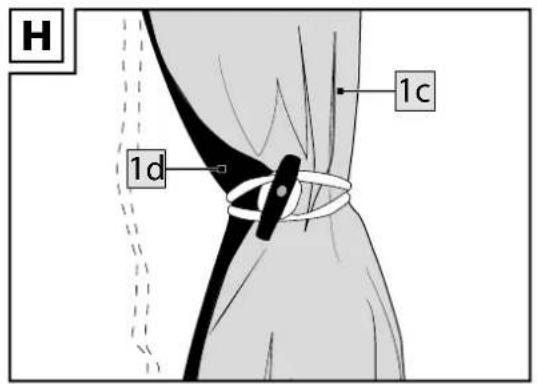
text_image
H 1d 1c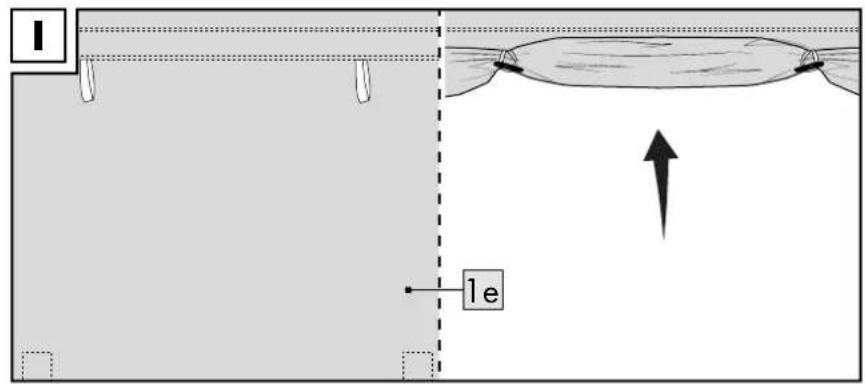
text_image
1 1e
text_image
J 2
natural_image
Diagram showing two views of a rectangular object with rotation arrows, no text or symbols present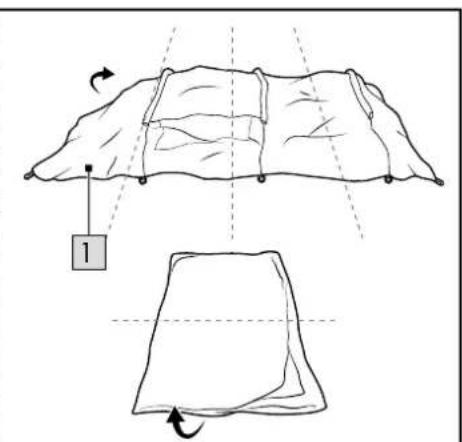
text_image
Diagram illustrating fabric folding steps with labeled components and directional arrows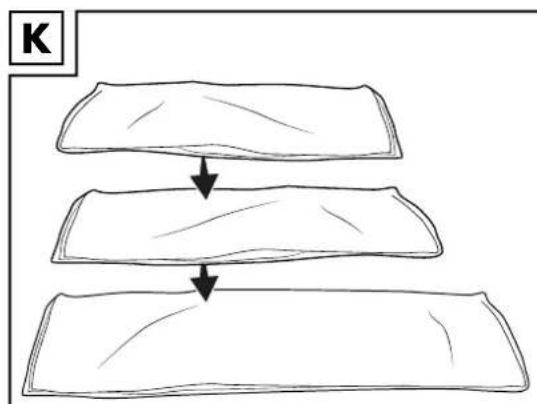
flowchart
graph TD
    A["Step 1: Initial state"] --> B["Step 2: Intermediate state"]
    B --> C["Step 3: Final state"]
natural_image
Simple line drawing of a stack of documents with a bag attached, showing a downward arrow indicating compression or lifting (no text or symbols)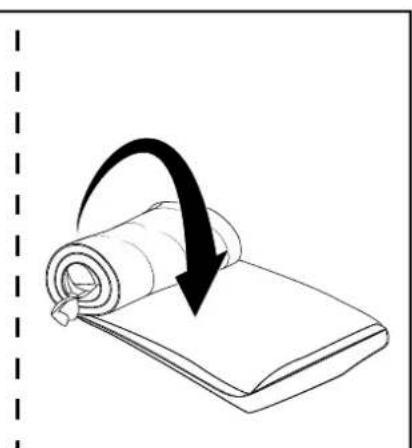
natural_image
Diagram showing a rolled-up document being curled with an arrow indicating rotation (no text or symbols)DE AT CH
Poisoning and fire hazard! ..... 15
Risk of injury! 15
Danger due to weather! ..... 16
Risk of property damage! ..... 16
Selecting a location 16
Assembly 16
Outer tent (Fig. B-E) 16
Inner tent (Fig. F) 17
Awning floor (Fig. G) ...... 17
Use 17
Opening doors and
windows (Fig. H and I) ..... 17
Closing doors and windows ... 17
Disassembly.... 17
Folding pattern (Fig. J and K) ...18
Repairs, care and storage 18
Repairs 18
Cleaning and stain removal ... 18
Preventing mould 18
Storage 18
Disposal 18
Notes on the guarantee
and service handling 18
FR BE
You have chosen to purchase a high-quality product. Familiarise yourself with the product before using it for the first time.

Read the following assembly instructions
and the safety information carefully.
Use the product only as described and only for the specified applications. Store these assembly instructions carefully. When passing the product on to third parties, please also hand over all accompanying documents.
Package contents (Fig. A)
1 x outer tent (1)
1 x inner tent (sleeping compartment) (2)
1 x awning floor (3)
2 x fibreglass pole, long (4)
1 x fibreglass pole, short (5)
1 x carry bag (6)
23 x ground peg (7)
1 x storage pouch for ground pegs (8)
1 x storage pouch for fibreglass poles (9)
1 x assembly instructions
Technical data
Material: polyester/PE
Water column:
Outer tent 3,000mm, sealed seams
Floor 5,000mm
Dimensions (L x W x H):
Outer tent:
approx. 455 x 260 x 190cm
Inner tent:
approx. 210 x 240 x 172cm
Awning floor:
approx. 230 x 240cm
Dimensions of guy ropes:
approx. 505 x 310cm
Size when packed:
approx. 63 x 26 x 26cm
Weight when packed:
approx. 11.65kg

Date of manufacture
(month/year): 12/2021
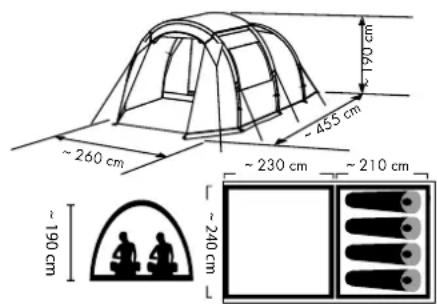
text_image
~260 cm ~455 cm ~230 cm ~210 cm ~190 cm ~240 cmCategory: cat. B camping tent Performance level 2: camping tent, designed primarily for use in mild weather conditions. Suitable for bad (wet and windy) weather conditions, but not intended for extreme or mountain conditions.
Intended use
This product serves as a space for sleeping and sheltering in the outdoors. It is suitable as accommodation for four persons. The product is not constructed for use in snow or storms. The product is intended for private use only and not for commercial use.
Symbols used

WARNING:
This signal word indicates a hazard with a medium risk level, which, if not avoided, can result in death or serious injury.

CAUTION:
This signal word indicates a hazard with a low risk level, which, if not avoided, can result in minor or moderate injury.
Safety information
Read the assembly instructions and safety information before use!
Failure to adhere to these may result in severe injury. When passing the product on to third parties, please also hand over all accompanying documents.
Do not remove any sewn-in labels, or model or information signs.

WARNING
Life-threatening hazard!
- Never leave children unattended with the packaging materials. There is a risk of suffocation.
Poisoning and fire hazard!
- Do not use fire inside the product, and keep it at a distance from heat sources.
- Familiarise yourself with the fire protection regulations in the area (e.g. camping ground, tent site).
- Do not use any gas or combustion devices inside the product.
• Additional ventilation is required when using gas or other combustion devices outside the product. Otherwise gas can accumulate inside the product. - Do not place hot appliances near the walls, roof or door flaps.
• Always follow the safety information for these appliances. - Never allow children to play near hot appliances.
- Keep the entrance clear.
- Make sure you are aware of the fire precautions on the premises.
- Make sure the ventilation openings are open at all times to prevent suffocation.

CAUTION
Risk of injury!
- Do not leave children unattended! The product is not a toy or a climbing apparatus! Make sure that people, especially children, do not climb on the product or lean on it. The product could unbalance and tip over. This could result in injuries and/or damage.
- Regularly check the integrity of all connection points and check the tension and the firmness of the peg
-
Make sure that all components are undamaged and properly assembled. There is a risk of injury due to improper assembly.
-
Damaged parts can affect the safety and function of the product.
- Never assemble or disassemble the product in extreme weather conditions, such as strong wind.
- Choose ground that is as solid and level as possible for erecting the product. Sandy or snowy surfaces reduce stability. Make sure that the ground provides a firm hold for the pegs.
- When the product is erected, there is a risk of tripping on the guy ropes.
- Check the product for damage or wear before each use. Only use the product if it is in perfect condition!
Danger due to weather!
- Pay attention to local and changing conditions. Consider e.g. tides, flood hazards and forest fire hazards.
- Protect the product from strong wind and storms. Place the product in a spot least susceptible to wind.
- In strong wind, replace the normal ground pegs with special storm pegs (not included in the package contents). Enquire about sensible accessories, such as extra guy lines, at a specialist shop.
- In heavy snow fall or storms, disassemble the product.
- Remove snow from the product. Otherwise the product can collapse under the weight.
- Do not tension the product too much, otherwise it cannot adapt to changing weather conditions and can become damaged.
- In the event of moisture or rain, tent fabrics expand to a varying extent, making it necessary to re-tension the guy lines.
When the material becomes tight again as it dries, the guy lines must be loosened again.
Risk of property damage!
- Assembling the product in the wrong sequence could result in damage. Liability of any kind is excluded.
- Never hit the ground pegs into the ground with too much force! If necessary, use a loop to extend the guy lines and move the ground peg to another spot.
- The polyester material is PU-coated and therefore water resistant. Do not use insect spray inside or on the product. The coating can be affected.
- Small leaks along the seams can be remedied with a seam spray (not included in the package contents) and a waterproofing spray can be used on the tent surface.
Selecting a location
WARNING! Danger due to weather!
- Pay attention to local and changing conditions. Consider e.g. tides, flood hazards and forest fire hazards.
-
Place the product in an area protected from the wind. Make use of natural wind protection such as hedges, rocks, etc.
-
Choose a site that is as level and clean as possible.
- Avoid depressions in the ground.
- Remove any stones, branches or other sharp objects, to avoid damaging the ground sheet.
- In sandy soil, use appropriate ground pegs (not included in the package contents) to avoid unintentional loosening of the tension.
Assembly
The product should be assembled by two people.
Carry out a test setup before your trip. Make sure the product and all components are complete and undamaged.
Outer tent (Fig. B–E)
- Open the carry bag (6) and take out the contents.
- Undo the ties around the rolled product.
- Remove all components and spread the outer tent (1) flat on the ground (Fig. B).
Note: put the ties in a safe place so they can be used again later to pack away the product.
- Put the short fibreglass pole (5) together and guide it through the rear tunnel guide of the outer tent (Fig. B).
Note: the short fibreglass pole and the rear tunnel guide are colour coded.
- Put the short fibreglass pole (4) together and guide it through the front and middle tunnel guides of the outer tent (Fig. B).
Note: ensure the ends of the fibre-glass poles are outside of the tunnel guides.
-
Bend the fibreglass poles and put their ends over the pins on the metal rings (1a) near the ground on the outer tent (Fig. C).
-
Secure the fibreglass poles with the plastic hooks (1b) of the outer tent (1) (Fig. D).
-
Stand the outer tent up and loosely anchor the outer guy lines one at a time in the ground with the ground pegs (7) (Fig. E).
Note: insert the ground pegs into the floor at a slight angle in a way that ensures a secure hold but does not increase the tension in the tent fabric. Tent fabric and guy points should only be slightly tensioned, allowing for wind strain.
-
Close the door zips.
-
Anchor all guy lines under slight tension with the ground pegs (Fig. E).
Note: make sure the product is not under too much tension.
Note: check the tensioning of the tent depending on the weather.
Inner tent (Fig. F)
Spread out the inner tent (2) in the rear part of the pitched outer tent. Make sure that the door of the inner tent faces the door of the outer tent.
- Use the plastic pins (2a) to hang the inner tent on the straps (1f) provided on the outer tent. Start with the rear hanging loop and end with the front hanging loop.
Note: ensure the centre plastic pins are attached to the centre hanging loops. Both are colour coded.
- Attach the corners of the inner tent floor to the metal rings of the outer tent (1g) using the hooks (2b) (Fig. F).
Awning floor (Fig. G)
-
Spread out the awning floor (3) in front of the pitched inner tent (2).
-
Attach the awning floor to the inner tent using the hook and loop fasteners (2c) and (3d).
-
Attach the awning floor to the plastic rings of the outer tent (1f) using the plastic pins (3a), and to the metal rings of the outer tent (1g) using the hooks near the floor (3b).
-
Stretch out the awning floor and secure the corners and corner loops (3c) with the ground pegs (7).
Use
WARNING. Precautionary measures for fire and ventilation.
Precautionary measures for your safety:
• Additional ventilation is required when using gas or other combustion devices.
- Do not place hot appliances near the walls, roof or door flaps.
• Always follow the safety information for these appliances.
- Never allow children to play near hot appliances.
- Keep the entrance clear.
• Make sure you are aware of the fire precautions on the premises.
- Make sure the ventilation openings are open at all times to prevent suffocation.
There are three plastic eyelets inside the tent where you can hang a camping light, for example (not included in the package contents). The tent's inner pockets can be used for daily items or clothing.
Note: water condensation generally occurs in all tents, but especially when there are strong temperature fluctuations.
After a night in the tent, there will be water condensation drops on the inside surface. Condensation is not a sign of leaks.
Good ventilation reduces condensation inside the tent.
Open the tent entrances and windows regularly to reduce condensation inside the tent.
Opening doors and windows (Fig. H and I)
To open the doors and windows of the inner and outer tent, proceed as follows:
- Open the zips of the outer fabrics or loosen the hooks on the corners of the outer fabrics.
- Roll up the fabrics.
-
Fasten the toggles to prevent them from unrolling.
-
If necessary, open the zips of the inner fabrics.
- Roll up the inner fabrics.
- Close the hook and loop fasteners.
Note: the door fabric of the outer tent can be fastened to the ground pegs using the hooks.
Closing doors and windows
To fully close the doors and windows of the inner and outer tent, proceed as follows:
- Undo the hook and loop fasteners.
- Roll down the door and window fabric.
- Close the zips and fasten the window fabric using both hooks.
Disassembly
Note: dismantle the product in as clean and dry a condition as possible, so as to avoid the formation of mould or stains.
After dismantling in the rain, let the product dry out completely before packing it away. Clean all components thoroughly before packing them away.
- Remove the outer tent, the inner tent and the awning floor by undoing the plastic pins, hooks and hook and loop fasteners.
- Remove all ground pegs (7).
- Roll up the guy lines.
- Remove the fibreglass poles (4) and (5) from the pins on the metal rings (1a).
- Pull the fibreglass poles out of the tunnel guides on the outer tent.
- Pull the fibreglass poles apart and fold them up.
- Stow the ground pegs and fibre-glass poles in the storage pouches (8) and (9) provided.
Folding pattern (Fig. J and K)
Important! When folding, make sure that the maximum folding dimensions of the inner tent, outer tent and awning floor do not exceed the length of the folded fibreglass poles.
- Spread the inner tent (2) and the tent floor (3) out flat.
- Fold the inner tent and the awning floor lengthways to approx. one fifth of their width, then crosswise twice.
- Lay the outer tent (1) folded in half so that its sides lie on top of each other.
- Fold the sides of the outer tent together as shown in Fig. J to create a rectangular shape.
- Fold the outer tent lengthwise and crosswise so that the outer tent, inner tent and awning floor are now folded to the same width.
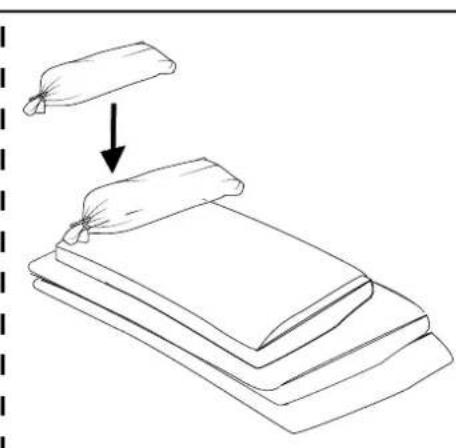
- Place the folded components on top of each other.
- Place the storage pouches (8) and (9) on one end and roll all components together tightly.
Note: ensure the hook and loop fasteners on the floor of the outer tent do not come into contact with the netting.
- Tie the rolled product with the bands and stow it in the carry bag (6).
Repairs, care and storage
Repairs
Small tears or holes in the fabric can be repaired with standard repair patches.
Important! Do not use repair patches on the seams.
Enquire at a specialist shop about what repair materials to use and how to use them. Follow the manufacturer's instructions. Larger tears should be repaired by someone with technical skills. Broken or defective frame parts must immediately be replaced, and must no longer be used. Enquire at a specialist shop about suitable replacement parts.
Cleaning and stain removal
Remove superficial dirt and minor stains with a soft brush or damp cloth.
IMPORTANT! Use only water and no cleaning agents, otherwise the product's waterproofing may be impaired.

Zips
Note: zips are wearing parts and are not covered by the warranty.
Regularly use a silicone spray (not included in the package contents) and apply it to the zips to prevent unnecessary wear.
Enquire at a specialist shop about a suitable silicone spray and its use.
Preventing mould
Do not store the product wet or damp over a long period of time. However, if light mould does form, use a soft and slightly dampened brush or sponge to remove the mould. Then seal the treated spot with a suitable tent fabric waterproofing agent (not included in the package contents).
Storage
When not in use, always store the product clean and dry at room temperature, to prevent the formation of mould.
When not in use for extended periods, take the product out of its storage bag and store it in a dry place away from direct sunlight.
Disposal
Dispose of the article and the packaging materials in accordance with current local regulations. Packaging materials such as foil bags are not suitable to be given to children.
Keep the packaging materials out of the reach of children.

Dispose of the products and the packaging in an environmentally friendly manner.

The recycling code is used to identify various materials for recycling. The code consists of recycling symbol - which is not to reflect the recycling cycle and a number which identifies the trial.
Notes on the guarantee and service handling
The product was produced with great care and under continuous quality control. DELTA-SPORT HANDELSKONTOR GmbH gives private end customers a three-year guarantee on this product from the date of purchase (guarantee period) in accordance with the following provisions. The guarantee is only valid for material and manufacturing defects. The guarantee does not cover parts subject to normal wear and tear that are thus considered wear parts (e.g. batteries) or fragile parts such as switches, rechargeable batteries, or parts made of glass.
Claims under this guarantee are excluded if the product has been used incorrectly, improperly, or contrary to the intended purpose, or if the provisions in the Assembly instructions were not observed, unless the end customer proves that a material or manufacturing defect exists that was not caused by one of the aforementioned circumstances.
Claims under the guarantee can only be made within the guarantee period by presenting the original sales receipt. Please therefore keep the original sales receipt. The guarantee period is not extended by any repairs carried out under the guarantee, under statutory guarantees, or as a gesture of goodwill. This also applies to replaced and repaired parts. If you wish to make a claim please first contact the service hotline mentioned below or contact us by e-mail. If there is a guarantee case, then the product will be repaired or replaced free of charge to you or the purchase price will be refunded, depending on our choice. Your legal rights, in particular guarantee claims against the respective seller, are not limited by this guarantee.
IAN: 388318_2107
GB Service Great Britain
Tel.: 0800 404 7657
E-Mail: deltasport@lidl.co.uk
IE Service Ireland
Tel.: 1800 101010
E-Mail: deltasport@lidl.ie
Félicitations !