IAN 384436 - Water pump CRIVIT - Free user manual and instructions
Find the device manual for free IAN 384436 CRIVIT in PDF.

| Product type | Foot air pump |
| Brand | Crivit |
| Model | IAN 384436 |
| Use | Inflating tires (bike, cart, trailer), balls, air mattresses, inflatable toys |
| Body material | Plastic and metal |
| Dimensions (approx.) | Height 30 cm, Width 25 cm, Depth 15 cm |
| Weight (approx.) | 1.2 kg |
| Power source | Manual (foot-operated) |
| Compatible valve types | Schrader, Dunlop, Presta |
| Included adapters | 4 adapters: for ball, toy, mattress, and reversible Schrader/Dunlop/Presta valve |
| Pressure gauge | Yes, with adjustable red needle for pressure marking |
| Hose length (approx.) | 60 cm |
| Locking mechanism | Lever on pump head for attachment to valve |
| Safety | Non-slip step surface, release lever, pressure gauge to avoid overpressure |
| Maintenance | Clean with a damp cloth; do not immerse in water |
| Storage | Store dry, cool, away from UV light |
| Warranty | 3 years from date of purchase |
| After-sales service | MONZ SERVICE-CENTER (toll-free phone 00800/68546854, email monz@teknihall.fr) |
| Spare parts available | Adapters and valve tips (available on request from customer service) |
| User manual | 29 pages, available in several languages (FR, CS, DA, DE, EN, etc.) |
Frequently Asked Questions - IAN 384436 CRIVIT
User questions about IAN 384436 CRIVIT
0 question about this device. Answer the ones you know or ask your own.
Ask a new question about this device
Download the instructions for your Water pump in PDF format for free! Find your manual IAN 384436 - CRIVIT and take your electronic device back in hand. On this page are published all the documents necessary for the use of your device. IAN 384436 by CRIVIT.
USER MANUAL IAN 384436 CRIVIT
Before weeding, a course is held for Illustration page and fertilization yourself with all device functions. The Illustration numbers appear in the corresponding position within the seat.
(图)(图)
G8/IE Poor Pump Instruction manual 11
m = 311
[Non-Text]
The Ground Truth image displays a single, solid horizontal line, which is a stylistic or background element (like a rule line on paper). According to Rule 2, such lines must be ignored by the OCR result. The provided OCR content is "____", which consists of underscores. Underscores are not equivalent to a solid line and are not permitted under the “Stylistic/Background Lines (Ignore)” rule. Outputting underscores for a stylistic line is incorrect because it misinterprets the line as a placeholder fill-in-the-blank area. Since the OCR output incorrectly rendered a stylistic line as underscores (which should be ignored), this violates the rule. Therefore, the OCR result is inconsistent with the Ground Truth.
[Non-Text]
DE AT CH
- Introduction ...... 11
- Intended use 11
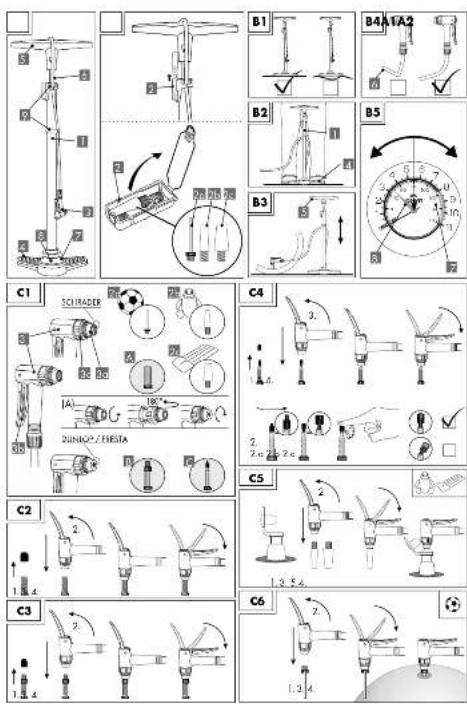
- Scope of delivery (fig. A1 + A2) .....11
- Technical specifications 12
- Safety information 12
- Start-up 12
6.1 Purposes of the adapters (fig. C1) ..... 13
6.2 Using the pump 12 - Cleaning & care instructions 14
- Disposal 14
- Warranty 14
- Warranty conditions 14
- Distributor.... 15
- Service address 15
1. Introduction
Congratulations!
With your purchase you have chosen a high-quality product. Make yourself familiar with the product before starting to use it. Carefully read the following instruction manual. Use the product only as described and only for the specified areas of application. They contain important information for safety, use and disposal. Familiarise yourself with all of the operating and safety information before using the product. Keep this instruction manual for future reference. When transferring this product to third parties, also include all documents. Keep the instructions for future reference.
Explanation of symbols
The following symbols and signal words are used in these operating instructions, on the product or on the packaging.
Hereinafter, the Floor Pump will be referred to as product.

WARNING!
This signal symbol/word indicates a hazard with a high level of risk which, if not avoided, may result in death or serious injury.

CAUTION!
This signal symbol/word indicates a hazard with a low level of risk which, if not avoided, may result in minor or moderate injury.
NOTE!
This signal word warns of possible property damage or provides you with useful additional information regarding the use.

Note about handling these operating instructions

This symbol indicates potential danger to children.

This symbol indicates the age rating of the product.

This symbol indicates potential danger in relation to overheating.

This symbol indicates potential danger in relation to explosions.

This symbol indicates potential problems with pressure displays.


These symbols inform you about the disposal of the packaging and product.

Certified safety: Products marked with this symbol comply with the re-
quirements of the German Product Safety Act (ProdSG).
2. Intended use
This product is suitable for pumping up all conventional bicycle tyres, transport carts or trailers, air mattresses, balls and similar.
The product is not intended for commercial use. Different use or a modification to the product are not deemed as intended use and may lead to risks, such as injuries and damage. The distributor assumes no liability for damage that results from improper use.
3. Scope of delivery (fig. A1 + A2)
1 x Floor Pump 1
1 x Adapter box 2
1 x Instruction manual (not shown)
Description of parts:
1x Metal adapter for balls 2c
1x Plastic adapter for inflatable toy etc. 2
1x Plastic adapter for air mattresses etc. 2c
1 x Pump head 3
! WARNING!
Risk of injury and suffocation! If children play with the produce or the packaging, they may in themselves or suffocate!
- Do
DO
pa
- Sup
- Kep
KEE
of
! WARNING!
Risk of injury!
A
[Unreadable]
1
1.2
[NO TEXT]
[NO TEXT]
9+
17
usin
the
the
sull
- Chi
Me
- Md
not
SUC
-
•
Observe national regulations!
-Ob
2.5
uni
pro
2017
10.10
Pay attention to ambient conditions!
.
[Non-Text]
m = 311
TO
du
+ i
s n
ot
all
OW
vec
to
b
2.1
ise
di
n t
em
one
to
•
[Non-Text]
[Non-Text]
[Non-Text]
[Non-Text]
C
1
1
[Non-Text]
•
The Ground Truth image displays a single, solid horizontal line. According to Rule 2 (UNDERSCORE & LINE RULES), this is a stylistic or background line, not a placeholder underscore. Therefore, the OCR result must ignore it and output nothing or only meaningful text. The provided OCR content is "____", which consists of four underscores. This is an incorrect interpretation of the line as a placeholder, violating the rule that stylistic lines must be ignored. The OCR has hallucinated underscores where none should exist based on the GT's visual context. Hence, the OCR result is inconsistent with the Ground Truth.
[Non-Text]
(1)
(五) 本说明仅供参考。
[Non-Text]
[Non-Text]
:
[Non-Text]
(No text)
•
•
•
-
-
3
P1
t h
ne
nu
mu
b
eq
d
3
wi
ith
the
a lo
150
B
2ND6
ani
no
OR
。
[Non-Text]
[Non-Text]
[Non-Text]
[Non-Text]
[Non-Text]
[Non-Text]
[Non-Text]
[Non-Text]
[Non-Text]
[Non-Text]
[Non-Text]
[Non-Text]
[Non-Text]
[Non-Text]
[Non-Text]
[Non-Text]
[Non-Text]
[Non-Text]
[Non-Text]
[Non-Text]
[Non-Text]
[Non-Text]
[Non-Text]
[Non-Text]
[Non-Text]
[Non-Text]
[Non-Text]
[Non-Text]
[Non-Text]
[Non-Text]
[Non-Text]
[Non-Text]
[Non-Text]
[Non-Text]
[Non-Text]
[Non-Text]
[Non-Text]
[Non-Text]
[Non-Text]
[Non-Text]
[Non-Text]
[Non-Text]
[Non-Text]
[Non-Text]
[Non-Text]
[Non-Text]
[Non-Text]
[Non-Text]
[Non-Text]
[Non-Text]
[Non-Text]
[Non-Text]
[Non-Text]
[Non-Text]
[Non-Text]
[Non-Text]
[Non-Text]
[Non-Text]
[Non-Text]
[Non-Text]
[Non-Text]
[Non-Text]
[Non-Text]
[Non-Text]
[Non-Text]
[Non-Text]
[Non-Text]
[Non-Text]
[Non-Text]
[Non-Text]
[Non-Text]
[Non-Text]
[Non-Text]
[Non-Text]
[Non-Text]
[Non-Text]
[Non-Text]
[Non-Text]
[Non-Text]
[Non-Text]
[Non-Text]
[Non-Text]
[Non-Text]
[Non-Text]
[Non-Text]
[Non-Text]
[Non-Text]
[Non-Text]
[Non-Text]
[Non-Text]
[Non-Text]
[Non-Text]
[Non-Text]
[Non-Text]
[Non-Text]
[Non-Text]
[Non-Text]
[Non-Text]
[Non-Text]
[Non-Text]
[Non-Text]
[Non-Text]
[Non-Text]
[Non-Text]
[Non-Text]
[Non-Text]
[Non-Text]
[Non-Text]
[Non-Text]
[Non-Text]
[Non-Text]
[Non-Text]
[Non-Text]
[Non-Text]
[Non-Text]
[Non-Text]
[Non-Text]
[Non-Text]
[Non-Text]
[Non-Text]
[Non-Text]
[Non-Text]
[Non-Text]
[Non-Text]
[Non-Text]
[Non-Text]
[Non-Text]
[Non-Text]
[Non-Text]
[Non-Text]
[Non-Text]
[Non-Text]
[Non-Text]
[Non-Text]
GB/IE
GB/IE
Pumping up balls 2a: (fig. C6)
-
Flip the lever3c upwards.
-
For this, insert the adapter 2a into the large opening of the pump head 3.
-
To lock, flip the lever on the 3b pump head 3 downwards.
NOTE!
Moisten the adapter 2c a little.
- Now, insert the adapter2a into the ball.
If you are finished with pumping, flip the lever upwards and remove the pump head from the valve.
NOTE!
To be able to pull out the adapter 2c more easily, first unscrew the reversible valve insert 3c.
6.2 Using the pump
-
Put the pump head 3 on the valve, see 6.1 Purposes of the adapters: (fig. C1)
-
(fig. B1) Place the product 1 on a sturdy and level surface.
-
(fig. B2) Always stand on the with both feet on the treat 4 of the product while pumping 1 so that it is secured against tipping over.
-
(fig. B3) Activate the pump handle 5 evenly and not too quickly.
NOTE!
- (fig. B4) The pump hose 6 must not be kinked.
- (fig. B5) In the middle of the pressure gauge 7 is a red indicator 8. This red indicator 8 can be used as a visible mark for the desired air pressure. To do this, turn the red indicator 8 to the desired pressure display.
Please note that the set mark is only for orientation and does not influence the air pressure!
NOTE!
To transport the product,1 place the pump hose over the pump handle 6 as shown in Fig. A1 5. Clamp the pump hose 6 into both of the clamping 9 devices, as shown. Now, you can lift the product 1 on the pump handle 5.
7. Cleaning & care instructions
- clean with a damp cloth
- do not immerse in water
- Check the screw fittings of the product 1 for tightness prior to use
- The product 1 is maintenance-free.
- Store the product 1 in a cool, dry place, protected from UV light.
8. Disposal
Disposal of the packaging
The packaging and operating instructions are made of 100% environmentally friendly materials, which you may dispose of at local recycling centres.
Disposal of the the product
The product may be disposed of with normal household waste.
9. Warranty
Warranty from MONZ Handelsgesellschaft International mbH & Co. KG
Dear customer, the warranty on this product is 3 years from the purchase date. In the event of defects in this product, you are entitled to exercise your statutory rights against the seller of the product. These statutory rights are not limited by our warranty described in the following:
10. Warranty conditions
The warranty begins on the date of purchase. Please keep the original receipt. This document is required as verification of the purchase.
If a material or manufacturing defect arises within three years from the purchase date of this product, the product will be repaired or replaced, as per our choice, at no charge to you. This warranty service requires the submission of the purchase receipt and the defective product within the three-year period and a short written description of the defect and when it arose.
If the defect is covered by our warranty, the repaired or a new product will be returned to you. The warranty period does not restart with the repair or replacement of the product.
Guarantee period and statutory claims for defects
The guarantee period will not be extended by the warranty. This also applies to replaced and repaired parts. Damage and defects which may pos
sibly already exist upon purchase must be reported immediately after unpacking. After the guarantee period has expired, required repairs shall be subject to a charge.
Scope of guarantee
The device has been carefully produced under strict quality guidelines and conscientiously inspected prior to delivery. The guarantee service applies to material or manufacturing faults. This guarantee does not extend to product parts, which are exposed to normal wear and tear and can therefore be regarded as wearing parts or to damage to fragile parts, e.g. switches, battery packs or which are made of glass.
This guarantee shall lapse, if the product is damages, not used properly or maintained properly. For proper use of the product, all of the instructions in the operating instructions must be precisely complied with. Purposes and actions, which are dissuaded from or warned about in the operating instructions must be avoided.
The product is only intended for private and not commercial use. In the case of abusive and improper handling, use of force and with interventions, which are not performed by our authorised service branch, the guarantee shall lapse.
Processing in the case of a guarantee claim.
To ensure quick processing of your concern, please follow the instructions below:
- Please have the till receipt and article number available (e.g. IAN 384436_2107) as proof of the purchase.
- You can find the article number on the rating plate on the product, as an engraving on the product, the title place of your instructions or the sticker on the back or underside of the product.
- If malfunctions or other defects occur, first contact the service department below by telephone or e-mail.
- You can then send a product that has been recorded as being defective, including the proof of purchase (till receipt) and stating what the defect is and when it occurred, postage-free to the service address provided to you.
On www.lidl-service.com, you can download these an many other manuals, product videos and installation software.
With this QR code, you can directly reach the Lidl Service website (www.lidl-service.com) and can open your operating instructions by entering the article number (IAN) 384436_2107.
11. Distributor
Hotline:00800 / 68546854 (free of charge, mobile networks may vary)
E-Mail: monz-gb@teknihall.com
E-Mail: monz-ie@teknihall.com
08/2021 / PO30030118
Monz Item No.: 26235
IAN 384436_2107
POMPE À PIED
Mode d'emploi
- In
2.
2.0
- Et
1
4.
-
C
-
M
4.7.1
0.1
fig.
6.2 L
7 c
-
6
-
El
-
G
10
10.
- L
12.
1. Introduction
Toutes nos félicitations !
(valves A, B, C non fournies)
2.1. 2007, putative adaptation (2007-21), minimum
6.2 Použivanie pumpy 41
2.2.10.2017年1月1日
ch/organ's project, twin but an available
6.2 Brug at pumpen ....52
-
Kengøring og pleje 52
-
Bortskaffelse 52
-
Gardhille 52
-
Compositing values 50
-
Gardnberingelser 52
-
Forhandler ....5
- Conjugal ....5