M5 - Microphone Røde - Free user manual and instructions
Find the device manual for free M5 Røde in PDF.
| Product Type | Compact 1/2" Cardioid Condenser Microphone |
| Brand | Røde |
| Model | M5 (sold as a pair) |
| Polar Pattern | Cardioid |
| Capsule | 1/2" with gold-plated diaphragm |
| Frequency Response | 20 Hz – 20 kHz |
| Output Impedance | 200 Ω |
| Equivalent Noise | 19 dBA SPL (IEC 651) |
| Maximum Output Level | +13.5 dBu (1 kHz, 1% THD into 1 kΩ) |
| Sensitivity | -34 dB re 1 V/Pa (10.46 mV at 94 dB SPL) ±2 dB |
| Dynamic Range | 121 dB SPL |
| Maximum SPL | 140 dB SPL |
| Signal-to-Noise Ratio | 75 dBA (IEC 651) |
| Phantom Power | 24 V or 48 V |
| Output Connector | 3-pin XLR (balanced, pin 2+, 3-, 1 ground) |
| Weight | 80 g |
| Body Material | Metal, matte black finish |
| Included Accessories | 2 RM5 clips, 2 WS5 windscreens |
| Warranty | 1 year (extendable to 10 years with online registration) |
| Maintenance | Wipe with a soft, dry cloth; store away from dust; use the provided desiccant. |
| Designed and Manufactured | Australia |
Frequently Asked Questions - M5 Røde
User questions about M5 Røde
0 question about this device. Answer the ones you know or ask your own.
Ask a new question about this device
Download the instructions for your Microphone in PDF format for free! Find your manual M5 - Røde and take your electronic device back in hand. On this page are published all the documents necessary for the use of your device. M5 by Røde.
USER MANUAL M5 Røde
text_image
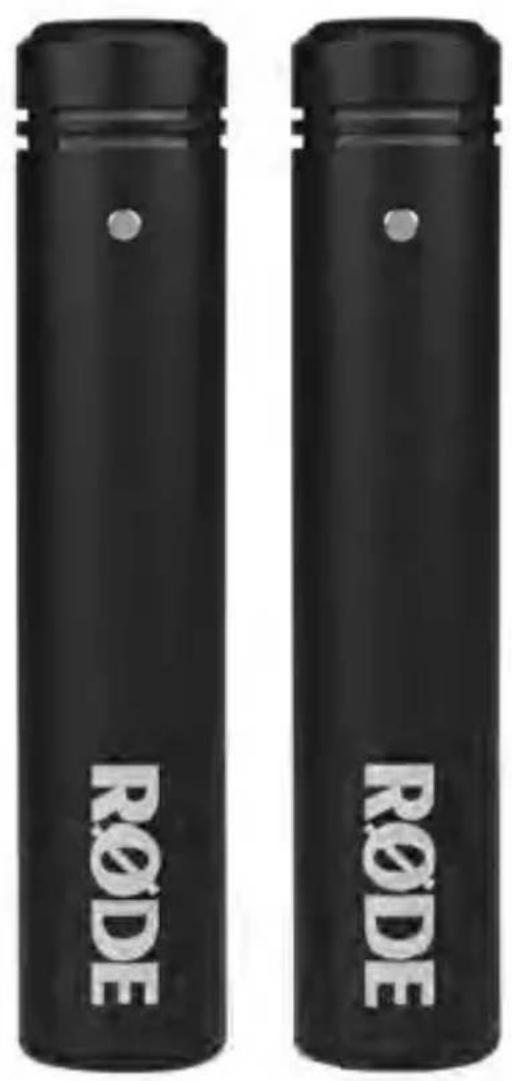
R∅DE R∅DEM5
Compact 1/2" Cardioid Condenser Microphones
www.rodemic.com/m5
2 Introduction
The M5 is a studio quality half-inch condenser microphone, designed for highly detailed sound reproduction. It features a cardioid polar pattern and end address design, meaning that it will pick up sound directed into the end of the microphone, and reject sound from the rear of the mic.
This pickup pattern allows for recording of the desired sound source while reducing the level of other surrounding instruments, noises or sound sources.
The M5 is not only ideal for recording music, but is a fantastic microphone for environmental recordings and indoor dialogue on film sets.
The enclosed pair has been hand-picked by R∅DE's audio engineering team to be acoustically matched to ensure perfect compatibility when used in stereo confi gurations.
Features
- 1/2 ” capsule with gold-plated membrane
- Cardioid polar pattern
- All metal body
- Ultra-low noise transformerless circuitry
• State-of-the-art surface mount electronics
• Heavy-duty matte black fi nish
• Gold plated output connectors - Designed & manufactured in Australia
- Free 10 year extended warranty when you register online at www.rodemic.com/warranty
4
Warranty
The M5 is covered by a limited warranty for one (1) year from the date of purchase. This can be extended free of charge to a full ten (10) year warranty by registering your microphone online at visiting our website as below.

text_image
QR code image containing encoded data, no visible human-readable textRegister your M5 pair now and validate your free 10 year warranty.
Scan the QR code with a smartphone, or visit www.rodemic.com/warranty
Specifications
Polar Response
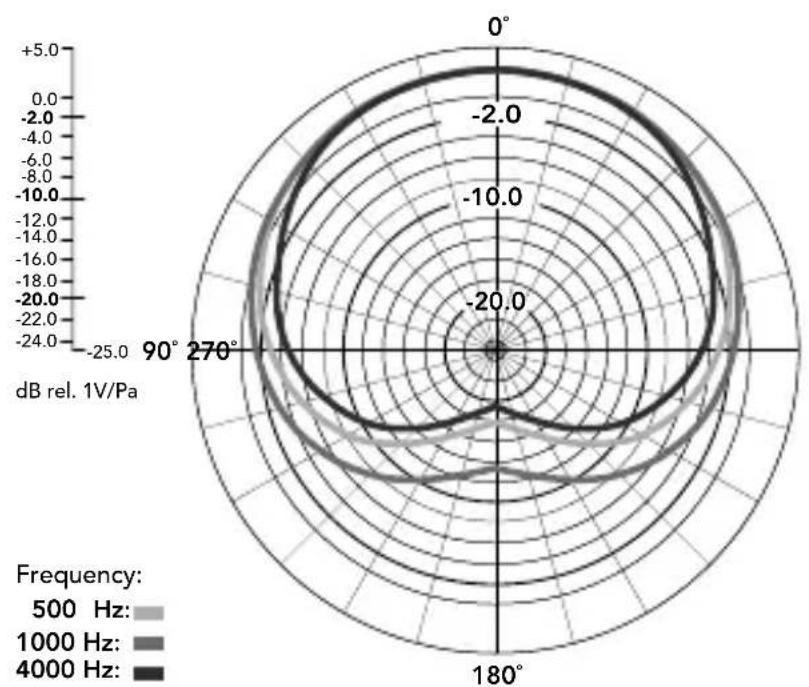
radar
| Angle | Frequency: 500 Hz | Frequency: 1000 Hz | Frequency: 4000 Hz | |-------|-------------------|--------------------|--------------------| | 0° | -2.0 | -4.0 | -6.0 | | 90° | -2.0 | -4.0 | -6.0 | | 180° | -2.0 | -4.0 | -6.0 | | 270° | -2.0 | -4.0 | -6.0 |Frequency Response
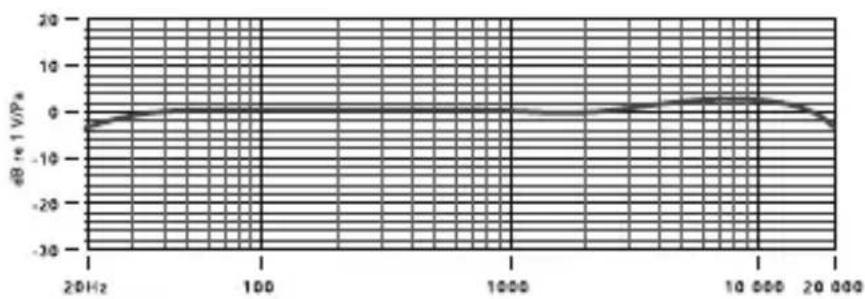
line
| Frequency | dB at 1 V/PA | | --------- | ------------ | | 20 Hz | -5 | | 100 | 0 | | 1000 | 0 | | 10000 | 5 | | 20000 | -5 || 6 | Specifications | |
| Acoustic Principle | Pressure Gradient | |
| Active Electronics | JFET impedance converter with bipolar output buffer | |
| Directional Pattern | Cardioid | |
| Frequency Range | 20Hz ~ 20kHz | |
| Output Impedence | 200Ω | |
| Equivalent Noise | 19 dBA SPL (as per IEC651) | |
| Maximum Output | +13.5 dBu (1KHz, 1% THD into 1K Ω load) | |
| Sensitivity | -34 dB re 1V/Pa(10.46mV @ 94dB SPL)± 2dB @ 1kHz | |
| Dynamic Range | 121 dB SPL | |
| 7 | ||
| Maximum SPL | 140 dB SPL | |
| Signal / Noise | 75 dBA SPL (as per IEC651) | |
| Power Requirements | 24V phantom power48V phantom power | |
| Output Connection | 3 Pin XLRBalanced output between pin 2 (+),pin 3 (-) and pin 1 (ground) | |
| Net Weight | 80g | |
| Accessories | RM5 mic clip (x2)WS5 windshield (x2) | |
Powering the M5
Connect all cables before supplying phantom power to the microphone(s) and never remove the microphone cable while the power is connected.
The M5 requires 48V DC (P48) or 24V DC (P24) phantom power. If the mixer or preamp does not contain this phantom power requirement, then an external phantom power supply is needed.
Some phantom power supplies do not supply the voltage at which they are rated. If the required voltage is not supplied, the dynamic range and general performance of the microphone will be reduced.
We strongly suggest the use of a reputable high quality power supply. Damage caused by a faulty power supply is not covered under warranty.
What is Phantom Power?

All condenser microphones require a power source to operate the internal circuitry of the microphone.
Phantom power is a DC voltage, supplied to the microphone through the XLR cable, providing the microphone circuit with the power it requires to operate, without the need for an external microphone power supply.
Most mixing desks, audio interfaces, and preamp units have a phantom power switch inbuilt. If your equipment doesn't have a phantom power supply, an external one can be purchased and used in-line between the preamp and the M5. Be sure to check that your phantom power supply is either P48 (48V DC) or P24 (24V DC) to operate the correctly.
10
Mounting the M5
The M5 matched pair is supplied with a pair of RM5 stand mounts. These feature a standard 5/8" thread in the base and a 3/8" thread adaptor is supplied to provide even greater versatility in mounting.
To mount the M5 in the RM5 place the base of the microphone at the back of the mount and firmly push down towards the front until the microphone clicks into the mount.
The tension of the RM5 can be adjusted using the lever on the side of the mount.
General Operation
The M5 is an ‘end-address’ microphone, and so the mesh head should always be facing towards the sound source that you wish to record.
When recording any sound source, whether it be vocals, instruments or anything else, always spend time experimenting with mic placement to ensure you are picking up the best possible sound. Adjust the microphone position as many times as you need to achieve this, rather than attempting to compensate with EQ and other processing tools later on.
If you are recording through an interface, channel strip or mixing desk with an inbuilt EQ section, always begin by setting the EQ flat (no cut or boost) or turn it off if possible. Once the preferred sound has been achieved through mic placement, any processing such as EQ, compression, reverb and other effects can be added to enhance the sound of your recording.
EQ is always best used sparingly, and when attempting to change the sound of a recording in any way you should always start by ‘cutting’ any unwanted frequencies, rather than boosting the other frequencies.
12
General Operation
As with other aspects of the recording process, finding the right sound is always a matter of experimentation, and you should always go with whatever sounds best to you. Listen with your ears, not with your eyes!
Microphone Placement
Whether using them as a single microphone or stereo pair, there are no set rules when it comes to placement for your M5 microphones, but the tips below are a great starting point to achieve great results in most scenarios. Don't be afraid to experiment with your own mic placements to produce the sound that you'd like to pick up with your M5.

text_image
QR code image containing encoded data, no visible human-readable textScan the code with your smartphone or visit rockro.de/m5stereo to watch a video showing stereo applications for the M5
Microphone Placement
Stereo spaced pair
To mount your M5 microphones in a spaced pair configuration, you'll need to place your microphones on two separate microphone stands. It is best to experiment with the exact positioning and direction of the microphones while listening to the signal, to ensure phase compatibility.

The Spaced pair is ideal for recording sound sources or instruments that cover a wider area, or require more than one point-source to pick up a true representation of the sound.
It will generally produce a very wide stereo image, and is great for recording sound sources such as choirs and ensembles, but can also produce incredible results on individual instruments when used correctly.
Sound Source

text_image
RODE RODEMicrophone Placement
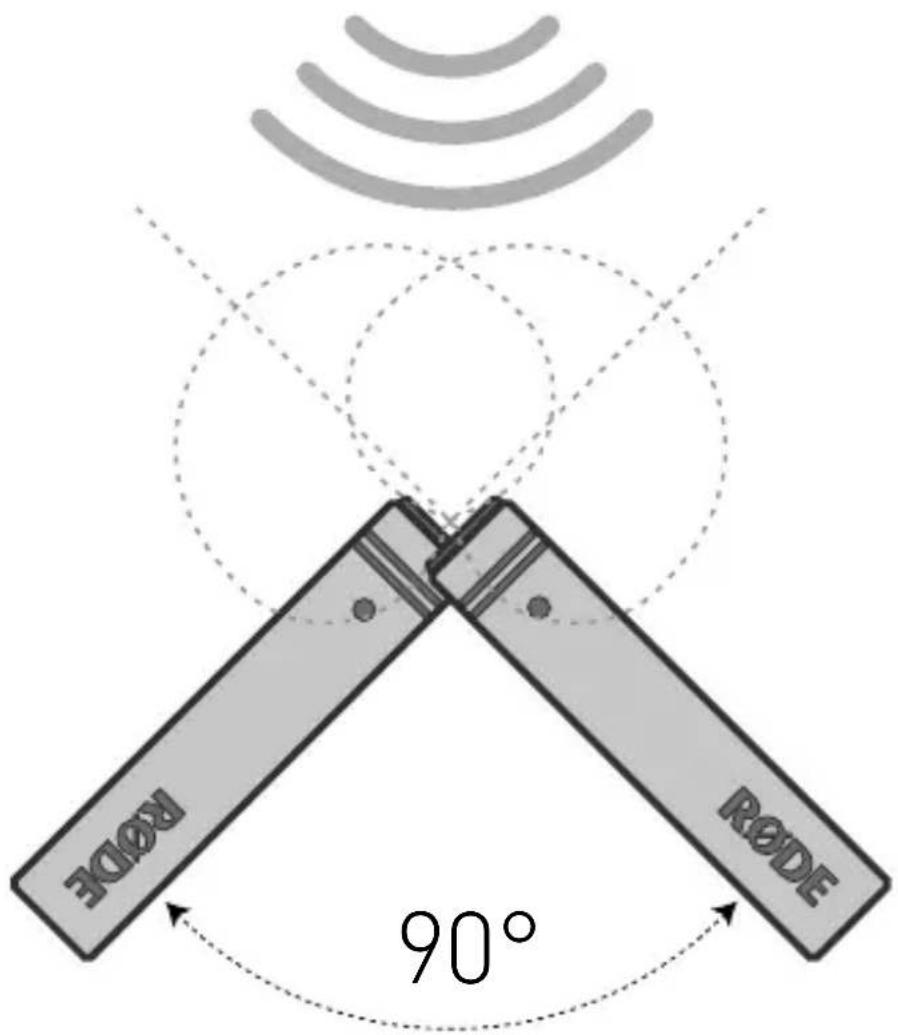
Stereo X-Y
To mount your M5 pair in X/Y configuration, place the microphones either on a stereo bar, or on two separate microphone stands. The microphones should be placed at 90° to one another (right angle) with the capsules stacked above each other vertically.

X/Y configuration is a coincident stereo technique that can be used to pick up sound sources in stereo with maximum phase coherency, meaning that the sounds you record will not only sound great in stereo, but they will also sound great when played back in mono.
This is achieved by having the capsules placed right above one another, as close as possible on the vertical axis, so that sound reaches both capsules at the same time. While X/Y configuration is great for mono compatibility and ease of use, the stereo image will not be as wide as other techniques such as ORTF or a spaced pair configuration.
Sound Source
text_image
RODE RODE 90°Microphone Placement
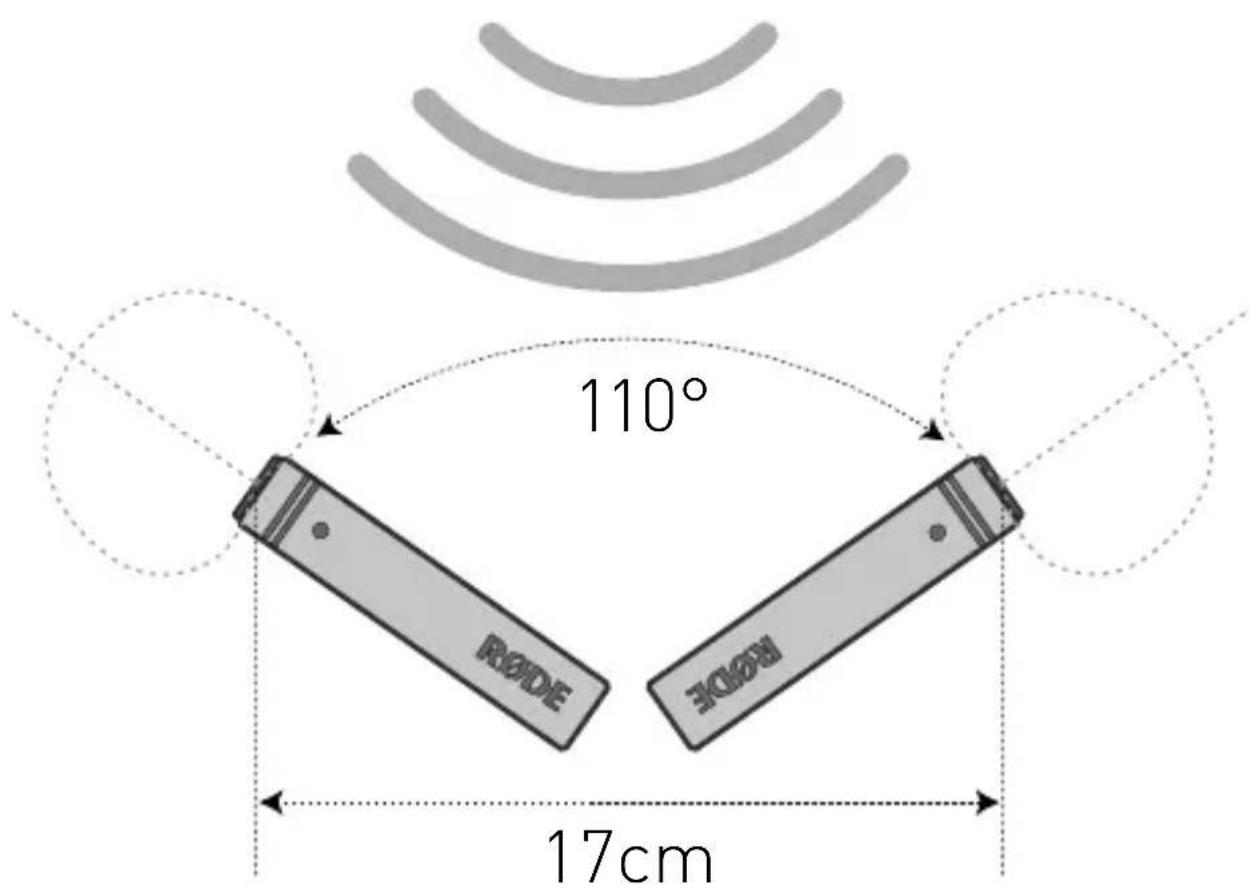
Stereo ORTF
To mount your M5 pair in ORTF configuration, place the microphones either on a stereo bar, or on two separate microphone stands. The microphones should be placed at 110^ to one another with the capsules 17cm apart and facing outward.

The ORTF technique was devised around 1960 by a French broadcast station, the Offi ce de Radiodiffusion Télévision Française, and was originally designed to mimic the response of human hearing.
The increased distance between the capsules will produce a wider stereo image than coincident stereo miking techniques like X/Y or Mid-side.
Sound Source
text_image
110° RODE ECON 17cm20
Safety and maintenance
After use the M5(s) should be removed from its mount, wiped with a dry, soft cloth and placed into storage.
Be sure to place the moisture-absorbent crystals (supplied) at the head of the microphone when in storage, so as to absorb any moisture present. Eventually this pack of crystals will need to be dried. This is indicated by the crystals turning pink in colour.
They can easily be re-used by placing them in an oven at 100 – 150 degrees Celsius for approximately ten minutes. The crystals will operate effectively again once they have turned blue.
Support
If you experience any problem, or have any questions regarding your R∅DE microphone, first contact the dealer who sold it to you. If the microphone requires a factory authorised service, return will be organised by that dealer.
We have an extensive distributor/dealer network, but if you have diffi culty getting the advice or assistance you require, please do not hesitate to contact us directly.
Alternatively please visit www.rodemic.com/support for contact details and a list of Frequently Asked Questions.
Importers & distributors
For a full list of international importers and distributors, visit our website at www.rodemic.com/distributors.
22
Contact
International
107 Carnarvon Street
Silverwater NSW 2128 Australia
USA
2745 N Raymond Ave
Signal Hill CA 90755
USA
PO Box 91028
Long Beach CA 90809-1028
USA

text_image
R∅DE R∅DEM5
text_image
QR code image containing encoded data, no visible human-readable textwww.rodemic.com/warranty.
Technische Daten
Richtcharakteristik

radar
| Angle | Frequency: 500 Hz | Frequency: 1000 Hz | Frequency: 4000 Hz | |-------|-------------------|--------------------|--------------------| | 0° | -2.0 | -2.0 | -2.0 | | 90° | -2.0 | -2.0 | -2.0 | | 180° | -2.0 | -2.0 | -2.0 | | 270° | -2.0 | -2.0 | -2.0 |Übertragungsbereich

line
| Frequency | dB at 1 V/PA | | --------- | ------------ | | 20 Hz | -5 | | 100 | 0 | | 1000 | 0 | | 10000 | 5 | | 20000 | -5 |text_image
QR code image containing encoded data, no visible human-readable textSignal Hill CA 90755
USA
PO Box 91028
Long Beach CA 90809-1028
USA

text_image
R∅DE R∅DEM5
text_image
QR code image containing encoded data, no visible human-readable textwww.rodemic.com/warranty.
Fiche technique
text_image
QR code image containing encoded data, no visible human-readable texttext_image
RODE RODEPlacement du micro
Couple X/Y
Signal Hill CA 90755
États-Unis
P0 Box 91028
Long Beach CA 90809-1028
États-Unis

text_image
R∅DE R∅DEM5
text_image
QR code image containing encoded data, no visible human-readable texttext_image
QR code image containing encoded data, no visible human-readable textSignal Hill CA 90755
EE.UU.
PO Box 91028
Long Beach CA 90809-1028
EE.UU.

text_image
R∅DE R∅DEM5
text_image
QR code image containing encoded data, no visible human-readable textline
| Frequency | dB at 1 V/PA | | --------- | ------------ | | 20 Hz | -5 | | 100 | 0 | | 1000 | 0 | | 10000 | 5 | | 20000 | -5 |text_image
QR code image containing encoded data, no visible human-readable textwww.rodemic.com/distributors.
110
Contatti
Internazionale
107 Carnarvon Street
Silverwater NSW 2128 Australia
USA
2745 N Raymond Ave
Signal Hill CA 90755
USA
P0 Box 91028
Long Beach CA 90809-1028
USA

text_image
R∅DE R∅DEM5
text_image
QR code image containing encoded data, no visible human-readable textline
| Frequency | dB at 1 V/PA | | --------- | ------------ | | 20 Hz | -5 | | 100 | 0 | | 1000 | 0 | | 10000 | 5 | | 20000 | -5 |text_image
QR code image containing encoded data, no visible human-readable texttext_image
RODE RODE话筒摆位
立体声 X/Y
Signal Hill CA 90755
美国
PO Box 91028
Long Beach CA 90809-1028
美国
text_image
R∅DE R∅DEM5
コンパクト 1/2イン
チ・カーディオイド
コンデンサーマイク
www.rodemic.com/m5
はじめに
text_image
QR code image containing encoded data, no visible human-readable texttext_image
QR code image containing encoded data, no visible human-readable textSignal Hill CA 90755
USA
P0 Box 91028
Long Beach CA 90809-1028
USA

text_image
R∅DE R∅DEM5
text_image
QR code image containing encoded data, no visible human-readable texttext_image
QR code image containing encoded data, no visible human-readable text스마트폰으로 코드를
스캔하시거나 rockro.de/
m5stereo를 방문하시면 M5의
스테레오 사용법에 대한 비디오를
시청하실 수 있습니다.
마이크 배치
스테레오 스페이스 페어 배치
Signal Hill CA 90755
미국
PO Box 91028
Long Beach CA 90809-1028
미국