Wireless GO II - Microphone Røde - Free user manual and instructions
Find the device manual for free Wireless GO II Røde in PDF.
| Product Type | Dual Channel Wireless Microphone System |
| Brand | Rode |
| Model | Wireless GO II |
| Receiver Dimensions (approx.) | 44 x 46 x 20 mm |
| Transmitter Dimensions (approx.) | 44 x 46 x 20 mm |
| Receiver Weight (approx.) | 32 g |
| Transmitter Weight (approx.) | 30 g |
| Power Supply | Built-in rechargeable lithium-ion battery via USB-C |
| Battery Life | Up to 7 hours |
| Range | 200 meters (line of sight) |
| Transmission Frequency | 2.4 GHz with 128-bit encryption |
| Microphone Capsule | Built-in omnidirectional |
| Main Features | Onboard recording (up to 40h compressed / 7h uncompressed), Merge and Split modes, gain control (3 levels + fine via app), safety channel, camera presets, mute, markers |
| Connectivity | 3.5 mm TRS output, USB-C (digital audio), compatible with iOS and Android via appropriate cables |
| Companion App | Rode Central (desktop and mobile) for configuration, firmware updates, export recordings |
| Care and Cleaning | Use the supplied windshields outdoors; clean with a soft, dry cloth |
| Safety | Avoid exposure to water and shocks; do not open the device |
| Spare Parts and Repairability | Windshields, USB-C cables, TRS cable, carry case; optional charge case; no user-serviceable parts, repair by authorized center |
| General Information | Brand: Rode; Model: Wireless GO II; Manufacturer's warranty included; Made in China (assumed) |
Frequently Asked Questions - Wireless GO II Røde
User questions about Wireless GO II Røde
0 question about this device. Answer the ones you know or ask your own.
Ask a new question about this device
Download the instructions for your Microphone in PDF format for free! Find your manual Wireless GO II - Røde and take your electronic device back in hand. On this page are published all the documents necessary for the use of your device. Wireless GO II by Røde.
USER MANUAL Wireless GO II Røde
text_image
R∅DE WIRELESS GO II R∅DE WIRELESS GO IIUSER GUIDE & SUPPORT
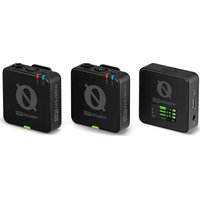
The Wireless GO II is a versatile and ultra-compact dual channel wireless microphone system consisting of a dual channel receiver and two transmitters.
Discover everything you need to know about using your Wireless GO II here.
Contents
Features
Receiver
Wireless GO II / USER GUIDE & SUPPORT
text_image
RODE WIRELESS GO II 1 2 1 2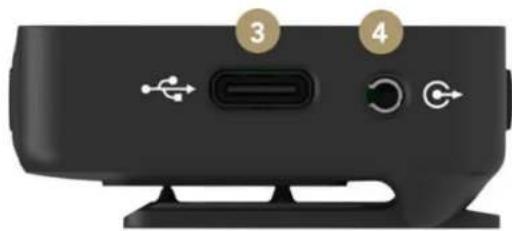
natural_image
Close-up of a black electronic device rear panel showing ports, buttons, and a speaker icon (no readable text or symbols)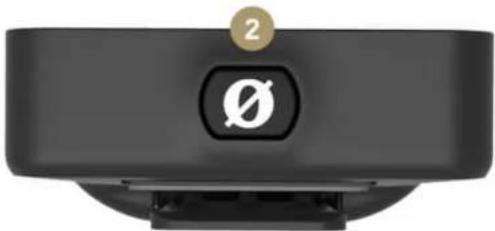
natural_image
Close-up of a black electronic device with a circular button labeled '2' and a white symbol on the side (no readable text or numbers beyond the number)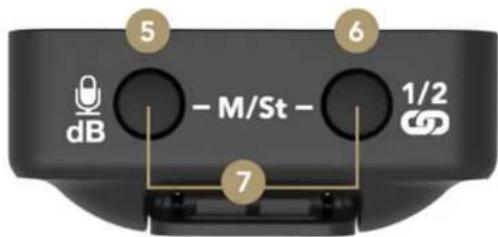
text_image
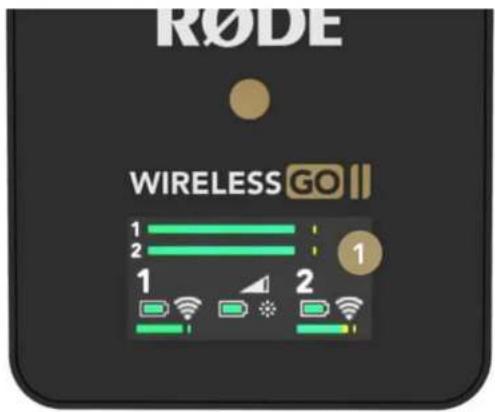
5 dB - M/St - 6 1/2 71 LED Screen
2 Power Button
3 USB-C Connector
4 3.5mm TRS Output
5 Gain Control/Mute Button
6 Pair Button/Channel Selection
7 Merged/Split Mode Selector
Transmitter
text_image
R∅DE WIRELESS GO II
natural_image
Close-up of a black electronic device rear panel showing ports and a USB symbol (no readable text or labels)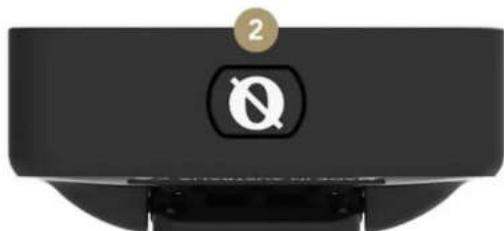
natural_image
Close-up of a black plastic container with a circular logo and a 'Q' symbol, no readable text or numbers present.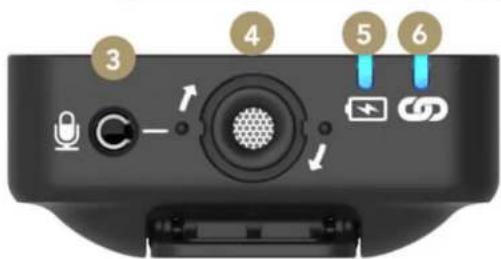
text_image
3 4 5 61 USB-C Connector
2 Power Button
3 3.5mm TRS Input
4 In-built Mic
5 Battery Indicator LED
6 Connectivity Indicator LED
1 x Receiver, 2 x Transmitters, 3 x Furry Windshields, 3 x SC20 USB-C to USB-A Cables, 1 x SC5 TRS to TRS Memory Cable, 1 x Carry Pouch
The Dual Channel Receiver
The Wireless GO II features two transmitters and a dual channel receiver that allows you to connect both transmitters for recording two sound sources into a single device. Out of the box, the transmitters come auto paired to the receiver and will remember which channel they've been assigned to, so you don't have to worry about pairing them again.
The receiver's LED screen is split into four main sections, with icons for battery life, signal strength and input level displayed for each transmitter on the bottom left and right, and icons for battery life, backlight mode and output gain for the receiver in the middle. Above this is an output level meter for the receiver, which makes it easy to monitor the levels going into your camera or recording device and ensuring your signal isn't too hot.
Turning On and Pairing Your Wireless GO II
To turn on your Wireless GO II, simply press and hold the power button on the receiver. To pair your transmitters to the receiver, press and hold the power button on the transmitters one at a time. Once turned on, they will automatically pair to the receiver. This should take a few seconds.
If a transmitter loses connection with the receiver, the blue '∞' LED on the transmitter will flash and the icons for that channel will go blank on the receiver, making it easy to identify which one you need to reconnect.
If you need to reconnect a transmitter to the receiver, press and hold the pair button ('∞') on the receiver for three seconds to enable pairing mode, then single-click the power button on the transmitter and wait a few seconds.
To disconnect a transmitter, select it by single-clicking the pair button, then press and hold the pair button for three seconds.
Understanding R∅DE's Series IV 2.4GHz Digital Transmission
The Wireless GO II utilises R∅DE's all-new Series IV 2.4GHz digital transmission with 128-bit encryption. This delivers an extended transmission range of 200 metres (line of sight). The Wireless GO II is optimised for extremely stable operation in environments where there is a lot of RF activity, including dense urban areas, shopping malls, universities, convention centres, and offices, so you can worry less about dropouts and focus more on what you're recording.
Wireless GO II / USER GUIDE & SUPPORT

text_image
R∅DE WIRELESS GO ||Merged & Split Mode
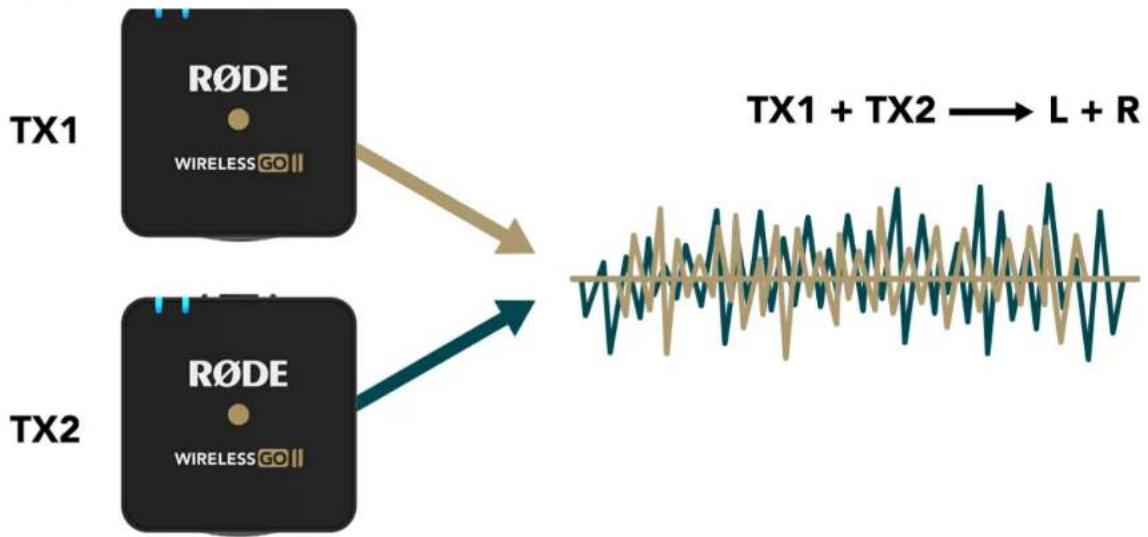
The Wireless GO II gives you the option to record in either 'Merged' or 'Split' mode. This allows you to record each transmitter onto separate channels on the output or combine the two into a single output.
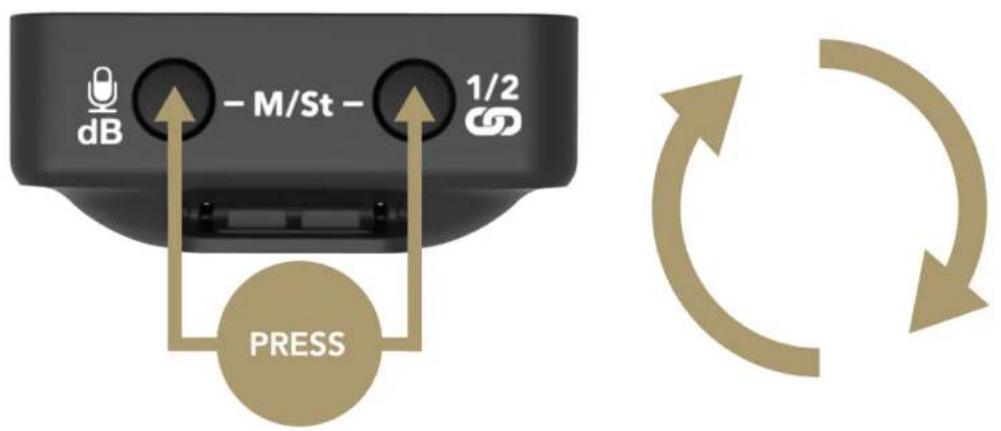
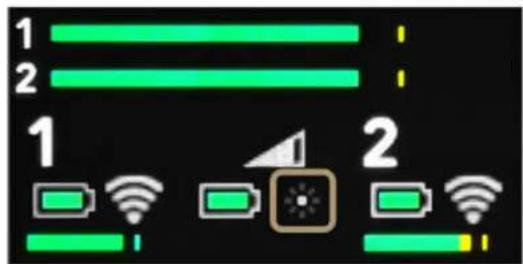
To switch between 'Merged' and 'Split' mode, press and hold both buttons on the receiver for three seconds and keep an eye on the output level meter on the LED screen.
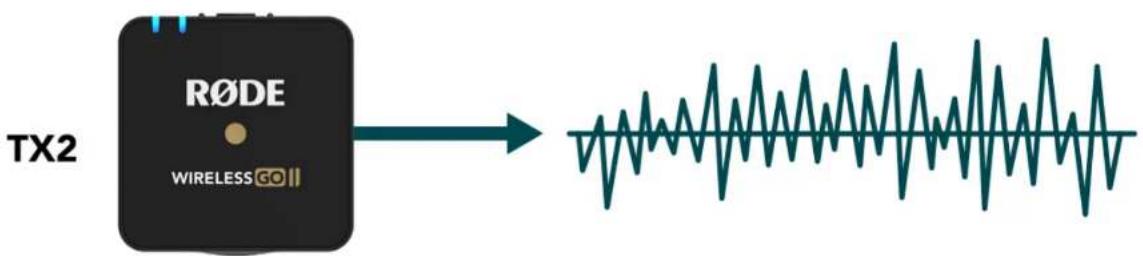
When there are two meters, you are in 'Split' mode. This means that each transmitter's output is being recorded onto separate channels (left and right) on the Wireless GO II's output, which can be processed individually in post-production. This is great for two-person interviews where you need to be able to edit and mix each sound source independently.
When there is just one meter, you are in 'Merged' mode. This means that the two transmitters are being combined into a single summed output. This is great if you're only using one transmitter and want the audio recorded onto both channels of your recording device, or if you are using the safety channel (see below for more information). It also works well if you are using the Wireless GO II in a live presentation setup.
For more information on how to import and separate your audio in post-production, check out this blog post on 'How To Record Two Microphones Into Your Camera'.
Wireless GO II / USER GUIDE & SUPPORT
flowchart
graph TD
    A["TX1"] --> B["R∅DE"]
    B --> C["WIRELESS GO II"]
    D["TX2"] --> E["R∅DE"]
    E --> F["WIRELESS GO II"]
    G["TS1 + TX2"] --> H["L + R"]
text_image
dB - M/St - 1/2 PRESS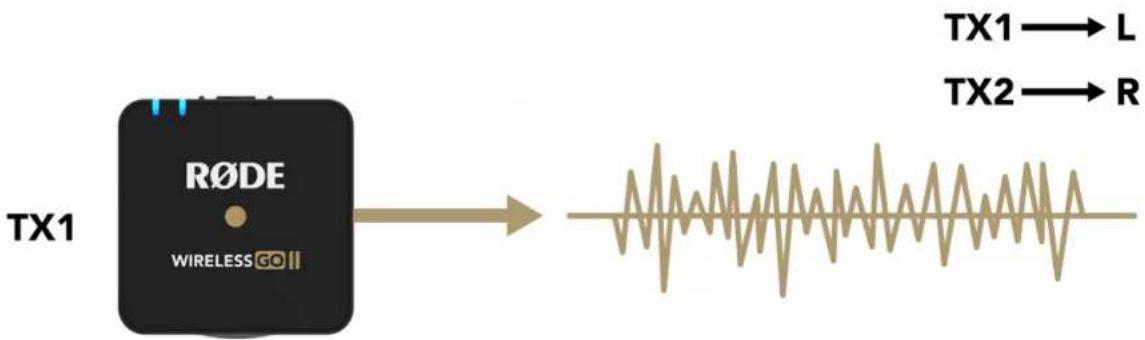
flowchart
graph LR
    A["TX1"] --> B["RODE WIRELESS GO"]
    B --> C["Waveform Signal"]
    style A fill:#000,stroke:#fff,color:#fff
    style B fill:#000,stroke:#fff,color:#fff
    style C fill:#000,stroke:#fff,color:#fff
flowchart
graph LR
    A["RODE"] --> B["Wireless GO"]
    style A fill:#000,stroke:#fff,color:#fff
    style B fill:#999,stroke:#000,color:#fff
Wireless GO II / USER GUIDE & SUPPORT
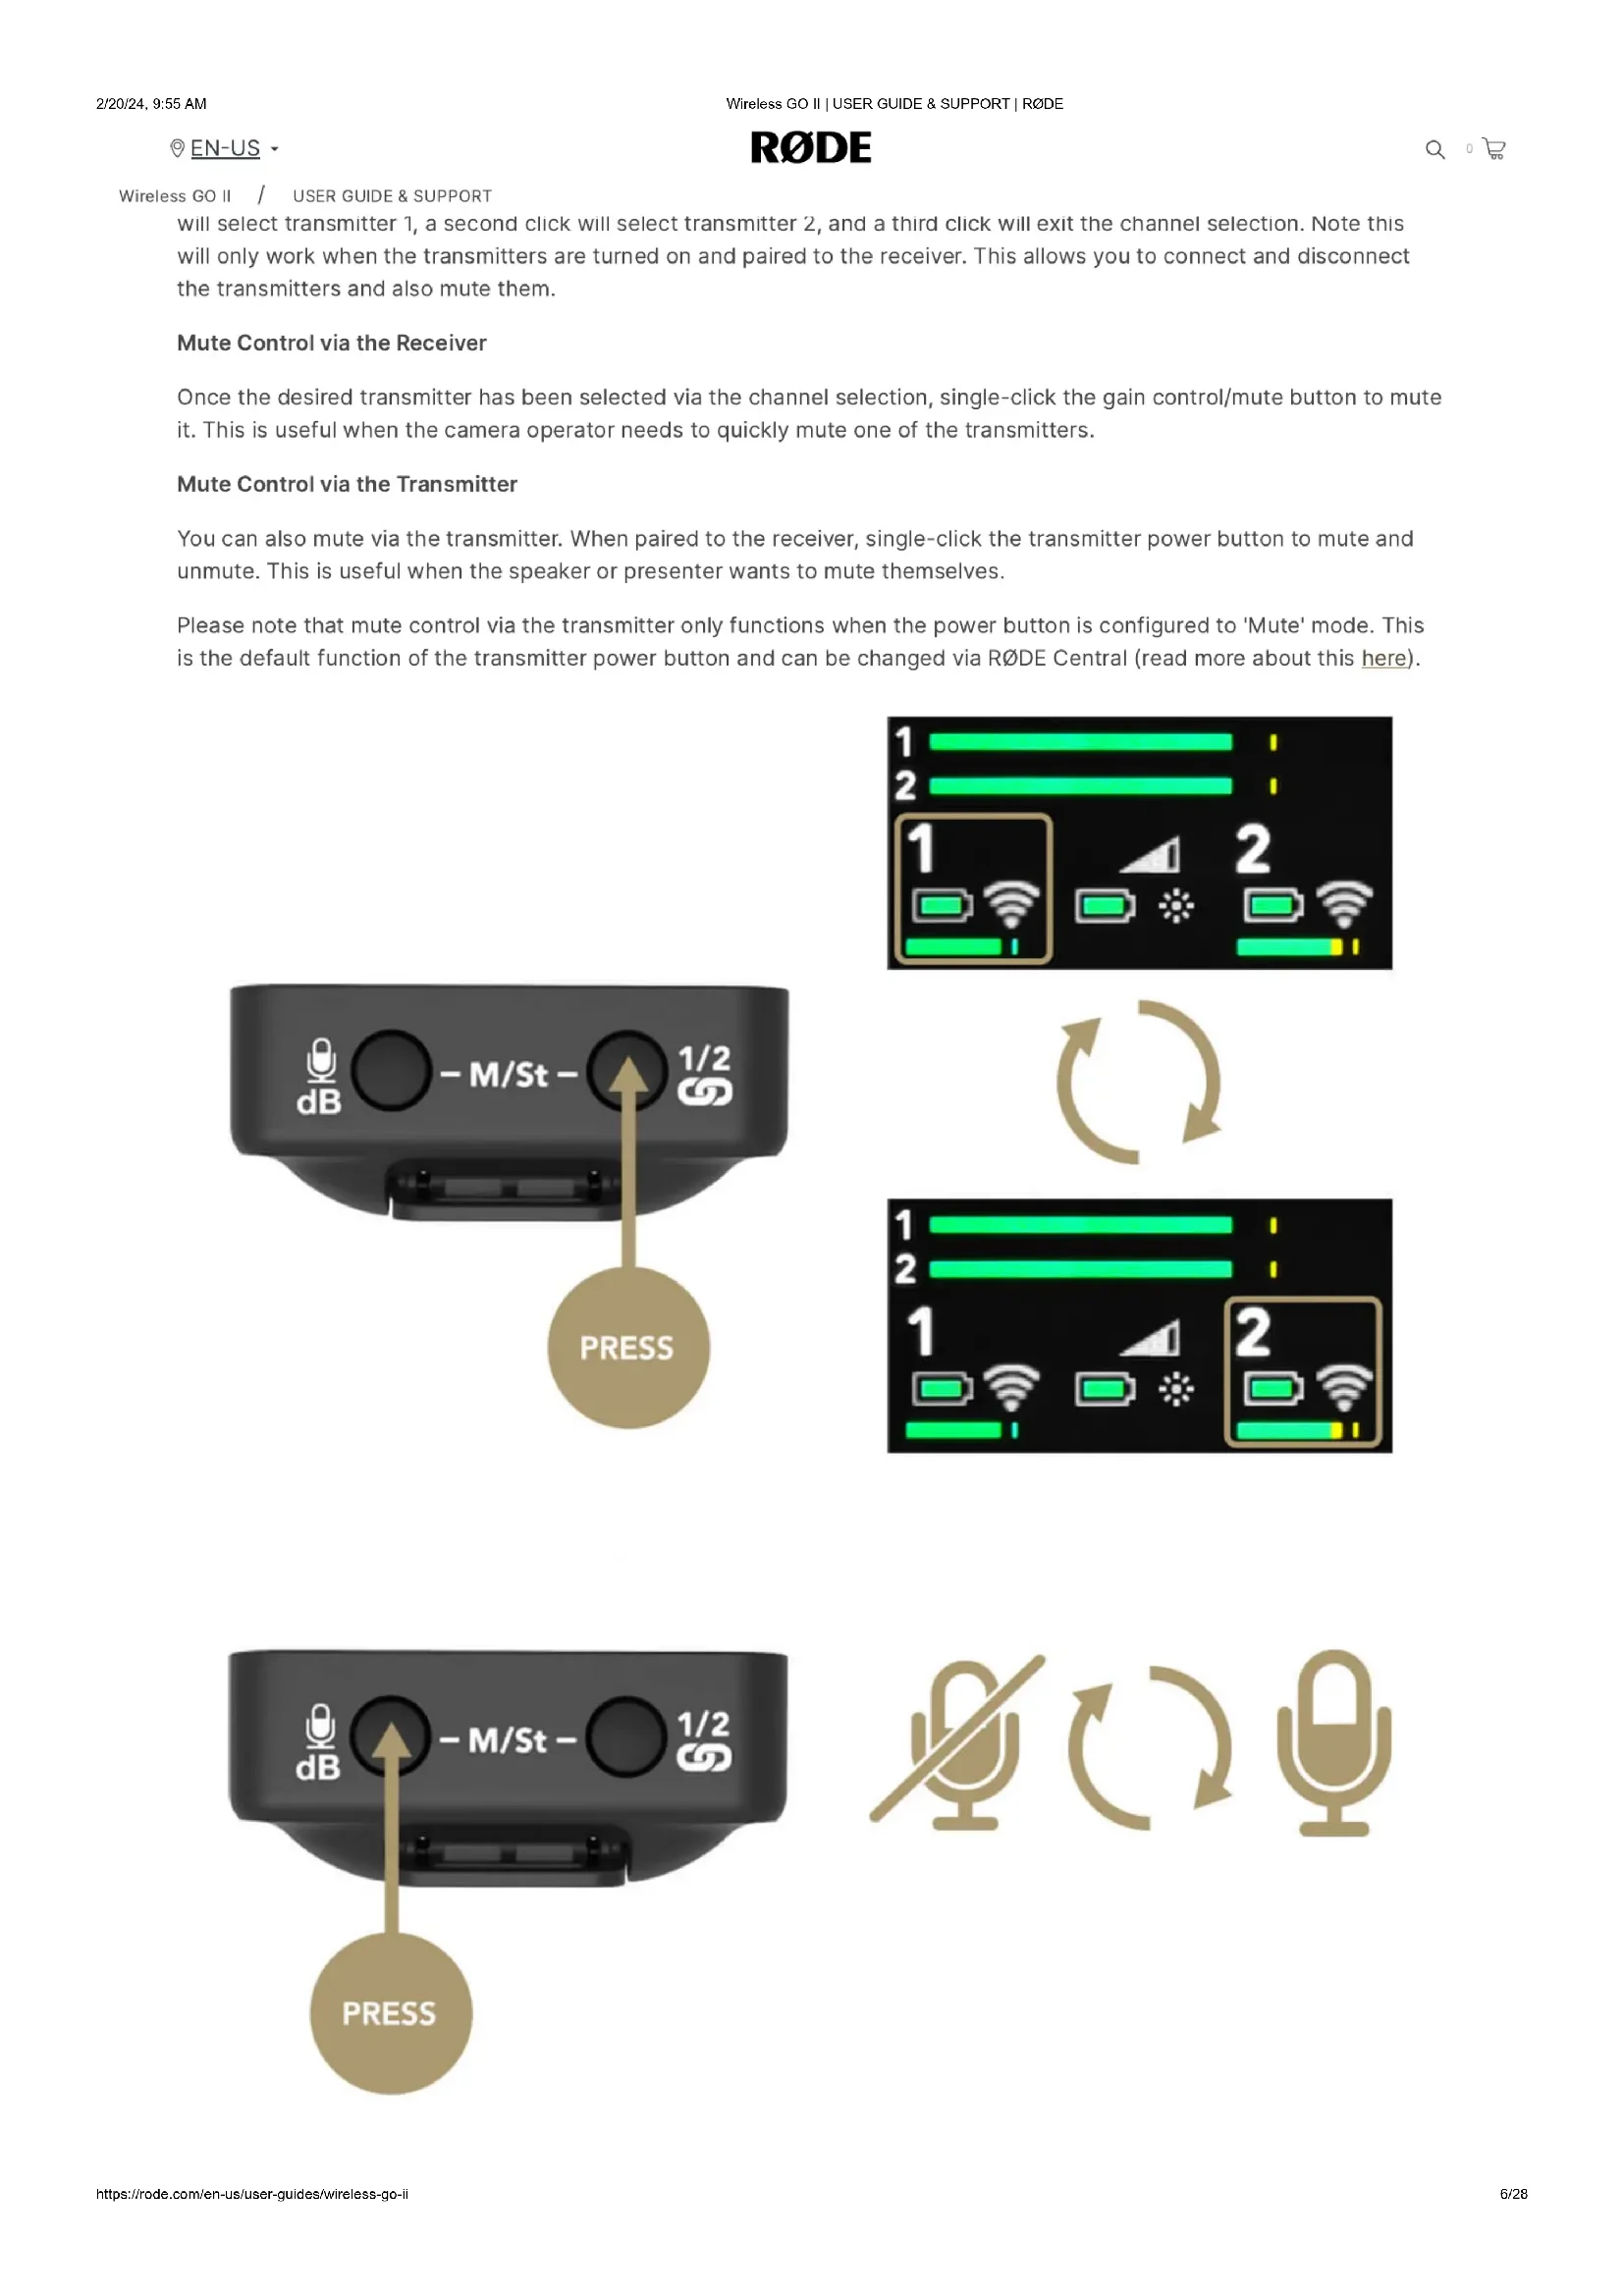
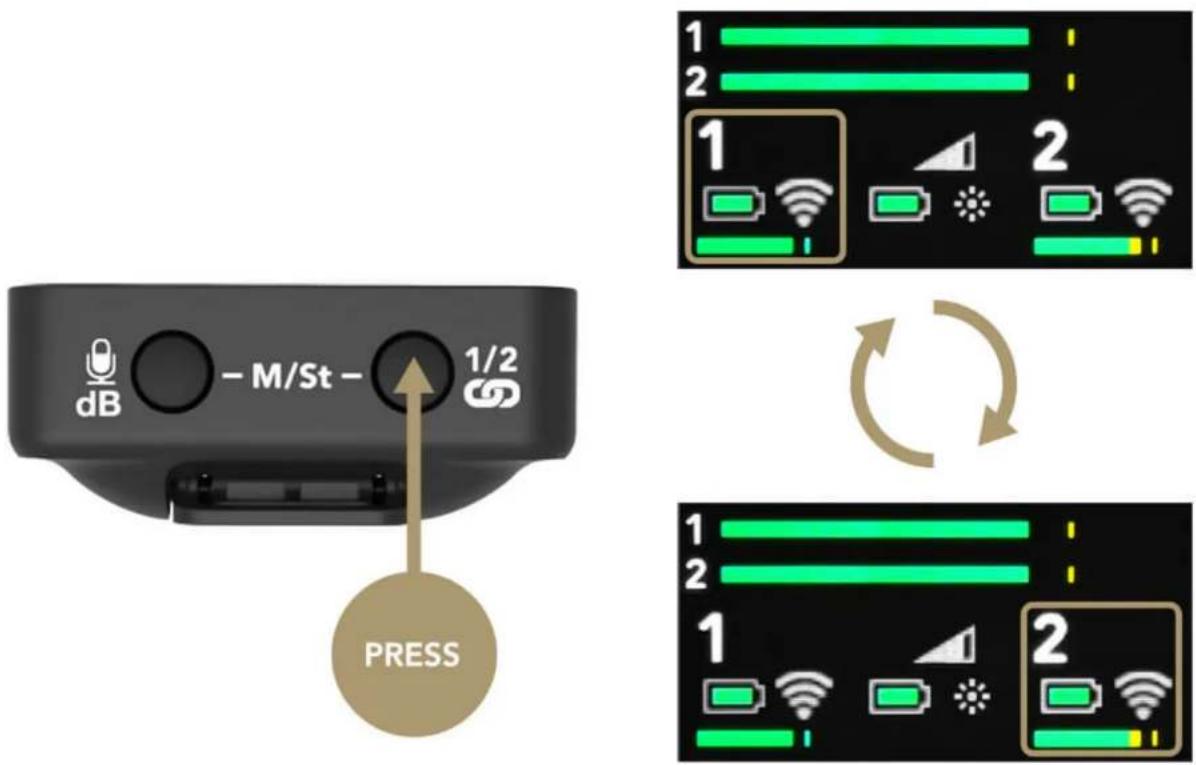
will select transmitter 1, a second click will select transmitter 2, and a third click will exit the channel selection. Note this will only work when the transmitters are turned on and paired to the receiver. This allows you to connect and disconnect the transmitters and also mute them.
Mute Control via the Receiver
Once the desired transmitter has been selected via the channel selection, single-click the gain control/mute button to mute it. This is useful when the camera operator needs to quickly mute one of the transmitters.
Mute Control via the Transmitter
You can also mute via the transmitter. When paired to the receiver, single-click the transmitter power button to mute and unmute. This is useful when the speaker or presenter wants to mute themselves.
Please note that mute control via the transmitter only functions when the power button is configured to 'Mute' mode. This is the default function of the transmitter power button and can be changed via R∅DE Central (read more about this here).
text_image
dB - M/St - 1/2 PRESS 1 2 1 2 1 2 1 2 2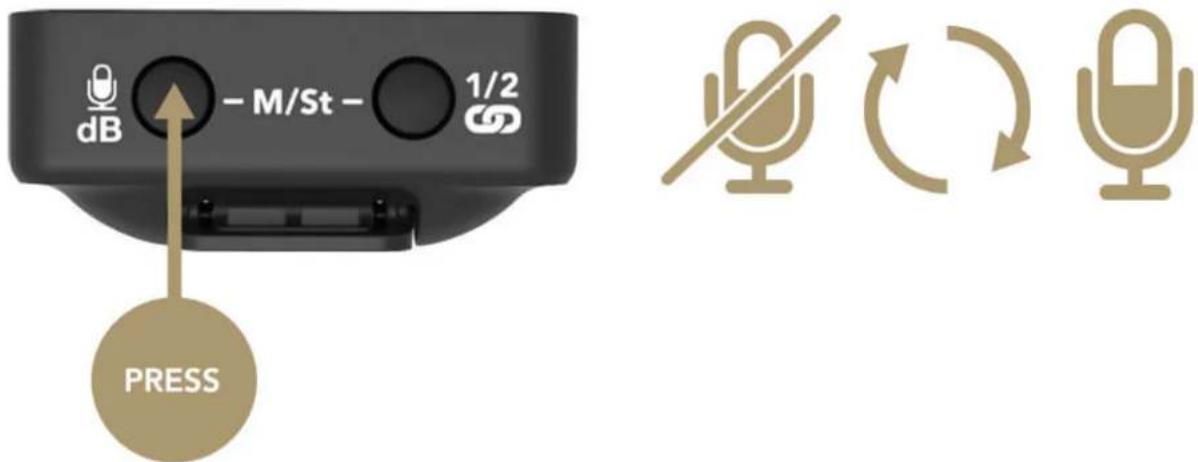
text_image
dB -M/St - 1/2 PRESSDevice Connectivity
natural_image
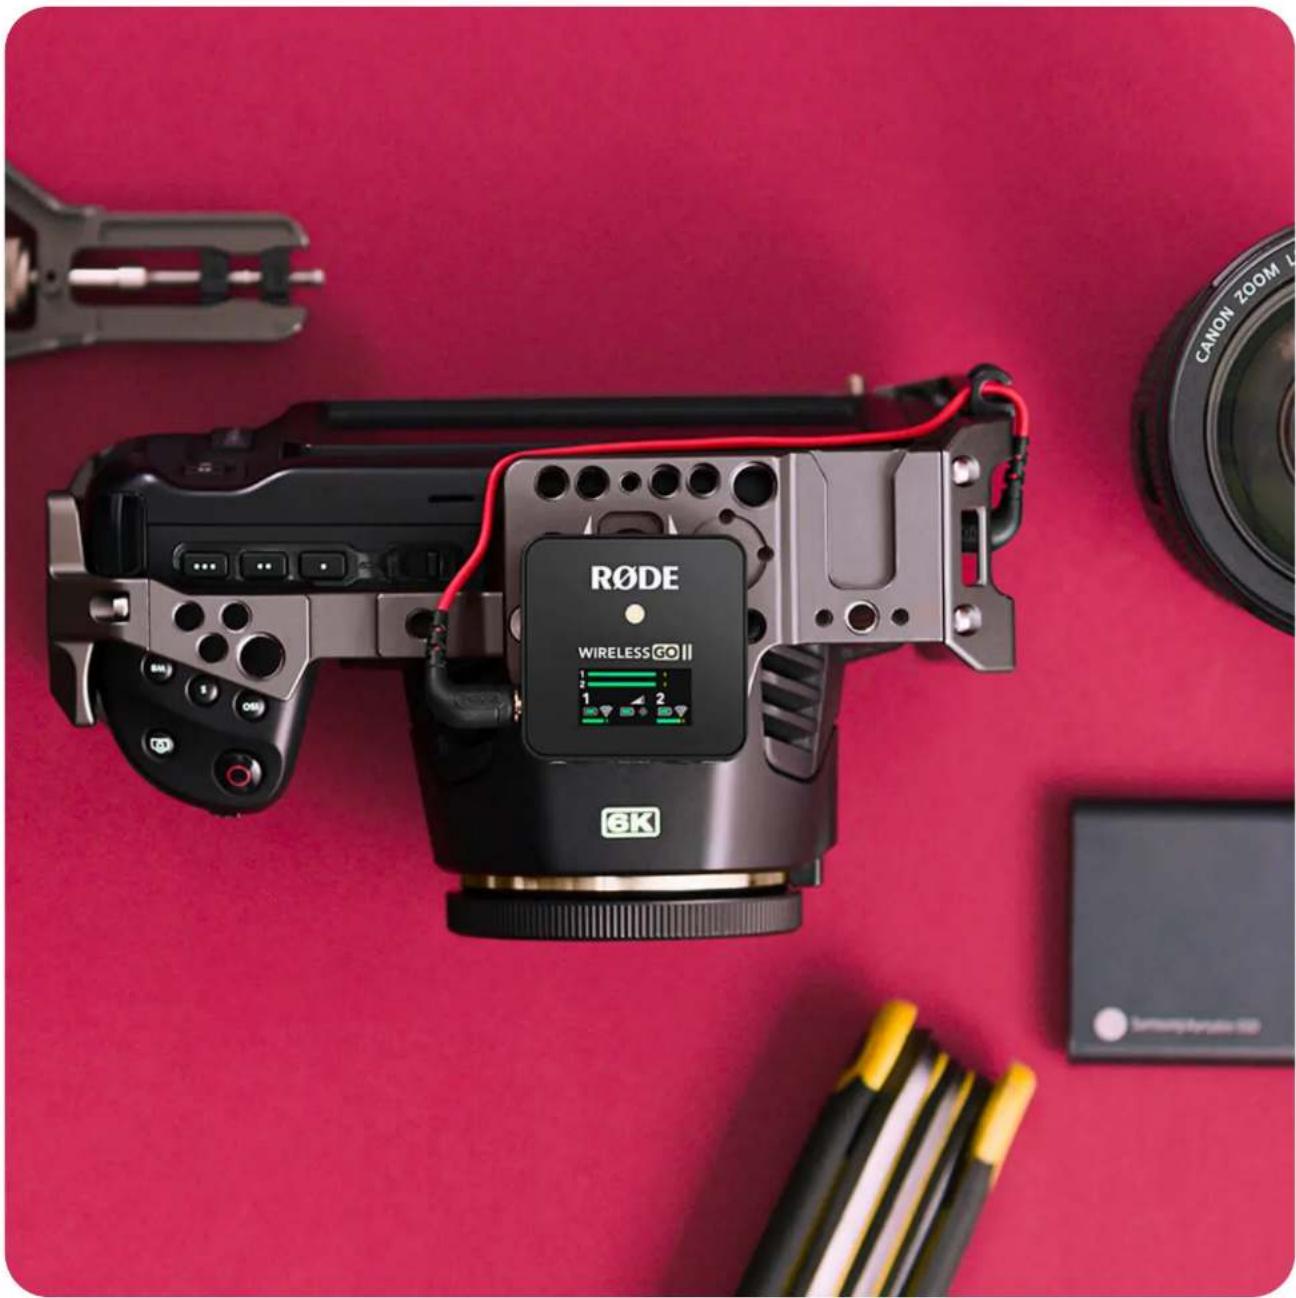
Rode DSLR camera with attached wireless camera module on red background (no text or symbols on main subject)Connecting to Cameras
Use the supplied SC5 cable to connect your Wireless GO II to cameras and other devices with a 3.5mm TRS input. If you need to connect your microphone to a device with an XLR input, use an adaptor like the VXLR Pro.
Wireless GO II / USER GUIDE & SUPPORT
natural_image
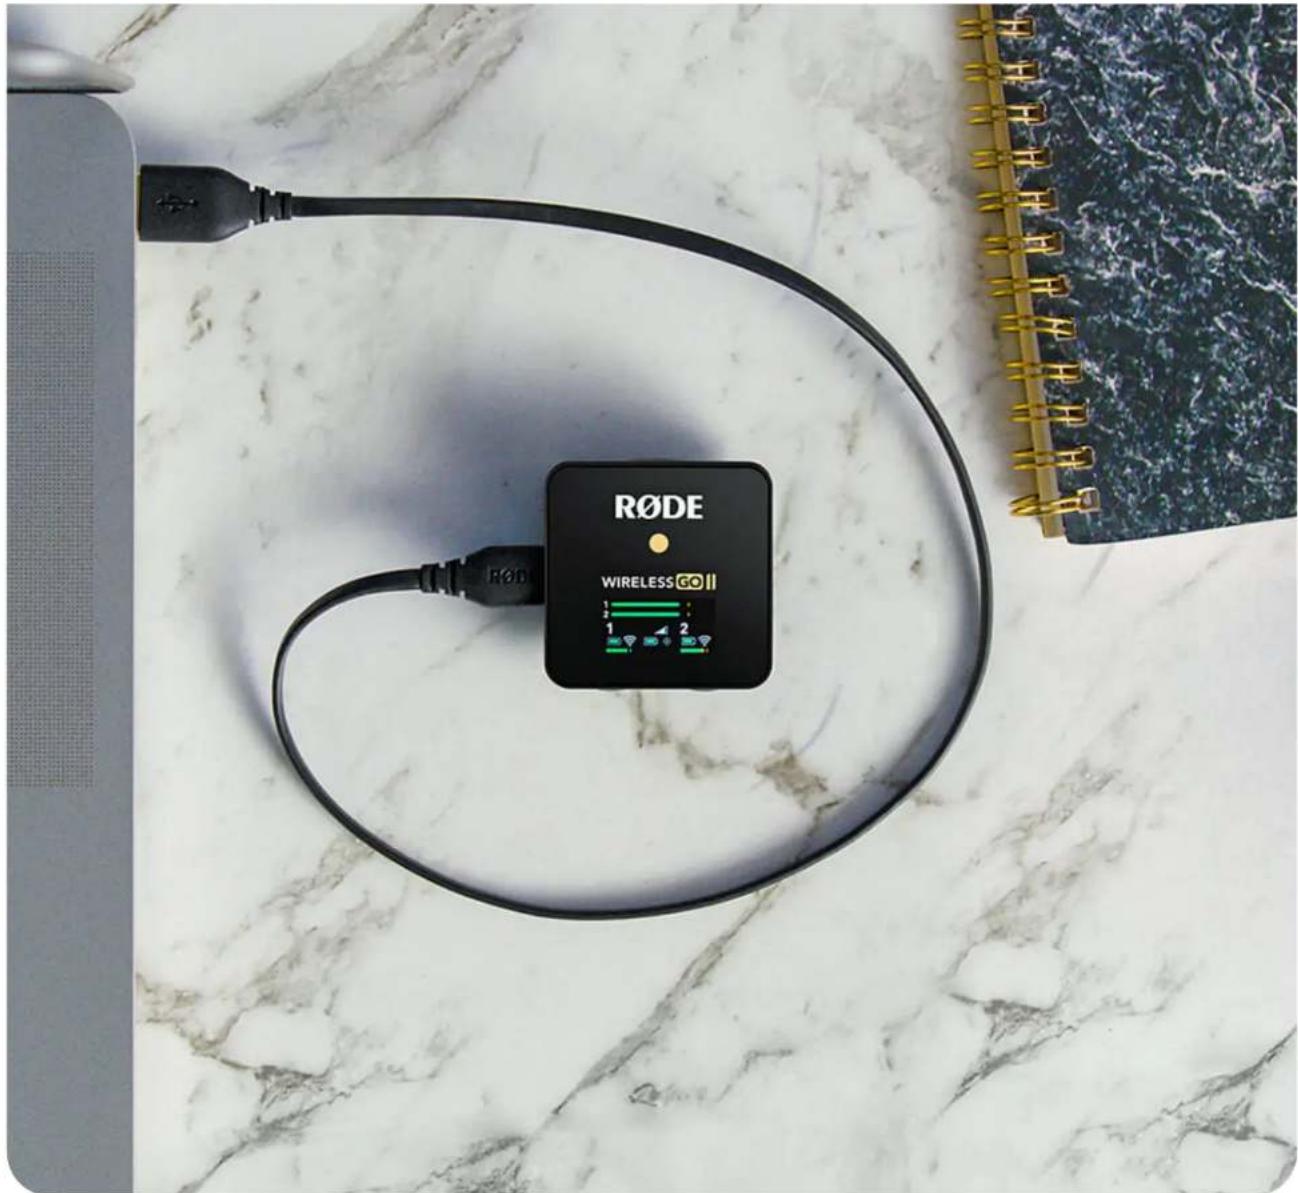
Close-up of a black RøDE wireless controller connected to a white marble surface, with a notebook and water slide nearby (no readable text or symbols on the device itself)Connecting to Computers
Use the supplied USB-C to USB-A cable to connect the Wireless GO II receiver to any computer with a USB-A input (use USB-C to USB-C cable for computers with a USB-C input), then go to your audio settings and select 'Wireless GO II RX' as your input device. This essentially turns the Wireless GO II receiver into a wireless USB audio interface.
Wireless GO II / USER GUIDE & SUPPORT
text_image
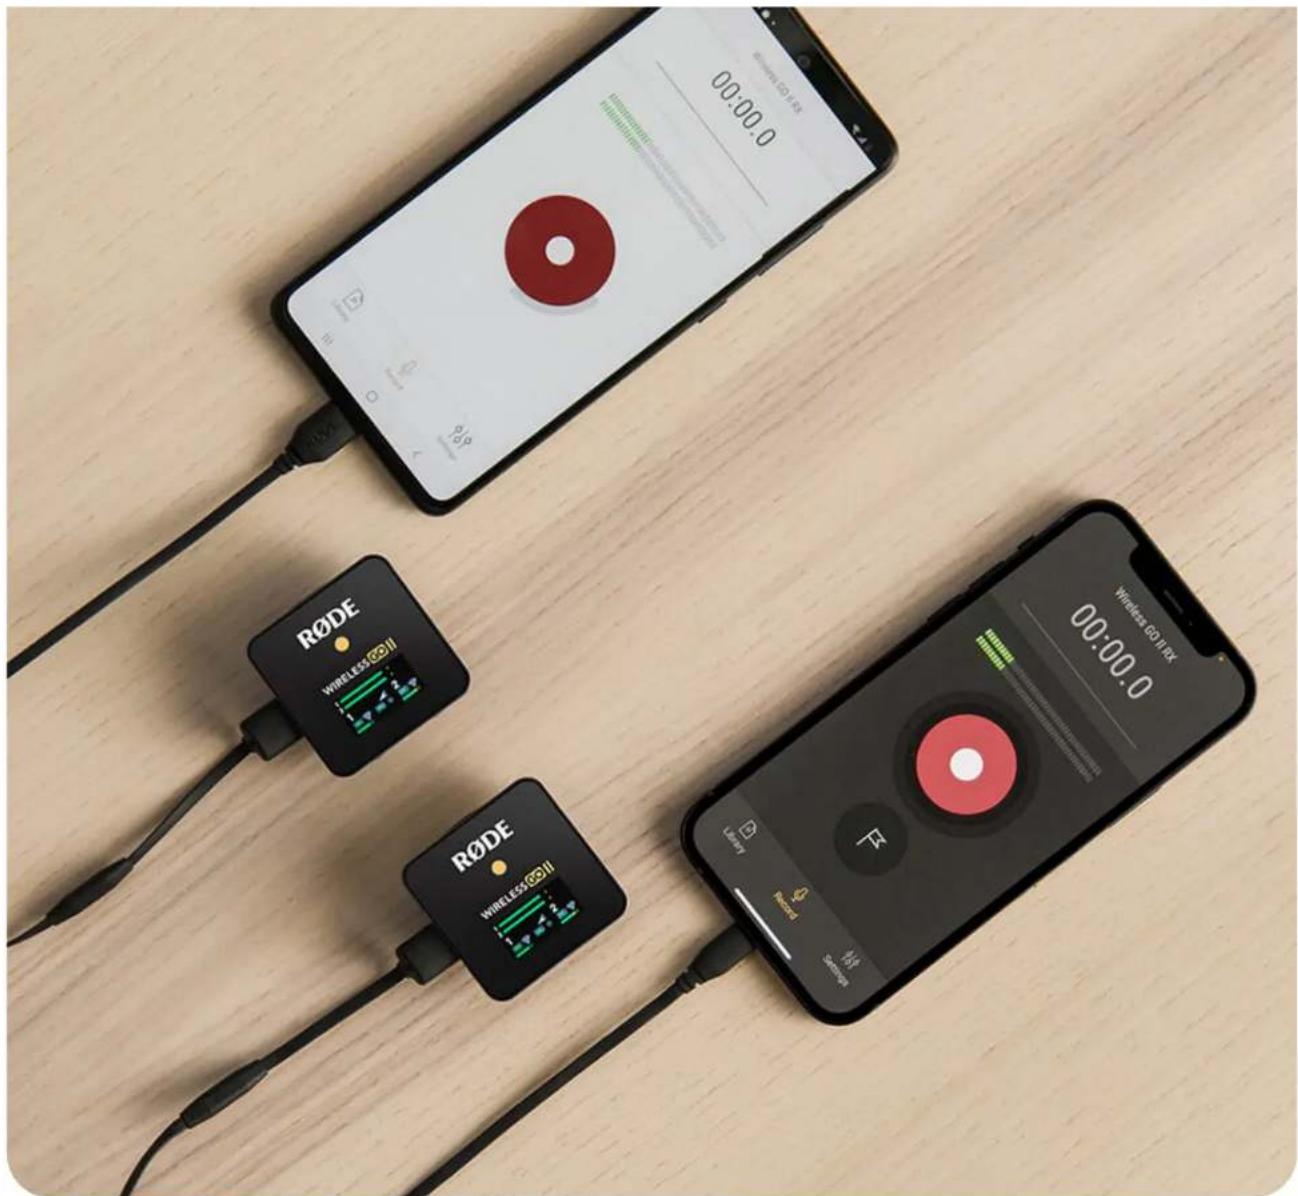
00:00.0 RODE WIRELESS@OII RODE WIRELESS@OII 00:00.0 Wireless GOII RXConnecting to Mobile Devices
To connect the Wireless GO II to a smartphone or tablet, you will need additional cables. For iOS devices with a Lightning input, use the SC15 or SC19. The Wireless GO II is MFi-certified, meaning it will seamlessly interact with any iOS device. For Android and other devices with a USB-C input, use the SC16 USB-C to USB-C cable.
Note: To connect the Wireless GO II to iOS device with a Lightning port, you must use a R∅DE Lightning Accessory Cable – either the SC15 or SC19. Standard USB-C to Lightning cables are not compatible with the Wireless GO II.
Pro Tip
Connecting the Wireless GO II to your smartphone or tablet via USB-C rather than using the 3.5mm analog TRS output gives you access to a number of useful features:
High-quality audio output – Using the USB-C output bypasses the recording device's analog input circuitry, giving a direct digital signal transfer for optimum quality.
Headphone monitoring – Using the USB-C output frees up the 3.5mm output so you can plug your headphones in and monitor your audio while recording. You can even use the gain control to adjust the volume of your headphones.
Connecting to the R∅DECaster Series
Wireless GO II / USER GUIDE & SUPPORT
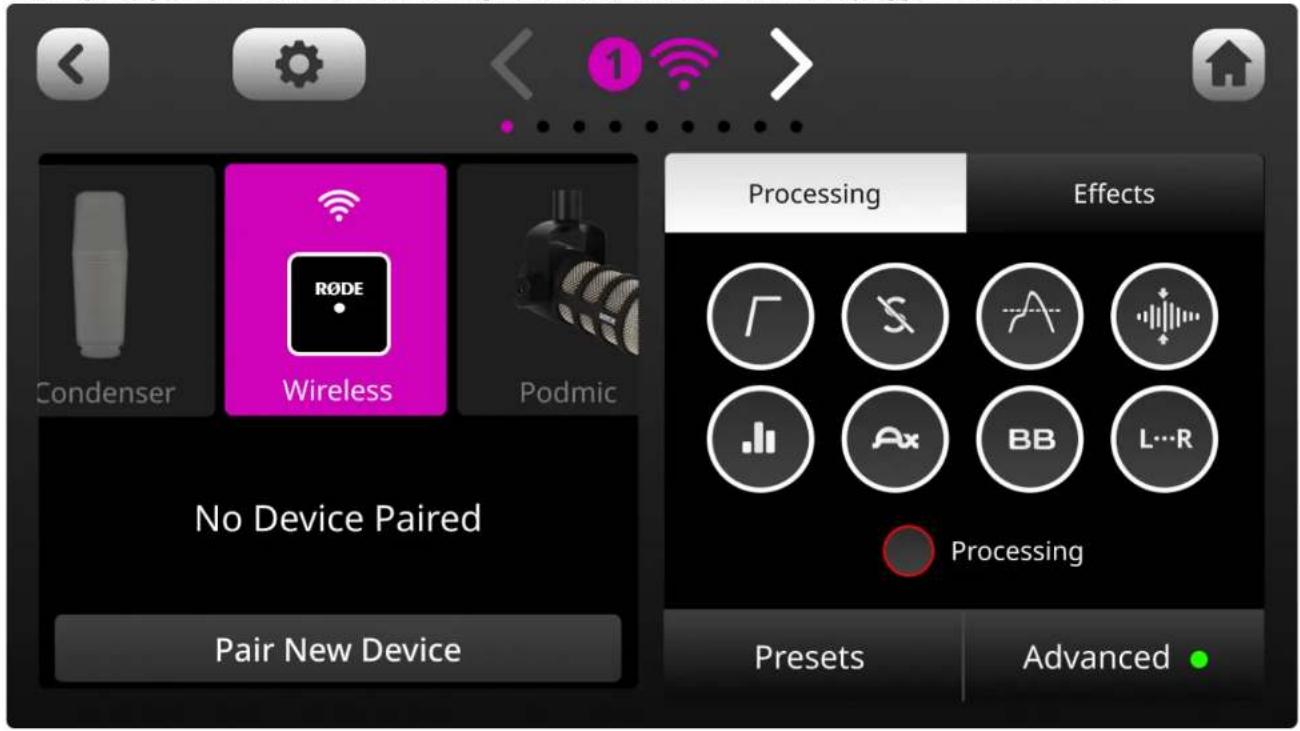
the physical button above the fader you wish to assign your wireless device to. On this screen, you will see a list of microphone, instrument and other input options that you can scroll through. Scroll to the left to select the 'Wireless' option, tap 'Pair New Device' to enter pairing mode, power on your Wireless GO II transmitter and short-press its power button (ensuring that the transmitter isn't already connected to another receiver). Your device's connectivity, recording, mute and battery status status will be displayed on this screen.
Note: Assigning any of the four input channels to the 'Wireless' option will override the associated physical XLR/TRS input, meaning that you won't hear any audio coming from microphones or instruments plugged into that channel.
text_image
Condenser Wireless Podmic No Device Paired Pair New Device Processing Effects Processing Presents AdvancedGain Control
The Wireless GO II has flexible gain controls that allow you to precisely tailor the receiver's output to avoid clipping or distortion in your recording device.
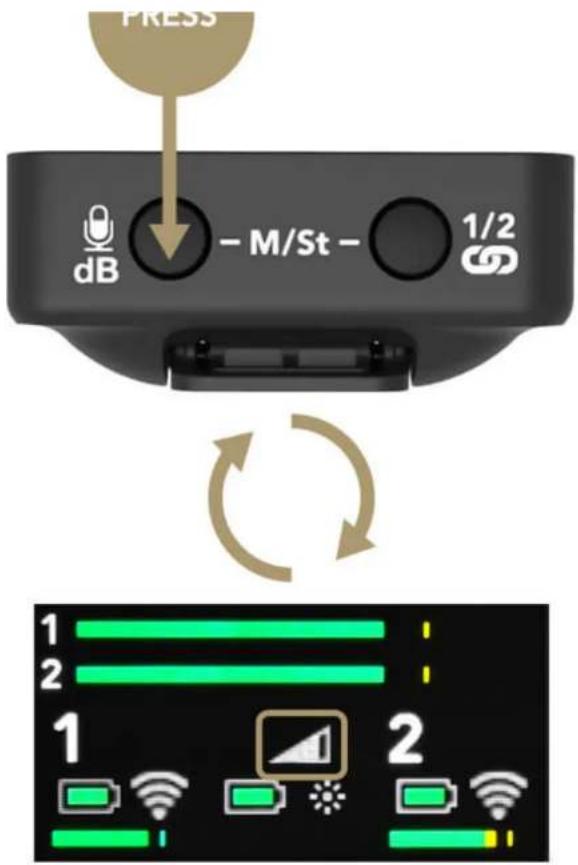
The gain control is found on the receiver. This is a three-stage pad that cuts your output level in 12dB increments. A single click of the gain control button will allow you to select between high (0dB), medium (-12dB), and low (-24dB) gain settings. The level icon in the middle of the screen indicates which gain setting is selected. An additional fine gain control mode can also be enabled in the R∅DE Central app. See below for more information.
Note that the gain control only affects the 3.5mm output of the Wireless GO II, not the digital USB-C output. If you are using the Wireless GO II with a smartphone or computer and need to adjust your gain, do so in your recording software or app.
It's also possible to have more granular control over the gain level, as well as to select a gain preset based on a wide variety of popular camera manufacturers and models. For more information on these features, visit the user guide for Using R∅DE Central with Wireless GO II.
text_image
PRESS dB - M/St - 1/2 1 2 1 2Pro Tip
To get the cleanest signal when you record, it is recommended that you set the gain on your camera as low as possible, then use the gain control on the Wireless GO II to boost your signal if required. Cameras generally have poor-quality, noisy preamps that are quite sensitive, so it's best to not rely on them to achieve good recording levels.
Battery Life and Power Saver Mode
Backlight Control/Power Saver Mode
To conserve battery life, you can activate power saver mode on the receiver. When enabled, this will turn the LED backlight off after 10 seconds of inactivity.
To turn power saver mode off, single-click the power button. The backlight will now always stay on. The small sun icon indicates if power saver mode is engaged or not (full = disengaged).
Battery and Charging
The Wireless GO II's transmitters and receiver each have an in-built lithium-ion battery that can last up to seven hours. When the battery is low on a transmitter, the battery LED will start flashing. When it is very low, it will flash faster.
There are also battery level icons for each unit on the receiver screen. When the battery is fully charged, it will display a green outline. When the battery level is very low, it will turn red. The Wireless GO II can be recharged using the supplied USB cables. When charging, the battery LED on the transmitters will flash and the battery level icon on the receiver will display a lightning bolt. You can still use the Wireless GO II while it's charging.
Wireless GO II / USER GUIDE & SUPPORT
text_image
PRESS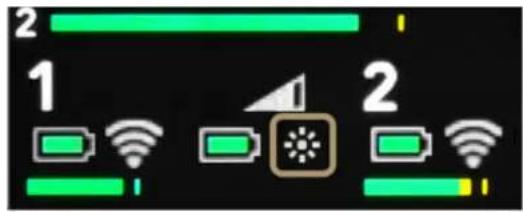
text_image
2 1 2
text_image
1 2 1 2Using the Windshields
Each transmitter features a high-quality in-built omnidirectional condenser capsule. These are sensitive microphones that are designed to pick up sound from all around in great detail.
When recording outdoors or in windy environments, it's recommended you use the supplied furry windshields to help protect the capsules and reduce any wind or background noise in your recording.
The Wireless GO II comes with three furry windshields. These have been completely redesigned to ensure an extremely strong connection and will not fall off your transmitters, even with vigorous use.
To attach them securely, align the two white dots on the windshield with the black dots on the receiver, then push the windshield down and twist to lock it in place. Reverse the process to remove them.
Wireless GO II / USER GUIDE & SUPPORT

natural_image
Two smiling young people posing for a selfie outdoors with rocky coastline and sky in background (no text or symbols visible)R∅DE Central
R∅DE Central is an easy-to-use desktop and mobile companion app for the Wireless GO II that allows for complete device configuration anywhere, including:
- Configuring the on-board recording function
- Unlocking advanced features, including the safety channel, fine gain control and more
- Changing the ∅ button function
• Manually powering on and off your units - Running a diagnostic test on battery life, bugs and firmware version
It also allows you to optimise and export the on-board recordings (desktop only), update to the latest firmware (desktop only), and access device information.
Download it for free to unlock the full potential of your Wireless GO II.
Note: OS Requirements – MacOS 10.15 or later; Windows 10 Version 1803 or later; iOS 14 or later; Android 9.0 or later.
Download Now
Wireless GO II / USER GUIDE & SUPPORT
natural_image
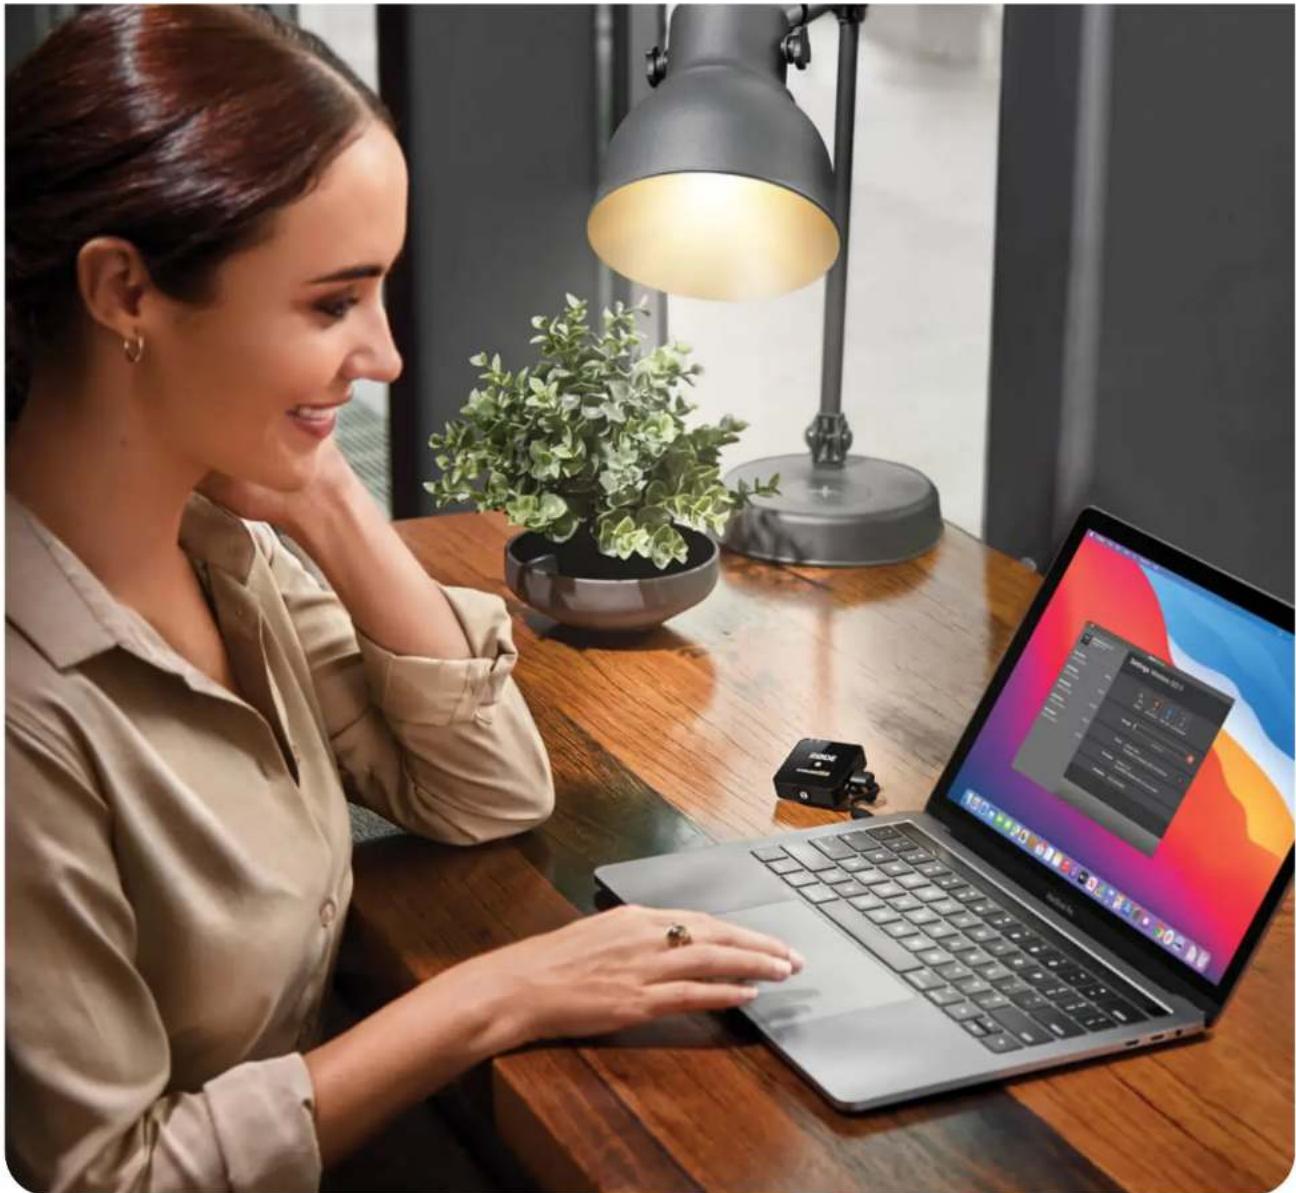
Woman smiling while using a laptop at a wooden desk with a potted plant and lamp in the background (no visible text or symbols)Using the On-Board Recording Function
Each of the Wireless GO II's transmitters has an on-board recording function, with internal memory capable of storing over 40 hours of compressed audio or seven hours of uncompressed audio.
This feature can be activated via R∅DE Central via the 'Record' setting. When activated, a red 'REC' recording icon will appear above the channel that the transmitter is connected to on the receiver.
Configuring the Recording Mode
There are four different on-board recording modes to choose from. These can be selected via R∅DE Central:
'Always' recording mode: When this mode is activated, the transmitter will start recording audio as soon as it is switched on. It will continue recording until it is switched off, regardless of whether it is connected to the receiver. This means that you will have a continuous recording from the moment the transmitter is switched on, making this mode suitable for using the Wireless GO II as a standalone field recorder. Note that in this mode, the 'mute' function will not affect the on-board recording (although it will still mute the wireless transmission). When this is activated, audio can only be recorded in uncompressed format (see below for more info on this).
'Backup' recording mode: When this mode is activated, the transmitter will start recording audio when it connects to the receiver. When the receiver is switched off, the recording will stop. This means that if the signal drops out at any time or if you forget to hit record on your device, you will still have a backup recording for the period that the wireless connection was active.
Wireless GO II / USER GUIDE & SUPPORT
dim. Each time you end a recording, a new recording will be made when you next click the button. To activate this mode, configure the '∅ Button' setting for your transmitter to 'Record' – this automatically enables 'Button' mode recording. When this is activated, audio can only be recorded in uncompressed format (see below for more info on this).
'Off': Switching off the recording function means the transmitter will not record any audio internally. Existing recordings will remain on the unit until manually deleted using R∅DE Central.
text_image
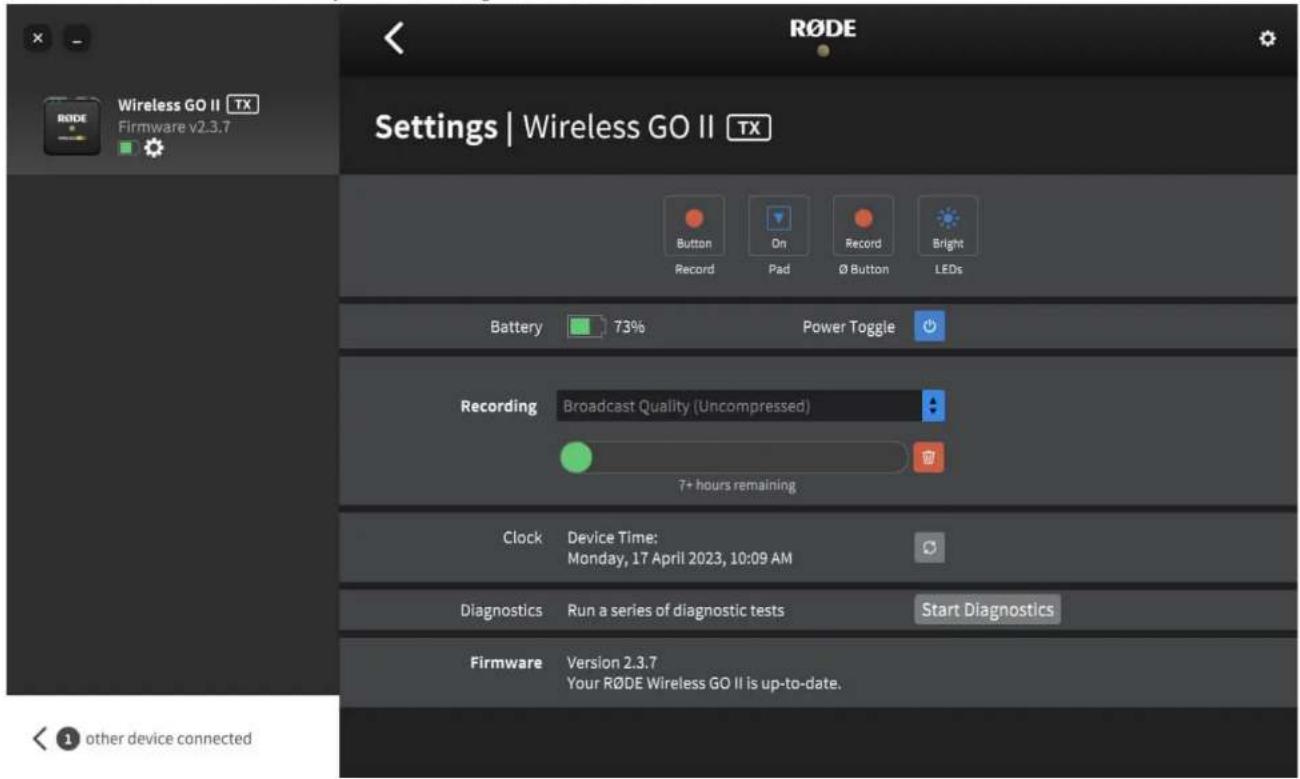
RODE Wireless GO II TX Firmware v2.3.7 Settings | Wireless GO II TX Button Record On Pad Record Ø Button Bright LEDs Battery 73% Power Toggle Recording Broadcast Quality (Uncompressed) 7+ hours remaining Clock Device Time: Monday, 17 April 2023, 10:09 AM Diagnostics Run a series of diagnostic tests Start Diagnostics Firmware Version 2.3.7 Your RODE Wireless GO II is up-to-date. other device connectedAccessing, Optimising and Exporting Your Recordings
R∅DE Central allows you to access, listen back to, optimise and export all internal recordings from within the software (desktop version only).
To access your recordings, open R∅DE Central, plug in your transmitter(s) and select one from the list of devices. Your recordings will be listed chronologically in the left-hand column from newest to oldest, with the recording time, date, length, and file type displayed.
Click on a recording to get started. A waveform will be displayed with real-time and elapsed recording time on the horizontal axis. This allows you to scrub to the desired time easily. You will also find zoom in/out buttons to adjust your view of the waveform.
There is also a mini-nav bar above the master waveform, which shows all the waveform data as well as any dropouts and user markers in the file (see below for more information on markers). This allows you to quickly jump to a region rather than having to scrub through the whole file, which is particularly handy for longer recordings.
Direct WAV Export
If you record in 'Uncompressed' mode, you can also access your recordings as WAV files when you've connected your Wireless GO II transmitter to your computer, just as you would any other mass storage device or hard drive. The transmitter will show up as a drive on your computer when plugged in via USB – here, you can copy your recordings across to your computer if you need to quickly offload them.
Note: If you want to view any placed markers in your audio files, you'll need to also copy across the WAV file's corresponding EGG file and later import them into Central to view the markers (see 'Importing Files' section below for more details).
Wireless GO II / USER GUIDE & SUPPORT
text_image
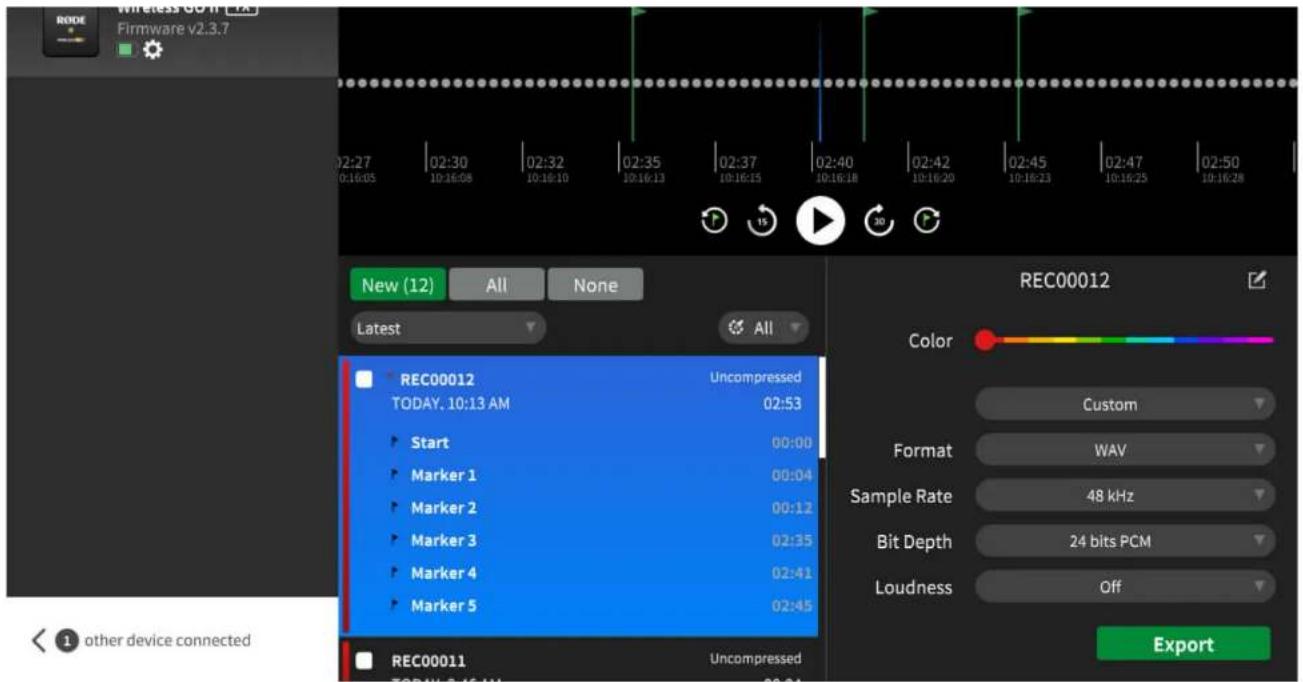
RODE Wireless GO II [FX] Firmware v2.3.7 02:27 01:16:05 02:30 10:16:08 02:32 10:16:10 02:35 10:16:13 02:37 10:16:15 02:40 10:16:18 02:42 10:16:20 02:45 10:16:23 02:47 10:16:25 02:50 10:16:28 New (12) All None Latest All REC00012 TODAY, 10:13 AM Uncompressed 02:53 Start 00:00 Marker 1 00:04 Marker 2 00:12 Marker 3 02:35 Marker 4 02:41 Marker 5 02:45 REC00011 Uncompressed TODAY, 10:13 AM Custom Format WAV Sample Rate 48 kHz Bit Depth 24 bits PCM Loudness Off ExportNested Recordings
If a recording runs over 30 minutes, or if it includes any manually placed markers (see below), it will have a dropdown arrow beside the filename. Clicking this arrow shows you each 30-minute segment as its own 'chapter' and also displays any markers you've manually placed in your recording, allowing you to quickly navigate to, and select sections of your larger file.
Marker Drops
The waveform will display any marker drops in the recording. These signify dropouts (red markers), dropout regions (red sections) and user markers that you have manually dropped (green markers). This is useful for pinpointing exactly what section of audio you need to export.
- Dropouts: If the quality of the wireless signal between a transmitter and the receiver falls below the acceptable range during recording, a marker will be automatically dropped into the internal recording to signify a signal dropout. These are displayed as red flags.
- Dropout Regions: If several dropouts occur within 10 seconds of each other, this will be displayed as a dropout region rather than multiple marker lines clumped together.
- User Markers: You can manually drop a marker in your recording at any time via the receiver or transmitters. This feature can be enabled in R∅DE Central by toggling the power ('∅') button mode to 'Marker' (see below). User markers are displayed as green flags in R∅DE Central. In addition to appearing in the waveform, user markers are indexed in a drop-down menu under each recording. Click a marker to jump to that section of the recording.
- 'Jump-to Marker' Buttons: Navigating to markers in a recording is easy using the 'Jump-to Marker' buttons, which are located next to the play button under the waveform. Simply select what type of marker you want to navigate to (dropouts or user markers), then click the buttons to jump to those markers.
Wireless GO II / USER GUIDE & SUPPORT
text_image
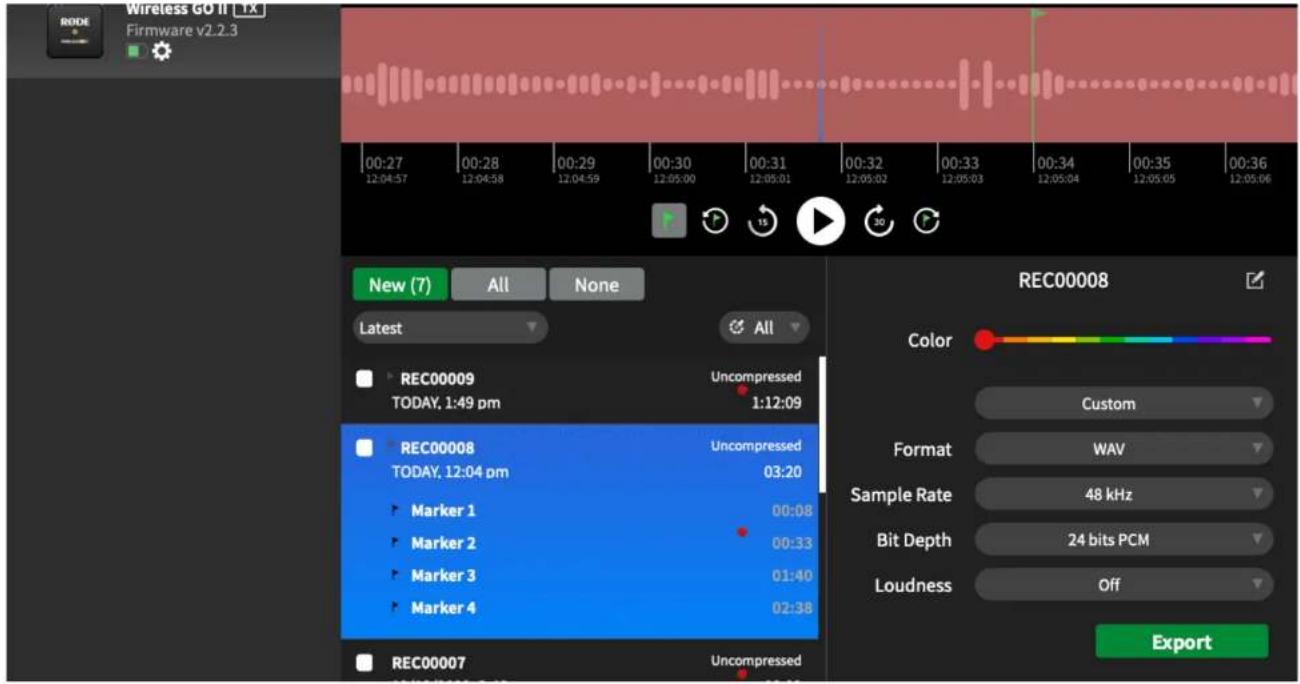
RODE Wireless GO II 1X Firmware v2.2.3 00:27 12:04:57 00:28 12:04:58 00:29 12:04:59 00:30 12:05:00 00:31 12:05:01 00:32 12:05:02 00:33 12:05:03 00:34 12:05:04 00:35 12:05:05 00:36 12:05:06 New (7) All None Latest All REC00009 TODAY, 1:49 pm Uncompressed 1:12:09 REC00008 TODAY, 12:04 pm Uncompressed 03:20 Marker 1 Marker 2 Marker 3 Marker 4 00:08 00:33 01:40 02:38 REC00007 Uncompressed REC00008 Color Custom Format WAV Sample Rate 48 kHz Bit Depth 24 bits PCM Loudness Off ExportOptimising and Exporting Your Recordings
When a recording is selected in R∅DE Central, an 'Export' button will appear. Clicking the 'Export' button will give you access to a drop-down menu of export options for optimising your audio, including:
- File name
- File type (WAV/MP3)
- Bit rate
- Sample rate
Find out more about the optimisation and export options that R∅DE Central offers.
Batch Export and Export Selection
In addition to being able to export individual recordings, you can export multiple files simultaneously by checking the box next to any recording and clicking 'Export Selection.'
You can also export a specific section of a recording by right-clicking and dragging the selection tool anywhere on the waveform to highlight the region you need, then clicking 'Export Selection'. You can also do this in the mini-nav bar.
Deleting Your Recordings
When storage in the transmitter is full, new recordings will begin overwriting the oldest recordings. After a recording session, it's a good idea to export all of your audio then delete the files from the Wireless GO II to ensure you don't lose any audio you haven't saved.
Clicking the transmitter settings cog in R∅DE Central will allow you to see how much storage space you have left and mass delete all recordings on the transmitter.
Wireless GO II / USER GUIDE & SUPPORT
text_image
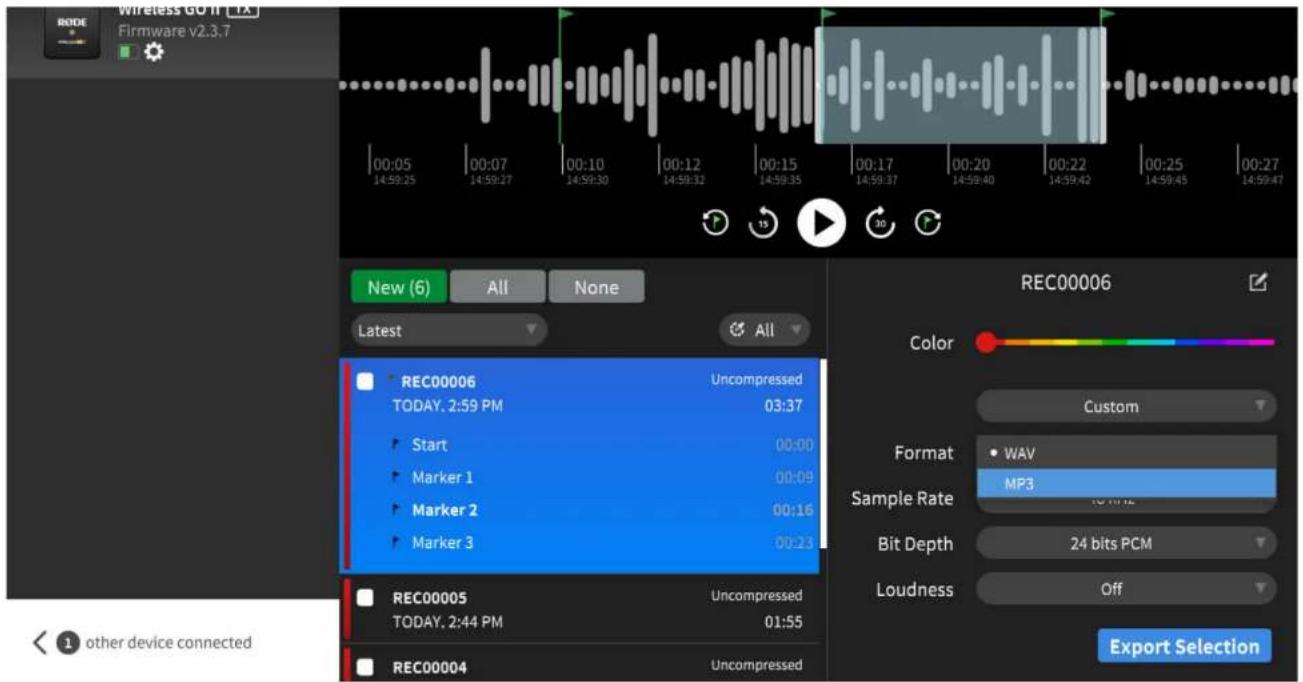
RODE Wireless GO II [1X] Firmware v2.3.7 00:05 14:59:25 00:07 14:59:27 00:10 14:59:30 00:12 14:59:32 00:15 14:59:35 00:17 14:59:37 00:20 14:59:40 00:22 14:59:42 00:25 14:59:45 00:27 14:59:47 New (6) All None Latest All REC00006 TODAY, 2:59 PM Uncompressed 03:37 Start 00:00 Marker 1 00:09 Marker 2 00:16 Marker 3 00:23 REC00005 TODAY, 2:44 PM Uncompressed 01:55 REC00004 Uncompressed REC00006 Color Custom Format WAV MP3 Sample Rate 15 MHz Bit Depth 24 bits PCM Loudness Off Export Selection other device connectedImporting Files
When a Wireless GO II transmitter is plugged into a computer, you can access the on-board files as you would any other external storage device (such as a hard drive). If you recorded in uncompressed quality, you can simply copy the WAV files to your computer, however if you recorded in compressed quality, the files will be in a different format (UGG) and won't be playable until they're exported via R∅DE Central. However, if you want to quickly offload your files, you can copy them onto your computer and import them into R∅DE Central at a later stage in order to manage, select and export your audio into the format you wish, without the transmitter connected.
To do so, create a new folder on your computer and select both the EGG and UGG/WAV files corresponding to the recording(s) you wish to import later, copying them from your transmitter to your new folder. For instance, copy both "PEA00008.EGG" and "REC00008.UGG" if you wish to import "REC0008" later on.
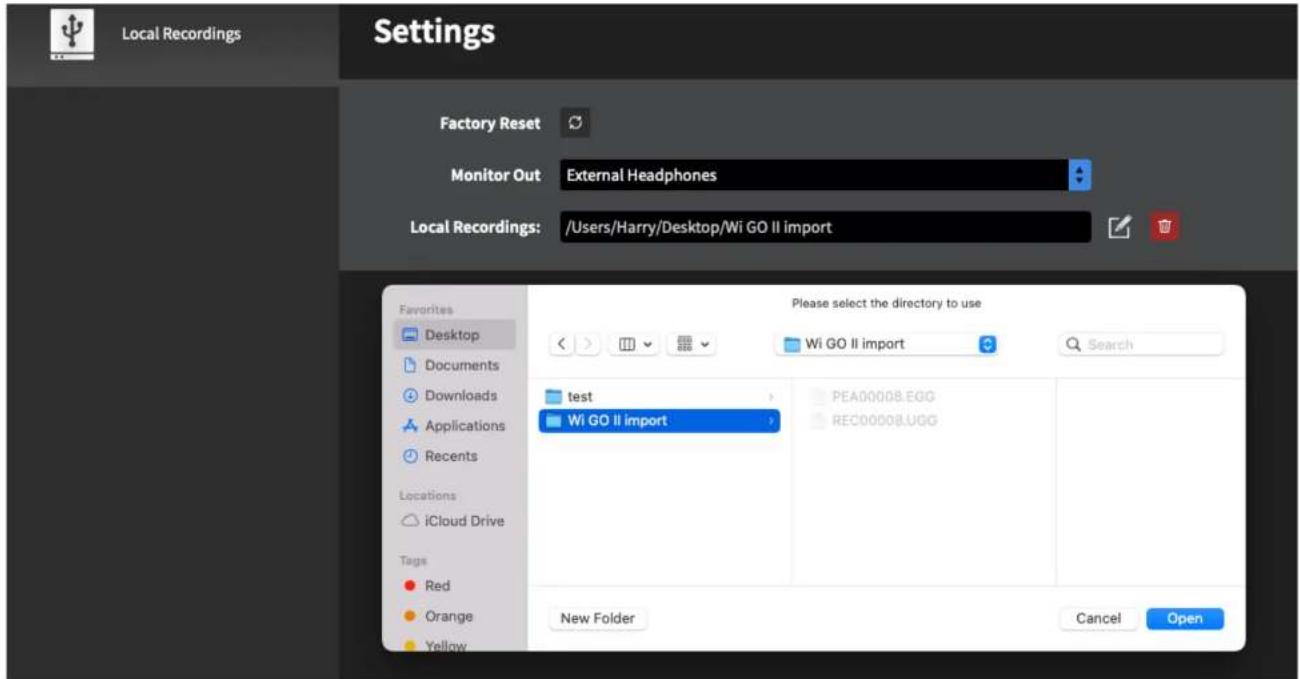
To import these files, open R∅DE Central (desktop), click the settings cog in the top right corner, click the 'Local Recordings' dropdown and select the folder that contains your EGG and UGG/WAV files. You'll see a 'Local Recordings' device show up on the left, and clicking on this allows you to manage, trim and export any recordings in the same way you would if it was a transmitter.
Wireless GO II / USER GUIDE & SUPPORT
text_image
Local Recordings Settings Factory Reset Monitor Out: External Headphones Local Recordings: /Users/Harry/Desktop/Wi GO II import Favorites Desktop Documents Downloads Applications Recents Locations iCloud Drive Tags Red Orange Yellow Please select the directory to use Wi GO II import Test Wi GO II import PEA0000B.EGG REC0000B.UGG New Folder Cancel OpenNaming Recordings
You can rename your recordings in R∅DE Central. Simply double-click a recording title to rename it and press 'Enter'/'Return' to confirm. This file name will be retained after being exported, making them easier to manage. This also provides a clear indication of which recordings are new each time you connect a transmitter (as these will be unnamed).
Note: Recording file names are stored in R∅DE Central, not on the transmitters, meaning that if you plug your Wireless GO II into a different computer, saved file names will not appear.

text_image
RODE Wireless GO II TX Firmware v2.2.3 New (7) All None Latest All Wireless GO II Uncompressed TODAY, 1:49 pm 1:12:09 REC00008 Uncompressed TODAY, 12:04 pm 03:20 REC00007 Uncompressed 19/12/2022, 3:46 pm 00:09 REC00006 Uncompressed 19/12/2022, 3:46 pm 00:11 REC00005 Uncompressed 19/12/2022, 3:46 pm 00:08 REC00009 Color Custom Format WAV Sample Rate 48 kHz Bit Depth 24 bits PCM Loudness Off ExportCompressed and Uncompressed Audio
Compressed recording: In this mode, the Wireless GO II transmitter records audio in a compressed format. Each transmitter can store over 40 hours of compressed audio. Note this is higher than the 24+ hours stated when the Wireless GO II was launched – our engineers have been able to optimise the storage capability through firmware updates (ensure you have the latest firmware version installed via R∅DE Central). This setting is only available when 'Backup Recording' mode is selected.
Uncompressed recording: In this mode, the Wireless GO II transmitter unit records in uncompressed WAV format, and currently utilises a 48KHz, 24-bit audio stream. In this mode, the unit can store around seven hours of audio. This is the only mode available when using the 'Always' and 'Button' recording modes. If you record in this format, your audio files are accessible as WAV files when plugging your transmitter into a computer, just as you would use any other USB drive or hard drive.
text_image
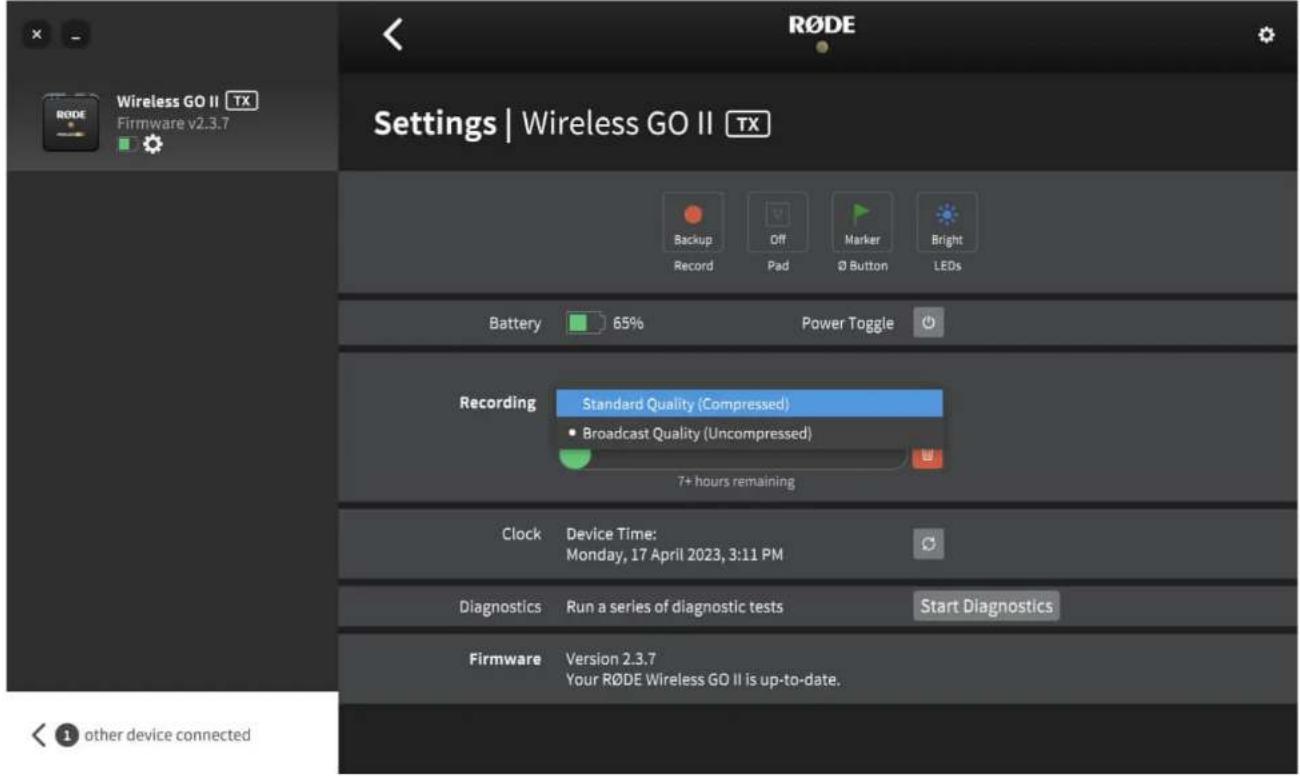
RODE Wireless GO II TX Firmware v2.3.7 Settings | Wireless GO II TX Backup Record Off Pad Marker Ø Button Bright LEDs Battery 65% Power Toggle Recording Standard Quality (Compressed) • Broadcast Quality (Uncompressed) 7+ hours remaining Clock Device Time: Monday, 17 April 2023, 3:11 PM Diagnostics Run a series of diagnostic tests Start Diagnostics Firmware Version 2.3.7 Your RODE Wireless GO II is up-to-date. other device connectedSafety Channel
R∅DE Central allows you to activate the Wireless GO II's safety channel. This is a handy feature that is also found on the VideoMic NTG and VideoMic Pro+.
The safety channel can only be activated in 'Merged' recording mode (when the transmitter channels are being combined into a single summed output). These recordings contain two channels of identical audio. However, enabling the safety channel will reduce the volume of one channel by 20dB.
This is a lifesaver in recording situations where your sound source suddenly gets louder and overloads the input of your recording device, causing distortion. This cannot be fixed in post-production and can effectively ruin your recording. Having a second channel recorded at 20dB lower than the main channel – and thus most likely not loud enough to cause distortion – means you will always have a safe backup of your audio.
To find out how to access the safety channel audio, check out this blog post on 'How To Record Two Microphones Into Your Camera', as many of the same principles can be applied.
Fine Gain Control
R∅DE Central gives you access to an additional fine gain control. Activating this on the Wireless GO II receiver will expand the three-stage pad to a 10-stage pad, going from 0dB to -30dB in 3dB increments. This allows you to precisely tailor your Wireless GO II's output to your recording device. It also gives you access to an extra 6dB of gain reduction, which is handy if you have a particularly sensitive recording device.
Wireless GO II / USER GUIDE & SUPPORT
text_image
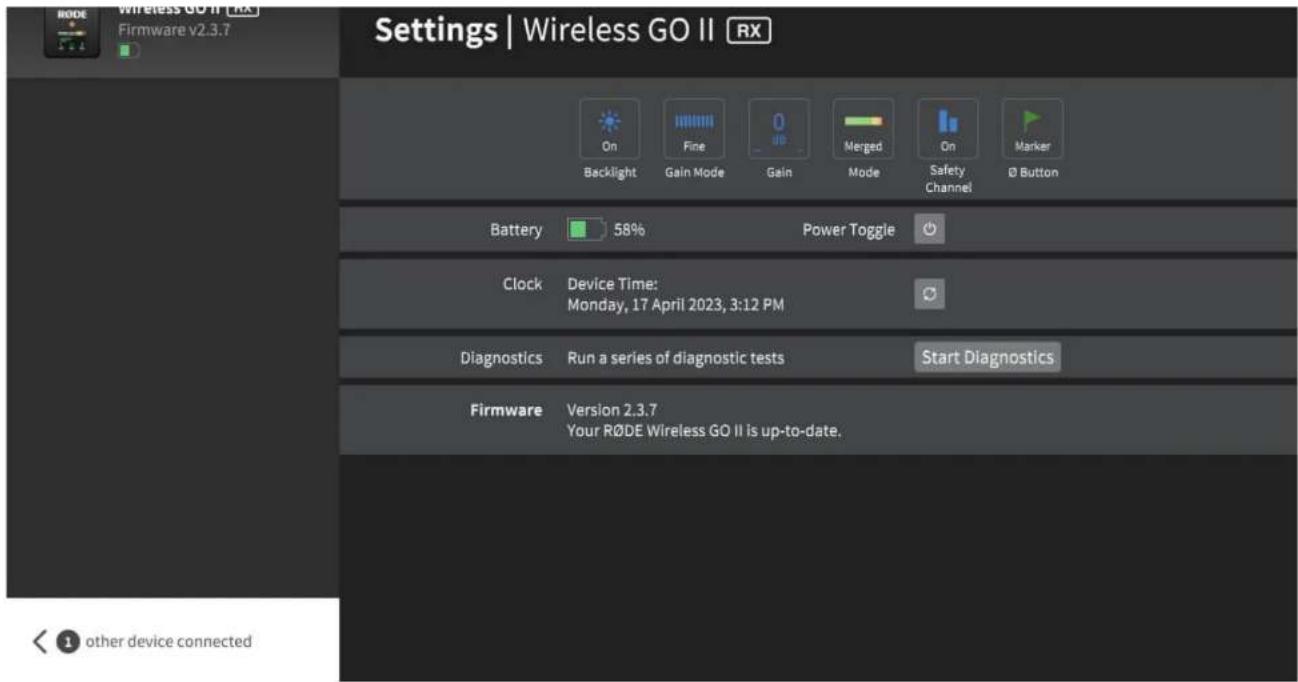
Settings | Wireless GO II RX RODE Wireless GO II [RX] Firmware v2.3.7 Backlight Gain Mode Gain Mode Safety Channel Marker Battery 58% Power Toggle Clock Device Time: Monday, 17 April 2023, 3:12 PM Diagnostics Run a series of diagnostic tests Start Diagnostics Firmware Version 2.3.7 Your RODE Wireless GO II is up-to-date. other device connectedCamera Presets
R∅DE Central features a large number of presets based on popular cameras. These presets automatically set the gain levels of your Wireless GO II to best match the audio levels and settings of the camera you're using it with, and we've also created guides to help you set up the audio settings on your camera.
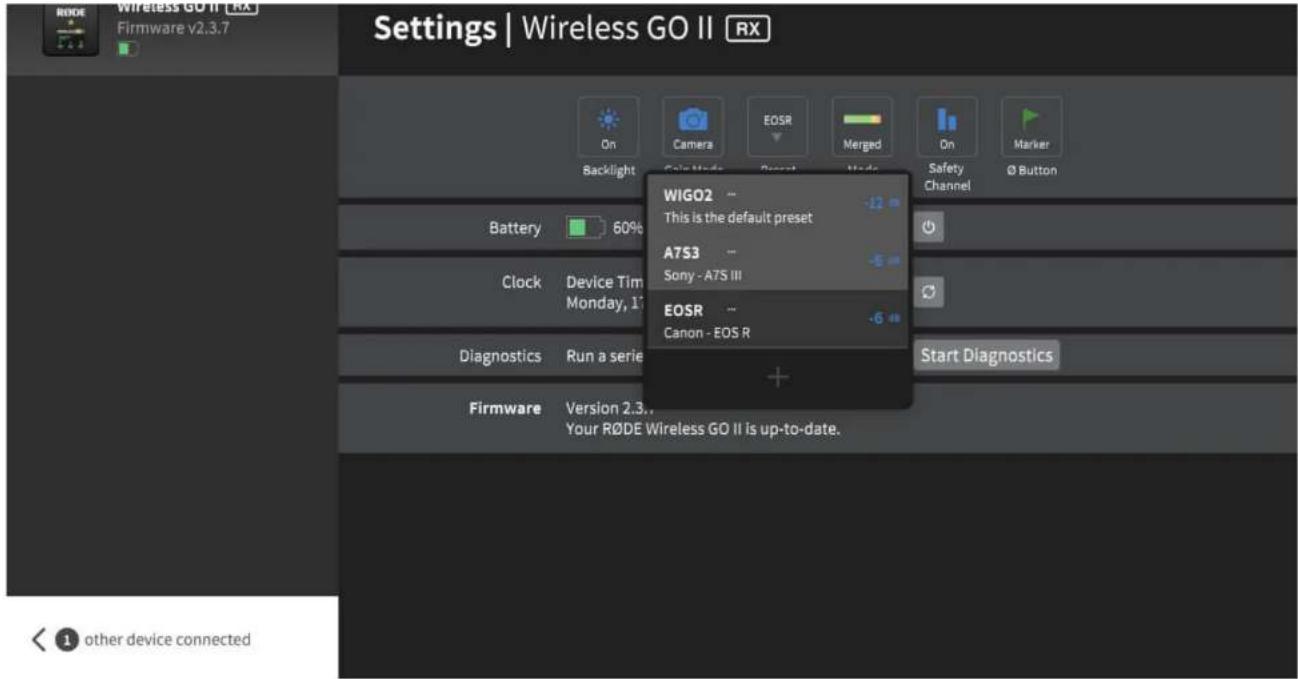
To access these presets, connect your Wireless GO II receiver to your computer and open R∅DE Central (desktop). Click 'Gain Mode' to cycle through the options until 'Camera' is selected. Now you can click 'Preset', click the '+' button, and select the manufacturer and model of camera you're using.
On the next screen, you'll find a link to a guide on setting up your camera's audio settings. Once you've followed these instructions, click 'Add' to load the preset onto your Wireless GO II. Repeat the process to add other presets for any other cameras you'll be using with your Wireless GO II.
Selecting a Preset on Your Receiver
With your camera presets loaded onto your Wireless GO II, you can cycle through them all by pressing the gain control/mute button on your receiver.
Along with any camera and custom presets you've loaded, there will also be a 'WIGO2' option that acts as a default preset. The gain level of this preset can be adjusted within the R∅DE Central desktop app by clicking the three dots next to 'WIGO2' in the preset list.
You can toggle between camera preset mode, coarse gain mode and fine gain mode in both R∅DE Central mobile and desktop apps, so if you're on the go and want granular control over your Wireless GO II gain level, simply plug the receiver into your phone and use the R∅DE Central mobile app to toggle gain modes.
Wireless GO II / USER GUIDE & SUPPORT
text_image
Settings | Wireless GO II RX RODE Wireless GO II [RX] Firmware v2.3.7 Backlight Camera EOSR Merged On Marker Safety Channel Ø Button Battery 60% Device Tim Monday, 17 Clock Diagnostics Run a series WIGO2 -- This is the default preset -12 A7S3 -- Sony - A7S III EOSR -- Canon - EOS R Start Diagnostics Firmware Version 2.3... Your RODE Wireless GO II is up-to-date. other device connectedPro Tip
You can also create your own presets by selecting 'Custom' from the list of manufacturers. Here, you'll be able to give your preset a label (that will show up on your Wireless GO II receiver display), set its gain level, and give it a description for easy selection within R∅DE Central.
Low Sensitivity Mode
Sometimes it may be necessary to reduce the sensitivity of the Wireless GO II's in-built microphone or external microphone, so we have included the option to activate a pad for the input of the transmitters.
To activate the pad, simply toggle the 'Pad' button in R∅DE Central. You can also activate the pad from the receiver by selecting the transmitter using the pair button ('∞'), followed by a long press on the 'dB' button.
Note: a short press will activate the mute function, so take care to hold the button until the pad symbol appears on the receiver display.
This feature is particularly useful when using the transmitter with the Interview GO handheld adapter, where it may be used very close to the mouth. The pad function also affects the 3.5mm microphone input if you are using an external lavalier.
LED Brightness
You can reduce the brightness of the LEDs on the transmitter via R∅DE Central. Connect the transmitter to your computer and open R∅DE Central. Select the transmitter, click the settings cog and toggle the 'LEDs' button to switch between 'Bright' and 'Dim' mode.
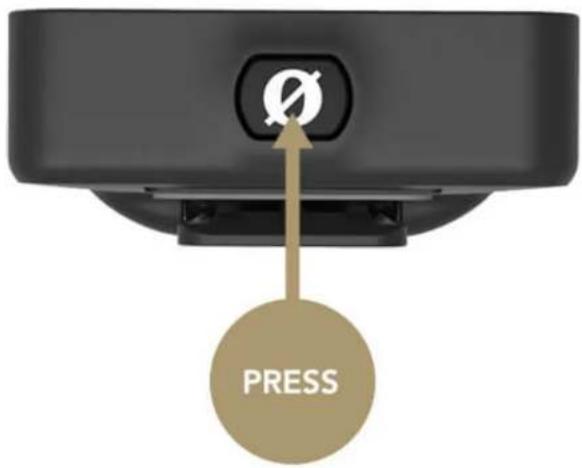
Transmitter Power (∅) Button Mode
You can change the function controlled with a short press on the power ('∅') button on the transmitter via R∅DE Central. There are four options available: 'Mute', 'Marker', 'Record' or 'None'.
In 'Mute' mode, a short press of the button will mute the microphone, and another short press will unmute it. The mute status is displayed on the receiver screen (note that the mute function has no effect on the on-board recording when in 'Always' recording mode).
In 'Marker' mode, a short press on the button will drop a marker into the internal recording, which is useful if you need to locate a specific section of audio in post-production.
In 'Record' mode, tapping on the transmitter's ∅ button will begin the on-board recording, and another press will end the recording (you'll also need to select 'Button Mode' from the 'Record' setting to enable this function).
Wireless GO II / USER GUIDE & SUPPORT
text_image
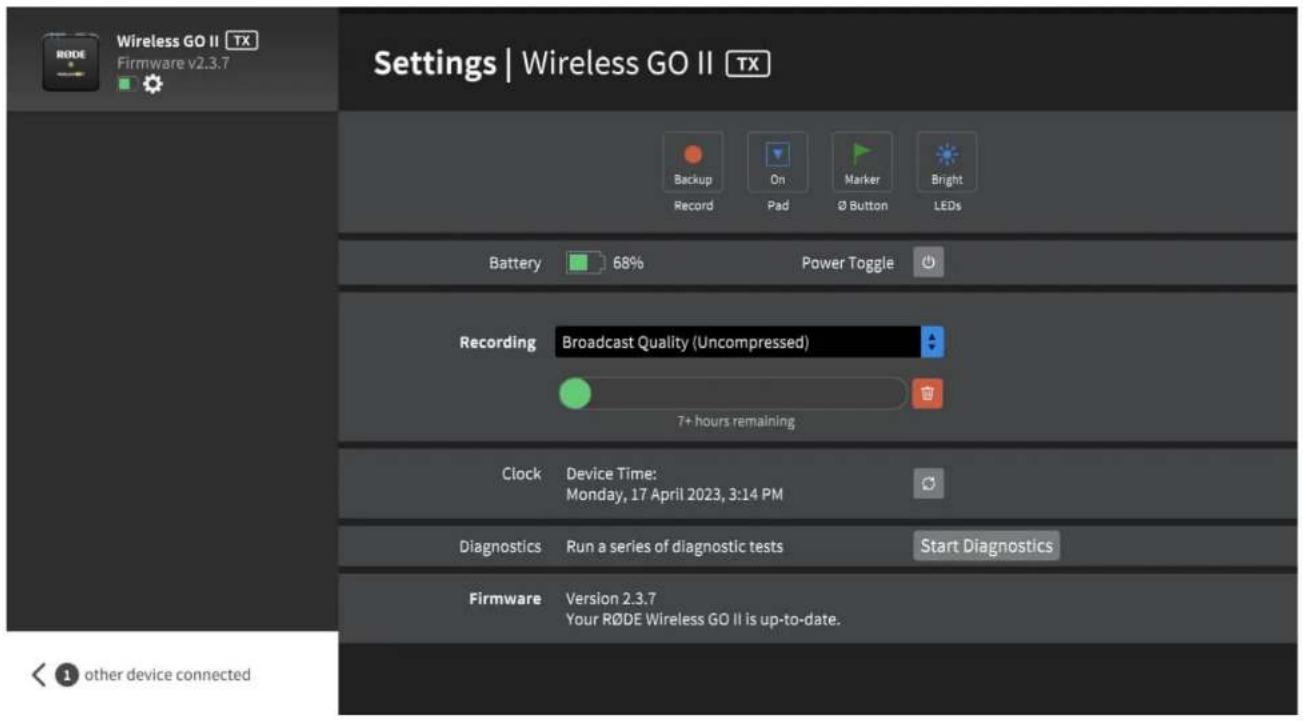
Settings | Wireless GO II TX Wireless GO II TX Firmware v2.3.7 Backup Record On Pad Marker Ø Button Bright LEDs Battery 68% Power Toggle Recording Broadcast Quality (Uncompressed) 7+ hours remaining Clock Device Time: Monday, 17 April 2023, 3:14 PM Diagnostics Run a series of diagnostic tests Start Diagnostics Firmware Version 2.3.7 Your RODE Wireless GO II is up-to-date. other device connectedR∅DE Central Mobile
In addition to the desktop version, R∅DE Central is also available on iOS and Android devices. This allows for on-the-go device configuration for even greater freedom and flexibility.
R∅DE Central Mobile for iOS Devices
Download R∅DE Central Mobile via the App Store or the link below. To use R∅DE Central Mobile on iOS devices, you will need to update your Wireless GO II firmware.
This cannot be done via the mobile app due to iOS limitations. To update your firmware, download the latest R∅DE Central desktop version and plug in your receiver and transmitters.
Note: OS Requirements – iOS 14 or later.

iOS
R∅DE Central Mobile for Android Devices
Download R∅DE Central Mobile via Google Play or the link below.
To use R∅DE Central Mobile on Android devices you will first need to update your Wireless GO II firmware. To update your firmware, download the latest R∅DE Central desktop version, plug in your receiver and transmitters and follow the prompts.
Note: OS Requirements – Android 9.0 or later.

Android
Wireless GO II / USER GUIDE & SUPPORT
text_image
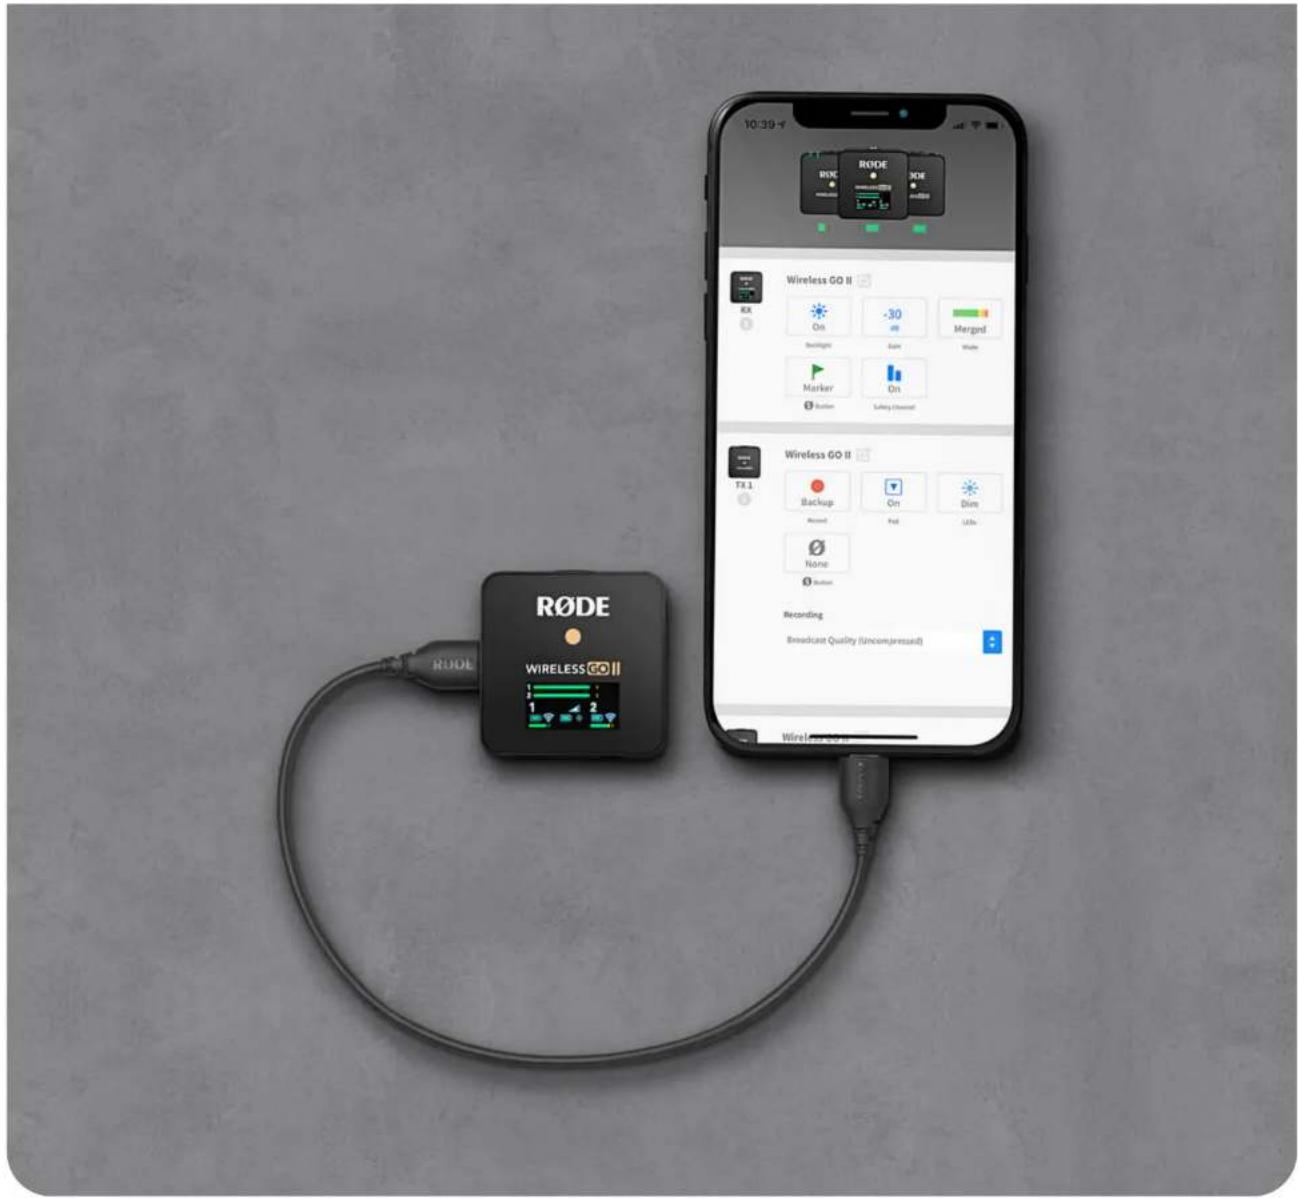
10:39 RODE RODE Wireless GO II RX On -30 Merge Backlight Gain Waste Marker On Rotation Latency (Channel) Wireless GO II TX 1 Backup On Dim Record Red LEDs None Button Recording Broadcast Quality (Uncompressed) RODE WIRELESS GO II 1 2 1Pro Tip
To connect your Wireless GO II to your Lightning-equipped iOS device, you must use a Lightning to USB-C cable like the R∅DE SC15 or SC19.
To connect your Wireless GO II to your Android device (or iPad Pro), you must use a USB-C to USB-C cable like the R∅DE SC16 or SC17.
Charge Case for Wireless GO II
The Charge Case for Wireless GO II is an optional accessory that securely stores and recharges your wireless kit on the road or at home. It can top up the receiver and both transmitters with an extra two full charges, giving you up to 21 hours of use in total, and features an innovative zip-up design to ensure your kit is kept safe and secure when not in use.
Learn More
Mounting and Charging Your Wireless GO II in the Charge Case
Wireless GO II / USER GUIDE & SUPPORT
Once mounted, your Wireless GO II kit will automatically begin charging if its battery isn't full.

natural_image
Black wireless Go modules in a closed pocket, no visible text or symbols on the modules themselves.Charging the Charge Case
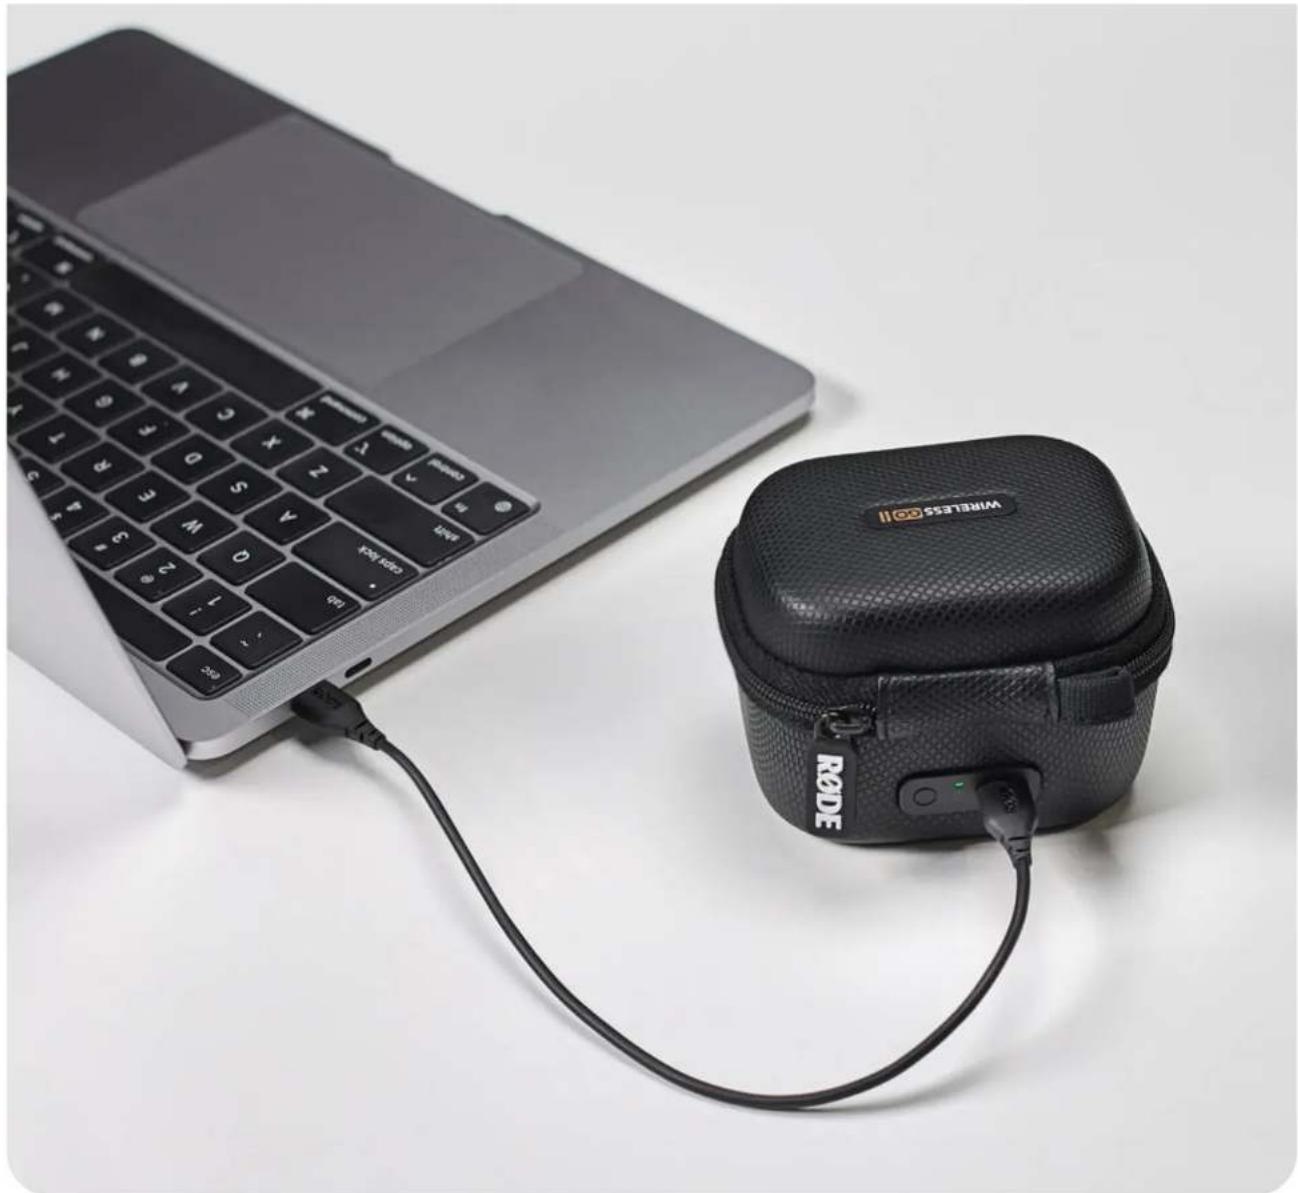
To top up the battery in the Charge Case itself, simply connect one of the USB-C cables included with your Wireless GO II to the USB-C port on the Charge Case, and connect the other end to a power source (5V, 3A maximum) such as your computer, laptop or a high-quality USB charger.
Wireless GO II / USER GUIDE & SUPPORT
natural_image
Laptop connected to a wireless case with a USB cable, no visible text or symbols on the device itself.Understanding the Charge Case Status LED
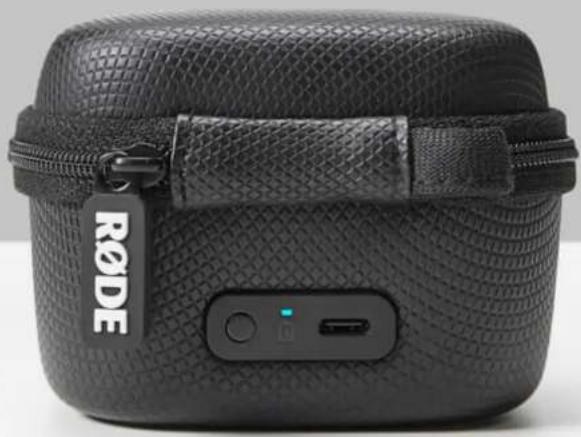
The Charge Case features an indicator LED and a status-check button next to its USB-C port. With your Wireless GO II mounted in the case, the LED will show solid blue while it's actively charging the transmitters and receiver.
To check the battery level of the Charge Case when it isn't connected to power, press the status-check button.
• Solid green = healthy charge
• Solid amber = low charge
• Solid red = very low charge
- Flashing red = critical charge
When the Charge Case is connected to power, this LED will display the case's charging status.
• Solid green = 100% (fully charged)
- Flashing green = 50% - 99%
- Flashing amber = 10% - 50%
- Flashing red = 0% - 10%
Wireless GO II / USER GUIDE & SUPPORT
natural_image
Black textured case with a visible RODE tag and control buttons (no readable text or symbols beyond branding)Products
Microphones
Headphones
Interfaces and Mixers
Accessories
Apps
Apparel
Support
Contact R∅DE
Service Centre
Warranty
Where to Buy
Authorised Dealers
Company
About R∅DE
News and Info
Job Opportunities
Account
Create Account
Subscribe to our latest news and offers
Subscribe
R∅DE

Wireless GO II / USER GUIDE & SUPPORT
© 2024 R∅DE All Rights Reserved.