PCKM 1096 - Food Processor PROFICOOK - Free user manual and instructions
Find the device manual for free PCKM 1096 PROFICOOK in PDF.
| Product type | Food processor |
| Brand | ProfiCook |
| Model | PCKM 1096 |
| Power supply | 220-240 V ~ 50/60 Hz |
| Power | 1500 W |
| Net weight | Approx. 11 kg |
| Protection class | Class I |
| Package contents | Swivel arm with control panel and display, mixing bowl (6 L), protective cover, whisk, mixing hook, 2 kneading hooks |
| Speeds | 6 speeds + pulse function (P) |
| Electronic timer | Up to 20 min 30 s, automatic shut-off |
| Maximum heavy dough capacity | 7.5 kg (max. 4750 g flour) |
| Maximum light dough capacity | 4 L |
| Maximum egg white capacity | Up to 30 eggs |
| Safety | Automatic stop when lifting the arm, overload protection, safety switches |
| Bowl cleaning | Dishwasher safe |
| Accessories cleaning | Hand wash (warm water and dish soap) |
| Motor housing cleaning | Damp cloth, do not immerse |
| Repairability | By a qualified professional; power cord replaceable by manufacturer or service center |
Frequently Asked Questions - PCKM 1096 PROFICOOK
User questions about PCKM 1096 PROFICOOK
0 question about this device. Answer the ones you know or ask your own.
Ask a new question about this device
Download the instructions for your Food Processor in PDF format for free! Find your manual PCKM 1096 - PROFICOOK and take your electronic device back in hand. On this page are published all the documents necessary for the use of your device. PCKM 1096 by PROFICOOK.
USER MANUAL PCKM 1096 PROFICOOK
Thank you for selecting our product. We hope that you will enjoy use of the appliance.
Symbols in this user manual
Important notes for your safety are marked distinctively. Pay absolute attention to them to avoid accidents and damage to the device:

WARNING:
Wards of dangers for your health and indicates potential risks of injury.

CAUTION:
Indicates potential dangers for the device or other objects.

IOTE:
Highlights tips and information for you.
Contents
Overview of the Components 3
General Notes 40
Special safety instructions for this unit 40
Overview of the Components /
Delivery scope 41
Preparation 41
Use Instruction 42
Recommended Recipes. 43
Cleaning 44
Storage 45
Technical Data. 45
Disposal. 45
General Notes
Read the operating instructions carefully before putting the appliance into operation and keep the instructions including the warranty, the receipt and, if possible, the box with the internal packing. If you give this device to other people, please also pass on the operating instructions.
- The appliance is designed exclusively for private use and for the envisaged purpose. This appliance is not fit for commercial use.
- Do not use it outdoors. Keep it away from sources of heat, direct sunlight, humidity (never dip it into any liquid) and sharp edges. Do not use the appliance with wet hands. If the appliance is humid or wet, unplug it immediately.
- The device and the mains lead have to be checked regularly for signs of damage. If damage is found the device must not be used.
- Use only original spare parts.
- In order to ensure your children's safety, please keep all packaging (plastic bags, boxes, polystyrene etc.) out of their reach.

WARNING:
Don't let small children play with foils for danger of suffocation!
Special safety instructions for this unit

WARNING: Risk of injury!
- Before replacement of accessories or additional parts which move during operation, the device must be switched off and cut off from the mains.
- Do not touch moving parts.
- Before switching on, make sure that the accessories attachment has been installed correctly and is seated securely.

WARNING: Risk of injury!
- Always disconnect the appliance from the supply if it is left unattended and before assembling, disassembling or cleaning.
- Do not repair the device by yourself. Please contact authorized personnel. In order to avoid hazards, a damaged mains cable must be replaced with an equivalent cable by the manufacturer, our customer service or any other qualified specialist.
- This appliance shall not be used by children.
- Keep the appliance and its cord out of reach of children.
Children shall not play with the appliance. - Appliances can be used by persons with reduced physical, sensory or mental capabilities or lack of experience and knowledge if they have been given supervision or instruction concerning use of the appliance in a safe way and if they understand the hazards involved.

CAUTION:
Do not immerse the device into water for cleaning. Please follow the instructions as stipulated in the chapter "Cleaning".
- Do not manipulate safety switches.
- Only process foodstuffs with this appliance.
- Misuse of the appliance for other purposes may cause injury.
Overview of the Components / Delivery scope
1 Swivel arm
A Control panel
2 Display
3 /time按钮
4 Control knob
5 Lowering lever / raising the arm
6 Egg whisk
7 Mixing hook
8a + 8b Kneading hook
9 Mixing bowl
10 Splash guard
Preparation
- Remove the appliance and all included accessories from the box.
- Check that the delivery scope is complete.
- Check the appliance for any transport damage to prevent danger.
NOTE:
If you find transport damage, contact your dealer without delay. A damaged appliance may not be used!
- In order to remove any production residue, clean all accessories before initial use as described under "Cleaning".
Electrical Connection
Ensure that your mains power corresponds with the specifications on the type label.
Use Instruction
- Make sure the control knob is at the "0" position.
- Opening the swivel arm: Press the lever (5) in the direction of the arrow. Manually guide the swivel arm to the top position. When the lever jumps back to the start position, the arm is locked.
- Set the mixing bowl into its holder. Turn the bowl in the direction of the arrow up to the stop (LOCK).
- Now attach the splash guard under the swivel arm: Hold the splash guard with the collar pointing upwards. The filling opening should
be in front of you on the left. Insert the guide projections of the splash guard into the recesses on the bottom of the swivel arm. Turn the splash guard anti-clockwise until it stops.
5a.Insert the egg whisk or the mixing hook: Fit an attachment to the drive shaft. The splint in the attachment fits into the shaft. Gently slide the attachment into the shaft and turn it anticlockwise.
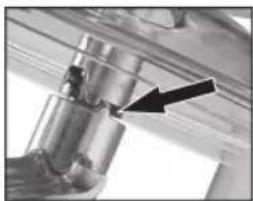
5b. Inserting the kneading hook: Always work with both kneading hooks. Install the kneading hooks in the same way
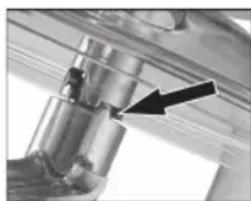
as the other attachments (item 5a). Refer to the picture on the right. The guide projection must engage the recess.
- Fill your ingredients into the bowl.
- Closing the swivel arm: Press the lever (5) in the direction of the arrow and lower the swivel arm at the same time. The lever jumps back to the start position.
- Connect the mains plug to a certified wall socket.
- Use the control knob to turn on the device and then select a speed setting according to the table below.
Table Dough Types and Tools
| Dough Type Tool Setting Amount | Max. oper- ating time | |||
| Heavy dough (e.g. bread or short-crust) | Kneading hook | 1 - 3 | max. 7,5 kg dough max. 4750 g flour (Recommended mixing ratio of flour / water: 5 : 3) | 5 min |
| Medium dough (e.g. cake batter) Mixing hook 1 - 3 | max. 6 litres | 5 min | ||
| Light dough (e.g. waffle or crepes dough, cream, pudding) | Egg whisk | 4 - 6 | min. 200 ml max. 4 litres | 10 min |
| Egg whites | Egg whisk | 6 | 5 - 30 eggs | 10 min |
NOTE:
- The display shows the operating time in "minutes : seconds".
Default in settings = 1 - 3 = 5 minutes, in settings 4 - 6 = 10 minutes.
After the timer has elapsed, the device turns off automatically. "---" appears in the display. - The electronic speed control prevents an overload of the motor. In case of a too high load, the rpm within one speed setting will be reduced automatically.
- Short time operation: With heavy dough do not operate the appliance longer than 5 minutes and leave for 10 minutes to cool down.
- P setting for pulse operation: Briefly activate the highest motor speed setting by holding the control knob at this position.
Pulse operation
WARNING: Risk of injury!
- Always set the control knob to "0" if you want to interrupt operation.
- Disconnect the plug from the mains if you want to change the attachment.
- Wait for the attachment to come to a complete stop!
NOTE:
If you should activate the lever (5) during operation in order to raise the arm, a safety switch turns the motor off. "CLOSE" flashes on the display - the request to close the swivel arm. You may only continue operation once you have set the control knob to "0". The remaining operating time is retained.
Electronic timer function
- Use the and buttons to set the operating time.
- A maximum of 20 minutes and 30 seconds can be set.
-
You can also change the duration during operation with the + and buttons.
-
In case of a short interruption, the countdown is maintained, as long as you do not unplug the device.
- If you want to reset (clear) the set time, keep the and buttons pressed at the same time for 3 seconds.
After the timer has elapsed, the device turns off automatically. "---" appears in the display.
NOTE:
If you wish to continue operation, set the control knob to the "0" position first.
End Operation and Remove Bowl
- Set the control knob to "0" after use. Disconnect the plug from the mains.
- Press the lever (5) in the direction of the arrow. The arm swings upwards.
- Remove the tool.
- Give the bowl a brief turn clockwise to detach it.
- Loosen the dough with a spatula and remove it from the mixing bowl.
- Clean all used components as described in chapter "Cleaning".
Recommended Recipes
Sponge Mixture
(Basic Recipe) Speed setting 1 - 3
Ingredients:
250 g soft butter or margarine, 250 g sugar, 1 sachet vanilla sugar or 1 sachet Citro-Back, 1 pinch of salt, 4 eggs, 500 g wheat flour, 1 sachet baking powder, approx. 1/8-litre milk.
Preparation:
Place wheat flour with the other ingredients in mixing bowl, mix with mixing hook for 30 seconds at speed 1, then approx. 3 minutes at speed 3.
Grease baking tin or lay out with baking paper, fill in dough and bake. Before the cake is removed from the oven, test to see if it is done. With a sharp wooden stick pierce the centre of the cake.
If no mixture sticks to it, the cake is cooked. Turn the cake on to a cake grid and allow to cool.
Conventional Oven:
Slide: 2
Heat: Electric oven: top and bottom heat 175 - 200^ gas oven: setting 2-3
Baking time: 50-60 minutes
You can modify this recipe according to your taste, e.g. with 100 g raisins or 100 g nuts or 100 g grated chocolate. Nothing limits your imagination.
Linseed Rolls Speed setting 1 - 2
Ingredients:
500-550 g wheat flour, 50 g linseed, 3/8-litre water, 1 cube yeast (40 g), 100 g low-fat curd, well drained, 1 teaspoon salt.
For brushing: 2 tablespoons water.
Preparation:
Soak linseed in 1/8-litre lukewarm water. Place the remaining lukewarm water (1/4-litre) in mixing bowl, crumble the yeast into it, add curd and mix well with kneading hook on speed setting 2. The yeast must be completely dissolved. Place flour with the soaked linseed and salt in mixing bowl. Knead on speed 1, then change to speed 2 and knead another 3-5 minutes. Cover dough and prove in a warm place for 45-60 minutes. Knead again, take out of mixing bowl and shape 16 bread rolls from it. Cover baking tray with wet baking pa
per. Place rolls on it, prove for 15 minutes, brush with lukewarm water and bake.
Conventional Oven:
Slide: 2
Heat: Electric oven: top and bottom heat 200 - 220^ (preheat for 5 minutes), Gas oven: setting 2-3
Baking time: 30-40 minutes
Chocolate Cream Speed Setting 5 - 6
Ingredients:
200 ml cream, 150 g semi-sweet chocolate coating, 3 eggs, 50-60 g sugar, 1 pinch of salt, 1 sachet vanilla sugar, 1 tablespoon brandy or rum, chocolate chips.
Preparation:
In the mixing bowl whisk the cream stiff with the eggbeater, remove from the bowl and place in a cold place.
Melt the chocolate coating according to the instructions on the packet or 3 minute in the microwave at 600W . In the mean-time, in the mixing bowl with the eggbeater, whisk eggs, sugar, vanilla sugar, brandy or rum and salt to a foam. Add the molten chocolate coating and evenly fold in at speed setting 5-6. Keep some of the whipped cream for garnishing. Add the remaining cream to the creamy matter and fold in with the pulse function. Garnish chocolate crème and serve well chilled.
Cleaning

WARNING:
- Disconnect from mains power supply before cleaning.
- Do not submerge the appliance into water. This may lead to electric shock or fire.

CAUTION:
- Do not use a wire brush or other abrasive utensils for cleaning.
- Do not use aggressive or abrasive cleaning agents.
Motor Housing
Clean the housing only with a damp cloth and a squirt of washing-up liquid.
Mixing bowl
The mixing bowl is dishwasher-safe. Make sure that excessive cleaning agent (detergent, salt and rinse aid) is not added.
Kneading and mixing attachments

CAUTION:
The attachments are not suitable for dishwasher. Heat and aggressive cleaning agents may warp or discolour the attachments.
- Parts which have come into contact with food can be rinsed out with water.
- Leave the parts to dry properly before reassembling the appliance.
Storage
- Clean the device as indicated.
- We recommend storing the device in its original packaging when not using the device for a longer period of time.
- Store the device at a well-ventilated and dry place out of reach of children.
Technical Data
Model: PC-KM 1096
Power supply: 220-240 V~50/60 Hz
Power consumption: 1500 W
Protection class:
Net weight: approx. 11.00 kg
The right to make technical and design modifications in the course of continuous product development remains reserved.
This device complies with all current CE directives, such as electromagnetic compatibility and low voltage directive and is manufactured according to the latest safety regulations.
Disposal
Meaning of the "Wheelie Bin" Symbol

Take care of our environment, do not dispose of electrical appliances via the household waste.
Dispose of obsolete or defective electrical appliances via municipal collection points.
Please help to avoid potential environmental and health impacts through improper waste disposal.
You contribute to recycling and other forms of utilization of old electric and electronic appliances.
Your municipality provides you with information about collecting points.
Instrukcja obslugi
IopTeHuaJIbHaJ OaCHOCTb IJa yCTpOJCTBa HnI DpyrNX PpeDMeTOB.
IPIIMEUAHNA:
COBETbI INHΦOpMaunr DnBaC.
CopepkaHne
O63op dTeane npnbopa 3
Oboine 3ameuHnra .67
CneunabHbIe HNCTpyKcnn no texnke
6e3oNaCHOCTn DnA 3TOO yCTPOINCTBa .68
O63op detanei npn6opa /
KOMnJIeKT NOCTaBKn 69
IoproToBka K paOte 69
Hnctpykun no nCnojb3oBaHHIO 69
Pekomehdyemblepeuen71
YnCTka. 73
XpaHeHne 73
Texnueckne daHHbIe 73
067ne 3ameuHn
Ipeed hauanom 3Kcnpyaataun npnbopa BnmaTeIbHO npouHTaTE npnilaraemyu INHCTpyKUIO NO 3Kcnpyaataun H COxpaHNTe ee B HaJeXHOM MeCTe, BMeCTe C rapaHTnHBIM TALOHOM, KACCOBbIM YekOM I, NO BO3MOXHOCTN, KAPTOHHOKOPO6KOc ynaKOBouHbIM MaTePnAion. EcnI DaTe KOMy-No6o NOnOB30BaTbcr np6Opom, O6H3ateJIbHO daJte BnpiDaay DaHHU INHCTpyKUIO No 3Kcnpyaataun.
-ПользуITEcBпиборOMTOлькОчаСнБIMOBpa3OMиHAЗHAЧENIO.ПиборHeпр徳HA3HauhenДЯКOMМерчecKOrOHCNoJIb3OBAHIN.
He noIb3yIeTcB npIbOpom nOd OTKpbITbIM HebOM. IpeIOxpaHnIe npIbOp ot Jkapbl, npAmbix COJIHeuHbIX Lyuei, BnaXHoCTN (HN B KOem clyuae He nOrgpJkaIte erO B BodY) u yapOB o6 ocTpbl. He npIkaCaiTeCB K npIbOpuyBaJXhblmPykAm. EcIn npIbOp yBnaJHHncra Hn HaMOK, TyT Jke BbIHbTe BnIKky N3 pO3ETKn.
- Pn6op n Ka6eIb cTeBOrO nHTaHnHa Heo6xO-dmO peYIpH0 o6cIeDObaTb Ha HAIuHne cIeIOB NOBpeKdEHH. Pn O6HapUKeHH NOBpeKdEHH pONb3OBAtbcr Pn6Opom 3a-npeuHETc.
- HcnoB3yTe TOIbKO OpiHnHaJIbHbIe 3aIuaCTN.
- 13 coo6paXeHn 6e30nacHOCTn dny detey He octabJIaIte JExKaTb yNaKOBky (PnaCTNKOBbie MeuKN, KapTOH, NeHONlaCT n T.D.) 6e3 npICMOTpa.
PENEYNPENHENE:
He no3BOJnTe DeTm nIgpaTb C non3TNHeHOBOI nIeHKO. OnachOcTB ydysb!
CpeuaJIbHbIe HnCTpyKcHn PO TexHnke 6e3OnaChOCTn dJa 3TOrO yCTpOiCTBa
PnoIroTOBka K pa6Ote
- N3BnKeKInTe yCTpOoiCTBO n BCE akceccyapbl n3 KOpO6Kn.
- IpoBepbTe NOHOTy KOMNNEKTA NOCTaKN.
- Поберытей устюг STBO Ha haJIuHne KaKx-JIb6 noBpeJdeHn npi TpaHcnpTnpOBKe dIpypeDorBpauSeHn onaChbIX cnTuaun.
I INPIMEUAHNA:
EcnBbI OshapyKnnn NOBpeXdHne, Bbl- 3BaHHoe TpaHCnpTnpOBkoJ, 6paTntEc b KaWemy dInepy HemeJeHNo. NOBpeXdHnHbIM yCTpOcTBOM NOlb30BaTbcr HeNb3r!
- YTO6bI ydaNTb YactnCbI n nbIb, OCTaBUnecr Nocne npOn3BOdCTBeHOro npOcecca, NOUcTHe BCE akCEccyapbl, KaK OINcaHO B pa3JeIe "YInctka".
3neKtpnueckne coeHHeHnA
PpOBepbTe, yTo6bl 3JIeKTPoNTaHne OT cETn COOTBETCTBOBANO CNeUHkauM nacnopTHOITa6NIuKN.
Hnctpykunno nCNoJb30BaHHIO
- Y6eIntecb, yTO peryIaTOp ynpaBHeHnHaXoDITcB NIOJKeHH "0".
- OTHpbITHe OTKnHDoH rOIOBHOJ cAChn: HaKmTe pbUar (5) B HAppaBLeHn CTpeJIkn. BpyHyIO yCTaHOBIne NOBOpOTbI pyKaB B BepxHee noLoXeHne. KOrda pbUar BCTaHET Ha3aI B nycKOBoE noLoXeHne, pyKaB 6yDet 3aФHKcnpOBaH.
- YctaHOBInTe MnCKy DnA CMeUHbAHnB B ee depKateIb. NOBepHInTe MnCKy B HAnpaBneHnn CTpeJIKN Do OCTaHOBKn (LOCK).
- Tenepb yctaHOBNTe 6pb3ROBN IOI NOBOPHTbIM pyKaBOM: YdePKNBaIte 6pb3ROBN TaK, YTO6bl BOpOTnHcOK 6bl HApPaBHeN BBePx. 3aINBHOe OTBepCTne DOJHKHO 6blb HApPoTbB Bac CNEBa. BCTaBte HAppaBJIIOUne BbICTynbl 6pb3ROBNa B yrIy6leHnHa IHe NOBOPOTHOpykAba. NObepHnTe 6pb3ROBN npOTNB acBOB CTpeKn Do ynopa.
5a.BCTaBbTe BEHnK nH KpOyOK IJI R CMeUH BAHN:YcTaHOBnTE HacaIKy Ha npINBOHOB BaI.ΦNKcatOp HacaIK N BCTaBnRETCR B BaI. AKKypaTHo HacaIte HacaIKy Ha BaI n NOBepHnTE ee npOTNB YacOBO CTpeKN.
5b.YCTaHOBka KpOuKa dJa 3ameUHaHH:
Bcerda paobatae c DByMa KpOuKaMn Dnla 3aMeuBaHn. BcTaBbTe KpOuKn Dnla 3aMeuBa-
HnTakm JKe O6pa3OM, KaN dpyrHe HacaI Kn (TeaIb 5a).CMOTpTE Ha pncyHOK cnpaba. HanpaBraIOuN BbICTyn DOJXeH BOITN Byrny6neHne.
- IomeCTnTe INHrpEIneHTbI B MmCKy.
- 3aKpbIthe roJOBHO uactH: HaXMMte pbUar (5) B HappaBHeHn CTpeJIKN I ONDHOpeMeHNO onyCTnte NOBOPOTbI pyKaB. PbUar BCTaHET Ha3aB B NyCKOBoE nOJOKeHne.
8.ПодсоeДиHITE BnIky ceteBOrO shHypa K po-3etke CETN 3JIeKTPoNTaHnY. - C nOMOuBIO peryIaTopa BkIIOUHTe npH6Op, a 3aTeM 3aJaTe CKOpOCTb B COOTBETCTBnC OcNeDyUoSe Tabnuei.
Tbna TnoB TcTa HnctpyMeHToB
(OchOBHO peuNT) YctahOBka CKoPoCTn 1-3
HrpeJeHtbl:
250 r märkoro macna ninn maprapnha, 250 r caxapa, 1 naKeTnK BaHnIbHoro caxapa ninn 1 naKeTnK IIMMOHHoro apomatn3aTopa, 1 uenotka coN, 4 nua, 500 r nneHnHoi Mykn, 1 naKeTnK pa3-pbIXnTeJI, npimepeHO 1/8 nITpa MOJoka.
PnroToBneHHe:
IomeCTnte nIeHnHyIO MyKc C dpyrHMn HHRpeJeHTAMN B DeKy, CMeShaTe C NOMOsbIO KpOuKa DnA CMeUWBaHn Ha npOTaJKeHn 30 cekynd Ha cKOpocTn 1, 3aTeM npImepHO 3 MNHyTbI Ha cKOpocTn 3. CmaXbTe JnPOM oMpMy DnA BblneKn IIn NoCTeNTe 6ymary DnBbICTnHa FOpM, HaleNe Te TcTo n 3aneKaIte. POBepbTe rTOBHOCTb NepeD Tem, KaK BblHyTb 6JIIOo n3 dYxOBKn: pOTKNITE TOPT 3aoCTpeHHoI DepeBHHoI NaOUCoB u cEHtpe. EcIn TcTo He npINNaET K naOChE, TOPT rTOB. IomeCTnte TOPT Ha nOdHoc DnRA BblneKn I NOOJdTe, NOKa OH OCTbHET.
CTaHdapTHaI dYxOBka:
YctaHOBka: 2
HarpeB: 3neKtpnuecka YdyOBka:
BepxHn HnKHN HaPeb
175-200°,ra3OBaIyXOBka:
yctaHOBKn 2-3
BpeMa 3aNeKaHn:50-60MmHyT
Bbl moKeTe n3MeHrTb 3OT peeENT no CBOEmy Bkycu, Hapnimep, doabvB 100 r n3Oma nn 100 r opexOB nn 100 r Teptoro wokola. Hn He orpaHnUBAeBaWe BOo6paJKeHne.
Bnyoukn c
ceMeHaMn IbHa YcTaHOBKa CkOPOCTn 1-2
HrpeJeHtbl:
200-220° (PpeBapntelhbln
HaRpeB 5 MmHyT),Fa3OBA
dYXOBka: yCTaHOBka 2-3
Bpema 3aneKaHn: 30-40 MNHyT
JokolaHbI
Kpem YcTaHOBka ChOpocTH 5-6
HrnpDneHTbI:
200 m n cmetahbl, 150 r noIycaIkoI wokoladHoi rna3ypn, 3 na, 50-60 r caxapa, 1 uenotka coII, 1 naKeTik BaHInbHorO caxapa, 1 cToNobai loKKa KOHbKa Hn poma, WokoladHa CTpyKka.
PnroToBneHne:
B36eTe cMeTaHy B EMKOCTn DnA CMEUBAHnC NOMOuBo BeHuNkA DnA B36uBaHn Ra; ydaIte cMeTaHy n3 EMKOCTn INoCTaBbTee ee B XoIoDHOE MeCTO.
Pactonnte wokoladnyo rna3ypb B COOTBETCTBnC HNCTpyknei Ha ynapokbe nI npodepkab ee 3 MNHyTB MIKPOBOHOBO neyn npn MOUHOCTn 600 Bt. Tem Bpemehem, C NOMOUBo BEHnka DnB36BaHHaRn RnC, B36eTe B EMKOCTN DnA CMeuBaHHra RnCa, caxap, BaHnbHbIcaxap, KOhijk nn pOM, n CoIb, Do NOABLeHnRA nenbl. DObabTe pactOnnEnHyo wokoladhyo rna3ypb n paBHomepho nepemeaTe Ha ckopocTn 5-6. OctabTe HEKOTOpoe KOJIueCTBO B36HTbIX CINBOK dnn yKpaWeHn. DObabTe OCTabuHncr KpeM K nepemEuBaEMo Macce n CMeuaite BCE BmMybcHom peKHeMe. TApHnpyTe wokoladhbK PEm I NoaTe erO K CTONY OXNAKeHHbIM.
UncTka
IPEyPExHHeHNE:
- OToCoeHInHe yCTpoIcTBo OT cEtN pHTaHnpePeOuNCtKoN.
He norgykaite yctpoiCTBO B BODY. 3TO MOKET npNBecTN K npaJxHIO 3JIeKTPnueCKm TOKOM nIIN NOXapy.
BHIMAHHE:
He nCnoIb3yIte MeTaNIIueckyIO uTeKu HnHbIe a6pa3NHBIE KxOHHbIe npHaJdJIeXHOCTn DnI OUcNTKn.
He nCnoJIb3yIte arpeccnBhIe nn a6pa3HBHbIe YNCTaUne cpeIcTBA.
Kohyx DnBraTeTn
KoJyX CneIyET YNCTnTb TOnbKO C NOMOuBIO BnaKHOI TKaHIN, O6abNB HEMHOrO XnIKoCTn DJIaMbITbY IOCyDbI.
Mncka dna CmeunBaHn
MnCKy dIa CMeuBaHnMoKHO MbITb B NocyDOMoeyHoMaunHe.He doabnTe n3nnHnxYnCTaXxCpeDCTB (MOUune CpeDCTBa,COJIbN OOnlaacknBaTeIb).
Hacaikn DJIbB36hBaHHNcMeunBaHHN
BHIMAHNE:
Hacadkn HeIb3a MbItb B nocydomoeyho MaunHe. HarpeB n arpeccnBhble ynctAune CpeDCTBa MoryT deOpMnpoBaT hnn oBeCuBeTHTb Hacadkn.
- DeTaHn yCTpOInCTBa, COpnKacabUneCn C NtueBbIMn PPOyKTAMN, MOxHo IpoONIOCKaTb BOIo.
-ДаиTe DeTajM NOJIHOCbIO BbICOXHyb Nepei TEM,ΚΑΚ COБиpaTb yCTpoIcTBO CHOBA.
XpaHeHne
OuHCTnTe npbOp B COOTBcTcBn C npBe-DeHHbIMN yKa3aHnA M.
- Ecn np6op He nnaHpyetc HcnoIb30BaTb TeueHHn dInTeIbHO BpeMeHN, peKOMeHdy-etc XpaHtB eO B opunHaJIbHO yNaKOBKe.
XpaHnTe npbOp B xopoIo npoBeTpnaemom N cyxOM nOmeuENB He doctyNa deten.
TexHnueckne daHHbIe
MoeIb: PC-KM 1096
3NeKtpoNTaHne: 220-240 B~ 50/60 Hz
Iotppe6nemar MoUHocb: 1500Bt
Klacc 3aunTbI:
Bec HeTo: npM. 11,00 K
CoxpaheNo npaBo Ha texHnueckne N KOHCTpyKuONHbIe n3MeHeHnB pAmkax npoDoJkaHOSeiCra pa3pa6OKn IpOdyKta.
Данhoe yctpoiCTBO COOTBETCTBYET BCEM TEkyuIM dIpeKTHBAM CE, TAKIM KaK 3JIeKTPomarHHTHAR COBMecTUMOCTb Hn3KOE HAnpJKeHne; OHO pON3BeDEHO B COOTBETCTBUN C HOBeiUHMII npaBnAmN TEXHKn 6e3OnaCHOCTN.
#
gall jglll 1
aill ggl l jglll ygi
algol aloljil pcc
ggeill jglall jzj
Jlgl Jglio
aai 1
PC-KM 1096 ..j
60/50-240-220.
1500 .
11,00 1
CE jLg j
Jg j
Jg J
Jg J
Jg J
Jg J
4k + 1 ≤ x_0 < 4
a1s 1g 1 g1 a1 s1 1s1 1s1 1s1 1s1 1s1
a
a1s: puiu g bao allo wao aobai 0iil oia i jiu jiu jie jie jie jie jie jie jie jie jie jie jie jie jie jie jie jie jie jie jie jie jie jie jie jie jie jie jie jie jie jie jie jie jie jie jie jie jie
bi 10
- 2008 all llue g blll cgc Jue zou
2008 and jll (jbi) g iiaia aiai pao
aal lal g cai g
4 = 2
aIgai gaiiaaiiaaiaiaiaiaiaiaiaiaiaiaiaiaiaiaiaiaiaiaiaiaiaiaiaiaiaiaiaiaiaiaiaiaiaiaiaiaiaiaiaiaiaiaiaiaiaiaiaiaiaiaiaiaiaiaiaiaiaiaiaiaiaiaiai
pall 1000000000000000000000000000000000000000000000000000000
:
2
aJrJrJrJrJrJrJrJrJrJrJrJrJrJrJrJrJrJrJrJrJrJrJrJrJrJrJrJr
220-200° aiee
(55
3-2 1e 12e1j1 j
40-30
6-5
4
二
150 200
S 60-50 3
i 1
A( 1,0) .B( -34,34)
:
jie jil jiyll i jao plsiy y jial
S_ OBC = 12 · CO · BC = 12 × CD × 5
C
3 2 1 1
Sswy wlll 600
a 1
1 1
6-5 2
aayssll oolall aayssll no gaa La cai . jy jill
g 10
S = S
:
2
Jrll
200-175 aalll
3-2 12x1j:1j1j j
60-50
aai 1iio aie g iiaagai
100 100 100 100
sii
2-1 aee
:
8/3 50 550-500
( p - 1) ÷ 40 = p
aLolal oAe aal 100
.
claljoljus jlaa:la
:
8/1
(j14/1)
a 1234567890
a 1 1
aall aee aal all jlll 1000
glc 4 gl. bany jzll ylac ly. blal ay
2 1
5-3
60-45 60
16 16
a
cllll 15 sdl j
julil 1ac 1y jtl
i
:
y
.
J 1
i 1
aaglll jg jgl 1
"0" gall lge kill gl baiy p
jlln no nlll jalil .
J
(5) aall 1e biil .
.
.
.
.
.
.
.
.
.
.
.
.
.
.
.
.
.
.
.
a jao ciaag
a
3-1 ciey (a
:
250 250
250
250
250
250
250
250
250
250
250
250
250
250
250
250
250
ojjll 4gill aole jiai.1jay aolal
Jd jdl Jd
aie 1
中
1g 1
laalgl aalll lalaaaall alalal 1alal 1alal 1alal 1alal 1alal 1alal 1alal 1alal 1alal 1alal 1alal 1alal 1alal 1alal 1alal 1alal 1alal
J 1111111111111111111111111111
1 1 1 1 1 1 1 1 1 1 1 1 1 1 1 1 1 1 1 1 1 1 1 1 1 1 1 1 1 1 1 1 1 1 1 1 1 1 1 1 1 1 1 1 1 1 1
a 111 111 111 111 111 111 111 111 111 111 111 111 111 111 1
Jolllj 10000000000000000000000000000000000000000000000000
:
Claal
gaiu joljlii jil 15 jaiy jaiy
i
Laiai aolll clogall oie lc lclg g p
oij Jiaoyi ygrnall no. xio Lc bliann
aill glal gao g dgsy jill laijill
= 23
1 1
4 = 1
a 1
:
Cilogial, gailll gail lla
Lg
- _allol all__or sbi
- 1ule
- 78....joll j1/1i 0
78
77 - 74
74
a slal oeg aolal aolll
!
J 1
a5jai1 jzJy Jaiy
1
-
1


GARANTIEKARTE
warranty card · garantiekaart · carte de garantie · scheda di garanzia · tarjeta de garantia · cartao de garantia · garantiokrt karta gwarancyjna · zaručni list · karta jamstva · carte de garantie · fapañúnoHnKa KapTa · zaručny list · garancijski list · garanciajegy · rapaHTiHnΦOpMynp · fapaHTuHbI tanoH ·
PC-KM 1096
24 Monate Garantie gemäß Garantieerklarung - 24 months warranty according to warranty declaration - 24 maanden garantie volgens garantieverklarung - 24 mois de garantie selon la déclaration de garantie - 24 messi de garancia seconde la dichiarazione di garanzia - 24 meses de garantia de acuero con la declaracion de garantia - 24 meses de garantia, de accordo com a declaracion de garantia - 24 manedes garanti i henhold tel garantibeteingensile - 24 misesge gwarancj na podstawe owiadzenia gwarancjngo - zaruka 24 mescic podle prohlaseni o zaruke - 24 mesecno jamstvo u skladu s jamstvenom declaracionj - 24 luni garantie conform declaratie de garantie - 24 meca rapanuBnB cbotbetme c rapanuHnHaT daeknapaun - 24 meacna zaruka poda vhyaisena o zaruke - 24-mesecnagarcja, skladnoz garancjsko izavo - 24 honap garancia a garanciafeletelekben leirtak szerint - rapanrHa Ha 24 micui BIDNOIOI ZARI npo rapanrIO - rapanrTHN 24 mecua cornacocho 3aRANENHM RApaNTHHM npabnam - 24 24
Kaufdatum, Handlsterpmel, Unterschied - date of purchase, dealer stamp, signature - aankoopdatum, dealerstempel, handledienning - date d'achat, tampon du concessionaire, signature - data del acquisto, timbre del rvenitori, firma - fecha de compra, selle del distribuidor, fima - data del comra, carmo do distribuidor, assinata - kapdata, forhandlerstempel, signature - data zakupu, piecreet sprzadawy, podis - datum zakupenl, raniziko prodige, podis - datum kupovine, zig trovica, petis - datum d'achitej, tampila fumeterulii, semnaturia - Data na nojmica, licev - Data npogasaiva, Iognac - datum nakuku, pedatraca obchodnirula/ preadjuc, podis - datum nakuku, zig trovica, podis - vasiaras datuma, kereskedi behegyrode, alalar - Data npogabaire, nekatka npogasaiv, ngnc - Data npogoberteniu, liatram npogasaia, Iognuc -
PROFI COOK
www.proficook.de
PROFI COOK®