PA1200RDSU - USB audio radio Monacor - Free user manual and instructions
Find the device manual for free PA1200RDSU Monacor in PDF.
| Product type | USB audio player with RDS FM/AM tuner |
| Brand | Monacor |
| Model | PA1200RDSU |
| Dimensions (W × H × D) | 195 × 40 × 96 mm |
| Weight | 260 g |
| Power supply | 17 V DC, 250 mA via PA amplifier or companion device |
| Frequency ranges | FM: 87.5-108 MHz; AM: 522-1620 kHz |
| Radio memory presets | 24 (3 × 6 FM, 1 × 6 AM) |
| Supported audio formats | MP3, WMA |
| Audio playback functions | Play, pause, stop, next/previous, fast forward/rewind, intro, repeat (track/folder), shuffle, folder selection |
| Radio functions | Auto search, manual tuning, 24 station presets, RDS (station name, PTY, AF), PTY genre selection |
| USB port | Front, for USB flash drive or USB hard drive with own power supply (compatible with SD/SDHC adapter) |
| Volume control | LEVEL potentiometer on front panel |
| Installation | Module to be inserted into compartment of compatible Monacor PA amplifiers |
| Antenna | ANT connector on rear panel for FM/AM antenna (simple antenna provided) |
| HF sensitivity (FM) | 6 dBμV; signal/noise ratio > 60 dB |
| HF sensitivity (AM) | 30 dBμV; signal/noise ratio > 35 dB |
| Distortion (FM) | < 0.5% |
| Maintenance and cleaning | Dry, soft cloth; no chemicals or water |
| Safety | Indoor use, avoid splashes and humidity; allowed temperature 0-40 °C; repair by qualified technician |
| Repairability and spare parts | Repair by specialized technician; no spare parts provided |
| General information | Intended for installers and users; keep the manual; warranty void in case of non-compliant use |
Frequently Asked Questions - PA1200RDSU Monacor
User questions about PA1200RDSU Monacor
0 question about this device. Answer the ones you know or ask your own.
Ask a new question about this device
Download the instructions for your USB audio radio in PDF format for free! Find your manual PA1200RDSU - Monacor and take your electronic device back in hand. On this page are published all the documents necessary for the use of your device. PA1200RDSU by Monacor.
USER MANUAL PA1200RDSU Monacor
FM/AM RDS Radio Module with USB Audio Player

text_image
MONACOR WWW.MONACOR.COM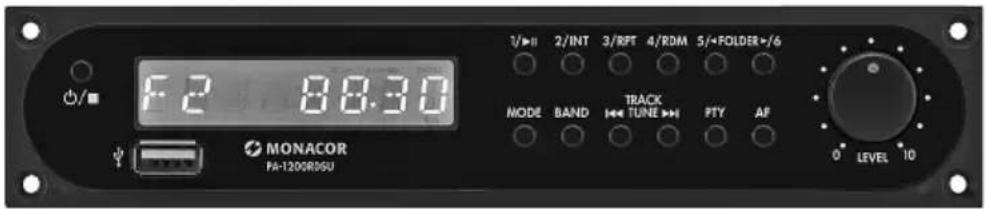
text_image
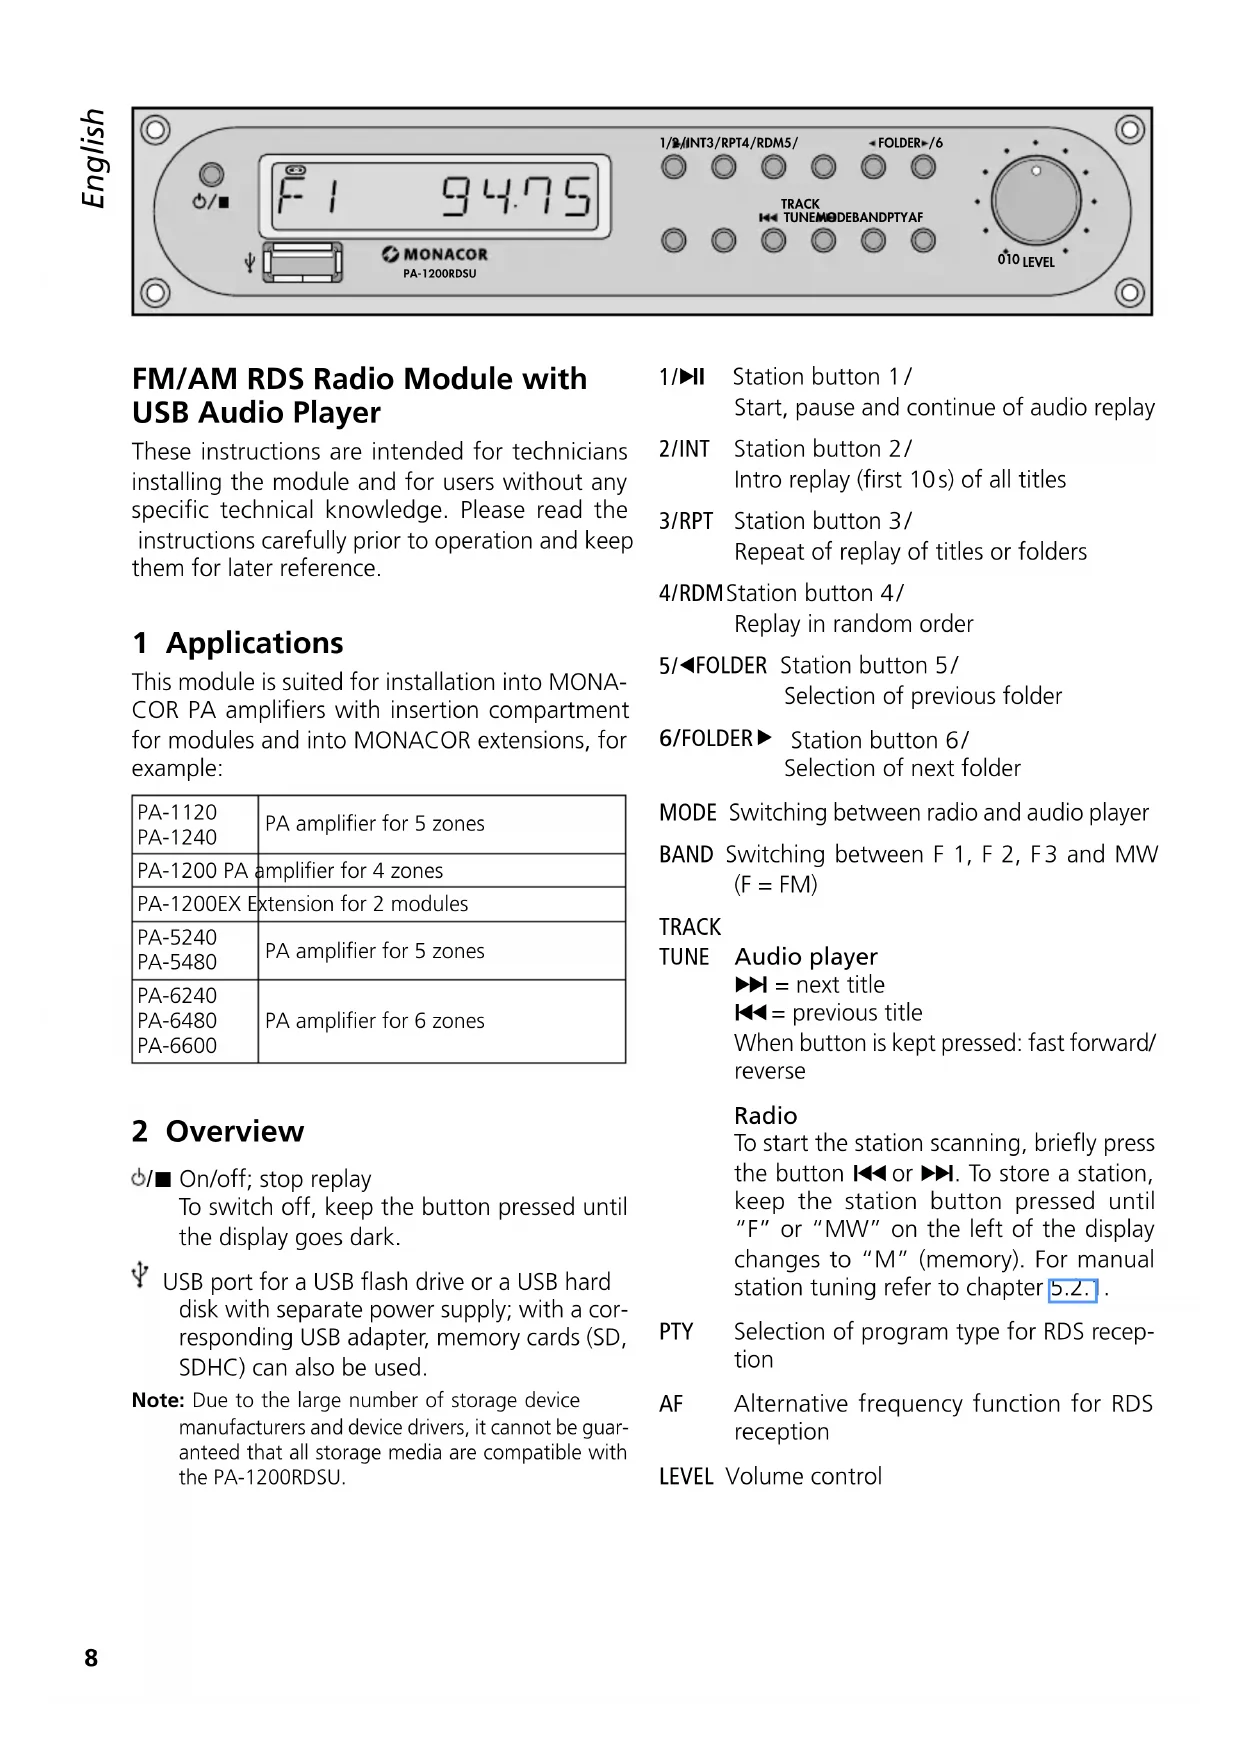
F2 88.30 MONACOR PA-120GRDSU 3/▶ II 2/INT 3/RFF 4/RDM 5/+FOLDER+/6 MODE BAND TRACK TUNE PFTY AF 0 LEVEL 10PA-1200RDSU
FM/AM RDS Radio Module with USB Audio Player
These instructions are intended for technicians installing the module and for users without any specific technical knowledge. Please read the instructions carefully prior to operation and keep them for later reference.
1 Applications
This module is suited for installation into MONACOR PA amplifiers with insertion compartment for modules and into MONACOR extensions, for example:
| PA-1120PA-1240 | PA amplifier for 5 zones |
| PA-1200 PA | amplifier for 4 zones |
| PA-1200EX Extension for 2 modules | |
| PA-5240PA-5480 | PA amplifier for 5 zones |
| PA-6240PA-6480PA-6600 | PA amplifier for 6 zones |
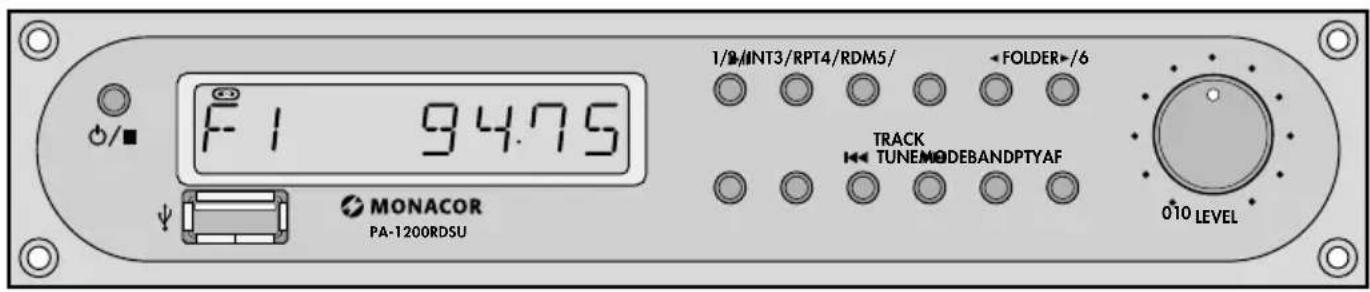
2 Overview
☑/■ On/off; stop replay To switch off, keep the button pressed until the display goes dark.
USB port for a USB flash drive or a USB hard disk with separate power supply; with a corresponding USB adapter, memory cards (SD, SDHC) can also be used.
Note: Due to the large number of storage device manufacturers and device drivers, it cannot be guaranteed that all storage media are compatible with the PA-1200RDSU.
1/▶II Station button 1/ Start, pause and continue of audio replay
2/INT Station button 2/ Intro replay (first 10s) of all titles
3/RPT Station button 3/ Repeat of replay of titles or folders
4/RDM Station button 4/ Replay in random order
5/◀FOLDER Station button 5/ Selection of previous folder
6/FOLDER▶ Station button 6/ Selection of next folder
MODE Switching between radio and audio player
BAND Switching between F 1, F 2, F 3 and MW (F = FM)
TRACK
TUNE Audio player ▶▶I = next title ◀◀ = previous title When button is kept pressed: fast forward/ reverse
Radio
To start the station scanning, briefly press the button ◀◀ or ▶▶. To store a station, keep the station button pressed until "F" or "MW" on the left of the display changes to "M" (memory). For manual station tuning refer to chapter 5.2.1.
PTY Selection of program type for RDS reception
AF Alternative frequency function for RDS reception
LEVEL Volume control
3 Safety Notes
The module corresponds to all relevant directives of the EU and is therefore marked with C€
- The module is suitable for indoor use only. Protect it against dripping water, splash water and high air humidity. The admissible ambient temperature range is 0–40°C.
-
Do not operate the unit with the integrated module
-
if the module or the unit is visibly damaged,
- if a defect might have occurred after the unit was dropped or suffered a similar accident,
- if malfunctions occur.
In any case the module or the complete unit must be repaired by skilled personnel.
- For cleaning only use a dry, soft cloth; never use water or chemicals.
- No guarantee claims for the module and no liability for any resulting personal damage or material damage will be accepted if the module is used for other purposes than originally intended, if it is not correctly installed or operated, or if it is not repaired in an expert way.

If the module is to be put out of operation definitively, take it to a local recycling plant for a disposal which is not harmful to the environment.
4 Installation of the Module
WARNING

The module must always be installed by experts; otherwise, you will risk an electric shock.
1) Disconnect the unit (PA amplifier / extension) into which the module is to be installed from the power supply and unscrew the cover of its housing.
2) On the front of the amplifier / extension, unscrew the plate covering the insertion compartment. Insert the module into the compartment and screw it on.
3) The 3-pole connection CON IN OUT (at the rear edge) supplies the module with its operating voltage (17 V) and sends the audio signal to the
amplifier. Connect the three-pole line of the amplifier/extension to this connection.
4) For installing the antenna jack provided, remove the cover plate "ANT. Terminal" on the rear of the amplifier / extension. Insert the antenna jack into the opening and screw it on.
text_image
AM GND 300 Ω FM 75 Ω ANT. Terminal (option) ANT5) Connect the line of the inserted antenna jack to the 5-pole connection ANT1 of the module.
6) Close the housing cover of the unit into which the module has been inserted. Connect the reception antenna to the antenna jack. A basic wire antenna is supplied with the module.
When using both an FM antenna and an AM antenna, connect the antennas to the jack ANT via an antenna combiner.
5 Operation
1) Switch on the unit into which the module has been inserted. Use the button ⏻ to switch on the module.
2) Press the button MODE to switch between radio and audio player.
3) Use the control LEVEL to set the desired volume.
4) To switch off, keep the button ⏻/■ pressed until the display goes dark. Alternatively, switch off the unit into which the module has been inserted.
The next time the module is switched on, all functions selected will be activated again.
5.1 Operation of the audio player
To replay MP3 files or WMA files, connect a USB flash drive or a USB hard disk with separate power supply to the USB port. With a corresponding USB adapter, memory cards (SD, SDHC) can also be used.
Note: Due to the large number of storage device manufacturers and device drivers, it cannot be guaranteed that all storage media are compatible with the PA-1200RDSU.

text_image
F1 94.75 MONACOR PA-1200RDSU 1/8/INT3/RPT4/RDM5/ FOLDER+/6 TRACK TUNEMODEBANDPTYAF 010 LEVEL| Button Function | |
| ▶II | To start, pause and continue the replay |
| ⚡/■ | Press briefly to stop the replay.Keep pressed until the display goes dark to switch off. |
| ◀◀ TRACK ▶▶I | Press briefly to go to the next / previous title.Keep pressed for fast forward / reverse (without any sound). |
| ◀FOLDER ▶ | To go to the next / previous folder. |
| INT | INTRO – replay of the first 10 s of the titles* |
| RPT | REPEAT – repeat of replay of the current titleWhen the button is pressed again, the indication REPEAT starts flashing and all titles in the folder will be repeated*. |
| RDM | RANDOM – replay of titles in random order* |
| * To exit a function, press the button once again or press one of the three buttons. | |
5.1.1 Automatic or manual start of replay
The audio player mode is selected. The module or the unit into which the module has been installed is switched off. The next time it is switched on again, the replay will either start automatically or manually by means of the button ▶II.
To switch between automatic and manual start, keep the button ▶II pressed while a title is replayed until the display indicates MANUAL or AUTO.
5.2 Operation of the radio
The radio is able to receive FM and AM stations. Multiple stations can be assigned to the six station buttons (1/ ... /6). Therefore, it is possible to store 3 × 6 FM stations (F1, F2, F3) and 6 AM stations (MW).
5.2.1 Station tuning and storage
1) If AF is indicated at the bottom of the display, press the button AF to switch off this indication.
2) Use the button BAND to select the desired bandwidth (F 1, F 2, F 3, MW).
3) Use the automatic scanning to find a station or tune the station manually:
To start the automatic scanning, briefly press the button TUNE ▶▶I (forward) or ◀◀(reverse). The scanning will stop at the next station. Restart the scanning repeatedly until the desired station is received.
For manual tuning, keep the button TUNE ▶▶ or ◀◀ pressed until the desired reception frequency is roughly reached. Then press the button to increase or reduce the frequency step by step (in the FM band by 0.05 MHz; in the AM band by 9 kHz). After manual tuning, the radio will return to automatic scanning after a few seconds. To prevent this, press the button ◀◀or ▶▶ again before the radio switches over.
4) When the desired station has been found, keep the desired station button (1/.../6) pressed until "F" or "MW" on the left of the display changes to "M" (memory).
5.2.2 Calling up stations which have been stored
1) Use the button BAND to select the bandwidth where the desired station has been stored.
2) Press the corresponding button (1/ ... /6) of the station.
For stereo broadcasts, the symbol 📄 appears on the top left of the display.
5.2.3 RDS reception
If the station selected broadcasts RDS information (Radio Data System), the display will indicate the station name instead of the frequency. Some radio stations provide additional information (e.g. music title, artist) which is displayed alternately with the station name.
Program type (genre)
The button PTY can be used to select a radio station which currently broadcasts music or information of a specific genre from the stations that have been stored. The following genres are available:
| Music Group Word Group | |
| to be selected with station button 1 | |
| POP M Pop musicROCK M Rock music | NEWS NewsAFFAIRS Current affairsINFO Information |
| to be selected with station button 2 | |
| EASY M Easy listening musicLIGHT M Light classical music | SPORT SportsEDUCATE EducationDRAMA Drama |
| to be selected with station button 3 | |
| CLASSICSSeriousclassical musicOTHER M Other music | CULTURE CultureSCIENCE ScienceVARIED Varied |
| to be selected with station button 4 | |
| JAZZ JazzCOUNTRY Country music | WEATHER WeatherFINANCE FinanceCHILDRENChildren'sprograms |
| to be selected with station button 5 | |
| NATION M National musicOLDIES Oldies | SOCIAL Social affairsRELIGION ReligionPHONE IN Phone in |
| to be selected with station button 6 | |
| FOLK M Folk music | TRAVEL TravelLEISURE LeisureDOCUMENT Documentary |
1) Use the button PTY to activate the program type function. This will allow a detailed selection from the music group. The display will indicate a genre from this group. To switch to the word group, press the button PTY once again. The display will indicate a genre from this group. (When the button is pressed for the third time, the program type function will be deactivated.)
2) Press the corresponding station button (repeatedly) to select the desired genre from the group previously selected. Among the radio stations stored, the radio will find a station
which currently broadcasts a program of the genre selected. The display will keep flashing while the search is in progress.
If the radio is unable to find a station of the corresponding genre, the display will briefly indicate the message PTY NONE after a while. The radio will stay tuned to the station most recently selected.
3) To deactivate the program type function and to be able to call up the stored stations with the corresponding station buttons again, press the button PTY once or twice so that the display indicates the station frequency or the station name.
Alternative frequency
Most programs are broadcast on various frequencies. The radio can be set to go automatically to the frequency with the best reception quality. To activate this function, press the button AF (Alternative frequency). The display will indicate AF. If the indication AF keeps flashing, this function is not available.
Note: This function is not required for stationary operation of the radio in a PA system. It is therefore recommended to deactivate this function.
6 Specifications
Reception frequency
FM: 87.5–108 MHz
AM: 522-1620 kHz
Storage locations: ..... 24
FM:....3 × 6
AM: 1 × 6
RF sensitivity; S / N ratio
FM: 6 dBμV; > 60 dB
AM: 30 dBμV; > 35 dB
THD:....< 0.5% (for FM)
DC power supply: ..... 17 V, 250 mA via PA amplifier or via the extension
Dimensions: 195 × 40 × 96 mm
Weight: 260 g
Subject to technical modification.
All rights reserved by MONACOR® INTERNATIONAL GmbH & Co. KG. No part of this instruction manual may be reproduced in any form or by any means for any commercial use.