the Bambino SES450 - Coffee machine SAGE - Free user manual and instructions
Find the device manual for free the Bambino SES450 SAGE in PDF.
| Product type | Espresso coffee machine |
| Brand | Sage |
| Model | the Bambino SES450 |
| Water tank capacity | 1.4 L |
| Heating technology | ThermoJet™, heats in 3 seconds |
| Temperature control | Electronic PID |
| Pre-infusion | Low pressure for even extraction |
| Volumetric control | Preset 1 and 2 cups, programmable |
| Included filter baskets | Single and double wall (1 cup 8-11g, 2 cups 16-19g) |
| Portafilter | Aluminum 54 mm (not dishwasher safe) |
| Steam wand | Articulated, for manual frothing and hot water |
| Functions | Espresso, steam, hot water, auto standby mode |
| Maintenance | Descaling every 60-90 days, regular cleaning |
| Included accessories | Stainless steel milk jug, 54 mm tamper, cleaning tool, water filters |
| Warranty | 2-year limited |
| Usage | Domestic use only |
| Dimensions (approx.) | Compact (height ~30 cm, width ~20 cm, depth ~30 cm) |
Frequently Asked Questions - the Bambino SES450 SAGE
User questions about the Bambino SES450 SAGE
0 question about this device. Answer the ones you know or ask your own.
Ask a new question about this device
Download the instructions for your Coffee machine in PDF format for free! Find your manual the Bambino SES450 - SAGE and take your electronic device back in hand. On this page are published all the documents necessary for the use of your device. the Bambino SES450 by SAGE.
USER MANUAL the Bambino SES450 SAGE
natural_image
Exterior view of a modern coffee machine (no signage or text visible)EN QUICK GUIDE
FR GUIDE RAPIDE
IT GUIDA RAPIDA
PT MANUAL RÁPIDO
DE KURZANLEITUNG
NL SNELSTARTGIDS
ES GUÍA RÁPIDA
2 Sage Recommends Safety First
9 Components
11 Features
11 Assembly
12 Functions
17 Care & Cleaning
20 Troubleshooting
23 Guarantee
SAGE RECOMMENDS SAFETY FIRST
At Sage we are very safety conscious. We design and manufacture consumer products with the safety of you, our valued customer, foremost in mind. In addition, we ask that you exercise a degree of care when using any electrical appliance and adhere to the following precautions.
IMPORTANT SAFEGUARDS
READ ALL INSTRUCTIONS BEFORE USE AND SAVE FOR FUTURE REFERENCE
- A downloadable version of this document is also available at sageappliances.com
- Carefully read all instructions before operating and save for future reference.
- Remove any packaging material and promotional labels or stickers safely before using the appliance for the first time.
- Before using for the first time, please ensure that your electricity supply is the same as shown on the rating label on the underside of the appliance. If you have any concerns, please contact your local electricity company.
- The installation of a residual current safety
switch is recommended to provide additional safety when using all electrical appliances.
Safety switches with a rated operating current not more than 30mA are recommended. Consult an electrician for professional advice.
- To eliminate a choking hazard for young children, discard the protective cover fitted to the power plug safely.
- Position the appliance on a stable, heat resistant, level, dry surface away from the counter edge, and do not operate on or near a heat source such as a hot plate, oven or gas hob.
- Fully unwind the power cord before operating.
-
Do not let the power cord hang over the edge of a counter or table. Do not let the power cord touch hot surfaces or become knotted.
-
Regularly inspect the power cord, plug and actual appliance for any damage. If found to be damaged in any way, immediately cease use of the appliance and return the entire appliance to the nearest authorised Sage Service Centre for examination, replacement or repair.
- Keep the appliance and accessories clean. Follow the cleaning instructions provided in this book. Any procedure not listed in this instruction booklet should be performed at an authorised Sage Service Centre.
- The appliance can be used by children aged 8 or older and persons with reduced physical, sensory or mental capabilities or a lack of experience and knowledge, only if they have been given supervision or instruction concerning use of the appliance in a safe way
and understand the hazards involved.
• Children should not play with the appliance.
- Cleaning of the appliance should not be carried out by children unless they are 8 years or older and under adult supervision.
- The appliance and its cord should be kept out of reach of children aged 8 years and younger.
- Do not use attachments other than those provided with the appliances.
- Do not attempt to operate the appliance by any method other than those described in this booklet.
- Do not move the appliance whilst in operation.
- Never use the appliance without water in the water tank.
- Ensure the portafilter is firmly inserted and secured into the brewing head before using the machine.
- Never remove the portafilter during the brewing operation as the machine is under pressure.
- Do not place anything on top of the appliance.
- Do not touch hot surfaces. Allow the product to cool down before moving or cleaning any parts.
- Heating element surface is subject to residual heat after use.
• Always ensure the appliance is turned OFF, unplugged at the power outlet and has been allowed to cool before cleaning, attempting to move or storing. - The appliance is not intended to be operated by means of an external timer or separate remote-control system.
- The use of attachments not sold or recommended by Sage may cause fire, electric shock or injury.
• Always turn the appliance to the off position, switch off at the power outlet and unplug at the power outlet when the appliance is not in use.
- Any maintenance other than cleaning should be performed by an authorised Sage® service centre.
- Do not use the appliance on a sink drain board.
- Do not operate the appliance if it is in an enclosed space, or within a cupboard.
SPECIFIC INSTRUCTIONS FOR BES450/SES450
- This appliance is recommended for household use only. Do not use this appliance for other than its intended use. Do not use in moving vehicles or boats. Do not use outdoors. Misuse may cause injury.
- If the appliance is to be: - left unattended - cleaned - moved - assembled; or - stored,
always switch Off the espresso machine by simultaneously pressing the 1 CUP and HOT WATER buttons. Unplug from the power outlet.
- Ensure the product is properly assembled before first use.
- Do not use any other liquid apart from cold mains/tap water. We do not recommend the use of highly filtered, de-mineralized or distilled water as this may affect the taste of the coffee and how the espresso machine is designed to function.
- Do not leave the product unattended when in use.
- Do not touch hot surfaces. Allow the product to cool down
before moving or cleaning any parts.
- Use caution when operating the machine, as metal surfaces are liable to get hot during use.

WARNING
To avoid the risk of injury, use caution when descaling, as hot steam may be released. Before descaling, ensure drip tray is inserted. Refer to ‘Care & Cleaning’ for further instructions.
Ensure the portafilter is firmly inserted and secured into the group head before starting the extraction. Never remove the portafilter during the brewing process.

WARNING
To avoid the risk of injury, do not open the brew chamber during the brew process.

WARNING
Do not place portafilter, the tamper or any parts of the appliance in the dishwasher.

WARNING
Do not immerse power cord, power plug or any parts of the appliance or the appliance in water or any other liquid.

WARNING
Misuse may cause injury.
SHORT CORD INSTRUCTIONS
- Your Sage appliance is fitted with a short power cord to reduce personal injury or property damage resulting from pulling, tripping or becoming entangled with a longer cord. Longer detachable power cords or extension cords are available and may be used if care is exercised. If an extension cord is used,
- the marked electrical rating of the cord set, or extension cord should be at least as great as the electrical rating of the appliance,
- the cord should be arranged so that it will not drape over the counter-top or table where it can be pulled on by children or tripped over unintentionally and
- the extension cord must include a 3-prong grounding plug.
NOTICE TO CUSTOMERS REGARDING MEMORY STORAGE
- Please note that in order to better serve our customers, internal memory storage has been embedded into your appliance. This memory storage consists of a small chip to collect certain information about your appliance including the frequency of use of the appliance and the manner in which your appliance is being used. In the event your appliance is returned for service, the information collected from the chip enables us to quickly and efficiently service your appliance.
- The information collected also serves as a valuable resource in developing future appliances to better serve the needs of our consumers. The chip does not collect any information regarding the
individuals who use the product or the household where the product is used. If you have any questions regarding the memory storage chip, please contact us at privacy@sageappliances.com
SPECIFIC INSTRUCTIONS FOR WATER FILTER
- Filter cartridge should be kept out of reach of children.
- Store filter cartridges in a dry place in the original packaging.
- Protect cartridges from heat and direct sunlight.
- Do not use damaged filter cartridges.
- Do not open filter cartridges.
- If you are absent for a prolonged period of time, empty the water tank and replace the cartridge.
The symbol shown indicates that this appliance should not disposed of in normal usehold waste. It could be taken to a al authority wastelection centre signated for this pose or to a dealer providing this service. r more information, ease contact your local council office.

To protect against electric shock, do not merse the power cord, wer plug or appliance water or any other uid.
FOR HOUSEHOLD USE ONLY SAVE THESE INSTRUCTIONS

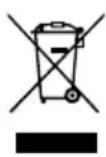
Components
text_image
A B C D E F G HA. 1.4L (47 fl.oz) removable water tank
B. Control panel
1 CUP, 2 CUP, hot water, steam buttons
C. Group head
D. 54mm aluminium portafilter
(WARNING: NOT dishwasher safe)
E. Steam wand grip
F. Steam wand
G. Removable drip tray grid
H. Removable drip tray with full indicator
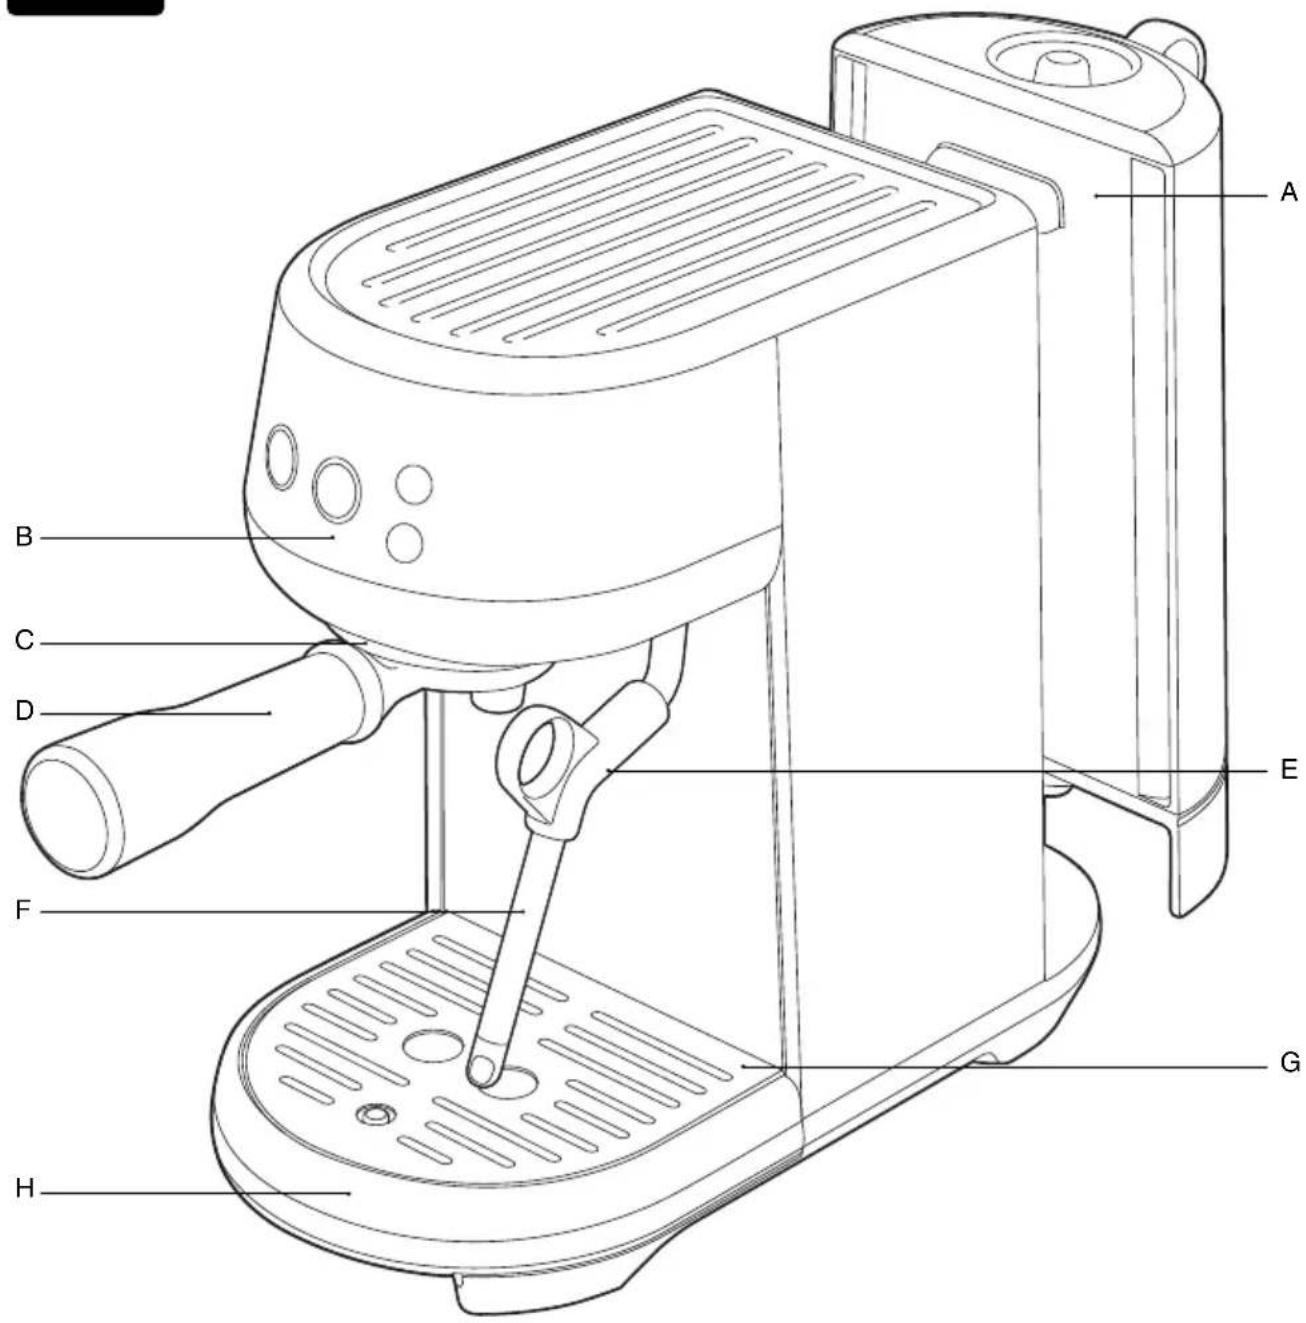
ACCESSORIES
A. Stainless steel milk jug
B. 54 ~mm tamper
(Note: Do not submerge in water or any liquid)
C. Descaling Powder
D. Steam tip and basket cleaning tool
(Located under the water tank)
E. Dual wall filter baskets (1 cup & 2 cup)
F. Single wall filter baskets (1 cup & 2 cup)
G. Water filter holder with filter

Bambino™ Features
COMPACT FOOTPRINT
Cafe quality coffee in a compact machine.
MANUAL MILK TEXTURING
Manually textures milk from silky smooth latté to creamy cappuccino.
THERMOJET™ TECHNOLOGY
Innovative heating system achieves ideal extraction temperature in 3 seconds.
PID TEMPERATURE CONTROL
Electronic PID temperature control for increased temperature stability.
LOW PRESSURE PRE-INFUSION
Applies low water pressure at the start of the extraction to gently expand grinds for an even extraction.
VOLUMETRIC CONTROL
Preset 1 & 2 cup volumes, manual over-ride or programmable shot volumes.
INSTANT HOT WATER
Hot water outlet via the steam wand for making long blacks and pre-heating cups.

Assembly
BEFORE FIRST USE
Machine Preparation
Remove and discard all labels and packaging materials attached to your machine. Ensure you have removed all parts and accessories before discarding the packaging.
Clean the drip tray, drip tray grid, portafilter, filter baskets using warm water and a gentle dish washing liquid. Rinse well and dry thoroughly before use.

INSTALLING THE WATER FILTER
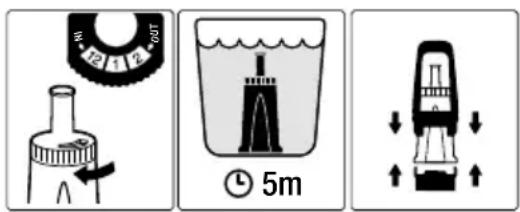
- Remove the water filter and water filter holder from the packaging.
- Set the reminder for the next month of replacement. We recommend to replace the filter after 3 months.
- Soak the filter in cold water for 5 minutes.
- Wash the filter holder with cold water.
- Insert the filter into the two parts of the filter holder. Ensure they are connected.
- Remove the water tank from the machine. Align the base of the filter holder with the adapter inside the water tank. Push down to lock into place.

Functions
FIRST USE
- Remove the water tank and fill it with potable water to the indicated MAX line. Place the water tank back firmly onto the machine.
- Ensure that the drip tray is firmly placed on the machine.
- Place a 500ml container under the portafilter and steam wand for the water drips for this first cycle.
- Plug the power cord into the power outlet, and the 1 Cup button illuminates.

natural_image
Simple line drawing of a sun, two circles, and four small icons (no text or symbols)- Press the 1 Cup button to begin the first use cycle.

NOTE
The first use cycle is to rinse the machine and prime the heating system.
STANDBY MODE
To turn off the operation and enter standby mode, press the 1 Cup and Hot Water buttons for 0.5 second simultaneously.

text_image
Diagram showing two hand gestures with icons and a time label '0.5s' indicating 0.5 seconds
NOTE
Unit will enter 'standby mode' when idle or no interaction from user after 10 minutes.
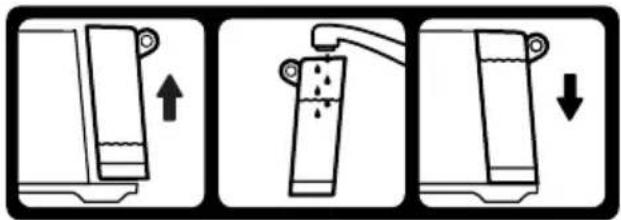
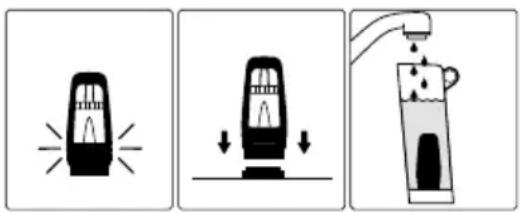
FILLING THE WATER TANK
Lift the water tank from the machine. Remove the water tank lid and add potable water to the water tank, filling to the MAX marking indicated.
text_image
Diagram illustrating three-step water treatment process: adding liquid, pouring into a container with liquid residue, and decreasing it.Replace the water tank onto the machine, press down ensuring it is properly attached and sitting flush against the back of the machine.

NOTE
Machine LED lights will flash 6 times for 3 seconds when no water is detected in the water tank.
FILTER BASKETS
This machine includes both single and dual wall 1 Cup and 2 Cup filter baskets.
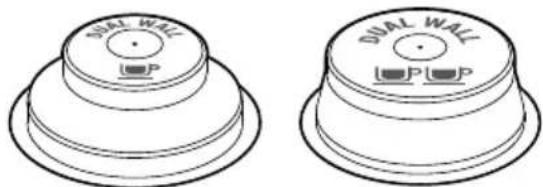
natural_image
Two identical line drawings of a dual-wall appliance with labeled buttons (no text or symbols beyond branding)1 CUP 2 CUP
Use the 1 cup filter basket when brewing a single cup and the 2 cup filter baskets when brewing 2 cups or a stronger single cup or mug.
Adjust the grind amount and size if switching from a single basket to a double basket, or vice versa.
The provided filter baskets are designed for:
1 Cup filter basket = 8-11g
2 Cup filter basket = 16-19g
SINGLE WALL FILTER BASKETS
Single Wall filter baskets should be used when grinding fresh whole coffee beans. These allows you to experiment with grind, dose and tamp to create a more balanced espresso.
DUAL WALL FILTER BASKETS
Dual Wall filter baskets should be used when using pre-ground coffee and older beans that are past the 30 day roast date. These regulate the pressure and helps to optimise the extraction regardless of the grind, dose and tamp pressure or freshness.
THE GRIND
When grinding coffee beans, the grind size should be fine but not too fine. The grind size will affect the rate at which the water flows through the ground coffee in the filter basket and the taste of the espresso.
If the grind is too fine (looks like powder and feels like flour when rubbed between the fingers), the water will not flow through the coffee even when under pressure. The resulting espresso will be OVER EXTRACTED, dark in colour and bitter in flavour.
If the grind is too coarse, the water will flow through the ground coffee in the filter basket too quickly. The resulting espresso will be UNDER EXTRACTED and lacking in colour and flavour.
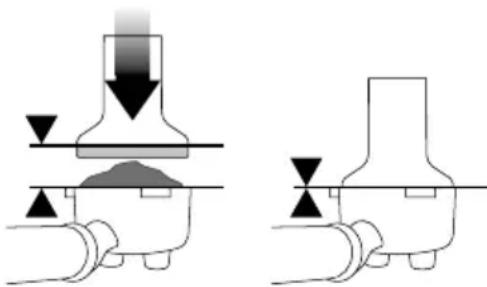
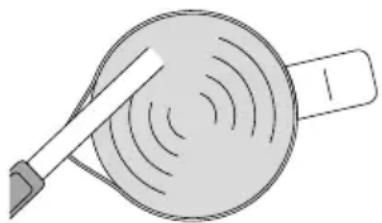
COFFEE DOSE AND TAMPING
- Insert the filter basket into the portafilter.
- Grind enough coffee to fill the filter basket.
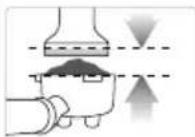
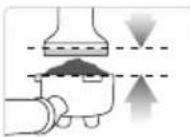
- Tap the portafilter several times to collapse and distribute the coffee evenly in the filter basket.
- Using the tamper, tamp down firmly (approx. 15-20kgs (30-40 lbs.) of pressure). The amount of pressure is not as important as the consistent pressure every time.
natural_image
Pure mechanical diagram showing two different states of a valve or pump mechanism (no text or symbols)As a guide, the top edge of the cap on the tamper should be level with the top of the filter basket AFTER the coffee has been tamped.

NOTE
We recommend quality 100% Arabica beans with a ‘Roasted On’ date stamped on the bag, not a ‘Best Before’ or ‘Use By’ date. Coffee beans are best consumed between 5–20 days after the ‘Roasted On’ date. Stale coffee may pour too quickly from the portafilter spouts and taste bitter and watery.
PURGING THE GROUP HEAD
Before placing the portafilter into the group head, run a short flow of water through the group head by pressing the 1 Cup or 2 Cup button. This will stabilize the temperature prior to extraction.
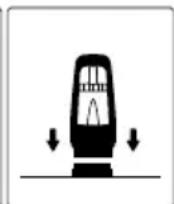
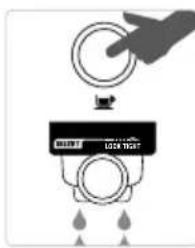
INSERTING THE PORTAFILTER
Place the portafilter underneath the group head so that the handle is aligned with the INSERT position. Insert the portafilter into the group head and rotate the handle towards the centre until resistance is felt.
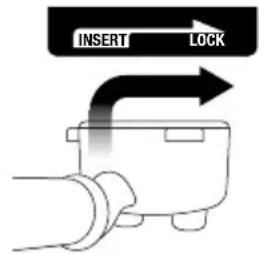
text_image
INSERT LOCKPlace your cup/s under the portafilter on the drip tray.
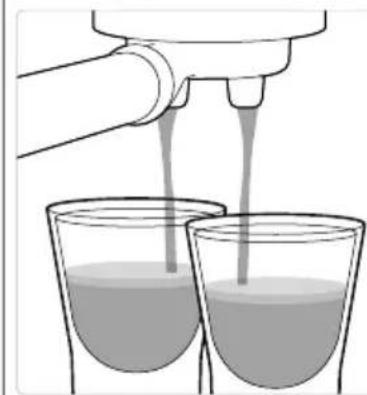
EXTRACTING ESPRESSO
As a guide the espresso will start to flow after 8–12 seconds (infusion time) and should be the consistency of dripping honey.
If the espresso starts to flow after less than 7 seconds, you have either under dosed the filter basket and/or the grind is too coarse. This is an UNDER EXTRACTED shot.
If the espresso starts to drip but doesn't flow after 12 seconds, the grind is too fine. This is an OVER EXTRACTED shot.
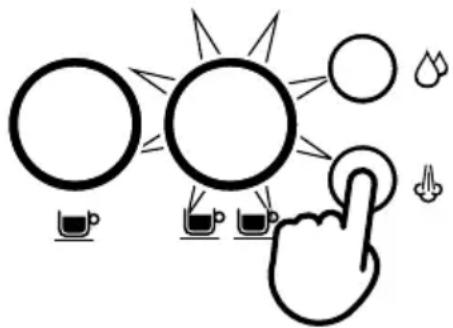
PRE-PROGRAMMED SHOT VOLUME - 1 CUP
Press the 1 Cup button for less than 1 second, the button will flash indicating that it has been selected. A preset single espresso volume of approximately 30ml will be extracted. The machine will automatically stop once the pre-set volume has been extracted.

natural_image
Simple line drawing of a hand touching a sun, with circular objects and droplets nearby (no text or symbols)PRE-PROGRAMMED SHOT VOLUME - 2 CUP
Press the 2 Cup button for less than a second, the button will flash indicating that it has been selected. A preset double espresso volume of approximately 60ml will be extracted. The machine will automatically stop once the pre-set volume has been extracted.

natural_image
Simple line drawing of a hand holding a magnifying glass with sound waves, surrounded by icons of circles and cups (no text or symbols)
NOTE
Pressing the corresponding 1 Cup or 2 Cup button during the programmed espresso extraction will immediately stop the extraction.
PROGRAMMING COFFEE VOLUME
Press and hold the 1 Cup and 2 Cup buttons for 2 seconds, the buttons will illuminate and flash.

text_image
+ ① 2sTo set the 1 Cup volume:
- Press the 1 Cup button for about 3 seconds to start the extraction.
- Press the 1 Cup button again to stop the extraction. The modified volume will be saved.
To set the 2 Cup volume, follow the above steps and select the 2 Cup button to start and stop the extraction.

NOTES
- If no user input after 30 seconds. Machine returns to ‘ready mode’
- The modified coffee volume will be saved into memory for the next use or when the machine is re-started.
- Pressing the steam or hot water button at any stage will cancel the operation and the machine will return to ready mode without saving any coffee volume program.
MANUAL PRE-INFUSION AND SHOT VOLUME
Press and hold the 1 Cup or 2 Cup button for more than a second. After one second the pump will start at pre-infusion pressure and continue while button is pressed. Release the button to start the extraction. Press any button again to stop the extraction.
MANUAL MILK TEXTURING
- Lift the steam wand and insert into the milk jug with the steam wand tip 1-2cm ( 3/4 inch) below the surface of the milk, close to the right-hand side of the jug at a 3 o'clock position.
- Press the STEAM button to begin texturing
text_image
Diagram illustrating light interaction with a hand, showing suns, cups, and droplets around a button- Keep the steam wand tip just under the surface of the milk until the milk is spinning clockwise, producing a vortex (whirlpool effect).
- With the milk spinning, slowly lower the jug. This will bring the steam wand tip to the surface of the milk and start to introduce air into the milk.
- Gently break the surface of the milk with the tip to get the milk spinning fast enough.
- Keep the steam wand tip at or slightly below the surface, continuing to maintain the vortex. Texture the milk until sufficient volume is obtained.
- Lift the jug to lower the tip beneath the surface but keep the vortex spinning. The milk is at the correct temperature (60-65°C) when the jug is hot to touch.
natural_image
Simple line drawing of a tool interacting with a circular object (no text or symbols)- When texturing is close to acceptable desired result, press any button to stop texturing.
• After the steam is released completely, remove the steam wand from the milk jug. - Wipe the wand and tip with a clean damp cloth.
To reduce steam wand blockages, we recommend running steam through the steam wand after milk texturing. Lower and point steam wand directly on drip tray and away from users and press the steam button to run steam to rinse steam wand, or press and hold steam button for 3 seconds, to activate the steam wand purge. This will run short water pulses through the steam wand.

NOTE
Both 1 Cup and 2 Cup buttons will blink during the steam purge function.

WARNING
After pressing steam button, the steam can't stop immediately, it needs a few seconds to completely stop steam.
STEAM WAND BLOCKED
Regularly check steam performance. If the steam wand is blocked, it will immediately stop operating. See ‘Cleaning the Steam Wand’ for further instructions.
HOT WATER OPERATION

natural_image
Simple line drawing of a sun, hand gesture, and icons (no text or symbols)Hot water through the steam wand
When machine is on ‘ready mode’, press hot water button, and hot water flow will start through the steam wand. Press any button to stop hot water flow.

WARNING
Cup temperature is at 90^ C ( 194^ F). Be careful in handling hot beverages.
EXTRACTION TIPS
A great espresso is about achieving the perfect balance between sweetness, acidity, and bitterness. The flavour of your coffee will depend on many factors, such as the type of coffee beans, degree of roast freshness, coarseness or fineness of the grind, dose of ground coffee and tamping pressure. Experiment by adjusting these factors just one at a time to achieve the taste of your preference.
natural_image
Illustration of a hand pouring liquid into two beakers (no text or symbols)- Flow starts after 8–12 secs
- Flow slow like warm honey
- Crema is golden brown with a fine mousse texture
- Espresso is dark brown
AFTER EXTRACTION
natural_image
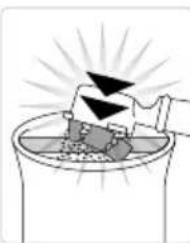
Simple line drawing of a container with a tray and a handle, emitting a light beam (no text or symbols)REMOVE USED GRINDS
Used grinds will form a coffee 'puck'. If the puck is wet, refer to the 'Under Extraction' section.
text_image
Diagram showing a hand interacting with a lock switch and water droplets, indicating control or monitoring system.RINSE FILTER BASKET
Keep the filter basket clean to prevent blockages. Without ground coffee in the filter basket, lock the portafilter into the machine and run hot water through.
natural_image
Illustration of a hand pouring liquid from a bottle into two beakers (no text or symbols)- Flow starts after 1–6 secs
- Flow fast like water
- Crema is thin and pale
- Espresso is pale brown
• Tastes bitter/sharp, weak and watery
SOLUTIONS SOLUTIONS
EXPERIMENT WITH GRIND:
- Grind needs to be finer for a slower extraction.
- Ensure you are controlling the dose.
Adjust & re-test
ALWAYS TAMP TO LINE
Adjust & re-test
Tamp using 15–20kgs of pressure. The top edge of cap on the tamper should be level with the top of the filter basket AFTER tamping.

natural_image
Illustration of a hand pouring liquid into a container with two filled glasses (no text or symbols)- Flow starts after 12 secs
- Flow drips or not at all
- Crema is dark and spotty
- Espresso is very dark brown
• Tastes bitter and burnt
EXPERIMENT WITH GRIND:
- Grind needs to be coarser for a faster extraction.
- Ensure you are controlling the dose.
Adjust & re-test
ALWAYS TAMP TO LINE
Adjust & re-test
Tamp using 15–20kgs of pressure. The top edge of cap on the tamper should be level with the top of the filter basket AFTER tamping.
GRIND GRIND DOSE TAMP
| OVER EXTRACTED BITTER • ASTRINGENT | Too fine | Too much Decrease dose | Too heavy |
| BALANCED | Optimum | 8-11g (1 Cup) 16-19g (2 Cup) | 15-20kgs (30-40 lbs.) |
| UNDER EXTRACTED UNDERDEVELOPED • SOUR | Too coarse | Too little Increase dose | Too light |

Care & Cleaning

CLEAN & DESCALE CYCLE
The Bambino Espresso machine requires regular cleaning and descaling.
When this is due, the 2 Cup button will continuously flash, indicating the machine needs cleaning and descaling.

natural_image
Simple line drawing of a handshake with sun rays and floating objects (no text or symbols)
NOTE
Pressing any of buttons will cancel the alert and return the machine to ready mode.

WARNING
It is NOT recommended to ignore the clean cycle warning because after regular use, hard water can cause mineral build-up in and on many of the inner functioning components, reducing the brewing flow, brewing temperature, power of the machine, and the taste of the espresso.

WARNING
Do not immerse the power cord, power plug or appliance in water or any other liquid. The water tank should never be removed or completely emptied during descaling.
TO PERFORM A CLEAN & DESCALE CYCLE
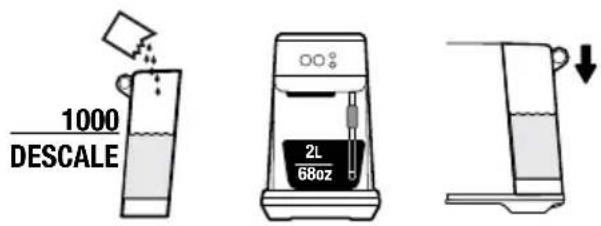
- Empty the drip tray and re-insert firmly into position on the machine.
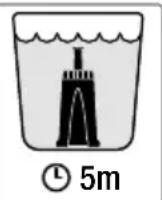
- Fill the water tank to the DESCALE line indicated and add the descaling agent to the water.
text_image
1000 DESCALE 2L 68oz- Place a 2 Litre (68 fl.oz) container under the group head and steam wand.

text_image
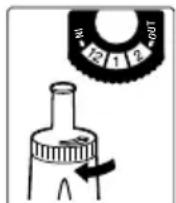
+ 5s- Press the 2 Cup and Steam buttons simultaneously for 5 seconds to start descaling.

natural_image
Simple line drawing of a circle and sun with three cups below (no text or symbols)
NOTE
The 2-Cup button will flash throughout the cycle.
- Once the descale solution has been used up, the descale mode will pause.
- Rinse and refill the water tank to the MAX line and empty the waste water container, then replace both parts on to the machine to proceed onto the rinse cycle.
- Press the 2 Cup button to proceed rinse cycle.
- When the rinse cycle is complete, the machine will then go into ready mode.

text_image
6302 21 & &- Remove and empty the waste water container. Rinse the drip tray and water tank and dry thoroughly before replacing them back onto the machine.

CLEANING THE STEAM WAND
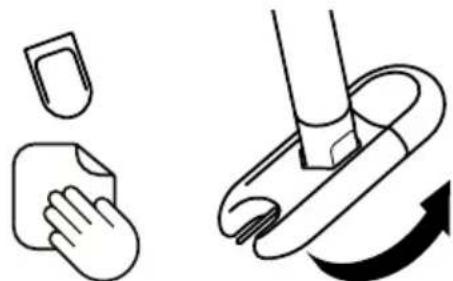
- The steam wand should always be cleaned after texturing milk. Wipe the steam wand with a damp cloth.
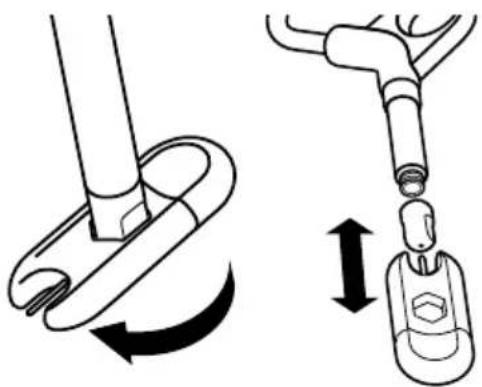
- If any of the holes in the tip of the steam wand become blocked, it may reduce frothing performance. Manually purge the steam wand to try and clear the holes.
- If the steam flow is very small and steam wand is still blocked, unscrew the steam wand tip using the steam tip cleaning tool, then use the tool to unblock the holes; cleaning tool is located in the back of the machine, under the water tank.
natural_image
Diagram showing two mechanical or electrical component assemblies with arrows indicating rotation and assembly (no text or symbols)Rinse the steam tip and wipe with a clean, dry cloth. Reassemble the steam wand by screwing the steam tip back on to the steam wand. Purge the steam wand after cleaning.
natural_image
Illustration showing a hand cleaning a pad and cleaning a tool with a curved arrow (no text or symbols)GROUP HEAD RINSE
- Press '2 Cup' button to flow freshwater flush cycle.
CLEANING THE FILTER BASKETS AND PORTAFILTER
- The filter baskets and portafilter should be rinsed under hot water directly after use to remove all residual coffee oils.
- If the holes in the filter baskets become blocked, use the steam wand cleaning tool to unblock the holes.

WARNING
Do not put portafilter in dishwasher.
- The group head interior and shower screen should be wiped with a damp cloth to remove any ground coffee particles.
- Periodically run hot water through the machine with the filter basket and portafilter in place, without any ground coffee, to rinse out any residual coffee.
CLEANING THE DRIP TRAY
The drip tray should be removed, emptied and cleaned after each use or when the drip tray indicator rises through the drip tray grid.
Remove the drip tray grid and wash both parts in warm soapy water.
CLEANING THE OUTER HOUSING
- Wipe the outer housing with a soft, damp cloth and then polish with a soft, dry cloth.

NOTE
Do not use any abrasive cleaners, pads or cloths which can scratch the surfaces of the machine.

NOTE
Do not clean any of the parts or accessories in the dishwasher.

WARNING
Do not immerse the power cord, power plug, plastic tamp or machine in water or any other liquid.
STORING YOUR MACHINE
Before storing, turn the machine off, switch off and remove the power plug from the power outlet. Empty the water tank and drip tray and ensure the machine is cool, clean and dry. Store in an upright position.
Do not place anything on top of the machine.
RESET FACTORY ESPRESSO VOLUME SETTINGS
- When machine is on standby mode
- Press and hold the 1 Cup and 2 Cup buttons for 10 seconds to enter Factory reset mode.
- The lights will flash 3 times to indicate that all volumes have been reset.
- Machine will then return to ready mode.

NOTE
When machine is turned on after reset, it enters directly to ready mode.

REPLACING THE WATER FILTER
The provided water filter helps prevent scale build-up in and on many of the inner functioning components. Replacing the water filter after 3 months or 40L will reduce the need to descale the machine.
PROBLEM POSSIBLE CAUSES EASY SOLUTION
| Water does not flow from the group head. No hot water. | Water tank is empty.Water tank is not fully inserted and locked into position.Machine needs to be cleaned & descaled.Coffee is ground too finely and/ or too much coffee in filter basket and/or over tamping and/or filter basket is blocked. | Fill tank.Push water tank down completely to lock into place.Perform clean & descale cycle.See below, ‘Espresso only drips from the portafilter spouts or not at all’. |
| Espresso only drips from the portafilter spouts or not at all. | Coffee is ground too finely.Too much coffee in the filter basket.Coffee tamped too firmly.Water tank is empty. Fill tank.Water tank is not fully inserted and locked into position.The filter basket may be blocked.Machine needs to be cleaned & descaled. | Use slightly coarser grind. Refer to ‘Coffee Dose and Tamping’ on page 13 and ‘Extraction Tips’ on page 16.Lower dose of coffee.Tamp between 15-20kgs (30-40 lbs) of pressure.Fill tank.Push water tank down completely to lock into place.Use the pin on the end of the provided cleaning tool to unblock the hole(s).Perform clean & descale cycle |
| Espresso runs out too quickly | Coffee is ground too coarsely.Not enough coffee in the filter basket.Coffee tamped too lightly. | Use slightly finer grind.Refer to ‘Coffee Dose and Tamping’ on page 13 and ‘Extraction Tips’ on page 16.Increase dose of coffee and tamp. Refer to ‘Coffee Dose and Tamping’ on page 13 and ‘Extraction Tips’ on page 16.Tamp between 15-20kgs (30-40 lbs) of pressure. |
PROBLEM POSSIBLE CAUSES EASY SOLUTION
| Espresso runs out around the edge of the portafilter. | · Portafilter not inserted in the group head correctly.· There are coffee grounds around the filter basket rim.· Too much coffee in the filter basket. | · Ensure portafilter is completely inserted and rotated until resistance is felt.· Clean excess coffee from the rim of the filter basket to ensure a proper seal in group head.· Lower dose of coffee. Refer to ‘Coffee Dose and Tamping’, page 13 |
| Small steam. | · Machine has not reached operating temperature.· Water tank is empty.· Water tank is not fully inserted and locked into position.· Machine needs to be cleaned & descaled.· Steam wand is blocked or almost blocked. | · Allow time for the machine to reach operating temperature.· Fill tank.· Push water tank down completely to lock into place.· Perform clean & descale cycle.· Refer to ‘Cleaning the Steam Wand’, page 18. |
| Pulsing/pumping sound while extracting espresso or steaming milk. | · The machine is carrying out the normal operation of the pump.· Water tank is empty. | · No action required as this is the normal operation of the machine.· Fill tank. |
| Coffee not hot enough. | · Portafilter not pre-heated. | · Rinse portafilter under hot water outlet. Dry thoroughly. |
| No crema. | · Coffee tamped too lightly.· Coffee is ground too coarsely.· Coffee beans or pre-ground coffee are not fresh.· The filter basket may be blocked. | · Tamp between 15-20kgs (or 30-40 lbs) of pressure.· Use slightly finer grind. Refer to ‘Coffee Dose and Tamping’ on page 13 and ‘Extraction Tips’ on page 16.· If grinding fresh whole coffee beans, use freshly roasted coffee beans with a ‘Roasted On’ date and consume between 5–20 days after that date. If using pre-ground coffee, use within a week of grinding.· Use the pin on the end of the provided cleaning tool to unblock the hole(s). |
| Water leaking | · Manual purge· Water tank is not fully inserted and locked into position. | · Turn the steam wand directly on the drip tray or jug before manual purge.· Push water tank down completely to lock into place. |
PROBLEM POSSIBLE CAUSES EASY SOLUTION
| Water doesn’t come through (the machine makes a loud noise). | Water tank is empty or water level is below minimum.Water filter has been inserted without soaking. | Fill tankEnsure the water filter has been soaked for 5 minutes before inserting into the water tank. |
| Machine is on but ceases to operate. | The safety thermal-cut out may have activated due to the pump overheating. | Press the 1 CUP and HOT WATER buttons simultaneously for 0.5 seconds to switch the machine off and unplug from the power outlet.Allow to cool for about 30–60 minutes. If problem persists, call Sage Support. |
| 2-cup coffee button flashing | This indicates machine needs cleaning and descaling | Perform a clean and descale cycle.Follow the steps outlined on page 17. |
| Too much/too little espresso is being delivered to the cup. | Grind amount and/or grind size settings and/or shot volumes require adjustment. | Adjust the grind amount and/or grind size settings. Refer to ‘Coffee Dose and Tamping’, page 13, ‘The Grind’, page 13 and ‘Extraction Tips’, page 16. |

Guarantee
2 YEAR LIMITED GUARANTEE
Sage Appliances guarantees this product for domestic use in specified territories for 2 years from the date of purchase against defects caused by faulty workmanship and materials. During this guarantee period Sage Appliances will repair, replace, or refund any defective product (at the sole discretion of Sage Appliances).
All legal warranty rights under applicable national legislation will be respected and will not be impaired by our guarantee. For full terms and conditions on the guarantee, as well as instructions on how to make a claim, please visit www.sageappliances.com.

Notes
the Bambino™
BES450/SES450

natural_image
Exterior view of a modern Barge coffee maker with control knobs and a handle (no visible text or symbols)DE
KURZANLEITUNG
Sage®

Inhalt
text_image
A B C D E F G Hnatural_image
Three identical diagrams showing a vehicle with directional arrows indicating motion or force, no text or symbols present.natural_image
Simple line drawing of a sun, two cups, and three circles with droplets and arrows (no text or symbols)text_image
Diagram showing two hand gestures with icons and a time label '0.5s' indicating 0.5 seconds duration.
HINWEIS
text_image
Diagram illustrating three steps of a water filtration or distillation process with upward and downward arrows indicating flow direction.natural_image
Two identical 3D-rendered wall-mounted domes with 'P' labels, shown from different angles (no text or symbols beyond branding)1 CUP 2 CUP
1 Becher-Siebeinsatz = 8–11 g
2 Becher-Siebeinsatz = 16–19 g
EINWANDIGE SIEBEINSÄTZE
natural_image
Pure mechanical diagram showing two stages of a valve or pump assembly with downward force arrows (no text or symbols)natural_image
Simple line drawing of a hand touching a sun, with circular objects and droplets below (no text or symbols)VORPROGRAMMIERTE MENGÉ - 2 CUP
natural_image
Simple line drawing of a hand holding a mug with sound waves and droplets, no text or symbols present
HINWEIS
text_image
Diagram illustrating light interaction with a hand, showing suns, cups, and droplets around a buttonnatural_image
Illustration of a spoon stirring a circular object with concentric rings (no text or symbols)natural_image
Simple line drawing of a sun, hand gesture, and coffee cups (no text or symbols)natural_image
Illustration of a hand pouring liquid from a bottle into two beakers with liquid droplets (no text or symbols)natural_image
Simple line drawing of a trash bin with a downward arrow and explosion effect (no text or symbols)text_image
Diagram showing a hand pressing a circular button onto a device labeled 'LEFT NOT' with droplet drops below, likely illustrating a control or monitoring system.natural_image
Illustration of a hand pouring liquid from a bottle into two cups (no text or symbols)natural_image
Illustration of a hand pouring liquid into two glasses with dark liquid, no text or symbols presentnatural_image
Simple line drawing of a hand holding a circular object with sun rays, surrounded by icons of cups and droplets (no text or symbols)
HINWEIS
text_image
Diagram showing two hand gestures with icons and a 5-second time labelnatural_image
Simple line drawings of a circle and a sun with three small cups below (no text or symbols)
HINWEIS
natural_image
Diagram showing two mechanical or fluidic device states: one with rotational motion and the other with a submerged object (no text or symbols)natural_image
Illustration showing two hand tools: one with a pad and one with a tool, both without any text or symbols.BRÜHGRUPPEN-SPÜLUNG
text_image
Diagram showing three steps of a car ignition and water drop process with Chinese labelsnatural_image
Exterior view of a modern coffee machine with a Boge brand logo and control buttons (no text or symbols on the device itself)FR GUIDE RAPIDE
Sage®

Table des matières
INSTRUCTIONS RELATIVES AU CORDON COURT
text_image
A B C D E F G HMOUSSAGE MANUEL DU LAIT
natural_image
Simple line drawing of a sun, two circles, and four small icons (no text or symbols)text_image
Diagram illustrating three-step water filtration process: inlet, test tube with liquid, and outlet with drop.natural_image
Two identical 3D-rendered wall-mounted objects with 'P' and 'Dual Wall' labels, no additional text or symbols present.1 TASSE 2 TASSES
natural_image
Diagram of a mechanical press or valve mechanism with downward force arrows and pressure indicators (no text or symbols)
natural_image
Pure mechanical diagram showing a lever and pivot point without any text or symbolsnatural_image
Simple line drawing of a hand touching a sun, with circular objects and droplets nearby (no text or symbols)VOLUME DE PRÉPARATION PRÉDÉFINI – 2 TASSES
natural_image
Simple line drawing of a hand pressing down on a circular object with rays, surrounded by icons representing water droplets and cups (no text or symbols)
REMARQUE
PROGRAMMATION DU VOLUME DU CAFÉ
MOUSSAGE MANUEL DU LAIT
natural_image
Simple line drawing of a hand pressing a button on a sun, surrounded by coffee cups and icons (no text or symbols)natural_image
Illustration of a tool interacting with a circular object, showing concentric wave patterns (no text or symbols)natural_image
Simple line drawing of a sun, hand gesture, and coffee cups (no text or symbols)natural_image
Illustration of a hand pouring liquid from a bottle into two beakers with liquid droplets (no text or symbols)natural_image
Simple line drawing of a container with a lid and surrounding debris, emitting a light beam (no text or symbols)RETIREZ LA MOUTURE UTILISÉE
text_image
Diagram showing a hand pressing a circular button onto a device labeled 'LIFE TEST' with droplet drops below, likely illustrating a camera or test setup.RINCEZ LE PANIER-FILTRE
natural_image
Illustration of a hand pouring liquid from a bottle into two cups (no text or symbols)natural_image
Illustration of a hand pouring liquid into a container with two filled glasses (no text or symbols)natural_image
Simple line drawing of a hand holding a circular object with sun rays, surrounded by icons representing water droplets and cups (no text or symbols)
REMARQUE
text_image
Diagram showing two hand gestures with icons and a 5-second time labelnatural_image
Simple line drawings of a circle and a sun with directional arrows, no text or symbols present
REMARQUE
text_image
380g A & 200gnatural_image
Diagram showing two mechanical or electrical component assembly steps, one with rotational motion and the other with a plug inserted into a container (no text or symbols)natural_image
Illustration showing a hand cleaning a pad and a tool interacting with a curved mechanical component (no text or symbols)RINÇAGE DU GROUPE CHAUFFANT
text_image
12 12 OUT 5m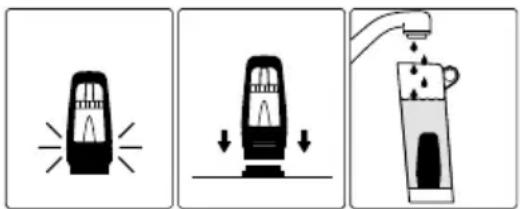
text_image
Diagram showing three-step cleaning process: lighting, down arrow, and spray bottle with water dropPROBLÈME CAUSES POSSIBLES SOLUTION FACILE
natural_image
Exterior view of a modern coffee machine with a Boge brand logo and control buttons (no text or symbols on the device itself)NL
SNELSTARTGIDS
Sage®

Inhoud
text_image
A B C D E F G Hnatural_image
Simple line drawing of a sun, two circles, and four small icons (no text or symbols)text_image
Diagram illustrating three-step process of a mechanical or fluid system with upward and downward arrows indicating movement.natural_image
Two identical 3D-rendered wall-mounted electronic components with 'P' and 'Dual Wall' labels, shown from different angles (no additional text or symbols)1 KOPJE 2 KOPJES
natural_image
Pure mechanical diagram showing two stages of a press or valve mechanism with downward arrows indicating motion (no text or symbols)text_image
Diagram showing a hand pointing at a sun icon, with three circular objects and corresponding icons below indicating visual elements.VOORGEPROGRAMMEERD SHOTVOLUME - 2 KOPJES
natural_image
Simple line drawing of a hand holding a circular object with surrounding circles and droplets (no text or symbols)
OPMERKING
text_image
Diagram illustrating light interaction with a hand, showing suns, cups, and icons for viewing, reflection, and interaction.natural_image
Diagram of a tool interacting with a circular object, showing concentric wave patterns (no text or symbols)natural_image
Simple line drawing of a sun, hand gesture, and two coffee cups with musical notes (no text or symbols)natural_image
Illustration of a pipette dispensing liquid into two beakers (no text or symbols)natural_image
Simple line drawing of a trash bin with a triangular object and a hand holding a container (no text or symbols)text_image
Diagram showing a hand pressing a circular button onto a device labeled 'Laser' with droplet drops below, likely illustrating a mechanical or electrical process.natural_image
Illustration of a hand pouring liquid from a bottle into two cups (no text or symbols)natural_image
Illustration of a hand pouring liquid into two glasses with dark liquid, no text or symbols present- Begint na 12 sec. te stromen
natural_image
Simple line drawing of a hand holding a cloud with sun rays and icons below (no text or symbols)
OPMERKING
text_image
Diagram showing two hands interacting with a computer, one pointing at the other and the other holding a clock icon with '5s' labelnatural_image
Simple line drawings of a circle and a sun with rays (no text or symbols)
OPMERKING
natural_image
Diagram showing two mechanical or electrical setups with arrows indicating rotation and assembly (no text or symbols)natural_image
Illustration showing a hand cleaning a pad and a tool interacting with a curved mechanical component (no text or symbols)DE ZETGROEP SPOELEN
UW APPARAAT OPBERGEN
text_image
10k 12 1 2 OUT 5m
text_image
Diagram showing three steps of a hairdryer with light emission, down, and up states, ending with a spray can.
Problemen oplossen
PROBLEEM MOGELIJKE OORZAKEN EENVOUDIGE OPLOSSING
natural_image
Exterior view of a modern coffee machine with control knobs and a side-mounted lever (no visible text or symbols)IT GUIDA RAPIDA
Sage®

Sommario
text_image
A B C D E F G Hnatural_image
Simple line drawing of a sun, two circles, and four small icons (no text or symbols)text_image
Diagram illustrating three-step water filtration process with upward and downward arrows indicating flow directionnatural_image
Two identical 3D-rendered dome-shaped objects with 'Dual Wall' branding, no text or symbols present.1 TAZZA 2 TAZZE
natural_image
Pure mechanical diagram showing two stages of a valve or pump assembly with downward force arrows (no text or symbols)natural_image
Simple line drawing of a hand touching a sun with another ring, alongside icons of water droplets and droplets (no text or symbols)VOLUME TAZZA PREPROGRAMMATO - 2 TAZZE
natural_image
Simple line drawing of a hand pressing down on a circular object with surrounding icons (no text or symbols)
NOTA
text_image
Diagram illustrating a weather interaction with suns, coffee cups, and icons for lighting and cooling.natural_image
Simple line drawing of a circular object with concentric rings and a rod extending outward (no text or symbols)natural_image
Simple line drawing of a sun, hand gesture, and icons (no text or symbols)natural_image
Illustration of a hand pouring liquid into two beakers with liquid droplets (no text or symbols)natural_image
Simple line drawing of a container with a lid and a handle, emitting a light beam (no text or symbols)RIMUOVERE IL CAFFE USATO
text_image
Diagram showing a hand pressing a circular button onto a device labeled 'LOCKING' with droplet drops below, likely illustrating a mechanical or electrical process.SCIACQUARE IL FILTRO
natural_image
Illustration of a hand pouring liquid from a bottle into two cups (no text or symbols)natural_image
Illustration of a hand pouring liquid into two filled glasses (no text or symbols)natural_image
Simple line drawing of a hand holding a cloud with sun rays, surrounded by icons of cups and droplets (no text or symbols)
NOTA
text_image
Diagram showing two hand gestures with icons and a 5-second time labelnatural_image
Simple line drawing of a sun and a circle with cups, no text or symbols present
NOTA
natural_image
Diagram showing two mechanical or fluidic device states: one with a curved pipe and arrow indicating rotation, the other with a submerged container (no text or symbols)natural_image
Illustration showing a hand holding a pad and cleaning a surface, with a mechanical component being cut (no text or symbols)PULIZIA DEL GRUPPO DI EROGAZIONE
natural_image
Exterior view of a modern coffee machine with a Boge brand logo and control buttons (no text or symbols on the device itself)ES
GUÍA RÁPIDA
Sage®

Índice
TECNOLOGÍA THERMOJET™
natural_image
Simple line drawing of a sun, two circles, and four small icons (water drop, coffee cup, water droplet) without any text or symbols.text_image
Diagram illustrating three-step water filtration process: inlet, drain, and outlet with directional arrows indicating flow direction.natural_image
Two identical line drawings of a dual-wall electrical connector with no text or symbols1 TAZA 2 TAZAS
natural_image
Pure mechanical diagram showing two stages of a valve or pump assembly with downward force arrows (no text or symbols)natural_image
Simple line drawing of a hand touching a sun with another ring, alongside icons of water droplets and droplets (no text or symbols)VOLUMEN DE DOSIS PREPROGRAMADO: 2 TAZAS
natural_image
Simple line drawing of a hand holding a mug with three cups, emitting rays toward a circle and droplet (no text or symbols)
NOTA
text_image
Diagram illustrating light interaction with a hand, showing suns, cups, and icons for viewing, interaction, and navigation.natural_image
Diagram of a circular object with concentric rings and a rod extending outward (no text or symbols)natural_image
Simple line drawing of a sun, hand gesture, and icons (no text or symbols)natural_image
Illustration of a pipette dispensing liquid into two beakers (no text or symbols)natural_image
Simple line drawing of a trash bin with a hand holding a container and a black arrow pointing upward (no text or symbols)DESECHA LOS POSOS DE CAFÉ
text_image
Diagram showing a hand pressing a circular button onto a device labeled 'LIFE TEST' with droplet drops below, likely illustrating a test or testing process.ENJUAGA EL FILTRO
natural_image
Illustration of a hand pouring liquid from a bottle into two cups (no text or symbols)natural_image
Illustration of a hand pouring liquid into two glasses with dark liquid, no text or symbols presentnatural_image
Simple line drawing of a hand holding a circular object with sun rays, surrounded by icons of coffee cups and droplets (no text or symbols)
NOTA
natural_image
Simple line drawing of a circle and sun with two coffee cups below (no text or symbols)
NOTA
text_image
21/2 630Z & 7natural_image
Diagram showing two mechanical or fluidic device states: one with a curved arrow indicating rotation, the other with a valve-like component and bidirectional arrow indicating movement (no text or symbols)natural_image
Illustration showing a hand cleaning a pad and a mechanical component with motion arrows (no text or symbols)ENJUAGUE DEL GRUPO
text_image
Diagram showing three steps of a hairdryer tool: lighting, pressing down, and pouring water.
natural_image
Exterior view of a modern coffee machine with a Boge brand logo and control buttons (no text or symbols on the device itself)PT
MANUAL RÁPIDO
Sage®

Índice
text_image
A B C D E F G Hnatural_image
Simple line drawing of a sun, two circles, and four small icons (water drop, coffee cup, hand icon) without any text or symbols.text_image
Diagram illustrating three-step water filtration process with upward and downward arrows indicating flow directionnatural_image
Two identical line drawings of a dual-wall electrical connector with no text or symbols1 CHÁVENA 2 CHÁVENAS
natural_image
Diagram of a mechanical press or valve mechanism with downward force arrows and a central component (no text or symbols)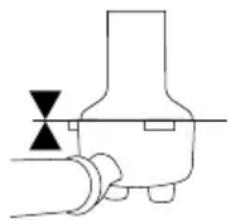
natural_image
Pure mechanical diagram showing a valve or pump assembly without any text, labels, or symbolsnatural_image
Simple line drawing of a hand touching a sun with another ring, alongside icons of water droplets and droplets (no text or symbols)VOLUME DA DOSE PRÉ- PROGRAMADO - 2 CHÁVENAS
natural_image
Simple line drawing of a hand holding a ring with surrounding circles and droplets (no text or symbols)
NOTA
text_image
Diagram showing a hand interacting with a sun, surrounded by icons for lighting, water, and interaction.natural_image
Simple line drawing of a circular object with concentric rings and a rod extending outward (no text or symbols)natural_image
Simple line drawing of a sun, moon, hand gesture, and water droplets (no text or symbols)natural_image
Illustration of a pipette dispensing liquid into two beakers (no text or symbols)natural_image
Simple line drawing of a trash bin with a hand holding a container and a downward arrow above it (no text or symbols)REMOVA OS GRÃOS MOÍDOS
text_image
Diagram showing a hand pressing a circular button onto a device labeled 'LIFE TEST' with falling droplets below, indicating a warning or alert mechanism.ENXAGUE O CESTO DE FILTRO
natural_image
Illustration of a hand pouring liquid into two cups (no text or symbols)natural_image
Illustration of a hand pouring liquid into two glasses with dark liquid, no text or symbols presentnatural_image
Simple line drawing of a hand holding a cup with sun rays and three cups below, no text or symbols present.
NOTA
text_image
Diagram showing two hand gestures with a plus sign and time label '5s' indicating 5-second durationnatural_image
Simple line drawings of a sun and a circle with water droplets, no text or symbols present
NOTA
natural_image
Diagram showing two mechanical or fluidic device states: one with a curved pipe and arrow indicating rotation, the other with a plug inserted into a container (no text or symbols)natural_image
Illustration showing a hand cleaning a pad and a mechanical component with motion arrows (no text or symbols)PROBLEMA CAUSAS POSSÍVEIS SOLUÇÃO FÁCIL
PROBLEMA CAUSAS POSSÍVEIS SOLUÇÃO FÁCIL
PROBLEMA CAUSAS POSSÍVEIS SOLUÇÃO FÁCIL
natural_image
Exterior view of a modern coffee machine with a Boge brand logo and control buttons (no text or symbols on the device itself)PL
SZYBKI PRZEWODNIK
Sage®

Spis treści
text_image
A B C D E F G Hnatural_image
Simple line drawing of a sun, two circles, and four icons (water drop, cloud, megaphone, microphone) without any text or symbols.text_image
Diagram showing two hand gestures with icons and a time label '0.5s' indicating 0.5 seconds duration.
UWAGA
text_image
Diagram illustrating three-step liquid transfer process with upward and downward arrows indicating flow directionnatural_image
Two identical 3D-rendered wall-mounted components with 'SEAL WALL' and 'P' labels, shown from top and side views (no additional text or symbols)1 FILIŽANKA 2 FILIŽANKI
natural_image
Diagram showing two mechanical or fluidic valve configurations with downward force arrows and triangular indicators (no text or symbols)natural_image
Simple line drawing of a hand touching a sun, with circular objects and droplet symbols below (no text or labels)FABRYCZNIE USTAWIONA OBJĘTOŚĆ KAWY - 2 FILIŻANKI
natural_image
Simple line drawing of a hand holding a mug with three cups, emitting rays toward a sun and three circles (no text or symbols)
UWAGA
text_image
Diagram showing a hand pressing a button on a sun, with icons for water droplets and droplets falling nearby.natural_image
Simple line drawing of a tool interacting with a circular object (no text or symbols)WYDAWANIE GORACEJ WODY

natural_image
Simple line drawing of a sun, moon, hand gesture, and water droplets (no text or symbols)natural_image
Illustration of a hand pouring liquid into two beakers with dark liquid, no text or symbols presentnatural_image
Simple line drawing of a trash bin with a downward arrow and waste inside (no text or symbols)WYJMIJ ZUŻYTĄ KAWĘ
text_image
Diagram showing a hand pressing a circular button onto a device labeled 'DOZZIE UMOCU', with falling droplets below indicating drop or damage.OPŁUCZ SITKA
natural_image
Illustration of a hand pouring liquid into two cups (no text or symbols)natural_image
Illustration of a hand pouring liquid into two glasses with dark liquid, no text or symbols presentnatural_image
Simple line drawing of a handshake with sun rays and icons below (no text or symbols)
UWAGA
text_image
Diagram showing two hand gestures with icons and a time label '5s'natural_image
Simple line drawings of a sun and a circle with water droplets, no text or symbols present
UWAGA
natural_image
Diagram showing two mechanical or electrical component assembly steps, one with rotational motion and the other with a plug inserted into a socket (no text or symbols)natural_image
Illustration showing two different cleaning or repair methods: one using a pad and the other with a curved tool (no text or symbols)PRZEPLUKANIE GŁOWICY ZAPARZAJĄCEJ
BRG Appliances Limited
Unit 3.2, Power Road Studios,
114 Power Road, London, W4 5PY
Freephone (UK Landline): 0808 178 1650
Mobile Calls (National Rate): 0333 0142 970
DEU
Sage Appliances France SAS
www.sageappliances.com
Registered in England & Wales No. 8223512
Registered in Germany No. HRB 81309 (AG Düsseldorf)
Registered in France No. 879 449 866 RCS
EN Due to continued product improvement, the products illustrated or photographed in this document may vary slightly from the actual product.
Copyright BRG Appliances 2021